
Design and edit in Word
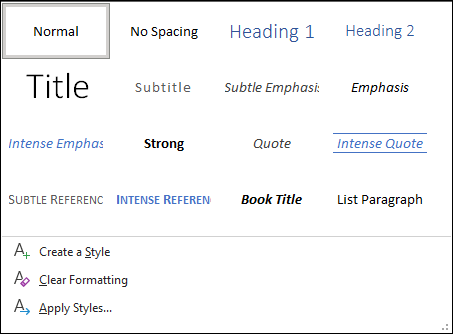
Use Styles
Styles templates apply a consistent font, font size, font color, and spacing to headings, paragraphs, and titling throughout your document.
-
Select the words, paragraph, list or table to edit.
-
On the Home tab, select a style.
If you don’t see the style you want, click the More button
 to expand the gallery.
 to expand the gallery.

Apply Themes
Themes add a professional look to your document.
-
Select Design > Themes.
-
Point to a theme to preview how it will look.
-
Select the theme you want.

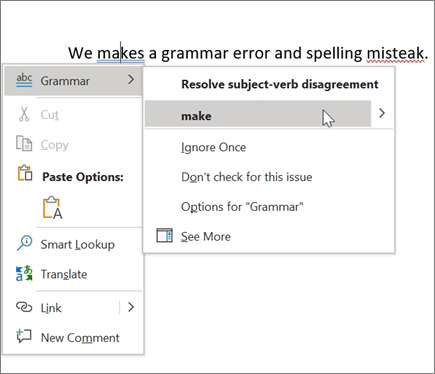
Check spelling and grammar
Word marks misspelled words with a red squiggly underline and grammar mistakes with a blue double underline.
-
Right-click the word.
-
Select a correction, or select Ignore.
Note: Spelling and grammar check work a little differently in newer versions of Word and Microsoft 365. For more, see Editor — your writing assistant.
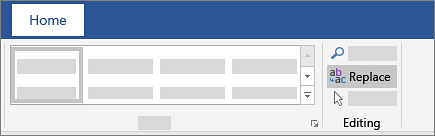
Find and replace text
-
Select Home > Replace.
-
For Find what, enter a word or phrase to search. For Replace with, enter the new text.
-
Select Find next, and then select:
-
Replace to replace the first instance, or
-
Replace all to replace all instances.
-
Next:
Collaborate in Word
Need more help?
Want more options?
Explore subscription benefits, browse training courses, learn how to secure your device, and more.
Communities help you ask and answer questions, give feedback, and hear from experts with rich knowledge.
When you create a new document in Microsoft Word, it looks decent right off the bat. But sometimes you want to make your page look much better than the default.
Use Microsoft Word’s page layout design tools to make easy-to-read documents that reflect positively on you and your business—even if you’re new to Word.


You can make page layout designs in Microsoft Word from scratch. Or, skip the grunt work by using Microsoft Word templates.
Envato Elements and GraphicRiver are both great sources of print templates for Word. Each template is made by professional designers. Elements makes a compelling offer. Download unlimited templates, fonts, photos, and other creative assets for one fixed subscription price.
But, if you only need the occasional template for MS Word and prefer to pay for each single use, then look to GraphicRiver.
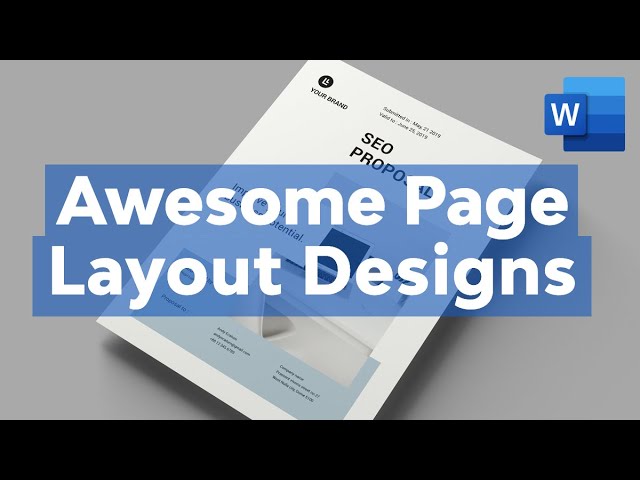
How to Make Awesome Page Layout Designs in Microsoft Word (Video)
If you create or modify documents in Word, you may want to change the standard Microsoft Word layout. There are a number of changes you can make.
Watch this quick screencast to find out what you need to know about Word page layout options:
To learn more about changing page layouts in Microsoft Word, study the complete written tutorial below:
Why Learn About Page Layouts In Word?
Page layout settings in Word determine how your document looks when you print it out. It includes the page orientation, margins, and columns, for example.
It’s important to pay attention to the page layout of your document for several reasons:
- It ensures consistency. This gives your readers a good experience while consuming your document.
- A good page layout makes your document more readable. When your document is aesthetically pleasing and has a consistent look, your audience is more likely to read, comprehend, and remember your content.
- A well-designed document reflects well on you. It reinforces your credibility and authority in your field.
Microsoft Word has robust page settings that allow you to control your page layout design. Everything is designed to be as simple and intuitive as possible. Yet, doing page layout in Word can be daunting if you’re new to the software.
This article breaks things down for you. So, you can follow along, step-by-step, and take control of how your document looks.
Types of Documents You Can Create in MS Word
You can create all kinds of printed documents in Microsoft Word.
Make business documents like:
- resumes
- cover letters
- business letters
- reports
- proposals
- invoices
- certificates
- forms
MS Word is also very handy for creating marketing documents. Create everything from:
- flyers
- brochures
- advertising inserts
- and more
For education or training use Word to prepare:
- handouts
- workbooks
- manuals
- certificates
You can also produce postcards, invitations, newsletters, and signs. If you can print it, then you can whip it up in Word.
In this tutorial, you’ll learn how to use Microsoft Word’s page layout tools to produce the print materials you need.
How to Work With Templates to Quickly Change Your Design
The quickest way to change or apply a page layout is by using a print template for Word. For the examples below, we’ll be using the SEO Proposal template from Envato Elements.


When looking for a print template for Word, it’s a good idea to choose one that uses paragraph and character styles. The styles feature will allow you to quickly format text even in a long document.
Below are some roundups of Microsoft Word templates you can choose from:
Now that you’ve chosen a template with a good page layout in Word, it’s time to learn how to use it.
1. Download the Template
Download the template of your choice to your computer’s hard drive. Unzip the file, then copy the template. This way, you’ve got the original template file intact, if you want to revert to it.


2. Customize the Template With Your Own Content
Replace the text with your own information.


If you want to change the text formatting, change the settings for fonts and paragraphs.
To add your own image, click on an image placeholder. The Format Picture dialog box opens. Under Fill, select Picture or texture fill. Under Picture source, click Insert….


Find and select the image you want to use. Click Insert.


Now, the image is inserted.


To replace an existing logo on the template, click on the logo, then click on the Picture Format tab.


Click the Change Picture button on the ribbon. Find and select the logo file, then click Insert.
![]()
![]()
![]()
If necessary, click-and-drag one of the handles of the logo to resize it.
Next, I’d like to change the color of the rectangle on the cover page. To do that, select the shape, then click the Shape Format tab.


The Shape Format ribbon is displayed. Click on the drop-down arrow beside the Shape Fill button. Select from the color options shown or click More Fill Colors… to specify the color you want to apply.


This is what the customized proposal cover looks like now:


Repeat these steps to customize the other pages of the template.
As you can see, when you start with a template for Word most of the design and page formatting decisions are already made for you by the template creator.
But, if you prefer to start your document from scratch, follow the steps below to change the default page format settings.
Type or paste your text into the document. Apply text and paragraph formatting to modify settings for fonts, spacing, alignment, and more. Then, you can move on to the page layout.
3. How to Set the Microsoft Word Page Orientation as Portrait or Landscape
To set the Microsoft Word page orientation of your document, go to File > Page Setup….


The Page Setup dialog opens. Click on the button for either Word portrait or landscape layout orientation.


4. How to Set the Print Size of the Paper
From the Microsoft Word Page Setup dialog, you can also change the paper size when you print the document. Click on the Paper Size field to show the different paper size choices available.


Select the size you wish to use. You can also click Manage Custom Sizes… to specify your own size.


5. How to Split Your Text into Multiple Columns
Sometimes you may want to divide your text into columns. This can make the document more readable and adds variety to an otherwise monotonous layout. Columns are popular in magazines, newsletters, and similar types of materials.
Arrange the Entire Document into Columns
To change the MS Word layout to columns, follow these steps:
1. Go to Layout > Columns.


The Columns dialog box opens.


2. Select one of the Presets or manually set the:
- number of columns
- width and spacing
- apply to the whole document or from that point forward
3. When you’re happy with the settings, click OK.
Apply Columns to a Part of the Document
You can also apply columns to only a specific part of the document.
1. Select the text you wish to display in columns.


2. Go to Layout > Columns.
3. In the Columns dialog box, choose the settings you want to apply.
Notice that you now have the option to apply the column settings to Selected text. Click OK.


Now, only the selected text has been broken into two columns. The rest remains in one column.


6. How to Add Page and Section Breaks
Sections in Microsoft Word enable you to apply different layouts to different parts of your document. This is useful for making creative layouts, especially to long documents.
Insert a Page Break in Word
A page break separates text, so that anything after the break is moved to a succeeding page. It’s useful for dividing up a document into chapters and sections.
To insert a page break, place the cursor at the point where you want the break to be, then go to Insert > Break > Page Break.


In our sample document, the title page is now on a separate page from the rest of the text.


Insert a Section Break in Word
If you wish to apply varying formatting on different parts of the document, then you’ll want to break it into sections. This includes varying the columns, headers and footers, pagination, borders, and other settings.
To create a section break, place the cursor where you would like the section break to be. Go to Insert > Break > Section Break.


Select the type of section break you want to insert:
- Section Break (Next Page) creates a section break and moves the next section into a new page.
- Section Break (Continuous) keeps the two sections on the same page while allowing you to apply different formatting settings for each.
- Section Break (Odd Page) starts a new section on the next odd-numbered page.
- Section Break (Even Page) starts a new section on the next even-numbered page.
Take Control of Your Page Layouts with Microsoft Word
Use Microsoft Word’s page layout tools to give your documents a consistent, readable, and professional look. You don’t have to be an expert in Word to take better control of your document’s page layouts. With Microsoft Word’s page layout tools, you can make any document look the way you want it to.
You don’t have to start from scratch, either. You can have professional designers make most of the design and layout decisions for you by using print templates for MS Word. If you want unlimited downloads of templates as well as photos, fonts, icons, and other creative assets—all for one small, fixed fee—then Envato Elements is the best source for you.
For one-off Word templates and other desktop publishing tools, look to GraphicRiver. Here, you can access everything you need to create impressive print materials on a pay-per-use basis.
And when you use a template, the skills you learned in this post will help you customize and adapt it to your needs.
Editorial Note: Video added by Alexis (Lexi) Rodrigo.
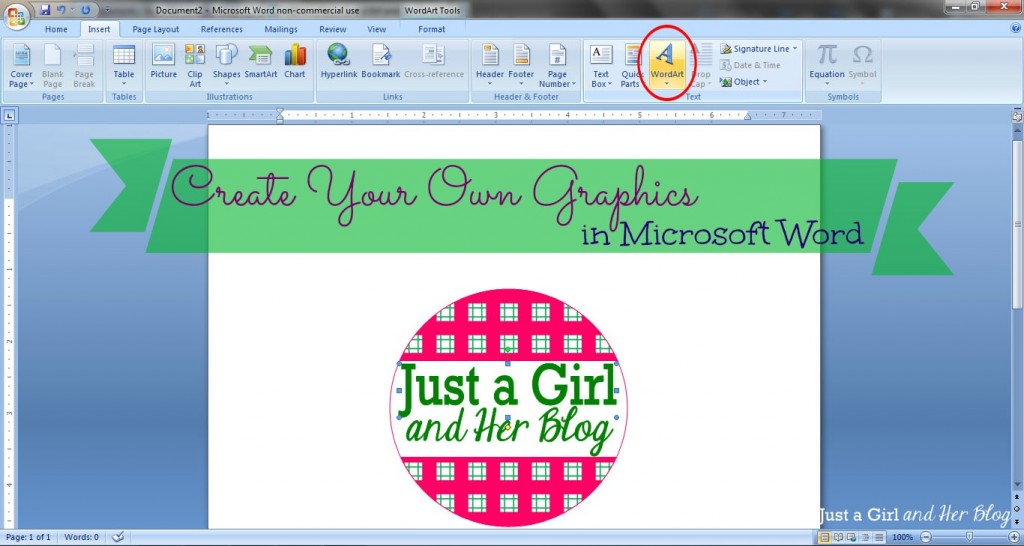
After my posts about creating monograms, labels, and banners in Word, I have received quite a few questions asking if it was possible to make other graphics as well. It is! Today I’m going to show you a couple examples of how to create your own graphics and let you in on my little graphic-making secret. 😉 Let’s get started!
Make Your Own Backgrounds
Have you ever searched and searched for a background graphic to use only to become frustrated that nothing is “just right”? I have definitely been there, so I started creating my own simple backgrounds. I actually make a lot of them in Photoshop Elements, but the same thing can easily be accomplished in Word as well.
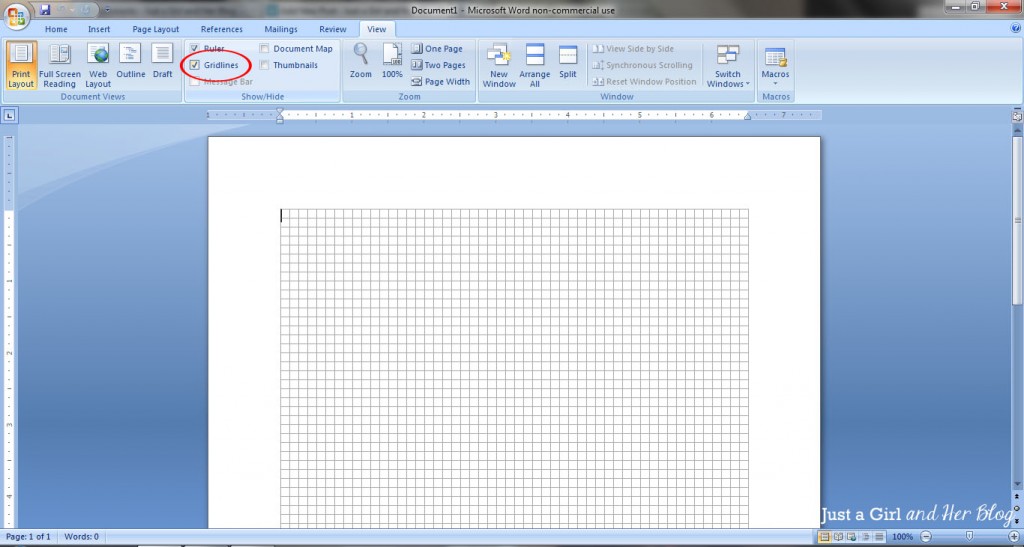
1. Use Gridlines
The first thing I do is, under the “View” tab at the top of the screen, check the “Gridlines” box. This way you’ll have a guide to help you make sure your patterns are straight and evenly spaced.
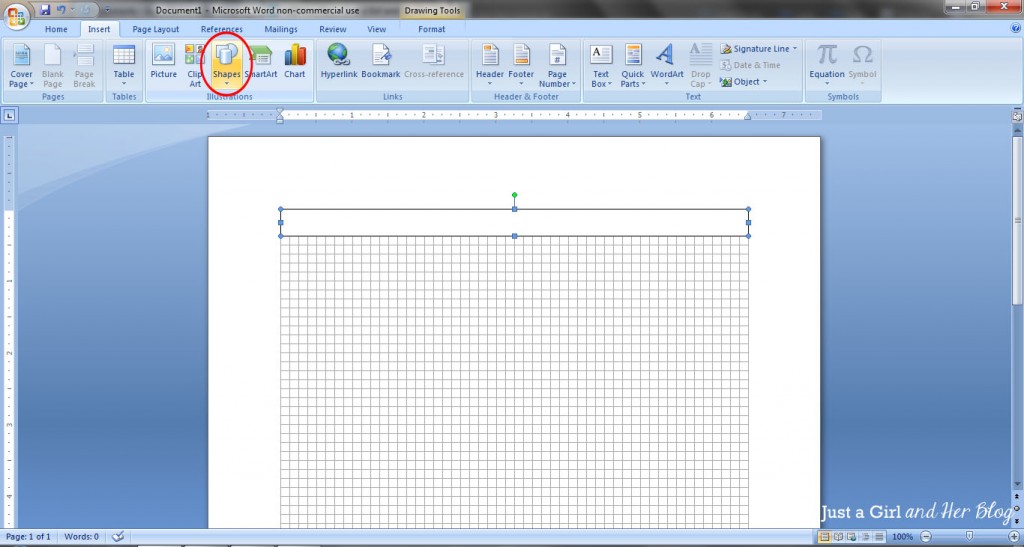
2. Start with a Shape
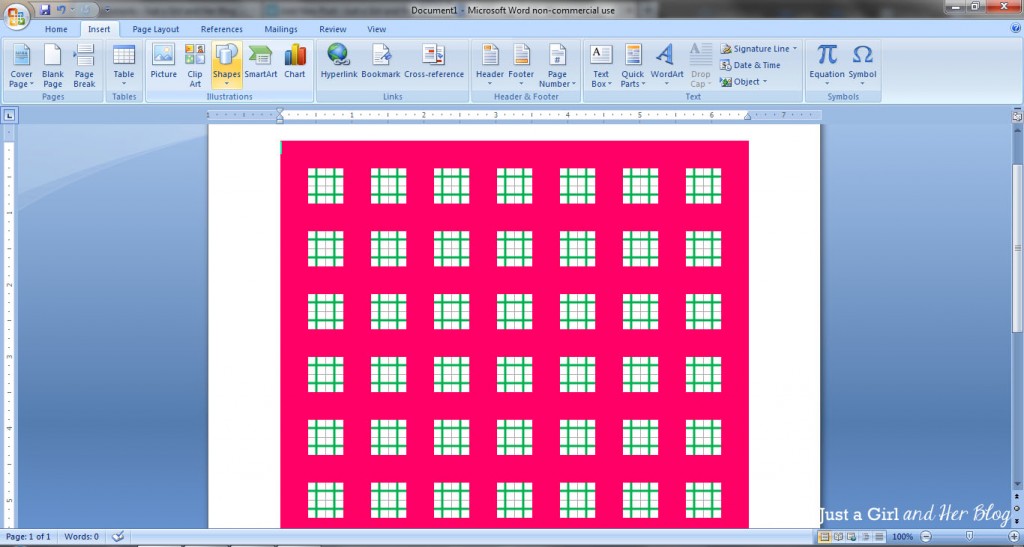
Let’s say I want to make a plaid pattern. I will go to the “Insert” tab, click on “Shape” and choose a rectangle to begin my pattern. I made my rectangle two boxes high and ran it the full width of the gridlines.
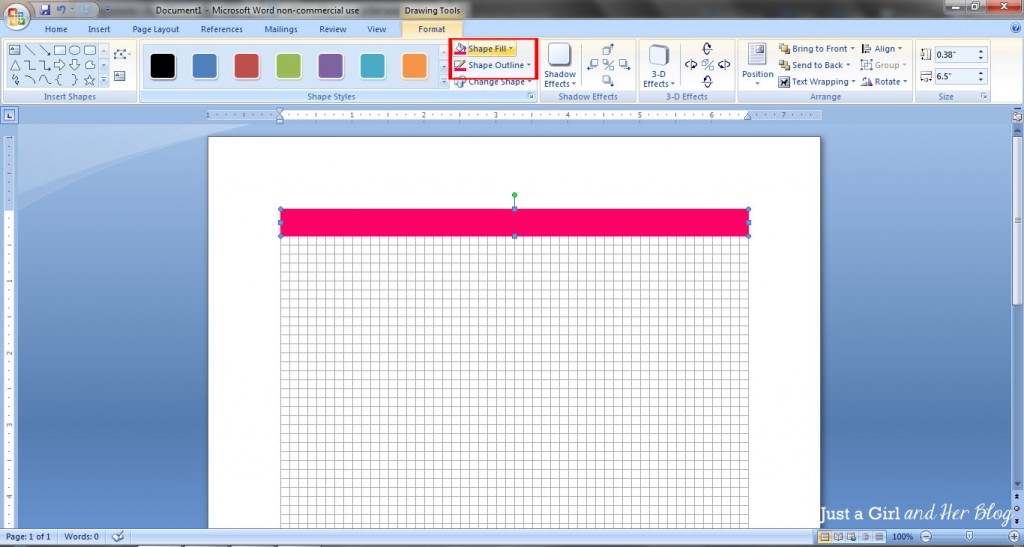
3. Pick your colors.
I can then go to my “Drawing Tools” toolbar to change the outline and fill colors of my shape. I chose pink. {Because who doesn’t love pink in the spring?!}
4. Continue Adding Shapes.
Continue this same process with each shape until you have the pattern you want. {Shortcut: You can copy and paste the shape if you’re using the same one over and over.} I used a combination of vertical and horizontal rectangles and the “Line” shape to make my pattern.
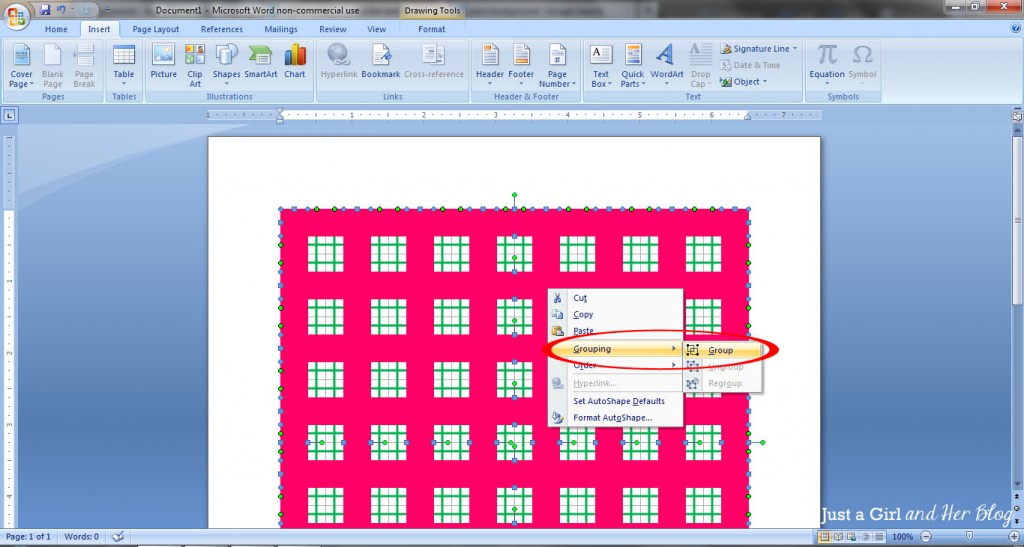
5. Group Your Shapes.
Next, like we did in the labels and bunting banner tutorials, I am going to “group” my pattern. To do this. I select each shape by holding down the “Ctrl” key and clicking each shape individually. I then right click and select “Grouping” and then “Group.”
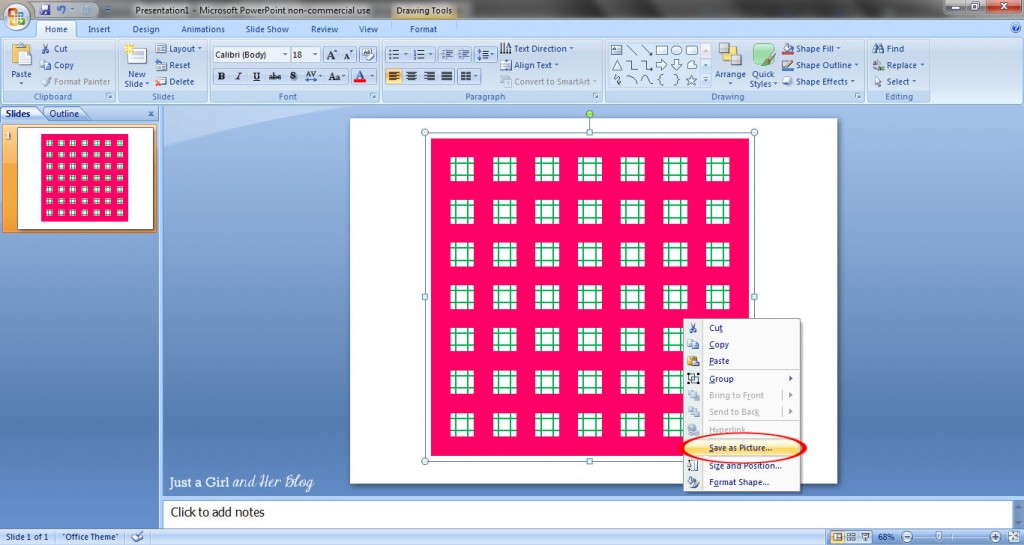
6. Save As Picture in PowerPoint.
Here comes my little secret when it comes to making graphics. In order to use this as a graphic, we need to save it as a .jpg or other picture file. While Microsoft Word doesn’t let you do this, PowerPoint does. So the next thing you’ll do is right click your shape and select “Copy.” Then paste it into a PowerPoint presentation and right click it. Select “Save as Picture…” I usually save it as a .jpg file as opposed to .png or .tif, but you can test them out and see what works best for you.
Use Your Background to Create a Graphic
You can now use your graphic as a background in Word or another program or to fill a shape, like we did in the bunting banner tutorial. I used my background to create a graphic for my blog in Word.
I drew a shape, then under the “Drawing Tools” tab, I clicked the “Shape Fill” drop down and selected “Picture.” I picked the pattern .jpg that I just created.
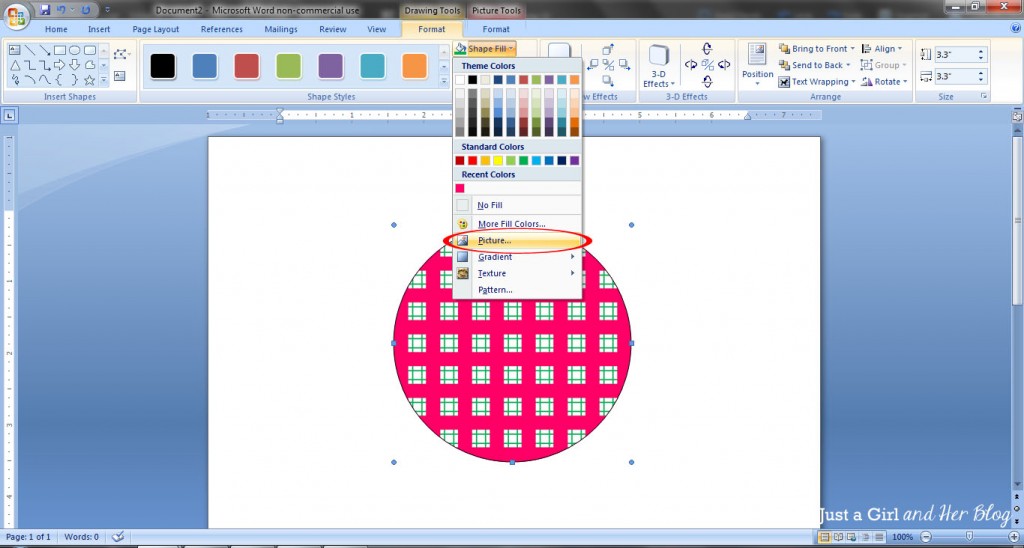
Next, I drew a white rectangle as a background for my blog name.
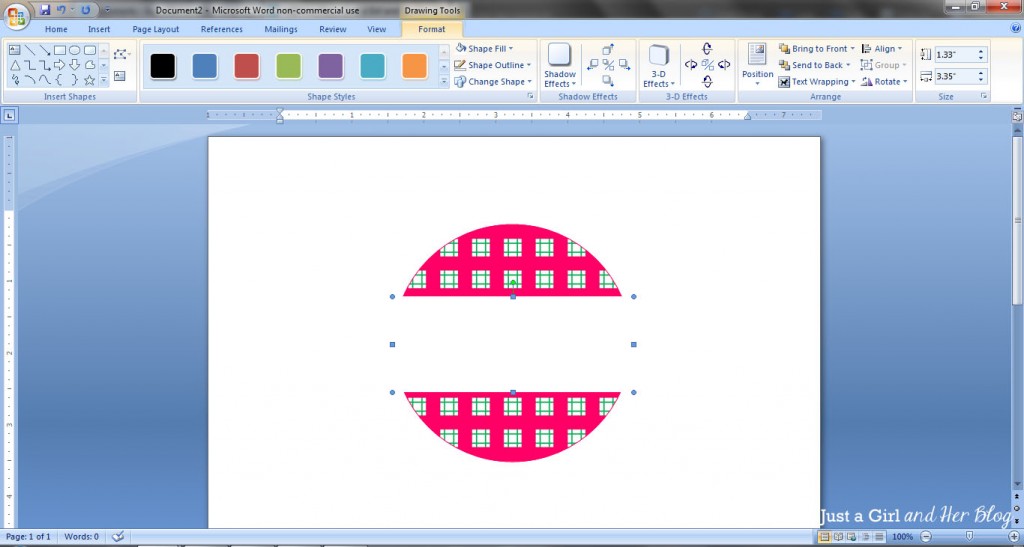
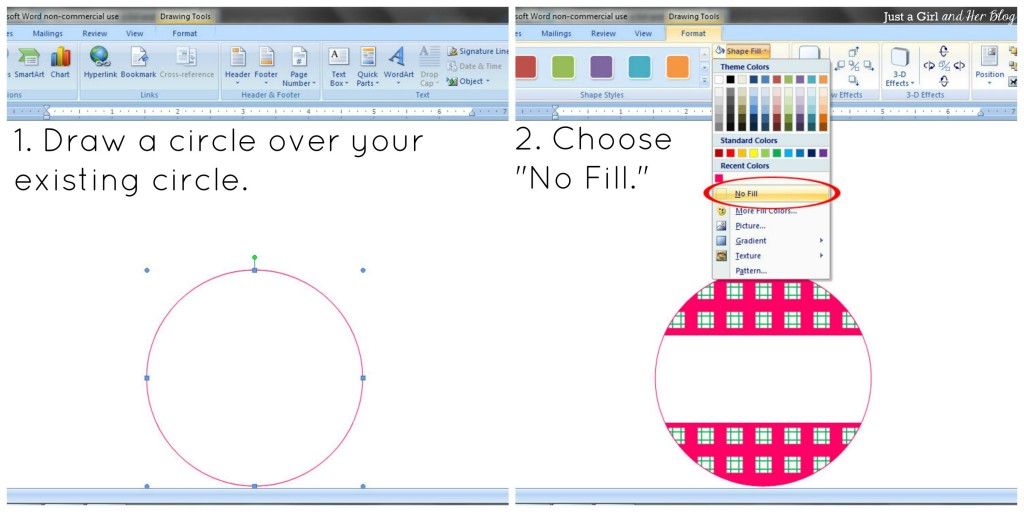
I wanted to make sure the circle was defined, so I drew another circle of the same size and put it directly over my existing circle. I chose “No Fill” as the fill color so that I could have a well defined outline while still seeing my patterned circle.
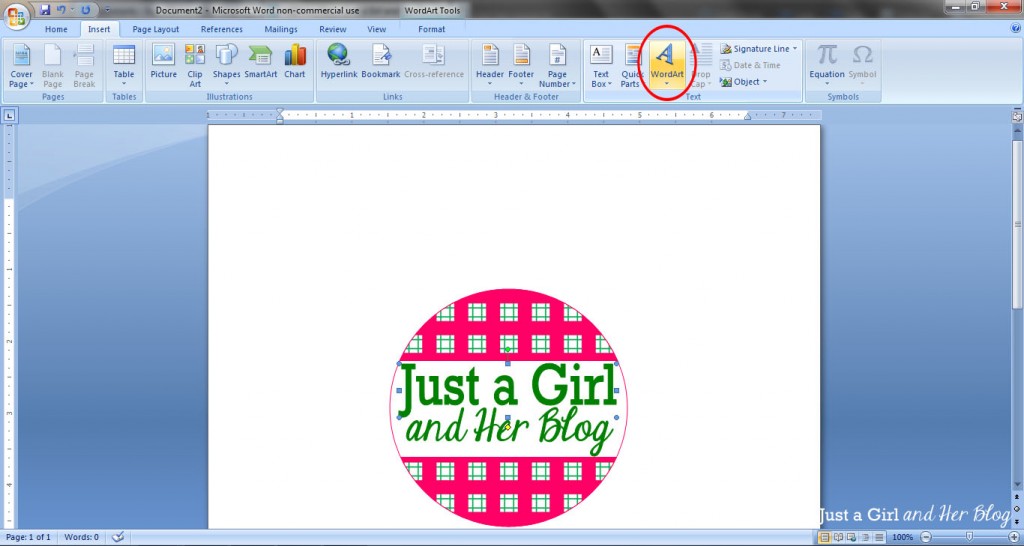
I then went under the “Insert” tab and used the “Word Art” feature to add my blog name. {For more details on how to format your Word Art, see my Bunting Banner Tutorial.}
Finally, you will want to follow steps five and six above to group the graphic and save it as a picture using PowerPoint. Then you can use it like you would use any other .jpg picture file!
If you’re just starting to experiment with graphic design and aren’t ready to invest in designing software, Microsoft Word has a surprising amount of options available and is SO easy to use! The possibilities are endless!
Do you have any design tips in Microsoft Word?

Linked Up Here:
Sharing with Domestic Superhero Thursday, House of Rose- Inspire Me Please
Follow my blog with Bloglovin
Microsoft Word can do more than bang out simple letters and plain text. Delve into its Design and Layout tools, and you’d be surprised at how much it can help even novices produce attractive layouts for brochures, flyers, and newsletters.
The more complex your layout and contents, the more you will need a design professional’s help—and maybe a high-end desktop publishing package, too. But before you do that, give Word’s built-in design talents a try.
Work with a template…
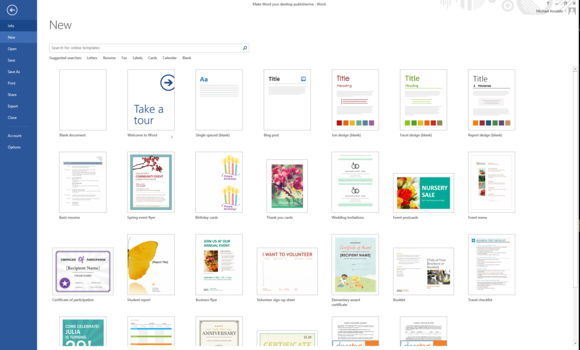
The easiest way to create more elaborate documents in Word is to use a template. Word has hundreds of them, from newsletters and flyers to business cards and faxes. To get started, go to File > New in the left navigation bar, which brings up a selection of popular templates (including the default blank page) topped by the search window.
Word has hundreds of templates to jumpstart your layout.
Templates come pre-populated with images and dummy text, both of which are easily replaceable with your own (you can either click on a block of text and start typing, or paste in text or images you’ve previously copied to the clipboard). But even if you want to change design elements (such as fonts, for example), you might start with a template just to pick up preset margins and other basic layout parameters that would be annoying to create from scratch.
…or work with themes
If you prefer to start from scratch on a blank sheet, you can set up page dimensions, margins, columns, and other basic defaults in the Page Layout ribbon. You might also want to click the Design tab and choose a theme—a collection of fonts for popular layout options such as titles, subheads, and plain text. You could, of course, specify these individually as you work, but the fonts in a theme are chosen and sized according to generally accepted design precepts so they’ll look good together.
The Design tab also provides collections of color palettes and effects you can apply to add character to your layout. You might choose one color from a palette for a border and another for subheads, for example. (Once you select a theme, the colors in the palette will show up when you click the Font Color icon on the Home ribbon.) You can experiment with different looks by hovering over a theme (or, for that matter, any other design element in the ribbon), which is then applied to the appropriate area in your document. To make the change permanent, you click on the desired element.
The Design tab offers collections of color palettes.
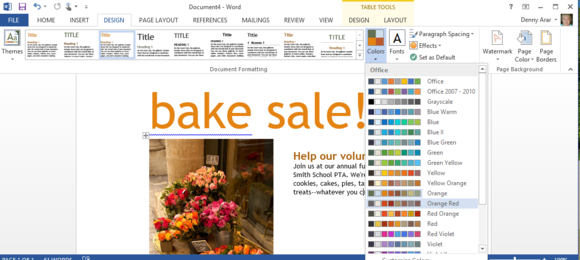
Another option in the Design tab lets you apply a background color, pattern, or even an image to your document. Click on Page Color to see these options—they’re a pleasant alternative to the usual plain white.
Play with typography
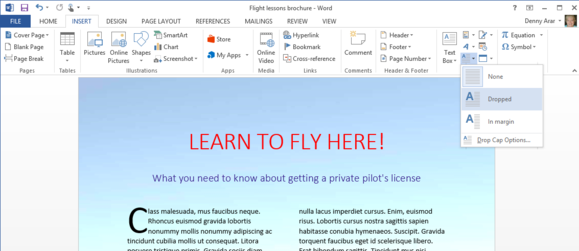
Nothing is more boring than a page full of plain text, but sometimes you don’t have a lot of images to relieve the monotony. Tools to make your layouts more interesting include drop caps, subheads, and pullquotes—and it’s relatively easy to apply them in Word.
Adding drop caps—large initial capital letters—to a paragraph is child’s play: In the Insert ribbon, simply click on the Add a Drop Cap icon in the Text tools. You can choose between having the enlarged initial capital letter embedded in the text or in the left margin. Drop Cap options let you change the font, the height (in number of lines of normal text) of the character, and its distance from the text.
Drop caps can liven up a page of plain text.
A pullquote is a quotation from the text that you copy into a box and use as a design element, much the way you’d use an image. It’s a way of highlighting an important nugget from the story, while at the same time adding visual interest to a page. In Word, put the cursor in the general area you’d like to place a text box, and click the Text Box icon in the Insert ribbon. This brings up a menu of several pre-formatted text box options. When you choose one, it will appear—with canned text—in your document. You can then replace the dummy text and adjust options such as font size and color.
Use a text box to create a pull quote in your document.
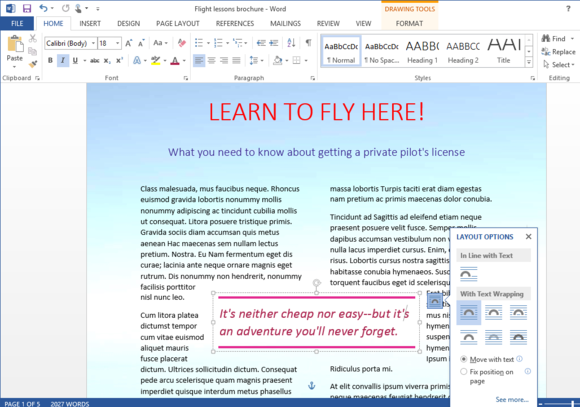
To the right of the box, a small icon lets you adjust how the box fits into the layout. You might, for example, opt to have text flow around the box, or you could choose to have it above and below (but not around) the box. You can also opt to fix the position of the box on the page or tie it to the copy around it, so that if the copy moves, so does the box.
Use colorful Word Art sparingly.
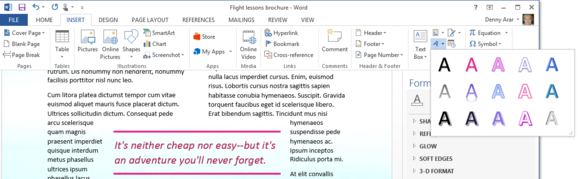
The Word Art icon on the Insert ribbon lets you use colorful display fonts with flourishes and effects you won’t find in standard fonts. You can use these characters to liven up a page, but avoid going overboard: A little of this sort of eye candy goes a long way.
Adding images, charts, and other content
By now you may have noticed that Text tools take up only a small area on the Insert ribbon, since there are so many other items you can add to spruce up the look and impact of a document.
Images are an obvious choice. Current versions of Word include tools that let you perform basic image editing from within the app. As with the text box, you start by placing the cursor in the area where you want the image to appear. Then click on Pictures (or Online Pictures if you want to look for images in Office’s huge collection of clip art), and click on the image you want to insert.
You can drag an image anywhere you want to use it in your document.
A couple of things will happen: The image will appear in your document—if not exactly where you intended, close enough so that you can easily drag it to where you want it. You can also make fine adjustments with arrow keys when the image is in moving mode.
At the same time, the Picture Tools ribbon will appear, filled with options for everything from cropping to artistic effects and frames. As with text boxes, you also get an icon next to the image that gives you choices for how it fits into the text.
SmartArt lets you insert complex diagrams.

Word also has special tools for inserting shapes (for simple diagrams), SmartArt (for more complicated business diagrams), and even Excel-style charts that you create on the fly.
The newest graphic element in the Insert ribbon is the Screenshot icon: Click it and you’ll be able to insert any currently live screenshot on your Windows desktop—a useful tool for people who want to illustrate computer processes.
Use a text box to create unnumbered captions.
You can add captions to graphic elements using the Insert Caption feature in the References ribbon, but there’s a catch: Because the feature was intended for academic publications, it automatically assigns numbers to them (in sequence)—and it’s all but impossible to get rid of them in print unless you want to go into Word’s field codes. If you want your images to have captions that aren’t numbered, you have to either create a text box below (or beside) the image just for the caption or put them both in a box to tie them together, another complicated procedure.
Making adjustments
Many of Word’s tools can be applied on the fly, so if you don’t like the way something looks you can easily change it. For example, you can flow text into columns simply by selecting it all and clicking on the number of columns you want in the Page Layout tab.
You can realign objects in Word with layout options.
If you’ve added several elements to a document and they aren’t behaving the way you want, you might find help in the Arrange section of the Page Layout tab. Here you can find features for aligning objects and bringing them in front of or behind other objects.
Finishing steps
Most commercial printers who work with small businesses will accept documents in PDF format, and Word lets you save documents as PDFs. There are, however, different types of PDFs, so make sure to check with a printer beforehand—ask if they can work with the PDF format generated by the Word version you are using.
Word can’t do everything a high-end desktop publishing program can do. For example, if you need crop marks on pages, Microsoft advises you to export your Word document to Publisher, the Office desktop publishing app. Desktop publishing packages can usually export to all major PDF types. High-end packages also let you create multiple master pages to serve as templates for complicated documents. While Word makes it easy to create pages with headers and footers, it’s not so easy to mix them up with other page styles in the same project.
But for people who are simply looking to enhance the appearance of everyday documents—flyers, brochures, booklets and the like—Word has much to offer. The learning curve isn’t too steep, and if it’s already on your desktop, the price is right.

Word allows you to do much more than simply insert or place graphics. For our fourth lesson in this series, we will focus on the graphic design functions in Word such as pictures, SmartArt, screenshots, and other items that can be found on the “Insert” tab.
These functions really breathe life into your drab black and white text documents. With a simple picture or chart, you can turn your term paper from meh to yeah! Luckily, there’s a whole range of ways you can add images to better illustrate (no pun intended) your point.
We’ll wrap the lesson by changing gears a bit and discussing how to use more than one language in Word 2013.
Images and Multimedia
You don’t have to think of Word as simply a word processing program. It has requisite tools for doing some pretty nifty page layout. While it’s not a feature-complete or robust as a professional page layout program such as Adobe InDesign. You can still get very professional looking results if you know what’s in your toolbox and how to use it.

Pictures and Online Pictures
Both “Pictures” and “Online Pictures” accomplish the same goal. The only difference is that “Pictures” means you can insert pictures locally, while “Online Pictures” allows you to insert images from an internet-based source such as clip art from Office.com, Bing, or OneDrive (formerly SkyDrive).
You can also insert pictures from your Facebook profile or Flickr although you could always just save the pictures you want to insert to your computer and then insert them from there if you don’t want to connect Office to these profiles.
Picture Tools
As always, when you want to edit a picture or any element place in a Word document, you can click on it and the appropriate tab will appear on the Ribbon.
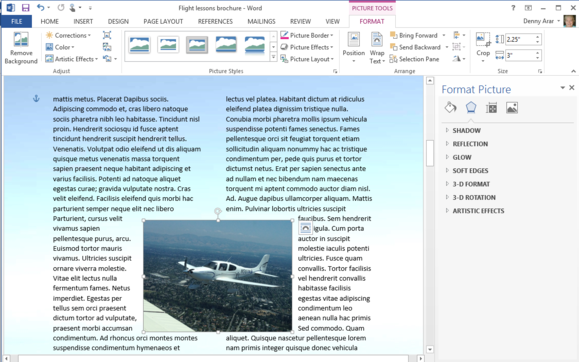
With pictures, that tab is “Picture Tools.” Here we see you can make all kinds of corrections to the picture on-the-fly. For example, you can correct brightness and contrast, the color, add a border.
Where you position and how you wrap text will also play a large role in formatting your documents.
Here we see those controls. In our documents, we don’t worry so much about word wrapping or positioning because Word isn’t the final step toward publishing online. However, if you’re going to produce something WYSIWYG (What You See is What You Get), such as for a PDF or print publication, then these things will definitely matter.
Also, there are a couple ways you make changes to your pictures inline, such as resizing, rotating, and moving them. In the following image, you see these controls, many of which you will likely be familiar with.
When you click on an image in your document, you get a box on each corner, which will let you resize a picture. At the top, in the middle, is a circular arrow, grab this to freely rotate your picture. To move the image, hover the mouse over the image until the pointer is the four arrows, you can then click and drag the image anywhere you like.
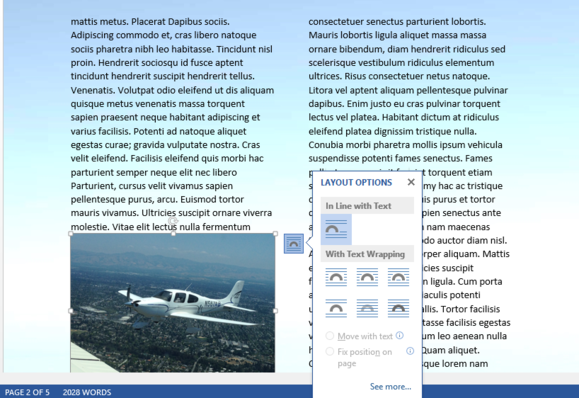
Finally, if you click on the little “Layout Options” button, you can change your text wrapping without going to the Ribbon.
Clicking on “See more…” at the bottom of the “Layout Options” opens the full-blown “Layout” dialog.
Note, the size tab both on the Ribbon the “Layout” dialog allows you to specifically resize, rotate, and scale your pictures, rather than relying wholly on winging it:
We’d like to spend the whole day talking about formatting images in Word, but as you can see, there’s a ton of options at your disposal. Let’s move on now to other objects you can insert into your documents, starting with “Shapes.”
Shapes
Microsoft Word 2013 comes with an array of built-in shapes, which you can use to create callouts, boxes, stars, and other shapes.
When you choose a shape, you simply draw it on a blank space on the page. It doesn’t matter if you get it perfect or just the way you want it because you can adjust it to your heart’s content once it is placed in your document.
Note in the screenshot, the previously mentioned little “handles” you can use to resize and rotate your shapes.
At the bottom of the “Shapes” menu, there’s an option to create a “new drawing canvas.” This will open, what is essentially a text box for shapes. With this drawing canvas, you can create drawings using these shapes allowing you to create things like diagrams and flowcharts.
SmartArt and WordArt
SmartArt and WordArt tend to have some overlap, particularly if you create something using WordArt and then customize any of the text within it. Of course, you can use one or the other and never the twain shall meet, but we’re going to talk about them in the same section because one often leads to the other.
Think of SmartArt as premade drawing canvases that you can insert into your document and then customize as you like. Simply pick an arrangement, such as a list, process, or cycle.
As you can see, we created a graphic based on a “Continuous Block Process.” When we click on the text boxes, we can edit what is inside. There are also the usual grab handles needed to resize the image, and the “Layout Options” allowing you to wrap text to your preference.
If you use SmartArt, note that the Ribbon changes to reflect this. The “SmartArt Tools” features two tabs: “Design” and “Format.” Let’s cover each one and its features.
The right half of the “Format” tab allows you to pick from a number of “SmartArt Styles” and you can also “Change Colors.”
If you look at our previous example, you can see we applied an embossed, shiny effect and changed the colors of our text boxes and arrow.
On the left half of the “Design” tab, you can “Create Graphic” so you can add shapes, bullets, text, and move things around.
The “Layouts” section lets you change how your graphic looks on the fly. Simply hover over any of the built-in options to see how it would look utilizing a different layout. Changes to the layout are not applied unless you first click on a style.
The right side of the “Format” tab is used for affecting changes to text. These include “WordArt Styles” and other effects suchs as fill and outline. Beyond that, you can arrange multiple layers by sending them forward and backward.
The “Layout” dialog pops out if you select the little arrow in the bottom-right corner of the “size” section or you can choose more options from any of the drop-down menus including “Position”, “Align”, and “Rotate.”
On the left side of the “Format” tab you can select any of your shapes and change them to another, and also make them larger or smaller.
If you click on “Shape Styles” you will be able to choose from a selection of pre-defined shapes and colors.
Shift right just slightly and you will find controls to alter the fill. Choose from various “Theme Colors” or select your own. You an also use pictures, gradients, and textures for even more fill options.
If you want to refine the outline around your shape(s), you can choose any color, weight, or dashes.
Finally, “Shape Effects” has quite a few options for enhancing your shapes, many of which will give them a cool 3D effect that you can adjust by clicking 3D Options at the bottom of the of the menu.
Format Text Effects
Let’s take a closer look at this because it contains a pretty sizable amount of features. We’ll cover the basics so that you’re more aware of them. The pane titled, “Format Text Effects,” slides out from the right edge.
As with any other panes in Word 2013, it can be detached, which you can then stick out of the way to save screen area, or keep it nearby so it is handy. Regardless, this dialog box will allow you to quickly work with text, so you don’t have to repeatedly keep going to the ribbon to change things. Note also that the dialog is split into functions, “Text Fill and Outline” and “Text Effects.” “Text Fill and Outline” is simple enough to figure out, and is used to enhance how text appears.
Say, for instance, we want to write How-To Geek School and enhance it so that it is size 48 pt., blue with a black 1 pt. outline. We simply select the text we want, increase to the size to 48, then in the “Format Text Effects” dialog, we can change the color (we can also do this in the “Font” section of the “Home” tab. Then under “Text Outline” we choose “Solid line” and choose block and 1 pt. for the outline width.
That looks pretty good, but we really want it to pop, let’s add some more text effects, such as a shadow, a reflection, and we’ll add a bit of a 3d bezel to round the lettering out.
The result is a bit more striking and while it’s not likely to make it into any final designs, it does give you an idea of what you can do with WordArt.
Chart
Who doesn’t like charts? Charts are a great way to visually display data sets and Word 2013 comes jam packed with a large assortment of Charts to choose from, including columns, pie, bar charts and much, much more. Check out the screenshot for an idea of just how many options there are:
When you choose a style, you’ll get a spreadsheet, which will allow you to enter the data points on your x and y axes. As you enter data, the chart will change.
Manipulating and formatting charts is easy. Whenever you click on a chart in your document, you’ll get the “Chart Tools,” which, as you might have guessed, is the Ribbon tab devoted solely to charts.
Using the “Design” tab, if you don’t like the colors or style of your chart, you can instantly apply changes to it without having to generate a new one.
If you decide you don’t think the layout works for this particular type of data, change it using “Quick Layout” or add another element such as another axis, chart title, gridlines, and more.
On the right side of the “Design” tab you will find essential tools for altering your data and you can also go back and completely change the type of chart you’re using.
So, if you think a pie chart would work better, you can change to that. Note however, some data points, such as “breakfast,” “lunch,” and “dinner” aren’t represented on this chart.
The “Chart Tools” also give you a “Format” tab so you can dress things up a bit by adding shapes and then being able to change the style, fill, and outline.
Turning to the right side of the “Format” tab, you are given options for adding and changing WordArt, arranging elements, and adjusting the size of your chart (which you can also do with the grab handles).
It’s easy also to affect changes inline too. When you click on a chart in your document, formatting controls appear along the upper-right corner. From top-to-bottom, you get “Layout options” so you can set your text wrapping. You can change chart elements with the plus (+) symbol, so if you want to change chart titles, add gridlines, and stuff like that.
The paintbrush icon is for setting a style and color them, and finally, the sieve icon is for “Chart Filters,” so you can edit data points and names on your chart.
Screenshot
The “Screenshot” feature will allow you to take a screen clip, which is automatically pasted in you document.
When you use the screenshot function, it will let you choose between any currently open windows, or you can select “Screen Clipping,” which will minimize Word allowing you to take a selection or full shot of your desktop. So for example, if you want to simply insert a shot of your desktop and its icons, you would first need to minimize everything you have open.
There’s a myriad of ways you can take and add screenshots, so we’re not going to dwell on it. Just note this feature, if you’re unfamiliar with adding screenshots, and you want an easy way to do it in Word.
Online Video
You can insert “Online Video” such as Bing, YouTube, or video embed code into your document.
When you embed a video, it will appear as if it is a regular picture, complete with grab handles and text wrap controls.
Further, you can adjust how the emedded video thumbnail appears (as a picture) using the “Picture Tools” so you can make adjustments to the color, add a border, correct the contrast and brightness, and more.
So you see, we simply applied a “picture style” and add a purple border. This is only a fraction of the stuff you can do, so if you to add some really nice looking effects and create a nice looking document that really pops, you should take your time to familiarize yourself with everything.
On the other hand, if you don’t like your changes and you want to go back to the default, simply click “Reset Picture” and it will revert to normal.
Other Text Features
Here are few more text features that you might want to be aware of though you will probably rarely use them.
Text Box
Text boxes are like their own little islands in Word. What we mean is, when you add a “Text Box” to your documents, it is immune to changes you make to the rest of the document. It is like a document within a document.
This is useful if you want to present something “as is” in your work, be able to make overarching changes to the document’s formatting, but have something you’ve pasted remain unchanged.
For the most part, text boxes are something of a bane to an editor’s existence because they don’t play nice with styles (Lesson 5). You may find them extremely convenient and that’s perfectly fine, but if you want something that conforms to your document’s style and formatting, but still place it in a box or have a border around it, then we recommend simply adding a border, which we covered in Lesson 2 – Shading and Borders.
Drop Cap
Drop caps are simply that one letter at the beginning of a chapter or book that is larger than the rest:
You can either make your drop cap “Dropped” (the text below it shifts underneath it) or “In Margin.” Check out the “Drop Cap” options for more power over how your drop caps behave.
Using More than One Language
If you want to produce content in a language other than the one that comes with Word by default, you will likely need to purchase it. Open the Word “Options” and click on “Language.”
Pick the language you want to add from the dropdown list and then click the “Add” button. When you add a language, you will need to enable it, which means that you will have to turn it on in the “Control Panel.”
From here, you can write in the language, but Word won’t display in it, in other words, menus and help systems will still appear in the default language. To get the full multilingual experience, you may need to purchase a language pack from Microsoft.
To see what languages are available for purchase, and how much, click on “Not installed” and you will be whisked to the Microsoft Office website.
If you want to add proofing tools, such as spellcheck, grammar check, and/or screen tooltips, then you may be able to simply download them for free.
While it’s doubtful you’ll be using Word in full multilingual mode, it’s nice to know how you can affect those changes. Moreover, most languages are freely available to use system-wide so actually creating a document in another language is well within your reach, for free.
Coming up Next…
So that concludes this section. We know it’s been a lot to absorb but you’ll see that after a while, this stuff is a cinch!
Once you get the hang of one skill, the rest is pretty similar and comes easier. By now you should have more than enough knowledge to create awesome documents with lists, tables, pictures, video, and anything you need to create a true multimedia publication!
Don’t forget though, if you’ve missed anything in this series you can always go back and read our introduction in Lesson 1, all that stuff on paragraphs and lists in Lesson 2, and all-important tables and other formatting options in Lesson 3.
In our final lesson, Lesson 5, we will cover styles, templates, and themes. It doesn’t sound like much, but they can be a fantastic way to not only save tons of time and create consistently formatted documents, but quickly apply themes that will instantly affect the entire appearance of your documents, as well as create templates that you can later use over and over again!
READ NEXT
- › How to Adjust and Change Discord Fonts
- › The New NVIDIA GeForce RTX 4070 Is Like an RTX 3080 for $599
- › This New Google TV Streaming Device Costs Just $20
- › Google Chrome Is Getting Faster
- › HoloLens Now Has Windows 11 and Incredible 3D Ink Features
- › BLUETTI Slashed Hundreds off Its Best Power Stations for Easter Sale