
Using Excel as a barcode formulator and to translate numbers and letters into barcodes can aid in your business’s inventory management and barcode management processes. Learn how to create barcodes in Excel with this step-by-step guide.
Included on this page, you’ll learn how to create a barcode in Excel step-by-step, how to generate random barcodes, types of barcodes and barcode fonts, and which versions of Excel support barcode creation.
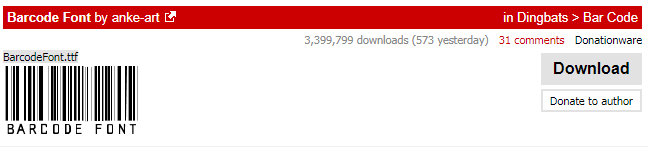
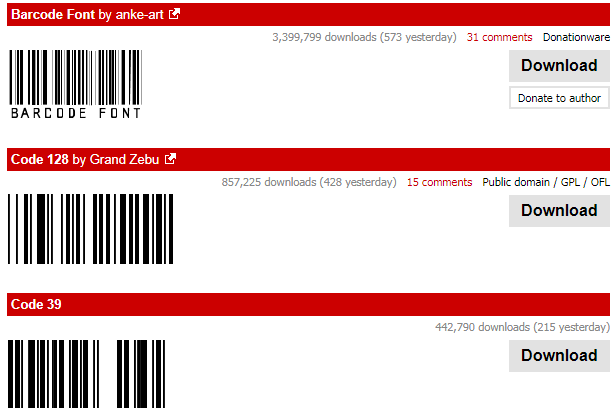
First, you’ll need to download a barcode font. The most common font — and the one we’ll use in this tutorial — is code 39 (more on that in this section of the article). You can download a version of the font from a number of places, including Dafont, Free Barcode Font, ID Automation, or Square Gear. Once you download the font, follow Microsoft’s instructions on how to install a font for Office to get it working with your version of Excel.
Below are a couple of notes about installing fonts:
- You may need to quit and restart Excel for the font to appear in your font list.
- Not all fonts work perfectly for all OSs and versions of Excel. If one doesn’t operate well, delete it and try another.
- Code39 has worked best during the research for this article
Creating a Barcode in Excel
Once you install the font, it’s easy to create barcodes in Excel. Simply follow the steps below.
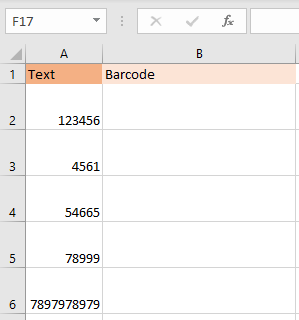
Step One: Create two columns in a blank spreadsheet.
Title the columns Text and Barcode.
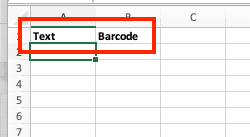
Place the alphanumeric data in the Text column (this is the basis for the barcodes). The barcodes will appear in the Barcode column.
Note: If you want to add a description of each item the barcode applies to, add additional columns to make a table-like layout.
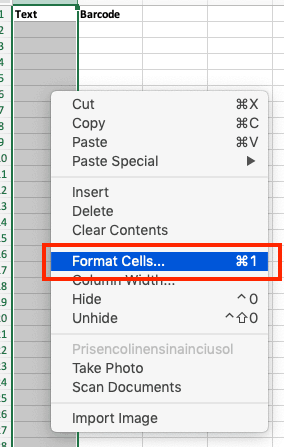
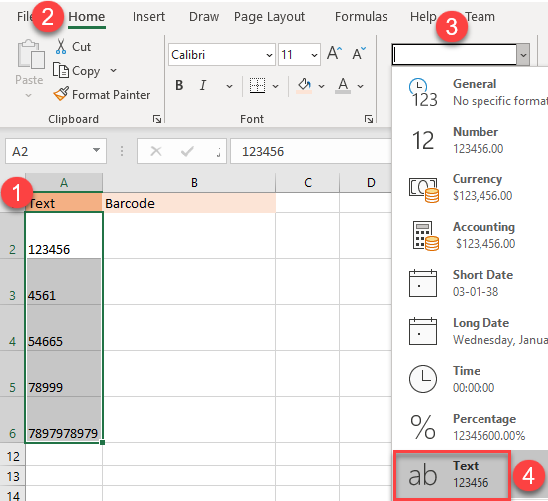
Step Two: Format the cells in the Text column.
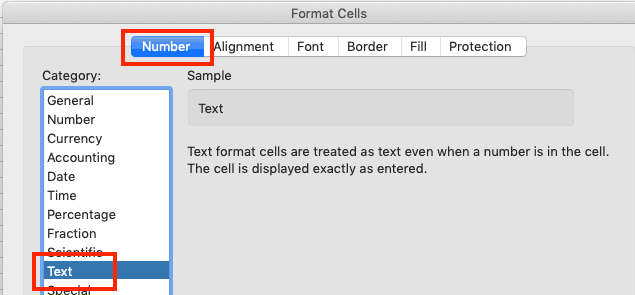
Select the Text column, then right-click on it. Click Format Cells, click Number, click Text. This will prevent larger numbers from displaying in scientific notation as well as preserving leading zeros.

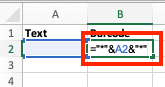
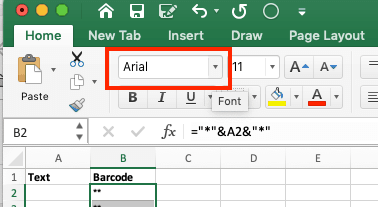
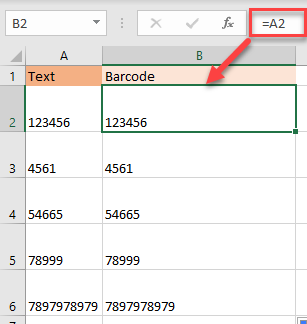
Step Three: Enter the following formula: =»*»&A2&»*» in the first blank row of the Barcode column.
In this step, we’re assuming that the cell in the Text column is A2; if not, adjust the formula accordingly. If you there’s no text in the first column, the second column will display two asterisks.
Step Four: Fill the Barcode column down.
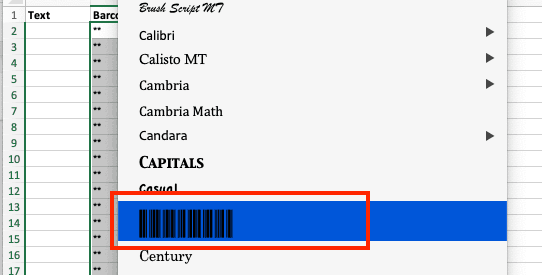
Step Five: Change the font in the Barcode column.
From the font menu, select the downloaded and installed barcode font. It’s a good idea to use the same font for the header row as you do for the rest of the spreadsheet, but that’s up to you.
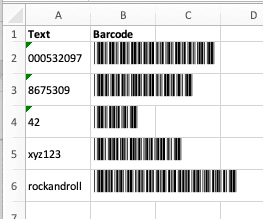
Step Six: Enter alphanumeric data into the Text column.
The Code 39 font can encode 1-9, A-Z (the font considers uppercase and lowercase the same), the en dash (-), dollar sign ($), percent sign (%) period (.), slash (/), plus (+), and a space. The font also encodes the asterisk (*), which is used as an indicator for the beginning and end of the sequence (this is also why the formula in Step Three adds an asterisk before and after the text entered). The Barcode row will automatically populate with barcodes.
Benefits of Creating Barcodes in Excel
While creating barcodes in Excel will work well for many, doing so may not be scalable. However, the process is an easy and inexpensive way to do the following:
- Print product numbers or UPC codes.
- Produce a product catalog or product list.
- Track stocked items.
All of these capabilities are extremely useful in inventory management.
How to Generate Random Barcodes in Excel
You can use the RANDBETWEEN Excel function for barcodes that require random numbers. Follow the steps below to automatically create random numbers for barcodes.
Note: If you changed the column to text format (see Step Two in the Creating a Barcode in Excel section), change it back to General.
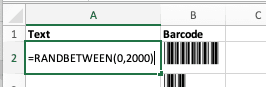
- Enter the RANDBETWEEN Excel function. In the first cell of the Text column, enter =RANDBETWEEN(X,Y), where X is the lowest value and Y the highest. For example, =RANDBETWEEN(100,500) will generate random numbers between 100 and 500.

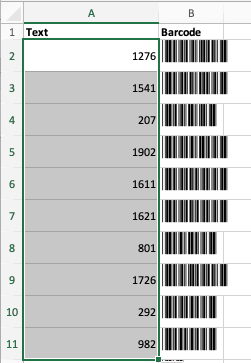
- Fill down the row to generate random barcode numbers. Each cell will have a random number in the specified range.

What Versions of Excel Can Make Barcodes?
The 2010, 2013, and 2016 versions of Microsoft Excels can make barcodes. Some older versions may also be able to make barcodes with a supported add-in. This includes those released in 2003 and 2007.
Types of Barcodes and Barcode Fonts
In addition to Code 39, there are a number of other barcodes available, including the following:
- Code 128: This code is generally used for shipping and supply chain labels. It can encode the same set of characters as Code 39 (though uppercase and lowercase letters can appear differently). There is no length restriction.
- UPC/EAN: This is the barcode most people are familiar with because it’s used for product barcodes. UPC stands for Universal Product Code; EAN for European Article Numbering. The barcode is also known as UPC-A and is restricted to 12 characters.
- I2of5: This is a two row barcode that’s used on rolls of 35mm film, and to label some cartons. It’s also known as industrial 2 of 5 or interleaved 2 of 5, and encodes numeric characters.
- UPC-E: This is a variation of a UPC barcode where certain characters (e.g., leading zeros) are omitted, in order to keep the code to six digits.
- QR: This 2D barcode can be used to open a website or app when scanned with a mobile phone camera. These barcodes are usually used for a printed ticket, to provide a discount, or for mobile payment. The barcode can encode alphanumeric, binary, and kanji. QR stands for Quick Response.
- Postnet: Formerly used by the U.S. Postal Service, this barcode encodes numeric characters.
- Intelligent Mail: Currently used by the U.S. Postal Service, this barcode encodes up to 65 characters. Not only do the width of the bars and spaces carry information, but so do the height and vertical location. Intelligent Mail encodes numeric characters.
What’s the Deal with Code 39?
Also called the 3 of 9 Barcode, Code 3 of 9, and Barcode39, this option is popular for the following reasons:
- It’s well-established.
- It encodes both numbers and letters.
- It’s readily available for free.
Each character display appears as five bars and four spaces; three of the nine bars in the barcode will always be wider.
Creating Barcodes in Word and Other Apps
You can also create barcodes in Word, PowerPoint, Wordpad, TextEdit, and pretty much any app that allows you to change the font. Once you download the font and install it on your computer, enter the text in your program of choice and change the font to the barcode font.
How to Use Excel Barcode Fonts
Once you’ve created barcodes, you need to deploy them. You can print or use a barcode in a catalog and then use a scanner to retrieve the data encoded in the barcode. Scanners can be custom built or off-the-shelf, and you can also use a smartphone that has a designated scanning app.
How Excel Barcodes Work with Android, iPhone, and Macs
You can create barcodes in Excel on a Mac, just like you would on a PC. Apple’s iOS doesn’t support custom fonts, so you can’t view, edit, or create barcodes on an iPhone. An app called AllFonts claims it can get past this restriction, but we have not tested it. Android devices accept custom fonts, so you can download a barcode font to your phone and use it in the Excel app to view, edit, and create barcodes using the same steps above.
How to Create a Barcode in Excel 2007
Download and install a barcode font. Create two rows (Text and Barcode) in a blank Excel spreadsheet. Use the barcode font in the Barcode row and enter the following formula: =»*»&A2&»*» in the first blank row of that column. Then, fill the formula in the remaining cells in the Barcode row. The numbers/letters you place in the Text row will appear as barcodes in the Barcode row. See step-by-step instructions for Excel 2007 here.
How to Create a Barcode in Excel 2010
Download and install a barcode font. Create two rows (Text and Barcode) in a blank Excel spreadsheet. Use the barcode font in the Barcode row and enter the following formula: =»*»&A2&»*» in the first blank row of that column. Then, fill the formula in the remaining cells in the Barcode row. The numbers/letters you place in the Text row will appear as barcodes in the Barcode row. See step-by-step instructions for Excel 2010 here.
How to Create a Barcode in Excel 2013
Download and install a barcode font. Create two rows (Text and Barcode) in a blank Excel spreadsheet. Use the barcode font in the Barcode row and enter the following formula: =»*»&A2&»*» in the first blank row of that column. Then, fill the formula in the remaining cells in the Barcode row. The numbers/letters you place in the Text row will appear as barcodes in the Barcode row. See step-by-step instructions for Excel 2013 here.
How to Create a Barcode in Excel 2016
Download and install a barcode font. Create two rows (Text and Barcode) in a blank Excel spreadsheet. Use the barcode font in the Barcode row and enter the following formula: =»*»&A2&»*» in the first blank row of that column. Then, fill the formula in the remaining cells in the Barcode row. The numbers/letters you place in the Text row will appear as barcodes in the Barcode row. See step-by-step instructions for Excel 2016 here.
Free Excel Barcode Generators
There are a number of websites that will turn alphanumeric text into barcodes. If you don’t want to use Excel, or you only need a barcode once in a while, the following sites are good options:
- Barcode.tec
- Bartender Software
- Cognex
- POSGuys
How to Generate Bulk Barcodes in Excel
If you need a lot of barcodes, you can follow these steps to create them individually, but that might be arduous. Another option is to use a barcode generator add-in. You can also use the online bulk barcode generator offered by POSGuys, and then upload the barcodes to a spreadsheet.
How to Use a Barcode Scanner with Excel
You can use barcode scanners with Excel to scan existing barcodes and enter the data into Excel. For example, when a shipping/receiving department gets new parts, they can scan the barcodes on each part and then enter those codes into a Received Parts spreadsheet.
The second way is to use a scanner to scan the barcodes created in Excel via the steps outlined in this article. You can then enter them into a database or other system.
Using Third-Party Excel Barcode Add-Ins and Software
An add-in is a software package that allows you to extend Excel’s (as well as other Office applications) functionality. You can use Excel barcode add-ins to create individual barcodes, lists, or tables, and to set parameters. Below are some examples of add-ins that can help create barcodes:
- TBar: This is an Excel add-in that can create a single barcode, as well as lists and tables. The add-in allows for direct insertion into cells, and dynamically links to other spreadsheet data. You can also customize the parameters of the barcodes, including height, width, and check digits.
- Barcode Resource Encoder: This standalone software package interfaces with Excel and uses macros to create barcodes.
- ConnectCode: This is a standalone software package to create barcodes.
Discover a Better Way to Manage Your Work with Smartsheet
Empower your people to go above and beyond with a flexible platform designed to match the needs of your team — and adapt as those needs change.
The Smartsheet platform makes it easy to plan, capture, manage, and report on work from anywhere, helping your team be more effective and get more done. Report on key metrics and get real-time visibility into work as it happens with roll-up reports, dashboards, and automated workflows built to keep your team connected and informed.
When teams have clarity into the work getting done, there’s no telling how much more they can accomplish in the same amount of time. Try Smartsheet for free, today.
Barcode allows you to show data in a visual format that can easily be read by machines.
I am sure you have seen barcodes hundreds of times on products, including from grocery to clothing.
In this tutorial, I will show you how to add a barcode font in Excel so that you can insert barcodes in your worksheet.
Something as shown below:

Excel allows you to format cells as barcodes, which can be extremely useful, especially in the inventory management.
This way, you can create a product catalog with all barcodes, print product UPC codes, or track items easily.
While there is no in-built way in Excel to convert values to barcodes, you can easily do that using the Barcode font.
Let’s see how to so this.
Download and Install the Code 39 Barcode Font
In order to be able to use barcodes in Excel, you need to download a barcode font and install it first.
The most frequently used font is Code 39, and we will use it in examples.
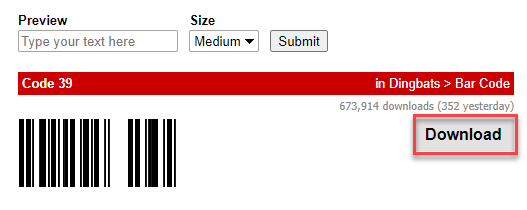
You can download the Code 39 font from various free sites for fonts downloading. We did it from Dafont (https://www.dafont.com/search.php?q=code+39).
Just click on the Download button next to the Code 39 font.
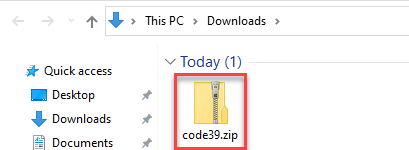
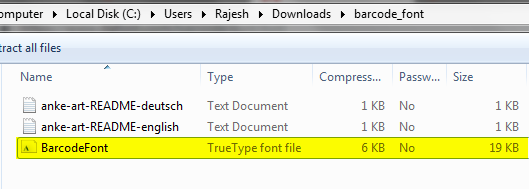
The font will be downloaded in a ZIP folder in your Downloads folder (or wherever you download your files), as a .TTF file (TrueType font).
Below are the steps to install the Barcode font on your system so it’s also available in Excel:
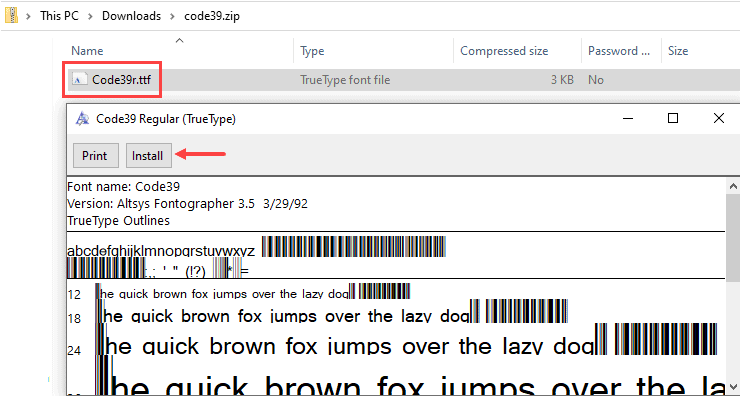
- Double-click the ZIP folder of the Code 39 font (that you downloaded from the above link)
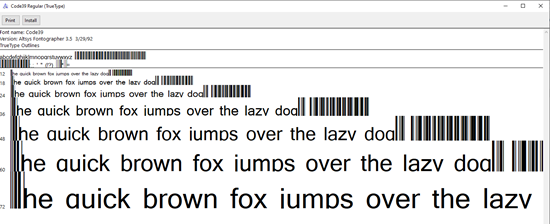
- Double-click the .TTF file (when you open a file, you can see the preview of the font)
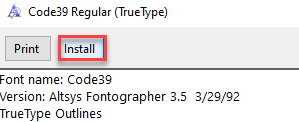
- Click on Install. This will install the font on your system
- Close the dilaog box
Now, the font is installed on your computer and you can use it in applications such as MS Excel.
In case you already have a file open, you should save and then reopen it to be able to see it in the barcode font.
If you’re wondering why this is called Code39, that’s because it generates a barcode that has five bars and four spaces (so a total of 9). And three of these nine bars would have more width, hence the 3 in 39.
Creating Barcodes in Excel
Now that the barcode font is installed on your system, let’s see how to use it to create barcodes in Excel.
Converting Cell Format to Text
Before I show you how to convert numbers or alphanumeric characters into barcode, you need to know an important thing.
The cells that has the numbers (that you want to convert to barcodes) need to be in the text format.
Let me explain why this is important.
Excel, in its bid to be as helpful as possible, does some automatic number formatting by default. For example, if you enter 0001 in a cell, it will be converted into 1 (as Excel thinks the leading zeroes are useless).
Or if you enter a large number, say 123456789876, Excel will change it to 1.23457E+11.
But when you’re generating barcodes, you need the text or the number as is. You don’t want Excel to change it
So by converting cells format to text, you ensure that the numbers don’t get truncated or changed by Excel.
IMPORTANT: You need to change the cell format before putting the numbers into the cells for which you want the barcode. So make the cell format Text first, and then enter the numbers.
Here is how you can change the cell format to Text
- Select cells where you plan to have the numbers that you would convert to barcodes. In my example, I will select column A
- Click on General (Number Format) in the Number part of the Home tab
- Choose ‘Text’
Once you have formatted the cells, you can enter the values that needs to be converted to Barcodes.
In case you’re copying this data from somewhere, make sure to paste it as values only (so it doesn’t mess up our Text formatting).
Enter the Values for Barcodes
Now that you have the column formatted as Text, you can enter the values that you converted to barcodes.
But I don’t want to convert the values to barcodes. Instead, I would like to have the value as is and it’s barcode in the adjacent cell.
For this, I will have to have the same values in the adjacent column as well.
This can be done easily.
Below are the steps to copy values from column A to column B.
- In the cell B2, enter: =A2;
- Drag the formula down until the last populated cell in column A (A6).
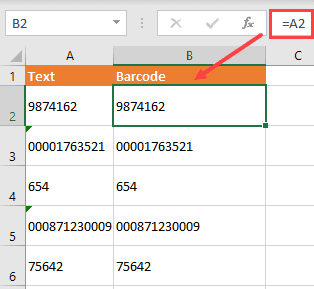
Don’t worry about the formatting on column B. Excel will make sure the formatting is same as that of cells in column A.
Formatting the Values to Convert into Barcodes
You can now format the values in column B as barcodes (font Code 39).
Below are the steps to do this:
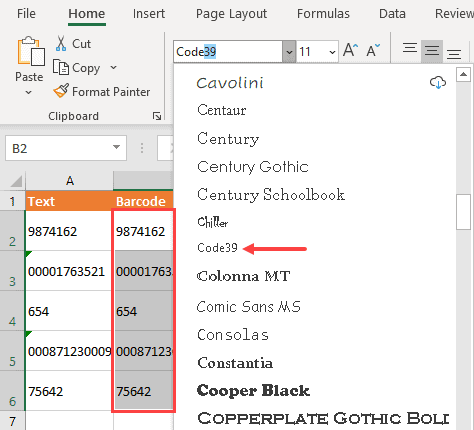
- Select all cells with values in column B
- Click on the Font menu in the Home tab
- Choose Code39
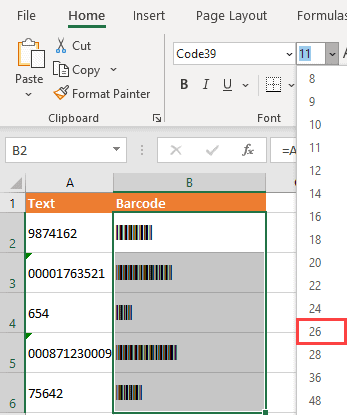
After this, you get all the values in column B formatted as barcodes. You can also increase the font size in order to make them more visible.
- Click on the font size menu in the Home tab
- Choose (for example) 26
As a result, you get a barcode for each text in column A.
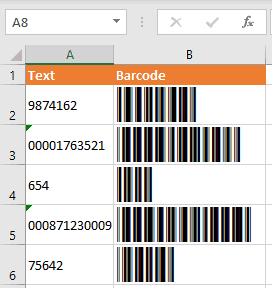
In our example, the barcode in column B is dynamic, which means that if the value in column A changes, the barcode would automatically update. In case you don’t want this, you can convert the formula in column B to values.
Note that when you install the font on your system, it doesn’t work just in Excel. It would also work on other office applications such as MS Word and MS PowerPoint.
Different Types of Barcodes
Code 39 is one of the easiest barcode font to use and includes both numbers and letters.
This type displays each character as five bars and four spaces, while three bars are wider than the others. That’s why it got the name 39.
Apart from this type, you probably heard of other barcodes, such as Code 128 (similar to 39, usually used for shipping), or UPC/EAN (used for product barcodes).
You can also install and use other barcodes in Excel similar to Code 39.
If you’re the curious type, here is some more information on different types of barcodes.
- Code 128: It is generally used for shipping and supply chain labels. In comparison with Code 39, the barcodes of Code 128 are denser and are usually used for container and pallet levels in the supply chain. It can also use the full ASCII character set, which Code39 can only use alphanumeric characters.
- UPC/EAN: UPC stands for Universal Product Code, EAN for European Article Numbering. This is a widely used barcode that can be found in items in-store and at the point of sale. The character set in UPC is restricted to 12 characters only.
- UPC-E: This is a simpler version of UPC, which was developed for smaller packages where the full 12 characters barcode of UPC won’t fit. This is restricted to 6 digits, where the leading and trailing zeroes are omitted.
- QR: QR stands for Quick Response and is used to open a website or app when you scan it with a mobile phone camera. You will often find this as a printed code where you can use it to make payments or avail discounts.
- I2of5: It stands for (Interleaved 2 of 5), where 2 out of every five bars are wide. It is a high-density barcode that supports numeric characters. It is a two-row barcode that’s used on 35 mm film rolls, and to label cartons.
- Postnet: It stands for Postal Numeric Encoding Technique and was used by the U.S. Postal Service. It can encode numeric characters only.
- Intelligent Mail: This one is currently used by the U.S. Postal Service. It encodes up to 65 characters. Apart from the width of the bars and spaces between them, even the height and vertical location of these bars can be read and converted into information. It uses numeric characters.
Generating Random Barcode in Excel
Now that you know how to easily install the barcode font and use it to create barcodes from numbers and alphanumeric text strings, you can also use Excel to create random barcodes.
Suppose you want to generate a random list of 20 barcodes. You can do that using the RANDBETWEEN formula, where you specify the lower and the upper limit and it will give you random numbers between these two values.
For example, if you want to generate random numbers between 1 and 100, you can use the formula RANDBETWEEN(1,100) and enter it into 20 cells to get 20 random values.
Below are the steps to generate random barcodes:
- In a cell, enter the formula =RANDBETWEEN(1,100)
- Copy the formula and paste it for 20 cells (or however number of random barcodes you want)
- Copy the entire range of cells that have these random numbers, and copy it (use Control + C or right-click and then click on Copy)
- With the cells selected, right-click and then click on the Paste as Values icon
The above steps would generate a list of 20 random numbers and then we have converted these to values (as RANDBETWEEN is a volatile formula and would other keep on updating).
Note that this can be done only with numbers. It’s a bit harder to generate random alphanumeric strings.
Now that you have random numbers, you can simply select these and apply the barcode formatting to to.
To do this:
- Select the cells that have the numbers
- Click the Home tab
- Select Code39 as the font
In case you want the numbers in a separate column and the barcodes in a separate column, you can first copy the numbers in the adjacent column and then apply the barcode font to it.
Third-Party Tools and Excel Barcode Add-Ins
While using the Excel barcode font technique works fine, there are other ways you can generate barcodes and then use in Excel.
There are some decent web based tools as well as applications that you can check out.
Some of the prominent bar codes generators include:
- Barcode.tec
- Cognex
- POSGuys
- Bartender Software
So this is how you can use the Code 39 font to easily generate barcodes in Excel.
I hope you found this tutorial useful,
Other Excel tutorials you may also like:
- How to Copy Formatting In Excel
- How to Set the Default Font in Excel (Windows and Mac)
- How To Set Column Width in Inches (or Centimeters) in Excel?
- How to Add Cell Borders in Excel
- What does Pound/Hash Symbol (####) Mean in Excel?
- How to Change Theme Colors in Excel?
See all How-To Articles
This tutorial demonstrates how to create barcodes in Excel and Google Sheets.
Add Barcode Font in Excel
In Excel, you can format cells as barcodes which can be very useful, especially in inventory management. For example, you can create a product catalog with all barcodes, print product UPC codes, or track items easily. To use barcodes in Excel, you need a barcode font installed. Code 39 is the most frequently used font. To download it, follow these steps:
- You can download Code 39 from several sources. Try this one.
- After opening this link, choose Code 39 on the page and click the Download button.
- The font is downloaded as a ZIP folder to your Downloads. Unzip it to get the TTF (true to font) file.
- Then, double-click on the TTF file. You can see a preview of the font.
- To install the barcode font, in the Font Preview window, click on Install.
As a result, the barcode font is installed on your computer. To see it listed in your fonts, you may need to reopen Excel.
Create Barcodes in Excel
- Once you have a barcode font installed, you are ready to create barcodes from a list of numbers. For example, see the list below in Column A. Let’s create barcodes from those numbers in Column B. First, be sure that all values from Column A are formatted as text, in order to avoid numbers being condensed.
- To format values from Column A, select those cells and in the Ribbon, go to Home > Number. Select Text from the drop-down list.
(If you skip this step, Excel omits leading zeros, or shortens large numbers.)
- Now, copy the values from Column A to Column B. To do that, in cell B2 enter =A2 and then, drag the formula down to the last populated cell in the column (B6).
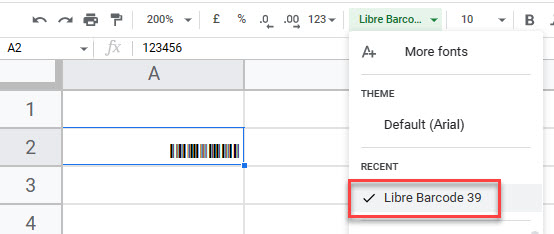
- Then, select all cells with values in Column B (B2:B6) and in the Ribbon, go to Home > Font. Select Code 39 from the drop-down list.

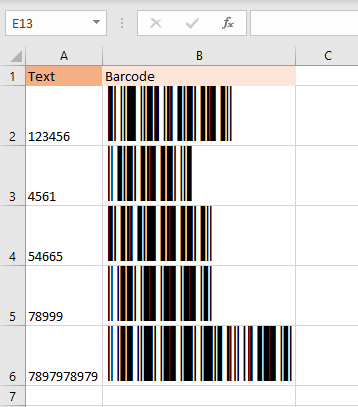
- Now all values in Column B are formatted as barcodes. Make barcodes more visible by increasing the font size.
You may already have the values you need for your barcodes. If not, consider using the RAND Function or Rnd in VBA to generate random numbers. Or, start with a string of numbers at the desired length and generate all permutations.
Create Barcodes in Google Sheets
In Google Sheets, you can create barcodes exactly the same way. Once you install the font, it’s also available in Google Sheets under the name Libre Barcode 39.
We begin our journey by entering three values into our spreadsheet:
- 1 digit for Type
- 5 digits for Manufacturer
- 5 digits for Product

Upon entering the above values, the barcode is generated.

Like any good magic trick, it looks complex but it’s really quite simple once you understand it.
(click any of the following images for a larger view)
Main Parts of a Barcode
The Guards
The highlighted areas below are known as the “guards”. These are fixed in design and do not change with different products. The guards serve as borders for the scanner to know where the start and endpoints of the relevant information are located.

Type of Barcode
The left-most value defines the type of barcode.

The values seen here are defined as:
- 0 = Standard
- 2 = Weighed Items
- 3 = Pharmacy
- 5 = Coupons
Manufacturer Code
The left-set of 5 digits represent the manufacturer code.

Product Code
The right-set of 5 digits represent the product code.

Modulo Check Character
The right-most value is automatically generated. This is known as the Modulo Check Character.

This value is generated using the formula below.
3 × (1 + 3 + 5 + 7 + 9 + 11) + (2 + 4 + 6 + 8 + 10)The values in the parentheses are the digit positions for the 11 numbers as read from left to right.
Using the above example, the formula would appear as follows:
3 × (5 + 0 + 6 + 6 + 0 + 1) + (9 + 0 + 7 + 5 + 1)This would evaluate to 76.
We then subtract that value from the next highest multiple of 10, in this case, 80, giving us a value of 4.
80 – 76 = 4Generating the Black Bars
The black lines are generated from the two sets of numbers that define the manufacturer and the product.
If we look closely, we can see that each number is defined by 7 thin bars (we’ll call them “tracks”.)

Each of the 7 “tracks” shadings is defined by a corresponding 0 (zero) or 1 in that track. If the track is 1, the track is filled with the color black. If the track is 0, then the track is left white.
The table below lists the combinations of 1’s and 0’s for the values of 0 through 9. There is a separate set of code combinations for the left side (manufacturer) and the right side (product).

If you look closely, you’ll notice that the right side of 1’s and 0’s as an inversion of the left side of 1’s and 0’s.

Returning to our example from above; a value of 9 on the left side (manufacturer) is represented by the 0/1 sequence of 0001011.

The Complete Package
The below image (courtesy of In One Lesson entitled “How Barcodes Work”) shows how all of the components fit together.

Creating the Barcodes in Excel
Let’s break the worksheet into its components to see exactly which Excel features control which parts of the barcode result.
Named Ranges
If we select the leftmost value (the barcode type), we see that the cell is referencing a named range called “typeNumber” (cell B3).

The manufacturer code (left set of 5 digits) has each value contained in a single, merged cell. Each cell is referencing a named range called “leftNumber” (cell B5).

The product code (right set of 5 digits) has each value contained in a single, merged cell. Each cell is referencing a named range called “rightNumber” (cell B7).

Text Functions
Each of the values in the manufacturer’s code is using a text function to extract a single character from the 5-digit value stored in “leftNumber”.
These functions are as follows (reading from left to right):
- Position 1 – LEFT(leftNumber)
- Position 2 – MID(leftNumber, 2, 1)
- Position 3 – MID(leftNumber, 3, 1)
- Position 4 – MID(leftNumber, 3, 1)
- Position 5 – RIGHT(leftNumber)
Each of the values in the product’s code is using a text function to extract a single character from the 5-digit value stored in “rightNumber”.
These functions are as follows (reading from left to right):
- Position 1 – LEFT(rightNumber)
- Position 2 – MID(rightNumber, 2, 1)
- Position 3 – MID(rightNumber, 3, 1)
- Position 4 – MID(rightNumber, 3, 1)
- Position 5 – RIGHT(rightNumber)
Modulo Check Character Calculation
The Modulo Check Character is referencing a named range called “moduloCheck” (cell B9). These rows are hidden, so you’ll need to unhide the rows to see the “moduloCheck” cell and its related formula.
The formula behind the modulo check is the same as the one stated earlier:
3 × (1 + 3 + 5 + 7 + 9 + 11) + (2 + 4 + 6 + 8 + 10)(Remember – the numbers in the parentheses represent number positions as read from left to right)
When translated into Excel, the formula looks like so…
=MOD(10 - MOD((3 * (B3 + MID(B5, 2, 1) + MID(B5, 4, 1) + LEFT(B7) + MID(B7, 3, 1) + RIGHT(B7)) + (LEFT(B5) + MID(B5, 3, 1) + RIGHT(B5) + MID(B7, 2, 1) + MID(B7, 4, 1))), 10), 10)I know, it looks insane, but if you study it closely it’s performing the following steps:
- Individual number extractions using the LEFT, MID, and RIGHT functions
- Add the left 5 and right 5 values
- Multiply the left result by 3
- Add the result to the right side
- Use a modulo function to divide the result by 10 and retain only the remainder
- Subtract the result from 10
- Use a modulo function to divide the result by 10 and retain only the remainder
The reason for the second modulo function is to account for results where the remainder would be zero. If that occurs, Step 6 would be 10 – 0 which results in 10, and we can’t return a double-digit result to the Modulo Check Character position.
Generating the Black Bars (Conditional Formatting)
Notice that all the columns that contain the visualization of the barcode are very narrow.

A cell in this range will either be black or white. The color is predicated on the presence of a 1 (for black) or a 0 (for white).

A Conditional Formatting rule has been set to have a cell “look” at its respective value and set the cell to black if a 1 is present or white if a 0 is present. If we select cell H12 and select Home (tab) -> Styles (group) -> Conditional Formatting -> Manage Rules, we see the rules for H12 and range of examination for the rest of the barcode color cells.

The alteration of the 1’s and 0’s is controlled by VBA code that we will examine in just a moment.
Since the Left, Right, and Center guards are fixed, those are manually colored and are not dependent on Conditional Formatting.
A Closer Look
Examining the first few digits of our barcode (5 90067 65011 4), we can consult the binary conversion chart from earlier and note the following binary patterns:
- 5 = 0110001
- 9 = 0001011
- 0 = 0001101
- 6 = 0101111
The 1/0 patterns can be seen in the sets of 7 below.

Peeking Behind the Curtain (a Bit of VBA Automation)
Decoding the user-entered values into sets of 1’s and 0’s is handled by some clever VBA code.
To see the code, press the key combination ALT-F11, then double-click the “Module 1” module sheet in the Project Explorer windows (left).
If you are interested in learning VBA, consider our VBA course titled “Unlock Excel VBA & Excel Macros”.

Although we won’t be dissecting this code line for line, let’s generalize the major steps.
Generating the Binary Code for the Left and Right Sets of Numbers
The code begins by creating 20 variables, 10 for the left set of numbers 1 through 9, and 10 for the right set of numbers 1 through 9.

Each of the variables is then populated with a set of 7 1/0 combinations that correspond to our number-to-binary table from earlier.

Converting the Numbers to Binary
Next, a loop routine parses each of the user-entered values to determine its value of 0 to 9. A Select Case statement will pick the associated array of 1’s and 0’s from the previous step and store the results in a new memory array.
This is done for the left set of values (manufacturer), then again for the right set of values (product).

Once the final arrays have been assembled, those arrays are copied to the worksheet. These are discovered by virtue of Named Ranges called “leftArray” and “rightArray”.


The bars height is achieved by stretching the height of the row containing the 1’s and 0’s.
Adding a Touch of Dynamism
(that’s a fancy word)
Because we want the barcode to update when new values are entered for the type/manufacturer/product cells, a bit of code is entered to detect when one of these three cells have been changed.
This code has two special properties:
- The code is stored on the codesheet for the sheet holding the visualization named “Barcode”.
- The code is placed in a special type of procedure called an Event-Driven Procedure; in this case, an event called Worksheet_Change.

Each line monitors one of the three entry cells as named “typeNumber”, “leftNumber”, and “rightNumber”. If an update to any of these three cells is detected, the CreateBarcode subprocedure is called (located on the previously examined “Module 1” sheet) and executed.

A Bit of Polish with Some Data Validation and VBA Error Checking
Data Validation
To ensure a user selects only 1 of the valid 4 Type codes, and that the user always enters exactly 5 numbers for the manufacturer code and product code, Data Validation has been applied to the three data entry cells.
For the Type cell (B3), a validation List allowing the numbers 0, 2, 3, or 5 has been applied.

For the Manufacturer and Product cells (B5 and B7 respectively), a Text Length requirement of exactly 5 characters has been applied.

Keep in mind, this would allow for letters and punctuation to be entered by the user, effectively sending this down the hole of failure.
For more robust data validation, we could create a custom validation formula like the following to restrict only numbers and exactly 5 of those numbers.
For Manufacturer (cell B5):
=AND(LEN(leftNumber) = 5, ISNUMBER(VALUE(leftNumber)))
For Product (cell B7):
=AND(LEN(rightNumber) = 5, ISNUMBER(VALUE(rightNumber)))
VBA Error Checking
If an error were to be encountered during execution of the “CreateBarcode” subprocedure, we can include an error handling routine to inform the user than an error has occurred and to check their entered values.
We can place an instruction directly after our variable declarations to tell the system to skip to the end of the code and execute the error-handling routine in the event of an error.

If the error-handling routine is invoked, we can display a message box informing the user of some malfunction and to let them try a new code set.

The error would appear as follows.

Download Different Versions of the Excel Barcode Generator
Thanks to our community members we have different versions you can download:
Download Pete’s original version with Excel VBA HERE.
Barcode generator with INDEX & MATCH from Max Vitzliputzli: Download HERE.
Barcodes with VLOOKUP from David Barahona: Download HERE.
and finally barcodes in Excel with OFFSET from Boko Moko: Download HERE.
MANY THANKS to our contributors for sharing their versions and inspiring us to learn from one another.
Published on: February 6, 2020
Last modified: March 17, 2023


Leila Gharani
I’m a 5x Microsoft MVP with over 15 years of experience implementing and professionals on Management Information Systems of different sizes and nature.
My background is Masters in Economics, Economist, Consultant, Oracle HFM Accounting Systems Expert, SAP BW Project Manager. My passion is teaching, experimenting and sharing. I am also addicted to learning and enjoy taking online courses on a variety of topics.
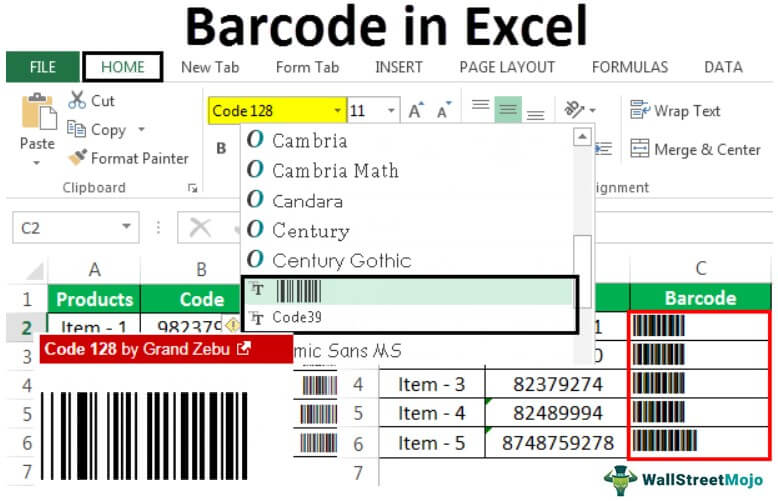
Barcodes, in general, are codes that can only be readable by machines. They are lines and bars which are codes for characters. Barcodes in Excel are fonts that represent the characters we provide. Although in Excel, by default, fonts are not available for barcodes, we need to install a separate font to use barcodes in Excel from a third party.
For example, you may easily create a product catalog with all barcodes, track items, or print UPC codes.
Barcode is a machine-readable code in a predefined format of dark bars and white spaces affixed to retail stores, identification cards, etc., to identify a particular product, number, person, etc. It is an approach to encoding the information in a visual pattern that a machine can read. We can create a barcode in Excel using the barcode font from the font list. To get the different Excel barcode font options, we should install them from the dafont website.
Table of contents
- Excel Barcode
- How to Generate a Barcode in Excel? (Step-by-Step)
- Examples
- Example #1 – Creating barcode using the “Code39” barcode Font
- Example #2 – Creating barcode using the “Barcode” Font
- Example #3 – Creating barcode using the “Code128” Font
- Things to Remember
- Recommended Articles
How to Generate a Barcode in Excel? (Step-by-Step)
Let us follow the below steps.
- Let us see how to generate barcodes in Excel for different codes, including numbers and letters.

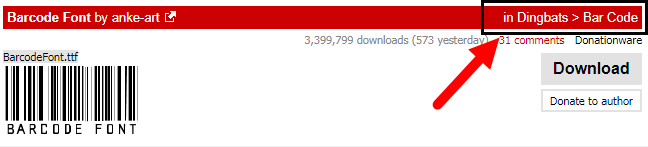
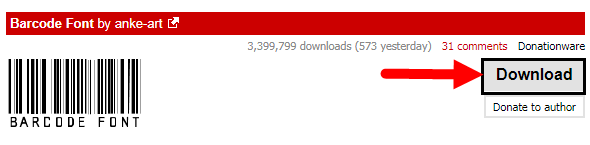
- Initially, we need to download the barcode font list by clicking the Download option, as shown in the above picture. Then, we need to open the folder that got downloaded. And can find the link to install the barcode fonts as shown below.

- We can also access different barcodes by clicking on the barcode, as shown below.
- When we click for the other barcode options, as shown in the above figure, we can see the different fonts available for barcodes.

Examples
You can download this Barcode Excel template here – Barcode Excel template
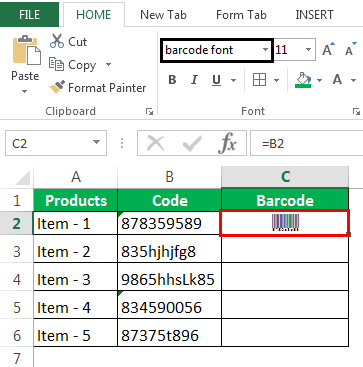
Example #1 – Creating a barcode using the “Code39” barcode Font
Let us see how to generate a barcode in Excel using the “Code39” font by converting a few values into a barcode.
Code39 is a common barcode used for labels such as inventory, badges, and industrial applications. This character consists of numbers 0-9, upper case letters A-Z, the space character, and a few symbols like $ / + %.
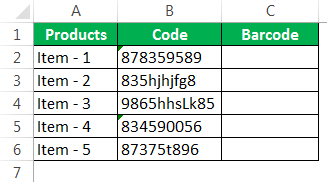
Assume the below numbers are quoted for items/products as below.
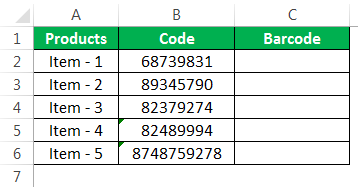
Above is the list of items in the retail store and their code as per the retail owner to create the barcode to scan it. The code consists of numbers that need to be designed for the barcode. We need to ensure the code format is in “Text.”
As we generate a barcode per the Code39 font, we should download the font from the web link we discussed below.

Install the “Code39” from the above link.
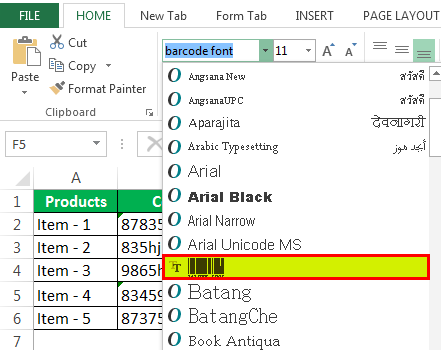
We can see the font style of “Code39” in the font list. After installing it, we need to close and reopen the Excel. As a result, we can see the list shown below.
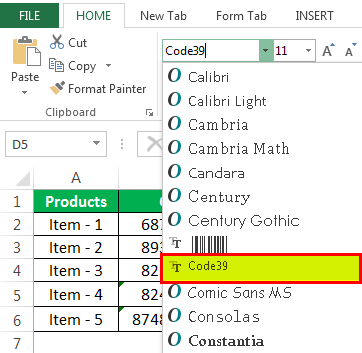
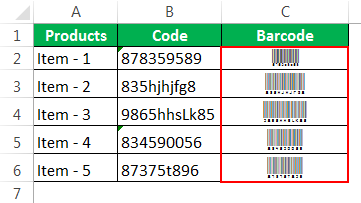
Now, we can link the “Barcode” column with the “Code” column and then change the font of the “Bar Code” column to “Code39”.
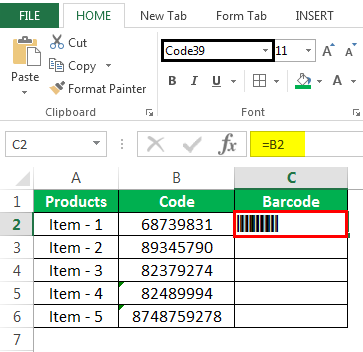
We can visualize the barcodes as given below:
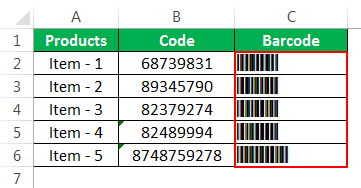
Here, we can observe the barcodes for the code number of the products. Also, we can increase the barcode size as per our convenience for better visualization by increasing the font size.
Example #2 – Creating a barcode using the “Barcode” Font
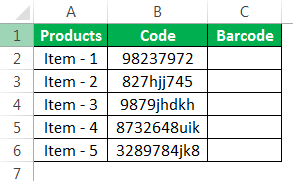
Let us see how to generate a barcode using the “Barcode” font by converting a few values into a barcode.
Assume that we have got the items list for the shop. These items have some code, and we need to convert the code into a barcode. But, here, we have the code that includes both numeric and alphabetical, as below.
We need to ensure that the codes are formatted in text format. And we must download the font “Barcode” from the dafont website and install the same as below.
When we install the barcode font, we can observe that this will reflect in the font list of the Excel sheet.
We will link the barcode cell with the code cell and convert it into a barcode by selecting the “Barcode” font from the font list in Excel.
We can visualize the barcodes as follows:
Here, we can observe the barcodes, which also have the number at the bottom of the code, which is alpha-numeric. We can increase the barcode size for better visualization by increasing the font size at our convenience.
Example #3 – Creating barcode using the “Code128” Font
“Code128” is another font for barcode conversion in Excel, a high-density linear symbology that encodes numbers, text, and the entire 128 ASCII character set (from ASCII 0 to ASCII 128). Code128 contains 106 different barcode patterns depending on which character sets are used.
Assume that we have the code of the items for the retail store, which is an alphanumeric as below:
Next, we need to download the “Code128” font from the “dafont” website and install the same.

We can see “Code128” appears in the font list of Excel sheets, which we can use to convert the code into a barcode.
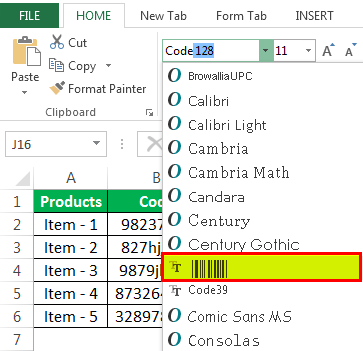
As shown in the above picture, we must change the font of the code to “Code 128,” which is already installed on our device.
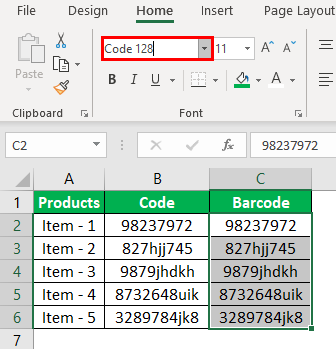
The result will be the code’s barcode, as shown below.
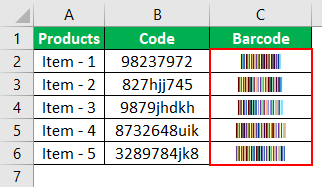
The above barcodes are “Code 128” font barcodes used for scanning purposes. The barcode size can be increased by increasing the font size for better visualization.
Things to Remember
- Barcode font should be downloaded and installed from web sources like “dafont,” “automation,” etc.
- Code39 does not consider lowercase characters when we download and install it through “dafont,” but it is easily encoded with extended fonts in the IDAutomation Code 39 Font Package.
- Barcodes are used in several industrial, retail stores, medical centers, and many others, playing a key role in quickly scanning the product with a certain code.
- The bars for different types of barcodes will vary in terms of the width of the bar and any other width in spaces between bars. But it may not be the same as different barcode fonts.
- There are many other barcode fonts available in different web sources. Therefore, it gives us many options to choose from as per our requirements.
- Code39 barcode is sometimes also referred to as Code 3 of 9. It is the most used barcode among other barcode fonts and is scannable by every barcode scanner. It can encode 26 upper-case letters, 10 digits, and 7 special characters.
- Code 128 barcode consists of data digits, a start character, a check character, and a stop character. It contains 106 different barcode patterns.
Recommended Articles
This article is a guide to Barcode in Excel. We discuss how to generate a barcode in Excel, including numbers, letters, and code fonts and a downloadable Excel template. You may learn more about Excel from the following articles: –
- Excel Column to Number
- VBA Remove Duplicates
- Add Months to Date in Excel
- Forecast Excel Formula