
Содержание
- Создание с нуля приложения на основе холста из данных Excel
- Предварительные условия
- Открытие пустого приложения
- Подключиться к данным
- Создание экрана просмотра
- Создание экрана изменений
- Добавление и переименование экранов
- Настройка значков на экране просмотра
- Настройка значков на экране редактирования
- Тестирование приложения
- Дальнейшие шаги
- Excel and VBA Creating an Excel Application
- Similar presentations
- Presentation on theme: «Excel and VBA Creating an Excel Application»— Presentation transcript:
Создание с нуля приложения на основе холста из данных Excel
Создайте с нуля собственное приложение на основе холста, используя данные Excel в табличном формате, и при необходимости добавьте в него данные из других источников. Следуя указаниям в этом руководстве, вы создадите приложение с двумя экранами. На одном экране пользователи смогут просматривать набор записей. На другом экране пользователи могут создать запись, обновить одно или несколько полей в записи или удалить всю запись. Этот подход требует больше времени по сравнению с созданием базового приложения из Excel, но позволяет опытным пользователям создавать приложения в соответствии со своими потребностями.
Предварительные условия
Чтобы точно выполнить действия из этого руководства, создайте файл Excel на основе следующего примера данных.
Скопируйте эти данные и вставьте их в файл Excel.
| StartDay | Время начала | Доброволец | Резервное копирование |
|---|---|---|---|
| Суббота | 10:00–12:00 | Васкес (Vasquez) | Кумаширо (Kumashiro) |
| Суббота | 12:00–14:00 | Ice | Сингхал (Singhal) |
| Суббота | 14:00–16:00 | Мик (Myk) | Мюллер (Mueller) |
| Воскресенье | 10:00–12:00 | Ли (Li) | Адамс (Adams) |
| Воскресенье | 12:00–14:00 | Сингх (Singh) | Морган (Morgan) |
| Воскресенье | 14:00–16:00 | Батье (Batye) | Нгуен (Nguyen) |
Отформатируйте данные в виде таблицы под названием Schedule, чтобы приложение Power Apps могло проанализировать их.
Дополнительные сведения см. в разделе Форматирование таблицы в Excel.
Сохраните файл под именем eventsignup.xls, затем закройте его и отправьте в учетную запись облачного хранилища, например OneDrive.
Вы можете использовать собственный файл Excel и ознакомиться только с общими понятиями в этом учебнике. Тем не менее данные в файле Excel должны быть отформатированы в виде таблицы. Дополнительные сведения см. в разделе Форматирование таблицы в Excel.
Открытие пустого приложения
Создайте пустое приложение на основе холста с макетом Телефон.
Подключиться к данным
В центре экрана выберите подключение к данным.
На панели Данные выберите подключение к нужному облачному хранилищу, если оно отображается. В противном случае выполните следующие действия для добавления подключения:
- Щелкните Новое подключение, а затем — плитку облачной учетной записи и выберите Создать.
- Если появится запрос, предоставьте учетные данные для этой учетной записи.
В разделе выбора файла Excel вставьте строку eventsignup или введите ее первые буквы, чтобы отфильтровать список, а затем выберите загруженный файл.
В разделе выбора таблицы установите флажок Расписание и щелкните Подключиться.
Закройте область Данные, нажав значок закрытия (X) в правом верхнем углу.
Создание экрана просмотра
На вкладке Главная щелкните стрелку вниз рядом с элементом Новый экран, чтобы открыть список типов экрана, и выберите Список.
Экран добавляется с несколькими элементами управления по умолчанию, в том числе с полем поиска и элементом управления Gallery (Коллекция). Коллекция занимает размер всего экрана под полем поиска.
В верхней части нового экрана выберите элемент управления Label (Метка), а затем замените текст [Title] строкой View records (Просмотр записей).

На панели навигации слева выберите BrowseGallery1.
Вокруг коллекции появится рамка выделения с маркерами захвата.
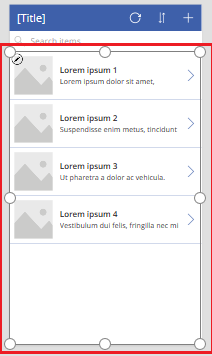
На вкладке Свойства на панели справа щелкните стрелку вниз в меню Макет.
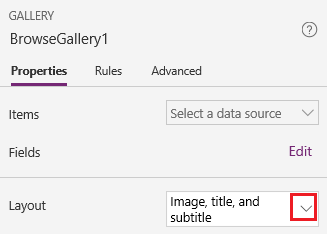
Выберите Заголовок, подзаголовок и текст.
В строке формулы замените CustomGallerySample на Schedule, а также замените оба экземпляра SampleText на Volunteer.
Справа от строки формулы щелкните стрелку вниз, а затем выберите Форматирование текста.
Формула соответствует следующему примеру:
На вкладке Свойства на панели справа выберите Изменить рядом с меткой Поля.
В поле Title2 выберите Volunteer, в поле Subtitle2 выберите StartDay, а в поле Body1 выберите StartTime.
Закройте область Данные, нажав значок закрытия (X) в правом верхнем углу.
Пользователи могут сортировать и фильтровать коллекции по имени волонтера, используя функции формулы SortByColumns и Search.
- Когда пользователь вводит в поле поиска хотя бы одну букву, в коллекции отображаются только те записи, для которых поле Volunteer содержится эта буква.
- Когда пользователь нажимает кнопку сортировки (между кнопкой «Обновить» и кнопкой со знаком «плюс» в строке заголовка), записи в коллекции отображаются в возрастающем или убывающем порядке (в зависимости от того, сколько раз пользователь нажал на кнопку) на основе значения поля Volunteer.
Дополнительные сведения об этих и других функциях приведены в справочнике формул.
Создание экрана изменений
На вкладке Главная щелкните стрелку вниз рядом с элементом Новый экран и выберите Форма.
На левой панели навигации выберите EditForm1.
На вкладке Свойства на панели справа щелкните стрелку вниз рядом с элементом Источник данных и в появившемся списке выберите Расписание.
В указанном источнике данных выберите Изменить поля.
В области Поля выберите Добавить поле, установите флажок для каждого поля и выберите Добавить.
Щелкните стрелку рядом с именем каждого поля, чтобы свернуть его, а затем перетащите поле Volunteer вверх, чтобы оно появилось в верхней части списка полей.
Закройте область Поля, нажав значок закрытия (X) в правом верхнем углу.
Установите это выражение в качестве значения свойства Item, скопировав и вставив его в строку формул или набрав с помощью клавиатуры:
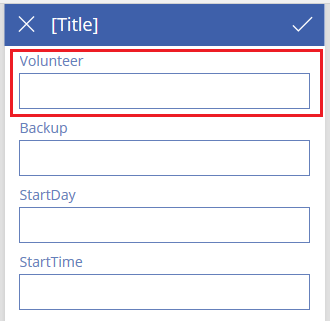
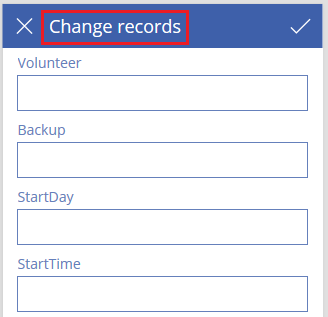
В верхней части экрана выберите элемент управления Метка, а затем замените текст [Title] строкой Изменение записей.
Добавление и переименование экранов
На панели навигации слева нажмите на кнопку с многоточием (. ) для экрана Screen1 и выберите действие Удалить.
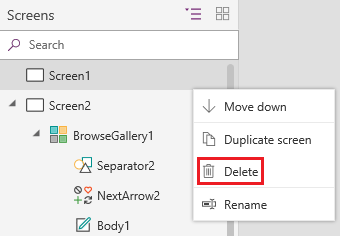
Нажмите на кнопку с многоточием (. ) для экрана Screen2, выберите действие Переименовать и введите для него имя ViewScreen.
Нажмите на кнопку с многоточием (. ) для экрана Screen3, выберите действие Переименовать и введите для него имя ChangeScreen.
Настройка значков на экране просмотра
В верхней части экрана ViewScreen щелкните значок с кольцевой стрелкой.
Для свойства OnSelect этой кнопки введите следующую формулу:
Когда пользователь щелкнет этот значок, данные из таблицы Schedule будут заново извлечены из файла Excel.
Дополнительные сведения об этих и других функциях приведены в справочнике по формулам.
В правом верхнем углу экрана ViewScreen щелкните значок «плюс».

Для свойства OnSelect этой кнопки введите следующую формулу:
Когда пользователь щелкнет этот значок, откроется экран ChangeScreen с пустыми полями для быстрого создания записи.
Щелкните стрелку вправо рядом с первой записью в коллекции.
![]()
Задайте для свойства OnSelect этой стрелки следующую формулу:
EditForm(EditForm1); Navigate(ChangeScreen, ScreenTransition.None)
Когда пользователь щелкнет этот значок, отобразится экран ChangeScreen с информацией из выбранной записи в каждом поле, что позволит легко изменить или удалить эту запись.
Настройка значков на экране редактирования
На экране ChangeScreen щелкните значок «X» в левом верхнем углу.
Для свойства OnSelect этой кнопки введите следующую формулу:
Когда пользователь щелкнет этот значок, отменятся все внесенные на этом экране изменения и отобразится экран просмотра.
В правом верхнем углу выберите значок галочки.
Задайте для свойства OnSelect этой галочки следующую формулу:
SubmitForm(EditForm1); Navigate(ViewScreen, ScreenTransition.None)
Когда пользователь щелкнет этот значок, сохранятся все внесенные на этом экране изменения и отобразится экран просмотра.
На вкладке Вставка выберите Значки, а затем — значок мусорной корзины.
Задайте для свойства Color этого значка значение White и переместите его так, чтобы он располагался рядом со значком галочки.
Для свойства Visible значка мусорной корзины введите следующую формулу:
Этот значок будет отображаться, только если форма находится в состоянии Изменить, а не в состоянии Создать.
Для свойства OnSelect значка мусорной корзины введите следующую формулу:
Remove(Schedule, BrowseGallery1.Selected); Navigate(ViewScreen, ScreenTransition.None)
Когда пользователь щелкнет этот значок, выбранная запись будет удалена из источника данных и откроется экран просмотра.
Тестирование приложения
Выберите экран ViewScreen, откройте режим предварительного просмотра, нажав клавишу F5 или щелкнув значок Предварительный просмотр в правом верхнем углу.

Введите или вставьте одну или несколько букв в поле поиска, чтобы отфильтровать список по имени добровольца.
Выберите значок сортировки один или более раз, чтобы отсортировать данные по имени добровольца по возрастанию или по убыванию.
Измените значения полей в новой записи и сохраните эти изменения.
Измените значения полей в этой же записи и отмените эти изменения.
Удалите запись, которую вы добавили ранее.
Закройте режим предварительного просмотра, нажав клавишу Esc или выбрав значок закрытия в правом верхнем углу.
Дальнейшие шаги
- Нажмите клавиши CTRL+S, чтобы сохранить приложение в облаке. После этого его можно будет запускать с других устройств.
- Поделитесь приложением, чтобы другие пользователи могли с ним работать.
- См. дополнительные сведения о таких функциях, как Patch, которые позволяют управлять данными без необходимости создавать стандартную форму.
- Свяжите это приложение с решением, чтобы можно было, например, развернуть его в другой среде или опубликовать его в AppSource.
Каковы ваши предпочтения в отношении языка документации? Пройдите краткий опрос (обратите внимание, что этот опрос представлен на английском языке).
Опрос займет около семи минут. Личные данные не собираются (заявление о конфиденциальности).
Источник
Excel and VBA Creating an Excel Application
Published byAlbert Davis Modified over 7 years ago
Similar presentations
Presentation on theme: «Excel and VBA Creating an Excel Application»— Presentation transcript:
1 Excel and VBA Creating an Excel Application
Complete a software development life cycle Use the Excel Object Model in VBA code Create forms Use financial functions Create function procedures Initialize, display, and close forms Create or search a list in a worksheet Prepare an application for distribution In chapter 2, Creating an Excel application you will explore the software development life cycle (SDLC) to create an application in Excel. Also, you will create forms, use financial functions, create function procedures, create a list, and prepare an application for distribution. Copyright © 2012 Pearson Education, Inc. Publishing as Prentice Hall.
2 Completing a Software Development Life Cycle
Software developers use the software development life cycle (SDLC) to develop applications. Steps in the SDLC include: 1. Plan the application. 2. Design the user interface. 3. Write code to handle events. 4. Run and test the application to verify that it produces the intended results. It is good practice to follow a structured application development process. The software development life cycle (SDLC) is a structured process for planning, designing, testing, and implementing an application. Copyright © 2012 Pearson Education, Inc. Publishing as Prentice Hall.
3 Step 1: Plan the Application
What information to obtain from the user? How to manage and store user input? How the applications act upon this information (calculations, data storage, and results)? How to return the program results to the user? Define the User Inputs and Outputs? Addressing these questions helps you design a custom application. Although the applications you customize in this chapter are relatively simple, getting into the practice of following the SDLC will help you as you learn to design more complex applications. Copyright © 2012 Pearson Education, Inc. Publishing as Prentice Hall.
4 Step 2: Design the User Interface
The user interface includes all the controls that provide access to your application: Forms for entering and editing data Buttons for performing actions Navigating between worksheets Exiting the application When designing the user interface the developer will plan instructions for the user of the application, plan out any input forms necessary for data input and calculations, and display the calculated worksheets. Copyright © 2012 Pearson Education, Inc. Publishing as Prentice Hall.
5 Copyright © 2012 Pearson Education, Inc. Publishing as Prentice Hall.
Step 3: Write the Code Write the VBA code to handle the following: Procedures Functions Click events Input forms Change property attributes The third step in designing an application is writing the VBA code procedures that handle events and perform actions. The procedures created will associate each button’s Click event and, in the case of the form for entering data, the Change events for two controls. Copyright © 2012 Pearson Education, Inc. Publishing as Prentice Hall.
6 Step 4: Run and Test the Application
Test your applications before distributing them. Prepare test cases in which you define particular input values to enter. Determine if the application produces the expected output. When testing a custom application, check for the following: • Usability: the interface is intuitive and easy to use, controls are clearly labeled, and the flow of controls is easy to read • Accuracy: the calculations produce correct values based on input values entered • Protection: the application anticipates user events and protects the application from modification that adversely impacts its use Copyright © 2012 Pearson Education, Inc. Publishing as Prentice Hall.
7 Using the Excel Object Model in VBA Code
An object represents an element of the host application. In Excel, objects can include worksheets, cells, charts, or forms. The object model organizes all objects into an object hierarchy. A collection is a group of objects with similar characteristics and behaviors. The object model is a framework that organizes objects into a hierarchy. An object is an element, such as a worksheet cell, within a host application. A collection is a group of objects with similar characteristics and behaviors. Copyright © 2012 Pearson Education, Inc. Publishing as Prentice Hall.
8 Understanding Object Hierarchy
Indicate the worksheet (“Payment”) Indicate the workbook that contains the worksheet (“Loan Calculator.xlsx”) Indicate the Range (“B9”) Indicate the Application object to directly identify the workbook. Assume you are creating a VBA procedure that needs to obtain a value from the Payment worksheet. The worksheet is a member of the Worksheets collection. Therefore, you specify the Worksheets object with the worksheet object name enclosed in quotation marks within the parentheses. If you are working with two workbooks that both have a worksheet named Payment, you need to indicate which worksheet you want to manipulate, by indicating the name of the workbook. When you reference multiple objects in a hierarchy, the top-level object is referenced first. A period (dot) separates the object references. Copyright © 2012 Pearson Education, Inc. Publishing as Prentice Hall.
9 Manipulate Object Properties, Methods, and Events
Line 1 of the code in the example Code Window shows how to write code to change the value in a range (cell B5) in a specific worksheet (Payment) in a specific workbook (Loan Calculator). Line 2 of the code uses ActiveCell.Offset to move the active cell to the same row (0) and to the right one cell (1) and use the Activate method to activate that cell. Line 3 of the code uses ActiveCell.FormulaR1C1 to assign the content of the variable strFirst to the active cell. Line 4 of the code uses the Activate method to activate a specific worksheet (Customer Information). The last block of the code applies several Font property values (Bold, Color, Name, and Size) to a selected range at one time. Sample VBA code to manipulate properties Copyright © 2012 Pearson Education, Inc. Publishing as Prentice Hall.
10 Manipulate Object Properties, Methods, and Events
A property is an attribute of an object that defines one of the object’s characteristics such as size or color A method is an action that an object can perform. An event is an action occurring at run time that triggers a program instruction. To change an object’s characteristics, you can use an assignment statement to set the value of a property. The object reference and property name are separated by a period, and an equal sign assigns a value to the property. An example of a method, the Worksheet objects have an Activate method, which makes a specified worksheet the active sheet. Range objects have a Clear method, which clears all the cells in a range. Recall that VBA is an event-driven language in which program statements execute at run time to process information or perform actions in response to events. Copyright © 2012 Pearson Education, Inc. Publishing as Prentice Hall.
11 Copyright © 2012 Pearson Education, Inc. Publishing as Prentice Hall.
Creating Forms Add a UserForm object to an Excel workbook. Click Insert on the VBA menu bar, and then select UserForm. Set the form’s properties, such as Name and Caption. By default, a UserForm is given the name UserForm1 or another integer value if more than one form has been added to an application. Adding a UserForm to an application also opens the Control Toolbox so that you can add controls to your form. After you insert a new UserForm object, you should set the form’s properties. Most of the form properties control the appearance of the form. Copyright © 2012 Pearson Education, Inc. Publishing as Prentice Hall.
12 Copyright © 2012 Pearson Education, Inc. Publishing as Prentice Hall.
Creating Forms (Cont.) Add controls to Forms The Toolbox, contains the standard controls: Text boxes or buttons To add a control to a form, click a control icon in the Toolbox, then drag to create the control on the form. Common form controls include labels, text boxes, buttons, list boxes, check boxes, options buttons, and image controls. Each control provides specific functionality to a form. To add a control to a form, click a control icon in the Toolbox, and then drag to create the control on the form. Use the sizing handles to resize the control. You can also adjust the alignment, spacing, and appearance of the control using commands on the Format menu. Copyright © 2012 Pearson Education, Inc. Publishing as Prentice Hall.
13 Copyright © 2012 Pearson Education, Inc. Publishing as Prentice Hall.
Creating Forms (Cont.) An important property of all objects and controls is the Name property. Used to reference the object in the program code Example: cmdExit for a command button The Properties window is used to change the control’s properties. Displays the properties and current settings for the selected object The Name property is an object or control’s attribute with which you reference that object in code. You should have names long enough to be meaningful but short enough to be easily understood. The Modified Hungarian Notation is the most common standard for naming controls in Visual Basic. This convention precedes the name of each instance of a control with a three-character prefix to the control and a descriptive title for the control. The three-character prefix appears in lowercase, and the descriptive title starts with an uppercase character. In the example, cmdExit, lower case cmd represents the Command Button control and the Exit, represents the button name. Copyright © 2012 Pearson Education, Inc. Publishing as Prentice Hall.
14 Use Bound and Unbound Controls
A bound control is connected to a data source in the application. The data source can be a cell or a range of cells. An unbound control is not connected to data in the application. A bound control is connected to a data source in the host application. An unbound control is not connected to a data source in the host application. The ControlSource property is an attribute that defines the cell to which a control is bound. The RowSource property specifies items through a worksheet range that will appear in a list box or combo box at run time. Copyright © 2012 Pearson Education, Inc. Publishing as Prentice Hall.
15 Setting Other Control Properties
The Enabled property determines if a control can receive focus and if that control can respond to the user. The TabStop property determines whether a control receives focus when the Tab key is pressed. The TabIndex property determines the order in which a control receives the focus. The TextAlign property specifies the alignment of a caption appearing in a label. Setting Control Properties ensures that the Control functions correctly for the users and allows for the use of the Tab key for quick data entry. Copyright © 2012 Pearson Education, Inc. Publishing as Prentice Hall.
16 Using Financial Functions
Excel and VBA include a set of financial functions for performing calculations related to: Payments Investments Depreciation of assets By taking advantage of Excel and VBA functions, your custom application can perform virtually any task. Examples of VBA Financial functions include: IPmt, Pmt, PPmt calculates payments; NPV, PV calculates present value; Rate calculates an interest rate; and DDB, SLN, SYD calculates depreciation. Copyright © 2012 Pearson Education, Inc. Publishing as Prentice Hall.
17 Creating Function Procedures
A function procedure begins with the Function statement and concludes with the End Function statement. A function procedure returns a value back to the calling procedure. Functions can be used multiple times in an application. A calling procedure is a statement within a procedure that calls or executes a function. A function returns a value back to the calling procedure. Copyright © 2012 Pearson Education, Inc. Publishing as Prentice Hall.
18 Example Function Procedure
The Loan_Payment sub procedure is the main procedure. The procedure declares four variables. The procedure also displays input boxes to obtain the values from the user, and converts the data to values before storing the values in the declared variables. The procedure calls the function LoanPayment and also passes three pieces of data, curPrincipal, sngRate, and intTerm to the function. The function LoanPayment accepts the values into three arguments, Principal, Rate, and Term. The values in the three arguments are used to calculate the loan payment. The result is returned to the calling procedure and placed in curPayment. Copyright © 2012 Pearson Education, Inc. Publishing as Prentice Hall.
19 Insert Controls on a Worksheet
A worksheet control, such as a command button, is used to open the form and initialize the application. The first task is to insert a button on the worksheet that displays and initializes the user form. The second task is to edit the control and set properties. To insert a control, click the Developer tab, click Insert in the Controls group, and then click the icon for the type of control you want to insert. When you add a control from the Control Toolbox to an Excel worksheet, the control is in Design mode, which enables you to edit the control. You can also display the Properties window for a control in Design mode. Copyright © 2012 Pearson Education, Inc. Publishing as Prentice Hall.
20 Show, Hide, and Unload Forms
The form displays as a modal form. A modal form disables all other worksheet objects until the form is closed. All data entry and editing must be done while the form is open. The Show method displays the form. The Hide method closes the form, but does not remove it from memory. To unload a form from memory, use the Unload frmFormName statement. The command button that displays the data entry form handles a click event that opens the form from the worksheet. The Show method displays the form. The Hide method closes the form. To unload a form from memory, use the statement Unload frmFormName. Copyright © 2012 Pearson Education, Inc. Publishing as Prentice Hall.
21 Creating or Searching a List
Programmers can write VBA code that creates a list. Programmers also write VBA code to search within an existing list in a worksheet. Use a repetition structure (i.e., loop) to create a list. Each iteration through the loop, data is entered on the next blank line in the list. Sometimes, it is useful to write VBA code that creates a list or search within an existing list in a worksheet. For example, you might want to create an amortization table that lists each monthly payment’s details for a particular loan. You can use a repetition structure (i.e., loop) to create a list where through each iteration, data is entered on the next blank line in the list. Copyright © 2012 Pearson Education, Inc. Publishing as Prentice Hall.
22 Creating or Searching a List (Cont.)
Loan details Closing costs List created through repetition structure The Payment Schedule worksheet to display the loan principal, term, rate, monthly payment, and closing costs. It also displays the following details for each monthly payment: the payment number, the amount of the monthly payment that applies to the loan principal, the amount of the monthly payment that applies to the loan interest, the principal paid to date, the interest paid to date, the total principal and interest paid to date, and the outstanding loan balance. Copyright © 2012 Pearson Education, Inc. Publishing as Prentice Hall.
23 Preparing an Application for Distribution
When all data entry is through the form, the worksheets need to have protection set. The formula bar and row and column headings can be hidden. This improves the user interface and prevents users from trying to make changes directly to worksheet cells. Do final testing of the application for functionality. When you create a custom application you should test its functionality before you distribute it. However, before testing the application, you should prepare the application for distribution. Copyright © 2012 Pearson Education, Inc. Publishing as Prentice Hall.
Источник
It only takes 3 steps to convert your Excel spreadsheet to an app! We´ll tell you how!
Microsoft Excel remains the go-to software solution for millions of businesses across the globe. It is favored for its versatility and flexibility and for the depth of data manipulation and analysis that it allows. And thanks to the Open as App platform that turns Excel spreadsheets into apps within minutes, some of the challenges in using Excel have been overcome.
Download your checklist to get started
Just enter your contact data, and we´ll send you our checklist. This list will help you take everything into account when choosing a platform to build your app. Check it out for free!
Excel to app: How to convert spreadsheets
Whether you need Excel to collect data, plan projects and analyze risks, report metrics, generate quotes, predict financial outcomes, or something as big as production planning or order management, you know it will be there for you.
But when it comes to using Excel collaboratively or protecting the data efficiently, that’s when things can get really messy. Suddenly, your Excel sheet is crashing, data is corrupt, and you have no idea whether you’re looking at the latest version or not. While this is quite characteristic of unmanaged Excel files, it can frequently occur with managed ones as well.
In this case, you may want to consider turning your Excel spreadsheet into a native or web application. This will allow you to reduce some of the common errors related to data management, distribution, and protection. Another benefit is that your Excel will look like an app – this offers greater usability and variety in terms of design.
Here are some reasons you should turn your Excel spreadsheet into an app and how to go about that.
Why should you turn your Excel into an app?
For all their usefulness, spreadsheets can quickly turn into what’s known as “Excel Hell” due to one or two simple mistakes. Such as when JP Morgan lost about $6.5 billion during the so-called “London Whale” incident because of several faulty equations and copy-pasted cells.
So, when do spreadsheets fail, and how can turning them into an app help you avoid their pitfalls?
Spreadsheet version control is hard
With spreadsheets constantly circulating around, chances are the latest version will get lost sooner or later. Moreover, updates by different people can end up damaging the core data and make the file unusable.
When you move your data to an app, you can limit user’s access to the “master version” of your spreadsheet and only allow admins to access it. Under this setup, users are only given access to specific data and fields, with everything else remaining hidden. This allows them to conduct the necessary operations without inadvertently corrupting the native spreadsheet.
Excel does not work like a database and is difficult to scale
While Excel is a good place to store and manipulate data, it does not offer the functionalities of a database or a data management system. Excel does not support complex data types, relations between files and records, or different data sets. This limits the types of operations you can perform.
Moreover, spreadsheets don’t allow for real-time multi-user input when used on a desktop and not online. Your spreadsheet then soon becomes a hindrance to scaling operations and improving efficiency. This is further compounded by the fact that as files grow in size, operations become slower and more cumbersome.
Reversely, by making an app out of your spreadsheet, you can offer your users the advantage of flexible and easy access to data and data collection from various sources, not just Excel. Plus, you can give multiple users access to your know-how without the risk of them overwriting your work or exposing your data.
Apps offer greater security
Even though a certain level of security, such as password protection, is available in Excel, this can fairly easily be bypassed. If you want to keep your data safe, then retaining it in a spreadsheet that is widely accessible is not a good idea.
By turning your Excel spreadsheet into an app, you are effectively removing user access to the source file, encrypting the data, and hosting it securely in your own environment. There, it will be accessible only to users at the admin level. This guarantees the safety and integrity of the data. It also allows you to specifically determine who can see your data and entirely limit third parties from gaining access. You can even set an expiry date for your app, after which it will simply stop being accessible to users.
For even greater security, you can initially create your app with dummy data and populate it with your original data later on.
Present your data more user-friendly
An Excel sheet is not the perfect asset to share with your customers or the management team or embed into your website. With an app, you provide an easy-to-use tool that shows you all relevant data in a user-friendly way, which can be used on mobile, desktop, and tablets.
How can no-code apps help to improve your business?
No-code app creation has benefits that go beyond spreadsheet trouble and will affect your business even more. That’s because with no-code apps, innovation and optimization are no longer only dedicated to the IT department or an external service provider – now, everyone who knows Excel can jump in and start creating, deploying, and managing an app.
No programming skills needed – everyone can contribute
Unlike with a custom software solution that is coded by hand, you don’t need any programming skills to turn your Excel sheet into an app. This is the case regardless of which of the myriad functions of Excel you’re using.
Innovation at low cost
Turning your spreadsheet into an app is not as costly as a custom solution either. Say you want to develop a web or native app that allows users to perform various types of calculations. This can be very time-consuming and expensive to code.
Instead, creating these calculations in Excel and then converting them into an app is highly cost and time-efficient and allows you to mobilize your data without switching your already existing system or files stored online.
People who know the business create apps
The people who will be working with the app know best what they want. A no-code app is created by business experts who previously created the Excel solution. They know the processes, the needs of their users, and how the app should be used. Briefing a developer and explaining what is vital for your business takes a long time and is an iterative process.
When the app is directly created based on the previously used Excel solution, creation, roll-out, and updating are amazingly fast. Once the business experts know what’s possible, they usually devise many innovative ideas that can be realized in almost no time.
Great service improvements – easily done
For your customers, partners, and your team, an app is always easier to use than an Excel spreadsheet. An app can typically be accessed anytime and anywhere, whereas an Excel spreadsheet can be quite cumbersome to work with on your mobile.
Keep operating costs down
An additional benefit of having an app is that you can automatically roll out updates to your entire network of users. That helps you to reduce the cost around the life cycle of an app. With in-built email and push notifications, you can easily notify users of changes and updates, improving your brand’s communication.
If you’re curious about the kinds of apps you can create by turning a spreadsheet into an app, see the next section for a list and overview of various use cases!
What kind of apps can you create from a spreadsheet?
The possibilities for creating an app from a spreadsheet are mostly limited by what you can imagine creating in Excel. The range within which you can create apps varies from data-heavy industries like finance, insurance, healthcare, and real estate to simple directory and personal budget apps.
Some of the possible applications of native app and web app development platforms include:
Excel-based app examples
- Business apps that include checklists, calculators, manuals, an address book, or simple CRM
- Embedded web calculators for finance, mortgages, insurance, interest, personal finances, and more
- Medical practice apps for patient experience, operations and administration, and more
- Reporting apps with forecasts, break-even, profit and loss, and high-level economics
- Dashboards for sales and marketing, such as ROI for B2B sales or advertising campaigns
- Production and logistics dashboards and stock inventory lists
- …and many more
These are only some of the possible applications of app development platforms. So, what platforms and tools are available to turn a spreadsheet into an app, and how do they work? Here is Open as App in more detail.
How to prepare your Excel sheet before you turn it into an app?
Before you submit your spreadsheet to the Open as App platform, you have to make sure that it’s formatted right. This will ease the process of converting it into an app and eliminate possible errors. There are several simple rules to follow when doing this.
The 5 Basic rules:
- Your lists must have headings at the top of the column. This guarantees that the list will be recognized as one by the app wizard and assigned the proper values.
- Your data must be clear. Any highlights, crossed-out data, comments or anything else will not be considered when your spreadsheet is processed.
- Any cells outside a list area will not be taken into account by the wizard. Neither can merged cells be analyzed properly. One cell should always have only one input and be within the space of the list it belongs to.
- Format your cells accordingly to have their values displayed. The Open as App platform will consider any values you ascribed to your cells and add them to your app. Examples of values include the date, currency, phone number, drop-down menu, etc.
- Avoid pivot tables (when using Google Sheets) and macros. Macros cannot be included, as that would make apps impossible to use on iOS.
Rules for more complex Excel sheets:
- Use explicit cell references rather than structured references; i.e., do not use table or column names but simply direct cell number references.
- References to external files cannot be accessed: Any references you make in your Excel file must be part of that file, even if not on the same sheet.
- Ensure you’re using supported formulas: Over 90% of common formulas are supported by Open as App. However, if you find an error in your app, see if the formulas you have used are supported. Array formulas and certain formulas specific to Google Sheets are not currently supported by the platform.
- Always specify all the arguments in a formula: Optional arguments with a default value given to them by Excel cannot be evaluated.
Keeping these rules in mind, you can create your own app within minutes without any difficulties.
How to design your app?
Once you have prepared your spreadsheet and uploaded it to the Open as App platform, you will get a recommendation for your app. Then, you can pick a design theme you like and manually design your app as you imagine it.
With the Open as App platform, you can customize the design of your app to your brand identity and, more specifically, configure how cells function. You can also add additional functionalities.
Once you are in the App Designer, you are given several options.
- Preview – this option allows you to preview how your app will look, but you can also edit or delete individual items, such as the app header and name.
- Add elements – these options permit you to add new types of content such as cells – if you have additional data to incorporate into your app, charts – if you’d like to make your app more interactive and engaging, or lists – if you want to add sub-lists to your calculations. You can also add headers, spacers, images, info buttons, image upload or signature fields, a map, or action buttons
- Rearrange elements – with this, you can rearrange the elements in your app, group them together as you wish, and even add new pages to fill with extra elements.
- Design – change theme – with this function, you can change the whole theme of your app using a predefined layout provided by Open as App.
- Add print functionality – allows you to generate a PDF file through your app and send it via email.
Using the App Designer, you can stylize your app visually and functionally to match your desired result. You can fine-tune to what extent users can interact with the different contents and enrich the presentation of data thanks to different visual elements such as charts and graphs. All of this takes a minimal amount of time, and the simplicity or complexity of your final app depends entirely on what you want.
So what happens once you design and publish your app? Thanks to the way Open as App functions, there is a two-way connection between the sheet and the app. This means that both the sheet and the app are always updated in both ways. At the same time, access to your app and its functionalities is easy for all users while all the data remains protected to the extent you want it to.
Don’t forget to download your checklist
Just enter your contact data, and we´ll send you our checklist. This list will help you take everything into account when choosing a platform to build your app. Check it out for free!
Ready to turn your Excel sheet into an app?
Are you ready to give it a try? Simply open our App Creation Wizard, watch a short tutorial video (2 minutes), and follow the instructions to create your first app!
Data Entry Application is one of the highest utilized application in any of the organization. Data Entry Software allows you to enter the details with the form and transfer input data from User Form to Database.
You can go for several paid Data Entry Application but the real pain is Trust, Data Privacy and Info-Sec approval. Most of the time, we can’t download and install the commercial Data Entry Application in our organization. Considering all the issue, cost and data privacy, it’s always a good decision to design your own Multi-User Data Entry form in Microsoft Excel and MS Access. In this tool, you don’t seek any approval from IT or invest extra budget on application.
If you are comfortable with VBA and MS Access then it will be easy for you. But what if you are familiar with Visual Basic For Application and MS Access. In this case, it will be very difficult for you to design the application even though VBA is very simple language.
In this tutorial, we will learn How to Create a Data Entry Application in Excel and MS Access? You just need to be familiar with the Excel sheet and you can follow the steps to create fully dynamic data entry form in Excel and Access.
In this application, we will be using MS Excel as front end of this application and MS Access as Database. With the help of both application, we will design application for shareable environment where multiple users can use the Data Entry Form to transfer the data simultaneously. So without further delay, let’s begin!
First of all, you need to create a Folder where you can save Excel and MS Access file. Let’s create a folder named ‘Data Entry Application’
Now, open the MS Access application and create a Blank Database. In MS Access window, create a table named ‘tblEmployee’ and open the table in Design Mode.
Create the required Fields Name with required Data Type. Please see the below image.
Now Save the Table and go to File and Save the Database. To save the Database, please select ‘Access 2002 -2003 Database (*.mdb) and then Click on Save As. Please see the below image.
Given the database name as ‘Database’ and click on Save. Make sure you selected the same folder which we created for Data Entry Application.
Now, close the current open database and go to File then click on Open. Browse the database file which we created for application and then click on drop-down available beside the Open button and then select ‘Open Exclusive’. Please see the below snapshot.
This will open the ‘Database.mdb’ in Exclusive mode so that we can apply the protection on Database file. It will secure our database and users will not be able to open it and make any changes if they will not enter the correct password.
Now, go to File menu and select the Info. Under Info, click on the third option e.i. Set Database Password. Please see the below image.
Now, enter the Password ‘thedatalabs’ in both the Password and Verify text boxes and then click on Okay.
Close the database from the Exclusive mode and open it in normal mode (while opening just click on Open. Don’t select any other option from drop-down available beside the Open button). When you will open the database, it will ask Password. Please enter ‘thedatalabs’ as password to open the database.
Here, we have done with Database designing. Let’s move ahead and create Data Entry form in Excel.
Open MS Excel Application and create a New Workbook. Save the file with the name ‘Data Entry Application in Excel and MS Access’ and select the File Type ‘xlsm’. Macro enabled file is required to retain all the codes which we will write for this Data Entry Form.
Change the Sheet1 name to Home, remove the gridlines, and create labels and rounded rectangle for Launch button. Please see the below pic.
Let’s move to Visual Basic For Application (VBA) window to design the Form and write the required VBA codes.
To open the VBA window, go to Developer Tab in Excel and then click on Visual Basic under Code group. Alternatively, you can also use Shortcut key ALT + F11 to open the VBA window.
In VB window, let’s insert a UserForm. To insert the form, go to Insert menu and click on UserForm.
Let’s set the properties of Form.
Name: frmDataEntry; Caption: Data Entry Application;Height: 428.25; Width: 420
Let’s add other controls and set the properties of each and every controls. Follow the same format which is used in below image.
Set the properties for input controls. Name would be txtEmpID, txtName, txtDOB, imgCalendar, optFemale, optMale, cmbQualification, txtMobile, txtEmail, txtAddrss, cmdSubmit, cmdReset
Caption for optFemale would be Female, optMale would be Male, cmdSubmit would be Submit and cmdReset would be Reset.
Set the tab order for all input controls.
Let’s import the Custom Calendar from the Support File. Please see the below image.
Let’s add coding on Double click on txtDOB and imgCalendar. Make sure you have locked the txtDOB so that user will not be able to enter data directly.
Double click on txtDOB and add the below code on double click events.
Private Sub txtDOB_DblClick(ByVal Cancel As MSForms.ReturnBoolean)

Application.ScreenUpdating = False

Dim sDate As String

On Error Resume Next

sDate = MyCalendar.DatePicker(Me.txtDOB)

Me.txtDOB.Value = Format(sDate, "dd-mmm-yyyy")

On Error GoTo 0

Application.ScreenUpdating = True
End Sub
Now, double click on imgCalendar and add the below code on click events.
Private Sub imgCalendar_Click()

Application.ScreenUpdating = False

Dim sDate As String

On Error Resume Next

sDate = MyCalendar.DatePicker(Me.txtDOB)

Me.txtDOB.Value = Format(sDate, "dd-mmm-yyyy")

On Error GoTo 0

Application.ScreenUpdating = True
End Sub
Let’s insert a module in our project. To insert a module go to Insert menu and click on Module. Rename the Module1 to mdDataEntry.
Now double click on mdDataEntry to view the code window.
Add the below code in mdDataEntry to Reset and Initialize the form.
Sub Reset_Form()

With frmDataEntry

    .txtEmpID.Text = ""
    .txtEmpID.BackColor = vbWhite

    .txtName.Text = ""
    .txtName.BackColor = vbWhite

    .txtDOB.Text = ""
    .txtDOB.BackColor = vbWhite

    .optFemale.Value = False
    .optMale.Value = False

    .txtMobile.Value = ""
    .txtMobile.BackColor = vbWhite

    .txtEmail.Value = ""
    .txtEmail.BackColor = vbWhite

    .txtAddress.Value = ""
    .txtAddress.BackColor = vbWhite

    .cmbQualification.Clear
    .cmbQualification.BackColor = vbWhite

    .cmbQualification.AddItem "10+2"
    .cmbQualification.AddItem "Bachelor Degree"
    .cmbQualification.AddItem "Master Degree"
    .cmbQualification.AddItem "PHD"

    .cmbQualification.Value = ""

End With

End Sub
Add the below function in mdlDataEntry to validate the Email Id entered by User.
Function ValidEmail(email As String) As Boolean
Dim oRegEx As Object
 Set oRegEx = CreateObject("VBScript.RegExp")
 With oRegEx
    .Pattern = "^[w-.]{1,}@([da-zA-Z-]{1,}.){1,}[da-zA-Z-]{2,3}$"
    ValidEmail = .Test(email)
 End With
 Set oRegEx = Nothing
End Function
Let’s add one more function to validate all the entries made by user in Data Entry Form. You just need to copy the below code and paste it below the email validation function.
Function ValidEntry() As Boolean

ValidEntry = True

With frmDataEntry

    'Default Color

    .txtEmpID.BackColor = vbWhite
    .txtName.BackColor = vbWhite
    .txtDOB.BackColor = vbWhite
    .txtMobile.BackColor = vbWhite
    .txtEmail.BackColor = vbWhite
    .txtAddress.BackColor = vbWhite
    .cmbQualification.BackColor = vbWhite

    'Validating Name

    If Trim(.txtEmpID.Value) = "" Then
        MsgBox "Employee ID is blank. Please enter a valid ID.", vbOKOnly + vbInformation, "Emp ID"
        .txtEmpID.BackColor = vbRed
        ValidEntry = False
        Exit Function
    End If


    'Validating Name

    If Trim(.txtName.Value) = "" Then
        MsgBox "Employee Name is blank. Please enter a valid name.", vbOKOnly + vbInformation, "Employee Name"
        .txtName.BackColor = vbRed
        ValidEntry = False
        Exit Function
    End If

    'Validating DOB

    If Trim(.txtDOB.Value) = "" Then
        MsgBox "DOB is blank. Please enter DOB.", vbOKOnly + vbInformation, "Invalid Entry"
        .txtDOB.BackColor = vbRed
        ValidEntry = False
        Exit Function
    End If


    'Validating DOB

    If .optFemale.Value = False And .optMale.Value = False Then
        MsgBox "Please select gender.", vbOKOnly + vbInformation, "Invalid Entry"
        ValidEntry = False
        Exit Function
    End If

    'Validating Qualification

    If Trim(.cmbQualification.Value) = "" Then
        MsgBox "Please select the Qualification from drop-down.", vbOKOnly + vbInformation, "Invalid Entry"
        .cmbQualification.BackColor = vbRed
        ValidEntry = False
        Exit Function
    End If

    'Validating Mobile Number

    If Trim(.txtMobile.Value) = "" Or Len(.txtMobile.Value) < 10 Or Not IsNumeric(.txtMobile.Value) Then
        MsgBox "Please enter a valid mobile number.", vbOKOnly + vbInformation, "Invalid Entry"
        .txtMobile.BackColor = vbRed
        ValidEntry = False
        Exit Function
    End If

    'Validating Email

    If ValidEmail(Trim(.txtEmail.Value)) = False Then
        MsgBox "Please enter a valid email address.", vbOKOnly + vbInformation, "Invalid Entry"
        .txtEmail.BackColor = vbRed
        ValidEntry = False
        Exit Function
    End If

    'Validating Address

    If Trim(.txtAddress.Value) = "" Then
        MsgBox "Address is blank. Please enter a valid address.", vbOKOnly + vbInformation, "Invalid Entry"
        .txtAddress.BackColor = vbRed
        ValidEntry = False
        Exit Function
    End If


End With

End Function
Let’s add sub procedure to transfer the data from User Form to Database. Before writing the code, we need to add the reference of ADO library in our project. To do that, just go to Tool menu and select the References… In references window, please select ‘Microsoft ActiveX Data Objects 6.1 Library’ and then click on Okay. Please see the below snapshot.
Now, we have added the reference for ADO. Let’s start coding for Submitting Data. You just need to copy the below code and paste it below the ValidEntry Function. Here, we have utilized dynamic connection string to connect the database. You can check the support folders and use the fixed path link to replace the dynamic code. The same has been explained in our YouTube tutorial. Support file link has been provided at the bottom of this post.
Sub Submit_Data()

Application.EnableCancelKey = xlDisabled
Application.DisplayAlerts = False
Application.ScreenUpdating = False

On Error GoTo ErrorHandler
Dim nConnection As New ADODB.Connection
Dim nRecordset As New ADODB.Recordset

Dim sqlQuery As String

#If Win64 Then
    nConnection.Open "Provider=Microsoft.ACE.OLEDB.12.0;Data Source=" & ThisWorkbook.Path & "Database.mdb" & ";Jet OLEDB:Database Password=thedatalabs"
#Else
    nConnection.Open "Provider=Microsoft.Jet.OLEDB.4.0;Data Source=" & ThisWorkbook.Path & "Database.mdb" & ";Jet OLEDB:Database Password=thedatalabs"
#End If

sqlQuery = "Select * from tblEmployee"

nRecordset.Open Source:=sqlQuery, ActiveConnection:=nConnection, CursorType:=adOpenKeyset, LockType:=adLockOptimistic

With nRecordset

    .AddNew ' If new records

    .Fields("Employee ID").Value = frmDataEntry.txtEmpID.Value   'Employee ID
    .Fields("Employee Name").Value = frmDataEntry.txtName.Value   'Employee Name
    .Fields("DOB").Value = frmDataEntry.txtDOB  'DOB
    .Fields("Gender").Value = IIf(frmDataEntry.optFemale.Value = True, "Female", "Male") 'Gender
    .Fields("Qualification").Value = frmDataEntry.cmbQualification.Value   'Qualification
    .Fields("Mobile Number").Value = frmDataEntry.txtMobile.Value   'Mobile Number
    .Fields("Email ID").Value = frmDataEntry.txtEmail.Value   'Email
    .Fields("Address").Value = frmDataEntry.txtAddress.Value   'Address

    .Fields("SUBMITTED BY").Value = Environ("username")
    .Fields("SUBMITTED ON").Value = [Now()]

   .Update

   .Close

End With

nConnection.Close

'Reset the form

Call Reset_Form

Application.DisplayAlerts = True
Application.ScreenUpdating = True

MsgBox "Data submitted successfully!"

Exit Sub
ErrorHandler:
MsgBox Err.Description & " " & Err.Number, vbOKOnly + vbCritical, "Database Error"
Application.DisplayAlerts = True
Application.ScreenUpdating = True
nConnection.Close

End Sub
Add the below code at the bottom of Submit_Data procedure to launch the form. We will utilize this sub procedure to assign it on ‘Launch Form’ button available on Home sheet.
Sub Show_Form()
  frmDataEntry.Show
End Sub
Let’s move to frmDataEntry and add the required code in Form Intilization, Click events of Submit and Reset.
Double click on Form and add the below sub procedure on initialize event.
Private Sub UserForm_Initialize()
Call Reset_Form
End Sub
Code for Click event on Submit Button
Private Sub cmdSubmit_Click()
Dim i As VbMsgBoxResult

i = MsgBox("Do you want to submit the data?", vbYesNo + vbQuestion, "Submit Data")

If i = vbNo Then Exit Sub

If ValidEntry Then

    Call Submit_Data

End If
End Sub
Code for click event on Reset button
Private Sub cmdReset_Click()
Dim i As VbMsgBoxResult

i = MsgBox("Do you want to reset the form?", vbYesNo + vbQuestion, "Reset")

If i = vbNo Then Exit Sub

Call Reset_Form
End Sub
Now coding for this project is done. Let’s move to Excel window and assign the macro on ‘Launch Form’ button available on Home sheet. Right Click on ‘Launch Form’ button and select Assign Macro and then choose the macro named ‘Show_Form’ from the available options.
All done. Let’s launch the form with the help of ‘Launch Form’ button available on Home sheet.
Please watch our step by step tutorial for this form on YouTube.
Please click on below button to download the Excel, Database and other support files.

How to develop an Excel Task Pane App
Posted on Thursday, November 22nd, 2012 at 10:35 am by .
Instead of an article, this is more like a memoir…
“Ty Anderson: An Apps for Office developer memoir”.
Apps for Office – Not your typical Office Object Model
The new Apps for Office development model provides plenty of new possibilities for Microsoft Office developers. Although new, they give the appearance of familiarity. Do you think I’m crazy? Well maybe, but consider the following:
- The content apps are akin to dropping an ActiveX control (for example, a calendar control) onto an Excel spreadsheet.
- Mail apps are not too different from Outlook form regions.
- Task pane apps are just like… well… task pane apps.
Or are they? Certainly they are similar…
- They have the same name as the VSTO and COM-based counterparts.
- They are vertical UI elements.
- They provide access to the Office host’s object model.
- Etc.
Despite these obvious similarities, the Task Pane app is familiar but is very different from anything Office developers have built previously. The main difference is the Office Javascript library (Office.js). This library servers as the gateway to the Office object model and is severely limited. So limited that you find yourself not believing the depths of its limits and attempting unreasonable workarounds.
When I say ‘you’… I mean ‘me’.
A good idea but impossible
Originally conceived, the Excel Table Templates app was meant to be something I dubbed “Easy Rows”. The idea of the app was to:
- Recognize anytime the user selected a cell that comprised part of an Excel table.
- Auto-populate an Excel task pane with a label and text box for each cell in the current table row.
- Allow the user to edit the row by editing the data in the task pane.

The idea was to create an Excel app that would make it easier to work with really, really, really long rows of data in a spreadsheet. The trouble began instantly. The details are boring so I’ll summarize. Using the Office.js library…
- You can recognize when the user has selected a cell within a table. BUT…
- You cannot navigate within the table.
- You cannot read any data outside the selected range of cells.
- You can determine if the table has a header row.
- You cannot actually read the header row’s column titles.
I refused to believe the “cannots” and spent too many hours reading and re-reading the Office.js documentation on MSDN. I finally conceded and moved on to what became today’s article.
The Table Templates Excel task pane app
Despite all the frustration, I discovered it is really easy to insert data into an Excel file. And, given the API’s limitations, I decided one of the best applications of this new development model is to use for inserting content into a file. So, why not build an app that makes it possible to quickly select and insert a table from a library of templates? What’s the worst that could happen?
Here’s the design:

To build this app, you need the following tools:
- Visual Studio 2012
- With Apps for Office project templates
- Excel 2013
Let’s build this thing.
Creating the Table Templates App for Excel 2013
The Table Templates app uses the Apps for Office 2013 Visual Studio 2012 template. If you don’t see this template in the New Project dialog box, be sure you installed all the pre-requisites listed above. To create Table Templates, just follow these steps:
- With Visual Studio 2012 open, select File > New Project from the main menu.
- In the New Project dialog box, select the Templates > Office/SharePoint > Apps node.
- Click the App for Office 2013 project template and name the project TableTemplates. Click the OK button.
- The Create App for Office dialog box will display. Select the Task pane app in option and only enable Excel as a host Office application. Click Finish to create the project.
Visual Studio will create the project and display the TaskTemplates.html file in the code window. This file is the HTML that defines the task pane display. We want this file to contain a couple of tables:
- Table 1: This table contains the app icon and title.
- Table 2: This table contains the images along with their labels. The images will act as buttons. When the user clicks them, we will call a custom JavaScript method.
Both tables reside within the <Body> tag. Listing 1 contains the HTML and is ready for you to copy and paste into your TableTemplates.html file. Go ahead and paste it over the existing content in the <Body> tag.
Listing 1.
<div id="Content"> <table class="maintable"> <tr style="background-color: #0072C6;height: 30px;"> <td style="height: 60px;width: 55px;text-align: center;vertical-align: middle;"> <img src="../Images/TableTemplateIcon.png" alt="logo" width="50" height="50" style="float: right;padding-right: 5px;padding-top: 3px; padding-left: 5px" /> </td> <td style="background-color: #0072C6;font-family: 'Segoe UI', Tahoma, Geneva, Verdana, sans-serif;font-size: 18px;font-weight: bold;color: #FDFDFD;text-align: left;vertical-align: middle;padding: 0;margin: 0;height: 30px;">TABLE TEMPLATES</td> </tr> </table> <table style="height:100%;" id="tableContent"> <tr><td height="35" colspan="2" >Select a template to insert into your spreadsheet.</td></tr> <tr> <td width="17%" height="52" > <img src="../Images/TableTemplateIcon-Tasks.png" width="50" height="50" style="cursor: pointer;" onclick="setData('task');"></td> <td width="83%" >Tasks Template</td> </tr> <tr> <td height="52"><img src="../Images/TableTemplateIcon-Contacts.png" width="50" height="50" style="cursor: pointer;" onclick="setData('contact');"></td> <td >Contacts Template</td> </tr> <tr> <td height="52" ><img src="../Images/TableTemplateIcon-Expenses.png" width="50" height="50" style="cursor: pointer;" onclick="setData('expense');"></td> <td >Expenses Template</td> </tr> <tr> <td height="52" ><img src="../Images/TableTemplateIcon-Issues.png" width="50" height="50" style="cursor: pointer;" onclick="setData('issue');"></td> <td >Issues Template</td> </tr> <tr><td colspan="2"> </td></tr> </table> </div>
The key component is the content in the <IMG> tags:
<img src="../Images/TableTemplateIcon-Tasks.png" width="50"
    height="50" style="cursor: pointer;" onclick="setData('task');">
Each image tag has a method defined in its onclick attribute. When the user clicks the image, the app will execute the setData method. Listing 2 contains the code for setData.
By the way, feel free to use your own images (or for that matter buttons). At the same time, you are more than welcome to use the images I created. They are part of the sample code for this article.
Listing 2.
// Writes data to current selection.
function setData(tableType) {
    Office.context.document.setSelectedDataAsync(createTablefromTemplate(tableType));
}
I cheated and used this method as it 1) was included in the app by default and 2) did almost exactly what I needed it to do. The only changes I made from the original version included by Visual Studio is to change the method’s parameter name to tableType and then call the createTablefromTemplate method. By calling createTablefromTemplate, we can create the table template we want and then insert it into the spreadsheet.
So how does createTablefromTemplate work? Magic. Listing 3 reveals its secrets. Open the TableTemplates.js file and insert its code.
Listing 3.
function createTablefromTemplate(tableType) {
    var tableData = new Office.TableData();
    switch (tableType) {
        case "task":
            tableData.headers = [
                ['Task Title', 'Start Date', 'Due Date',
                'Status', 'Category', 'Assigned To']];
            tableData.rows = [
                ['Sample Task #1', '=Today()', '=Today()+1', 'Not Started', 'Work', 'Me'],
                ['Sample Task #2', '=Today()', '=Today()', 'Not Started', 'Work', 'Me'],
                ['Sample Task #3', '=Today()', '=Today()', 'Not Started', 'Work', 'Me']];
            return tableData;
            break;

        case "contact":
            tableData.headers = [
                ['First Name', 'Last Name', 'Title', 'Phone Number', 'Email',
                    'Street', 'City', 'State', 'Zip']];
            tableData.rows = [
                ['John', 'Doe', 'Generic Person', '212-555-1212', 'john@doe.com',
                    '1234 Main', 'Oakland', 'CA', '94601']];
            return tableData;
            break;

        case "expense":
            tableData.headers = [['Expense Date', 'Category', 'Client/Project', 'Amount']];
            tableData.rows = [['=Today()', 'Meals', 'Custom App for Office', '$55.00']];
            return tableData;
            break;

        case "issue":
            tableData.headers = [
                ['Issue', 'Status', 'Priority', 'Area', 'Due Date',
                    'Date Resoled', 'Notes']];
            tableData.rows = [
                ['Severely limited Office.js API', 'In-Progress', 'Normal',
                    'Development', '=today()+7', '', 'I wish the API was more extensive.']];
            return tableData;
            break;
    }
}
This is a simple method that branches based on the value of the tableType parameter. We have four template choices (task, contact, expense, & issue tables). And it doesn’t matter what template we specify, the steps are the same. First, the method creates an array that will serve as the table’s header row. Second, the method creates a sample data row so the user gets a little more bang for the buck and can see how they should use the table. Third, and last, the method returns the table as the function value.
Demo Time!
That’s all the code we need. Let’s demo it!
Close your eyes…
Cross your fingers…
Stand on one toe (this is the tricky part)…
—AND—
CLICK F5!
If all goes well, Excel will open and your task pane app will look like this:

***
The Apps for Office developer model has plenty to offer. The trick is to take the APIs at face value. They do what they do. Nothing more… nothing less. Don’t try to trick them out or convince yourself a scenario should be possible because it’s possible with VBA, COM add-ins, and VSTO. The Office JavaScript library is a new animal. We haven’t seen it before. So read about it. Observe it. And see how it acts in the wild.
You may also be interested in:
- Excel 2013 development – 7 questions developers should ask
- Office UX guidelines for Excel 2013 content apps and Word 2013 task pane apps
Available Downloads:
Table Template app for Excel 2013 (C#)
Everybody in this country should learn how to program a computer... because it teaches you how to think." -Steve Jobs
I wish to extend the wise words of Steve Jobs and say everyone in the world should learn how to program a computer. You may not necessary end up working as a programmer or writing programs at all but it will teach you how to think.
In this VBA tutorial, we are going to cover the following topics.
- What is Visual Basic for Applications (VBA)?
- Why VBA?
- Personal & Business Applications of VBA in Excel
- Introduction to Visual Basic for Applications
- Step by step example of creating a simple EMI calculator in Excel
- How to use VBA in Excel Example
Visual Basic for Applications (VBA) is an event-driven programming language implemented by Microsoft to develop Office applications. VBA helps to develop automation processes, Windows API, and user-defined functions. It also enables you to manipulate the user interface features of the host applications.
Before we go into further details, let’s look at what computer programming is in a layman’s language. Assume you have a maid. If you want the maid to clean the house and do the laundry. You tell her what to do using let’s say English and she does the work for you. As you work with a computer, you will want to perform certain tasks. Just like you told the maid to do the house chores, you can also tell the computer to do the tasks for you.
The process of telling the computer what you want it to do for you is what is known as computer programming. Just as you used English to tell the maid what to do, you can also use English like statements to tell the computer what to do. The English like statements fall in the category of high level languages. VBA is a high level language that you can use to bend excel to your all powerful will.
VBA is actually a sub set of Visual Basic 6.0 BASIC stands for Beginners All-Purpose Symbolic Instruction Code.
Why VBA?
VBA enables you to use English like statements to write instructions for creating various applications. VBA is easy to learn, and it has easy to use User Interface in which you just have to drag and drop the interface controls. It also allows you to enhance Excel functionality by making it behave the way you want.
Personal & Business Applications of VBA in Excel
For personal use, you can use it for simple macros that will automate most of your routine tasks. Read the article on Macros for more information on how you can achieve this.
For business use, you can create complete powerful programs powered by excel and VBA. The advantage of this approach is you can leverage the powerful features of excel in your own custom programs.
Introduction to Visual Basic for Applications
Before we can write any code, we need to know the basics first. The following basics will help you get started.
- Variable – in high school we learnt about algebra. Find (x + 2y) where x = 1 and y = 3. In this expression, x and y are variables. They can be assigned any numbers i.e. 1 and 3 respective as in this example. They can also be changed to say 4 and 2 respectively. Variables in short are memory locations. As you work with VBA Excel, you will be required to declare variables too just like in algebra classes
-
Rules for creating variables
- Don’t use reserved words – if you work as a student, you cannot use the title lecturer or principal. These titles are reserved for the lecturers and the school authority. Reserved words are those words that have special meaning in Excel VBA and as such, you cannot use them as variable names.
- Variable names cannot contain spaces – you cannot define a variable named first number. You can use firstNumber or first_number.
- Use descriptive names – it’s very tempting to name a variable after yourself but avoid this. Use descriptive names i.e. quantity, price, subtotal etc. this will make your Excel VBA code easy to read
-
Arithmetic operators – The rules of Brackets of Division Multiplication Addition and Subtraction (BODMAS) apply so remember to apply them when working with expressions that use multiple different arithmetic operators. Just like in excel, you can use
- + for addition
- – for subtraction
- * for multiplication
- / for division.
-
Logical operators – The concept of logical operators covered in the earlier tutorials also apply when working with VBA. These include
- If statements
- OR
- NOT
- AND
- TRUE
- FALSE
How to Enable the Developer Tab
Below is the step by step process on how to enable the developer tab in Excel:
- Create a new workbook
- Click on the ribbon start button
- Select options
- Click on customize ribbon
- Select the developer checkbox as shown in the image below
- Click OK

You will now be able to see the DEVELOPER tab in the ribbon
VBA Hello World!
Now we will demonstrate how to program in VBA programming language. All program in VBA has to start with “Sub” and end with “End sub”. Here the name is the name you want to assign to your program. While sub stands for a subroutine which we will learn in the later part of the tutorial.
Sub name()
.
.
.
End Sub
We will create a basic VBA program that displays an input box to ask for the user’s name then display a greeting message
This tutorial assumes you have completed the tutorial on Macros in excel and have enabled the DEVELOPER tab in excel.
- Create a new work book
- Save it in an excel macro enabled worksheet format *.xlsm
- Click on the DEVELOPER tab
- Click on INSERT drop down box under controls ribbon bar
- Select a command button as shown in the image below
 in Excel")
Draw the command button anywhere on the worksheet
You will get the following dialogue window
 in Excel")
- Rename the macro name to btnHelloWorld_Click
- Click on new button
- You will get the following VBA code window
 in Excel")
Enter the following instruction codes
Dim name As String
name = InputBox("Enter your name")
MsgBox "Hello " + name
HERE,
- “Dim name as String” creates a variable called name. The variable will accept text, numeric and other characters because we defined it as a string
- “name = InputBox(“Enter your name”)” calls the built in function InputBox that displays a window with the caption Enter your name. The entered name is then stored in the name variable.
- “MsgBox “Hello ” + name” calls the built in function MsgBox that display Hello and the entered name.
Your complete code window should now look as follows
 in Excel")
- Close the code window
- Right click on button 1 and select edit text
- Enter Say hello
 in Excel")
- Click on Say Hello
- You will get the following input box
 in Excel")
- Enter your name i.e. Jordan
- You will get the following message box
 in Excel")
Congratulations, you just created your first VBA program in excel
Step by step example of creating a simple EMI calculator in Excel
In this tutorial exercise, we are going to create a simple program that calculates the EMI. EMI is the acronym for Equated Monthly Instalment. It’s the monthly amount that you repay when you get a loan. The following image shows the formula for calculating EMI.
 in Excel")
The above formula is complex and can be written in excel. The good news is excel already took care of the above problem. You can use the PMT function to compute the above.
The PMT function works as follows
=PMT(rate,nper,pv)
HERE,
- “rate” this is the monthly rate. It’s the interest rate divided by the number of payments per year
- “nper” it is the total number of payments. It’s the loan term multiplied by number of payments per year
- “pv” present value. It’s the actual loan amount
Create the GUI using excel cells as shown below
 in Excel")
Add a command button between rows 7 and 8
Give the button macro name btnCalculateEMI_Click
Click on edit button
Enter the following code
Dim monthly_rate As Single, loan_amount As Double, number_of_periods As Single, emi As Double
monthly_rate = Range("B6").Value / Range("B5").Value
loan_amount = Range("B3").Value
number_of_periods = Range("B4").Value * Range("B5").Value
emi = WorksheetFunction.Pmt(monthly_rate, number_of_periods, -loan_amount)
Range("B9").Value = emi
HERE,
- “Dim monthly_rate As Single,…” Dim is the keyword that is used to define variables in VBA, monthly_rate is the variable name, Single is the data type that means the variable will accept number.
- “monthly_rate = Range(“B6”).Value / Range(“B5″).Value” Range is the function used to access excel cells from VBA, Range(“B6”).Value makes reference to the value in B6
- “WorksheetFunction.Pmt(…)” WorksheetFunction is the function used to access all the functions in excel
The following image shows the complete source code
 in Excel")
- Click on save and close the code window
- Test your program as shown in the animated image below
 in Excel")
How to use VBA in Excel Example
Following steps will explain how to use VBA in Excel.
Step 1) Open your VBA editor
Under Developer tab from the main menu, click on “Visual Basic” icon it will open your VBA editor.

Step 2) Select the Excel sheet & Double click on the worksheet
It will open a VBA editor, from where you can select the Excel sheet where you want to run the code. To open VBA editor double click on the worksheet.

It will open a VBA editor on the right-hand side of the folder. It will appear like a white space.

Step 3) Write anything you want to display in the MsgBox
In this step we are going to see our first VBA program. To read and display our program we need an object. In VBA that object or medium in a MsgBox.
- First, write “Sub” and then your “program name” (Guru99)
- Write anything you want to display in the MsgBox (guru99-learning is fun)
- End the program by End Sub

Step 4) Click on the green run button on top of the editor
In next step you have to run this code by clicking on the green run button on top of the editor menu.

Step 5) Select the sheet and click on “Run” button
When you run the code, another window will pops out. Here you have to select the sheet where you want to display the program and click on “Run” button

Step 6) Display the msg in MsgBox
When you click on Run button, the program will get executed. It will display the msg in MsgBox.

Download the above Excel Code
Summary
VBA Full Form : Visual Basic for Application. It’s a sub component of visual basic programming language that you can use to create applications in excel. With VBA, you can still take advantage of the powerful features of excel and use them in VBA.