Create a document
Try it!
-
Open Word.
-
Select Blank document.
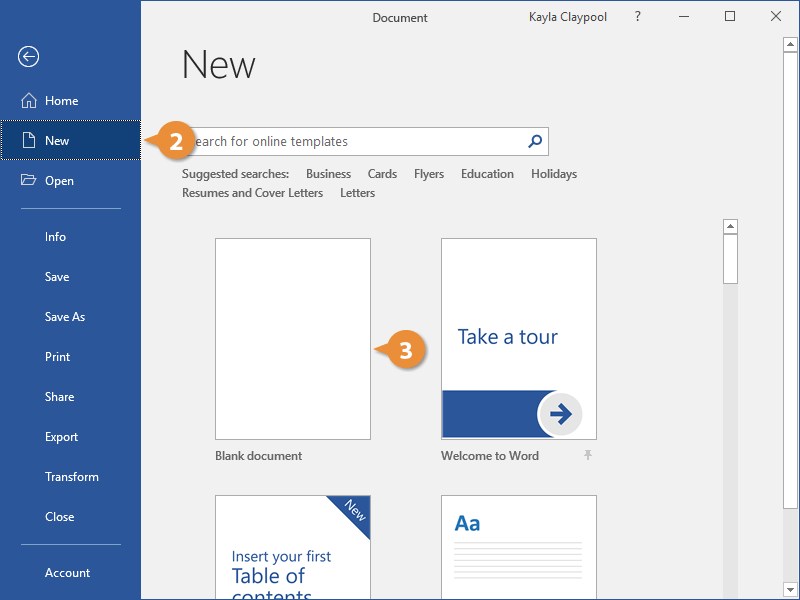
Or, if Word is already open, select File > New > Blank document.
To create a document using a template
-
Open Word. Or, if Word is already open, select File > New.
-
Double-click a template to open it.
Tip: Pin templates you like, so you always see them when you start Word. Select the template and then select the pin icon that appears next to the name of the template.
Search for a template
-
Open Word. Or, if Word is already open, select File > New.
-
In the Search for online templates box, enter a search word like letter, resume, or invoice.
Or, select a category under the search box like Business, Personal, or Education.
-
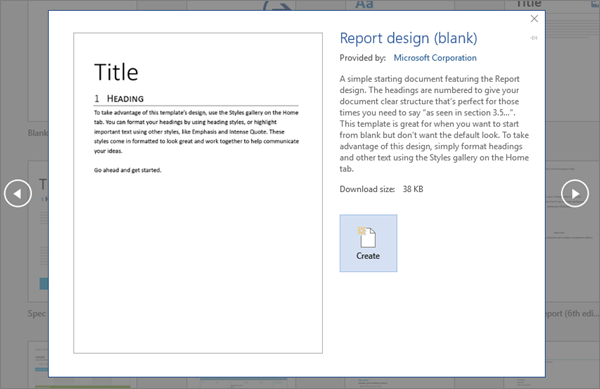
Click a template to see a preview. Click the arrows on the side of the preview to see more templates.
-
Select Create.
For more templates, see Microsoft templates.
Want more?
Create more with Microsoft templates
Download free, pre-built templates
Save documents online
Discover more Word training at LinkedIn Learning
Need more help?
Want more options?
Explore subscription benefits, browse training courses, learn how to secure your device, and more.
Communities help you ask and answer questions, give feedback, and hear from experts with rich knowledge.
Create a document in Word
With Word on your PC, Mac, or mobile device, you can:
-
Create documents from scratch, or a template.
-
Add text, images, art, and videos.
-
Research a topic and find credible sources.
-
Access your documents from a computer, tablet, or phone with OneDrive.
-
Share your documents and work with others.
-
Track and review changes.
Create a document
-
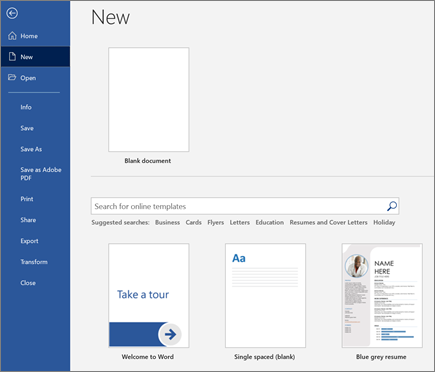
On the File tab, click New.
-
In the Search for online templates box, enter the type of document you want to create and press ENTER.
Tip: To start from scratch, select Blank document. Or, for practice using Word features, try a learning guide like Welcome to Word, Insert your first table of contents, and more.
Add and format text
-
Place the cursor and type some text.
-
To format, select the text and then select an option: Bold, Italic, Bullets, Numbering, and more.
Add Pictures, Shapes, SmartArt, Chart, and more
-
Select the Insert tab.
-
Select what you want to add:
-
Tables — select Table, hover over the size you want, and select it.
-
Pictures — select Pictures, browse for pictures from your computer, select a stock image, or even search Bing.
Note:
Older versions of Word may have Online Pictures on the ribbon next to Pictures. -
Shapes — select Shapes, and choose a shape from the drop-down.
-
Icons — select Icons, pick the one you want, and select Insert.
-
3D Models — select 3D Models, choose from a file or online source, go to the image you want, and select Insert.
-
SmartArt — select SmartArt, choose a SmartArt Graphic, and select OK.
-
Chart — select Chart, select the chart you want, and select OK.
-
Screenshot — select Screenshot and select one from the drop-down.
-
Next:
Save your document to OneDrive in Word
Need more help?
Want more options?
Explore subscription benefits, browse training courses, learn how to secure your device, and more.
Communities help you ask and answer questions, give feedback, and hear from experts with rich knowledge.
Find solutions to common problems or get help from a support agent.
Updated: 11/18/2022 by
To create a document, you must either have a word processor for word processing or a computer capable of creating a document on an online service.
Note
When we refer to a «document,» we’re talking about a rich text document with text formatting (e.g., bold), images, different fonts, and font sizes, and not a plain text file. For steps on making a text-only file, see: How to create a text file.
The most common and widely used word processor program is Microsoft Word. However, because of all of the different needs of users today, we’ve included additional options that are available for creating a document.
Creating a document with Google Docs
Google Docs is one of our favorite solutions for most users, especially those who are new computers. The reasons we like it are because it’s free, easy to access, supports collaborative editing, can open other document files, and may be accessed from many devices. To create a document in Google Docs, follow the steps below.
Create a blank document
- Open Google Drive. If prompted, log into your Google account.
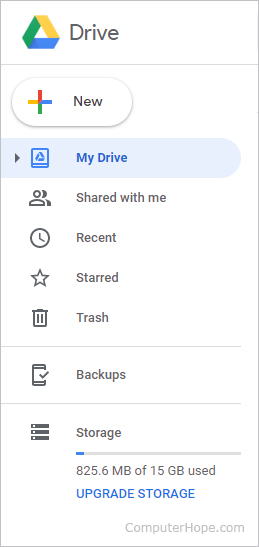
- In the upper-left corner of the window, click the
button.
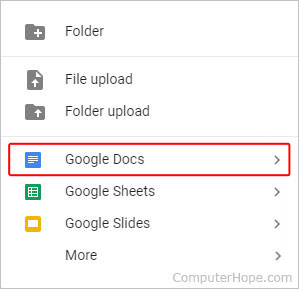
- In the drop-down menu that appears, move your mouse cursor over the arrow next to Google Docs.
- Choose Blank document from the box that appears.
Create a document using a template
- Complete steps 1-3 in the previous section.
- Choose From a template in the box that appears.
- Select a template in the window that appears.
Tip
Your newly-created document may be accessed in the My Drive section (first tab in the left menu).
Creating a document with Microsoft Word
To use Microsoft Word to open a document, follow the steps below.
Open Word in Windows
- Open Microsoft Word. If you’re unsure how to open or find Word, skip to the finding Microsoft Word section.
- In newer versions of Word, the first screen asks what type of Word document you want to create. Select the «Blank document» option to create a document from scratch. You can also select from one of the Word templates provided if you want to create a specific type of document.
- Once the blank document or template is open, any new information can be entered using a keyboard or on-screen keyboard.
- Once complete or while working on the document, you can save through the File tab at the top of the Word program window.
How to find Microsoft Word in Windows
- In Windows, click Start.
- In the search box, type word. If Word is installed, it shows in the search results. For example, you may see Microsoft Word 2010, Microsoft Word 2013, or Microsoft Word 365.
Tip
In Windows 10, the search box is on the Taskbar next to Start. In Windows 8, start typing word on the Start page and the search results show on the right side of the screen.
Note
Word and WordPad are two different programs. See the creating a document with Microsoft WordPad section below for further information on this program.
How to install Microsoft Word
If Word is not found, it needs to be installed before it can run, or one of the other free alternatives can be used. Today, the latest version of Word is included in Office 365 and requires a subscription. You can download Office 365, which includes Excel, Word, and other Office applications, from the Office 365 website.
Tip
If you’ve purchased Office or Word in the past, older versions of Office can also be installed on newer computers, even those running Windows 8 or Windows 10. You must have the installation discs to install Office or Word again.
How to open a new document if a Microsoft Word document is already open
Press the shortcut keys Ctrl+N simultaneously to open a new document.
— OR —
- Click File in the file menu or the File tab at the top of the program window.
- Select the New option.
- A prompt should open that presents you with several options. Select the Blank document option.
Creating a document with Microsoft WordPad
Microsoft WordPad is a free rich-text editor included with Microsoft Windows for viewing and editing rich-text files (.RTF, .DOCX, and .ODT) files. WordPad can perform basic text formatting like changing the font, alignment, and inserting multimedia. However, realize that it does not support all formatting options in .DOCX and .ODT files, so some formatting may be incorrect. To open WordPad, follow the steps below.
- In Windows, click Start.
- In the search box, type wordpad and select the WordPad application in the search results. Once open, there should be a blank window similar to the example below.
Tip
In Windows 10, the search box is on the Taskbar next to Start. In Windows 8, start typing wordpad on the Start page and the search results show on the right side of the screen.
- Type and create the document how you want it to appear.
- After changes are made to your document, you can save the file in the File section.
If WordPad is already open and you want to create a new document
Press the shortcut keys Ctrl+N simultaneously to open a new document.
— OR —
In the menu bar, click File and select New. If the File tab or menu is not available, click the blue Menu tab in the top-left corner and select New from the drop-down menu.
Creating a document with LibreOffice and OpenOffice
LibreOffice and OpenOffice Writer are other great free products that allow anyone to create documents on their computer and can even support most of the features in Word. Below are the steps on how to run LibreOffice and OpenOffice in Windows.
Open LibreOffice and OpenOffice in Windows
- In Windows, click Start.
- In the search box, type writer. If LibreOffice or OpenOffice is installed, either LibreOffice Writer or OpenOffice Writer show in the search results.
Tip
In Windows 10, the search box is on the Taskbar next to Start. In Windows 8, start typing writer on the Start page and the search results show on the right side of the screen.
How to install LibreOffice or OpenOffice
LibreOffice is available for download on the LibreOffice website and OpenOffice is available for download on the OpenOffice website.
Once either of these programs are installed, you can follow the steps above to create a document.
Creating a document with AbiWord
AbiWord is another great free product and solution for creating documents on your computer. Below are the steps on how to create a document with AbiWord.
- Open AbiWord.
- Click File and New or press the shortcut Ctrl+N to create a new document.
- Type the document you want to create.
- Save the document by clicking File > Save or pressing the shortcut key Ctrl+S.
- Free Courses
- Microsoft Word
- How to Create a Word Document
How to Create New Documents in Word
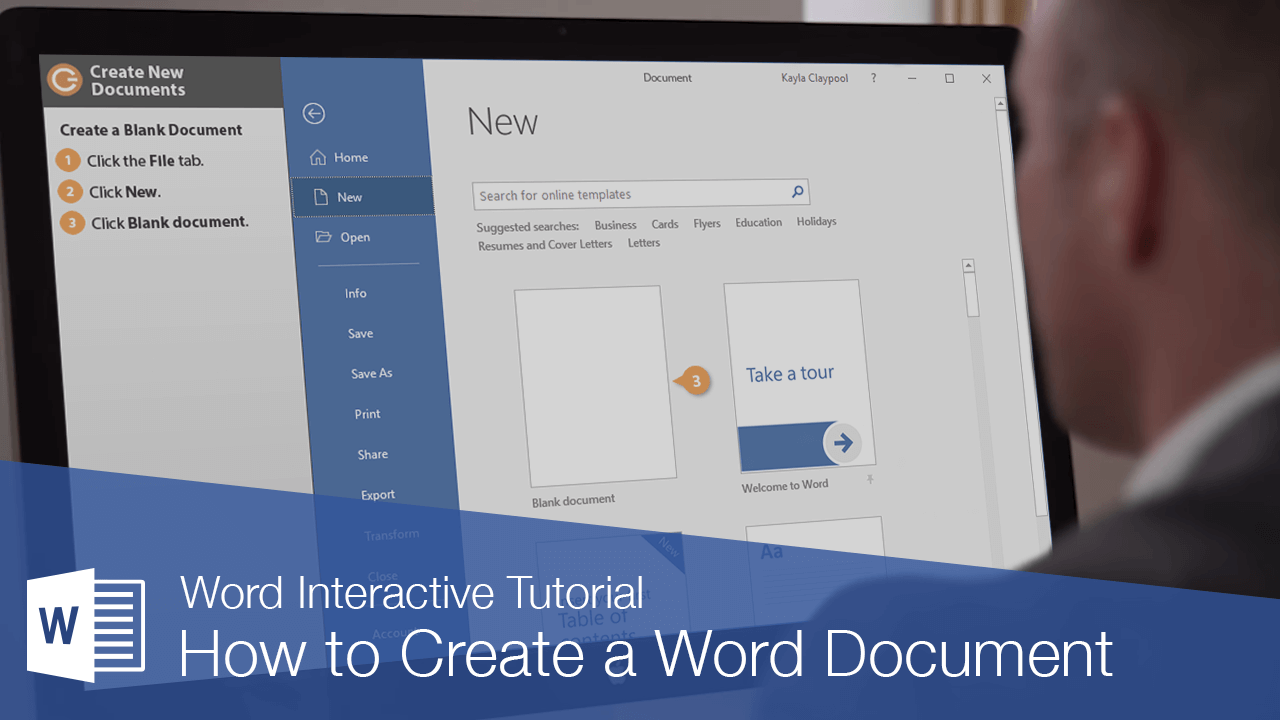
Creating a new document is one of the most basic commands you need in Word. You can create a new blank document, or you can create a new document based on a template.
Create a Blank Document
- Click the File tab.
- Click New.
- Select Blank document.
A new, blank document is created in a new window.
Press Ctrl + N to open a new blank document.
Create a Document from a Template
- Click the File tab.
- Click New.
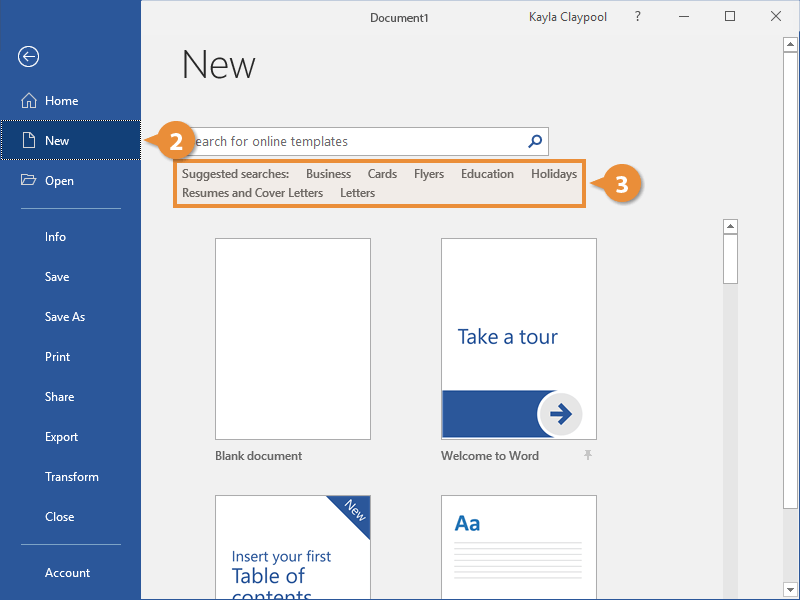
The New screen has a few ways for you to select a template.
First, several featured templates will appear, after the Blank document template.
You can also search for a template using the search field or select a template category from the suggested searches.
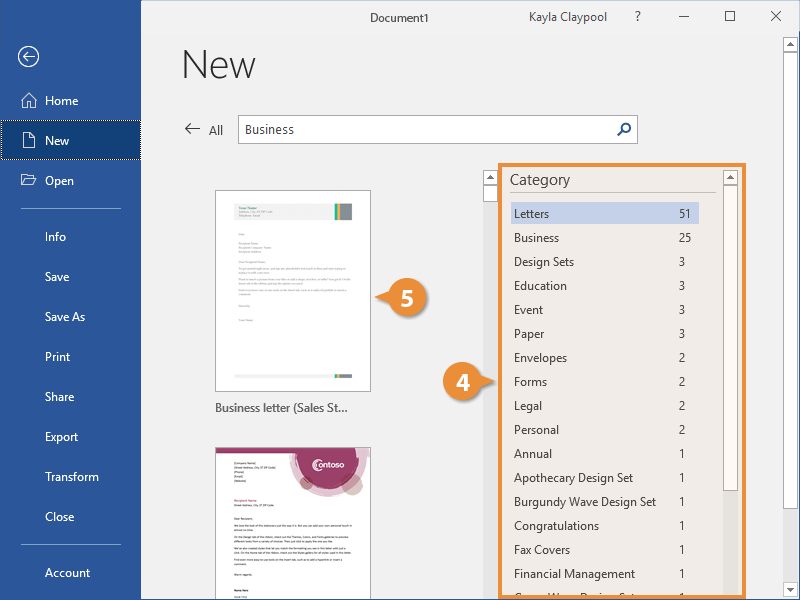
- (Optional) Select or search for a template category.
Preview images of the templates will appear for the selected category, along with a Category list.
- (Optional) Select or search for a template category.
Selecting additional categories allows you to narrow your template search even more. Only templates that fit into all the selected categories will appear.
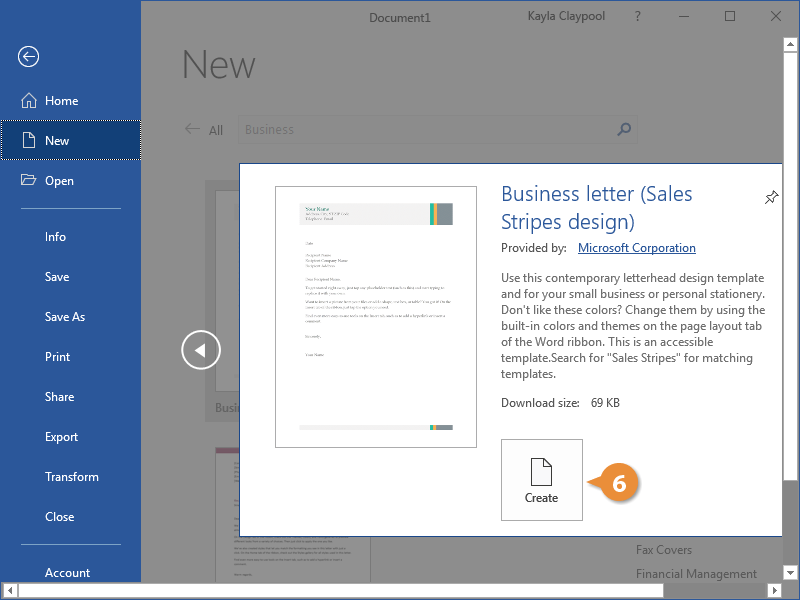
- Select a template.
A larger preview of the template appears, along with a description.
- Click Create.
A new document from the template is created. Now, just fill in the placeholders.
FREE Quick Reference
Click to Download
Free to distribute with our compliments; we hope you will consider our paid training.
How would you create a document? To create a document, you will need a word processing application installed in your computer system. You might also use online word processing apps such as Google Docs, Zoho Writer, Pages, Office online, etc.
There are different word-processing desktop applications that you can use to create a document. Some of them are Pages for Apple devices, WordPerfect for Windows only, and LibreOffice for Linux, Windows, and Mac. In this tutorial, our emphasis is on creating a document using Microsoft Word only.
From the previous tutorial [What is Microsoft Word?], we discovered that you can create different kinds of documents in Word. For example, letters, reports, memos, newsletters, flyers, books, etc. In this Microsoft Word tutorial, we shall learn how to create letters, resumes, invoices, and certificate documents.
Creating your First Document
Creating your first document begins with saving a new document or by creating a file. There are two options:
- Create a document from available templates
- Start with a blank document template
Every document created will be saved to allow us to have access to them in the future. Also, every change made to a document requires saving to sustain the changes. This means that when something is added or removed from a document, it must be saved to sustain the changes.
Before we delve into creating different kinds of documents, let us understand how to save a document. This is the process of creating a file. You can create a file in any compatible application using a similar method.
Create a file in MS Word
Saving a document is the process of storing a document in a storage device for easy accessibility in the future. When you create a document, you must preserve it so you can use it in the future. The saved document which becomes a file can be:
- archived for future references
- updated or revised to meet the present-day needs
- deleted if it is no longer needed
The document is usually saved in a storage device which is primarily the hard drive in the computer system. There are other storage devices where you can save your documents, including the cloud. Microsoft has made it easy for you to save documents in the cloud using OneDrive for your desktop. Documents saved in the cloud are accessible from any device by using your Microsoft ID.
Also Available:
- What is Microsoft Word: A Practical Overview
- What is a Word Processor in 2021?
- What are Word Processing Fundamentals?
- Fundamental Concepts of Computer System
Also, to save a document, you need to place it in a folder. The default folder where all documents are saved in Microsoft Word is called Documents. However, you have the option of choosing an appropriate folder where your documents will be saved. Hence, you can create new folders for ease of file organization.
This means that as a business owner or student, you can have different folders where different files are stored. Files for research work can be stored in the research folder, while other files are stored in documents. Haven said this, how do you save your documents?
To save your document or create a file in Microsoft word, do the following:
- Open Microsoft Word using any of the methods discussed in our previous post.
- On the Microsoft Word window that appears, do any of the following:
- Select the Save button on the Quick Access toolbar; or
- Press [CTRL+S] on the keyboard; or
- Go to File, from the file menu, select Save. The Save this file mini dialog box will appear.
- On this dialog box (shown above), enter a name for your document in the File Name box.
- Choose the location (folder) where you want to save your file under Choose a Location. NB: available locations are folders you recently saved a file, including OneDrive.
- When you are done, click the Save button to save your document.
Choosing a different location for your file
Sometimes, the location you may want to save your document will not be available on the mini dialog. Or, you may want to create a new folder for your document. If this is the case, continue with the following steps.
- On the Save this file mini dialog box, select More options… The Save As (backstage view) will appear. You can also select More Locations → in the Choose a Location menu.
- On the Save As backstage view, you will notice two panes. The left pane displays links to the different locations you can save your document. The right pane displays available folders in your selected location.
- Select a location on the left pane, e.g., OneDrive – Personal. On the right pane, select the folder location you want to save your document, e.g. My Tutorial-Courses. The Save As dialog box will appear.
- On the Save As dialog box, enter a name for your document in the File Name box.
- Click the Save button.
Creating a new folder for your file
To enhance file organization, you may want to create a folder for your new document. The folder may contain all the files of that department, sector, or job. If you feel like creating a new folder location for your new document in Microsoft Word. Then, continue with the following steps.
- On the Save As dialog box (shown above), select the New folder button. The new folder will immediately appear on the list of files.
- Change the “New folder” name to the appropriate name you want, and press Enter on the keyboard.
- Select the Open button to open the folder location.
- Enter a name for your document in the File Name box, and click the Save button.
What is Microsoft word compatibility mode?
Microsoft Word compatibility mode is a file format that is compatible with other applications. It extends functionality to other applications for viewing or /and editing purposes.
For example, Microsoft Word 97-2003 uses the .doc file extension while 2007 and above use .docx. This implies that documents saved in word 2007 and above formats cannot be opened in word 97-2003. Similarly, documents created in Microsoft word applications cannot be opened in other word processors.
To ensure that your document is compatible with other apps, you will need to save it in a compatibility mode. This is simply a means of extending functionality to other word processing applications. It will then allow you to view or edit your document with other applications. This is important, especially, when viewing your file in a system that does not have Microsoft word.
Some of the compatibility formats available in Microsoft word include
- PDF/XPS: This will allow you and others to view a word document using Adobe Acrobat Reader or XPS viewer. You can only edit the document in Adobe reader if you have access to pdf editor.
- Word 97-2003: This will enable you and others to view and edit documents created in Word 2007 – 2019 in word 97 – 2003. This is the word compatibility mode that enables people who are using older versions to access your document.
- Rich text format: This is a format that allows your word document to be accessible in different word processors. Though it has limited functionality. Documents with the .rtf extension can be opened and edited in the WordPad application.
- Open document text: This is a format that is compatible with OpenOffice word processing applications. To create a document that is compatible with people using OpenOffice or LibreOffice, use this extension.
Save in compatibility mode
To save your document using the compatibility mode, continue with the following:
- On the Save As dialog box shown below.
- Click the Save as type: dropdown menu.
- From the list, select the file type you want. E.g. Word 97-2003 Document for word compatibility; PDF to convert to PDF; OpenDocument text for .odt extension.
- Select the Save button.
Now that you have learned how to save your document, always remember to save every change made.
Create a document in Microsoft Word using a template
Microsoft word makes it easy and faster to create any type of document through its list of templates. Templates are prototype documents that one can mimic when creating his/her document. It removes the hassle required when creating a document from the scratch. It also makes it easy for those not familiar with MS Word to create professional-looking documents.
Microsoft Word installs different document templates that you can use on your computer. If you did not see what you want, you can browse online for more templates.
Create a letter document using a template
To use a template to create a letter, do the following:
- Open Microsoft Word app in backstage view.
- If MS Word is already open, go to File and select New from the menu.
- On the window that appeared, scroll down to choose a letter template of your choice.
- If you did not see a letter template, select the Letters link under the Search Box. You can also search for letters in the search box. NB: you need an internet connection.
- Scroll down through the search result to see the types of letters available.
- Select the appropriate type of letter from the list. E.g., cover letter, thank you letter, letter of resignation, etc.
- On the ‘create letter’ window that appears, click on the Create button. The template will be downloaded and opened in a new window.
- On the template’s window, select each placeholder, delete the default text and replace them with yours.
- Save the document.
Create a certificate document using a template
To create a document using a certificate template, do the following:
- Repeat steps 1 – 4 above.
- In step (4), enter ‘certificates’ in the Search Box and press Enter on the keyboard.
- Continue with steps 5 – 9 above.
Create a document using a blank document
You can create a document from the scratch without the assistance of a template. This requires the knowledge of Microsoft Word. A blank document presents you with an empty page. You will need to add texts, images, shapes, and placeholders in other to create a professional document.
Let us get started creating documents with a blank document.
- Open Microsoft Word. Word opens in the backstage view.
- On the backstage view, select Blank document. A blank word document opens.
- If Microsoft word is already open, follow any of these steps:
- Go to File and select New. On the New view, select Blank document.
- On the Quick Access toolbar, select the New file icon.
- Press CTRL+N on the keyboard.
- Save your blank document.
Creating different kinds of documents in Microsoft Word
Let us use the blank document template to create the following types of documents: resume, and invoice. We will illustrate how, but you will complete the document yourself. We shall use the default document size in all our illustrations.
Create a resume document in word using a blank document
A resume has different formats. You can use any of the formats provided by the templates in Microsoft Word. However, we shall create a simple resume with a simple design.
A resume is a single page that briefly shows the following information:
- name, contacts, and objectives
- biodata, and
- professional qualifications including education, skills, and work experience
Let us begin in the following steps.
- Open a new Microsoft word document.
- On the Layout tab, select Columns and choose Left.
- On the left side of the page, insert a picture by doing the following:
- Go to Insert tab, under Illustrations, select Pictures.
- From the dropdown list, select This Device. The insert pictures dialog window will appear.
- Choose a picture and click the Insert button. The picture is inserted into the document. Click outside the image and press the Enter key on the keyboard.
- Under the picture in your document, insert a table with one column and four rows as follow.
- Go to the Insert tab and select Table.
- From the dropdown menu, point on column 1 and move to the 4th row, and select.
- A table with one column and four rows will appear on your document.
- Select the box on the bottom-right of the table and drag it towards the bottom of the page.
- Alternatively, you can start entering information in the respective rows of the table. As information fills each row, the table will expand on its own.
- Fill in the information on each row under the following headings: Objectives, Skills, Contacts, and Hobbies.
- When you are done, click outside the table (specifically, below the table). Press Enter key on the keyboard to move to the right column.
- On the right side of the page, insert another table with three rows. Follow the same process discussed above.
- Enter information under the following headings on each row: Biodata, education, and work experience.
- The complete document should look like the image below. The color formatting should not be a problem for you.
Create an invoice document in Microsoft word using a blank document
An invoice is used to capture product sales. It can have different formats. You may decide to use any of the formats provided by the templates in Microsoft Word. Here, we shall create a simple invoice. Over time you can create invoices with sophisticated design.
An invoice should contain the following information:
- Name of company and contact information
- Name of a customer with contact information or space to include such
- Date, invoice no., and products description including quantity, rate, and total amount.
Let us begin in the following steps.
- Open a new Microsoft word document.
- On the Insert tab, under Illustrations, select Pictures. Choose a picture that represents the logo of the organization.
- Under the picture, insert a 1×1 (one column and one row) table. In this table, enter the company’s name and contact information.
- Go to the Insert tab, under Illustrations, select Shapes. From the list of shapes, under Basic Shapes, select the Text Box.
- On the right side of the page, along with the logo image, click and drag to create a text box.
- In the text box, insert a 1×2 table (1 column and 2 rows). See the final image below.
- In the first row, enter the following information: INVOICE, Date, and invoice no.
- In the second row, enter the information of the customer. If the information is not handy, enter lines to create a space so that the information can be entered manually.
- Click below the text box and press the Enter key.
- Insert a 4×11 table and adjust the width of the columns.
- Enter the following information appropriately Qty, Description, Rate, Amount, Subtotal, VAT, and Total. See the final document below.
- Highlight the three rows of subtotal, VAT, and Total.
- Go to the Design tab, under Borders, select Borders. From the list that appears, click on Borders and Shading…
- The Borders and Shading dialog box will appear.
- In the borders and shading dialog, under Preview, remove all borders except the top and right borders. Remove borderlines by clicking on the borderlines on the preview window.
- Click OK to apply changes.
The final document after all changes is made should look like the image below. If you didn’t get it exactly, don’t worry, but keep practicing.
To edit a document means to either add items or remove existing ones from a document. It is simply called updating a document.
Before you edit a document, the document must have been existing. Hence, you will locate the document, open it before you can edit it. Let us go through the process.
Open an existing document
To open an existing Microsoft Word document or file, follow the following steps.
- Locate the folder where the file is stored, and double click the file to open it; OR
- Click the Start button, and type in the name of the file in the Search box. Select the file from the results that appears; OR
- Open Microsoft word application.
- On the File menu, check through the list of Recent files.
- Select the file you want to open. The document opens.
- If the document is not on the Recent list, do the following:
- Select Open from the backstage view.
- On the left pane, choose a location where the file is stored, say, This PC, OneDrive.
- On the right pane, select the Folder or the File you want to open. If you selected a folder, it will expose the files on the folder. Then select the file you want to open within the folder.
- Instead of the File menu, you can also do any of this to display the Open Backstage View.
- On the Microsoft word window, select the Open icon on the Quick Access toolbar.
- Press CTRL+O on the keyboard.
- Follow step 6(a-c)
Edit a document
To edit a document in Microsoft word, you will learn how to insert texts and images, and format them. Here, we just introduced the method. You will need to follow through this tutorial to master how to work with Microsoft word. Meanwhile, do the following:
- Place your cursor where you want to enter additional text and start typing. Highlight the texts and format them appropriately.
- Highlight the texts you want to remove from the document and press Delete on the keyboard.
- Place the cursor where you want to insert a shape or image and press Enter on the keyboard. Select the appropriate shape you want to add. Insert and format the shape(s) appropriately.
- Use the Spelling & Grammar check tool to proofread the document.
- When you are done editing, save the document to update the changes made.
Conclusion
To create a document in Microsoft word, you will need a word application installed on your PC. Alternatively, you can use the online version of MS Word.
In this tutorial, we learned how to create simple documents using Microsoft word. We created the following documents a letter, an invoice, and a resume. These documents were created using templates and blank documents.
To effectively work with Microsoft word, you need to learn how to use it. This is why we are bringing this tutorial to you. Continue with us next week as we bring to you how to set up your document.


