To create a form in Word that others can fill out, start with a template or document and add content controls. Content controls include things like check boxes, text boxes, date pickers, and drop-down lists. If you’re familiar with databases, these content controls can even be linked to data.
Show the Developer tab
If the developer tab isn’t displayed in the ribbon, see Show the Developer tab.
Open a template or a blank document on which to base the form
To save time, start with a form template or start from scratch with a blank template.
-
Go to File > New.
-
In Search online templates, type Forms or the type of form you want and press ENTER.
-
Choose a form template, and then select Create or Download.
-
Go to File > New.
-
Select Blank document.
Add content to the form
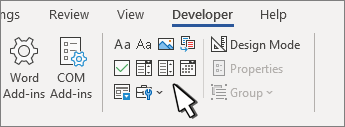
Go to Developer, and then choose the controls that you want to add to the document or form. To remove a content control, select the control and press Delete. You can set properties on controls once inserted.
Note: You can print a form that was created using content controls, but the boxes around the content controls will not print.
In a rich text content control, users can format text as bold or italic, and they can type multiple paragraphs. If you want to limit what users add, insert the plain text content control.
-
Click or tap where you want to insert the control.
-
Select Developer > Rich Text Content Control
or Plain Text Content Control
.
To set specific properties on the control, see Set or change properties for content controls.
A picture control is often used for templates, but you can also add a picture control to a form.
-
Click or tap where you want to insert the control.
-
Select Developer > Picture Content Control
.
To set specific properties on the control, see Set or change properties for content controls.
Use building block controls when you want people to choose a specific block of text. For example, building block controls are helpful when you need to add different boilerplate text depending on the contract’s specific requirements. You can create rich text content controls for each version of the boilerplate text, and then you can use a building block control as the container for the rich text content controls.
-
Click or tap where you want to insert the control.
-
Go to DeveloperBuilding Block Gallery Content Control
(or Building Block Content Control).
-
Select Developer and content controls for the building block.
-
Click or tap where you want to insert the control.
To set specific properties on the control, see Set or change properties for content controls.
In a combo box, users can select from a list of choices that you provide or they can type in their own information. In a drop-down list, users can only select from the list of choices.
-
Go to Developer > Combo Box Content Control
or Drop-Down List Content Control
.
-
Select the content control, and then select Properties.
-
To create a list of choices, select Add under Drop-Down List Properties.
-
Type a choice in Display Name, such as Yes, No, or Maybe.
Repeat this step until all of the choices are in the drop-down list.
-
Fill in any other properties that you want.
Note: If you select the Contents cannot be edited check box, users won’t be able to click a choice.
-
Click or tap where you want to insert the date picker control.
-
Select Developer > Date Picker Content Control
.
To set specific properties on the control, see Set or change properties for content controls.
-
Click or tap where you want to insert the check box control.
-
Select Developer > Check Box Content Control
.
To set specific properties on the control, see Set or change properties for content controls.
Legacy form controls are for compatibility with older versions of Word and consist of legacy form and Active X controls.
-
Click or tap where you want to insert a legacy control.
-
Go to Developer > Legacy Forms
drop-down.
-
Select the Legacy Form control or Active X Control that you want to include.
Set or change properties for content controls
Each content control has properties that you can set or change. For example, the Date Picker control offers options for the format you want to use to display the date.
-
Select the content control that you want to change.
-
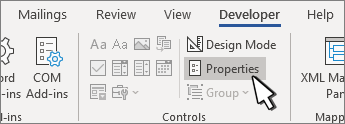
Go to Developer > Properties.
-
Change the properties that you want.
Add protection to a form
If you want to limit how much others can edit or format a form, use the Restrict Editing command:
-
Open the form that you want to lock or protect.
-
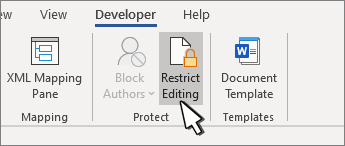
Select Developer > Restrict Editing.
-
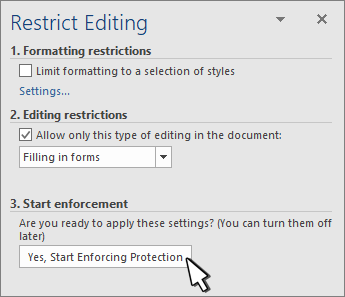
After selecting restrictions, select Yes, Start Enforcing Protection.
Advanced Tip:
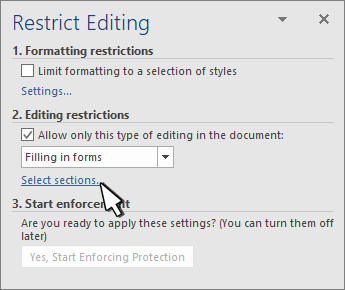
If you want to protect only parts of the document, separate the document into sections and only protect the sections you want.
To do this, choose Select Sections in the Restrict Editing panel. For more info on sections, see Insert a section break.
Show the Developer tab
If the developer tab isn’t displayed in the ribbon, see Show the Developer tab.
Open a template or use a blank document
To create a form in Word that others can fill out, start with a template or document and add content controls. Content controls include things like check boxes, text boxes, and drop-down lists. If you’re familiar with databases, these content controls can even be linked to data.
-
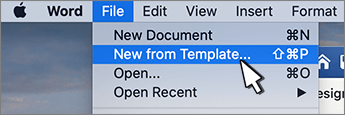
Go to File > New from Template.
-
In Search, type form.
-
Double-click the template you want to use.
-
Select File > Save As, and pick a location to save the form.
-
In Save As, type a file name and then select Save.
-
Go to File > New Document.
-
Go to File > Save As.
-
In Save As, type a file name and then select Save.
Add content to the form
Go to Developer, and then choose the controls that you want to add to the document or form. To remove a content control, select the control and press Delete. You can set Options on controls once inserted. From Options, you can add entry and exit macros to run when users interact with the controls, as well as list items for combo boxes, .
-
In the document, click or tap where you want to add a content control.
-
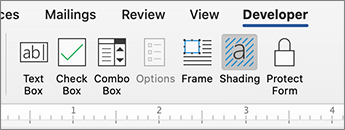
On Developer, select Text Box, Check Box, or Combo Box.
-
To set specific properties for the control, select Options, and set .
-
Repeat steps 1 through 3 for each control that you want to add.
Options let you set common settings, as well as control specific settings. Select a control and then select Options to set up or make changes.
-
Set common properties.
-
Select Macro to Run on lets you choose a recorded or custom macro to run on Entry or Exit from the field.
-
Bookmark Set a unique name or bookmark for each control.
-
Calculate on exit This forces Word to run or refresh any calculations, such as total price when the user exits the field.
-
Add Help Text Give hints or instructions for each field.
-
OK Saves settings and exits the panel.
-
Cancel Forgets changes and exits the panel.
-
-
Set specific properties for a Text box
-
Type Select form Regular text, Number, Date, Current Date, Current Time, or Calculation.
-
Default text sets optional instructional text that’s displayed in the text box before the user types in the field. Set Text box enabled to allow the user to enter text into the field.
-
Maximum length sets the length of text that a user can enter. The default is Unlimited.
-
Text format can set whether text automatically formats to Uppercase, Lowercase, First capital, or Title case.
-
Text box enabled Lets the user enter text into a field. If there is default text, user text replaces it.
-
-
Set specific properties for a Check box.
-
Default Value Choose between Not checked or checked as default.
-
Checkbox size Set a size Exactly or Auto to change size as needed.
-
Check box enabled Lets the user check or clear the text box.
-
-
Set specific properties for a Combo box
-
Drop-down item Type in strings for the list box items. Press + or Enter to add an item to the list.
-
Items in drop-down list Shows your current list. Select an item and use the up or down arrows to change the order, Press — to remove a selected item.
-
Drop-down enabled Lets the user open the combo box and make selections.
-
-
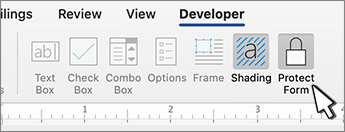
Go to Developer > Protect Form.
Note: To unprotect the form and continue editing, select Protect Form again.
-
Save and close the form.
If you want, you can test the form before you distribute it.
-
Protect the form.
-
Reopen the form, fill it out as the user would, and then save a copy.
Show the Developer tab
-
On the right side of the ribbon, select
, and then select Ribbon Preferences.
-
Under Customize, select Developer .
Open a template or a document on which to base the form
You can start with a blank document and create your own form. Or, to save time, you can start with a form template.
-
Go to File > New from Template.
-
In the left pane, expand Online Templates, and then select Forms.
-
Double-click the form template that you want to use.
Add content controls to the form
-
In the document, click where you want to add the control.
-
On the Developer tab, under Form Controls, select Text Box, Check Box, or Combo Box.
-
To set specific properties for the control, select Options, and then configure the properties that you want.
Note: To create a list of drop-down items in a combo box, select the combo box placeholder, click Options, and then add the items that you want to appear in the drop-down list.
-
Repeat steps 1 through 3 for each control that you want to add.
Add instructional text (optional)
Instructional text (for example, «Type First Name») in a text box can make your form easier to use. By default, no text appears in a text box, but you can add it.
-
Select the text box control that you want to add instructional text to.
-
On the Developer tab, under Form Controls, select Options.
-
In Default Text, type the instructional text.
-
Make sure that Fill-in enabled is selected, and then select OK.
Protect the form
-
On the Developer tab, under Form Controls, select Protect Form.
Note: To unprotect the form and continue editing, click Protect Form again.
-
Save and close the form.
Test the form (optional)
If you want, you can test the form before you distribute it.
-
Protect the form.
-
Reopen the form, fill it out as the user would, and then save a copy.
Creating fillable forms isn’t available in Word for the web.
You can create the form with the desktop version of Word with the instructions in Create a fillable form.
When you save the document and reopen it in Word for the web, you’ll see the changes you made.
You can use Word to create interactive digital forms that other people can fill out on their computers before printing or sending them back to you. It takes a little preparation but keeps you from having to decipher messy handwriting! Some of the tools you will use when creating a form include:
- Templates: Forms are normally saved as templates so that they can be used again and again.
- Content controls: The areas where users input information in a form.
- Tables: Tables are often used in forms to align text and form fields, and to create borders and boxes.
- Protection: Users can complete the form fields without being able to change the form’s text and/or design.
Show the Developer Tab
Before you can create a form, you’ll need to turn on the Developer tab to get access to the advanced tools.
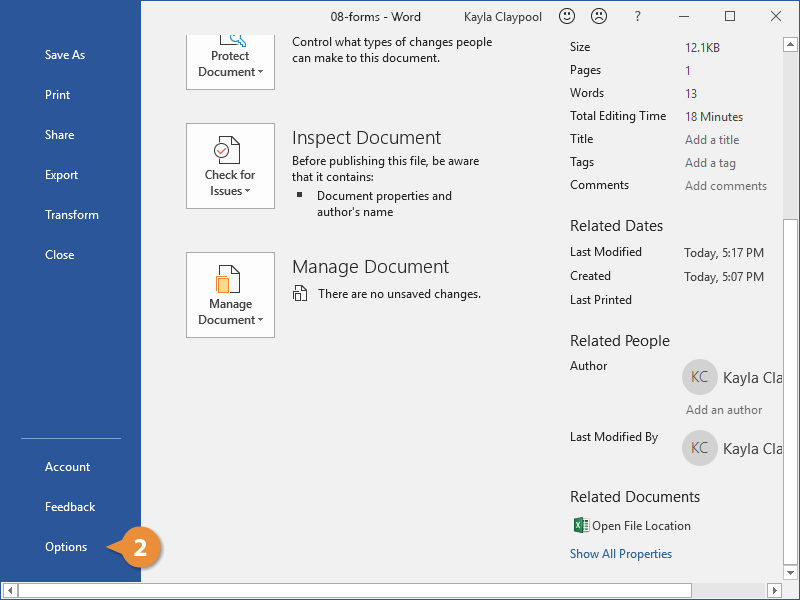
- Click the File tab.
- Select Options.
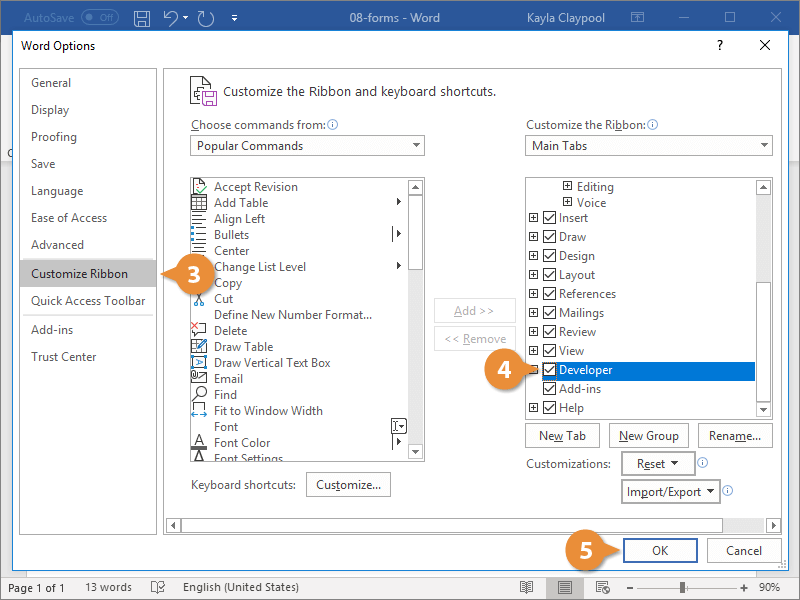
The Word Options window opens.
- Click the Customize Ribbon tab on the left.
The column on the right controls which ribbon tabs are enabled.
- Check the Developer check box.
- Click OK.
The Developer tab now appears on the ribbon. In addition to advanced tools for macro recording, add-ins, and document protection, we now have access to form controls.
Create a Form
Once you’ve enabled the Developer tab, and created the layout and structure of the form, you can start adding form fields to your document with Content Controls.
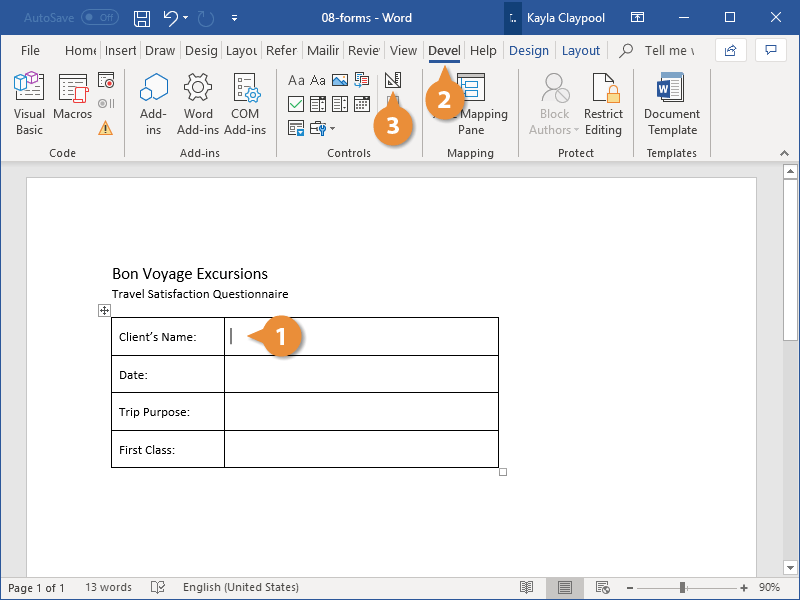
- Place the text cursor where you want to insert the form field.
- Click the Developer tab on the ribbon.
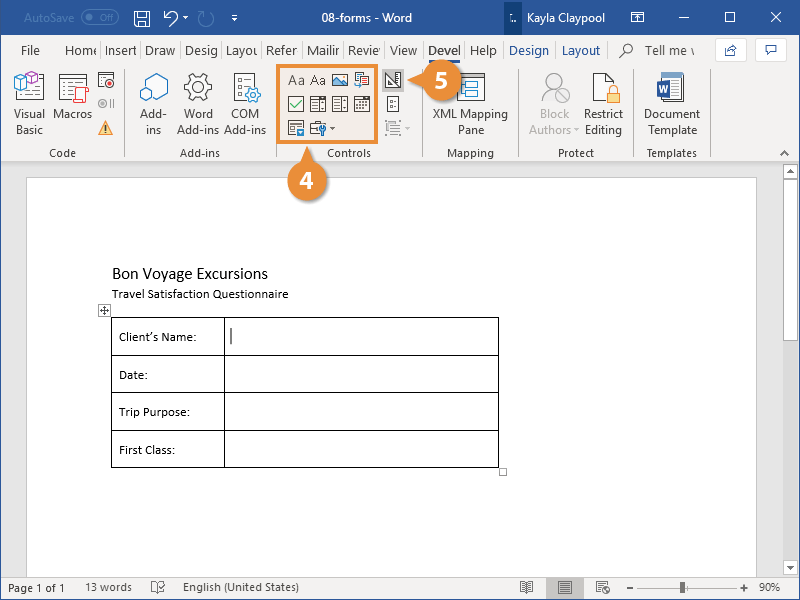
The Controls group contains the different kinds of content controls you can add to a form, as well as the toggle button for Design Mode.
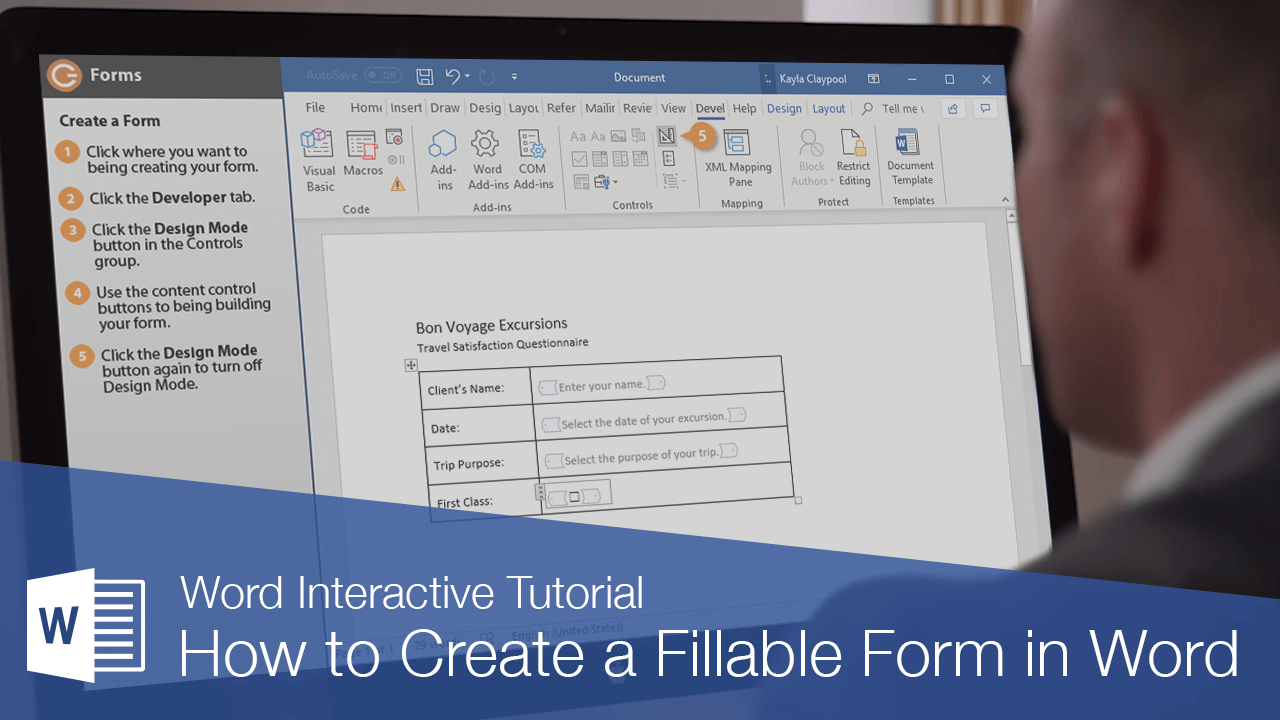
- Click the Design Mode button in the controls group.
While Design Mode is active, controls you insert won’t be active, so clicking a check box to move it around won’t also check it. You can also customize placeholder text for some controls.
- Click a Content Control buttons to insert the selected type of control.
The content control is inserted.
Select a form field and click the Properties button on the ribbon to edit a control’s options. Depending on the type of control you’ve inserted, you can change its appearance, set up the options in a list, or lock the control once edited.
- When you’re done, click the Design Mode button again to exit Design Mode.
You leave Design Mode, and the content controls that you’ve inserted can now be used.
Types of Form Controls
There are many different types of form controls you can add to a form that will allow people to add different types of responses.
Finalize a Form
When you’re ready to distribute a form so others can fill it out, you can restrict the form so that content controls cannot be removed or changed by those filling it out.
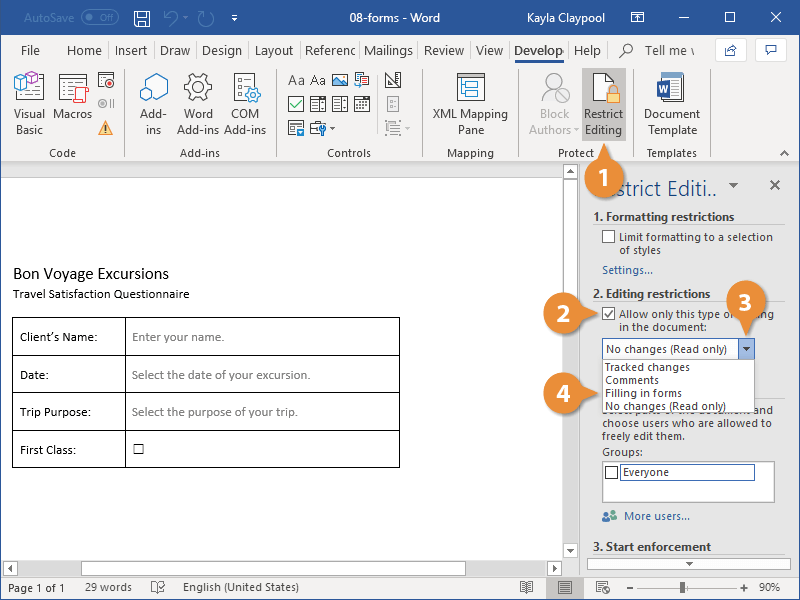
- Click the Restrict Editing button on the Developer tab.
The Restrict Editing pane appears on the right.
- Check the Editing restrictions check box.
- Click the Editing restriction list arrow.
- Select Filling in forms.
When this option is enabled, the only change that anyone else can make to this document is the filling in of form fields. They won’t be able to move, delete, or edit the fields themselves until protection is turned off.
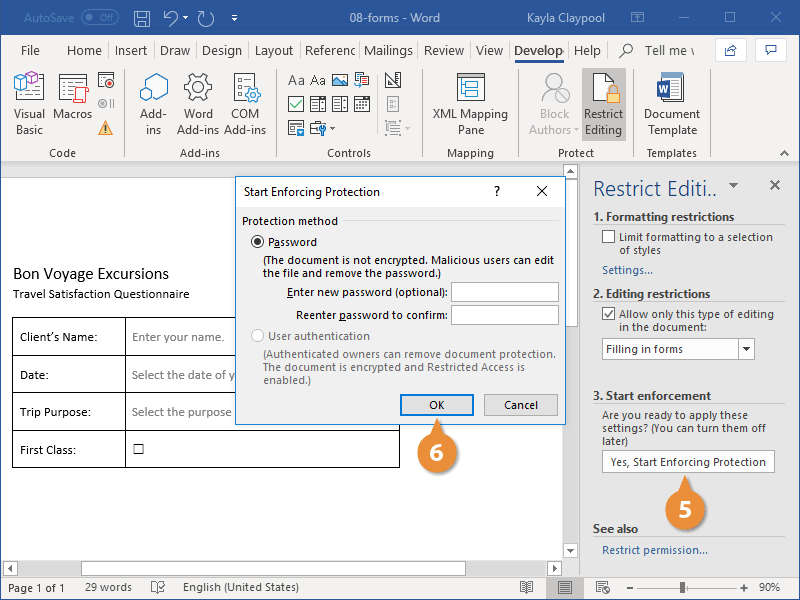
- Click the Yes, Start Enforcing Protection button.
A password is not required to start enforcing protection, but you can add one if you’d like to prevent just anyone from turning this protection off.
- Enter a password (optional), then click OK.
The document is now restricted, and anyone you send it to will only be able to fill in the forms.
FREE Quick Reference
Click to Download
Free to distribute with our compliments; we hope you will consider our paid training.
Forms are a great way to gather information. Aside from being interactive, they also make it easier for you to connect with your intended audience, especially since there are many ways to deliver forms today. Whether it’s through email or website or any other platform, forms allow you a convenient, highly customizable way to collect important and relevant data, especially when they are created in Word. Let us show you how to create forms in Word.
We all know Word has been around for a long time as a top word processing application. Over the years, it has added more features to tailor to its users’ needs. When it comes to forms in Word, the steps are easy and practically fool-proof. Anyone can create beautiful, interactive, and useful forms, surveys or questionnaires that can be downloaded or printed to be handed out traditionally.
Create Forms in Word Through the Developer Tab
To create forms in Word, you first have to turn on the Developer tab. To do this, click File and then Options to open the Word Options dialog box, where you can select Customize Ribbon. Here, click the Developer checkbox. Click OK.
Once the Developer tab is enabled, you can now create your forms. You can do this by adding different parts of the form to your Word document, called content control fields.
To add each control field, you simply place your cursor anywhere you like in the document, then choose a field from the Controls group among the menu options under the Developer tab. Hover your mouse over the different options to find which content control field suits your needs.
Create Relevant Questions
Create questions relevant to the information you want to gather. In our example, you can add a date selection field at the top of your questionnaire. Then, you can start your customer satisfaction survey by finding out just how often your customers visit your restaurant. You can also have a text form field to allow your customers or respondents to enter their own specific answers, which may not be among your premade choices.
Aside from date pickers and checkboxes, you can also add pictures, content gallery, combo box, and many other content controls.
Customize Forms in Design Mode
If you want a more customized look for your forms or questionnaires, you can turn on the Design Mode under the Controls group, which is also in the Developer tab. From here, you can create a more robust and more personalized form. You can customize each field with a little more time and creativity. One good example is creating a drop-down list, which is often used in online forms.
You can also add instructions to add more usability to your forms in Word. This makes it easy for your respondents to follow the survey and make fewer mistakes.
Video Tutorial
You can also refer to this brief video tutorial by Business Management Daily to get an idea regarding how to create forms in Word.
Once you have added all the necessary fields in your documents or forms in Word, you can then send them out to your respondents. You can do this by emailing them the form by using your mailing list. You can also upload this to your website. For a more traditional route with a more personal flair, you can print out the forms and give each of them out personally to your customers or target respondents.
If you’ve ever used Microsoft Word, you’ve probably spent a lot of time customizing different options to get your document to look exactly the way you want. But have you ever created a document for other people to use?
For example, let’s say you’re organizing a field trip and want everyone to send in their permission forms electronically. To simplify the process, you could create a form in Microsoft Word. A form allows you to create placeholders for different types of information, such as text, dates, yes-no questions, and so on. This makes it easier for everyone to know what type of information to include, and it also helps ensure all of the information is formatted the same way.
We’ll use Word 2013 to show you how to create a form, but this should work the same way for Word 2010 or Word 2007. You can also download our example file if you’d like to follow along.
Step 1: Turn on the Developer tab
Before you create form elements in a document, you’ll need to activate the Developer tab on the Ribbon. To do this, click File > Options to access the Word Options dialog box. Select Customize Ribbon, then click the check box for the Developer tab.
The Developer tab will appear on the Ribbon.
Step 2: Add content controls
Now you’re ready to add the different parts of the form, which Word calls content control fields. To add a content control field, place your cursor in the desired location, then choose a field from the Controls group on the Developer tab. You can hover your mouse over the fields to see the different options. In this example, we’re adding a text field so users can type their first names.
The content control field will appear in the document.
You can add several types of fields. For example, you can add check boxes for a yes-no question:
Or even a date selection field:
Once you’ve added all of your fields to the document, you’re ready to send out the form for others to use!
Step 3: Customize as needed
If you want even more control over the way your form looks, you can turn on Design Mode from the Controls group on the Developer tab.
Then you can modify the properties for each content control field, including the text that will appear in each field. If you’re willing to spend a little more time customizing each field, you can build a pretty robust form. For example, you could create your own custom drop-down list, as in the example below:
Those are the basics of creating your own custom form in Microsoft Word. If you want to learn more, check out this article from Microsoft on how to Create a Fillable Form.

 or Plain Text Content Control
  .
. .
. (or Building Block Content Control).
 or Drop-Down List Content Control
  .
. .
. .
. drop-down.

 , and then select Ribbon Preferences.
