
Did you know that you can group numbers in Excel using tags? By just listing all the categories an item should belong to, you can make it easier to group them. In this post, I’ll show you how you can use tags in Excel to efficiently summarize different categories.
Creating tags
Suppose you wanted to list all the possible streaming services you might subscribe to. You might have a list that looks something like this:
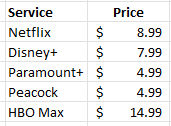
This is fine if you want to compare them or even tally them all up. But what if you wanted to look at different scenarios, such as what if you select some of these services, but not all of them? This is where tags can be really helpful. Let’s say I want to create the following categories:
- Basic
- Kids
- Tier 1
- Tier 2
- Tier 3
Each category will have a different mix of services. Here’s how I can use tags to make that happen. I’ll create another column next to the price where I specify all the categories a service will fall under:
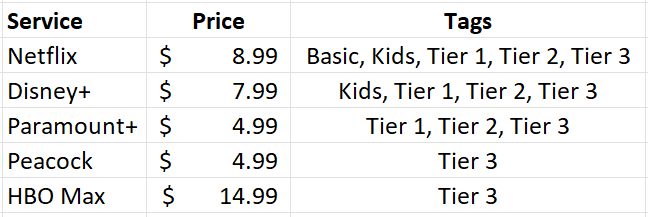
In the above example, Netflix is included in every package but HBO Max is only included in Tier 3. Next, what I’m going to do is create columns for each one of these tags, such as follows:

Without using tags, you might be tempted to put a checkmark to determine which service belongs in which category. But that’s not necessary here. Instead, I’m going to use a function to determine whether to pull in the price or not.
Using a formula to determine if a tag is found
The key to making this work is the SEARCH function. This will look within the tag values to see if there is a match. If there is, then the price will be populated within the corresponding category. To check if the ‘basic’ keyword is found within the tags related to Netflix (assume this is cell C2), this is how that formula would look:
=SEARCH(“basic”,C2,1)
This will return a value of 1, indicating that the term is found at the very start of the string. If you use the function to look for the word ‘kids’ then it would return a value of 8 as that comes after ‘basic in my example.’ Of key importance here is that there is a number. If there isn’t a number and instead there is an error, that means that the tag wasn’t found. I will adjust the formula as follows to check if there is a number:
=ISNUMBER(SEARCH(“basic”,C2,1))
This will return a value of either TRUE or FALSE. But the formula needs to go further than just identifying if the tag was found. It needs to pull in the corresponding value. To do this, I’ll need an IF statement to extract the value from column B:
=IF(ISNUMBER(SEARCH(“basic”,C2,1)),B2,0)
By freezing the formulas and copying this across the other categories, this formula will now allow me to pull in the amounts correctly based on the tags:
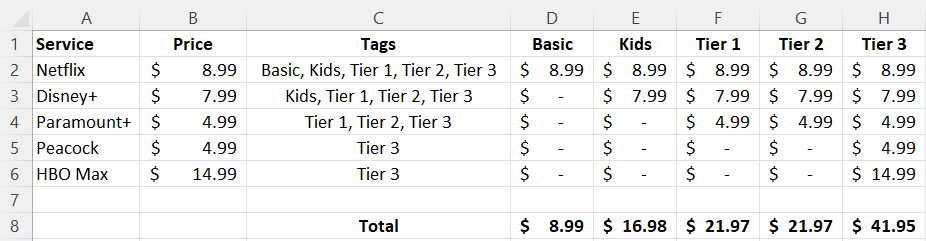
But let’s say you don’t even want to do this, you just want to quickly group the totals without these extra columns. You can also do that with the help of tags.
Summarizing the totals by category
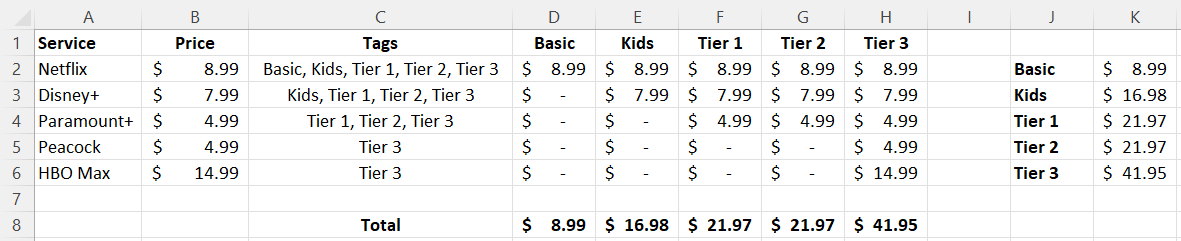
You don’t need to create a column for each group if you don’t want to. You summarize the total in just an array formula. Simply use the formula referenced earlier and include it within a SUM function, while referencing the entire range:
=SUM(IF(ISNUMBER(SEARCH(“basic”,C2:C6,1)),B2:B6,0))
This is the same logic as before, except this time the values will be totaled together. On older versions of Excel, you may need to use CTRL+SHIFT+ENTER after entering this formula for it to correctly compute as an array. But if you’re using a newer version, you don’t need to. If you copy the formula to the other categories, you’ll be able to sum the values by without the need for additional columns:
If you liked this post on Using Tags in Excel, please give this site a like on Facebook and also be sure to check out some of the many templates that we have available for download. You can also follow us on Twitter and YouTube.
One benefit of using Microsoft Excel to create tables containing information such as the names and titles of employees or conference attendees is that you can use that table later as a data source for a mail merge in Word. You can also use this feature to create nametags and print them on perforated sheets or customize the size to suit your needs. The key is setting up the spreadsheet for the merge and then using the correct fields to import the data into Word.
Preparing the Worksheet
Step 1
Add headings to the Excel worksheet if the columns do not already have them. Your headings do not have to match Word’s merge fields, but using functional headings such as «First Name» and «Last Name» will make the merge process easier.
Step 2
Delete any blank rows or columns within the data. Right-click on a blank row or column and select «Delete.» Choose «Entire Row» or «Entire Column» and click «OK.»
Step 3
Select the entire table. Click the «Formulas» tab and click «Define Name» in the Defined Names group. Enter a name for the list, such as «Nametags,» and click «OK.»
Step 4
Save the workbook and close Excel.
Performing the Merge
Step 1
Open Microsoft Word. Select the «Mailings» tab and click «Start Mail Merge» in the Start Mail Merge group. Choose «Step by Step Mail Merge Wizard.» The Mail Merge pane opens.
Step 2
Select «Labels» under Document Type and click «Next.» Click «Label Options» and choose the brand and product number if you are using commercial nametag sheets. Click the «New Label» button to enter custom label dimensions. Click «OK» to continue.
Step 3
Click «Next» to select your data. Select «Use an Existing List» and click «Next.»
Step 4
Click «Insert Merge Field» in the «Write & Insert Fields» group on the Mailings tab. Click on the first heading that you want to appear on the nametags, such as «First Name.» Insert all of the fields you want on the tags and format the fields as you want the text to appear, adjusting the font, size and alignment as needed. Click the «Update All Labels» button to add the merge fields to all of the nametags.
Step 5
Click «Next» to preview the nametags. Edit the tags as desired, then click «Next» to complete the merge.
Step 6
Click «Print» under Merge to print the nametags, or press «Ctrl-S» to save the nametags to use in the future.
References
Writer Bio
Tricia Goss’ credits include Fitness Plus, Good News Tucson and Layover Magazine. She is certified in Microsoft application and served as the newsletter editor for OfficeUsers.org. She has also contributed to The Dollar Stretcher, Life Tips and Childcare Magazine.
Image Credit
Photos.com/Photos.com/Getty Images
Select the entire table. Click the “Formulas” tab and click “Define Name” in the Defined Names group. Enter a name for the list, such as “Nametags,” and click “OK.”.
How do you make name tags?
Create and print a page of different labels Go to Mailings > Labels. Select Options. Select the type of printer you’re using. Select your label brand in Label products. Select the label type in Product number. Select OK. Select OK in the Labels dialog box. Type the information you want in each label.
How do I make name labels from Excel to Word?
With your address list set up in an Excel spreadsheet, Outlook Contacts, or a new list you created, you can use mail merge in Word to create mailing labels. Go to Mailings > Start Mail Merge > Labels. In the Label Options dialog box, choose your label supplier in the Label vendors list.
How do I print name tags from Excel?
Select Mailings > Write & Insert Fields > Update Labels. Once you have the Excel spreadsheet and the Word document set up, you can merge the information and print your labels. Click Finish & Merge in the Finish group on the Mailings tab. Click Edit Individual Documents to preview how your printed labels will appear.
How do I make a name tag online?
Create Custom Name Badges Online Step 1: Start a New Project. Go to Avery Design & Print Online, and click “Start Now.” Step 2: Choose Your Avery Product. Select the category, “Name Badges” from the list on the left. Step 3: Choose a Design. Step 4: Customize the Appearance. Step 5: View Instructions and Print. Step 6: Save.
How do I make mailing labels?
Create and print labels Go to Mailings > Labels. Select Options and choose a label vendor and product to use. Type an address or other information in the Address box (text only). To change the formatting, select the text, right-click, and make changes with Font or Paragraph. Select OK.
How do I print labels from Excel without word?
How to: How to Print labels from Excel without Word Step 1: Download Excel spread sheet and enable Macros. Step 2: Paste your single column data into 1A. Step 3: Press CTRL + e to activate the macro. Step 4: Choose “3” for number of columns. Step 5: Set margins to “custom margin”.
How do I add a label to a cell in Excel?
Add a label or text box to a worksheet Click Developer, click Insert, and then click Label . Click the worksheet location where you want the upper-left corner of the label to appear. To specify the control properties, right-click the control, and then click Format Control.
How do you create a mailing list in Excel?
Here are some simple steps for building and printing your mailing list in Excel: Step 1: Open Excel. Step 3: Type or paste in your customer or lead list directly into Excel. Step 4: Save your mailing list. Step 5: Open a MS Word document. Step 6:Go to the Mailings Menu > Start Mail Merge >Step by Step Mail Merge Wizard.
Can you make Avery labels from an Excel spreadsheet?
You can import addresses or other data from an Excel spreadsheet and add them on Avery labels, cards, and tags. Then you can print using Avery Labels, Microsoft, and a standard printer.
How do I create a mail merge from Excel?
You can insert one or more mail merge fields that pull the information from your spreadsheet into your document. Go to Mailings > Insert Merge Field. Add the field you want. Repeat steps 1 and 2 as needed. Choose File > Save.
How do you separate names in Excel?
Read the steps Add an empty column by right-clicking on the top of the column next to the existing column of names, then select Insert. Click the Data tab. Click on the top of the column with your contacts’ names to highlight the whole column. Click Text to Columns. Select “Delimited” and click Next.
What is a text label in Excel?
In a spreadsheet program, such as Microsoft Excel, a label is text in a cell, usually describing data in the rows or columns surrounding it. 3. When referring to a chart, a label is any text over a section of a chart that gives additional information about the charts value.
How do you make text dynamic in Excel?
Select the text box. Go to the formulas tab. Write “=” and the cell address to which you want to link the cell, then press Enter. Now when the value in the cell changes the text box will dynamically change.
What are name tags made of?
Permanent name tags are usually made of lightweight metal or plastic and may be known as name badges. Name tags may be attached to garments with adhesive or worn with the assistance of a magnet or pin. Plastic or metal name tags can be attached to various backings used to attach to the clothing of the wearer.
How do you make a metal name badge?
100pcs Printable Metal Business Card, Sublimation Blanks White Business Card for Promotion Gift Card Name Card Desk Number Tag Gift Metal Cards, 3.4”x2. 1”.
Can you name Zombies Minecraft?
Limitations. Any mob can be named except for the ender dragon and players.
How do you keep name tags on desk?
WAYS to attach my name tags: double-sided tape, packing tape and even sticky tack. None of these methods has lasted long term. Either the kids picked at them, or the custodians had issues with them. That is when I tried velcro strips instead.
How do you fold a name stand?
Answer Print your name tent on card stock for best results. Score your name tent lightly along the dashed score lines. Make four 1/2 inch cuts into your name tent from the edges along the solid cut lines. Fold your name tent along the three scored lines (mountain folds, for you origami types).
How do I use Avery 5160 labels in Excel?
Head to the Mailings tab in the new Word document and select the Start Mail Merge option. Select Labels and click Label Options. This is where you format the Word document for the Avery 5160 labels. Choose continuous feed printer or page printer based on the model you use.
Have you ever wanted to use tags in Excel?
Maybe you want to assign tags in Excel for your business contacts, friends, or favorite recipes.
You may have many different tags, frequently create new ones, and an arbitrary amount of tags assigned to each individual.
It’s extremely easy to do this using filters and Excel’s search functionality. It only takes a few seconds.

You may also want to do this using formulas, to update dynamically, or output different information depending on whether a certain tag is present.
That’s a bit more complicated, but I walk you through how to do it in the video.
Links and Resources
Filters: Excel’s Easy Button
How to Use the & Function
The formula for tags in Excel: =IF(ISNUMBER(SEARCH([the tag or reference to the tag you’re looking for],[the cell where tags are listed])),[output if the tag is found],[output if the tag is not found])
In the specific example of the video, it’s =IF(ISNUMBER(SEARCH($L$2,E2)),$L$2,”Not “&$L$2).
There are two substantive and one minor difference using AutoTag in Excel as opposed to using AutoTag in Microsoft Word. All of these problems revolve around one issue: Excel basically turns everything off when you are typing text in the formula bar.
Virtually all Excel menu and toolbar items are disabled when you are typing in a formula.
Insert and Edit a Tag
Because you cannot bring up the tag editor when you are editing a formula, you cannot use the position of the cursor in the formula window to determine where to insert a tag (or which tag to edit if there are multiple tags in a cell).
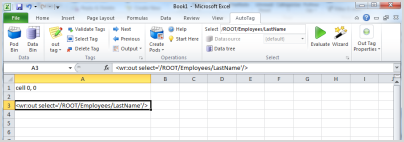
If a cell has just one tag, when you click Edit, it will bring up AutoTag. If a cell is empty and you click Insert Tag, it will also bring up the tag editor.
In this first example we have a cell whose content is a single tag:
When you click Tag Builder, the program needs to know if you want to insert the new tag before or after the existing tag. So you will get this prompt:
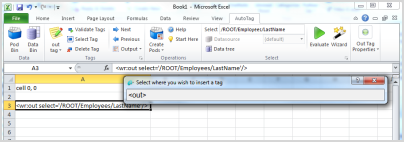
You now need to click in the pop-up window either before (and «on» counts as before) the text for the tag or after it. That tells AutoTag to insert your new tag before or after the existing tag. Click the red X to cancel the insert.
In the following screenshot, the cursor is at the end of the formula bar. Because Excel is editing the formula, most AutoTag buttons are disabled. You will also find most other Excel commands are also disabled:
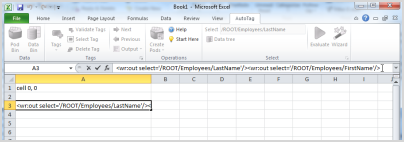
And now, let’s go back to inserting a tag. In this case the prompt will be as follows:
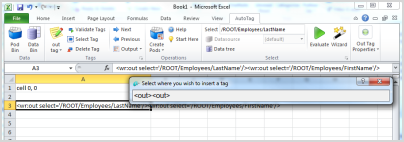
Each tag is a single unit; you cannot insert a tag in the middle of another tag. But you can select between the two tags, or, if there is text between the tags, between any two letters of the text.
Text Tags Only
Finally, Excel does not support fields, so all tags must be in the full text display format. However, AutoTag uses a macro to make text tags look like field tags.
For more information on using AutoTag with Excel’s functions, see the Add Tags in Excel article.
Using AutoTag with PowerPoint
Using AutoTag in PowerPoint is essentially the same as using AutoTag in Word. The main difference is that there is no field option for tags in PowerPoint, which means that all tags will be displayed as full text.
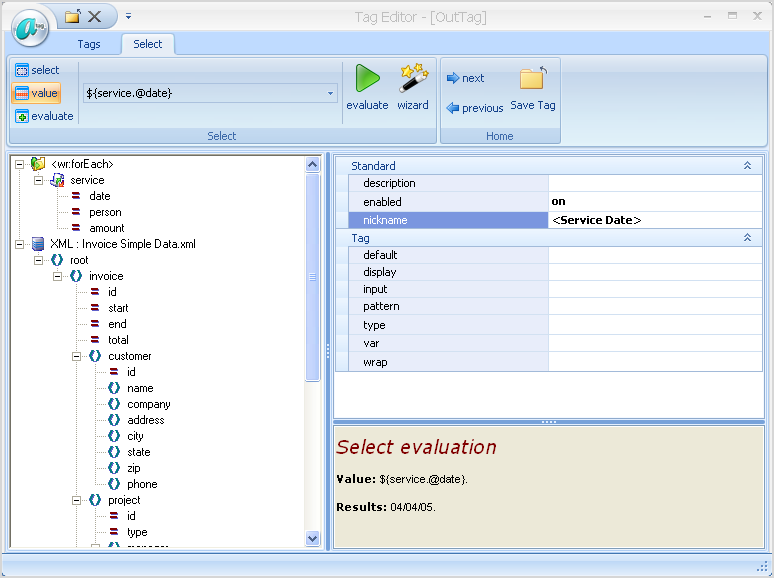
Evaluate Tags
From the Tag Editor Dialog, you can evaluate your data selection (the select= attribute) to verify you are retrieving the correct data. The evaluate icon is in the top of the dialog.
In the case of a forEach tag, the evaluate function displays the rows of data returned.
Click the evaluate icon to evaluate the data selection. The results display in the lower right pane.
As far as I know there are no built-in features that can parse and summarize comma-separated tags in Excel. You can, of course, create your own solution with worksheet functions and a little VBA. Here’s a quick solution for doing this.
Step 1: Press Alt+F11 to open the VBA editor pane in Excel. Insert a new module and paste in this code for a custom function.
Public Function CCARRAY(rr As Variant, sep As String)
'rr is the range or array of values you want to concatenate.  sep is the delimiter.
Dim rra() As Variant
Dim out As String
Dim i As Integer

On Error GoTo EH
rra = rr
out = ""
i = 1

Do While i <= UBound(rra, 1)
    If rra(i, 1) <> False Then
        out = out & rra(i, 1) & sep
    End If
    i = i + 1
Loop
out = Left(out, Len(out) - Len(sep))
CCARRAY = out
Exit Function

EH:
rra = rr.Value
Resume Next

End Function
This function will allow you to create comma-separated lists to summarize the tag data you have.
Step 2: In a worksheet, enter in a cell (H2 in the example below) the tag you want to search for. In the cell to the right, enter the following formula by pressing Ctrl+Shift+Enter.
=IFERROR(CCARRAY(IF(NOT(ISERROR(FIND(H2,$B$2:$B$6))),$A$2:$A$6),", "),"No matches found.")
By pressing Ctrl+Shift+Enter, you are entering the formula as an array formula. It will appear surrounded by {...} in the formula bar. Note that in the formula $B$2:$B$6 is the range that holds all the tags for the items listed in $A$2:$A$6.

EDIT:
If you don’t mind your matches being listed in a column instead of in a list in one cell, you can return matches for tags using only worksheet functions.
Where your titles are in Column A, the tags are in Column B, and the tag you are searching for is in H2, you can use the following array formula in I2 and fill down as far as you need:
=IFERROR(INDEX($A$1:$A$6,SMALL(IF(NOT(ISERROR(FIND($H$2,$B$1:$B$6))),ROW($B$1:$B$6),2000000),ROW()-1)),"")

The formula works by first forming an array of numbers based on whether the tags in each row contains the search term. If a match is found, the row number is stored in the array. If it is not found, 2000000 is stored in the array. Next, the SMALL(<array>,ROW()-1) part of the formula returns the ROW()-1th smallest value from the array. Next, this value is passed as an index argument to the INDEX() function, where the value at that index in the array of titles is returned. If a number greater than the number of rows in the title array is passed to INDEX() as an argument, an error is returned. Since 2000000 is passed as the argument when no matches are found, an error is returned. The IFERROR() function then returns "" in this case.
It is important to grasp how ROW() is being used in this formula. If you want to display your list of results starting in a different row, you will need to adjust the second argument of the SMALL() function so that it returns the first smallest value from the array. E.g., if your list of results starts in Row 1 instead of Row 2, you would use SMALL(...,ROW()) instead of SMALL(...,ROW()-1).
Also, if your list of titles and tags does not start in Row 1, you will need to adjust the formula as well. The second argument of the IF() function must be adjusted so that a match in the first row of your data returns 1. E.g., if your list of titles starts in Row 2 instead of Row 1, you will need the formula to include IF(...,ROW($A$2:$A$7)-1,...) instead of IF(...,ROW($A$1:$A$6),...).
Your business’s Excel spreadsheets can often help you perform unexpected tasks that save you time and money. For instance, if you need to generate nametags for an event you don’t have to type them manually. Microsoft built a powerful Mail Merge feature into Microsoft Word that can pull in records from any Excel spreadsheet and generate labels. After purchasing labels whose dimensions resemble those of nametags you can let Word use your Excel data to create nametags automatically.
Select Excel Data Source
-
Click the «Mailings» tab on Word’s ribbon and then click «Start Mail Marge.» Click «Labels» to open the Label Options pop-up window. Click the «Label Vendor» drop-down box and select the vendor who makes the labels you are using.
-
Scroll through the list of product numbers in the «Product Number» box and select the product number that identifies the type of label you purchased.
-
Click «OK.» Word displays a page full of empty labels. Click «Mailings | Select Recipients» to view the Select Data Source window.
-
Locate your Excel file in the list of files that appear and double-click that file to select it. The «Select Table» pop-up opens and displays the spreadsheet’s worksheets.
-
Click the worksheet that contains your nametag information. If the worksheet’s first row contains column headers, click the «First Row of Data Contains Column Headers» check box to put a checkmark there. Otherwise, leave the check box empty. Click «OK» to continue.
-
Click «Mailings» and then «Edit Recipient List» to view the «Mail Merge Recipients» window. This window displays spreadsheet’s rows. Check marks appear next to each row. If you don’t want to generate nametags for certain rows, remove the checkmarks from those rows. Click «OK» to close the window.
Link Labels to Excel
-
Click «Mailings | Insert Merge Field» to view the list of column headings your spreadsheet contains. Click the heading you wish to use to populate the nametags. For instance, if your spreadsheet has a column called «First Name,» click that heading to select it. If you would like to include another heading in the label, click that heading to highlight it and then click «Insert.» Click Close when done. The column headings you selected appear in the first label on the page.
-
Click «Mailings | Match All Fields.» The Match Fields pop-up window opens. Click the «Unique Identifier» drop-down box to view a list of options. The name field you selected in the previous step appears in that list. Click that name field and then click «OK» to close the pop-up window.
-
Click «Mailings | Update Labels.» Doing this copies the fields from the first label to all the labels on the page
-
Click «Mailings | Preview Results» to view a preview of your labels. Word populates each label with the fields you selected from your Excel spreadsheet.
-
Add the paper that contains your labels to your printer and click «Mailings | Finish & Merge.» Select «Print Documents» and click «OK.» Word prints the nametag information on the labels.