
Word for Microsoft 365 Outlook for Microsoft 365 Word 2021 Outlook 2021 Word 2019 Outlook 2019 Word 2016 Outlook 2016 Word 2013 Outlook 2013 Word 2010 Outlook 2010 Word 2007 Outlook 2007 More…Less
To convert text to a table or a table to text, start by clicking the  Show/Hide paragraph mark on the Home tab. This lets you see how text is separated in your document.

Convert text to a table
-
Insert separator characters—such as commas or tabs—to indicate where to divide the text into table columns.
Note: If you have commas in your text, use tabs for your separator characters.
-
Use paragraph marks to indicate where you want to begin a new table row.
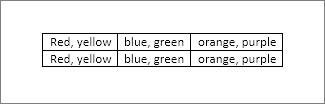
In this example, the tabs and paragraph marks will produce a table with 3 columns and 2 rows:

-
Select the text that you want to convert, and then click Insert > Table > Convert Text to Table.
-
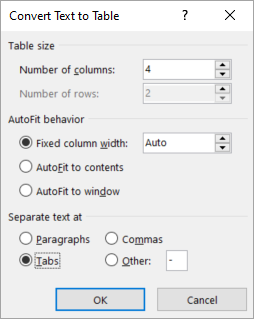
In the Convert Text to Table box, choose the options you want.
Under Table size, make sure the numbers match the numbers of columns and rows you want.
Under AutoFit behavior, choose how you want your table to look. Word automatically chooses a width for the table columns. If you want a different column width, choose one of these options:
To do this
Choose this option
Specify a width for all the columns
In the Fixed column width box, type or select a value.
Resize the columns to fit the width of the text in each column
AutoFit to contents
Resize the table automatically in case the width of the available space changes (for example, web layout or landscape orientation)
AutoFit to window
Under Separate text at, choose the separator character you used in the text.
-
Click OK. The text converted to a table should look something like this:


Convert a table to text
-
Select the rows or table you want to convert to text.
-
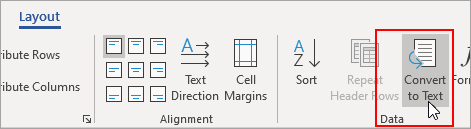
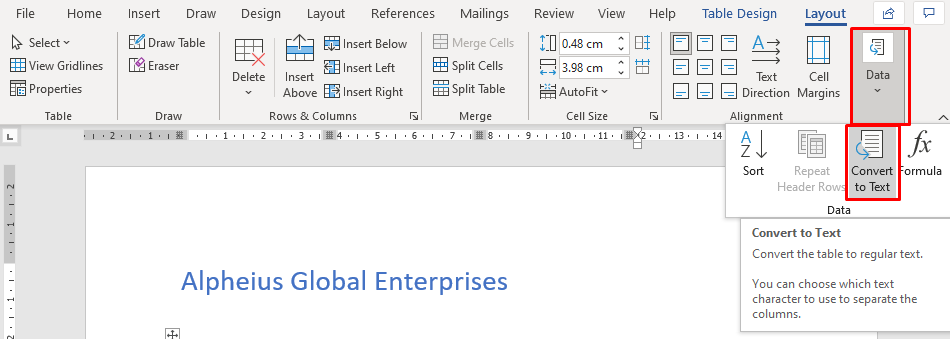
On the Layout tab, in the Data section, click Convert to Text.
-
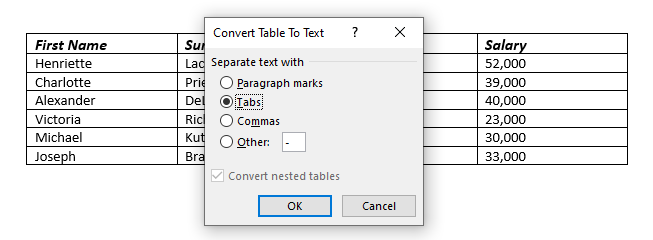
In the Convert to Text box, under Separate text with, click the separator character you want to use in place of the column boundaries. Rows will be separated by paragraph marks.
-
Click OK.
Need more help?
Want more options?
Explore subscription benefits, browse training courses, learn how to secure your device, and more.
Communities help you ask and answer questions, give feedback, and hear from experts with rich knowledge.

Have you ever started adding text to your document only to discover it would be better suited in a table? After all, a table provides a solid structure and appearance. In Word, you can simply convert text to table.
Whether you have text separated by tabs or commas or a list in a numbered or bulleted format, converting it to table is easy enough. Plus, it takes less time than creating a table and manually moving all that text into the cells.
You can choose the type of delimiter you’re using to properly convert the text. For instance, you may separate words with commas or phrases with tabs. If you aren’t sure, you can display the paragraph marks by going to the Home tab and selecting the Show/Hide paragraph button.

This is good to know if you’re using tabs because you don’t see them in ordinary text, only when you show the paragraph marks.
RELATED: How to Display Non-Printing Characters in Word
Select the text that you want to convert to a table. Then, go to the Insert tab and click the Table drop-down arrow. Choose “Convert Text to Table.”
In the pop-up window, pick the number of columns you want. By default, the text you select separates into columns. If you prefer to use rows, decrease the number of columns so that the number of rows correlates to the number of items you select.
Optionally, select the AutoFit Behavior. You can pick a specific width for the columns or AutoFit the table to the contents or window.
Finally, choose the delimiter you’re using. In our example, we have a list of names separated by tabs.
Select “OK” when you finish. You’ll see your text pop into a table. You can then add rows, resize the table, or center the text.
Convert a List to a Table in Word
Converting a list to a table is a little different than text because the list is already separated by numbers or bullets. This places each item in a separate row instead of a column, but you can change this if you like.
RELATED: How to Automatically Resize a Table in Microsoft Word
Select the list that you want to convert to a table. If you want to include the numbers or bullets in the table, move on to the next step. But if you don’t want those in the table, deselect the list type in the Paragraph section of the Home tab.
This removes the numbers or bullets so that you list items display on separate lines without leaders.
With your list items selected, go to Insert > Table and select “Convert Text to Table.” You’ll see the same pop-up as above. By default, your items display in rows. If you prefer them in columns, enter the same number of columns as your number of list items. Then, optionally choose the AutoFit settings.
By default, the delimiter should be set to Paragraph because the list items are on separate lines. Click “OK” and you’ll see your items in a table. You can then insert columns, resize the table, or move it.
Convert a Table to Text
If you change your mind after converting to a table or have a table that you prefer to remove and leave the text on its own, you can do the reverse of the above. Yes, you can convert a table to text too.
Select the table and go to the Layout tab that displays. Click “Convert to Text” in the Data section of the ribbon.
Choose how you want to separate the text once it’s converted. You can pick paragraph marks, tabs, commas, or a custom option you enter. Click “OK.”
You’ll then see your table data as ordinary text in your document.
Converting your text to a table in Word is a true time-saver compared to creating the table and moving the text into it. For more, take a look at how to nest a table or how to add formulas to tables in Word.
READ NEXT
- › The New NVIDIA GeForce RTX 4070 Is Like an RTX 3080 for $599
- › This New Google TV Streaming Device Costs Just $20
- › BLUETTI Slashed Hundreds off Its Best Power Stations for Easter Sale
- › Google Chrome Is Getting Faster
- › How to Adjust and Change Discord Fonts
- › HoloLens Now Has Windows 11 and Incredible 3D Ink Features
Insert and Edit a Table with Multiple Columns and Rows in Word
by Avantix Learning Team | Updated August 23, 2022
Applies to: Microsoft® Word® 2013, 2016, 2019, 2021 and 365 (Windows)
You can create a table in a Word document in 4 easy ways using the Ribbon. A table is a grid made up of columns and rows that intersect to form cells. You can insert text, numbers and images in a table. Once you have inserted a table, you can easily add and resize columns and rows and change table formatting.
It’s best to avoid using Draw Table to create a table since the table may not be created in a consistent way.
Note: Buttons and Ribbon tabs may display in a different way (with or without text) depending on your version of Word, the size of your screen and your Control Panel settings. For newer versions of Word, Ribbon tabs may appear with different names. For example, the Table Design tab may appear as Table Tools Design.
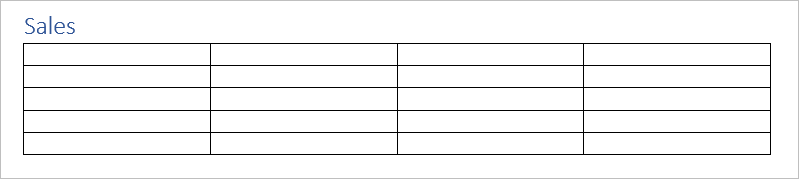
In the following example, a table with 4 columns and 5 rows has been inserted in a Word document:
Recommended article: 10 Microsoft Word Shortcuts for Moving Around in Tables
Do you want to learn more about Microsoft Word? Check out our virtual classroom or in-person classroom Word courses >
Create a table using the Table Grid
To insert a table using Insert Table and select columns and rows in the Table Grid:
- Click in the Word document where you want to insert a table.
- Click the Insert tab in the Ribbon.
- Click Table in the Tables group. A drop-down menu appears with a Table Grid.
- Hover over the grid until the number of columns and rows you want is selected.
- Click in the highlighted area of the grid to insert a table.
To insert a table, select cells in the Table Grid as follows:

Create a table using the Insert Table dialog box
To insert a table using the Insert Table dialog box:
- Click in the Word document where you want to insert a table.
- Click the Insert tab in the Ribbon.
- Click Table in the Tables group. A drop-down menu appears.
- Select Insert Table. A dialog box appears.
- Enter the number of columns and rows you want to create.
- Select the desired options below AutoFit behavior (typically Fixed column width: Auto).
- Click OK.
The Insert Table dialog box appears with options to select the number of columns and rows:

Create a table using Quick Tables
To insert a table using Quick Tables:
- Click in the Word document where you want to insert a table.
- Click the Insert tab in the Ribbon.
- Click Table in the Tables group. A drop-down menu appears.
- Select Quick Tables. A gallery appears.
- Click the table you want to insert.
Quick Tables appear in the Table drop-down menu:

Create a table by converting text to a table
If you have used tabs or other delimiters in paragraphs, you can convert the data into a table (if the delimiters are entered consistently). Wherever you have pressed Enter or Return to create a new paragraph, Word will create a new table row. You can use various delimiters to separate data but the most common are tabs, spaces or commas.
To convert delimited data to a table:
- Select the text that you want to convert.
- Click the Insert tab in the Ribbon.
- Click Table in the Tables group. A drop-down menu appears.
- Select Convert Text to Table. A dialog box appears.
- Enter the number of columns if necessary and ensure a delimiter is selected in the Separate text at area.
- Under AutoFit behavior, choose how you want your table to appear. Word chooses a width for the table columns by default. If you want a different column width, choose AutoFit to contents or AutoFit to window.
- Click OK.
In the Convert Text to Table dialog box, enter the number of columns as well as the delimiter:

Show table gridlines
Gridlines show the cell boundaries of a table on screen if table borders are not applied. Gridlines appear only on the screen and are not printed.
Gridlines are not visible when you view a document in a Web browser or in Print Preview.
To show table gridlines in a Word document:
- Click in a table.
- Click the Table Layout or Table Tools Layout tab in the Ribbon.
- In the Table group, check View Gridlines.
View Gridlines appears on the Table Tools Layout or Table Layout tab in the Ribbon:

Move around in a table
You can use the following keys to move from one cell to another in a table:
- Tab to move to the next cell to the right.
- Shift-Tab to move to the cell to left.
- Ctrl-Tab to tab within a cell.
Add a row or a column
To add a row in a table:
- Click in a cell that is located above or below where you want to add a row.
- Click the Table Layout or Table Tools Layout tab in the Ribbon.
- To add a row above the cell you clicked in, click Insert Above in the Rows and Columns group. To add a row below the cell you clicked in, in the Rows and Columns group, click Insert Below.
The commands to insert rows or columns appear on the Table Tools Layout or Table Layout tab in the Ribbon:

You can also right-click in a row and choose Insert from the drop-down menu and insert options from the sub-menu.
If you click in the last cell in a table and press Tab, Word will automatically add a row.
To add a column in a table:
- Click in a cell that is located to the right or left of where you want to add a column.
- Click the Table Layout or Table Tools Layout tab in the Ribbon.
- To add a column to the left of the cell you clicked in, click Insert Left in the Rows and Columns group. To add a column to the right of the cell you clicked in, in the Rows and Columns group, click Insert Right.
You can also right-click in a row and choose Insert from the drop-down menu and insert options from the sub-menu.
Delete a column or row
To delete a row or column:
- Select the row or column (drag over the cells or click to the left of a row or above a column when the arrow appears).
- Click the Table Layout or Table Tools Layout tab in the Ribbon.
- In the Rows & Columns group, click Delete. A drop-down menu applears.
- Click Delete Rows or Delete Columns as appropriate.
You can also right-click in a row or column and choose Delete from the drop-down menu and delete options from the sub-menu.
Change column width
To change column width:
- Select the column or columns you want to change.
- Click the Table Layout or Table Tools Layout tab in the Ribbon.
- Click Properties in the Table group. You can also right-click and choose Properties from the drop-down menu. A dialog box appears.
- Click the Column tab.
- Check Preferred Width.
- Type the new measurement for the column width. For example, typer 1.0″ or click the up and down arrows.
- Click OK.
The Table Properties dialog box appears as follows with the Column tab selected:

You can also drag the right line of a column to resize it.
Change row height
To change row height:
- Select the row or rows you want to change.
- Click the Table Layout or Table Tools Layout tab in the Ribbon.
- Click Properties in the Table group. You can also right-click and choose Properties from the drop-down menu. A dialog box appears.
- Click the Row tab.
- Check Specify Height.
- Type the new measurement for the row height. For example, type 1.0″ or click the up and down arrows.
- Specify row height as At Least or Exactly.
- Click OK.
The Table Properties dialog box appears as follows with the Row tab selected:

You can also drag the bottom line of a row to resize it.
Distribute rows and columns evenly
To distribute rows and columns evenly:
- Select the entire table by clicking the four-arrows that appear on the top left of the table.
- Click the Table Layout or Table Tools Layout tab in the Ribbon.
- Click Distribute Rows and / or Distribute Columns in the Cell Size group.
Apply a table style
To apply a table style:
- Click in the table.
- Click the Table Design or Table Tools Design tab in the Ribbon.
- Click a table style or click the More arrow to display the Table Styles gallery and click a style.
Table Styles gallery appears on the Table Tools Design or Table Design tab in the Ribbon:

To learn more about working with table styles, check out the article How to Format Microsoft Word Tables Using Table Styles (Ultimate Guide).
Subscribe to get more articles like this one
Did you find this article helpful? If you would like to receive new articles, JOIN our email list.
More resources
4 Ways to Delete a Table in Word
How to Make Columns in Word (Newspaper-style)
How to Insert Formulas and Functions in Word Tables
How to Keep a Microsoft Word Table Together on One Page
How to Delete a Page in Word (Remove Blank or Extra Pages)
Related courses
Microsoft Word: Intermediate / Advanced
Microsoft Excel: Intermediate / Advanced
Microsoft PowerPoint: Intermediate / Advanced
Microsoft Word: Long Documents Master Class
Microsoft Word: Styles, Templates and Tables of Contents
Microsoft Word: Designing Dynamic Word Documents Using Fields
VIEW MORE COURSES >
Our instructor-led courses are delivered in virtual classroom format or at our downtown Toronto location at 18 King Street East, Suite 1400, Toronto, Ontario, Canada (some in-person classroom courses may also be delivered at an alternate downtown Toronto location). Contact us at info@avantixlearning.ca if you’d like to arrange custom instructor-led virtual classroom or onsite training on a date that’s convenient for you.
Copyright 2023 Avantix® Learning
Microsoft, the Microsoft logo, Microsoft Office and related Microsoft applications and logos are registered trademarks of Microsoft Corporation in Canada, US and other countries. All other trademarks are the property of the registered owners.
Avantix Learning |18 King Street East, Suite 1400, Toronto, Ontario, Canada M5C 1C4 | Contact us at info@avantixlearning.ca
 Please Note:
This article is written for users of the following Microsoft Word versions: 2007, 2010, 2013, 2016, and 2019. If you are using an earlier version (Word 2003 or earlier), this tip may not work for you. For a version of this tip written specifically for earlier versions of Word, click here: Converting Text Into a Table.
![]()
Written by Allen Wyatt (last updated November 2, 2019)
This tip applies to Word 2007, 2010, 2013, 2016, and 2019
There are two major ways you can create tables in Word. One way is to create a blank table by any of the various methods provided by Word (such as drawing the table or using the Insert Table tool). The other method is to convert existing text into a table. To convert text into a table, follow these steps:
- Make sure the text that is to be converted into the table contains only a single tab character between each column.
- Select the text you want converted into a table.
- Display the Insert tab of the ribbon.
- Click the Table tool and then click Convert Text to Table. Word displays the Convert Text to Table dialog box. (See Figure 1.)
- Make sure all the table settings in the dialog box are correct.
- Click OK.
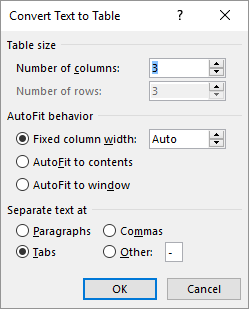
Figure 1. The Convert Text to Table dialog box.
The selected text is immediately converted into a table. In some instances, the width of columns in the resulting table may need to be adjusted. You will know if this is the case because the table will look very strange. Sometimes you can get files from programs such as a spreadsheet that use commas to separate columns. Word will also convert this comma-separated text to a table.
WordTips is your source for cost-effective Microsoft Word training.
(Microsoft Word is the most popular word processing software in the world.)
This tip (7725) applies to Microsoft Word 2007, 2010, 2013, 2016, and 2019. You can find a version of this tip for the older menu interface of Word here: Converting Text Into a Table.
Author Bio
With more than 50 non-fiction books and numerous magazine articles to his credit, Allen Wyatt is an internationally recognized author. He is president of Sharon Parq Associates, a computer and publishing services company. Learn more about Allen…
MORE FROM ALLEN
Using TC Fields for Notes
The TC field is normally used in constructing manual Tables of Contents. The way the field works, however, makes it a …
Discover More
Combining First and Second Numbered Levels on One Paragraph
Want to customize your paragraph numbering in Word? There are a few tricks that can be used to automatically display the …
Discover More
Formatting Page Numbers
Need to format the page numbers you added to your document? Word makes it easy, using the same techniques you use to …
Discover More
More WordTips (ribbon)
Unwanted Numbering on Pasted Tables
When pasting text from another document or from the Web you can have unexpected characters sometimes show up. Many of …
Discover More
Putting Something in Every Cell of a Table
Need to make sure that all the cells of a table have something in them? It’s easy to do with a handy little macro.
Discover More
Adding Table Columns to Columns with Merged Cells
Word’s table editor allows you to modify the structure of tables in a wide variety of ways. If you want to add columns to …
Discover More
Trouble viewing the screencast at work? Try signing up for new posts on our home page with your personal email address and watch the screencast from home.
You may have had to transfer text in paragraph form into a table. This manual process can be automated with the help of Microsoft Word’s Convert text to table feature.
How the Convert Tool Works
The convert tool will transform each line break of your text into a row of the new table. Each row will further be split into columns based on the concept of a delimiter. A delimiter is a character or section of the document that marks a specific part of the text. In this particular case, the delimiter would mark the start of a new column. Common delimiters are new paragraphs, commas, tabs, or spaces.
When the convert tool is started, it will prompt you to specify your delimiter character. For example, in the following paragraph I have chosen a blank space to be my delimiter. Therefore, the paragraph would be split into two rows and three columns as shown below. It is split into two rows because of the line break after «Jersey». It will be split into four columns because of the single spaces between each of the four words on each line.
navitend Byram New Jersey
GREENER GRASS THIS WAY
| navitend | Byram | New | Jersey |
| GREENER | GRASS | THIS | WAY |
The line in your text that contains the most delimiters will determine how many columns are in your table. Any lines that contain less delimiters will not completely fill their particular row. For example, the following text would result in the table below:
navitend
GREENER GRASS THIS WAY
| navitend | |||
| GREENER | GRASS | THIS | WAY |
How To Use the Convert Tool
Follow along with these steps to learn how to use the feature.
1. Open Microsoft Word and highlight the text you wish to convert into a table.

2. Select the Insert tab and choose Convert Text to Table… from the Table dropdown.

3. The following window will appear. Is is okay to leave the Table size and AutoFit behavior options at their default values. Make sure you choose the appropriate delimiter character from the Separate text at options. In this case, I separated by columns with a blank space, so I’ve chosen Other and typed a blank space into the box.

4. Click OK to complete the process.
If you have an unanswered technical question that you would like to see addressed in an upcoming issue, feel free to email it to social@navitend.com.
Contact us at 973.448.0070
Converting Text Into A Table format can help you better organise your data for people reading it.
It also allows you to easier transfer your data between Word and Excel, making it great for any user of both.
If you are learning either software you can view our Excel Course Offerings or Word Course Offerings here.
Converting Your Text To A Table – Simple Example
When Converting your text to a table, you need to first have some text in Word. Here you can see my text, under the title “Alpheius Global Enterprises”.
To convert text into a table the text needs to be in columns using some sort of separator – for example a tab, hyphen, comma or other symbol. My text specifically is seperated by tabs and has 4 columns (this will be important later).

- Highlight the piece of text to be converted into a table format.
- In the Insert ribbon there is a table button.
- Click on the table button and convert text to table.

- A dialog box will appear asking how many columns you want, how you want the text to fit and what are the separators used in your document
- Choose the number of columns required, fixed column width and our document has tabs which are separating the text then click OK.
- Your document will now be in a table format.

After selecting your options hit OK. For this example I chose 4 columns as you can see from the inital data, as well as that they are seperated by tabs. For your data you will want to specify differently based on your own data. After hitting OK you should see the results immediately. Below you can see my data changed into a table!

If you want to learn more about Tables and how they can be formatted, read our guide on columns for a newsletter in Word.
Why Convert Between Table And Text?
Going between tables and texts allows you simply to have different types of visual representation.
Ultimately the choice will be up to your discretion but follow these brief guidelines!
If you are doing a presentation based more on raw statistics and important facts maybe a table is more suitable. Tables are more analytical in nature and tend to lend themselves more to situations that are more formal and possibly educational (for example sending your coworker a plan for your business).
If you want to do a more graphically appealing layout maybe the raw text with some formatting is more appropriate (more on Font Formatting In Excel here). Text tends to be better for more informal presentations, and in general for a more casual audience (for example just sending a friend over some information found).
Converting From Table To Text
You can now also convert your table back to text if need be!
- First off just highlight the table using the table highlight option in the top right corner of the table
- Go to the Table Tools and select the layout ribbon
- In the data group at the end of the ribbon you will find the command convert to text
- The convert to text dialog box will appear. Use the tab option as this will keep your text in similar columns to your table
This will take your text back to it’s original form. Whichever you decide, Table or Text, you can save either for later use – read our guide here on How to Create and Use Building Blocks in Word.
Conclusion:
This guide has given you the tools on how to convert text into a Word table and a Word table back into text. Becoming proficient in these simple tools will help greatly when presenting your work, as well as when trying to move your work between Word and Excel. Try and experiment with these different types of representation to see what fits you best – but follow our rough guidelines if you are in need of guidance.