
This article is a sponsored article. Articles such as these are intended to provide you with information on products and services that we consider useful and of value to developers
- Download SSIS_Excel.zip — 60.25 KB
Introduction
This article is intended primarily for intermediate to advanced SSIS (SQL Server Integration Services) users who are familiar with SQL Server Business Intelligence. Basic understanding of script task, Execute Sql Task, parameters and variables are required, as it is not exactly a tutorial, but a description of the implementation of exporting the database table objects to Excel Objects through SSIS without the need of any templates and much of programming.This package will help to migrate data in a simple and efficient way. This package could also be useful to the users of SQL Server 2008 database, which could help in replacing the deprecated sp_makewebtask feature for exporting the data to excel.
The Goal of this article is to help the users by providing the concept to create a Excel file with unlimited sheets with all the data from the SQL Sever database eliminating the need of SSIS data conversion tasks, mapping and predefined column names, data types and etc. The same concept of developing generic packages can be applied similarly when migrating SQL Server data to different databases like Oracle, Teradata, MS-Access and etc using the connection manager with related data source providers can be achieved through the SSIS ETL Tool.
This Generic DTSX package is basically to demonstrate a method of data migration to export SQL Server database tables to Excel file with multiple sheets. After reading many blogs about people having problems in generating excel files and sheets dynamically from SQL Server 2000/2005 through SSIS (SQL Server Integration Services). Here is the simple DTSX package which creates a excel file on the fly and dumps the data on the sheets.
Currently Most of the Microsoft Dynamics ERP software products like (Navision, Axapta, Great Plains, Solomon, Concorde, Point of Sale, Retail Management System, Customer Relationship Management and etc) are also using the SQL Server and Excel for data migration and reporting purpose.
Little bit of tweaks in the below code in the tasks could help many users to achieve their goals in a easiest way.
Below is the demonstration of the steps to achieve this.
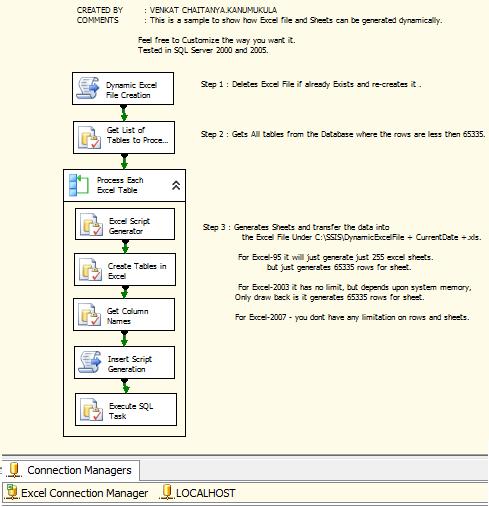
The dtsx package should look like the above Image. The package is developed using Visual Studio 2005.
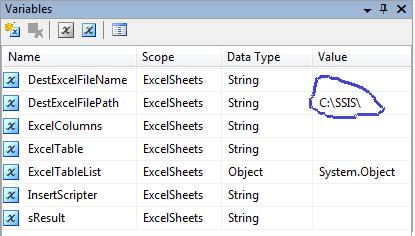
Change the database connection to SQL Server 2000/2005 and point to the database which you want to export (currently it is pointed to master database). Change the Variable DestExcelFilePath Value from ‘C:SSIS‘ for creating a file at the desired location.
Note: This package should work properly if all the Table names and Column names in the database are followed as per the microsoft naming standards.
Background
Excel file treats each sheet as a table.Excel-95/2003 generates only 65335 rows for sheet and 255 sheets maximum if its Excel-95, There is no rows or sheets limitation if you are using Excel 2007 and above. There are certain limitations to Excel previous versions. Read online documentation for more information.
Following are few links on Excel differences and comparisons.
http://www.add-ins.com/Excel%202003%20versus%202007.htm
http://technet.microsoft.com/en-us/library/cc179105(office.12).aspx
The above package uses the SQL Server OPENROWSET Object for data migration. For more information on the
OPENROWSET functionality and its options refer online documentation at the following link http://msdn.microsoft.com/en-us/library/aa276850(v=sql.80).aspx
Explanation and use of OPENROWSET, SP_SERVEROPTION, SP_MAKEWEBTASK and server options like ‘DATA ACCESS‘,’SHOW ADVANCED OPTIONS‘, ‘AD HOC DISTRIBUTED QUERIES‘ is out of scope of this article.
Using the Code
These options need to be configured ‘Show Advanced Options‘ and ‘Ad Hoc Distributed Queries‘ on the SQL Server before running the package. The package will fail without these Options. And importantly the database login should have admin privileges to execute the package tasks successfully. If you want to run this code, then better check with your DBA’s regarding permissions you require.
SP_CONFIGURE 'Show Advanced Options', 1
GO
RECONFIGURE
GO
SP_CONFIGURE 'Ad Hoc Distributed Queries', 1
GO
RECONFIGURE
GO
[Get List of Tables to Process] Execute SQL Task: The query is to retrieve all the table names which are less then 65335 rows. ( Customize this query as per your requirement.)
DECLARE @Server varchar(50)
SET @Server = @@SERVERNAME

EXEC sp_serveroption  @Server,'DATA ACCESS','TRUE'

SELECT [TableName] = so.name
                FROM sysobjects so, sysindexes si
                WHERE so.xtype = 'U' AND si.id = OBJECT_ID(so.name)

                AND si.rows < 65335


                GROUP BY so.name
                ORDER BY 1 DESC
[Excel Script Generator] Execute SQLTask:The query in this task builds the table structure with the data types required for the Excel.(Most of the SQL data types have been handled here. If you want add any other specific data type or a different database then you need to modify this.)
DECLARE @vsTableName VARCHAR(100)
SET @vsTableName =?
DECLARE @vsSQL VARCHAR(8000)

BEGIN

  SELECT @vsSQL = 'CREATE TABLE ' + '`' + @vsTableName + '`' + CHAR(10) + '(' + CHAR(10)

  SELECT @vsSQL = @vsSQL + '[' + sc.Name + '] ' +
  CASE WHEN st.Name IN ('nvarchar','ntext','text','varchar','varchar','char','nchar','xml','uniqueidentifier') THEN  'LongText'
       WHEN st.Name IN ('tinyint','int','smallint','bigint','float','numeric','decimal','money','smallmoney','bit') THEN  'Long'
       WHEN st.Name IN ('date','datetime','timestamp') THEN  'datetime'
  ELSE ' ' END + ',' + CHAR(10)
  FROM sysobjects so
  JOIN syscolumns sc ON sc.id = so.id
  JOIN systypes st ON st.xusertype = sc.xusertype
  WHERE so.name = @vsTableName

  AND st.Name not in ( 'image','sysname','binary','varbinary','xml','uniqueidentifier')
  ORDER BY
  sc.ColID

  SELECT SUBSTRING(@vsSQL,1,LEN(@vsSQL) - 2) + CHAR(10) + ')'  AS ExcelTableName
 END
[Create Tables in Excel] Execute SQLTask: The create table script query from the above task is passed to this task, which is executed in the Excel file with the Excel Connection Manager for creating sheets with the table structure and data types required for the Excel. The destination file could be found with the Name (DynamicExcelFileDDMMYYYY.xls). Basically this task is the key to create all the sheets in the excel destination file.
[Get Column Names] Execute SQLTask: The task builds the column names and passes it to the below [Insert Script Generation] Script Task which is used in the query with OPENROWSET.
DECLARE @SRCOBJECT varchar(8000)
SET @SRCOBJECT=?
DECLARE @SRCOBJECT1 varchar(8000)
SET @SRCOBJECT1 = SubString(@SRCOBJECT,CHARINDEX ('(',@SRCOBJECT)+ 1 , CHARINDEX (')',@SRCOBJECT) - 1)

SET @SRCOBJECT1 = Replace(@SRCOBJECT1,'LongText','')

SET @SRCOBJECT1 = Replace(@SRCOBJECT1 ,'Long','')

SET @SRCOBJECT1 = Replace(@SRCOBJECT1,'DateTime','')

SET @SRCOBJECT1= Replace(@SRCOBJECT1,')','')

SET @SRCOBJECT1 = Replace(@SRCOBJECT1,'`','')

SELECT @SRCOBJECT1
[Insert Script Generation] ScriptTask: This script task code in vb.net is to build a Query using SQL Server OPENROWSET function which finally inserts the data into the ExcelSheets. The query is passed to the Execute SQL Task through a variable and is executed on the Excel file with the Excel Connection Manager.
Imports System
Imports System.Data
Imports System.Math
Imports Microsoft.SqlServer.Dts.Runtime

Public Class ScriptMain

    Public Sub Main()


        Dim excelFilePath As String = CStr(Dts.Variables("User::DestExcelFilePath").Value) + CStr(Dts.Variables("DestExcelFileName").Value)
        Dim TableName, ExcelTable As String
        TableName = CStr(Dts.Variables("User::ExcelTable").Value)

        If TableName.Length > 30 Then
            ExcelTable = Strings.Left(TableName, 31)

        Else
            ExcelTable = TableName
        End If

        Dim ColumnNames As String = CStr(Dts.Variables("User::ExcelColumns").Value)
        Dim strCn As String = " Insert into OPENROWSET('Microsoft.Jet.OLEDB.4.0'," & _
                "'Excel 8.0;Database=" + excelFilePath + "','SELECT " + ColumnNames + " FROM [" + ExcelTable + "$]') SELECT " + ColumnNames + " FROM [" + TableName + "]"


        Dts.Variables("User::InsertScripter").Value = strCn
        Dts.TaskResult = Dts.Results.Success
    End Sub

End Class
Conclusion
The above mentioned demonstration of steps determine that excel file with multiple sheets along with data migration from SQL Server can be dynamically created using SSIS.
Hence it can be concluded that exporting the database table objects to a Excel file with multiple sheets is achieved through SSIS without the need of any templates, DLL’s and much of programming.
This Article is basically intended to demonstrate the concept of developing a generic package to create sheets and table structures in a excel file with SSIS and to understand the excel functionalities. The same concept can be applied similarly when migrating SQL Server data to different databases. Its not a good Idea to export a huge database with the above package where it might end up using the system memory and other resources.
Since the Web Assistant features like SP_MAKEWEBTASK which help in exporting the data objects to html, excel, word, etc are no longer available in SQL Server 2008. This package could also be useful to the users of SQL Server 2008 database, which could help in replacing the deprecated sp_makewebtask for exporting the data to excel file.
There are many articles on creating & handling excel files including formatting the cells, inserting formulas and manipulating the excel objects which can be achieved through various programming languages. But this article is intended for the SQL Server Integration Services users who are aware of its benefits and limitations.
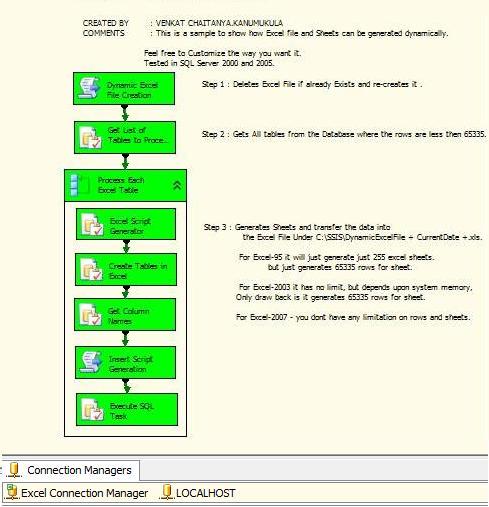
The above image is provided as a sample to show the excel file created through this package.
Hope this article will serve the purpose. Any suggestions or corrections are most welcome.
References
http://msdn.microsoft.com/en-us/library/aa276850(v=sql.80).aspx
http://www.add-ins.com/Excel%202003%20versus%202007.htm
http://technet.microsoft.com/en-us/library/cc179105(office.12).aspx
Points of Interest
Reverse Engineering, Up-gradations, Conversions, Integrations and Data migration.
Have loads of real time experience on million dollar Banking and Financial data migration projects.
History
Last Updated on 16 Th Jan 2012.
Mr. Kanumukula is a IT-Professional and has been in the industry since 1997.
• Around 15+ years of experience in the areas of system design & architecture, application programming, development, testing, deployments, execution with implementations & Roll-outs of business applications in cloud/on-premise.
• Experience with Dynamics 365 for F&O/Dynamics AX, D365 for Business Central/NAV,(Inc -Visual Studio.Net, X++, AL, C#, CSide, SharePoint, SQLServer, SFDC, Power-BI, Power Apps, Dataverse/Common Data Service, CRM, SSIS/SSRS/SSAS, BizTalk, IOT, IIOT, JAVA, AWS, GCP, Azure, API, etc)
• Experience in managing Operations & Data Center maintenance both on-premise & cloud hosting, infrastructure/applications assessments & build systems.
• Experience in ERP upgrades, Mulesoft API’s,MS Dynamics 365,Azure administration & hosting, LCS-Life Cycle Services.
• Experience with Commitment to Quality, technical quality assurance(before, during & after development). Create partnership with project manager to give technical assistance regarding important decisions.
• Well-Versed with Agile, SCRUM & CMMI process & methodologies to support rapid iterative Quality software development.
A highly motivated, self-starter & problem solver with multi-tasking skills, Had managed and served through an established process to get the job done in a timely and efficient manner with an eye on every detail during ERP-implementations. Flexible to work under stress and have ability to prioritize workload and stay organized in a fast-paced environment.
Learned & adapted to new technologies & tools at ease, aggressively delivered tasks on-demand at a fast-pace satisfying the needs of product owners, product development, program managers, Vendors, Higher Management, Internal/External Clients.
Have a proactive & positive attitude with a willingness to do what it takes to complete the job. Self-managed work style within a team environment. Extremely detail & Customer service oriented.
If your target is Excel and you
want to refresh/load Excel with new set of data without creating a new file and
you want your destination sheet name fixed too, yes it’s possible!
How? Create a new excel table
(Sheet) instead of creating a new file each time.
Open BIDS
Create a new package, go to
Control Flow tab
Drag two “Execute SQL Task”
task and one “Data Flow Task”
Give name “Drop Excel Table”
and “Create Excel Table” to two “Execute SQL Task” above
Open/Double click “Data Flow
Task”
Drag an “OLE DB Source” Source
Note: Since already have AdventureWorksDW sample database, I will
use this for my example
Create a connection
AdventureWorksDW to database table DimPromotion or use below SQL
SELECT [PromotionKey]
,[PromotionAlternateKey]
,[EnglishPromotionName]
,[SpanishPromotionName]
,[FrenchPromotionName]
,[DiscountPct]
,[EnglishPromotionType]
,[SpanishPromotionType]
,[FrenchPromotionType]
,[EnglishPromotionCategory]
,[SpanishPromotionCategory]
,[FrenchPromotionCategory]
,[StartDate]
,[EndDate]
,[MinQty]
,[MaxQty]
FROM
[AdventureWorksDW].[dbo].[DimPromotion]
Create a new connection to a Excel file in C:DimPromotion.xls
Now drag “Excel Destination”
and configure this to use connection created above and then create a new excel table as shown below

Copy above generated create script to notepad as we need this later!
Next step is to configure
“Create Excel Table”, choose ConnectionType as EXCEL and point this to
connection create above, use below for SQLStatement
CREATE TABLE
`Excel Destination` (
`PromotionKey` INTEGER,
`PromotionAlternateKey` INTEGER,
`EnglishPromotionName` NVARCHAR(255),
`SpanishPromotionName` NVARCHAR(255),
`FrenchPromotionName` NVARCHAR(255),
`DiscountPct` DOUBLE
PRECISION,
`EnglishPromotionType` NVARCHAR(50),
`SpanishPromotionType` NVARCHAR(50),
`FrenchPromotionType` NVARCHAR(50),
`EnglishPromotionCategory` NVARCHAR(50),
`SpanishPromotionCategory` NVARCHAR(50),
`FrenchPromotionCategory` NVARCHAR(50),
`StartDate` DATETIME,
`EndDate` DATETIME,
`MinQty` INTEGER,
`MaxQty` INTEGER
)

Now configure ““Drop Excel
Table”, choose ConnectionType as EXCEL and point this to connection create
above, use below for SQLStatement
DROP TABLE `Excel Destination`

Finally package looks like
below

- Remove From My Forums
-
Question
-
I am using a Create Table script to add a worksheet to a excel destination in SSIS. Everything works great except when I try to include a space in the «table name». The space gets replace with an underscore.
CREATE TABLE [Excel Destination] (
[Col1] Varchar(15),
[Col2] LongText,
[Col3] Double
)The worksheet is named «Excel_Destination» and not «Excel Destination»
Is there any way to work around this without using a script task?
Answers
-
As far as I know there is no workaround for this nuance.
Arthur My Blog

-
Proposed as answer by
Wednesday, July 9, 2014 3:29 AM
-
Marked as answer by
Mike Yin
Wednesday, July 16, 2014 4:45 PM
-
Proposed as answer by

In this article we will develop an SSIS package that uses the EPPlus.dll assembly to create an Excel file and write to it while looping through the result set of a SQL Server query.
1. Download and extract EPPlus.zip
Download the EPPlus zip file from http://epplus.codeplex.com/.
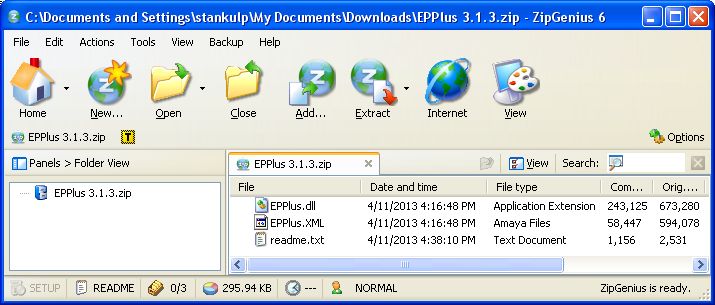
Extract the contents of the EPPlus zip file to a folder.
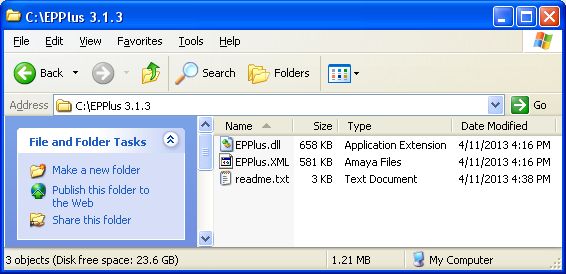
IMPORTANT ADDENDUM 01/21/2016 — Add the EPPlus.dll assembly to the Global Assembly Cache (GAC)
The EPPlus.dll assembly is not available to your code until you add it to the GAC using one of the following methods.
- Add an assembly to the GAC with gacutil.exe: https://emendezrivas.wordpress.com/2011/03/19/add-an-assembly-to-the-gac/
- Add an assembly to the GAC with GAC Manager: https://gacmanager.codeplex.com/
- Add an assembly to the GAC with WinGAC: https://wingac.codeplex.com/
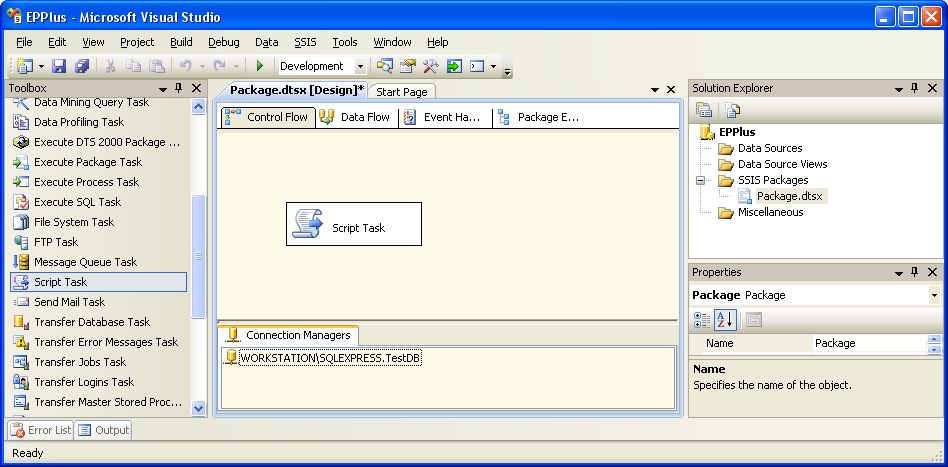
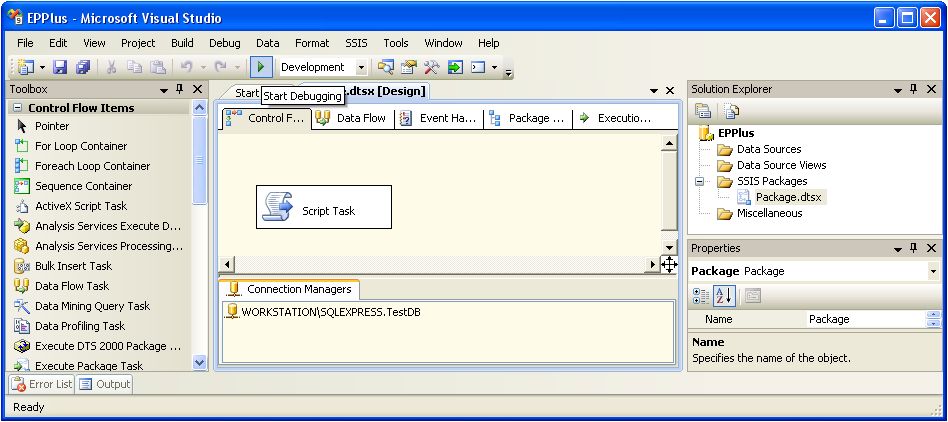
2. Create an SSIS package with a C# script task and configure it for EPPlus
EPPlus can also be used with VB.NET. See the appendix for notes on how to do it. ***
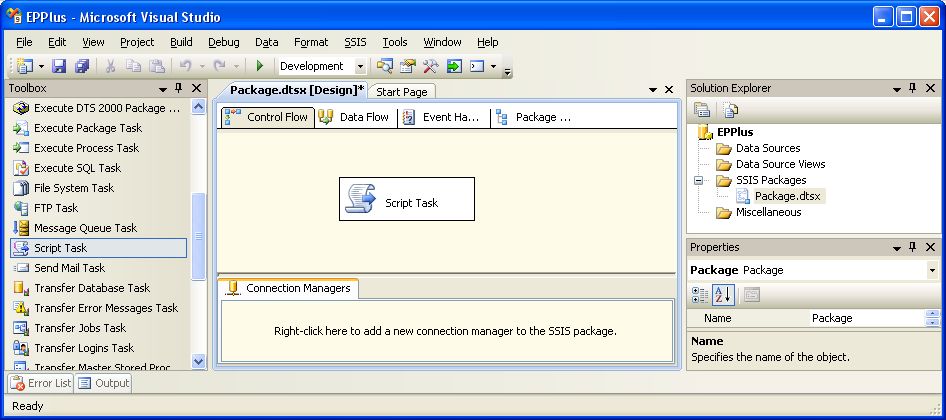
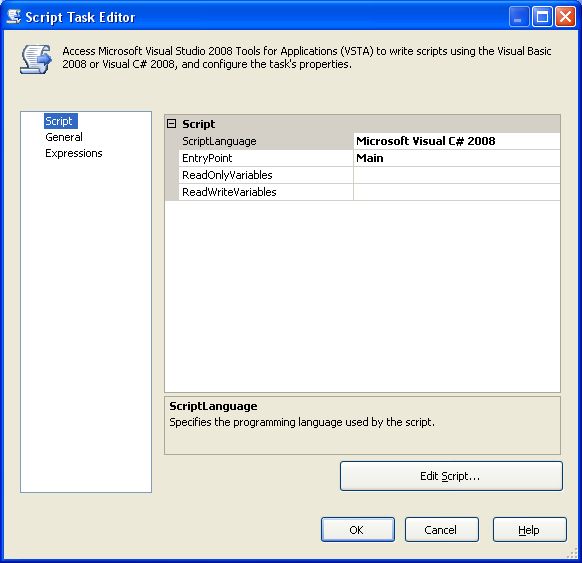
Create a new SSIS package and add a ‘Script Task’ to the ‘Control Flow’ panel, then double-click on the ‘Script Task’ component to bring up the ‘Script Task Editor’ dialog box.
Click the ‘Edit Script’ button of the ‘Script Task Editor’ dialog box to bring up the C# script task code editor..
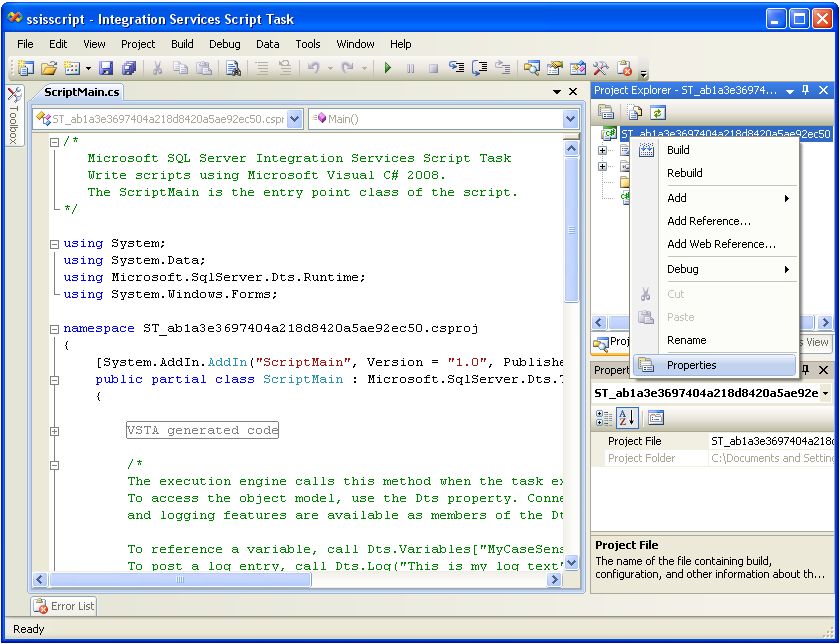
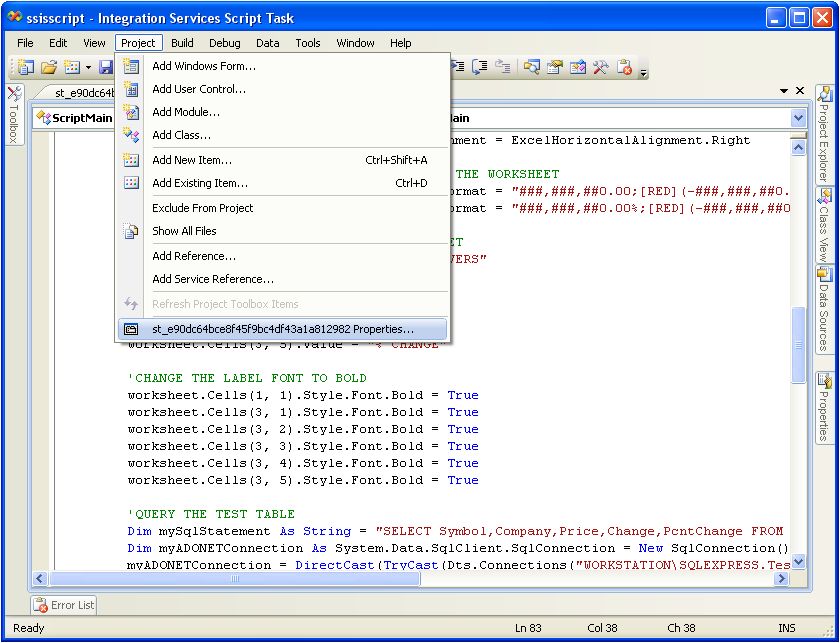
Right-click the top node of the ‘Project Explorer’ window of the script task code editor and select the ‘Properties’ menu item.
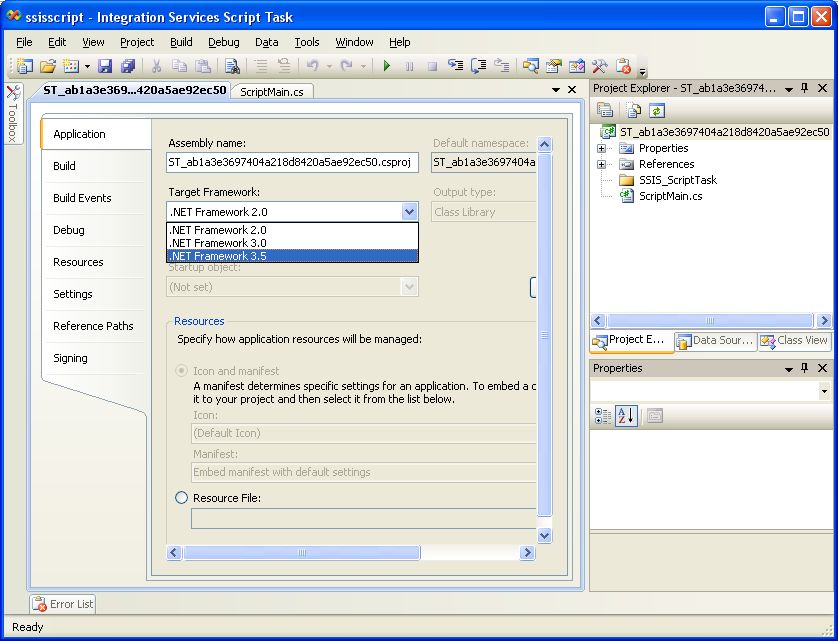
Selecct ‘.NET Framework 3.5’ from the ‘Target Framework’ drop-down menu.
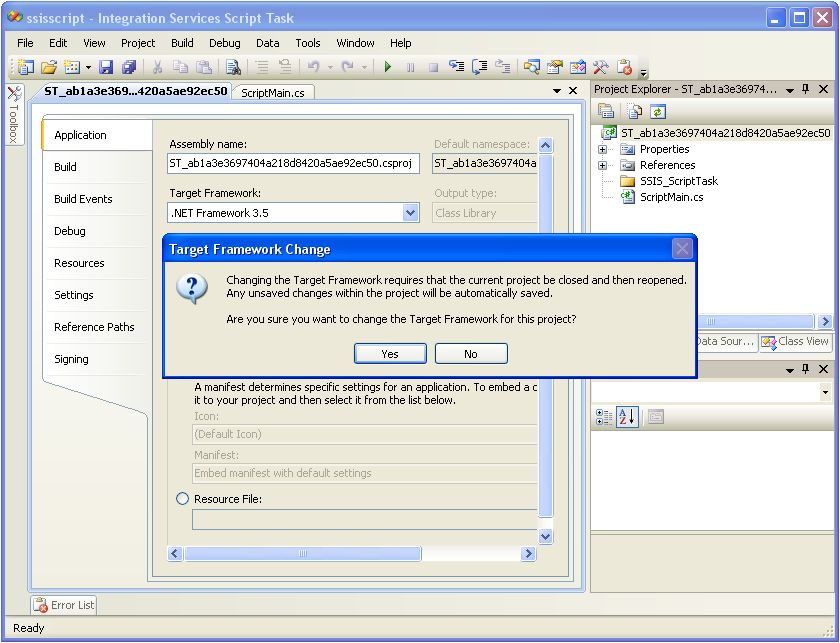
Click the ‘Yes’ button of the ‘Target Framework Change’ dialog box.
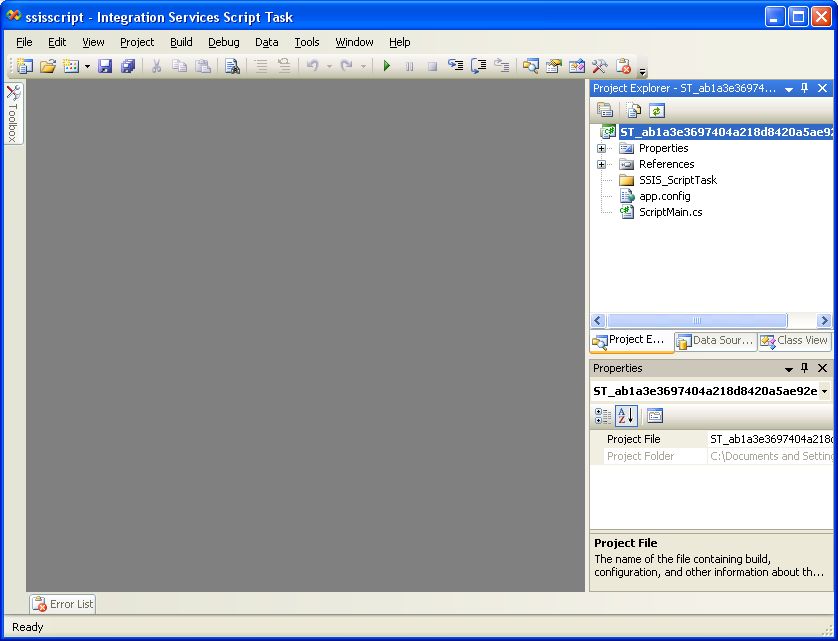
Close the script task code editor window.
Reopen the script task code editor by again clicking the ‘Edit Script’ button of the ‘Script Task Editor’ dialog box.
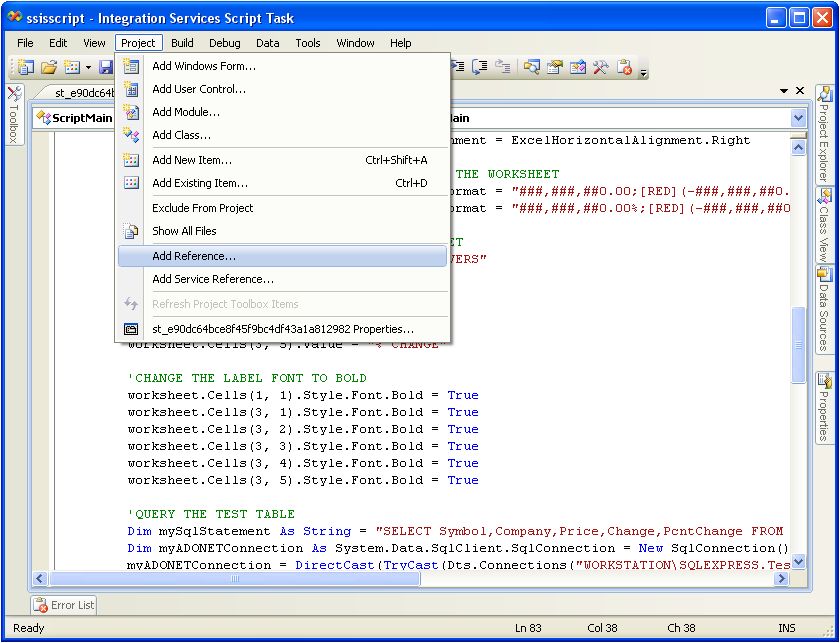
Right-click the ‘References’ folder of the ‘Project Explorer’ and select the ‘Add Reference’ menu item.
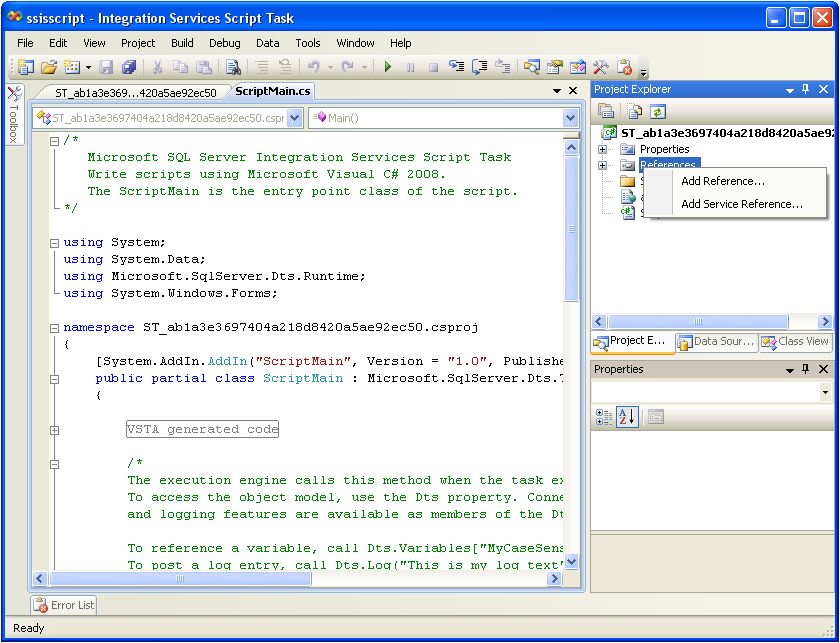
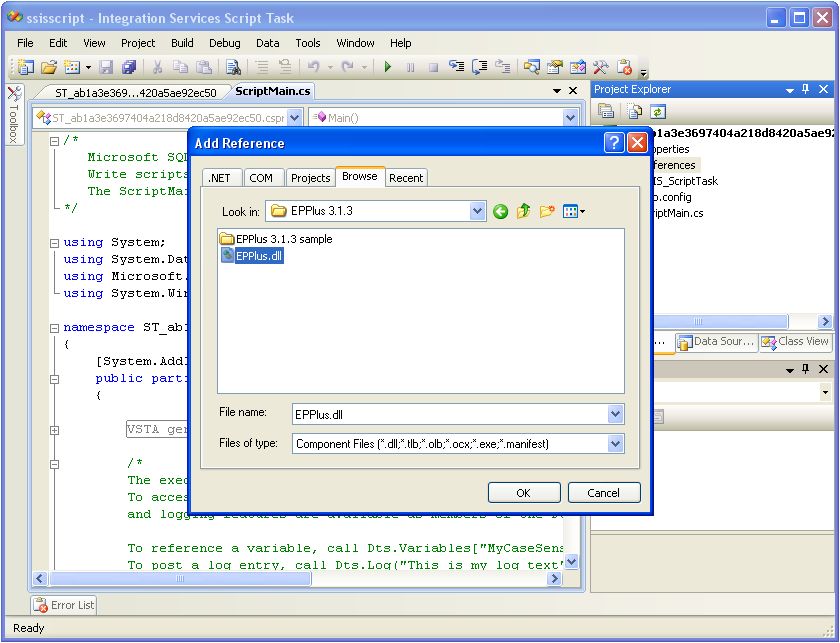
Browse to and select the EPPlus.dll assembly that we previously extracted from the downloaded EPPlus zip file, then click the ‘OK’ button.
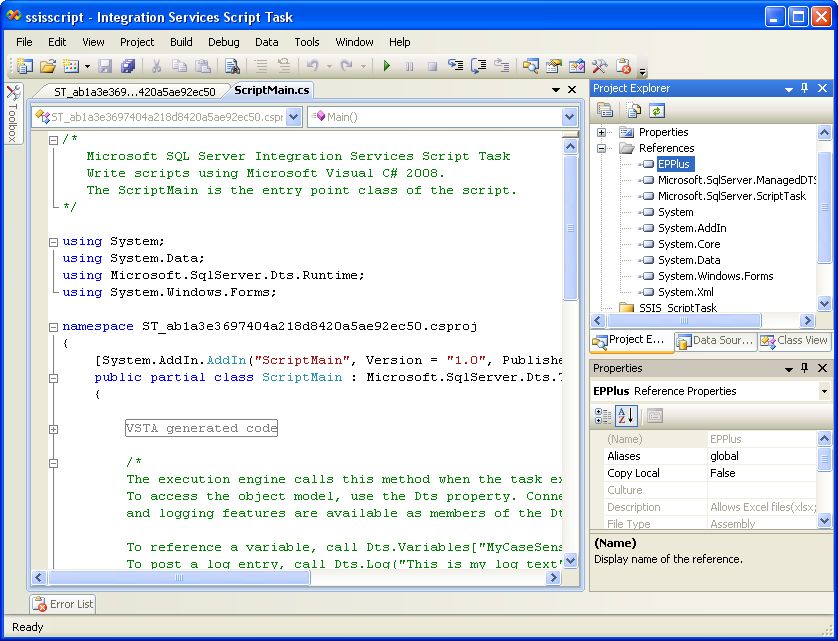
Note the addition of the ‘EPPlus’ item in the ‘References’ folder.
Add ‘using OfficeOpenXml’ and ‘using OfficeOpenXml.Style’ statements to the namespace list.
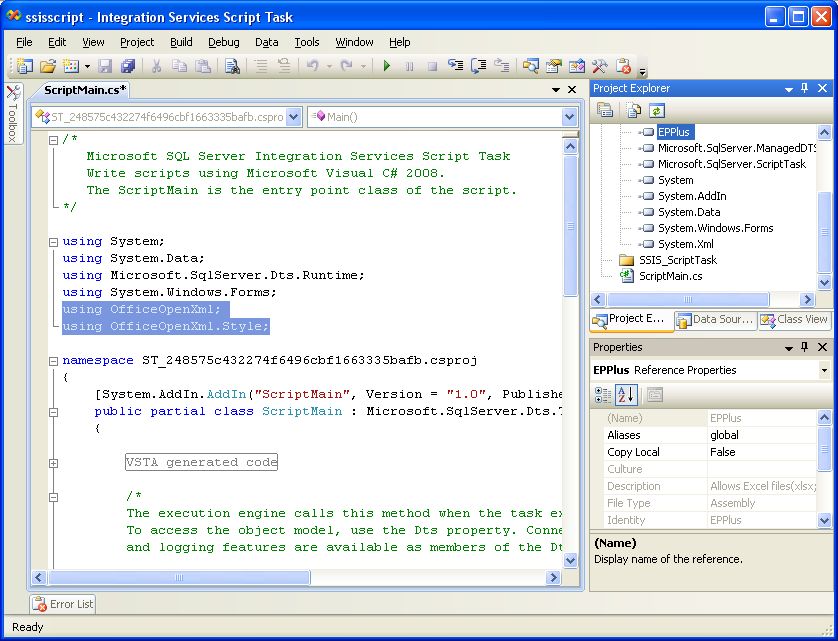
At this point the script task is configured to use EPPlus for reading and writing Excel files.
3. Create a table containing test data
Open SQL Server Management Studio and paste the following code…
USE [TestDB]
GO
BEGIN TRY
DROP TABLE [TestDB].[dbo].[Market]
END TRY
BEGIN CATCH
END CATCH
GO
CREATE TABLE [TestDB].[dbo].[Market](
[Symbol] [nvarchar](4),
[Company] [nvarchar](50),
[Price] [decimal] (18,2),
[Change] [decimal] (18,2),
[PcntChange] AS CAST([Change]/[Price] AS [numeric] (12,6))
) ON [PRIMARY]
GO
INSERT INTO [TestDB].[dbo].[Market]
(Symbol,Company,Price,Change)
VALUES
('INTC','Intel Corporation',25.85,-0.69),
('GE','General Electric Company',26.58,-0.62),
('BAC','Bank of America Corporation',17.01,-0.07),
('BBY','Best Buy Co., Inc.',24.43,-2.40),
('SIRI','Sirius XM Holdings, Inc.',3.7150,+0.0450),
('AA','Alcoa, Inc.',11.36,+0.32),
('MU','Micron Technology, Inc.',22.38,-0.75),
('MSFT','Microsoft Corporation',36.38,-0.51),
('AMD','Advanced Micro Devices',4.18,-0.20),
('CSCO','Cisco Systems, Inc.',22.74,-0.04)
GO
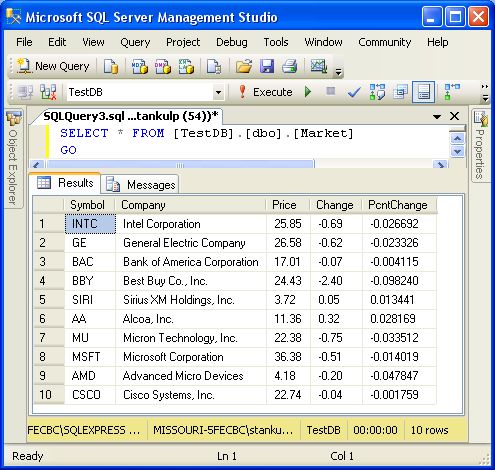
SELECT * FROM [TestDB].[dbo].[Market]
GO
…into a new query editor window.
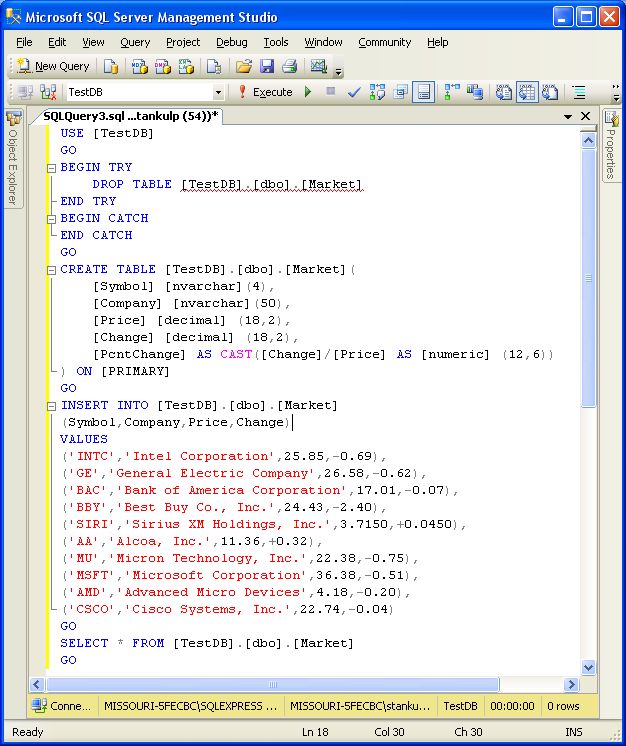
Execute the query to display the contents of the newly created [Market] table.
4. Add an ADO.NET connection to the SSIS package pointing to the database where the test table was created
Right-click on the ‘Connection Managers’ panel and select ‘New ADO.NET Connection’ from the menu list.

Click the ‘New’ button of the ‘Configure ADO.NET Connection Manager’ dialog box.

Select the server and database where the [Market] table was created, then click the ‘OK’ button.
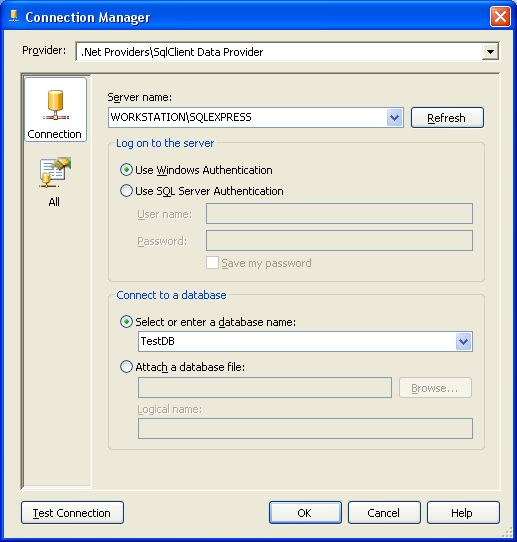
The database connection has been added to the SSIS package.
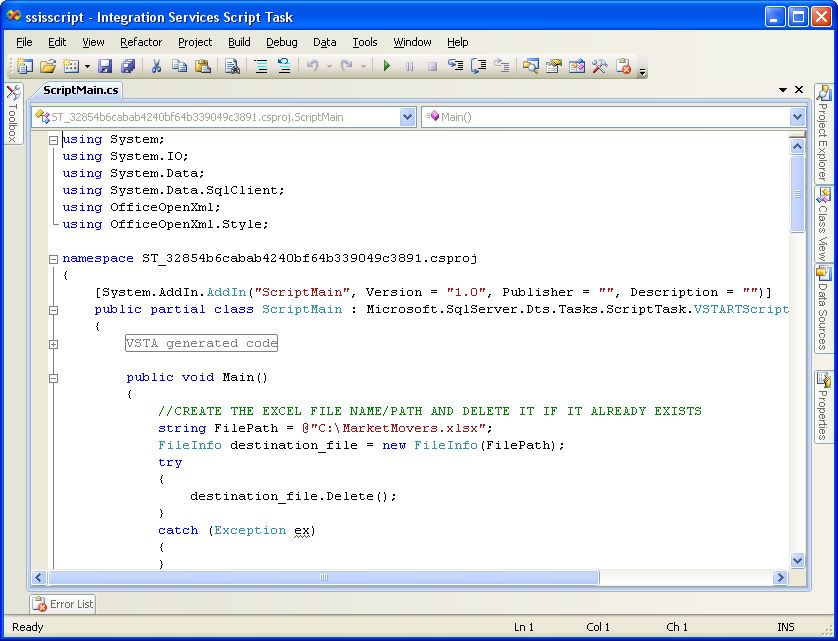
5. Paste code that creates and writes to an Excel spreadsheet into the C# script code editor
Reopen the script task code editor and paste the following code over the existing code.
using System;
using System.IO;
using System.Data;
using System.Data.SqlClient;
using OfficeOpenXml;
using OfficeOpenXml.Style;
namespace ST_32854b6cabab4240bf64b339049c3891.csproj
{
    [System.AddIn.AddIn("ScriptMain", Version = "1.0", Publisher = "", Description = "")]
    public partial class ScriptMain : Microsoft.SqlServer.Dts.Tasks.ScriptTask.VSTARTScriptObjectModelBase
    {
        #region VSTA generated code
        enum ScriptResults
        {
            Success = Microsoft.SqlServer.Dts.Runtime.DTSExecResult.Success,
            Failure = Microsoft.SqlServer.Dts.Runtime.DTSExecResult.Failure
        };
        #endregion
        public void Main()
        {
            //CREATE THE EXCEL FILE NAME/PATH AND DELETE IT IF IT ALREADY EXISTS
            string FilePath = @"C:MarketMovers.xlsx";
            FileInfo destination_file = new FileInfo(FilePath);
            try
            {
                destination_file.Delete();
            }
            catch (Exception ex)
            {
            }
            //CREATE THE EXCEL SPREADSHEET FILE
            FileInfo newFile = new FileInfo(FilePath);
            ExcelPackage p = new ExcelPackage(newFile);
            //ADD AND NAME A WORKHEET TO THE EXCEL SPREADSHEET
            ExcelWorksheet worksheet = p.Workbook.Worksheets.Add("MarketMovers");
            //DEFINE THE DEFAULT FONT TYPE AND SIZE FOR THE WORKSHEET
            worksheet.Cells.Style.Font.Size = 11; //Default font size for whole sheet
            worksheet.Cells.Style.Font.Name = "Calibri"; //Default Font name for whole sheet
            //DEFINE THE WIDTHS OF COLUMNS IN THE WORKSHEET
            worksheet.Column(1).Width = 10;
            worksheet.Column(2).Width = 30;
            worksheet.Column(3).Width = 10;
            worksheet.Column(4).Width = 10;
            worksheet.Column(5).Width = 12;
            //DEFINE THE ALIGNMENT FOR COLUMNS IN THE WORKSHEET
            worksheet.Column(3).Style.HorizontalAlignment = ExcelHorizontalAlignment.Right;
            worksheet.Column(4).Style.HorizontalAlignment = ExcelHorizontalAlignment.Right;
            worksheet.Column(5).Style.HorizontalAlignment = ExcelHorizontalAlignment.Right;
            //DEFINE THE FORMAT OF NUMERIC COLUMNS IN THE WORKSHEET
            worksheet.Column(4).Style.Numberformat.Format = "###,###,##0.00;[RED](-###,###,##0.00)";
            worksheet.Column(5).Style.Numberformat.Format = "###,###,##0.00%;[RED](-###,###,##0.00%)";
            //ADD SOME LABELS TO CELLS IN THE WORKSHEET
            worksheet.Cells[1, 1].Value = "MARKET MOVERS";
            worksheet.Cells[3, 1].Value = "SYMBOL";
            worksheet.Cells[3, 2].Value = "COMPANY";
            worksheet.Cells[3, 3].Value = "PRICE";
            worksheet.Cells[3, 4].Value = "CHANGE";
            worksheet.Cells[3, 5].Value = "% CHANGE";
            //CHANGE THE LABEL FONT TO BOLD
            worksheet.Cells[1, 1].Style.Font.Bold = true;
            worksheet.Cells[3, 1].Style.Font.Bold = true;
            worksheet.Cells[3, 2].Style.Font.Bold = true;
            worksheet.Cells[3, 3].Style.Font.Bold = true;
            worksheet.Cells[3, 4].Style.Font.Bold = true;
            worksheet.Cells[3, 5].Style.Font.Bold = true;
            //QUERY THE TEST TABLE
            string mySqlStatement = "SELECT Symbol,Company,Price,Change,PcntChange FROM [TestDB].[dbo].[Market]";
            System.Data.SqlClient.SqlConnection myADONETConnection = new SqlConnection();
            myADONETConnection = (SqlConnection)(Dts.Connections["WORKSTATION\SQLEXPRESS.TestDB"].AcquireConnection(Dts.Transaction) as SqlConnection);
            System.Data.SqlClient.SqlCommand myCommand = new System.Data.SqlClient.SqlCommand(mySqlStatement, myADONETConnection);
            SqlDataReader reader = myCommand.ExecuteReader(CommandBehavior.CloseConnection);
            //SET THE FIRST ROW TO BE WRITTEN TO THE WORKSHEET FROM THE QUERY TO ROW 4
            int row_index = 4;
            //LOOP THROUGH THE QUERY RESULT SET AND WRITE THE FIELD VALUES TO CELLS IN THE WORKSHEET
            while (reader.Read())
            {
                worksheet.Cells[row_index, 1].Value = reader["Symbol"].ToString();
                worksheet.Cells[row_index, 2].Value = reader["Company"].ToString();
                worksheet.Cells[row_index, 3].Value = System.Convert.ToDecimal(reader["Price"].ToString());
                worksheet.Cells[row_index, 4].Value = System.Convert.ToDecimal(reader["Change"].ToString());
                worksheet.Cells[row_index, 5].Value = System.Convert.ToDecimal(reader["PcntChange"].ToString());
                //INCREMENT WRITING TO THE NEXT ROW IN THE WORKSHEET FOR THE NEXT RECORD IN THE RESULT SET
                row_index += 1;
            }
            //CLOSE THE READER AND QUERY CONNECTION
            reader.Close();
            myADONETConnection.Close();
            //SAVE AND CLOSE THE EXCEL SPREADSHEET
            p.Save();
            Dts.TaskResult = (int)ScriptResults.Success;
        }
    }
}
The code contains comments that describe how EPPlus is being used.
Execute the SSIS package by clicking the  (‘Start Debugging’) button.
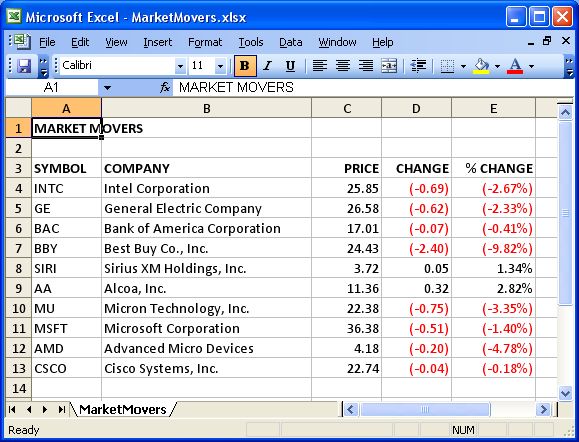
The package generates the ‘C:MarketMovers.xslx’ file.
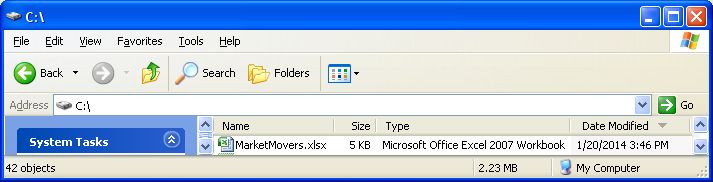
Open the ‘MarketMovers.xlsx’ file to confirm that it conatins the test data.
6. Sample EPPlus C# code
Download the ‘EPPlus 3.1.3 Samples Including Binary’ zip file from http://epplus.codeplex.com/releases/view/89923. The file contains a number of sample files that can be used to learn to create more elaborate Excel spreadsheets.

Appendix: How to use EPPlus with VB.NET
The following VB.NET code is analogous to the C# code.
Imports System
Imports System.Collections.Generic
Imports System.IO
Imports System.Data
Imports System.Data.SqlClient
Imports OfficeOpenXml
Imports OfficeOpenXml.Style
<System.AddIn.AddIn("ScriptMain", Version:="1.0", Publisher:="", Description:="")> _
<System.CLSCompliantAttribute(False)> _
Partial Public Class ScriptMain
    Inherits Microsoft.SqlServer.Dts.Tasks.ScriptTask.VSTARTScriptObjectModelBase
    Enum ScriptResults
        Success = Microsoft.SqlServer.Dts.Runtime.DTSExecResult.Success
        Failure = Microsoft.SqlServer.Dts.Runtime.DTSExecResult.Failure
    End Enum
    Public Sub Main()
        'CREATE THE EXCEL FILE NAME/PATH AND DELETE IT IF IT ALREADY EXISTS
        Dim FilePath As String = "C:MarketMovers.xlsx"
        Dim destination_file As New FileInfo(FilePath)
        Try
            destination_file.Delete()
        Catch ex As Exception
        End Try
        'CREATE THE EXCEL SPREADSHEET FILE
        Dim newFile As New FileInfo(FilePath)
        Dim p As New ExcelPackage(newFile)
        'ADD AND NAME A WORKHEET TO THE EXCEL SPREADSHEET
        Dim worksheet As ExcelWorksheet = p.Workbook.Worksheets.Add("MarketMovers")
        'DEFINE THE DEFAULT FONT TYPE AND SIZE FOR THE WORKSHEET
        worksheet.Cells.Style.Font.Size = 11
        worksheet.Cells.Style.Font.Name = "Calibri"
        'DEFINE THE WIDTHS OF COLUMNS IN THE WORKSHEET
        worksheet.Column(1).Width = 10
        worksheet.Column(2).Width = 30
        worksheet.Column(3).Width = 10
        worksheet.Column(4).Width = 10
        worksheet.Column(5).Width = 12
        'DEFINE THE ALIGNMENT FOR COLUMNS IN THE WORKSHEET
        worksheet.Column(3).Style.HorizontalAlignment = ExcelHorizontalAlignment.Right
        worksheet.Column(4).Style.HorizontalAlignment = ExcelHorizontalAlignment.Right
        worksheet.Column(5).Style.HorizontalAlignment = ExcelHorizontalAlignment.Right
        'DEFINE THE FORMAT OF NUMERIC COLUMNS IN THE WORKSHEET
        worksheet.Column(4).Style.Numberformat.Format = "###,###,##0.00;[RED](-###,###,##0.00)"
        worksheet.Column(5).Style.Numberformat.Format = "###,###,##0.00%;[RED](-###,###,##0.00%)"
        'ADD SOME LABELS TO CELLS IN THE WORKSHEET
        worksheet.Cells(1, 1).Value = "MARKET MOVERS"
        worksheet.Cells(3, 1).Value = "SYMBOL"
        worksheet.Cells(3, 2).Value = "COMPANY"
        worksheet.Cells(3, 3).Value = "PRICE"
        worksheet.Cells(3, 4).Value = "CHANGE"
        worksheet.Cells(3, 5).Value = "% CHANGE"
        'CHANGE THE LABEL FONT TO BOLD
        worksheet.Cells(1, 1).Style.Font.Bold = True
        worksheet.Cells(3, 1).Style.Font.Bold = True
        worksheet.Cells(3, 2).Style.Font.Bold = True
        worksheet.Cells(3, 3).Style.Font.Bold = True
        worksheet.Cells(3, 4).Style.Font.Bold = True
        worksheet.Cells(3, 5).Style.Font.Bold = True
        'QUERY THE TEST TABLE
        Dim mySqlStatement As String = "SELECT Symbol,Company,Price,Change,PcntChange FROM [TestDB].[dbo].[Market]"
        Dim myADONETConnection As System.Data.SqlClient.SqlConnection = New SqlConnection()
        myADONETConnection = DirectCast(TryCast(Dts.Connections("WORKSTATIONSQLEXPRESS.TestDB").AcquireConnection(Dts.Transaction), SqlConnection), SqlConnection)
        Dim myCommand As New System.Data.SqlClient.SqlCommand(mySqlStatement, myADONETConnection)
        Dim reader As SqlDataReader = myCommand.ExecuteReader(CommandBehavior.CloseConnection)
        'SET THE FIRST ROW TO BE WRITTEN TO THE WORKSHEET FROM THE QUERY TO ROW 4
        Dim row_index As Integer = 4
        'LOOP THROUGH THE QUERY RESULT SET AND WRITE THE FIELD VALUES TO CELLS IN THE WORKSHEET
        While reader.Read()
            worksheet.Cells(row_index, 1).Value = reader("Symbol").ToString()
            worksheet.Cells(row_index, 2).Value = reader("Company").ToString()
            worksheet.Cells(row_index, 3).Value = System.Convert.ToDecimal(reader("Price").ToString())
            worksheet.Cells(row_index, 4).Value = System.Convert.ToDecimal(reader("Change").ToString())
            worksheet.Cells(row_index, 5).Value = System.Convert.ToDecimal(reader("PcntChange").ToString())
            'INCREMENT WRITING TO THE NEXT ROW IN THE WORKSHEET FOR THE NEXT RECORD IN THE RESULT SET
            row_index += 1
        End While
        'CLOSE THE READER AND QUERY CONNECTION
        reader.Close()
        myADONETConnection.Close()
        'SAVE AND CLOSE THE EXCEL SPREADSHEET
        p.Save()
        Dts.TaskResult = ScriptResults.Success
    End Sub
End Class
To change the .NET framework for the VB.NET script, click on the ‘Project-Properties’ menu item in the VB editor window.
Then click the ‘Compile’ tab, followed by the ‘Advanced Compile Options’ button.
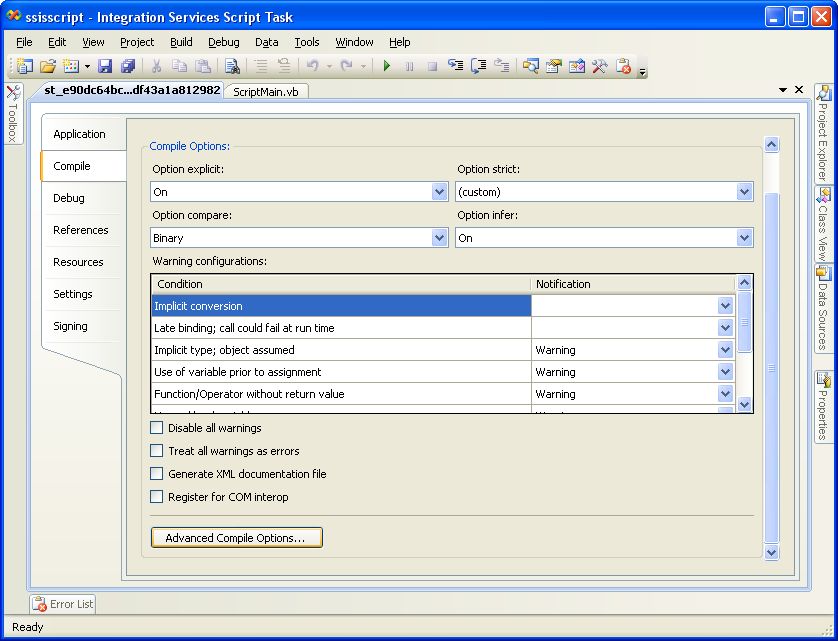
Then select ‘.NET Framework 3.5’ from the ‘Target framework’ dropdown list.

Add the reference for the EPPlus.dll assembly the same way as for the C# code.
The VB.NET code already contains the ‘Imports OfficeOpenXml’ and ‘Imports OfficeOpenXml.Style’ statements.