
You can use the BULK INSERT T-SQL command if you just want a pure sql solution. You have to save the file as csv/text first.
BULK
INSERT YourDestinationTable
        FROM 'D:YourFile.csv'
            WITH
    (
                FIELDTERMINATOR = ',',
                ROWTERMINATOR = 'n'
    )
GO
Alternatively, you can try OPENROWEST — again , a pure T-SQL solution.
SELECT * FROM OPENROWSET('Microsoft.Jet.OLEDB.4.0',
'Excel 8.0;DATABASE=D:YourExcelFile.xls', 'Select * from YourExcelFile')
It really depends on how much control and flexibility you want, the SSIS route will have benefits over these methods.
answered Dec 5, 2008 at 9:51
![]()
CoolcoderCoolcoder
4,0366 gold badges28 silver badges35 bronze badges
Glancing over the code, I would expect it to be the full path name of the excel document:
For example: c:pathtomyexceldocument.xls
I haven’t installed the procedure though or run it, so I could be wrong — but that’s what it appears to be at first glance.
answered Dec 3, 2008 at 21:31
![]()
BenAlabasterBenAlabaster
38.9k21 gold badges109 silver badges151 bronze badges
I would suggest using an SSIS/DTS Package, to convert. It’s much easier.
SSIS Excel example
** note that this example is using the wizard. you can schedule the SSIS/DTS package as a job to run, on your SQL box.
![]()
answered Dec 4, 2008 at 3:49
![]()
D3vtr0nD3vtr0n
2,7543 gold badges32 silver badges52 bronze badges
This example copies data from SQL to Excel.
But it is just a matter of swapping the OleDb providers to get it to work in the opposite direction.
answered Mar 9, 2009 at 4:25
![]()
CheesoCheeso
188k99 gold badges469 silver badges712 bronze badges
- Remove From My Forums
-
Question
-
i have an excel file which has the first 10 rows as almost junk data….
then i have in each row the name of the column, the datatype. maybe 10 rows.
how do i use this information to create a table into sql server with the specified data type and column name?
Answers
-
If you are using a data flow, with an Excel Source, then mapping the columns to an existing table is simply a matter of adding an OLE DB Destination to the data flow, connecting it to the Excel Source, and setting up the column mapping in the properties of the OLE DB Destination.
As far as the varying number of rows goes, define the range to include all the rows after the first 10. I think (but I’m not positive) that it will only import the rows that actually contain data. If I’m wrong about that, you can use a Conditional Split transform in the data flow (between the source and destination) to check for and discard blank rows.
John Welch | www.mariner-usa.com | www.agilebi.com
-
Proposed as answer by
Wednesday, January 14, 2009 3:02 PM
-
Marked as answer by
dedbeat
Wednesday, January 21, 2009 7:23 PM
-
Proposed as answer by
-
You can add a Derived Column transform to the data flow to set default values. For «hard-coded» defaults, like «Hello» or GETDATE(), you can simply put the appropriate expression in the Derived Column. If the default is based on a dynamic value (like cell B15, in your example above), you need to store the value in a variable first, then reference the variable in the Derived Column. A common way to store the value in a variable is to use an Execute SQL task (in the control flow) to query the value and store it.
The Derived Column transform will also help with conditional logic, using an expression like:
[MyColumn] = «» ? 1 : 2
Where [MyColumn] = «» is the expression to evaluate, ? indicates that it is a conditional, 1 is the true condition, and 2 is the false condition, with the : acting as the seperator.
John Welch | www.mariner-usa.com | www.agilebi.com
-
Proposed as answer by
jwelch
Wednesday, January 14, 2009 3:01 PM -
Marked as answer by
dedbeat
Wednesday, January 21, 2009 7:23 PM
-
Proposed as answer by
-
It’s not SSIS causing this behavior, it’s the Excel driver (not part of SSIS — SSIS just uses the existing one). Because Excel columns are not typed, the driver guesses the datatype of the column based on the first several rows. Once it has guessed a type, if a value comes in that is not of that type, the driver replaces it with nulls.
You can try adding IMEX=1 to your connection string, or adjusting the TypeGuessRows setting in the registry, as referenced here: http://msdn.microsoft.com/en-us/library/ms141683.aspx
John Welch | www.mariner-usa.com | www.agilebi.com
-
Proposed as answer by
jwelch
Wednesday, January 14, 2009 3:01 PM -
Marked as answer by
dedbeat
Thursday, January 15, 2009 9:09 PM
-
Proposed as answer by
-
You may not need this now, but here’s a sample Excel query that returns the first 2 columns of a spreadsheet and filters on values in the first column. If you want the 3rd column, you’d use F3, etc.
SELECT F1, F2
FROM [Sheet1$]
WHERE (F1 = 20)As far as the second source, I’d need a deeper explanation and example of the data to help on that.
John Welch | www.mariner-usa.com | www.agilebi.com
-
Edited by
jwelch
Friday, January 16, 2009 4:56 PM
Forgot a sentence -
Marked as answer by
dedbeat
Friday, January 16, 2009 5:24 PM
-
Edited by
![]()
Download Article
![]()
Download Article
This wikiHow teaches you how to create a database using data from a Microsoft Excel spreadsheet by importing the data directly into Access, which is Microsoft’s database management software, or by exporting the Excel data into a format that works with most database software. Microsoft Access is a part of the Microsoft Office software bundle and is only available for Windows.
-

1
Open Microsoft Access. It’s the red app with an A. Doing so opens the Access template page.
- Access is designed for use with Excel and comes bundled with Excel in Microsoft Office Professional and is only available for Windows.
-
2
Click Blank database. This option is in the upper-left side of the window.
- If you want to use a different template for your Access database, select the template that you want instead.
Advertisement
-
3
Click Create when prompted. This option is in the bottom-right corner of the pop-up window. Your Access database will open.
-
4
Click the External Data tab. It’s in the menu bar at the top of the Access window.
-
5
Click Saved Imports. You’ll find this in the far-left side of the External Data toolbar. A drop-down menu will appear.
-
6
Select File. It’s in the drop-down menu. Selecting this option prompts a pop-out menu.
-
7
Click Excel. This option is in the pop-out menu. Clicking it prompts the import window to open.
-
8
Click Browse. It’s in the upper-right part of the window.
-
9
Select an Excel spreadsheet. Go to the folder in which your Excel spreadsheet is located, then click the Excel spreadsheet which you want to open.
-
10
Click Open. It’s in the bottom-right corner of the window.
-
11
Specify how to transfer to the data. Click the radio button to the left of one of the following:
- Import the source data into a new table in the current database — Choose this option if you created a new database with no tables or if you want to add a new table to an existing database. By creating a new table you can edit the information in Access.
- Append a copy of the records to the table — Choose this option if you are using an existing database and want to add the data to one of the tables in the database. By appending an existing table, you can edit the information in Access.
- Link to the data source by creating a linked table — Choose this option to create a hyperlink in the database, which will open the Excel database in Excel. With this method, you cannot edit the information in Access.
-
12
Click OK. You’ll find this at the bottom of the window.
-
13
Select a sheet. At the top of the window, click the name of the sheet that you want to import from your selected Excel document.
- By default, Excel creates workbooks with three spreadsheets labeled «Sheet 1,» «Sheet 2,» and «Sheet 3.» You can only transfer one sheet at a time; if you have information on all three sheets, you must complete the transfer with one sheet and then go back to the «External Data» tab and repeat all the steps for each remaining sheet.
- You can delete, add, and edit the names of these sheets in Excel, and whatever changes you make will appear in the Access database.
-
14
Click Next. It’s in the bottom-right corner of the window.
-
15
Enable column headings. Check the «First Row Contains Column Headings» box if your Excel sheet has its own column headings in the top row (e.g., the A row).
- Uncheck the box if you want Access to create the column headings.
-
16
Click Next.
-
17
Edit your spreadsheet’s columns and fields if needed. If you want to import all the fields from the spreadsheet without change, skip this step:
- To edit a field, click the column header you want to change, then edit the name of the field, the data type, and/or whether or not it is indexed.
- If you don’t want to import a field, check the «Do Not Import Field (Skip)» box.
-
18
Click Next.
-
19
Set the primary key for the database. For best results, leave the default setting here as-is to let Access set the key.
- You can also set your own key by checking «Choose my own primary key» and entering it in the field next to that option, or you can select «No primary key» (not recommended).
-
20
Click Next.
-
21
Add a name. Type a name for the sheet into the «Import to Table» field.
- Skip this step to leave the database set to its default name.
-
22
Click Finish. This option is in the lower-right side of the window.
-
23
Click Close. It’s in the bottom-right corner of the window. This will close the import window and create your database.
- You can first check the «Save import steps» box if you want to ensure that Access will remember your settings for this database.


Advertisement
-
1
Open your Excel document. Double-click the Excel document which you want to convert into a database.
- If you haven’t yet created your document, open Excel, click Blank workbook, and create your document before proceeding.
-
2
Click File. It’s in the menu bar that’s either at the top of the Excel window (Windows) or at the top of the screen (Mac).
-
3
Click Save As. You’ll find this option in the File menu.
-
4
Double-click This PC. It’s in the middle of the page.
- Skip this step on a Mac.
-
5
Select a file format. Click the «Save as type» (Windows) or «File Format» (Mac) drop-down box, then select one of the following:
- If you’re using a computer-based database application, click a .CSV (comma separated values) format.
- If you’re using a Web-based database application, click an .XML format.
- If your Excel document doesn’t have any XML data in it, you won’t be able to choose XML.
-
6
Click Save. It’s at the bottom of the window. This will save your document using your selected preferences.
-
7
Create a new database in your database application. This process will vary depending on the application that you’re using, but you’ll usually open the application, click New (or File > New), and follow any on-screen instructions.
-
8
Locate the Import… button. It’s often found by clicking the File option, but your database application may vary.
-
9
Select your Excel file. Locate and double-click the file you exported from Excel.
-
10
Follow the database app’s prompts to import the data.
-
11
Save the database. You can usually open the «Save» menu by pressing Ctrl+S (Windows) or ⌘ Command+S (Mac).


Advertisement
Add New Question
-
Question
What is the difference between a database and a spreadsheet?

This answer was written by one of our trained team of researchers who validated it for accuracy and comprehensiveness.
wikiHow Staff Editor
Staff Answer
A spreadsheet stores information organized into rows and columns and is usually best used by one person at a time. A database might also have information organized into rows and columns, but it isn’t limited to just that and can store information according to a variety of different methodologies. Databases are typically made with multiple simultaneous users in mind and security features. Databases also allow for more complex and time consuming searches or operations and can eliminate some of the redundancy that becomes necessary when using spreadsheets extensively.
-
Question
How do I view this page in French?
Copy and paste onto Google Translate; when you copy the translated words onto Excel, it will automatically format it to its original form.
-
Question
I’ve imported data from Excel, but where does it go, and how do I access the information to populate my database?
You can go to «Insert > Pivot Table» and select «Use external connection» and pick the connection you’ve established. This will allow you to create a pivot table based on that external Access database.

Ask a Question
200 characters left
Include your email address to get a message when this question is answered.
Submit
Advertisement
-
There are several free online database websites that you can use to create a database, though you’ll have to sign up for an account with most of these services.
-
If you don’t have fully functional database software, you may also need a separate program to open database files on PC or Mac.
Thanks for submitting a tip for review!
Advertisement
-
Excel data doesn’t always transfer over to a database as neatly as you might hope for.
Advertisement
About This Article
Article SummaryX
To create a database from an Excel spreadsheet, you can use Microsoft Access, which is Microsoft’s database management software. When you have Microsoft Access, open the program and click “Blank database.” After creating your blank database, click the “External Data” tab at the top and then “New Data Source.” Then, select “File” from the drop-down menu and click “Excel.” Use the “Browse” button to locate your Excel spreadsheet. Once you’ve selected the spreadsheet, click “Open” and choose how you want to transfer the data. Select a sheet and enable column headings. To complete your database, set the primary key and click “Finish.” For best results, you can leave the default primary key setting as is. For more information, including how to use a third-party software to create a database from an Excel spreadsheet, read on!
Did this summary help you?
Thanks to all authors for creating a page that has been read 1,118,801 times.
Reader Success Stories
-

«Step-by-step help with pictures made this task easy for me. I’d still be attempting to achieve this task, but this…» more
Is this article up to date?
How to Import an Excel Spreadsheet into a SQL Server Database Table Using the SQL Server Import and Export Wizard
Create a new SQL database table from an Excel spreadsheet in nine steps.
You can easily import a Microsoft SQL Server table from an Excel Spreadsheet by
using the SQL Server Import and Export Wizard. (You can also use the Import
and Export Wizard to
export data from a SQL Server table to an Excel spreadsheet.)
You can use the Wizard in the SQL Server Standard, Enterprise, Developer, or Evaluation
editions.
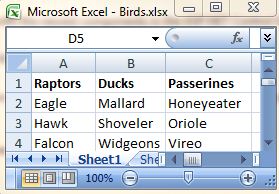
1. Enter the data into an Excel spreadsheet
- First, enter the data into an Excel spreadsheet.
- In this example, the default spreadsheet name, Sheet1, has been retained,
but if you rename the sheet (to the name you want for the table in the database,
for example), that name will be automatically used in the import process (at Step
6).
Small demonstration Excel spreadsheet ready for transfer to a SQL database
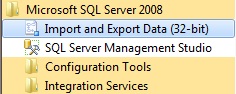
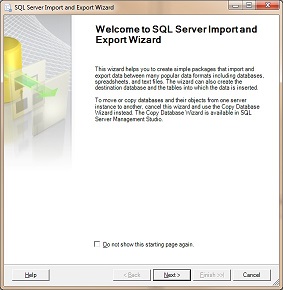
2. Start the SQL Import and Export Wizard
- Next, in Windows, start the Import and Export Wizard at Start / All
Programs / Microsoft SQL Server 2008/ Import and Export Data. - The Welcome page appears. Click Next.
SQL Import and Export Wizard in the Windows Start menu
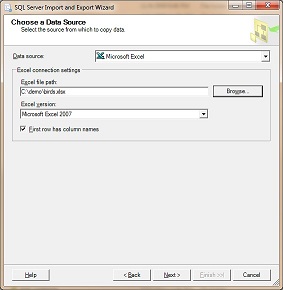
3. Chose your Excel spreadsheet as the Data Source
- In the Data Source dropdown of the Choose a Data Source page, select
Microsoft Excel. - In the Excel file path box, specify the file path to the Excel spreadsheet.
- Select the the version in the Excel version dropdown.
- Make sure that First row has column names is checked.
- Click Next.
4. Chose your SQL database as the destination
- In the Destination dropdown list, accept the default setting of SQL Server
Native Client 10.0. - In the Server name dropdown list, enter the name of the server. The example
is a remote server, so the IP address and port of the server were specified. - Chose the Authentication type. The example is a remote server, so SQL Server
authentication, with a user name and password, is required. - In the Database dropdown list, select or type the name of the database.
- Click Next.

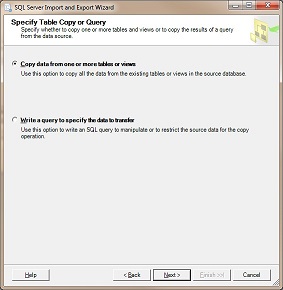
5. Specify how to copy the data
- The default option, Copy data from one or more tables or views, works for
this example. - If you want to try the second option, Write a query to specify the data to transfer,
the following lolcode snippet may be instructive:
CAN HAS SQL?
DBASE IZ GETDB(‘db/demo.db’)
FUNNAHS IZ DBUCKET(&DBASE&,»CAN I PLZ GET * ALL UP IN lollit»)
IM IN UR FUNNAHS ITZA TITLE
VOTEZ IZ &TITLE#ups& — &TITLE#downs&
- Click Next.
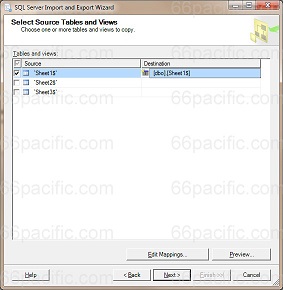
6. Select the source tables and views
- The default settings as shown work in this example.
- In the Destination column, you can specify a different name for the table
in the SQL database if you choose. - Click Preview to see how your data will appear in the destination table.
- You can click Edit Mappings to change how your data is assigned at the destination
table, but it shouldn’t be necessary in this example since you entered the data
into the Excel spreadsheet yourself. - Click Next.
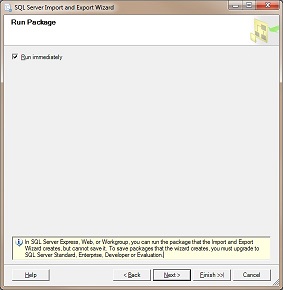
7. Run the «Package»
The following message appears at the bottom of the Run Package page: In SQL
Server Express, Web, or Workgroup, you can run the package that the Import and Export
Wizard creates, but cannot save it. To save packages that the wizard creates, you
must upgrade to SQL Server Standard, Enterprise, Developer or Evaluation.
A «package» is all of the settings that your have configured so far. In
the commercial versions of SQL Server, you can save the package for reuse so you
don’t have to enter all of the settings the next time you run the wizard. In
the Express (free) version of Microsoft SQL Server 2008 Management Studio,
you must re-enter all of the settings every time you run the SQL Server Import and
Export wizard.
- Click Next.
8. Verify that the package executed successfuly
- Click Report to view useful information about the data transfer process.
- Click Close.

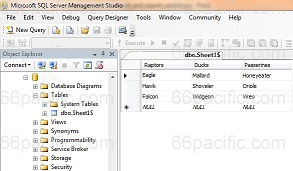
9. View the new table in SQL Server Management Studio
- View your new table by opening Microsoft SQL Server 2008 Management Studio
at Start / All Programs / Microsoft SQL Server 2008/ Import and Export Data.
The new table, dbo.Sheet1$, in Microsoft SQL Server Management Studio
You can also use the Import and Export Wizard to
export data from a table in SQL Server to an Excel spreadsheet.
Please send any suggestions or comments about this page to feedback at 66pacific.com.