
Before you can add a citation, a works cited list, or a bibliography, you must add a source to your document. A works cited list is a list of sources, usually placed at the end of a document, that you referred to (or «cited») in the document. A works cited list is different from a bibliography, which is a list of sources that you consulted when you created the document. After you add sources, you can automatically generate a works cited list or a bibliography based on that source information. Each time that you create a new source, the source information is saved on your computer. You can use the Source Manager to find and reuse any source that you have created, even sources in other documents.
Citations are parenthetical references that are placed inline with the text. Citations are different from footnotes and endnotes, which are placed at the bottom of the page or end of the document. The source information stored in the Citations tool or Source Manager can be used to create citations, a works cited list, or a bibliography. However, you cannot use the information in the Citations tool or the Source Manager to create footnotes or endnotes.
For more information about templates for various styles, such as APA style, visit the Office for Mac templates web site.
To add a citation to your document, first add the source you used.
-
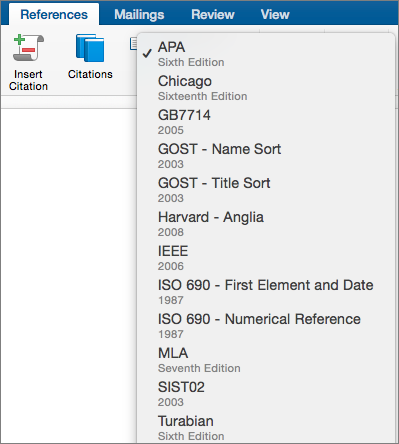
On the References tab, click the arrow next to Bibliography Style, and click the style that you want to use for the citation and source. For example, social sciences documents usually use the MLA or APA styles for citations and sources.

-
Click at the end of the sentence or phrase that you want to cite.
-
On the References tab, click Insert Citation.
-
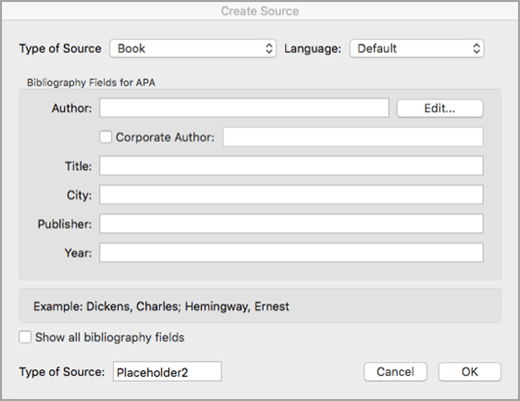
In the Create Source dialog box, next to Type of Source, select the type of source you want to use (for example, a book section or a website).
-
Enter the details for the source and click OK. The source is added as a citation at the place you selected in your document.
When you’ve completed these steps, the citation is added to the list of available citations. The next time you quote this reference, you don’t have to type it all out again. You just add the citation (see the steps in the following procedure).
-
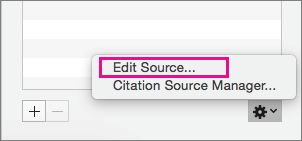
If you need to edit a source, on the References tab, click Citations, and then click the settings button in the bottom right corner of the Citations pane.
-
click Edit Source.
-
Make the changes you want to the source, and then click OK.
To manage your list of sources, click Citation Source Manager, and then add, edit, or delete sources in the list.
-
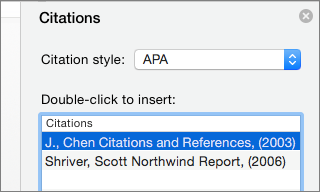
Click at the end of the sentence or phrase that you want to cite, and then on the References tab, click Citations.
-
In the Citations pane on the right, double-click the citation you want to add.

In addition to the citation options that are included in Word by default, you can add custom citation styles, such as Vancouver, to create the bibliographies and reference materials you want.
The easiest approach is to download citation styles from sources such as BibWord.
By working with XML code you can also create your own custom styles. For details, see Create Custom Bibliography Styles.
A works cited list is a list of all works you referred to (or «cited») in your document, and is typically used when you cite sources using the MLA style. A works cited list differs from a bibliography, which is a list of all works that you consulted when your researched and wrote your document.
-
In your document, click where you want the works cited list or bibliography to appear (usually at the very end of the document, following a page break).
-
On the References tab, click the arrow next to Bibliography, and then click Bibliography or Works Cited.
You can change the style of all the citations contained in a document’s works cited list or bibliography without manually editing the style of the citations themselves. For example, you can change the citations from the APA style to the MLA style.
-
On the View menu, click Draft or Print Layout.
-
On the References tab, click Citations.
-
In the Citations pane, on the Citation style list, select a style.
All references in your document’s bibliography change to the new style.
Add, edit, or remove a source
To add a citation, a works cited list, or a bibliography to your document, you first add a list of the sources that you used.
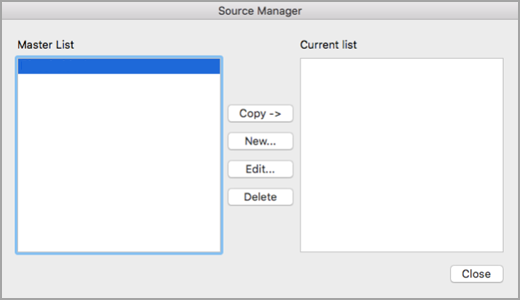
The Source Manager lists every source ever entered on your computer so that you can reuse them in any other document. This is useful, for example, if you write research papers that use many of the same sources. If you open a document that includes citations, the sources for those citations appear under Current list. All the sources that you have cited, either in previous documents or in the current document, appear under Master list.
-
On the Document Elements tab, under References, click Manage.
-
At the bottom of the Citations tool, click
, and then click Citation Source Manager. -
Click New.
-
On the Type of Source pop-up menu, select a source type.
-
Complete as many of the fields as you want. The required fields are marked with an asterisk (*). These fields provide the minimum information that you must have for a citation.
Note: You can insert citations even when you do not have all the publishing details. If publishing details are omitted, citations are inserted as numbered placeholders. Then you can edit the sources later. You must enter all the required information for a source before you can create a bibliography.
-
When you are finished, click OK.
The source information that you entered appears in the Current list and Master list of the Source Manager.
-
To add additional sources, repeat steps 3 through 6.
-
Click Close.
The source information that you entered appears in the Citations List in the Citations tool.
 , and then click Citation Source Manager.
You can edit a source directly in the document or in the Citations tool. When you change the source, the changes apply to all instances of that citation throughout the document. However, if you make a manual change to a particular citation within the document, those changes apply only to that particular citation. Also, that particular citation is not updated or overridden when you update the citations and bibliography.
-
On the Document Elements tab, under References, click Manage.
-
In the Citations List, select the citation that you want to edit.
-
At the bottom of the Citations tool, click
, and then click Edit Source. -
Make the changes that you want, and then click OK.
If you see a message that asks whether you want to save changes in both the Master list and the Current list, click No to change only the current document, or click Yes to apply changes to the source of the citation and use it in other documents.
Before you can remove a source from the Citations List, you must delete all related citations.
-
In the document, delete all the citations associated with the source that you want to remove.
Tip: You can use the search field to locate citations. In the search field
, enter part of the citation. -
On the Document Elements tab, under References, click Manage.
-
At the bottom of the Citations tool, click
, and then click Citation Source Manager. -
In the Current list, select the source that you want to remove, and then click Delete.
The source now appears only in the Master list.
Note: If the Delete button is unavailable, or if you see a check mark next to the source in the list, there is still at least one related citation in the document. Delete all remaining related citations in the document, and then try deleting the source again.
-
Click Close.
The source that you removed no longer appears in the Citations List.
 , enter part of the citation.
Insert, edit, or delete a specific citation
You can insert citations from a list of sources and make changes to a specific citation,
-
In your document, click where you want to insert the citation.
-
On the Document Elements tab, under References, click Manage.
-
In the Citations List, double-click the source that you want to cite.
The citation appears in the document.
Use this option to make custom changes to a citation and keep the ability to update the citation automatically.
Note: The changes that you make by using this method apply only to this citation.
-
Click anywhere between the parentheses of the citation. A frame appears around the citation.
-
Click the arrow on the frame, and then click Edit this Citation.
-
Add page numbers, or select the Author, Year, or Title check box to keep that information from showing in the citation.
If you want to change a specific citation manually, you can make the citation text static and edit the citation in any way that you want. After you make the text static, the citation will no longer update automatically. If you want to make changes later, you must make the changes manually.
-
Click anywhere between the parentheses of the citation. A frame appears around the citation.
-
Click the arrow on the frame, and then click Convert Citation to Static Text.
-
In the document, make the changes to the citation.
-
In the document, find the citation that you want to delete.
Tip: You can use the search field to locate citations. In the search field
, enter part of the citation. -
Select the whole citation, including the parentheses, and then press DELETE .
Insert or edit a works cited list or a bibliography
A works cited list is a list of all works you referred to (or «cited») in your document, and is typically used when you cite sources using the MLA style. A works cited list differs from a bibliography, which is a list of all works that you consulted when your researched and wrote your document.
-
In your document, click where you want the works cited list or bibliography to appear (usually at the very end of the document, following a page break).
-
On the Document Elements tab, under References, click Bibliography, and then click Bibliography or Works Cited.
You can change the style of all the citations contained in a document’s works cited list or bibliography without manually editing the style of the citations themselves. For example, you can change the citations from the APA style to the MLA style.
-
On the View menu, click Draft or Print Layout.
-
On the Document Elements tab, under References, click the Bibliography Style pop-up menu, and then click the style that you want to change the bibliography’s references to.
All references in your document’s bibliography change to the new style.
If you add new sources to the document after you inserted the works cited list or bibliography, you can update the works cited list or bibliography to include the new sources.
-
Click the works cited list or bibliography. A frame appears around it.
-
Click the arrow on the frame, and then click Update Citations and Bibliography.
Word inserts a works cited list or a bibliography as a field. The field frame indicates that the works cited list or bibliography was created automatically from the sources in the document. The frame enables you to convert the field into static text and edit it as you would any other text.
Note: If you convert a works cited list or a bibliography to static text, you cannot use Word to automatically update it. Instead, you must delete the works cited list or bibliography and then insert a new one.
-
Click the works cited list or bibliography. A frame appears around it.
-
Click the arrow on the frame, and then click Convert Bibliography to Static Text.
See also
Add or change footnotes or endnotes
Create or edit an index

There are several third-party plug-ins that can help you create a citation with multiple sources in Microsoft Word. But today, we are going to create multi-source citations in Word without using a plug-in. We will also look at how to remove or edit individual sources within a multi-source citation.
Quick Links:
- How to Create a Citation with Multiple Sources
- How to Remove or Edit Individual Sources in a Multi-Source Citation
The steps below are based on the assumption that you have already created your single-source citations. For step-by-step instructions on how to create a citation in Word, please see my other tutorial titled “How to Insert Citations in Microsoft Word.”
This tutorial is available as a YouTube video showing all the steps in real time.
Watch more than 150 other writing-related software tutorials on my YouTube channel.
The images below are from Word for Microsoft 365. These steps will also work in Word 2021, Word 2019, and Word 2016.
Here are the basic steps to create a citation with multiple sources. If you want to add a source to an existing citation, skip to step 5.
- Place your cursor where you want to insert the citation.
- Select the References tab in the ribbon.

- Select the Insert Citation button in the Citations & Bibliography group.

- Select the first source you want to cite from the Insert Citation menu.
Alternatively, select Add New Source and then create a new source, as shown in “How to Insert Citations in Microsoft Word.”

The single-source citation should appear in your document.
- Place your cursor to the left of the closing parenthesis.

- Reselect the Insert Citation button (see figure 2).
- Select the second source you want to cite from the Insert Citation menu (see figure 3).
The second source should be inserted within the existing parentheses.
- Repeat steps 5 through 7 until you have added all the sources needed in the citation.

Pro Tip: The punctuation inserted between the sources will depend on the style guide chosen for your citations in the Style menu in the References tab. For example, the Chicago and Turabian styles use commas between sources, and the APA and MLA styles use semicolons between sources.

How to Remove or Edit Individual Sources in a Multi-Source Citation
These steps show how to remove sources or edit sources in a citation, including adding page numbers and removing information through suppression.
- Select the citation and then select the Citation Options menu arrow.
![]()
- Select Remove Citation, Edit Citation, or Edit Source from the menu.
-
- Remove Citation lets you remove individual sources.
- Edit Citation lets you add page numbers or suppress (remove) the author’s name, year, or title.
- Edit Source lets you edit the source information.

- Select the source you want to remove or edit from the menu.

- If you chose Edit Citation, enter the page number(s) you want to insert. Or, choose to suppress (remove) the author, year, or title.
Select the OK button after making your choices.

- If you chose Edit Source, update the source information in the Edit Source dialog box.
Select the OK button when you are finished editing.
Important Note: Word will automatically update all other citations in your current document that reference the source you just edited.

- Select the Yes button in the alert box if you want to update the source in your master source list and your current source list. Select the No button if you only want to update your current source list.

The individual source in your citation should be updated.
Related Resources
How to Cross-Reference Tables and Figures in Microsoft Word
How to Create and Update a List of Tables or Figures in Microsoft Word
How to Create and Update a Table of Contents in Microsoft Word
Updated August 14, 2022
![]()
Download Article
![]()
Download Article
Microsoft Word has many automatic features that can help you write a report or academic paper. Among these, you can keep a list of sources and citations to automatically generate a bibliography (also called a «Reference List» or «Works Cited») at the end of your paper. If you need footnotes or endnotes, Word has features that can help you format those as well.
-
1
Choose a citation style on the «References» tab. When you click on the «References» tab, you’ll see the word «Style» next to a drop-down menu. If you click on the drop-down menu, you can select the citation style you want to use for your references.
- Make sure the edition is the same as the one you need to use. Word typically offers the most recent edition of each style, but if you have an older version of Word you may need to upgrade. If you have a subscription version, simply download the latest update.[1]
- Make sure the edition is the same as the one you need to use. Word typically offers the most recent edition of each style, but if you have an older version of Word you may need to upgrade. If you have a subscription version, simply download the latest update.[1]
-
2
Click «Add New Source» to enter information about a source. On the «References» tab, click the «Insert Citation» button in the «Citations and Bibliography» group. Any sources you’ve already entered will appear in a drop-down. Select «Add New Source» if the source you want to cite isn’t already listed.
- A dialogue box will appear with the necessary fields for the citation, including spaces for the author, title, year of publication, city, and publisher. Enter all the information you have for your source, then click «OK.»
- If you have additional information about the source that doesn’t fit into any of these basic fields, check the box next to «Show All Bibliography Fields.»
Tip: If you don’t have all the information for the source, or if you don’t want to interrupt your train of thought to add a new source, you can click «Add New Placeholder» instead. This alerts you that you need to add a citation there.
Advertisement
-
3
Continue to insert citations as you write your paper. Set the cursor at the end of a sentence where you need a citation. Go back up to the «References» tab and click on «Insert Citation» to bring up the list of sources. Click on the source you want to cite, and Word will automatically generate an in-text citation in the style you’ve chosen.
- To edit an individual citation, such as if you wanted to add a page number for a direct quote, right-click the citation for citation options and click «Edit Citation.»[2]
- To edit an individual citation, such as if you wanted to add a page number for a direct quote, right-click the citation for citation options and click «Edit Citation.»[2]
-
4
Use the «Manage Sources» button to edit or delete sources. Particularly if you have a long paper with a lot of sources, you may find as you go that you have some duplicated sources or some that you no longer need to use. You can add, delete, or edit sources using the «Manage Sources» button in the «Citations & Bibliography» group under the «References» tab.
- Choose the source you want to edit from your master list. As you edit, you’ll see a preview of the final citation in the lower box.
- If you inserted placeholders while you were writing, you can also use this menu to add information for those sources.


Advertisement
-
1
Select the footnote or endnote option on the «References» tab. Set your cursor where you want the footnote or endnote number in your text. Typically this will be at the end of a sentence, but it may be after a signal phrase or author’s name. Go up to the «References» tab and click «Insert Footnote» or «Insert Endnote.»[3]
- Word will automatically create a superscripted number in your text and move the cursor to the footnote or endnote field.
Keyboard shortcuts:
Insert Footnote: Alt+Ctrl+F (PC); Command+Option+F (Mac)
Insert Endnote: Alt+Ctrl+D (PC); Command+Option+E (Mac) -
2
Use the «Expand» icon to adjust footnote or endnote settings. You can use sequential numbers, letters, or other symbols to mark your footnotes or endnotes. You can also specify what number or letter you want them to start from.[4]
- By default, footnotes or endnotes will continue sequential numbering throughout your document. If you want the numbers to restart at the beginning of each new section or chapter, you can specify this in the settings.
If you need to convert footnotes to endnotes, click on the «Insert» menu, then «Footnote,» then «Options.» Select «Convert» from the menu, then click on «Endnotes.»
-
3
Type your footnote or endnote into your document. You can enter your citation by hand, or you can use the «Insert Citation» tool to add a citation in your footnote or endnote. Choose your source from the drop-down or add a new source if you want to cite a source that you haven’t entered yet.[5]
- You can also use the «Placeholder» tool if you don’t yet have all the information for the source and need to add it in later.
- Check the formatting against your style guide to make sure it’s correct before you continue.
-
4
Double-click the footnote number to go back to the document. When you’re ready to go back up to where you left off and start writing again, double-click the number or other symbol at the beginning of the footnote. It will send the cursor back to the end of the text.[6]
- Similarly, you can double-click a superscripted footnote number in the text to check that footnote, edit, or add to it. While you can also simply scroll down the page, this is a quicker way to get there.
To delete a footnote or endnote, highlight the footnote or endnote number in your text and press the delete key. Word will automatically renumber your other footnotes or endnotes to accommodate for the deletion.


Advertisement
-
1
Choose the format for your bibliography. Word automatically builds your bibliography for you as you enter your sources. Select «Bibliography» fro the «References» tab, then choose the type of bibliography you want from the drop-down.[7]
- For example, if you’re writing your paper in MLA style, you would want a «Works Cited» bibliography. Assuming you chose MLA as the style for your source citations, the «Works Cited» format would be the first format option in the «Bibliography» drop-down menu.
-
2
Generate your bibliography with a click. When you find the format you want, simply select it from the drop-down menu and click. Word will automatically create your bibliography at the end of your document.[8]
- The bibliography is considered a separate object from the paper you’re writing, and will automatically start on a new page.
Tip: You don’t have to wait until you’ve finished writing your paper to create your bibliography. Word will auto-populate your bibliography with any new sources you add after the bibliography has been generated.
-
3
Proofread your bibliography carefully. Even though Word has done the hard work of formatting for you, you still need to double-check each entry. Make sure the source is correct and the entry is formatted correctly for the style you’ve chosen.[9]
- For example, if you made a typographical error when entering the information about the source, that error would carry over into your bibliography.


Advertisement
Ask a Question
200 characters left
Include your email address to get a message when this question is answered.
Submit
Advertisement
Thanks for submitting a tip for review!
-
The steps and information in this article are accurate for Word for Office 365, Word 2019, Word 2016, Word 2013, Word 2010, and Word 2007. If you have a different edition of Word, your menu options may differ slightly.[10]
Advertisement
About This Article
Thanks to all authors for creating a page that has been read 91,028 times.