
Insert a worksheet
-
Select the New Sheet plus icon
 at the bottom of the workbook.
 -
Or, select Home > Insert > Insert Sheet.
 at the bottom of the workbook.
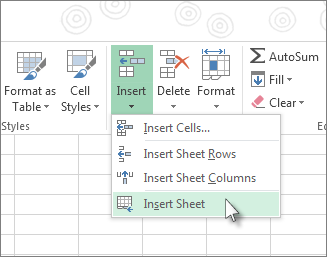
Rename a worksheet
-
Double-click the sheet name on the Sheet tab to quickly rename it.
-
Or, right-click on the Sheet tab, click Rename, and type a new name.
Move a worksheet
-
To move the tab to the end, right-click the Sheet tab then Move or Copy > (move to end) > OK .
-
Or, click and drag to tab to any spot.
Delete a worksheet
-
Right-click the Sheet tab and select
Delete. -
Or, select the sheet, and then select Home > Delete > Delete Sheet.
 Delete.
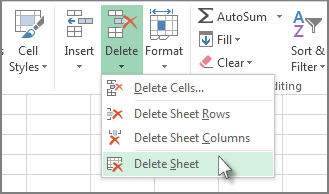
Note: Sheet tabs are displayed by default. If you don’t see them, click Options > Advanced > Display options for this workbook > Show Sheet tabs.
To insert a new worksheet, do one of the following:
-
To quickly insert a new worksheet at the end of the existing worksheets, click the Insert Worksheet tab at the bottom of the screen.
-
To insert a new worksheet in front of an existing worksheet, select that worksheet and then, on the Home tab, in the Cells group, click Insert, and then click Insert Sheet.
Tip: You can also right-click the tab of an existing worksheet, and then click Insert. On the General tab, click Worksheet, and then click OK.
Note: To change the order of the worksheets in a workbook, click the tab of the worksheet that you want to move, and then drag it to the location that you want.


What do you want to do?
-
Insert multiple worksheets at the same time
-
Change the default number of worksheets in a new workbook
-
Insert a new sheet that is based on a custom template
-
Rename a worksheet
-
Delete one or more worksheets
Insert multiple worksheets at the same time
-
Hold down SHIFT, and then select the same number of existing sheet tabs of the worksheets that you want to insert in the open workbook.
For example, if you want to add three new worksheets, select three sheet tabs of existing worksheets.
-
On the Home tab, in the Cells group, click Insert, and then click Insert Sheet.
Tip: You can also right-click the selected sheet tabs, and then click Insert. On the General tab, click Worksheet, and then click OK.
-
To change the order of the worksheets in a workbook, click the tab of the worksheet that you want to move, and then drag it to the location that you want.
Change the default number of worksheets in a new workbook
-
Click the File tab.
What and where is the Microsoft Backstage Button?
For more information about the Microsoft Backstage Button, see What and where is the Backstage?
-
Under Excel, click Options.
-
In the General category, under When creating new workbooks, in the Include this many sheets box, enter the number of sheets that you want to include by default when you create a new workbook.
-
Click any other tab to return to your file.
Insert a new sheet that is based on a custom template
-
If needed, create the worksheet template that you want to base a new worksheet on.
How to create a worksheet template
-
Select the worksheet that you want to use as a template.
-
Click the File tab.
-
Under Info, click Save As.
-
In the File name box, type the name of the worksheet template.
-
To create a custom worksheet template, type the file name that you want to use.
-
To create the default worksheet template, type sheet.
Note: Custom templates are automatically saved in the Templates folder. The default worksheet template, sheet.xltx or sheet.xltm, should be saved in the XLStart folder, which is usually C:Program FilesMicrosoft OfficeOffice14XLStart.
-
-
Do one of the following:
-
On a computer that is running Windows Vista, in the list, click Excel Template or Excel Macro-Enabled Template.
-
On a computer that is running Microsoft Windows XP, in the Save as type box, click Excel Template or Excel Macro-Enabled Template.
-
-
Click Save.
-
-
Right-click the sheet tab of a worksheet, and then click Insert.
-
Double-click the template for the type of sheet that you want.
Rename a worksheet
-
On the Sheet tab bar, right-click the sheet tab that you want to rename, and then click Rename Sheet.
-
Select the current name, and then type the new name.
Tip: You can include the name of the sheet when you print the worksheet.
How to print sheet names
-
On the Insert tab, in the Text group, click Header & Footer.
-
In the Page Layout View, click the location where you want the sheet name to appear.
-
In the Header & Footer elements group, click Sheet Name
.
-
 .
.Delete one or more worksheets
-
Select the worksheet or worksheets that you want to delete.
Tip: When multiple worksheets are selected, [Group] appears in the title bar at the top of the worksheet. To cancel a selection of multiple worksheets in a workbook, click any unselected worksheet. If no unselected sheet is visible, right-click the tab of a selected sheet, and then click Ungroup Sheets on the shortcut menu.
-
On the Home tab, in the Cells group, click the arrow next to Delete, and then click Delete Sheet.
Tip: You can also right-click the sheet tab of a worksheet or a sheet tab of any selected worksheets that you want to delete, and then click Delete Sheet.
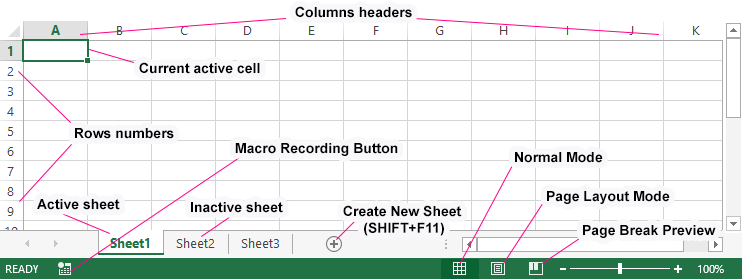
The Excel worksheet – is the workspace under the toolbar. This sheet consists from a set of cells arranged among it selves relative to rows and columns.
Its appearance resembles to a large table. There are 3 sheets are default in each new Excel workbook.
For the user, the sheet is a file with a document that is nested in the folder (Excel workbook). Sheets can and should be managed. The sheets can be moved in other workbooks. This operation saves a lot of time than just copying and transferring the contents of the sheet itself.
Excel sheets as a data environment
In a standard book, each sheet is the large tables, that are filled with data and formulas. How to add a sheet in Excel? As necessary, you can insert the additional sheets (SHIFT+F11) or delete unused ones. To create a new worksheet in Excel, you can clicking on the last tab of the sheets, as it shown in the picture:
The book can contain from 1 to 255 sheets.
How do I copy a worksheet to Excel? For fast implementation of this task it is necessary:
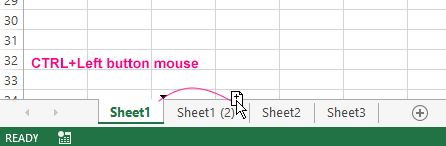
- To point the mouse cursor on the sheet tab (shortcut) that you need to copy.
- To make the click with the left button of the teddy bear, holding down the button + CTRL key and move the cursor to the place of the bookmarks where the copy should be inserted.
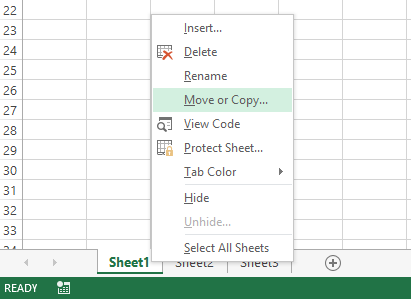
If there are too many sheets, or if you need to copy / move a sheet to a new workbook, then we do the following:
- Right-click on the bookmark tab (shortcut) to call the context menu, where we select the option «Move or Copy …».
- In the window that appears, we configure the parameters for copying the worksheet. From the top you need to choose what of the opening work books should copy. Below we indicate, what sheets to insert a copy between.
- If we copy the sheet, but do not transfer it, check the «Create a copy» option.

The exercises with sheet elements
Task 1: Click on each element shown in the picture above and try to remember its location, name.
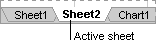
Task 2: Click on the tabs located in the bottom (Sheet2, Sheet3 and Sheet1) alternately. After clicking, the tab of each sheet becomes active, and its bookmark is highlighted.
Note: each book can contain a lot of sheets (up to 255 pcs.), similar to how the folder contains files.
Various operations with sheets will be considered in the following lessons.
Working with Sheet Cells
The most important element of the sheet is the cell. Each cell has its own sequence number relative to the rows and a Latin letter relative to the columns. Thus, each cell has its own address (like cells in a chessboard). That is, the first cell (in the upper left corner) has the address A1, and under it the cell with the address A2. On the right side of the cell address B1, etc.
The number of rows in each sheet of Excel 2010 is slightly more than one million, more precisely is 1 048 578 pcs. The number of columns is much smaller — 16 384 pcs.
Pay attention! After 26 Latin letters, the name of the columns is no longer of one, but of 2 or more letters in logical, alphabetical order. Thus, the address of the last cell in the bottom-right corner of the sheet is XFD1048578.
Each cell can be written:
- text;
- number;
- date and time;
- formulas;
- logical expressions.
Each cell can be formatted and assigned a note. All data and cell formatting styles can be changed. It is also worth noting that formatting the borders of cells is the key basis for designing the appearance of tables (for example, for printing forms, etc.).
Do you need to add a new sheet tab to your Excel workbook? This post is going to show you all the ways that you can insert a new sheet in Excel!
Excel allows you to add multiple sheets within a workbook. This is a great way to organize your spreadsheet solutions as you can separate your inputs, data, calculations, reports, and visuals into different sheets.
Organizing your workbooks with sheets can also make the spreadsheet easier to navigate for any user.
How can you add new sheets to an Excel workbook? Follow this post to find out all the ways to add sheet tabs in Excel. You’ll even learn how to add multiple sheets based on a list!
Add a New Sheet with the New Sheet Button
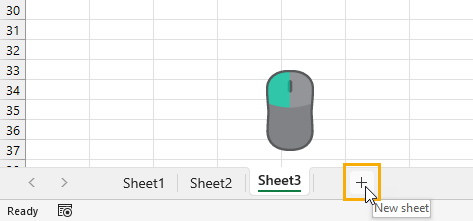
The quickest and easiest way to insert a new sheet in Excel is using the New Sheet button located to the right of the current sheet tabs.
Left click on the plus sign icon to the right of the sheet tabs and Excel will create a new blank sheet in your workbook!
Add a New Sheet from the Home Tab
Adding a new sheet can also be done from the Excel ribbon.
You might think this action would be located in the Insert tab, but it will actually be found in the Home tab.
Follow these steps to insert a new sheet from the Home tab.
- Go to the Home tab.
- Click on the lower part of the Insert command found in the Cells section.
- Choose the Insert Sheet option from the menu.
This will create a new sheet in your workbook.
Add a New Sheet with a Keyboard Shortcut
Good news for anyone who prefers to navigate Excel with their keyboard as much as possible! There is a dedicated keyboard shortcut for adding a new sheet.
Press Shift + F11 on your keyboard to insert a new sheet.
Add a New Sheet with Excel Options
When you create a new Excel workbook, the number of sheets it comes with will be determined by your Excel Options settings.
You can change this default so that any time you create a new workbook, it will have your desired number of blank sheets available.
The Excel Options menu allows you to customize your Excel experience with various app and workbook settings.
Follow these steps to adjust the default number of sheets in a workbook.
- Go to the File tab.
- Select Excel Options in the lower left.
- Go to the General section of the Excel Options menu.
- Scroll down to the When creating new workbooks section.
- Change the number in the Including this many sheets input.
- Press the OK button.
The next time you create a new Excel workbook, it will have your desired number of blank sheets.
💡 Tip: You can test out this new setting by pressing Ctrl + N to create a new workbook.
Add Multiple New Sheets with a Pivot Table
Did you know you can create multiple sheets from a list in the grid by using a pivot table?
This is a hidden gem for when you need to quickly create many sheets.
For example, suppose you need to create new sheets for each US state or each product that your company sells. This would be a tedious process with the previous methods.
If you have these sheet names as a list inside the grid, then you can create a pivot table based on this list and use the Show Report Filter Pages feature to generate the sheets for you.
This example shows a list of US states which can then be used to generate sheets with those US state names.
Follow these steps to automatically generate sheets from a list using a pivot table.
- Create a pivot table based on your list.
💡 Tip: Check out this post to see how to insert a pivot table from your list.
- Click and drag the sheet name field to the Filters area in the PivotTable Fields menu.
- Go to the PivotTable Analyze tab.
- Click on the Chevron icon in the Options command.
- Choose the Show Report Filter Page option from the menu.
This will open the Show Report Filter Pages menu.
- Select the field with your sheet names.
- Press the OK button.
You will only see multiple field choices in the menu if you have added multiple fields to the Filters area of your pivot table.
This will create a new sheet for each unique item in your list, and each sheet will be named based on the text in your list.
Each sheet will contain a filtered version of your pivot table in cell A1. The pivot table will be filtered on the same item as the sheet name.
Add Multiple New Sheets with VBA
VBA is a great way to automate any task for Excel in the desktop app. This includes adding sheets!
You can create a VBA macro that will create new sheets based on a selected list.
Go to the Developer tab and select the Visual Basic command or press Alt + F11 to open the visual basic editor.
📝 Note: You might need to enable the Developer tab first as it is disabled by default.
Go to the Insert menu in the visual basic editor and select the Module option from the menu.
Sub AddSheets()
Dim myRange As Range
Dim sheetTest As Boolean
Set myRange = Selection

For Each c In myRange.Cells
sheetTest = False
    For Each ws In ThisWorkbook.Worksheets
        If ws.Name = c.Value Or c.Value = "" Then
            sheetTest = True
        End If
    Next ws
    If Not (sheetTest) Then
          Sheets.Add.Name = c.Value
    End If
Next c
End Sub
Paste the above code into the new module.
This code will loop through the selected range in your workbook and will create a new sheet for each cell. If the sheet name already exists, then this item will be skipped.
Now you will be able to select any range in your workbook and run the VBA code to automatically create multiple sheets.
Add Multiple New Sheets with Office Scripts
Another way you can automate the creation of your sheets is by using Office Scripts.
Office Scripts is the JavaScript language for automating tasks in Excel online. You will need to be using Excel on the web with a business Microsoft 365 account as this feature isn’t available otherwise.
Open Excel online and go to the Automate tab and select the New Script option. This will open the Office Script editor on the right side.
function main(workbook: ExcelScript.Workbook) {

	//Create an array with the values in the selected range
	let selectedRange = workbook.getSelectedRange();
	let selectedValues = selectedRange.getValues();
	//Get dimensions of selected range
	let rowHeight = selectedRange.getRowCount();
	let colWidth = selectedRange.getColumnCount();

	//Loop through each item in the selected range
	for (let i = 0; i < rowHeight; i++) {
		for (let j = 0; j < colWidth; j++) {
			try {
				workbook.addWorksheet(selectedValues[i][j]);
			}
			catch (e) {
				//do nothing
			};
		};
	};
};
Add the above code to the editor and press the Save script button.
This code will loop through the selected range on your sheet and create a new sheet for each item in the range.
Now you select a range in your sheet and press the Run button in the Code Editor. This will run the code and create the required sheets in your workbook!
Add Multiple New Sheets with Power Automate
Microsoft Power Automate is a cloud-based service that makes it easy for end users to create and run automated workflows.
Users can build workflows in a matter of minutes, without any need for coding or complex configuration with the intuitive user interface.
The service can be used to automate a wide range of tasks, including sending emails, copying files, and creating records in databases.
Power Automate is part of the Microsoft Power Platform, which also includes Power BI and Power Apps. Together, these products provide a powerful end-to-end solution for business process automation.
But the best part is it’s available for use as part of any Microsoft 365 subscription!
You can use Power Automate to create sheets from a list inside an Excel Table. In this example, the desired sheet names are in an Excel Table with a column named Names.
📝 Note: This Excel file will need to be saved in either SharePoint or OneDrive in order to work with Power Automate.
Go to the Power Automate Portal and log in with your Microsoft credentials.
Then go to the Create tab and select an Instant cloud flow. This will allow you to run the flow manually with a button in the Power Automate portal.
Give your Flow a name then select the Manually trigger a flow option and then press the Create button.
This will open the flow builder and you can add steps to your workflow.
- Add a List rows present in a table step and then select the relevant file and table location in the various fields.
This action will read all the items in your table of sheet names. This will be used in the next step to create and name new worksheets.
- Add a Create worksheet step and select the same file.
- Select the Names field from the previous List rows present in a table action.
When you add the Names field to the Name input in the Create worksheet step, it will automatically add this step into an Apply to each action. This way a worksheet will be created for each item in your list of sheet names.
Press the Save button to save your flow and it will be ready to run!
Go to the My flows menu, select the Cloud flows tab, and then press the Run button for your flow.
You don’t even have to have the file open, and the sheets will be added to your workbook!
Conclusions
Most of your workbooks will need more than one sheet, so learning how to add sheets in Excel is essential.
There are manual ways to create new sheets such as the New Sheet button, the Home tab, and a keyboard shortcut. There are all great methods when you only need to add a few sheets.
There are also several methods for adding sheets in an automated manner based on a list! VBA, Office Scripts, Power Automate, and even pivot tables can all be used for situations where you need to add a lot of sheets.
Which method do you prefer for adding sheets to your workbooks? Do you have any other tips for this? Let me know in the comments section below!
About the Author
John is a Microsoft MVP and qualified actuary with over 15 years of experience. He has worked in a variety of industries, including insurance, ad tech, and most recently Power Platform consulting. He is a keen problem solver and has a passion for using technology to make businesses more efficient.
![]()
Download Article
![]()
Download Article
Do you need to create a spreadsheet in Microsoft Excel but have no idea where to begin? You’ve come to the right place! While Excel can be intimidating at first, creating a basic spreadsheet is as simple as entering data into numbered rows and lettered columns. Whether you need to make a spreadsheet for school, work, or just to keep track of your expenses, this wikiHow article will teach you everything you know about editing your first spreadsheet in Microsoft Excel.
-
1
Open Microsoft Excel. You’ll find it in the Start menu (Windows) or in the Applications folder (macOS). The app will open to a screen that allows you to create or select a document.
- If you don’t have a paid version of Microsoft Office, you can use the free online version at https://www.office.com to create a basic spreadsheet. You’ll just need to sign in with your Microsoft account and click Excel in the row of icons.
-
2
Click Blank workbook to create a new workbook. A workbook is the name of the document that contains your spreadsheet(s). This creates a blank spreadsheet called Sheet1, which you’ll see on the tab at the bottom of the sheet.
- When you make more complex spreadsheets, you can add another sheet by clicking + next to the first sheet. Use the bottom tabs to switch between spreadsheets.
Advertisement
-
3
Familiarize yourself with the spreadsheet’s layout. The first thing you’ll notice is that the spreadsheet contains hundreds of rectangular cells organized into vertical columns and horizontal rows. Some important things to note about this layout:
- All rows are labeled with numbers along the side of the spreadsheet, while the columns are labeled with letters along the top.
- Each cell has an address consisting of the column letter followed by the row number. For example, the address of the cell in the first column (A), first row (1) is A1. The address of the cell in column B row 3 is B3.
-
4
Enter some data. Click any cell one time and start typing immediately. When you’re finished with that cell, press the Tab ↹ key to move to the next cell in the row, or the ↵ Enter key to the next cell in the column.
- Notice that as you type into the cell, the content also appears in the bar that runs across the top of the spreadsheet. This bar is called the Formula Bar and is useful for when entering long strings of data and/or formulas.[1]
- To edit a cell that already has data, double-click it to bring back the cursor. Alternatively, you can click the cell once and make your changes in the formula bar.
- To delete the data from one cell, click the cell once, and then press Del. This returns the cell to a blank one without messing up the data in other rows or columns. To delete multiple cell values at once, press Ctrl (PC) or ⌘ Cmd (Mac) as you click each cell you want to delete, and then press Del.
- To add a new blank column between existing columns, right-click the letter above the column after where you’d like the new one to appear, and then click Insert on the context menu.
- To add a new blank row between existing rows, right-click the row number for the row after the desired location, and then click Insert on the menu.
- Notice that as you type into the cell, the content also appears in the bar that runs across the top of the spreadsheet. This bar is called the Formula Bar and is useful for when entering long strings of data and/or formulas.[1]
-
5
Check out the functions available for advanced uses. One of the most useful features of Excel is its ability to look up data and perform calculations based on mathematical formulas. Each formula you create contains an Excel function, which is the «action» you’re performing. Formulas always begin with an equal (=) sign followed by the function name (e.g., =SUM, =LOOKUP, =SIN). After that, the parameters should be entered between a set of parentheses (). Follow these steps to get an idea of the type of functions you can use in Excel:
- Click the Formulas tab at the top of the screen. You’ll notice several icons in the toolbar at the top of the application in the panel labeled «Function Library.» Once you know how the different functions work, you can easily browse the library using those icons.
- Click the Insert Function icon, which also displays an fx. It should be the first icon on the bar. This opens the Insert Function panel, which allows you to search for what you want to do or browse by category.
- Select a category from the «Or select a category» menu. The default category is «Most Recently Used.» For example, to see the math functions, you might select Math & Trig.
- Click any function in the «Select a function» panel to view its syntax, as well as a description of what the function does. For more info on a function, click the Help on this function.
- Click Cancel when you’re done browsing.
- To learn more about entering formulas, see How to Type Formulas in Microsoft Excel.
-
6
Save your file when you’re finished editing. To save the file, click the File menu at the top-left corner, and then select Save As. Depending on your version of Excel, you’ll usually have the option to save the file to your computer or OneDrive.
- Now that you’ve gotten the hang of the basics, check out the «Creating a Home Inventory from Scratch» method to see this information put into practice.


Advertisement
-
1
Open Microsoft Excel. You’ll find it in the Start menu (Windows) or in the Applications folder (macOS). The app will open to a screen that allows you to create or open a workbook.
-
2
Name your columns. Let’s say we’re making a list of items in our home. In addition to listing what the item is, we might want to record which room it’s in and its make/model. We’ll reserve row 1 for column headers so our data is clearly labeled. [2]
.- Click cell A1 and type Item. We’ll list each item in this column.
- Click cell B1 and type Location. This is where we’ll enter which room the item is in.
- Click cell C1 and type Make/Model. We’ll list the item’s model and manufacturer in this column.
-
3
Enter your items on each row. Now that our columns are labeled, entering our data into the rows should be simple. Each item should get its own row, and each bit of information should get its own cell.
- For example, if you’re listening the Apple HD monitor in your office, you may type HD monitor into A2 (in the Item column), Office into B2 (in the Location column), and Apple Cinema 30-inch M9179LL into B3 (the Make/Model column).
- List additional items on the rows below. If you need to delete a cell, just click it once and press Del.
- To remove an entire row or column, right-click the letter or number and select Delete.
- You’ve probably noticed that if you type too much text in a cell it’ll overlap into the next column. You can fix this by resizing the columns to fit the text. Position the cursor on the line between the column letters (above row 1) so the cursor turns into two arrows, and then double-click that line.
-
4
Turn the column headers into drop-down menus. Let’s say you’ve listed hundreds of items throughout your home but only want to view those stored in your office. Click the 1 at the beginning of row 1 to select the whole row, and then do the following:
- Click the Data tab at the top of Excel.
- Click Filter (the funnel icon) in the toolbar. Small arrows now appear on each column header.
- Click the Location drop-down menu (in B1) to open the filter menu.
- Since we just want to see items in the office, check the box next to «Office» and remove the other checkmarks.
- Click OK. Now you’ll only see items the selected room. You can do this with any column and any data type.
- To restore all items, click the menu again and check «Select All» and then OK to restore all items.
-
5
Click the Page Layout tab to customize the spreadsheet. Now that you’ve entered your data, you may want to customize the colors, fonts, and lines. Here are some ideas for doing so:
- Select the cells you want to format. You can select an entire row by clicking its number, or an whole column by clicking its letter. Hold Ctrl (PC) or Cmd (Mac) to select more than one column or row at a time.
- Click Colors in the «Themes» area of the toolbar to view and select color theme.
- Click the Fonts menu to browse for and select a font.
-
6
Save your document. When you’ve reached a good stopping point, you can save the spreadsheet by clicking the File menu at the top-left corner and selecting Save As.


Advertisement
-
1
Open Microsoft Excel. You’ll find it in the Start menu (Windows) or in the Applications folder (macOS). The app will open to a screen that allows you to create or open a workbook.
- This method covers using a built-in Excel template to create a list of your expenses. There are hundreds of templates available for different types of spreadsheets. To see a list of all official templates, visit https://templates.office.com/en-us/templates-for-excel.
-
2
Search for the «Simple Monthly Budget» template. This is a free official Microsoft template that makes it easy to calculate your budget for the month. You can find it by typing Simple Monthly Budget into the search bar at the top and pressing ↵ Enter in most versions.
-
3
Select the Simple Monthly Budget template and click Create. This creates a new spreadsheet from a pre-formatted template.
- You may have to click Download instead.
-
4
Click the Monthly Income tab to enter your income(s). You’ll notice there are three tabs (Summary, Monthly Income, and Monthly Expenses) at the bottom of the workbook. You’ll be clicking the second tab. Let’s say you get income from two companies called wikiHow and Acme:
- Double-click the Income 1 cell to bring up the cursor. Erase the content of the cell and type wikiHow.
- Double-click the Income 2 cell, erase the contents, and type Acme.
- Enter your monthly income from wikiHow into the first cell under the «Amount» header (the one that says «2500» by default). Do the same with your monthly income from «Acme» in the cell just below.
- If you don’t have any other income, you can click the other cells (for «Other» and «$250») and press Del to clear them.
- You can also add more income sources and amounts in the rows below those that already exist.
-
5
Click the Monthly Expenses tab to enter your expenses. It’s the third tab at the bottom of the workbook. Those there are expenses and amounts already filled in, you can double-click any cell to change its value.
- For example, let’s say your rent is $795/month. Double-click the pre-filled amount of «$800,» erase it, and then type 795.
- Let’s say you don’t have any student loan payments to make. You can just click the amount next to «Student Loans» in the «Amount» column ($50) and press Del on your keyboard to clear it. Do the same for all other expenses.
- You can delete an entire row by right-clicking the row number and selecting Delete.
- To insert a new row, right-click the row number below where you want it to appear, and then select Insert.
- Make sure there are no extra amounts that you don’t actually have to pay in the «Amounts» column, as they’ll be automatically factored into your budget.
-
6
Click the Summary tab to visualize your budget. Once you’ve entered your data, the chart on this tab will automatically update to reflect your income vs. your expenses.
- If the info doesn’t calculate automatically, press F9 on the keyboard.
- Any changes you make to the Monthly Income and Monthly Expenses tabs will affect what you see in your Summary.
-
7
Save your document. When you’ve reached a good stopping point, you can save the spreadsheet by clicking the File menu at the top-left corner and selecting Save As.


Advertisement
Add New Question
-
Question
How do I name a spreadsheet?

When you click «Save As,» at the bottom of the page there should be a file name box. Whatever you type into that box will be your spreadsheet’s name.
-
Question
Can I rename the columns, instead of A, B, C, etc.?
You cannot change those labels. Typically, the name of the column is simply written in the first row.
-
Question
How do I make more space to type in the boxes?
As you’re typing, select the cell where you want the text to be and select «Wrap Text» at the top of the page. This will contain all of the text to the same cell, which will grow as you type.
See more answers
Ask a Question
200 characters left
Include your email address to get a message when this question is answered.
Submit
Advertisement
Thanks for submitting a tip for review!
About This Article
Article SummaryX
1. Open Excel.
2. Click New Blank Workbook.
3. Enter column headers into row 1.
4. Enter data on individual rows.
5. Click the Page Layout tab to format the data.
6. Click File > Save As to save the document.
Did this summary help you?
Thanks to all authors for creating a page that has been read 2,885,567 times.
Is this article up to date?
Creating New Worksheet
Three new blank sheets always open when you start Microsoft Excel. Below steps explain you how to create a new worksheet if you want to start another new worksheet while you are working on a worksheet, or you closed an already opened worksheet and want to start a new worksheet.
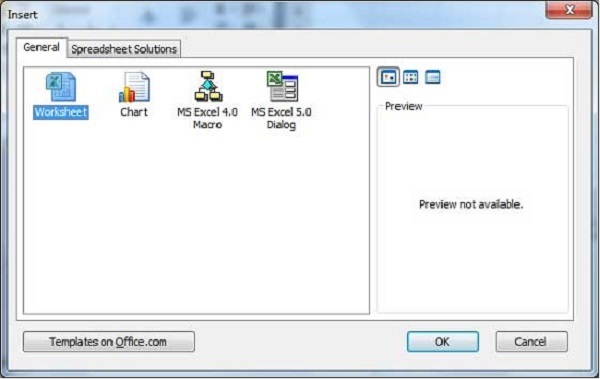
Step 1 − Right Click the Sheet Name and select Insert option.
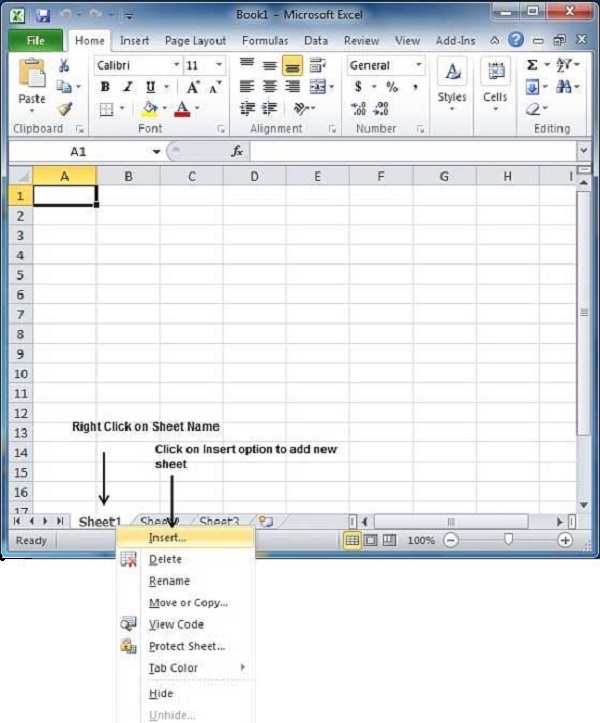
Step 2 − Now you’ll see the Insert dialog with select Worksheet option as selected from the general tab. Click the Ok button.
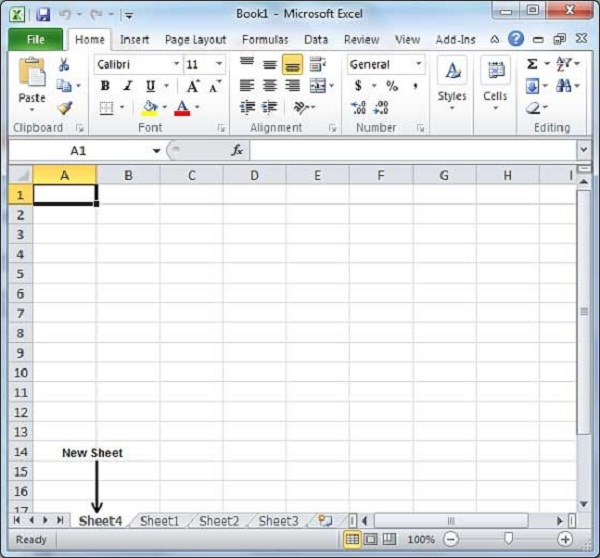
Now you should have your blank sheet as shown below ready to start typing your text.
You can use a short cut to create a blank sheet anytime. Try using the Shift+F11 keys and you will see a new blank sheet similar to the above sheet is opened.