
Please report all problems and bugs in the Feedback-Section to improve the quality of the converter. Thank you! |


Сконвертируйте ваши xls-файлы в ppt онлайн и бесплатно
Перетащите файлы сюда. 100 MB максимальный размер файла или Регистрация
Конвертировать в XLS
xls
Лист Microsoft Excel (97-2003)
Формат XLS используется для описания документов программы Microsoft Excel. Этот файл представляет собой электронную таблицу. Все данные в документе распределены по ячейкам и хранятся в них. Каждая ячейка имеет уникальный адрес, обозначаемый буквами и арабскими цифрами. Ячейка может содержать неизменяемые данные и данные в виде формул, которые связывают несколько ячеек.
Конвертер PPT
ppt
Microsoft PowerPoint 97/2000/XP
Файл для хранения созданных презентаций и слайд шоу Microsoft PowerPoint с возможностью редактирования. Впервые был введен для хранения данных в редакторе PowerPoint 97. Хранит набор отдельных слайдов с текстовой, графической, видео и аудио информацией. Файл содержит информацию о примененных визуальных эффектах внутри слайдов.
Как сконвертировать XLS в PPT
Шаг 1
Загрузите xls-файл(ы)
Выберите файлы с компьютера, Google Диска, Dropbox, по ссылке или перетащив их на страницу.
Шаг 2
Выберите «в ppt»
Выберите ppt или любой другой формат, который вам нужен (более 200 поддерживаемых форматов)
Шаг 3
Загрузите ваш ppt-файл
Позвольте файлу сконвертироваться и вы сразу сможете скачать ваш ppt-файл
Рейтинг XLS в PPT
4.1 (469 голосов)
Вам необходимо сконвертировать и скачать любой файл, чтобы оценить конвертацию!
PowerPoint for Microsoft 365 PowerPoint 2021 PowerPoint 2019 PowerPoint 2016 PowerPoint 2013 PowerPoint 2010 More…Less
If you are using PowerPoint 2013 or a newer version, you can link data from a saved Excel worksheet to your PowerPoint presentation. That way, if data in the worksheet changes, you can easily update it in your PowerPoint presentation.
Link an entire Excel worksheet to PowerPoint
-
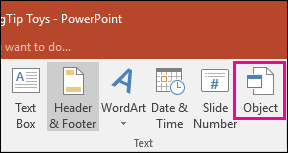
In PowerPoint, on the Insert tab, click or tap Object.

-
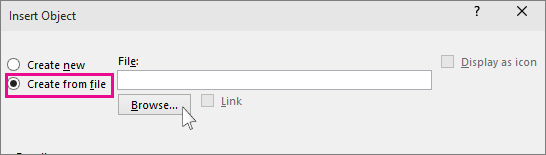
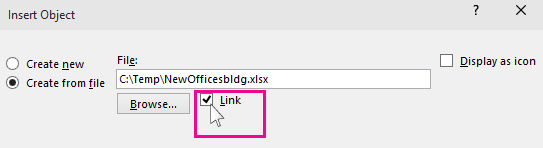
In the Insert Object dialog box, select Create from file.
-
Click or tap Browse, and in the Browse box, find the Excel workbook with the data you want to insert and link to.
-
Before you close the Insert Object box, select Link, and click OK.
Important: The linked object in your presentation displays all the data from the active, top worksheet in the linked Excel workbook. When you save the Excel workbook, make sure the worksheet you want in your presentation is the one you see when you first open the workbook.

Link a section of data in Excel to PowerPoint
-
In Excel, open the saved workbook with the data you want to insert and link to.
-
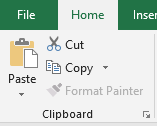
Drag over the area of data you want to link to in PowerPoint, and on the Home tab, click or tap Copy.
-
In PowerPoint, click the slide where you want to paste the copied worksheet data.
-
On the Home tab, click the arrow below Paste, and select Paste Special.
-
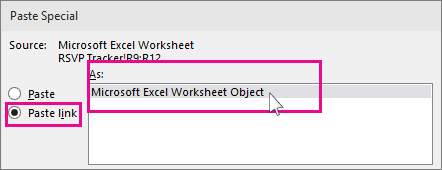
In the Paste Special box, click Paste link, and then, under As, select Microsoft Excel Worksheet Object.

Copy and paste (unlinked) Excel data in PowerPoint
In this case, the Excel data will not be linked to your PowerPoint presentation. You copy the data from an Excel worksheet and paste it into your presentation. The worksheet does not send automatic updates to PowerPoint.
-
In Excel, open the workbook with the data you want to copy.
-
Drag over the area of data you want to copy, and on the Home tab, click or tap Copy.
-
In PowerPoint, click the slide where you want to paste the copied worksheet data.
-
On the Home tab, in the Clipboard group, click the arrow below Paste.
-
Under Paste Options, pick one of the following. Move the mouse pointer over each Paste option to see a preview of what it would look like.
Use Destination Styles to copy the data as a PowerPoint table, using the format of the presentation
Keep Source Formatting to copy the Excel data as a PowerPoint table, using the format of the worksheet
Embed to copy the data as information that can be edited in Excel later
Picture to copy the data as a picture that can’t be edited in Excel
Keep Text Only to copy all the data as a single text box


See Also
Copy an Excel chart to another Office program
Insert a linked worksheet
To insert and link a saved Excel worksheet onto your PowerPoint slide, do the following:
Important: The linked object in your presentation displays all data from the active, top worksheet in the linked Excel workbook.
-
In PowerPoint 2010, on the Insert tab, in the Text group, click Object.
-
In the Insert Object dialog box, select Create from file.
-
Click Browse, and in the Browse dialog box, browse to and then select the Excel workbook that contains the information that you want to insert, and then click OK.
-
In the Insert Object dialog box, select Link and then click OK.
To edit a linked Excel worksheet, do one of the following:
-
To edit the data from within Excel, right-click the object on the slide, point to Linked Worksheet Object, and select Edit.
-
To update the data on the slide to match the data in the original Excel file, right-click the object on the slide, and click Update Link.
Insert a linked selection from a worksheet
To insert and link a selection of data from a saved Excel worksheet, do the following:
-
In Excel, open the workbook containing that data that you want to insert.
-
Select and copy the data that you want.
Keyboard shortcut You can press CTRL+C to copy the data.
-
In PowerPoint 2010, click the slide where you want to paste the copied worksheet data.
-
On the Home tab, in the Clipboard group, click the arrow below Paste, and select Paste Special.
-
In the Paste Special dialog box, under As, select a Microsoft Excel Worksheet Object.
-
Select the Paste link check box and click OK.
To edit a selection of cells from a linked Excel worksheet, do one of the following:
-
To edit the data from within Excel, right-click the object on the slide, point to Linked Worksheet Object, and select Edit.
-
To update the data on the slide to match the data in the original Excel file, right-click the object on the slide, and click Update Link.
Copy a selection of cells onto a slide
To paste a copy a selection of Excel data onto your PowerPoint slide, do the following:
Note: Data copied and pasted onto a PowerPoint slide does not automatically update when the data is changed in the Excel workbook. To link the data on the PowerPoint slide to the original Excel data source, see the «Insert a linked selection from a worksheet» section immediately above.
-
In Excel, open the workbook that contains the information that you want to copy.
-
Select and copy the data that you want.
Keyboard shortcut You can press CTRL+C to copy the data.
-
In PowerPoint 2010, click the slide where you want to paste the copied worksheet data.
-
On the Home tab, in the Clipboard group, click the arrow below Paste.
-
Under Paste Options, do one of the following:
-
Select Keep Source Formatting if you want to copy the data as a PowerPoint table, but want it keep the appearance of the original Excel worksheet.
-
Select Use Destination Styles if you want to copy the data as a PowerPoint table, but want it to assume the appearance of the PowerPoint presentation.
-
Select Embed if you want to copy the data as information that can be edited in PowerPoint.
-
Select Picture if you want to copy the data as an un-editable picture.
-
Select Keep Text Only if you want to copy all the data as a single text box.
-
See Also
Import content from other applications
Copy an Excel chart to another Office program
Need more help?
Want more options?
Explore subscription benefits, browse training courses, learn how to secure your device, and more.
Communities help you ask and answer questions, give feedback, and hear from experts with rich knowledge.
![]()
Download Article
Easy-to-follow instructions for converting Excel to PowerPoint
![]()
Download Article
If you want to take data from an Excel spreadsheet and put it into a PowerPoint presentation, you can do so with built-in controls available in both programs. This wikiHow shows you how to put Excel data into PowerPoint slides using these features.
-
1
Open an Excel file you want to use. Open your file explorer and navigate to the folder where your file is stored.
-
2
Click on the box in the top left to select data. You can select all of the data or only the data you want.
Advertisement
-
3
Click Edit and select Copy to copy the data.
-
4
Open Microsoft PowerPoint. You can minimize the Excel file’s window or exit Excel and navigate to PowerPoint.
-
5
Click File in the top left. This pulls up a drop-down list of more options for that PowerPoint file.
-
6
Click New. You can also open an existing presentation.
-
7
Click on the slide that you want to use. You can also format the slide for displaying data by picking the slide template.
-
8
Right click and select Paste. This pastes the Excel data into your chosen slide.
-
9
Click on the clipboard icon in the bottom right. This changes presentation options for your slide.
-
10
Select a mode for presentation from the drop-down menu. Save your work after you’re satisfied with the changes you’ve made.


Advertisement
-
1
Open your PowerPoint file. Navigate to the folder where it’s saved from your file explorer.
-
2
Click Insert in the menu bar.
-
3
Select Object.
-
4
Select Create from file.
-
5
Locate your Excel file. Once you’ve opened the dialog window, navigate to the Excel file you want to insert into your PowerPoint slide.
-
6
Select your file and click Insert. This will insert the file into the slide you’ve selected.
-
7
Resize and rearrange the spreadsheet snapshot as desired. You can grab the edges to make it bigger or smaller, or click and drag to move it. When you double-click on the actual spreadsheet, it’ll open the file in Excel.


Advertisement
Ask a Question
200 characters left
Include your email address to get a message when this question is answered.
Submit
Advertisement
Thanks for submitting a tip for review!
About This Article
Article SummaryX
1. Open a PowerPoint file.
2. Click Insert in the menu bar.
3. Select Object.
4. Select Create from file.
5. Select your Excel file and click Insert.
Did this summary help you?
Thanks to all authors for creating a page that has been read 203,449 times.
Is this article up to date?
The Excel spreadsheet is often used along with the PowerPoint presentations to produce budget reports, business plans, inventory details, financial reports, project status reports, etc. Microsoft Excel spreadsheet is arguably one of the best tools used for accounting and planning business. We frequently use Excel sheets to analyze data, plan events, plan audits, produce charts, calculate the budget, plan expenditure, etc. To present these analysis reports created from Excel, we mainly use Microsoft PowerPoint to make a professional presentation.
Both the Excel sheets and PowerPoint slides are used side by side and, we often copy the tables and charts from Excel, and paste them in PowerPoint slide to make a slideshow presentation. But, we usually keep updating the excel tables with new data regularly, and in cases like these, it is inconvenient to change all the tables in PowerPoint slides. This hindrance to updating the changes made in the Excel sheet to Powerpoint slide can be avoided by linking Excel data with PowerPoint.
Fortunately, Microsoft allows you to use object linking and embedding technique also known as OLE to link the data from Excel spreadsheet to PowerPoint slides which would automatically update Powerpoint presentations whenever you make changes to Excel worksheet. In this case, the Excel sheet is a source file, and the information from the Excel object is linked to the PowerPoint.That being said, any changes to the source file is reflected directly to the linked objects in PowerPoint. In this article, we explain how to copy the data from Excel worksheet and put it into PowerPoint presentation with the integrated controls.
Copy and paste Excel data in PowerPoint
You can copy the data tables from the Excel spreadsheet and paste them into your PowerPoint presentation. However, the data in PowerPoint is not updated automatically when the spreadsheet data is changed or updated.
Open Excel file you want to copy and select all the data in the file that you want to copy by dragging over the area of the data that you want.
Go to Home tab and click Copy.
Now open Microsoft PowerPoint and open the slide presentation where you want to paste the spreadsheet data.
Right click on the slide and select the Paste option from the drop-down menu.
You can change the presentation options by clicking on the clipboard icon.
Once done, click Save to apply changes.
Link an Excel worksheet to PowerPoint
Linking an Excel spreadsheet to the PowerPoint will insert all the contents of the file as an object into your PowerPoint presentation.
Open Microsoft PowerPoint and go to Insert tab
Click Object under the Text section.

The Insert Object dialogue box pops up. Click on the radio button with option Create from file.

Click the Browse button and select the Excel spreadsheet whose data you want to link to the Powerpoint.
Select the Link box and click Ok.
Resize the spreadsheet snapshot in the slide and double click on the spreadsheet to open the file in Microsoft Excel.
Link a section of data in Excel to PowerPoint
Launch Microsoft Excel and open the spreadsheet that you want to link to PowerPoint.
Select the data you want to insert into PowerPoint slide by dragging over the area of the data.
Go to Home tab and click Copy.
Launch PowerPoint and open the PowerPoint slide where you want to insert the data.
Go to Home tab and click on the arrow beside Paste option.
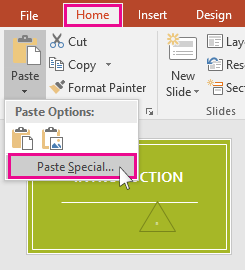
Select Paste Special.
In the Paste Special dialogue box, click on the radio button with option Paste Link and under Paste Link As, select Microsoft Excel Worksheet Object and click Ok.

It worth mentioning that the above OLE technique will not work if the Excel source file is renamed or if you move the source file from the original location, as the link won’t be able to search the file.
That’s all.
There are plenty of reasons to connect Excel with PowerPoint. Often this is about keeping numbers or charts up-to-date. In other cases it is about creating data-driven slides automatically. For both cases there are various add-ins available. The following list contains a selection of tools for exporting or connecting from Excel to PowerPoint.
1) “think-cell” add-in from think-cell.com

This is the darling of most consultants for one reason: It helps at creating awesome charts in PowerPoint, in particular the Waterfall chart. For this purpose it allows to connect the proprietary think-cell charts in PowerPoint with Excel data ranges. While think-cell itself is not meant to create slides itself, it works with SlideFab (however, this is not an official think-cell supported feature). Although think-cell is almost 20 years old, the company brings new versions on a regular basis. However, for a couple of versions not much seems to have changed.
It supports all Windows-based Office version since 2010 both 32 and 64 bit. macOS is supported from 10.12 and Office 2016 for Mac or later.
It costs EUR 945 per year at least (including 5 licenses) and it is also available as a 30 day free trial.
2) “EzPaste-Ultimate” add-in from metrics-institute.net

The EzPaste add-in can copy content from Excel to PowerPoint or to other targets such as Word. It contains various features to control the paste process. The setup is managed through a window where Excel objects (e.g. charts) need to be set up. It is a flexible tool with a history starting back in 2010.
It costs EUR 65.
3) “SlideMight” add-in from slidemight.com

An interesting way to mass-create PowerPoint slides represents the slidemight add-in. It uses structures text-files (e.g. XML, JSON) and placeholders within a PowerPoint template file to create filled slides automatically. So, it’s actually not about Excel to PowerPoint but a rather similar use case. So it makes sense to mention it here as it also produces data-driven slides.
It supports both Windows and MacOS.
It costs USD 59. A free trial version is available.
4) “E2P (Excel to PowerPoint)” add-in from thespreadsheetguru.com

The E2P add-in automates copy and paste from Excel to PowerPoint. It has a straight forward way to let the user do this: An control table contains the logic. Each row is a copy and paste command containing the address / name of the Excel object to export, the target slide number and position for PowerPoint and the paste type (e.g. image file types, text shapes or embedded objects). The add-in can target existing presentations or create presentations from scratch.
It supports all Windows-based Office version since 2007 both 32 and 64 bit.
It costs USD 78 and is also available as a 14 day free trial.
5) “DataPoint” add-in from PresentationPoint.com

Another PowerPoint Add-In to create slides from Excel is the “DataPoint plugin”. It can connect PowerPoint to Excel but also other data sources. Its main purpose is to connect PowerPoint shapes with Excel cells regarding text and numbers for info screens. Apart from that it has also the ability to mass-create slides using its “data scrolling feature”.
It supports all Windows-based Office version since 2010 both 32 and 64 bit.
It starts with 29€ per month or 249€ per year for the standard edition and goes up to 99€ per month and 799€ per year for the enterprise and industrial editions. A 15 day free trial is available.
6) “UpSlide” add-in from upslide.net

A software which brings various PowerPoint-related features is UpSlide. One of these features is to link PowerPoint with Excel. It supports charts, tables and even single words within text boxes. The linked data can be refreshed programmatically with the click of a button
Pricing remains a mystery and will be revealed upon request only.
7) “empower slides” add-in from empowersuite.com

Even though the empower slides add-in is a PowerPoint slide library foremost, it offers slide linking of charts as well. On its website there is a comparison to think-cell, so it is clear against what they pitch. Similarly to think-cell, empower slides does not support automatic / mass slide creation.
It is available both for Windows and Mac.
Pricing is 29,99€ per month. A free 30 day trial is available.
Conclusion and learnings regarding these tools
The list above gives an overview of available tools for exporting or connecting from Excel to PowerPoint. On the one hand, the software products for linking and creating PowerPoint charts from Excel (e.g. think-cell or empower slides) are quite powerful and also expensive. On the other hand, the mass-creation tools (e.g. EzPaste or slidemight) remain rather rudimentary.
SlideFab does clearly belong to the mass-creation tools. It offers a what-you-see-is-what-you-get (wysiwyg) interface and avoids an indirect setup of the automation itself. It offers a free lite version which is time-wise unlimited but allows only two automation objects per created slide.
- Что делает макрос
- Код макроса
- Как работает макрос
- Как использовать
- Скачать файл
Ссылка на это место страницы:
#zadacha
Вы можете создать книгу таким образом, что она имитирует презентацию PowerPoint. После того, как вы сделаете это, вы можете легко преобразовать рабочую книгу в презентацию PowerPoint, фактически используя только небольшую автоматизацию. С помощью этого макроса, вы можете строить целые презентации в Excel.
Перед тем, как осуществить этот макрос в вашей книге, необходимо установить ссылку на библиотеку объектов Microsoft PowerPoint.
Ссылка на это место страницы:
#formula
SubPreobrazovatRabochuyuKniguVPrezentaciyu()DimppAsPowerPoint.ApplicationDimPPPresAsPowerPoint.PresentationDimPPSlideAsPowerPoint.SlideDimxlwkshtAsExcel.WorksheetDimMyRangeAsStringDimMyTitleAsStringSetpp =NewPowerPoint.ApplicationSetPPPres = pp.Presentations.Addpp.Visible =TrueMyRange ="A2:F6"ForEachxlwkshtInActiveWorkbook.Worksheetsxlwksht.SelectApplication.Wait (Now + TimeValue("0:00:1"))MyTitle = xlwksht.Range("A1").Valuexlwksht.Range(MyRange).CopyPicture _Appearance:=xlScreen, Format:=xlPictureSlideCount = PPPres.Slides.CountSetPPSlide = PPPres.Slides.Add(SlideCount + 1, ppLayoutTitleOnly)PPSlide.SelectPPSlide.Shapes.Paste.Selectpp.ActiveWindow.Selection.ShapeRange.Align msoAlignCenters,Truepp.ActiveWindow.Selection.ShapeRange.Top = 100PPSlide.Shapes.Title.TextFrame.TextRange.Text = MyTitleNextxlwkshtpp.ActivateSetPPSlide =NothingSetPPPres =NothingSetpp =NothingEndSub
Ссылка на это место страницы:
#kak
1. Шаг 1 объявляет шесть переменных:
— PP является переменной объекта, приложения PowerPoint;
— PPPres является переменной объекта презентации PowerPoint;
— PPSlide является переменной слайдов в PowerPoint;
— xlwksht является переменной объекта рабочего листа;
— MyRange переменная, используемая для хранения и передачи имени диапазона в виде строки;
— MyTitle переменная, используемая для хранения и передачи заголовок для каждого слайда.
2. Шаг 2 открывает PowerPoint с пустой презентацией. Обратите внимание, что мы устанавливаем свойство Visible приложения PowerPoint в True. Это гарантирует, что мы можем увидеть, как работает код.
3. Шаг 3 заполняет переменную MyRange диапазоном, который мы хотим захватить как содержание слайдов. Мы также заполняем переменную MyTitle со значением ячейки A1. Это значение становится заголовком для слайда.
4. Шаг 4 запускает цикл через каждый лист в книге. Обратите внимание, что мы используем метод Application.Wait, говоря макросу, чтобы он сделал паузу в течение секунды. Это позволяет скопировать весь диапазон.
5. Шаг 5 использует метод CopyPicture для копирования в качестве изображения.
6. Шаг 6 добавляет новый слайд в презентации с помощью метода Add объекта Slide. Обратите внимание, что мы используем SlideCount + 1, чтобы указать порядковый номер добавленного слайда. Использование SlideCount + 1 позволяет динамически назначать следующий доступный номер в качестве индекса слайда. Также обратите внимание, что мы используем ppLayoutTitleOnly, обеспечивая наш слайд названием текстового фрейма.
7. Шаг 7 вставляет изображение в активный слайд, размещая его по центру, отступая от верхнего края 100 пикселей.
8. Далее передаем переменную MyTitle в заголовок.
Ссылка на это место страницы:
#touse
Для реализации этого макроса, вы можете скопировать и вставить его в стандартный модуль:
1. Активируйте редактор Visual Basic, нажав ALT + F11.
2. Щелкните правой кнопкой мыши имя проекта / рабочей книги в окне проекта.
3. Выберите Insert➜Module.
4. Введите или вставьте код во вновь созданном модуле.
Ссылка на это место страницы:
#file
Файлы статей доступны только зарегистрированным пользователям.
1. Введите свою почту
2. Нажмите Зарегистрироваться
3. Обновите страницу
Вместо этого блока появится ссылка для скачивания материалов.

Привет! Меня зовут Дмитрий. С 2014 года Microsoft Cretified Trainer. Вместе с командой управляем этим сайтом. Наша цель — помочь вам эффективнее работать в Excel.
Изучайте наши статьи с примерами формул, сводных таблиц, условного форматирования, диаграмм и макросов. Записывайтесь на наши курсы или заказывайте обучение в корпоративном формате.

Подписывайтесь на нас в соц.сетях: