Excel for Microsoft 365 Word for Microsoft 365 Access for Microsoft 365 Project Online Desktop Client Publisher for Microsoft 365 Word for the web OneNote for the web PowerPoint for the web Excel 2021 Word 2021 Access 2021 Project Professional 2021 Project Standard 2021 Publisher 2021 OneNote 2021 Excel 2019 Word 2019 Access 2019 Project Professional 2019 Project Standard 2019 Publisher 2019 Excel 2016 Word 2016 Access 2016 OneNote 2016 Project Professional 2016 Project Standard 2016 Publisher 2016 Office 2016 for Mac Excel 2013 Word 2013 Access 2013 OneNote 2013 Project Professional 2013 Project Standard 2013 Publisher 2013 Project Online Excel 2010 Word 2010 Access 2010 OneNote 2010 Project 2010 Project Standard 2010 Publisher 2010 Office 2010 Excel Starter 2010 More…Less
You can use the Office programs to save or convert your files to PDFs so that you can share them or print them using commercial printers. And you won’t need any other software or add-ins.
Use PDF format when you want a file that:
-
Looks the same on most computers.
-
Has a smaller file size.
-
Complies with an industry format.
Examples include resumes, legal documents, newsletters, files that are intended to be read (not edited) and printed, and files that are intended for professional printing.
Important: Many programs, including Microsoft Word, have the ability to open and edit PDF files. Simply sharing something as a PDF is not sufficient to guarantee the recipient can’t edit the file.
To see step-by-step instructions, select an Office program from the drop-down list.
-
Open the table or report you want to publish as a PDF.
-
On the External Data tab, in the Export group, select PDF or XPS.
-
In the File Name field, type or select a name for the document.
-
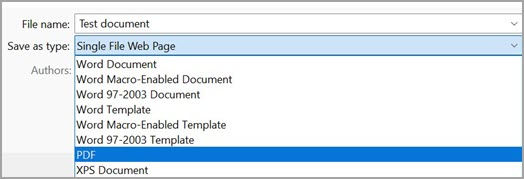
In the Save as type list, select PDF (*.pdf) .
-
If the document requires high print quality, select Standard (publishing online and printing) .
-
If file size is more important than print quality, select Minimum size (publishing online).
-
-
Select Options to set the page to be printed, to choose whether markup should be printed, and to select output options. Select OK .
-
Select Publish.
Note: You can’t save Power View sheets as PDF files.
-
Select the File tab.
-
Select Save As .
To see the Save As dialog box in Excel 2013 or Excel 2016, you have to choose a location and folder. -
In the File Name box, enter a name for the file, if you haven’t already.
-
In the Save as type list, select PDF (*.pdf) .
-
If you want the file to open in the selected format after saving, select the Open file after publishing check box .
-
If the document requires high print quality, select Standard (publishing online and printing) .
-
If file size is more important than print quality, select Minimum size (publishing online) .
-
-
Select Options to set the page to be printed, to choose whether markup should be printed, and to select output options. For more information on the Options dialog box in Excel, see More about PDF options . Select OK when finished.
-
Select Save .
-
Select the File tab.
-
Select Export .
-
Under Export Current , select what part of the notebook you want to save as PDF.
-
Under Select Format , select PDF (*.pdf) , and then select Export .
-
In the Save As dialog box, in the File Name field, enter a name for the notebook.
-
Select Save .
-
Select the File tab.
-
Select Save As .
To see the Save As dialog box in PowerPoint 2013 or PowerPoint 2016 , you have to choose a location and folder. -
In the File Name box, enter a name for the file, if you haven’t already.
-
In the Save as type list, select PDF (*.pdf) .
-
If you want the file to open in the selected format after saving, select the Open file after publishing check box.
-
If the document requires high print quality, select Standard (publishing online and printing) .
-
If the file size is more important than print quality, select Minimum size (publishing online) .
-
-
Select Options to set the page to be printed, to choose whether markup should be printed, and to select output options. Select OK when finished.
-
Select Save .
-
On the File tab, choose Save As .
To see the Save As dialog box in Project 2013 or Project 2016, you have to choose a location and folder. -
In the File Name box, enter a name for the file, if you haven’t already.
-
In the Save as type list, select PDF Files (*.pdf) or XPS Files (*.xps) , and then choose Save .
-
In the Document Export Options dialog box, select a Publish Range , whether to Include Non-printing Information , and ISO 19500-1 compliance (PDF only).
Formatting tips
Project doesn’t support every PDF or XPS formatting feature, but you can still use some print options to change the look of the final doc.
Choose File > Print , and then change any of these options:
-
Dates
-
Orientation
-
Paper Size
-
Page Setup
In the Page Setup dialog box, you can change options on these tabs:
-
Margins
-
Legend
-
View
-
Select the File tab.
-
Select Save As .
To see the Save As dialog box in Publisher 2013 or Publisher 2016, you have to choose a location and folder. -
In the File Name box, enter a name for the file, if you haven’t already.
-
In the Save as type list, select PDF (*.pdf) .
-
If you want to change how the document is optimized, select Change . (Select Options in Publisher 2013 or Publisher 2016.)
-
Make any changes you want to the picture resolution and non-printing information.
-
Select Print Options to make changes to the printing options for the document.
-
Select OK when finished.
-
-
If you want the file to open in the selected format after saving, select the Open file after publishing check box.
-
Select Save .
-
Select the File tab.
-
Select Save As .
To see the Save As dialog box in Visio 2013 or Visio 2016, you have to choose a location and folder. -
In the File Name box, enter a name for the file, if you haven’t already.
-
In the Save as type list, select PDF (*.pdf) .
-
If you want the file to open in the selected format after saving, select the Automatically view file after saving check box.
-
If the document requires high print quality, select Standard (publishing online and printing) .
-
If file size is more important than print quality, select Minimum size (publishing online) .
-
-
Select Options to set the page to be printed, to choose whether markup should be printed, and to select output options. Select OK .
-
Select Save .
-
If the file was previously saved, select File > Save a Copy.
If the file is unsaved, select File > Save As. -
Select Browse to choose the location on your computer where you want to save the file.
-
In the drop-down list, select PDF.
-
Select Save.
Select More Options > Options to customize your PDF.
-
To make a PDF file from only some of the pages in your document, choose an option under Page range.
-
To include tracked changes in the PDF, under Publish what, select Document showing markup. Otherwise, make sure Document is selected.
-
To create a set of bookmarks in the PDF file, select Create bookmarks using. Then, choose Headings or, if you added bookmarks to your document, Word Bookmarks.
-
If you want to include document properties in the PDF, make sure Document properties is selected.
-
To make the document easier for screen-reading software to read, select Document structure tags for accessibility.
-
ISO 19005-1 compliant (PDF/A) This option outputs the PDF document as version 1.7 PDF, which is an archiving standard. PDF/A helps to insure that a document will look the same when it’s opened later on a different computer.
-
Bitmap text when fonts may not be embedded If fonts can’t be embedded into the document, the PDF uses bitmap images of the text so that the PDF looks the same as the original document. If this option isn’t selected and the file uses a font that can’t be embedded, then the PDF reader might substitute another font.
-
Encrypt the document with a password To restrict access so only people with the password can open the PDF, select this option. When you select OK, Word opens the Encrypt PDF Document box, where you can type and re-enter a password.
Open and copy content from a PDF with Word
You can copy any content you want from a PDF by opening it in Word.
Go to File > Open and browse to the PDF file. Word opens the PDF content in a new file. You can copy any content you want from it, including images and diagrams.
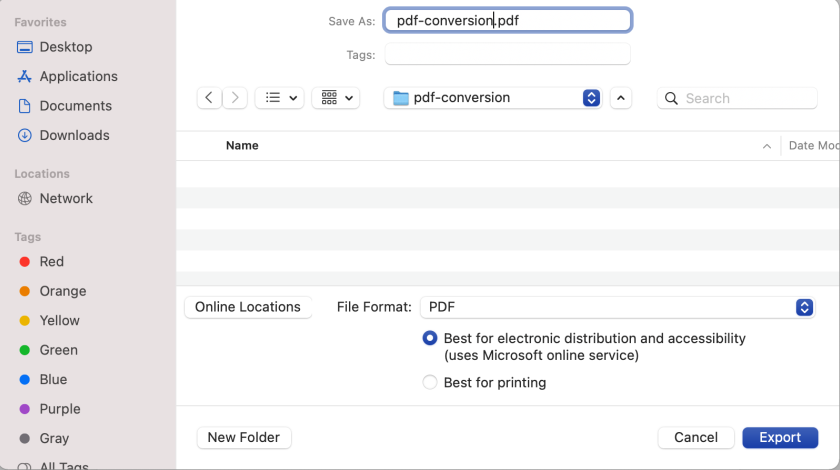
To save your file as a PDF in Office for Mac, follow these easy steps:
-
Select File.
-
Choose Save As.
-
Select File Format at the bottom of the window.
-
Choose PDF from the list of available file formats.
-
Give your file a name, if it doesn’t already have one, then select Export.
Note: When using Best for printing, the hyperlinks may not convert correctly. This is a known issue in Word for Mac.
Important:
-
When using Online Service , only font that Microsoft has the legal rights to can be used. If the documentation contains custom font, it will be substituted and may cause problems. This can be avoided by embedding the fonts into the document.
-
Learn more about embedding fonts by visiting:
-
Benefits of embedding custom fonts
-
Some of your fonts can’t be saved with the presentation
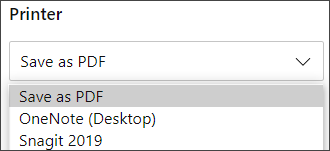
You can use Word, PowerPoint, and OneNote for the Web to convert your doc into a PDF.
-
Select File > Print > Print (in PowerPoint you will select one of three formats).
-
In the dropdown menu under Printer , select Save as PDF and then select Save.
-
Then in the Explorer menu that opens you can name the PDF and choose where to save it and then select Save.
This will generate a basic PDF that preserves the layout and format of your original document.
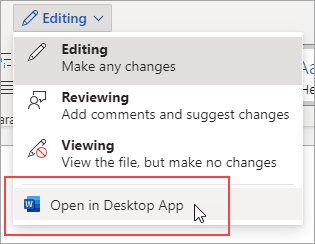
If you need more control over the options for your PDF, such as adding bookmarks, use the desktop app to convert your doc to a PDF. Select Open in Desktop App in the toolbar of PowerPoint and OneNote to start using the desktop app, and in Word select the Editing dropdown first and then select Open in Desktop App .
If you don’t own the desktop app, you can try or buy Microsoft 365.
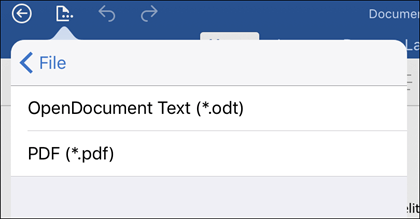
To export your Word document or Excel workbook to PDF format on iOS tap the File button at the top left, choose Export and then PDF.
Portable Document Format (PDF) preserves document formatting and enables file sharing. When the PDF format file is viewed online or printed, it retains the format that you intended. The PDF format is also useful for documents that will be reproduced using commercial printing methods. PDF is accepted as a valid format by many agencies and organizations, and viewers are available on a wider variety of platforms than XPS.
XML Paper Specification (XPS) is an electronic file format that preserves document formatting and enables file sharing. The XPS format ensures that when the file is viewed online or printed, it retains exactly the format that you intended, and that data in the file cannot be easily changed.
Important: Most modern web browsers can open and display a PDF file. If you have an older operating system, however, you may need a PDF reader installed on your device such as the Acrobat Reader, available from Adobe Systems.
See also
-
Edit or make changes to a PDF file
-
Create accessible PDFs
Need more help?
Want more options?
Explore subscription benefits, browse training courses, learn how to secure your device, and more.
Communities help you ask and answer questions, give feedback, and hear from experts with rich knowledge.
Find solutions to common problems or get help from a support agent.
Microsoft Word uses the DOCX file format by default. But did you know you can also create a PDF file in MS Word? This can be very useful, since a PDF has two key advantages over a standard MS Word document:
- PDF files are not platform dependent, so you can share them easily.
- It is harder to edit a PDF file, so it will be difficult to tamper with.
Creating PDFs in Microsoft Word is quick and simple, too. Let us explain.
How to Create a PDF in Microsoft Word for Windows
In Word for Windows, you can export a document as a PDF. To do this:
- Open the document you want to convert into a PDF
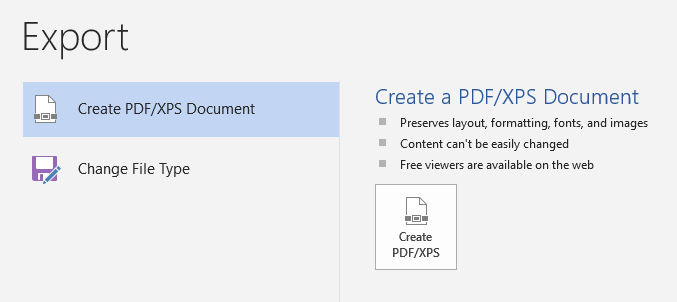
- Go to File > Export > Create PDF/XPS
- Select PDF as your chosen file type
- Pick a level of optimization (either “Standard” or “Minimum size”)
- Choose a name and location for the new file
- Click Publish to create a PDF file
This does not replace the original document, so you can still edit it in Microsoft Word and export it again if you need to update the PDF. You can also use this method to create an XPS file, which is like a PDF but a much less common format. As such, PDF is usually your best choice.
How to Create a PDF in Microsoft Word for Mac
The process for creating a PDF is a little different for Mac users:
Find this useful?
Subscribe to our newsletter and get writing tips from our editors straight to your inbox.
- Open the document you want to convert
- Go to File > Save As
- Rename the file and pick where to save it
- Click the File Format menu and select PDF from the list
- Click Export to save the document as a PDF file
To save the PDF as a separate document, make sure to change the file name and/or location. If you do not, the PDF will replace the DOCX file.
Other Methods for Creating a PDF from a DOCX File
If you have no tolerance for Windows and Bill Gates’ software empire, you can convert a DOCX file into a PDF without sullying yourself in the murky waters of Microsoft Word. To do this, you have a few options:
- Use a dedicated conversion service – Websites like Smallpdf offer free tools for converting files to and from the PDF format. Services like this may have some restrictions, or may ask you to pay for full access, but they are very useful for occasional PDF conversions.
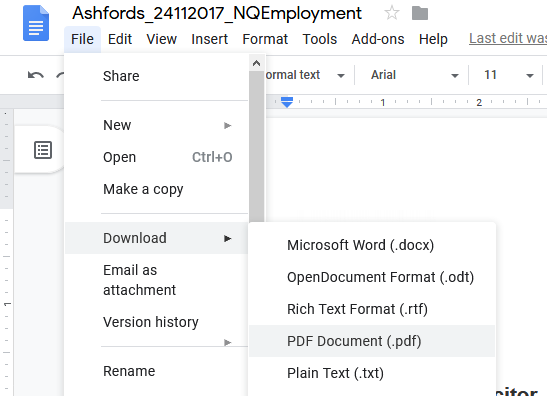
- Use Google Drive – If you upload a DOCX document to Google Drive, you can open and edit it in Google Docs. From here, simply go to File > Download and select PDF from the list.
And however you create your PDF files, if you want to be sure they’re error free, don’t forget to have them checked by the professionals.
Преобразовать с помощью OCR
Сканы будут преобразованы в редактируемый текст.
Метод OCR
Исходный язык файла
Чтобы получить оптимальный результат, выберите все языки, которые есть в файле.
Улучшить OCR
Применить фильтр:
Перечисляем самые быстрые способы для Windows, macOS и Linux.
Как создать файл PDF c помощью виртуального принтера
Это самый простой и универсальный способ создать файл PDF с любым содержанием, будь то страницы браузера, картинки, документы или ещё что‑то подобное.
Во всех уважающих себя операционных системах есть так называемый виртуальный принтер PDF, который можно выбрать в меню печати. Вместо того, чтобы выводить контент на физическое устройство (которого у вас может и не быть), эта опция создаёт файл PDF.
Windows
Откройте нужный вам документ или картинку. Нажмите Ctrl + P, чтобы вызвать меню печати, или щёлкните «Файл» → «Печать».
В открывшемся окне укажите, какие именно страницы нужно напечатать, или оставьте пункт «Все». Затем в списке «Принтер» выберите Microsoft Print to PDF. Нажмите «Печать» и укажите, куда сохранить ваш файл PDF.
macOS
В macOS печатать в PDF не сложнее, чем в Windows. Откройте нужный вам документ или картинку. Выберите «Файл» → «Напечатать» или нажмите Cmd + P.
Появится меню печати. В нём можно указать нужные страницы. В нижней части окна вы увидите выпадающее меню PDF.
Нажмите на неё и выберите «Сохранить в PDF». Затем укажите, куда поместить ваш файл.
Linux
Вообще, устройство интерфейса может варьироваться в разных дистрибутивах, но идея везде одинакова. Мы будем разбираться на примере популярнейшей Ubuntu.
Откройте нужный вам документ или картинку. Выберите «Файл» → «Печать» или нажмите Cmd + P. В открывшемся окне в выпадающем списке «Принтер» укажите «Печатать в файл…».
Нажмите кнопку «Печатать в файл» внизу окна и укажите, куда сохранить ваш файл PDF.
Как создать файл PDF в браузере
Кроме сохранённых у вас на диске файлов вроде документов и фотографий, вы можете сохранять в PDF и целые веб‑страницы. Во‑первых, так их можно потом распечатать — вдруг вам надо будет показать рецепт из интернета своей бабуле, а она не может читать с экрана.
Во‑вторых, так можно сделать себе коллекцию полезных инструкций на все случаи жизни, сохранить на планшете и получить возможность обращаться к ним, даже если вы остались без Сети.
Метод универсален и работает в любых популярных десктопных браузерах: Chrome, Firefox, Safari и прочих. Откройте нужную страницу и выберите «Меню» → «Печать». Или нажмите Ctrl + P в Windows и Linux или Cmd + P в macOS.
В появившемся окне в выпадающем списке «Принтер» выберите либо «Сохранить в PDF», либо Microsoft Print to PDF, в зависимости от того, какой пункт доступен. Результат всё равно будет одинаковым. Нажмите «Печать» и укажите, куда сохранить ваш PDF.
Как создать файл PDF в офисном пакете
Это можно сделать как в Word, Pages и OpenOffice, так и в «Google Документах».
Word
Самый популярный текстовый процессор тоже умеет сохранять документы в PDF, причём сделать это тут можно двумя способами.
Например, нажмите «Файл» → «Печать» или Ctrl + P. В открывшемся меню выберите Microsoft Print to PDF. Щёлкните «Печать» и укажите, куда сохранить ваш файл PDF.
Другой вариант: нажмите «Файл» → «Сохранить как» и укажите место, куда сохранить документ. В выпадающем списке форматов файла выберите PDF.
Третий способ: нажмите «Файл» → «Экспорт» → «Создать документ PDF/XPS».
И укажите место, куда его сохранить.
Pages
Встроенный текстовый процессор macOS тоже умеет сохранять документы в PDF. Нажмите «Файл» → «Экспортировать в…» и выберите формат PDF.
Щёлкните кнопку «Далее», укажите, куда надо сохранить файл, и нажмите кнопку «Экспорт».
OpenOffice
В свободных офисных пакетах OpenOffice и LibreOffice всё ещё проще, чем в Word. Нажмите «Файл» → «Экспорт в…» → «Экспорт в PDF». В открывшемся меню можете активировать дополнительные параметры, например добавить водяной знак.
Затем нажмите «Экспорт» и укажите, куда сохранить файл.
Google Документы
Откройте нужный вам документ в облачном редакторе от Google. Затем нажмите «Файл» → «Скачать» → «Документ PDF».
Файл будет сохранён в папку «Загрузки» вашего компьютера.
Читайте также 🧐
- Как объединить PDF-файлы в один документ онлайн и офлайн
- 13 самых удобных конвертеров PDF
- Как конвертировать DjVu в PDF: 4 бесплатных инструмента
- 7 бесплатных программ для работы c PDF
- Как сделать PDF-файл из скриншота в iOS 13
Вопросы и ответы
Как я могу конвертировать файлы Word в PDF?
- Используйте блок выбора файлов, чтобы выбрать файлы Word, которые вы хотите преобразовать в PDF формат.
- Начните конвертацию ваших файлов Word, нажав на кнопку Конвертировать.
- Сохраните преобразованные файлы Word как PDF используя кнопку скачивания.
Безопасно ли использовать инструменты PDF24?
PDF24 серьезно относится к защите файлов и данных. Мы хотим, чтобы пользователи могли доверять нам. Поэтому мы постоянно работаем над проблемами безопасности.
- Все передачи файлов зашифрованы.
- Все файлы удаляются автоматически из обрабатывающего сервера в течение часа после обработки.
- Мы не храним файлы и не оцениваем их. Файлы используются только по назначению.
- PDF24 принадлежит немецкой компании Geek Software GmbH. Все обрабатывающие серверы находятся в центрах обработки данных на территории ЕС.
- Кроме того, вы можете получить настольную версию инструментов PDF24 вместе с PDF24 Creator. Все ваши файлы остаются на вашем компьютере, так как эта программа работает офлайн.
Могу ли я использовать PDF24 на Mac, Linux или смартфоне?
Да, вы можете использовать PDF24 Tools в любой системе, в которой у вас есть доступ в Интернет. Откройте PDF24 Tools в веб-браузере, таком как Chrome, и используйте инструменты прямо в веб-браузере. Никакого другого программного обеспечения устанавливать не нужно.
Вы также можете установить PDF24 в качестве приложения на свой смартфон. Для этого откройте инструменты PDF24 в Chrome на своем смартфоне. Затем щелкните значок «Установить» в правом верхнем углу адресной строки или добавьте PDF24 на начальный экран через меню Chrome.
Могу ли я использовать PDF24 в офлайн без подключения к Интернету?
Да, пользователи Windows также могут использовать PDF24 в офлайн, то есть без подключения к Интернету. Просто скачайте бесплатный PDF24 Creator и установите программное обеспечение. PDF24 Creator переносит все инструменты PDF24 на ваш компьютер в виде настольного приложения. Пользователи других операционных систем должны продолжать использовать PDF24 Tools.
Оцените наш инструмент
Альтернатива: PDF24 Creator
Приложения для Windows с похожим функционалом
Download Article
An easy-to-use guide to turn your Word documents into viewable PDFs
Download Article
Do you want to convert your Word document into an easy-to-send PDF file? PDFs are compatible with all platforms, so turning your Word document into a PDF ensures that more people can open the file. It’s incredibly easy to convert a Word document to PDF—we’ll show you how to do it on any PC or Mac!
-
1
Open the Microsoft Word document. Double-click the Word document to open it in Microsoft Word.
- If you haven’t yet created the document, open Word, then click Blank document and create the document as needed before proceeding.
-
2
Click File. It’s in the top-left corner of the Word window. Doing so opens a pop-out window.
Advertisement
-
3
Click Export. This option is in the left-hand column of options. You should see several new options appear in the middle of the window.
-
4
Click Create PDF/XPS Document. It’s in the upper-left corner of the window.
-
5
Click Create PDF/XPS. This option is in the middle of the window. Doing so prompts a pop-up window.
-
6
Select a save location. On the left side of the window, click the folder in which you want to store the PDF version of your Word file.
- Since the PDF is a different file type than the Word document, you can store the PDF in the same file location as the Word file.
- You can also enter a new file name in the «File name» text box if you like.
-
7
Click Publish. It’s in the bottom-right corner of the window. This will create a PDF copy of your Word document in your specified location.
Advertisement
-
1
Open the Microsoft Word document. Double-click the Word document to open it in Microsoft Word.
- If you haven’t yet created the document, open Word, then click Blank Document and create the document as needed before proceeding.
-
2
Click File. It’s in the upper-left corner of your Mac’s screen. A drop-down menu will appear.
-
3
Click Save As…. This option is in the drop-down menu. Doing so opens a new window.
-
4
Enter a file name. Type whatever you want to name the PDF into the «Name» text box at the top of the window.
-
5
Select a save location. On the left side of the window, click the folder in which you want to save your PDF.
-
6
Click the «File Format» text box. It’s at the bottom of the window. A drop-down menu will appear.
-
7
Click PDF. This option is in the «Export» section of the drop-down menu.
- You may have to scroll down in the drop-down menu to see this option.
-
8
Click Export. It’s a blue button in the bottom-right corner of the window. Doing so saves your PDF in the specified file location.
Advertisement
-
1
-
2
Click Choose file. It’s in the middle of the SmallPDF page. Doing so will open either a File Explorer (Windows) or a Finder (Mac) window.
-
3
Select your Word document. Go to your Word document’s location, then click the Word document to select it.
-
4
Click Open. It’s in the bottom-right corner of the window. Doing so will upload the Word document to SmallPDF.
- On a Mac, you may click Choose here instead.
-
5
Click Download File. This option is in the lower-left side of the SmallPDF page. Your PDF will download onto your computer, though you may have to select a storage location and/or confirm the download depending on your browser’s settings.
- It may take a few seconds for this option to appear if your Word document is large or your Internet connection is slow.
Advertisement
-
1
Open Google Drive. Go to https://drive.google.com/ in your computer’s web browser. This will open your Google Drive page if you’re logged in.
- If you aren’t logged in, click Go to Google Drive, then enter your email address and password when prompted.
-
2
Click + New. It’s in the top-left side of the Google Drive window. A drop-down menu will appear.
-
3
Click File upload. It’s in the drop-down menu. Doing this will open either a File Explorer (Windows) or a Finder (Mac) window.
-
4
Select your Word document. Go to your Word document’s location, then click the Word document to select it.
-
5
Click Open. It’s in the bottom-right corner of the window. Your Word document will upload to Google Drive.
- On a Mac, you may click Choose here instead.
-
6
Open the Word document. Once the Word file finishes uploading to Google Drive, double-click it in Google Drive to open it in your browser.
-
7
Click File. It’s in the upper-left side of the window. Doing so prompts a drop-down menu.
- On a Mac, make sure you’re clicking File in your browser window and not in the menu bar at the top of the screen.
-
8
Select Download as. This option is in the middle of the drop-down menu. Selecting it prompts a pop-out menu.
-
9
Click PDF document. It’s in the pop-out menu. A PDF version of the Word document will immediately download onto your computer.
- Depending on your browser’s settings, you may have to confirm the download and/or select a save location before the file will actually download.
Advertisement
Add New Question
-
Question
Why doesn’t Microsoft Word give me the option to «Save as PDF» in the file menu?
A special type of software (technically called add-in) has the ability to convert Microsoft Word documents to PDF. However, Word 2007 does not include this add-in by default. To convert to PDF with Microsoft Word 2007, you have to download the add-in from Microsoft’s website.
-
Question
I need to convert a PDF file to a Microsoft Word document. Is there a way to do this?
Open up your PDF document and select «Save as —> Word Document.» You’ll need to clean it up afterwards (remove paragraph signs, reformat, etc.).
-
Question
How do I fix the glitches and formatting errors that show up in the new PDF file?
The latest versions (after MS Office 2007) allow you to save the document as a pdf, thus avoiding formatting errors. Go to Files->Save As and select «.pdf format» from Save As Type. Click to save.
See more answers
Ask a Question
200 characters left
Include your email address to get a message when this question is answered.
Submit
Advertisement
-
To open your PDF in your computer’s default PDF reader, simply double-click it; if you have more than one PDF reader, you may be prompted to select one after double-clicking the PDF.
-
You can also use the «Save as» menu to convert your Word document to a PDF on a Windows computer.
Advertisement
-
When converting sensitive documents (e.g., credit card statements), avoid using SmallPDF. While their site is secure, it’s best to keep such documents offline as much as possible.
Advertisement
About This Article
Article SummaryX
1. Go to https://smallpdf.com/word-to-pdf in your web browser.
2. Click Choose file.
3. Double-click the Word file you want to convert.
4. Click Download File when the PDF is available.
Did this summary help you?
Thanks to all authors for creating a page that has been read 4,795,095 times.


