
Forms
An order form is what one uses in the event that he or she would like to have a certain product or service provided. With the help of this form, one is able to specify details such as the type of product or service, where it should be provided, the name of the person who made the order, and much more.

This type of form can also be used internally within companies in the event that certain authoritative figures would need something like ordering specific products or have certain services done that would benefit the business. So once you’ve either obtained or made an order form, all you have to do is place all the required information to ensure that you get what you want and need.
Steps for Creating an Order Form with Microsoft Word
These instructions can help you create an order form with the use of Microsoft Word 2007. So here are the steps as follows:
- Firstly, open up the Microsoft Word program. You must then use the Windows’ Start button and select the “All Programs” option. Then select “Microsoft Word” from the “Microsoft Office” folder.
- Next you must click the Microsoft Office button that should be located on the upper left corner. Select the “New” option and it should launch a separate “New Document” pop-up menu on your screen.
- At the top of the new document window you must type in “order form” in the search field and click on the “search” arrow. Thumbnails will then be generated in the search results that should show you pre-formatted order forms. You can then get a larger view any of these by clicking on them and seeing a preview on the pane to the right of the screen.
- Under the form preview, you can see the “Download” option should you finalize which order form you would like to use. The order form template will then appear as a new document within Word.
- This is the part where you may then edit the order form to suit whatever you need. In order for you to edit the text, all you have to do is highlight and then type over it. Once you are satisfied with everything that you need to place in the order form, click on the Office button and select “Save As.” Then type the name of the document in the “File Name” field. Click on the down arrow to the right of the “Save as Type” field so that you may select the type of document you want.
- In the event that you would like to save this template so that you can use it in the future, you can select the “Template” option. If you would like to use the original version of this template again, then you don’t need to worry as there’s already a copy that’s automatically saved in the “My Templates” Folder where you can choose to use it again at any point in time.
The Different Types of Order Forms
If you’re going to start creating an order form, you must know that there are many different types of them that you can make as well as each of them having their own specific purpose. By knowing how they’re supposed to be utilized, you can choose the right order form template that best suits your needs. So here are a few examples of the different types of order forms that you can create:
- Job Order Form. This is the type of form that’s made use by just about every person who’s in need of some sort of service done. With a job order form, it specifies what kind of job needs to be done, where it should be done, how it should be done, and more. This kind of form can also be used internally by just about any kind of business when certain problems arise or when there’s an important need for specific type of job done that could enhance operations.
- Purchase Order Form. A purchase order form is what’s issued by a buyer to a seller. What the buyer can specify in this form is the type of product or service that seller should provide, the quantity, and the agreed price for whatever product or service the buyer would want. This kind of form is mostly used by companies for when they have to control the purchasing of products and services from any external suppliers.
- Event Order Form. With help of an event order form, those who organize events may outline the details of the kind of event that they would like to have. This can act as a sort of guideline for those who are required to provide whatever is necessary for any kind of event. So things such as the amount of tables and chairs needed, the decorations, and the location of the event are all specified within this form.
- Product Order Form. This is a form that’s specifically used by anyone who wishes to purchase certain products from a business that can supply them. A product order form allows one to specify what kind of product he or she needs along with its quantity. This is similar to purchase order forms, but this kind of document can only be used to purchase or request products and nothing else. Businesses can also use this in the event that they would like to have their suppliers provide them with what they need in order to continue their operations.
- Repair Order Form. This is a form that one utilizes in the event that he or she has certain maintenance problems that need to be looked into as soon as possible. The repair order form allows people to specify the type of repair that they would like done, giving the repair service provider an idea as to what type of materials to use, the amount of time it would take, as well as the payment that the buyer will have to compensate for everything. Much like job order forms, those with authority within the business can make use of this type of form to order their maintenance department in the event that certain equipment or facilities need to be fixed.
More in Forms
Microsoft Word’s Developer toolbar allows you to use Word for more than simple document creation. The Developer toolbar features a series of form controls, enabling you to create a simple order form which you can put on a website or distribute via email. Customers can then fill out this form and send it back to you to place their order. However, it is important to make sure that you protect the document so that only the form’s input boxes can be edited, as users may otherwise edit the labels on the form itself.
-
Open a new Word document and then click “File,” “Options” and then click the “Customize Ribbon” tab.
-
Check the “Developer” box and then select “OK.” The Developer tab displays on Word’s ribbon interface.
-
Enter the headings that you want to include on your order form as regular text. For example, you might include headings for name, address, product code and quantity.
-
Click the “Controls” section of the Developer tab and then select “Design Mode” to display Word’s form control buttons.
-
Use the control buttons to add controls to your form. Controls are methods of adding data to the form, such as text fields and check boxes. Which controls you use depends on the headings on your form. For example, you might use a text field to let users enter their names, and a date picker to let users select their preferred date of delivery for an item.
-
Click “File” and then select “Info.” Click the “Protect Document” button and then select “Restrict Editing” from the drop-down menu.
-
Check the “Allow Only This Type Of Editing In The Document” box and then select “Filling In Forms» from the drop-down menu.
-
Save the document to finish creating your form.
February 14, 2014 11:53 am
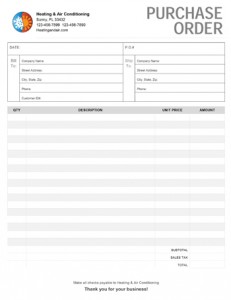 For companies looking to create their own business forms, Microsoft Office is an invaluable resource. The Microsoft library offers a variety of pre-made forms that can be used as a base to create invoices that fit your business. These tweaks are easy to do and this tutorial will offer tips on how to quickly make edits to Microsoft’s Purchase Order Invoices.
1. Open Microsoft Word
Under New Document, type in “Purchase Order”.
You will see many templates pop up. Scroll through and find one that has a layout that is functional and applies to your business. If there isn’t a perfect fit, choose one with the most useful layout. I’m going to pick this work order form because it gives me the most room for lines.
To select a template, double click on the icon. Word will open a new document with a ready-to-edit template.

2. Page Size
Click on the PAGE LAYOUT tab at the top. Click the Size icon and make sure your page is the desired size. This template is a full page.
Next click the Margins icon and select the .25 margins. If your Microsoft does not have this option then click Custom Margins at the bottom. Put .25 for Top, Left, Bottom and Right and click OK. This gives us more space to play with.
3. Gridlines
I know when I opened this template, I could not see the layout tables that all of the information is sitting in. The layout tables are not printable and aren’t shown when someone is filling out the form. If yours are visible, that’s fine. They’re helpful when trying to find where things are at. If they aren’t and you would like to see them, click on the DESIGN tab at the top. At the far right, there is an icon that says Borders. Under that, you will find View Gridlines. When that is selected, you will be able to see the form layout.

3. Place Your Logo
To place your company logo, click the “Your logo here” box and go to Insert>Picture. Find your logo on your computer and click Insert. Word will replace the text box with your company image. If your image is too large, use the transform tools to make it bigger or smaller (the transform tools are the little circles on the frame around your image when you have it selected). You can also drag the logo to any position you want inside the cell.
![]()
4. Slogan
This template gives us the option of entering a company slogan. You can choose to do so now or remove the words all together. Since I do not have a company slogan, I’m going to remove the text. To do that, simply click the text and hit the delete key on your keyboard.
5. Form Title
I needed a purchase order form and this one says work order. I’m going to highlight the word “work” and type in “purchase”. Word has now bumped the title to two lines. To get it to one line, change the font size by selecting the text. A pop up menu will appear and you can quickly select the font and size. Or while in the HOME tab, the font tool bar will be at the top left of the screen.
I’m going to leave it this way because I like the way it looks and I think I will move my company name and information up next to my logo since I chose not to type in a slogan.
6. Company Information
I’m going to go ahead and type in a company name and information that I’ve made up. To do this, I’m just going to click the line I want to edit and then begin typing.
Optional: I’m going to move this up next to the logo. Highlight the information and copy it to your clip board (ctrl+c) then delete the information. Put your selector into the cell next to your logo and paste the company information in (ctrl+v).
The company information ends up at the top of the cell. To fix that, right click in the cell and choose Table Properties. Choose your desired alignment and hit OK.

OPTIONAL: If you chose to leave out a slogan and if you’re keeping your company information where the template has it but you would like to have the Purchase Order on one line you can do that by selecting both of the cells:

Right click and choose Merge Cells. Your form should now look like this:

7. Fixing the Date and WO#
Since I moved the company address up next to the logo, I’ve freed up some pace on my form. Since the Date and WO# looks a little squished and will make writing difficult, I’m going to move them around.
Select the Date and delete, moving the WO# to the first line. I changed WO# to PO# and moved it away from the right margin so that I can later write in a number beside it. Then place your cursor in the other cell and type in “Date:“. These boxes are a little bigger than I need now so I’m going to click on the line dividing the upper cell from the lower and drag it upward.

The DATE and the PO# are in different fonts. To quickly fix this, highlight the P.O# and from the HOME tab choose Format Painter on the top left. With that, select the “Date:” and Word will automatically change the text formatting to match that of the “P.O.#”
8. Bill to and Ship to
Change “To” and “Job” to “Bill to” and “Ship to“. They’ll probably end up on two lines unless you make the font smaller or make the cell bigger. I dont mind the way they look on two lines so I’m going to leave them.
The customer information has already been supplied but if I’m having these forms printed, I wont be able to write in these boxes like they are. So I’m going to delete all of the text out of that cell.
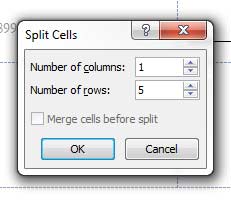
Right click in the cell and select Split Cells. Choose 5 rows and click OK.
Do the same for “Ship to“.
The “Ship to” section is a tad too small so readjust those cells by clicking on the vertical lines and dragging them toward the “Bill to” section.

Now the lines we see here wont stay so in order to have lines to write on, we’re going to have to paint them in. Right click on the table and choose Border Styles. Select the first option. Your cursor will change to a little paint brush. Now you can paint along the dotted lines.

Start in the upper left hand corner and drag your cursor all the way to the right. This will turn a dotted line into a solid one. Continue to paint along the dotted lines that you want to fill in.
9. Font Size, Color and Style
Garamond really isn’t the best choice for printed forms. San-serif fonts tend to print clearer and are easier to read. Also, this form is using light gray text that is hard on the eyes. I’m going to select some of my text now and change some text formatting. Again, this can be done from the little pop up or up at the toolbar at the top.

10. Terms and Conditions
At the bottom where it says “Make all checks payable …” is where you can insert your own terms and conditions. We jumped around a little but it is best to get your terms written in so you can determine how much room you have left over.
11. Products
Now lets jump back to our table.
The “QTY” column doesn’t need to be that big so in order to make more room for “Description“, I’m going to drag that vertical line to the left. Word keeps the column titles in the center which is convenient and easy. Change any of the text at the top by selecting the word and typing in what you need. I’m going to change “Line Total” to “Amount.”
The reason I chose this template in the first place was because it looked like the simplest theme that would give me lots of room for more product lines. Since I do have room to spare, I’m going to add a few more lines to this table.
Right click on any row and go to Insert-Row Above (or below, doesn’t matter). Repeat until the terms and conditions reach the bottom of the page. I squeezed in four more product lines but depending on your terms and conditions, you may have less room.
My new lines are all white opposed to the gray-white-gray pattern above. To fix this, I’m going to select the row using my cursor. The font formatting box should pop up. Inside the box is a little paint can. That’s the shading tool. Click on the Shading Tool and choose the lightest gray. This little icon can also be found at the top of the page under the HOME tab.

Now that we’ve added more rows, our columns are too short. I’m not sure what style the template used but that’s OK because Word gives us an eyedropper that makes formatting easy. Right click and choose Border Styles again but this time select the Border Sampler option. Click on one of the column lines. Word has copied the formatting you want to use. Now just fill in the columns where you see dotted lines (like you did above) and along the new rows.
12. Save as
The form is finished. To save your Purchase Order into a printable format, choose FILE from the tabs at the top. On the right hand side, choose Save As Adobe PDF.
Now that you have created your very own business form using Microsoft Word, you can print the purchase order yourself to use or you can have Printit4Less.com do the printing for you! We offer custom form printing that allows you to upload your own design for us to print into 2, 3 or 4 part sets.
Tags: business purchase order, custom purchase order, designing a purchase order, Microsoft Word, Purchase Order, purchase order form, purchase order template, Tutorial
Categorised in: Tutorials
This post was written by Progressive Printing Team
Back to blog
Word for Microsoft 365 Word for Microsoft 365 for Mac Word 2021 Word 2021 for Mac Word 2019 Word 2019 for Mac Word 2016 Word 2016 for Mac Word 2013 Word 2010 Word for Mac 2011 More…Less
To create a form in Word that others can fill out, start with a template or document and add content controls. Content controls include things like check boxes, text boxes, date pickers, and drop-down lists. If you’re familiar with databases, these content controls can even be linked to data.
Show the Developer tab
If the developer tab isn’t displayed in the ribbon, see Show the Developer tab.
Open a template or a blank document on which to base the form
To save time, start with a form template or start from scratch with a blank template.
-
Go to File > New.
-
In Search online templates, type Forms or the type of form you want and press ENTER.
-
Choose a form template, and then select Create or Download.
-
Go to File > New.
-
Select Blank document.
Add content to the form
Go to Developer, and then choose the controls that you want to add to the document or form. To remove a content control, select the control and press Delete. You can set properties on controls once inserted.
Note: You can print a form that was created using content controls, but the boxes around the content controls will not print.
In a rich text content control, users can format text as bold or italic, and they can type multiple paragraphs. If you want to limit what users add, insert the plain text content control.
-
Click or tap where you want to insert the control.
-
Select Developer > Rich Text Content Control
 or Plain Text Content Control .
 or Plain Text Content Control
  .
.To set specific properties on the control, see Set or change properties for content controls.
A picture control is often used for templates, but you can also add a picture control to a form.
-
Click or tap where you want to insert the control.
-
Select Developer > Picture Content Control
.
 .
.To set specific properties on the control, see Set or change properties for content controls.
Use building block controls when you want people to choose a specific block of text. For example, building block controls are helpful when you need to add different boilerplate text depending on the contract’s specific requirements. You can create rich text content controls for each version of the boilerplate text, and then you can use a building block control as the container for the rich text content controls.
-
Click or tap where you want to insert the control.
-
Go to DeveloperBuilding Block Gallery Content Control
(or Building Block Content Control). -
Select Developer and content controls for the building block.
 (or Building Block Content Control).
-
Click or tap where you want to insert the control.
To set specific properties on the control, see Set or change properties for content controls.
In a combo box, users can select from a list of choices that you provide or they can type in their own information. In a drop-down list, users can only select from the list of choices.
-
Go to Developer > Combo Box Content Control
or Drop-Down List Content Control . -
Select the content control, and then select Properties.
-
To create a list of choices, select Add under Drop-Down List Properties.
-
Type a choice in Display Name, such as Yes, No, or Maybe.
Repeat this step until all of the choices are in the drop-down list.
-
Fill in any other properties that you want.
Note: If you select the Contents cannot be edited check box, users won’t be able to click a choice.
 or Drop-Down List Content Control
  .
.-
Click or tap where you want to insert the date picker control.
-
Select Developer > Date Picker Content Control
.
 .
.To set specific properties on the control, see Set or change properties for content controls.
-
Click or tap where you want to insert the check box control.
-
Select Developer > Check Box Content Control
.
 .
.To set specific properties on the control, see Set or change properties for content controls.
Legacy form controls are for compatibility with older versions of Word and consist of legacy form and Active X controls.
-
Click or tap where you want to insert a legacy control.
-
Go to Developer > Legacy Forms
drop-down. -
Select the Legacy Form control or Active X Control that you want to include.
 drop-down.
Set or change properties for content controls
Each content control has properties that you can set or change. For example, the Date Picker control offers options for the format you want to use to display the date.
-
Select the content control that you want to change.
-
Go to Developer > Properties.
-
Change the properties that you want.

Add protection to a form
If you want to limit how much others can edit or format a form, use the Restrict Editing command:
-
Open the form that you want to lock or protect.
-
Select Developer > Restrict Editing.
-
After selecting restrictions, select Yes, Start Enforcing Protection.


Advanced Tip:
If you want to protect only parts of the document, separate the document into sections and only protect the sections you want.
To do this, choose Select Sections in the Restrict Editing panel. For more info on sections, see Insert a section break.

Show the Developer tab
If the developer tab isn’t displayed in the ribbon, see Show the Developer tab.
Open a template or use a blank document
To create a form in Word that others can fill out, start with a template or document and add content controls. Content controls include things like check boxes, text boxes, and drop-down lists. If you’re familiar with databases, these content controls can even be linked to data.
-
Go to File > New from Template.
-
In Search, type form.
-
Double-click the template you want to use.
-
Select File > Save As, and pick a location to save the form.
-
In Save As, type a file name and then select Save.

-
Go to File > New Document.
-
Go to File > Save As.
-
In Save As, type a file name and then select Save.

Add content to the form
Go to Developer, and then choose the controls that you want to add to the document or form. To remove a content control, select the control and press Delete. You can set Options on controls once inserted. From Options, you can add entry and exit macros to run when users interact with the controls, as well as list items for combo boxes, .
-
In the document, click or tap where you want to add a content control.
-
On Developer, select Text Box, Check Box, or Combo Box.
-
To set specific properties for the control, select Options, and set .
-
Repeat steps 1 through 3 for each control that you want to add.

Options let you set common settings, as well as control specific settings. Select a control and then select Options to set up or make changes.
-
Set common properties.
-
Select Macro to Run on lets you choose a recorded or custom macro to run on Entry or Exit from the field.
-
Bookmark Set a unique name or bookmark for each control.
-
Calculate on exit This forces Word to run or refresh any calculations, such as total price when the user exits the field.
-
Add Help Text Give hints or instructions for each field.
-
OK Saves settings and exits the panel.
-
Cancel Forgets changes and exits the panel.
-
-
Set specific properties for a Text box
-
Type Select form Regular text, Number, Date, Current Date, Current Time, or Calculation.
-
Default text sets optional instructional text that’s displayed in the text box before the user types in the field. Set Text box enabled to allow the user to enter text into the field.
-
Maximum length sets the length of text that a user can enter. The default is Unlimited.
-
Text format can set whether text automatically formats to Uppercase, Lowercase, First capital, or Title case.
-
Text box enabled Lets the user enter text into a field. If there is default text, user text replaces it.
-
-
Set specific properties for a Check box.
-
Default Value Choose between Not checked or checked as default.
-
Checkbox size Set a size Exactly or Auto to change size as needed.
-
Check box enabled Lets the user check or clear the text box.
-
-
Set specific properties for a Combo box
-
Drop-down item Type in strings for the list box items. Press + or Enter to add an item to the list.
-
Items in drop-down list Shows your current list. Select an item and use the up or down arrows to change the order, Press — to remove a selected item.
-
Drop-down enabled Lets the user open the combo box and make selections.
-
-
Go to Developer > Protect Form.
Note: To unprotect the form and continue editing, select Protect Form again.
-
Save and close the form.

If you want, you can test the form before you distribute it.
-
Protect the form.
-
Reopen the form, fill it out as the user would, and then save a copy.
Show the Developer tab
-
On the right side of the ribbon, select
, and then select Ribbon Preferences. -
Under Customize, select Developer .
 , and then select Ribbon Preferences.
Open a template or a document on which to base the form
You can start with a blank document and create your own form. Or, to save time, you can start with a form template.
-
Go to File > New from Template.
-
In the left pane, expand Online Templates, and then select Forms.
-
Double-click the form template that you want to use.
Add content controls to the form
-
In the document, click where you want to add the control.
-
On the Developer tab, under Form Controls, select Text Box, Check Box, or Combo Box.
-
To set specific properties for the control, select Options, and then configure the properties that you want.
Note: To create a list of drop-down items in a combo box, select the combo box placeholder, click Options, and then add the items that you want to appear in the drop-down list.
-
Repeat steps 1 through 3 for each control that you want to add.
Add instructional text (optional)
Instructional text (for example, «Type First Name») in a text box can make your form easier to use. By default, no text appears in a text box, but you can add it.
-
Select the text box control that you want to add instructional text to.
-
On the Developer tab, under Form Controls, select Options.
-
In Default Text, type the instructional text.
-
Make sure that Fill-in enabled is selected, and then select OK.
Protect the form
-
On the Developer tab, under Form Controls, select Protect Form.
Note: To unprotect the form and continue editing, click Protect Form again.
-
Save and close the form.
Test the form (optional)
If you want, you can test the form before you distribute it.
-
Protect the form.
-
Reopen the form, fill it out as the user would, and then save a copy.
Creating fillable forms isn’t available in Word for the web.
You can create the form with the desktop version of Word with the instructions in Create a fillable form.
When you save the document and reopen it in Word for the web, you’ll see the changes you made.
Need more help?
Do you know how frustrating it is when a waiter fails to write down your order and ends up serving you the wrong food? Businesses continually work to improve the way they streamline operations while also reducing the workload of their staff. One of the most common sales instruments that we’re all familiar with is the order form. It’s a document that enables customers to input their product or service orders that is clear enough for company employees to process without errors. But an order form can vary in terms of the nature of one’s business as well as the primary purpose it’s made to serve. While it’s easy to assume that these documents are a breeze to make, many businesses still struggle to create an order form that works for them.
53+ Sample Order Form Templates [work order / change order + MORE]
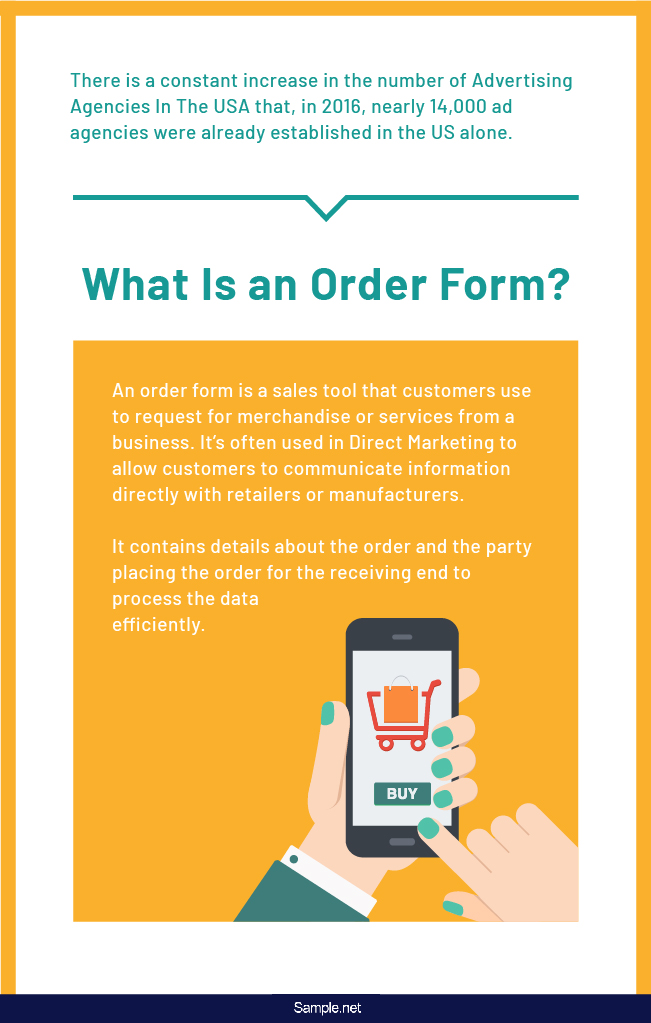
What Is an Order Form?
An order form is a sales tool that customers use to request for merchandise or services from a business. It’s often used in direct marketing to allow customers to communicate information directly with retailers or manufacturers. It contains details about the order and the party placing the order for the receiving end to process the data efficiently. By summarizing the needs of a customer accordingly in a single document, orders may be processed more smoothly for a successful transaction.
Although printable order forms have been around for decades, many businesses have begun to adapt to the modernized method of data collection through online order forms. Many of us are guilty of placing our orders in, as we scroll tirelessly through different shopping apps. A study by Statista even found that 46% of global online shopping orders were made by smartphone users as of early 2019, in which shoppers with Android devices had online orders that valued at approximately 67.96 U.S. dollars.
In cases where order forms are a key part of the business process, customers fill in the form, receive an invoice, and wait for their orders to arrive.
The Importance of Order Forms
One of the easiest ways to collect data for your business is through a form. You’ll find all kinds of business forms used for different intentions, but with a common aim of acquiring important information from users. In a sales cycle, a form lets you persuade prospects to make a purchase, monitor your sales funnel, evaluate your conversion rates, and store individual records of customers. These documents can come as an advantage to both the company and its consumers as it allows the business to list out its offers in detail for a customer’s convenience. Users can fill out these forms before initiating payment as they go through the crucial stages of the sales cycle.
Many small businesses and global corporations utilize custom-made order forms that are easy for users to fill. Once a customer submits the form, the data reflected in the document will then be forwarded to the designated departments for processing. Employees may quickly scan each column to find the data required to process the order before filing an invoice. It saves a lot of time for staff members to accommodate more requests as they continue with their daily operations.
As for securing business deals with other entities, many government agencies use order forms when venturing with private firms to not only validate the relationship but to also produce a record of the product or service availed. Having an order form for different company-related tasks is sure to expand and improve your scope, allowing the business to grow.
How to Make an Order Form
Securing a professional order form is a vital part of completing a purchase. But because these forms play a significant role in the sales process, knowing how to create one for the benefit of your staff and customers is not something to ignore. Collecting buyer information is easy if your form can do the job without issues. To help you out, found below is a step-by-step guide on how you can create an order form for your business.
Step 1: Download a Template
There are several reasons why using a form template could be your best option. For one, it saves time and effort. The structure of your order form becomes the least of your worries, as these are pre-formatted documents designed to meet a general function. All you need to do is to look for a template that closely fits your preferences and download a file in your format of choice.
Step 2: Determine the Essentials
In this step, you’ll spend most of your time customizing the template to suit your business needs. Apart from your company logo and contact information, the order form must also consist of specific indicators for easy tracking. Some of these elements include a purchase order number, order date, retailer name, and shipping date. Shipping and billing details must also be apparent in the form. As for product selection, you can stick with the basics, such as product information and price.
It is possible for your order form to be slightly different from the information provided. So as long as you know how your business runs, you should be able to identify the correct fields for your order form.
Step 3: Organize Data Fields
No one wants to fill out a form with a messy layout. Not only is it an eyesore to look at, but it’s bound to confuse those who attempt to fill it out. After determining the must-haves of your form, be sure to arrange these items correctly in the body of your document. Numbering your questions and dividing them into categories will also be a helpful approach.
Step 4: Conduct a Test Run
Order forms are crucial for businesses that rely on purchases and service inquiries to stay afloat in a competitive industry. So to finalize your order form, try conducting a test run to measure its effectiveness. See if the form fits well with your target audience by gathering a group of people for the pilot test. You can also create a separate feedback form to obtain insights on what you can do to improve the order form. Once you have applied the necessary changes, you can then finalize your form for printing or posting.
The Dos and Don’ts of Order Forms
You’d be surprised by how often people make mistakes when it comes to creating order forms for their business needs. There are several things that you should do and those that you should avoid doing to get the data you need from customers. With all that said, you might want to consider the following guidelines when creating an order form.
Dos
1. Do talk in the first person.
You want to make it seem as if you’re speaking to the customer directly. It’s almost like the digital version of a handshake to help close the deal, making the transaction seem more credible as customers begin to feel comfortable about pursuing it. It’s a technique that those in the field of customer relations would be familiar with when it comes to delivering a sales pitch. It helps you empathize with the needs of a consumer to help them find a solution to their problems.
2. Do restate the purpose of the form.
The most obvious reason for creating the form is to gather relevant data from a prospect to finalize a sale. It’s best to turn your focus to the benefits that those from the other end of the deal are set to acquire. Think about the objectives that your products or services offer their receivers. For instance, if a client fills a work order form to have movers transport his or her belongings from one location to another, then the objective of the service is to provide a fast and easy moving experience to a targeted market. Making this benefit known in the first part of your order form should encourage prospects to continue answering.
3. Do clarify the terms of the order.
Every business agreement comes with a set of terms and conditions that both parties must be aware of upon entering the first part of the sales deal. If there are things that a prospect should know about before submitting the order form, be sure to point it out in the document. In a work order form, for example, some businesses do allow customers to make special requests for an additional cost. Customers must be aware of these fees through the terms included in the order form. Hidden charges don’t resonate well with consumers, and they’re bound to jeopardize future deals with prospective clients.
4. Do organize related information in the same group.
One way to increase response rates is to improve the layout of your order form. Cluttered forms tend to discourage customers from going any further in the process, given the amount of time and effort it takes to complete. Forms like this tend to scare away customers who are looking for a more efficient alternative to purchasing goods. But by grouping similar fields together, users can make better sense of the information they need to fill in thanks to the boost in readability. It also helps establish a logical flow of information for users to finish the form with ease. Make sure that these sections consist of a parent label to make identification much easier to do.
5. Do mention important information.
Some things are worth emphasizing in your order form. It could cover anything from tax concerns to subscription details that customers may want you to address before they send in their orders. You’ll ease the minds of your customers by providing some reassurance, so make sure to have this clarified in your form to avoid the trouble.
Don’ts
1. Don’t name it an order form.
It’s easy for people to associate “order” with “money.” Whenever the idea of finalizing a sales deal comes to mind, prospects start to think twice about whether it’s something worth getting into. You don’t want people to start feeling hesitant about their decision as they stumble upon the first few parts of your order form. Instead, you can scratch off the concept of spending money by calling it a response form, a subscription form, or anything similar.
2. Don’t create ridiculously long field labels.
Try not to confuse prospects with wordy field names. It’s always a good idea to keep it simple and direct for better comprehension. Otherwise, users are likely to misinterpret specific fields, which will lead them to input the wrong data.
Take the time to review each of your field labels to ensure that they’re as clear and concise as possible. If you think it needs some modifications, you can try rewording your questions while still maintaining the essence of the point you want to convey. These changes may help improve the readability of your form for a higher response rate.
3. Don’t put everything together on one page.
How many times have you tried to order something online, only to receive a form that’s longer than your mother’s monthly grocery list?
Thanks, but no thanks.
Nothing drives customers away more than something that could seemingly consume a significant amount of their time. Using a small font size while putting everything on a one-page form—when you could have utilized the back for more space—is both lazy and unnecessary. You don’t want to turn the ordering process into a dreadful task for your customers to finish.
4. Don’t include unnecessary data fields.
The cardinal rule of forms is only to ask what you need. Naturally, you want to stick with the basics, such as one’s name, email address, and phone number. Always consider the relevance of what you’re asking to the objectives of your form. The more questions you ask, the more you risk affecting the form’s conversion rate. Adding one too many items will only lengthen your order form and discourage users from completing it. It’s essential to think long and hard about what you must include in the form to avoid a lengthy document.
5. Don’t make all fields mandatory.
You don’t want a customer to waste too much time filling out every field in the order form, even for areas that don’t concern them. Unless you’re using an online platform to create your order form, it’s essential to indicate which field items are mandatory to answer from those that are not. This technique allows users to skip parts of the order forms that do not apply to them. Keep in mind that it is possible to use the same order form for multiple purposes or to deal with clients with unique characteristics and preferences. In such cases, specific data fields may not apply to all.
Collecting data from your customers can be critical for operating a successful business. Fortunately, order forms allow you to record and manage product or service requests from buyers to help hasten operations. From job order forms to purchase order forms, there are a ton of order forms to suit your every business need. Feel free to browse through our collection of order form samples and templates to get started!