
Create a new workbook
A workbook is a file that contains one or more worksheets to help you organize data. You can create a new workbook from a blank workbook or a template.

Create a workbook
-
Open Excel.
-
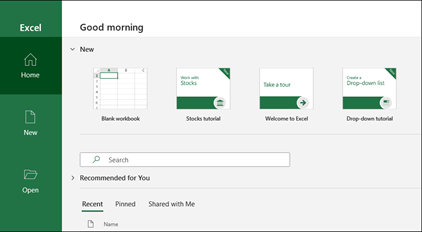
Select Blank workbook or press Ctrl+N.
-
Start typing.
Create a workbook from a template
-
Select File > New.
-
Double-click a template.
-
Click and start typing.
Open a new, blank workbook
-
Click the File tab.
-
Click New.
-
Under Available Templates, double-click Blank Workbook.
Keyboard shortcut To quickly create a new, blank workbook, you can also press CTRL+N.
Tips:
-
By default, a new workbook contains three worksheets, but you can change the number of worksheets that you want a new workbook to contain.
For more information, see Change the number of worksheets in a new workbook.
-
You can also add and remove worksheets as needed.
For more information about how to add or remove worksheets, see Insert or delete a worksheet.
Base a new workbook on an existing workbook
-
Click the File tab.
-
Click New.
-
Under Templates, click New from existing.
-
In the New from Existing Workbook dialog box, browse to the drive, folder, or Internet location that contains the workbook that you want to open.
-
Click the workbook, and then click Create New.
Base a new workbook on a template
-
Click the File tab.
-
Click New.
-
Do one of the following:
-
To use one of the sample templates that come with Excel, under Available Templates, click Sample Templates and then double-click the template that you want.
-
To use a recently used template, click Recent Templates, and then double-click the template that you want.
-
To use your own template, on the My Templates, and then on the Personal Templates tab in the New dialog box, double-click the template that you want.
Note: The Personal Templates tab lists the templates that you have created. If you do not see the template that you want to use, make sure that it is located in the correct folder. Custom templates are typically stored in the Templates folder, which is usually C:Usersuser_nameAppDataLocalMicrosoftTemplates in Windows Vista, and C:Documents and Settingsuser_nameApplication DataMicrosoftTemplates in Microsoft Windows XP.
-
Tip: To obtain more workbook templates, you can download them from Microsoft Office.com. In Available Templates, under Office.com Templates, click a specific template category, and then double-click the template that you want to download.
Need more help?
You can always ask an expert in the Excel Tech Community or get support in the Answers community.
See Also
Insert or delete a worksheet
Need more help?
Create a workbook in Excel
Excel makes it easy to crunch numbers. With Excel, you can streamline data entry with AutoFill. Then, get chart recommendations based on your data, and create them with one click. Or easily spot trends and patterns with data bars, color coding, and icons.
Create a workbook
-
Open Excel.
-
Select Blank workbook.
Or press Ctrl+N.
Enter data
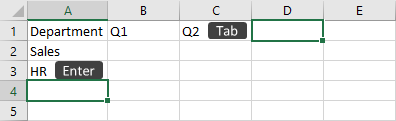
To manually enter data:
-
Select an empty cell, such as A1, and then type text or a number.
-
Press Enter or Tab to move to the next cell.
To fill data in a series:
-
Enter the beginning of the series in two cells: such as Jan and Feb; or 2014 and 2015.
-
Select the two cells containing the series, and then drag the fill handle
 across or down the cells.
 across or down the cells.

Next:
Save your workbook to OneDrive
Need more help?
What is an Excel Workbook and How to Create One (2023)
Everything in Excel starts with creating a new workbook. It’s the very first thing we do before we input, organize, or calculate data in an Excel worksheet.
You’ve probably created hundreds (if not thousands) of Excel workbooks. It’s so basic that you might think that there’s nothing left to learn about it 🤔
But there’s always something new to learn.
This article will cover what you already know and what you need to know about creating Excel workbooks. You’ll learn how to create a new blank workbook, create a new workbook from a template, and make an existing workbook as your template.
Let’s get started 😀
What is a workbook in Excel?
A workbook is an Excel file that contains one or more worksheets where you can enter and store data. Each worksheet in a workbook is composed of a large number of cells that can hold data you can organize accordingly.
Microsoft Excel allows you to create a new workbook from a blank workbook or a template.
Create a workbook in Excel
Let’s create a new blank workbook. You’ve probably done this multiple times already but let’s do a quick recall 😊
- Open Microsoft Excel.

An Excel window opens and asks you what you want to do.
- Double-click Blank Workbook.


You now have a new workbook 👍
You can click any of the cells in this worksheet to input data into cells. You can even add another worksheet by clicking the plus (+) button in the worksheet tab.

Create a new workbook while still in an open workbook
If you already have a workbook open and you want to create a new blank workbook, you can do this 👇
- Click the File tab from the left side of the Ribbon.

- Select New from the left sidebar.
- Double-click Blank Workbook.

Pro Tip!
When you already have an Excel workbook open and you want to create a new one, you can also use this Keyboard shortcut for New File. Press Ctrl + N on your keyboard.
This keyboard shortcut is also used for other programs, so it’s good to know one 😊
Create a new workbook from a template
Instead of starting with a blank workbook, you can use an Excel template to quickly create a new workbook for a particular project like planners, lists, charts, and more.
Excel has predesigned templates you can choose from. These templates are ready to use with formatting and formulas tailored to your needs.
Excel templates are already done for you which means saving a lot of time while being visually consistent and attractive 😀
To create a new workbook from a template, you can do the steps below.
- Go to the File tab.

- Select New.
- Choose your template from the suggested Workbook templates below.

There are a lot of options to choose from. There are workbook templates for Business, Personal, Planners and Trackers, and more!
You can browse or search for more available templates.
For example, you want to create a new workbook to budget your finances 💸
You can create your own but you can also choose to use this Personal monthly budget Excel template.

This is what the Personal monthly budget template looks like.

All you have to do is to enter your data since the template already has the layout, format, and formulas done for you. You can also do custom formatting to this template like changing the font or colors 😊
How to open an existing Excel workbook
If you already have an existing workbook and you want to open it, you can do the steps below.
- Go to the File tab.

- Click Open.

- Choose the Excel workbook.

You will see recent Excel files. Select which file you want to open.
You can also search from other locations like from your OneDrive, from your PC to find your Excel files 🔍
Use an Existing workbook as a template
If you don’t like the available templates in Excel, you can always create your workbook. You can then save this file as a template that you can reuse for a new one 🎨
Here’s how to do just that.
- Go to File.

- Click Open.

- Right-click on the existing workbook file, then select Open a copy.

This way, you won’t lose the existing workbook and you can use its custom formatting and formulas as a template for your next Excel project 👍
Difference between workbook and worksheet
When working in Microsoft Excel, you may come across the terms workbook and worksheet. It’s important to know these terms are related but not identical.
A workbook is a file that contains multiple worksheets. It contains one or more worksheets that consist of related information to each other.
A worksheet is a single page of a workbook that consists of billions of cells. These cells are organized into rows and columns where you can enter, store, and organize data.
That’s it – Now what?
As said, everything in Excel starts with creating a new workbook. You probably know some of the methods above already. Still, nice work on learning new things 👍
The next time you’re starting an Excel project, think about how you can most efficiently start one. You can make use of the available templates in Excel too.
Excel has so much to offer to make your work more efficient. But when you’re new to Excel, it’s important to learn Excel in the right order. So let’s start with the basics!
Join my free online email course and you get to learn the basics of Excel like what is a formula and how to write one. You will also learn about Excel’s most basic functions like the SUM, the AVERAGE, and the COUNT functions 😀
Get started with Excel here!
Frequently asked questions
The XLSX and XLS file extensions are used for Microsoft Excel spreadsheets, part of the Microsoft Office Suite of software.
The XLS is the file format of earlier versions (97-2003) of Microsoft Excel, while the XLSX is the Microsoft Office Excel file format.
Microsoft Excel is a spreadsheet program that enables users to enter, organize and calculate data. When you open Excel, you are opening a workbook.
Kasper Langmann2023-01-11T21:48:31+00:00
Page load link
Home / VBA / VBA Create New Workbook (Excel File)
To create a new workbook using VBA, you need to use the “Workbooks.Add” method. When you use this method, it inserts a new workbook (without saving it) and activates it after that. It works like when you press the keyboard shortcut CONTROL + N. You can also use a template to insert a new workbook.
Make sure to add the developer tab to the ribbon to enter this code into the VBE.
- Type the keyword “Workbooks” to refer to the workbook object.
- After that, type a dot.
- Here you’ll have a list of properties and methods to select.
- Select “Add” from that list or type it.
Sub vba_new_workbook()
Workbooks.Add
End Sub
Add a New Workbook using a Template
As I said, we are using the Workbooks.Add method. With this method, there’s an argument (optional) that you can use to refer to a file as a template.
Workbook.Add Template (Optional)Let’s say you have a workbook and want to have the new workbook exactly the same as it, you can refer to it as a template.
Workbooks.Add Template:="C:UsersDellDesktopbook1.xlsx"When you run the above code, it takes the reference from the “book1” which is saved on the desktop. The template workbook has 6 worksheets and the new workbook has exactly the same number of worksheets.

Apart from this, you can use the default arguments to decide what type of sheet you want to have in the new workbook.
- xlWBATChart: Chart Sheet
- xlWBATExcel4IntlMacroSheet: Macro Sheet Version 4
- xlWBATExcel4MacroSheet: Macro Sheet (International) Version 4
- xlWBATWorksheet: Worksheet
Create a New Excel Workbook and Save it
When you create a new workbook, Excel opens it but will not save it with the Add method. So for this, you need to use the SaveAs method.

Sub vba_create_workbook()
Workbooks.Add
ActiveWorkbook.SaveAs "C:usersdelldesktopmyBook.xlsx"
End Sub- First, use the workbook.add to create a new workbook.
- Next, refer to the active workbook and use the SaveAs method.
- In the SaveAs method, use the path where you want to save the workbook along with the name of the file.
- In the end, run the code.
More on VBA Workbooks
VBA Save Workbook | VBA Close Workbook | VBA Delete Workbook | VBA ThisWorkbook | VBA Rename Workbook | VBA Activate Workbook | VBA Combine Workbook | VBA Protect Workbook (Unprotect) | VBA Check IF a Workbook is Open | VBA Open Workbook | VBA Check IF an Excel Workbook Exists in a Folder
- VBA Workbook
How to create and open a new Excel workbook? What is the Excel spreadsheet? Excel is a software from the Microsoft Office suite. An Excel file is also called an Excel workbook. Like a traditional physical workbook, it consists of sheets but also tables and cells.
First of all, the Excel sheets are actually tabs. Tables and lists can be created. These tables and lists consist of cells. Tables allow you to calculate statistics, to search in other tables or other Excel files. And also to analyse data with pivot tables. Note that the Excel software is a very important tool for business activities.
How to create and open a new workbook file in Excel?
Indeed, a Microsoft Excel cell is the basic element of Excel, and contains a hard value or a formula. The Excel hierarchy can be formalised as follows, from largest to smallest. Or from container to content:
- First, the Excel file (or workbook)
- Excel sheet
- Excel table
- Last is the Excel cell, that contains formulas
The first solution to create and open an Excel or XLSX workbook is from the Windows Explorer
- To do this, open Windows Explorer, with the shortcut Windows + E for example.
- Then select the destination folder, here it is C:work
- Right-click.
- Choose New
- Then select Microsoft Excel Worksheet
- Then press Enter, by default the Excel file is called “New Microsoft Excel Worksheet.xlsx“.
- Finally, double-click on the file to open it in Excel.
Here are the steps to follow in image to create the Excel file from the Windows explorer:

The second solution to create an Excel file is use directly the workbook menu
Indeed, for this second simple and classic method, here is the procedure to follow :
- Open Excel from the Windows menu, under the letter E
- Click on File at the top left.
- Then choose New
- And finally select the Blank Workbook option
Finally, to go further and learn more Excel tips and tricks, here are the shortcuts for selecting cells in Excel.
- File
Related Articles
Open an Existing Workbook | Close a Workbook | Create a New Workbook | Turn off the Start screen
A workbook is another word for your Excel file. When you start Excel, click Blank workbook to create an Excel workbook from scratch.
Open an Existing Workbook
To open a workbook you’ve created in the past, execute the following steps.
1. On the File tab, click Open.
2. Recent shows you a list of your recently used workbooks. You can quickly open a workbook from here.

3. Click Browse to open a workbook that is not on the list.
Close a Workbook
To close a workbook (and Excel), click the upper right X. If you have multiple workbooks open, clicking the upper right X closes the active workbook.
![]()
Create a New Workbook
Sometimes you want to start all over again. To create a new workbook, execute the following steps.
1. On the File tab, click New.
2. Click Blank workbook.

Turn off the Start screen
When you start Excel, it shows a start screen that lists recently used Excel files and templates. To skip the start screen and always start with a blank workbook, execute the following steps.
1. On the File tab, click Options.
2. Under Start up options, uncheck ‘Show the Start screen when this application starts’.

3. Click OK.
Return to VBA Code Examples
In this Article
- Create New Workbook
- Create New Workbook & Assign to Object
- Create New Workbook & Save
- Create New Workbook & Add Sheets
This tutorial will demonstrate different methods to create a new workbook using VBA.
Create New Workbook
To create a new workbook simply use Workbooks.Add:
Workbooks.AddThe newly added Workbook is now the ActiveWorkbook.
You can see this using this code:
Sub AddWB()

Workbooks.Add
MsgBox ActiveWorkbook.Name

End Sub
Create New Workbook & Assign to Object
You can use the ActiveWorkbook object to refer to the new Workbook. Using this, you can assign the new Workbook to an Object Variable:
Dim wb as Workbook

Workbooks.Add
Set wb = ActiveWorkbook
But, it’s better / easier to assign the Workbook immediately to a variable when the Workbook is created:
Dim wb As Workbook

Set wb = Workbooks.Add
Now you can reference the new Workbook by it’s variable name.
MsgBox wb.NameCreate New Workbook & Save
You can also create a new Workbook and immediately save it:
Workbooks.Add.SaveAs Filename:="NewWB"This will save the Workbook as an .xlsx file to your default folder (ex. My Documents). Instead, you can customize the SaveAs with our guide to saving Workbooks.
Now you can refer to the Workbook by it’s name:
Workbooks("NewWB.xlsx").ActivateThis code will Activate “NewWB.xlsx”.
Create New Workbook & Add Sheets
After creating a Workbook you can edit it. Here is just one example to add two sheets to the new Workbook (assuming it’s the ActiveWorkbook):
ActiveWorkbook.Worksheets.Add Count:=2VBA Coding Made Easy
Stop searching for VBA code online. Learn more about AutoMacro — A VBA Code Builder that allows beginners to code procedures from scratch with minimal coding knowledge and with many time-saving features for all users!

Learn More!
 One of the most basic and common operations in Excel is creating a new workbook. You’ve probably created a countless number of new workbooks yourself.
If you’re automating some of your Excel work by using Visual Basic for Applications, the ability to create new workbooks can be of immense help. You may want, for example, do any of the following:
- Create a new workbook based on a particular template.
- Create a workbook with a certain amount and type of sheets.
- Create a new workbook and save it under a particular name.
- Copy or move one or several worksheets to a new workbook.
- Copy a range of cells to a new workbook.
If that’s the case, then this Excel VBA Tutorial should help you. In this blog post, I focus on how you can easily create new Excel workbooks with VBA.
In the first section of this Tutorial, I introduce some of the most relevant VBA constructs (with a focus on the Workbooks.Add method) that can help you to quickly craft a macro that creates a new workbook. In the second section, I provide a step-by-step explanation of 16 practical macro code examples that you can easily adjust and start using today.
Use the following Table of Contents to navigate to the section that interests you the most.
This Excel VBA Create New Workbook Tutorial is accompanied by an Excel workbook containing the data and macros I use in the examples below. You can get immediate free access to this example workbook by subscribing to the Power Spreadsheets Newsletter.
Let’s start by taking a look the VBA constructs that you’ll be using most of the time for purposes of creating new workbooks, the…
Workbooks.Add Method
You use the Workbooks.Add method to create a new Excel workbook.
The newly created workbook becomes the new active workbook. Therefore, the value that Workbooks.Add returns is a Workbook object representing that newly created workbook.
The syntax of Workbooks.Add is as follows:
expression.Add(Template)
For these purposes, the following definitions are applicable:
- expression: The Workbooks collection.
- Template: Optional parameter. It allows you to specify how Excel creates the new workbook.
As a consequence of the above, I simplify the syntax above as follows:
Workbooks.Add(Template)
Let’s take a closer look at the…
Template Parameter Of Workbooks.Add
Template is the only (optional) argument of Workbooks.Add.
You can use this parameter for purposes of specifying certain characteristics of the newly created workbook. More precisely, Template allows you to determine which of the following option Excel applies when creating the workbook:
- Create a new workbook with the default number of blank sheets. This is the default value of Template. Therefore, Excel does this whenever you omit the parameter.
- Create a new workbook with a single sheet of a certain type. As I explain below, you can choose this option by using the xlWBATemplate constants.
- Use a particular file as a template. You determine the template Excel uses by specifying the name of the relevant file.
If you want to create a new workbook based on an Excel template, you can use the Workbooks.Open method and set the Editable parameter to False. I introduce the Workbooks.Open method further below.
As a consequence of the above, whenever you’re using the Workbooks.Add VBA method, you have the following choices regarding how the new workbook is created:
- Omit the Template Parameter: The newly created workbook contains the default number of blank sheets. This number of sheets:
- Is determined by the Application.SheetsInNewWorkbook property. I provide further information about this property further below.
- Appears (and you can modify it from) within the General tab of the Excel Options dialog.
- Specify an existing Excel file as a string: The file you specify is used as a template for the new workbook.
When specifying the template that Excel uses, include the full path of the file.
- Specify an xlWBATemplate constant: The workbook is created with a single sheet of the type you specify. The following are the 4 constants of the xlWBATemplate enumeration:
- xlWBATWorksheet (-4167): Worksheet.
- xlWBATChart (-4109): Chart sheet.
- xlWBATExcel4MacroSheet (3): Version 4 international macro.
- xlWBATExcel4IntlMacroSheet (4): Version 4 macro.
Other Useful VBA Constructs To Create A New Workbook
Workbooks.Open Method
The Workbooks.Open method is the VBA construct you generally use to open workbooks while working with Visual Basic for Applications.
I provide a thorough explanation of Workbooks.Open and its parameters (including Editable) in this VBA tutorial about opening a workbook. Please check out that blog post if you’re interested in learning more about this particular method.
For purposes of this tutorial, it’s enough for you to know how to use the Open method to create a new workbook based on an Excel template.
Therefore, even though Workbooks.Open has 15 different parameters, I only use 2 of them here:
- FileName.
- Editable.
Considering the above, the following is a very basic syntax of the Workbooks.Open method geared to create a new workbook based on a template:
expression.Open FileName:=yourTemplateName, Editable:=False
For these purposes, the following definitions apply:
- expression: Workbooks object.
- FileName:=yourTemplateName: Filename parameter. “yourTemplateName” is the filename of the Excel template you want to use.
- Editable:=False: Editable parameter set to False. When Editable is False, Excel creates a new workbook based on the template you specify with the FileName parameter.
Considering the above, I further simplify the syntax of Workbooks.Open as follows:
Workbooks.Open FileName:=yourTemplateName, Editable:=False
I don’t cover the other 13 parameters of Workbooks.Open in this blog post. However, you may find some of them useful when creating a new workbook based on a template. If you’re interested in reading more about these parameters, please refer to my tutorial about the topic (to which I link to above).
Application.SheetsInNewWorkbook Property
Application.SheetsInNewWorkbook is the VBA property that determines how many sheets newly created workbooks have. It’s the equivalent of the Include this many sheets setting within the General tab of the Excel Options dialog.

The SheetsInNewWorkbook property is read/write. Therefore, you can use it to specify the number of sheets that is inserted in a workbook you create with the Workbooks.Add method. I provide a practical macro code example (sample #5) further below.
The basic syntax of Applications.SheetsInNewWorkbook is as follows:
expression.SheetsInNewWorkbook
“expression” represents the Excel Application object. Therefore, it’s generally possible to simplify the syntax as follows:
Application.SheetsInNewWorkbook
Sheets.Add, Worksheets.Add, Charts.Add, DialogSheets.Add, Excel4MacroSheets.Add And Excel4IntlMacroSheets.Add Methods
The Application.SheetsInNewWorkbook property allows you to modify the number of sheets that Excel inserts in a newly created workbook. However, consider the following:
- SheetsInNewWorkbook is a property of the Excel Application object. Therefore, any setting modifications you make with VBA apply in general to other newly created workbooks.
- The functionality provided by SheetsInNewWorkbook is relatively limited. In fact, you can only specify the number of sheets that the newly created workbook has.
You can usually handle item #1 above by ensuring that your VBA Sub procedures return SheetsInNewWorkbook to the same setting that applied prior to the macro being executed. Macro example #5 below shows an example of how you can do this.
However, there’s a VBA method that you can use as an alternative to Application.SheetsInNewWorkbook:
Add.
More precisely, the following versions of the Add method:
- Sheets.Add.
- Worksheets.Add.
- Charts.Add.
- DialogSheets.Add.
- Excel4MacroSheets.Add.
- Excel4IntlMacroSheets methods.
I explain these methods in the following sections. Let’s start with the…
Sheets.Add Method
The Sheets.Add method allows you to create any of the following sheets:
- Worksheet.
- Chart sheet.
- Dialog sheet.
- Macro sheet.
After the sheet is created, Sheets.Add activates the new sheet.
The basic syntax of the Sheets.Add method is as follows:
expression.Add(Before, After, Count, Type)
The following are the applicable definitions:
- expression: Sheets object.
- Before: Optional argument. The (existing) sheet before which you want to add the newly created sheet.
- After: Optional parameter. The (existing) sheet after which you want the new sheet to be inserted.
- Count: Optional parameter. Allows you to specify the number of sheets that VBA adds.
The default value of Count (applies if you omit the argument) is 1.
- Type: Optional parameter. You use Type to specify the type of sheet that Excel adds. You can either (i) specify the path and name of the template you want to use, or (ii) use the following values from within the xlSheetType enumeration:
- xlWorksheet (-4167): Worksheet.
xlWorksheet is the default value. Therefore, this is the type of sheet that Excel adds if you omit the Type parameter.
- xlDialogSheet (-4116): Dialog sheet.
- xlChart (-4109): Chart sheet.
- xlExcel4MacroSheet (3): Excel version 4 macro sheet.
- xlExcel4IntlMacroSheet (4): Excel version 4 international macro sheet.
- xlWorksheet (-4167): Worksheet.
The default location of the newly created sheet is before the active sheet. Therefore, this applies if you omit both the Before and After parameters above.
Considering the comments above, I simplify the syntax of the Add method as follows:
Sheets.Add(Before, After, Count, Type)
Worksheets.Add, Charts.Add, DialogSheets.Add, Excel4MacroSheets.Add And Excel4IntlMacroSheets.Add Methods
The following methods are, to a certain extent, substantially similar to the Sheets.Add method above.
- Worksheets.Add.
- Charts.Add.
- DialogSheets.Add.
- Excel4MacroSheets.Add.
- Excel4IntlMacroSheets.Add.
The main difference between all of these methods, is the collection they work with. More precisely:
- Sheets.Add works with the Sheets object. This is the collection of all sheets within the relevant workbook.
- Worksheets.Add works with the Worksheets object. That is, the collection of all worksheets within the appropriate workbook.
- Charts.Add makes reference to the Charts collection. This is the collection of all chart sheets.
- DialogSheets.Add works with the collection of dialog sheets.
- Excel4MacroSheets.Add makes reference to the collection of Excel 4.0 macro sheets in the workbook.
- Excel4IntlMacroSheets.Add works with the collection of Excel 4.0 international macro sheets.
The basic syntax of all the methods is substantially the same as the one I describe above for Sheets.Add. In other words, as follows:
- Worksheets.Add:
Worksheets.Add(Before, After, Count, Type)
- Charts.Add:
Charts.Add(Before, After, Count, Type)
- DialogSheets.Add:
DialogSheets.Add(Before, After, Count, Type)
- Excel4MacroSheets.Add:
Excel4MacroSheets.Add(Before, After, Count, Type)
- Excel4IntlMacroSheets.Add:
Excel4IntlMacroSheets.Add(Before, After, Count, Type)
From a broad perspective, most of the parameters of the Add method act in a similar manner regardless of the object you refer to. Therefore, the comments I make above regarding the Before, After and Count arguments of the Sheets.Add method also apply to this section.
When it comes to the Type parameter, there are some differences. Keep in mind, in particular, the following:
- Worksheets.Add: The default value of Type is xlWorksheet. The method fails if you set Type to xlChart or xlDialogSheet.
- Charts.Add: In this case, the default (and only acceptable) value is xlChart. In other words, the method fails with xlWorksheet, xlExcel4MacroSheet, xlExcel4IntlMacroSheet and xlDialogsheet.
- DialogSheets.Add: The default value is xlDialogSheet. This is also the only acceptable value. The method doesn’t work with xlWorksheet, xlChart, xlExcel4MacroSheet or xlExcel4IntlMacroSheet.
- Excel4MacroSheets.Add: Default value is xlExcel4MacroSheet. The method fails if you try to use xlChart.
- Excel4IntlMacroSheets.Add: The default value of Type is xlExcel4IntlMacroSheet. Similar to the Excel4MacroSheets.Add method, it fails with xlChart.
Workbook.SaveAs Method
From a general perspective, the Workbooks.SaveAs method allows you to save a workbook file.
As I explain in this tutorial, you can use the SaveAs method to create a new workbook with a particular filename.
I provide a very detailed explanation about Workbook.SaveAs method in my blog post about saving Excel workbooks with VBA, which you can find in the Archives. Please refer to that post in order to learn more about this method and all the possibilities it provides.
For purposes of this blog post, I use the following simplified syntax of Workbook.SaveAs:
Workbook.SaveAs Filename:=workbookName
For our purposes, “workbookName” is the name of the workbook you’re creating.
The SaveAs method has 12 different parameters. Filename is only one of them. Other useful parameters that you can use when creating a new workbook with VBA include the following:
- FileFormat: The file format of the newly created/saved workbook.
- Password: Protection password of the new workbook.
Please read my blog post about this topic (I link to the Archives above) to learn more about these other arguments.
Copy Method
Further above, I introduce the following versions of the Add method:
- Sheets.Add.
- Worksheets.Add.
- Charts.Add.
- DialogSheets.Add.
- Excel4MacroSheets.Add.
- Excel4IntlMacroSheets.Add.
Those methods are, at their basic level, substantially similar.
The same thing occurs with the Copy method. For purposes of this VBA tutorial, I focus on the Copy method applied to the following objects:
- Sheet (Sheet.Copy) or Sheets collection (Sheets.Copy).
- Worksheet (Worksheet.Copy) or Worksheets collection (Worksheets.Copy).
- Chart (Chart.Copy) or Charts collection (Charts.Copy).
- Dialog Sheet (DialogSheet.Copy) or Dialog Sheets collection (DialogSheets.Copy).
- Excel 4.0 macro sheet (Excel4MacroSheet.Copy) or Excel 4.0 macro sheets collection (Excel4MacroSheets.Copy).
- Excel 4.0 international macro sheet (Excel4IntlMacroSheet.Copy) or Excel 4.0 international macro sheets collection (Excel4IntlMacroSheets.Copy).
I cover all of these in the following sections:
Sheet.Copy And Sheets.Copy Method
The Sheet.Copy and Sheets.Copy methods allow you to copy a sheet or a collection of sheets to another location.
The basic syntax of these methods is as follows:
expression.Copy(Before, After)
The following definitions apply:
- expression: Sheet or Sheets object.
- Before: Optional parameter. The sheet before which you want to copied sheet(s) to be.
- After: Optional argument. The sheet after which you want to copy the sheet(s).
Therefore, I simplify the syntax as follows, depending on whether the macro works with the whole collection (Sheets) or not (Sheet):
Sheet.Copy(Before, After)
Sheets.Copy(Before, After)
Before and After are mutually exclusive arguments. In other words, you can only use one or the other:
- If you specify Before, don’t use After.
- If you specify After, don’t use Before.
You can omit both Before and After. The consequence of doing this is particularly interesting in the context of creating a new workbook (the topic of this post):
Whenever you use the Sheet.Copy or Sheets.Copy methods without arguments, Excel creates a new workbook with the copied sheet(s). In this case, the syntax is as follows:
Sheet.Copy
Sheets.Copy
Worksheet.Copy, Worksheets.Copy, Chart.Copy, Charts.Copy, DialogSheet.Copy, DialogSheets.Copy, Excel4MacroSheet.Copy, Excel4MacroSheets.Copy, Excel4IntlMacroSheet.Copy And Excel4IntlMacroSheets.Copy Methods
Most of the comments I provide above in connection with the Sheet.Copy and Sheets.Copy methods apply to the following methods:
- Worksheet.Copy or Worksheets.Copy.
- Chart.Copy or Charts.Copy.
- DialogSheet.Copy or DialogSheets.Copy.
- Excel4MacroSheet.Copy or Excel4MacroSheets.Copy.
- Excel4IntlMacroSheet.Copy or Excel4intlMacroSheets.Copy.
The basic (simplified) syntax of the methods I cover in this section is as follows:
- Worksheet.Copy:
Worksheet.Copy(Before, After)
- Worksheets.Copy:
Worksheets.Copy(Before, After)
- Chart.Copy:
Chart.Copy(Before, After)
- Charts.Copy:
Charts.Copy(Before, After)
- DialogSheet.Copy:
DialogSheet.Copy(Before, After)
- DialogSheets.Copy:
DialogSheets.Copy(Before, After)
- Excel4MacroSheet.Copy:
Excel4MacroSheet.Copy(Before, After)
- Excel4MacroSheets.Copy:
Excel4MacroSheets.Copy(Before, After)
- Excel4IntlMacroSheet.Copy:
Excel4IntlMacroSheet.Copy (Before, After)
- Excel4IntlMacroSheets.Copy:
Excel4IntlMacroSheets.Copy(Before, After)
Move Method
The Move method is, to a certain extent, similar to the Copy method I describe in the previous section.
When you manually copy or move a sheet, you use the Move or Copy dialog box. This dialog box allows you to specify whether you want to create a copy or not.

If you choose to create a copy, you’re using the equivalent of the Copy method. Otherwise, you’re working with the equivalent of the Move method.
Similar to the Copy method, you can apply the Move to the following objects:
- Sheet (Sheet.Move) or Sheets collection (Sheets.Move).
- Worksheet (Worksheet.Move) or Worksheets collection (Worksheets.Move).
- Chart (Chart.Move) or Charts collection (Charts.Move).
- Dialog Sheet (DialogSheet.Move) or Dialog Sheets collection (DialogSheets.Move).
- Excel 4.0 macro sheet (Excel4MacroSheet.Move) or Excel 4.0 macro sheets collection (Excel4MacroSheets.Move).
- Excel 4.0 international macro sheet (Excel4IntlMacroSheet.Move) or Excel 4.0 international macro sheets collection (Excel4IntlMacroSheets.Move).
I cover all of these methods in the following sections:
Sheet.Move And Sheets.Move Methods
You can use the Sheet.Move or Sheets.Move methods to move sheet(s) to another location.
The basic syntax of Sheet.Move and Sheets.Move is as follows:
expression.Move(Before, After)
The following definitions are applicable:
- expression: Sheet or Sheets object.
- Before: Optional parameter. Sheet before which you want to place the moved sheet(s).
- After: Optional argument. Sheet after which the moved sheet(s) is(are) located.
Considering the above, I simplify the syntax as follows, depending on whether the macro works with the whole Sheets collection (Sheets.Move) or not (Sheet.Move):
Sheet.Move(Before, After)
Sheets.Move(Before, After)
Similar to what occurs with the Copy method (which I describe above), the following comments are applicable:
- Before and After are mutually exclusive. Therefore, choose to use one or the other (not both).
- If you omit both Before and After, Excel creates a new workbook with the moved sheet(s). Therefore, in this case, you can further simplify the syntax as follows:
Sheet.Move
Sheets.Move
When applying the Move method to a whole collection, bear in mind that an Excel workbook generally must keep at least 1 visible sheet. If execution of your macro results in a workbook not having any visible sheets, you usually get a run-time error.

Worksheet.Move, Worksheets.Move, Chart.Move, Charts.Move, DialogSheet.Move, DialogSheets.Move, Excel4MacroSheet.Move, Excel4MacroSheets.Move, Excel4IntlMacroSheet.Move And Excel4IntlMacroSheets.Move Methods
The following methods are substantially similar to Sheet.Move and Sheets.Move (which I describe above). Therefore, my general comments above are also applicable.
- Worksheet.Move and Worksheets.Move.
- Chart.Move and Charts.Move.
- DialogSheet.Move and DialogSheets.Move.
- Excel4MacroSheet.Move and Excel4MacroSheets.Move.
- Excel4IntlMacroSheet.Move and Excel4IntlMacroSheets.Move.
The basic (simplified) syntax of each of these methods is as follows:
- Worksheet.Move:
Worksheet.Move(Before, After)
- Worksheets.Move:
Worksheets.Move(Before, After)
- Chart.Move:
Chart.Move(Before, After)
- Charts.Move:
Charts.Move(Before, After)
- DialogSheet.Move:
DialogSheet.Move(Before, After)
- DialogSheets.Move:
DialogSheets.Move(Before, After)
- Excel4MacroSheet.Move:
Excel4MacroSheet.Move(Before, After)
- Excel4MacroSheets.Move:
Excel4MacroSheets.Move(Before, After)
- Excel4IntlMacroSheet.Move:
Excel4IntlMacroSheet.Move(Before, After)
- Excel4IntlMacroSheets.Move:
ExcelIntlMacroSheets.Move(Before, After)
Array Function
From a broad perspective, you can define an array by the following characteristics:
- An array is a group of elements.
- The elements have the same name and type.
- The elements are sequentially indexed. Therefore, each element has a unique identifying index number.
I cover the topic of VBA arrays in detail here. Please refer to that tutorial in order to learn more about arrays and how they can help you when working with Visual Basic for Applications.
In the context of this tutorial, arrays help us manipulate several worksheets at once. More precisely, as I show in examples #10 and #13 below, you can use an array to copy or move several worksheets to a new workbook.
The examples below work with the Array Function. Array allows you to obtain a Variant that contains an array. Its basic syntax is as follows:
Array(argumentList)
For these purposes, “argumentList” represents the list of values you want to assign to the array elements. You separate the different arguments using a comma (,).
VBA Constructs To Copy And Paste Ranges
I cover the topic of copying and pasting ranges in this VBA tutorial. Some of the VBA constructs that I explain there are the following:
- The Range.Copy method.
- The Range.PasteSpecial method.
- The Worksheet.Paste method.
- The Range.CopyPicture method.
- The Range.Value property.
- The Range.Formula property.
Explaining each of these constructs exceeds the scope of this VBA tutorial. However, in macro examples #15 and #16 below, I provide VBA code examples that use the Range.Copy method to copy a range to a newly created workbook.
You can use the information and examples I provide in the blog post about copying and pasting with VBA (follow the link I provide above) for purposes of easily using the other VBA constructs I mention above.
The following sections provide you with 16 different practical macro examples that you can adjust and use to create a new workbook. All of the macro code samples below rely, mostly, on the VBA constructs I introduce and describe in the first part of this tutorial above.
Macro Example #1: Excel VBA Create New Workbook With Default Number Of Sheets
If you want to create an Excel workbook that has the default number of worksheets, you can use the following VBA statement:
Workbooks.Add
The following macro example (Create_New_Workbook) shows how you can easily implement this statement:

This macro has the following single statement:
Workbooks.Add
This simply makes reference to the Workbooks.Add method. It uses this method for purposes of adding a new workbook to the Workbooks collection. In other words, the statement simply creates a new workbook.
Even though each of the other macro examples (below) targets a different situation, several of them rely on this basic statement (or a close derivative).
When I execute the sample macro above, Excel simply creates a new workbook with (i) the default name (Book1 in this case), and (ii) the default number of blank worksheets (1 in this example).

Macro Examples #2 And #3: Excel VBA Create New Workbook Using Template
The following statement structure allows you to create a new Excel workbook using an existing file as a template:
Workbooks.Add Template:=”Filename”
For these purposes, “Filename” is the name of the Excel file you’re using as template for the new workbook.
The following macro example (Create_New_Workbook_With_Template_1) uses the Workbooks.Add method and the Template parameter. For purposes of this example, I use this 2016 Olympics Dashboard created by Excel Template authority Dinesh Natarajan Mohan from indzara.com.

The result I obtain when executing this macro is a new Excel workbook that uses Dinesh’s beautiful dashboard as a template.

As an alternative to the above, you can create a new workbook based on an Excel template by working with the Workbooks.Open method. The following basic syntax allows you to do this:
Workbooks.Open Filename:=”TemplateFilename”, Editable:=False
Within this structure, “TemplateFilename” makes reference to the template you want to use.
The following sample macro (Create_New_Workbook_With_Template_2) shows how you can easily implement this structure. For this example, I use this Excel Inventory Management Template (a macro-enabled file) created by Excel expert Puneet Gogia at ExcelChamps.com

When I execute this Sub procedure, Excel creates a new workbook using Puneet’s useful template:

Macro Example #4: Excel VBA Create New Workbook With A Chart Sheet
New Excel workbooks usually come with worksheets. However, if you want to create a new workbook with a chart sheet, use the following VBA statement:
Workbooks.Add Template:=xlWBATChart
The following procedure example (Create_New_Workbook_With_Chart_Sheet) implements this statement:

If I execute this particular macro, Excel creates a new workbook with a single chart sheet:

Macro Examples #5 And #6: Excel VBA Create New Workbook With Several Worksheets
The number of worksheets that Excel includes in a newly created workbook is determined by the Application.SheetsInNewWorkbook property. The following code structure allows you to use this property to create a new workbook that has a different number of worksheets:
Application.SheetsInNewWorkbook = new#
Workbooks.Add
For these purposes, “new#” is the number of worksheets you want the newly created workbook to have.
The process followed by this macro to create the new workbook is as follows:
- Modify the number of worksheets that newly created workbooks have.
- Create a new workbook.
This structure I provide is quite basic. Therefore, it simply modifies the setting that determines how many worksheets are included in a new workbook.
The following sample macro (Create_New_Workbook_Several_Worksheets_1) relies on the structure above to create a new workbook with 3 worksheets. However, it goes one step further and, after creating the workbook, resets the Application.SheetsInNewWorkbook property to its default value.

The process followed by this sample macro to create a new workbook is as follows:
- Reads the current setting of the Application.SheetsInNewWorkbook property (Application.SheetsInNewWorkbook).
- Stores the setting obtained in step #1 within a variable (currentSheetsSetting = ).
- Sets the Application.SheetsInNewWorkbook property to 3 (Application.SheetsInNewWorkbook = 3). Therefore, newly created workbooks have 3 sheets.
- Creates a new workbook (Workbooks.Add).
- Restores the original setting of Application.SheetsInNewWorkbook (Application.SheetsInNewWorkbook = currentSheetsSetting).
The following image illustrates this process:

The following screenshot shows the workbook that Excel creates when I execute this macro sample. Notice that, as expected, it has 3 sheets.

An alternative to relying on the Application.SheetsInNewWorkbook property is to work with the Sheets.Add, Worksheets.Add, Charts.Add or DialogSheets.Add methods that I explain above. These methods have some advantages (including more flexibility) over relying on the Application.SheetsInNewWorkbook property.
In this case, the basic code syntax you can use to create a new workbook with several sheets is as follows:
Workbooks.Add
Worksheets.Add Count:=#
For these purposes, “#” is the number of additional sheets you want to add. The workbook created by Workbooks.Add comes (already) with the number of worksheets determined by the Application.SheetsInNewWorkbook property (usually 1).
This macro follows a relatively simple 2-step process:
- Creates a new workbook.
- Adds a certain number of worksheets (#) to the newly created workbook.
The particular macro structure above works with the Worksheets.Add method. You can, however, also work with the Sheets.Add, Charts.Add or DialogSheets.Add methods by using a similar syntax. For purposes of understanding the differences between each of these methods (and how to use them), please refer to the appropriate section above.
The following macro example (Create_New_Workbook_Several_Worksheets_2) uses the structure above to create a new workbook and (immediately add 2 additional worksheets. The result is a newly created workbook with 3 worksheets.

The following image shows the workbook that Excel creates when I execute this macro. Notice that, just as in the previous example, the newly created workbook has 3 worksheets.

As I mention above, you can use similar macros to work with the Sheets.Add, Charts.Add or DialogSheets.Add methods. The following macro sample provides more ideas of what you can achieve with these methods:
Macro Example #7: Excel VBA Create New Workbook With A Worksheet And A Chart Sheet
If you create a workbook using the Workbooks.Add method, Excel includes the number of sheets determined by the Application.SheetsInNewWorkbook property. You can, however, easily create a workbook that has both a worksheet and a chart sheet using the following basic syntax:
Workbooks.Add
Charts.Add
This macro follows a simple 2-step process to create a new workbook with a worksheet and a chart sheet:
- Creates a new workbook.
- Adds a new chart sheet to the newly created workbook.
The following VBA code example (Create_New_Workbook_Worksheet_Chart_Sheet) implements the structure above without making any changes:

The newly created workbook looks as follows. Notice that, as expected, the workbook has 1 worksheets and 1 chart sheet.

Macro Example #8: Excel VBA Create New Workbook With Name
The Workbooks.Add method by itself creates a new workbook. Generally, the name of the newly created workbook is automatically determined by Excel. The actual name varies slightly depending on how you create the new workbook. However, as a general rule, the filename follows the following structure:
Item#
Usually, “Item” is “Book”. In other words, the newly created workbooks are named Book1, Book2, Book3, etc. However, there are some exceptions to this general rule. For example, if you use the Template parameter of the Workbooks.Add method, the default name of the new workbook is determined on the basis of Template’s value as follows:
- If Template is xlWBATWorksheet: “Item” is “Sheet”. Therefore, workbooks are named Sheet1, Sheet2, Sheet3, etc.
- If Template is xlWBATChart: “Item” is replaced by “Chart”. New workbooks have names such as Chart1, Chart2, Chart3, etc.
- If Template is xlWBATExcel4MacroSheet or xlWBATExcel4IntlMacroSheet: “Item” is “Macro”. The names of new workbooks are Macro1, Macro2, Macro3, and so on.
- If Template specifies an Excel file: “Item” is replaced by the name of the Excel file you specify. As a consequence, new workbooks have the name of Template followed by the appropriate number (TemplateName1, TemplateName2, TemplateName3, and so on).
Excel applies this same rule if you create a new workbook by using the Workbooks.Open method with an Excel template. I show a practical example of a macro that does this in sample #3 above.
Despite the above, you can easily assign a name to the newly created workbook by saving it. Use the following code syntax to do this:
Workbooks.Add.SaveAs Filename:=workbookName
“workbookName” is the name you want to assign to the newly created workbook.
The process followed by this statement to create a new workbook with name is as follows:
- Create a new workbook (Workbooks.Add).
- Save the workbook using the appropriate name (.SaveAs Filename:=workbookName).
The following macro example (Create_New_Workbook_With_Name) uses the structure above to create a new workbook named “Excel VBA Create New Workbook With Name”.

The following screenshot shows the results I get when executing this macro. Notice that, as expected, the workbook is indeed named “Excel VBA Create New Workbook With Name”.

Macro Examples #9, #10 And #11: Excel VBA Copy One Or Several Worksheets To New Workbook
The Copy method allows you to copy sheets to a new workbook. In this section, I show how you can use this method copy one or several worksheets to a new workbook.
In the examples below, I work with the Worksheet.Copy method. You can, however, easily adjust the code in order to work with any of the following:
- Sheet.Copy or Sheets.Copy.
- Chart.Copy or Charts.Copy.
- DialogSheet.Copy or DialogSheets.Copy.
- Excel4MacroSheet.Copy or Excel4MacroSheet.Copy.
- Excel4IntlMacroSheet.Copy or Excel4IntlMacroSheets.Copy.
I explain these methods above.
The following VBA statement allows you to copy a worksheet to a new workbook. In this case, the copied worksheet is the only worksheet in the newly created workbook:
Worksheet.Copy
The following macro example (Copy_Sheet_To_New_Workbook) uses the statement form above in order to copy a worksheet (Copy1) to a new workbook.

The following image shows the results I obtain when running the macro. Notice that the newly created workbook, indeed, contains the copied worksheet (Copy1).

If you want to copy several worksheets to a new workbook, the basic statement structure I explain above continues to apply. In order to get several worksheets at once, you can use the Array Function. The following statement structure can serve you as guidance:
Worksheets(Array(Worksheet1, Worksheet2, …, Worksheet#)).Copy
For these purposes, “Worksheet1” through “Worksheet#” are the worksheets you want to copy.
The following macro example (Copy_Several_Sheets_To_New_Workbook) uses the structure above to copy 5 worksheets (Copy1 through Copy5):

The following screenshot shows the workbook Excel creates when I execute this macro. Notice that, as expected, the worksheets I specified in the macro above (Copy1 through Copy5) are included in the new workbook.

Finally, if your purpose is to copy all of the worksheets within a particular workbook, you can apply the Copy method to the Worksheets collection. The following statement allows you to do this:
Worksheets.Copy
In this case, the newly created workbook contains all the worksheets within the applicable workbook.
The following macro example (Copy_All_Sheets_To_New_Workbook) implements the statement above.

The following image shows the workbook Excel creates when I execute this macro. The newly created workbook contains copies of all the worksheets within the relevant workbook (Copy1 to Copy5, Move1 to Move5 and Range).
 copied worksheets")
Macro Examples #12, #13 And #14: Excel VBA Move One Or Several Worksheets To New Workbook
You can use the logic behind the macros examples that copy worksheets to a new workbook for purposes of moving worksheets to a new workbook. For these purposes, you use the Move method.
Similar to the previous examples #9 to #11, the following sample procedures work with worksheets. However, using the information I provide in the relevant sections above, you can easily adjust them to work with the following methods:
- Sheet.Move or Sheets.Move.
- Chart.Move or Charts.Move.
- DialogSheet.Move or DialogSheets.Move.
- Excel4MacroSheet.Move or Excel4MacroSheet.Move.
- Excel4IntlMacroSheet.Move or Excel4IntlMacroSheets.Move.
Let’s start:
Use the following statement syntax to move a worksheet to a new workbook. The moved worksheet is the only within the newly created workbook.
Worksheet.Move
The following sample VBA code (Move_Sheet_To_New_Workbook) uses the statement structure above to move a worksheet (Move1) to a new workbook:

The following screenshot shows the newly created workbook. Notice that the workbook contains the moved worksheet (Move1).

If you want to move several worksheets to a new workbook use the Array Function alongside the Move method. The basic structure of the relevant statement is as follows:
Worksheets(Array(Worksheet1, Worksheet2, …, Worksheet#)).Move
The following macro example (Move_Several_Sheets_To_New_Workbook) uses this statement to move several worksheets (Move1 through Move5) to a newly created workbook:

The workbook that Excel creates when I execute this macro looks as follows. Notice that the workbook contains the 5 worksheets (Move1 to Move5) that I specified in the code above.

Finally, if you’re moving all of the worksheets within a particular workbook, use Worksheets.Move method. In other words, simply use the following VBA statement:
Worksheets.Move
The following sample macro (Move_All_Worksheets_To_New_Workbook) implements this statement to move all worksheets to a new workbook:

The following image shows the results I get when executing this macro. All worksheets in the applicable workbook (Copy1 to Copy5, Move1 to Move5 and Range) are moved to a new workbook.

The only remaining sheet in the source workbook is an empty chart sheet.

The existence of this chart sheet in the source workbook allows the workbook to comply with the requirement of having at least 1 visible sheet after all worksheets are moved to a new workbook. If this chart sheet doesn’t exist, execution of the Move_All_Worksheets_To_New_Workbook causes a run-time error.
Macro Examples #15 And #16: Excel VBA Copy Range To New Workbook
As I explain above, there are several ways in which you can copy and paste ranges using VBA. In this section, I provide a code example that relies on the Range.Copy method to copy a range to a newly created workbook. Please refer to the relevant section above for purposes of reading about the other VBA constructs you can use for these purposes.
You can use the following statement syntax for purposes of copying a range to the first (usually single) worksheet of a newly created workbook:
Workbook.Worksheet.SourceRange.Copy Destination:=Workbooks.Add.Worksheets(1).DestinationRange
For these purposes, the following definitions apply:
- Workbook.Worksheet.SourceRange: Fully-qualified reference to the range you want to copy.
- DestinationRange: Range where you want Excel to paste the range.
The following macro example (Copy_Range_To_New_Workbook_1) does the following:
- Copies cells B5 to C20 of the worksheet named “Range”. This cells simply contain some randomly generated numbers.
- Pastes the cells it copied in step #1 above in cells B5 to C20 of the first worksheet of a newly created workbook.

The following image shows the results I get when running this macro. The range is copied to cells B5 to C20 of the newly created workbook.

The structure I use in the macro example above, however, may not work properly with a few of the VBA constructs that you can use to copy ranges. A more flexible alternative involves assigning the newly created workbook to an object variable. After this has occurred, you can simply refer to the object variable.
The following basic syntax shows how you can (i) create a new workbook, (ii) assign it to an object variable, and (iii) copy a range to that new workbook.
Dim myNewWorkbook As Workbook
Set myNewWorkbook = Workbooks.Add
Workbook.Worksheet.SourceRange.Copy Destination:=myNewWorkbook.Worksheets(1).DestinationRange
The following macro code example (Copy_Range_To_New_Workbook_2) uses this structure to achieve the same purpose as the previous example above. In other words, this macro does the following:
- Copies cells B5 to C20 of the worksheet named “Range”.
- Pastes those copied cells in cells B5 to C20 of the first worksheet of a newly created workbook.

The following screenshot shows the results I obtain when executing the macro. Notice that they’re substantially the same as those obtained with the previous macro example #15.

Conclusion
Creating a new Excel workbook is one of the most essential and common activities in Excel. Knowing how to use Visual Basic for Applications for purposes of creating new workbooks allows you to automate several processes and become an even more efficient Excel user.
After reading this Excel VBA Tutorial, you have enough knowledge to start or continue developing a wide array of VBA applications that create new Excel workbooks.
In the first section of this blog post, you read about several VBA constructs that are commonly used when creating new workbooks. In that section, you focused on the Workbooks.Add method. This is the most basic and commonly used construct used within macros that create new workbooks.
In that first section, you also read about other VBA constructs that you can use to either (i) add functionality and flexibility to the procedures that create new workbooks or, (ii) create new workbooks without specifically using the Workbooks.Add method.
In the second section of this tutorial, you saw 16 different practical macro examples that you can easily adjust and start using to create new workbooks. Those examples of VBA code cover and target a wide variety of situations. The following are some of the things that these macro examples enable you to do:
- Create a new workbook.
- Use a template to create a new workbook.
- Create workbooks with different types of sheets.
- Create workbooks with a different number of sheets.
- Create a new workbook with a particular name.
- Create or move sheets to a new workbook.
- Copy a range of cells to a new workbook.