
![]()
Загрузить PDF
![]()
Загрузить PDF
Из этой статьи wikiHow вы узнаете, как создавать блок-схемы в программе Microsoft Word с помощью макетов SmartArt или выстраивая фигуры вручную.
-

1
Откройте документ Word. Двойным щелчком мыши откройте документ в программе Word. Чтобы создать новый документ, откройте программу, нажав на вкладку «Все программы» в меню «Пуск» (Windows) или в папке «Приложения» (macOS).
- В зависимости от версии программы Word, для создания нового документа, возможно, потребуется нажать «Файл» и затем «Новый» (или «Новый документ»).
-
2
Нажмите на вкладку Вставка. Она расположена в верхнем левом углу.
-
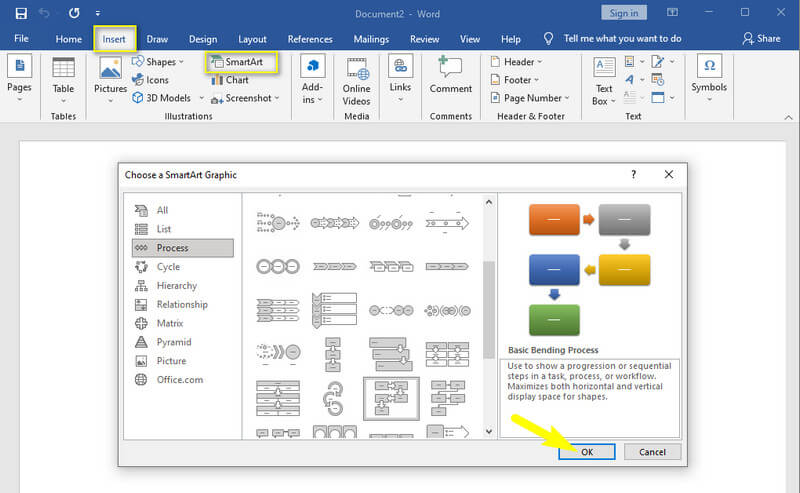
3
Нажмите на кнопку SmartArt. Она расположена в группе «Иллюстрации» панели инструментов в верхней части экрана. Ищите значок в виде зеленой стрелки с белым листом бумаги поверх нее.
- Объекты SmartArt — это готовые рисунки, созданные специально для блок-схем. При выборе объекта SmartArt доступен предпросмотр блок-схемы.
-
4
Просмотрите доступные диаграммы. Различные типы диаграмм описаны в параметрах слева. Выберите тип схемы, которую вы хотите создать, и ее примеры отобразятся на центральной панели. Затем нажмите на выбранный пример схемы. Подробная информация о выбранной схеме появится в крайнем правом углу панели.
-
5
Нажмите OK. Так вы добавите выбранный тип схемы в документ.
-
6
Добавьте на график обозначения. Для этого во всплывающем окне введите текст, и он появится на графике.
-
7
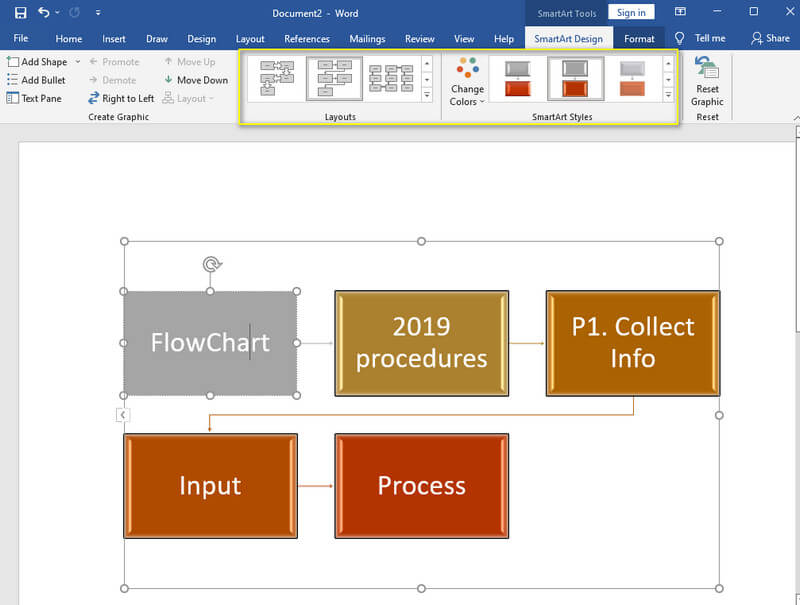
Настройте стиль фона и цвет. Для переключения между опциями нажимайте на кнопки на панели «Стили SmartArt» в верхней части экрана .
-
8
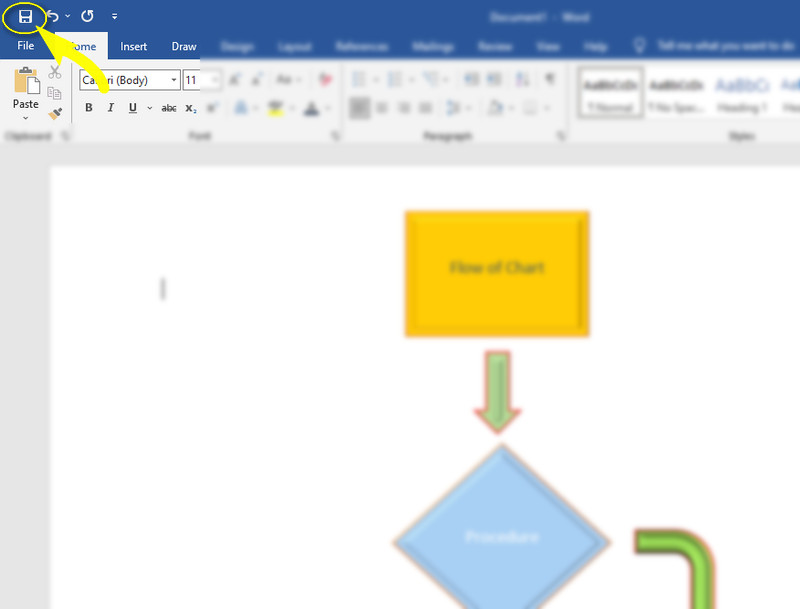
Сохраните готовую блок-схему. Для этого:
- Нажмите на вкладку «Файл».
- Выберите «Сохранить как».
- Выберите имя документа и нажмите «Сохранить».
Реклама


-
1
Откройте документ Word. Двойным щелчком мыши откройте документ в программе Word. Чтобы создать новый документ, откройте программу, нажав на вкладку «Все программы» в меню «Пуск» (Windows) или в папке «Приложения» (macOS).
- В зависимости от версии программы Word, для создания нового документа, возможно, потребуется нажать «Файл» и затем «Новый» (или «Новый документ»).
-
2
Нажмите на вкладку Вставка. Она расположена в верхнем левом углу.
-
3
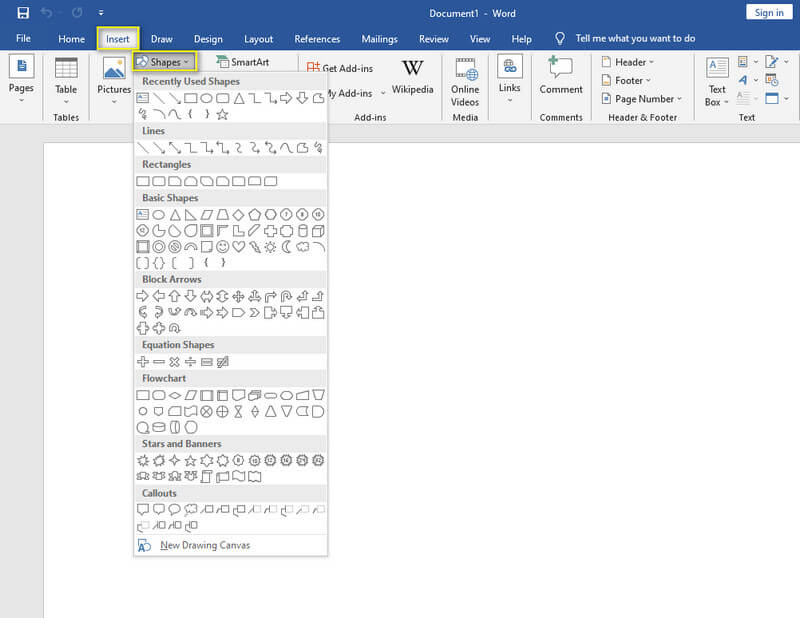
Нажмите Фигуры. Кнопка находится на панели в левой верхней части экрана. Откроется меню с различными фигурами.
-
4
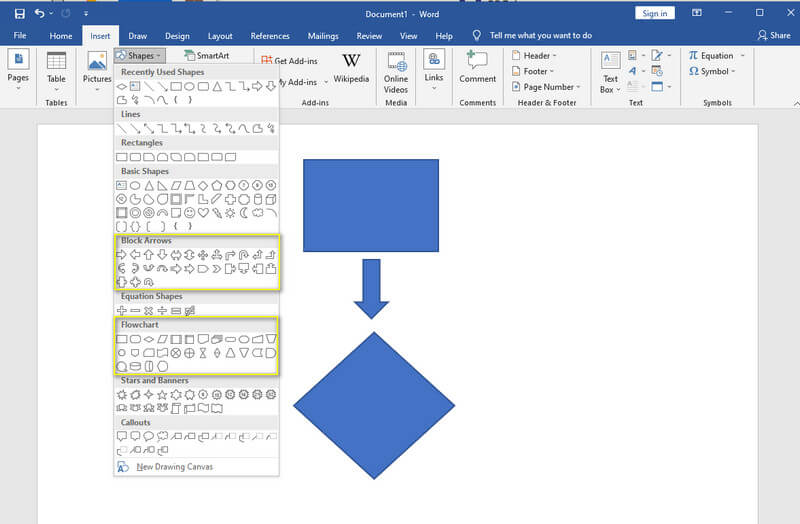
Нажмите на фигуру в разделе «Блок-схема».
-
5
Добавьте фигуру в документ. Нажмите в любом месте документа и затем, удерживая нажатие, перетащите курсор, чтобы начать рисовать фигуру. Когда фигура будет необходимого размера, отпустите кнопку мыши.
-
6
Добавьте дополнительные фигуры. Можно добавлять фигуры к каждой части блок-схемы. Например, вы можете вставить прямоугольник, за ним стрелку, а затем другой прямоугольник и так далее, чтобы обозначить прогресс.
-
7
Перетащите фигуры в выбранное местоположение. Когда фигуры будут расположены в задуманном порядке, вы сможете легко перетаскивать их в другое место в документе.
-
8
Создайте надпись фигуры. Для этого:
- Два раза щелкните по фигуре, чтобы открыть панель со средствами рисования.
- Нажмите на кнопку «Добавление надписи» в верхней части экрана.
- Нажмите на то место в документе, куда вы хотите добавить надпись, затем перетащите указатель мыши для создания рамки.
- Повторите эти шаги для каждой части диаграммы, к которой нужно добавить надпись.
-
9
Добавьте текст в поле надписи. Для ввода текста нажмите на поле для надписи. Повторите этот шаг для всех надписей, которые необходимо добавить.
-
10
Сохраните готовую блок-схему. Для этого:
- Нажмите на вкладку «Файл».
- Выберите «Сохранить как».
- Выберите имя документа и нажмите «Сохранить».
Реклама


Об этой статье
Эту страницу просматривали 10 045 раз.
Была ли эта статья полезной?
Comprehensive Guidelines on How to Make a Flowchart in Word
If you want to present an activity procedure that people will follow, then illustrating it via a flowchart is the best way to express it. Furthermore, a flowchart is also a way to promote a proper analysis of a problem within an algorithm presented to solve a task. On the other hand, many people choose to make this chart on Microsoft Word due to its simple accessibility on regular computer devices. However, creating a flowchart in Word has been challenging for them, as they couldn’t find the particular tools to use. For this reason, we wrote this article to give solutions by providing a complete tutorial on how to use Word to create a flowchart with two techniques to follow.

- Part 1. Two Ways to Make a Flowchart in Word
- Part 2. Bonus: The Best Way to Make Flowchart Online
- Part 3. FAQs about Flowcharts and Microsoft Word
Part 1. Two Ways to Make a Flowchart in Word
Word is a proprietary of Microsoft that is part of its office suits for desktops. Furthermore, it has hundreds of selections that are useful in creating flowcharts. Microsoft Word, along with the other office suits, has been very famous, but which however other users did not know that it is purchasable. On the other hand, if your desktop has it so far, then feel free to know the two different methods on how to use it in making flowcharts.
Method 1. Make a Flowchart in Customary Way
1
Download and install Microsoft Word to your desktop, and launch it. On the main interface of the Word, click the Insert tab for you to be able to see the Shape selection.
2
Next, you need to pick a shape from the Flowchart. Note that you need to repeat the step until you reach your chart’s preferred figures. Going back, click the specific shape, then use your mouse to drag and draw the chosen shape on the canvas, and that’s how to add a flowchart in Word.
3
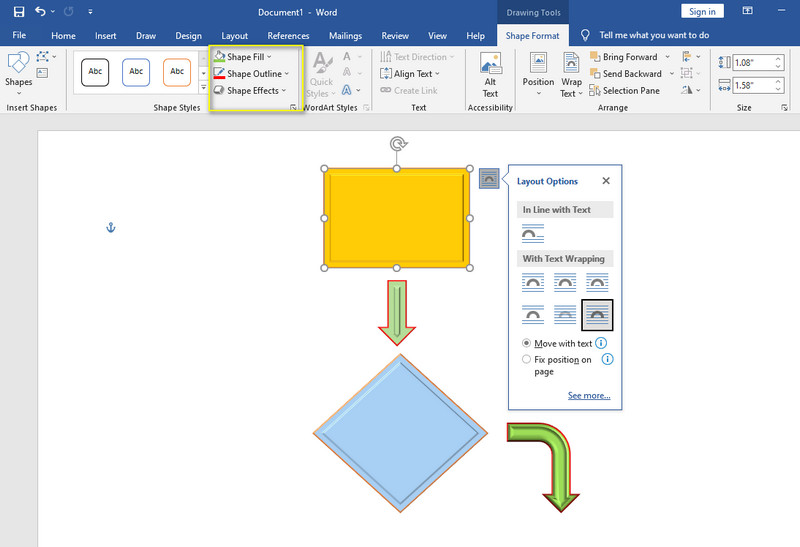
Then, for each figure you add to the chart, the tool will let you have the chance to customize it by giving you hundreds of choices of the Fill, Outline, and Effects for the shape.
4
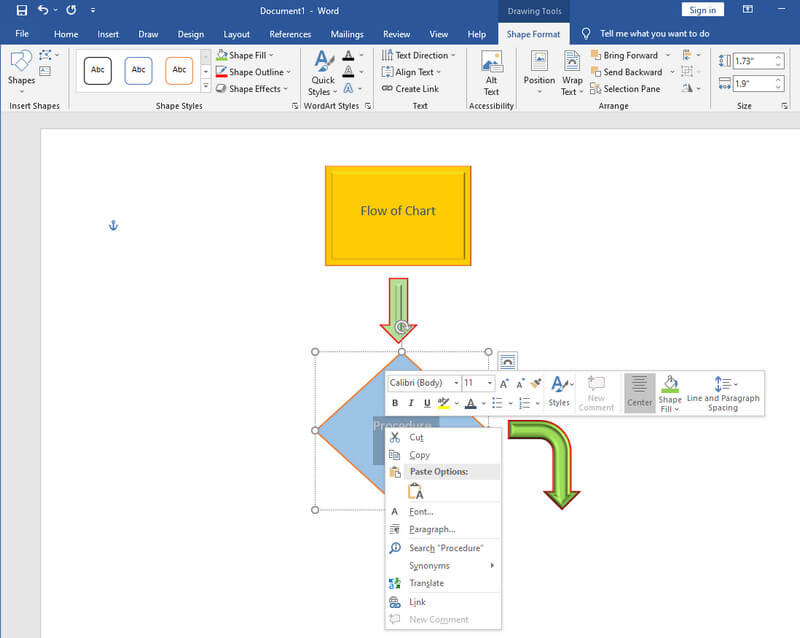
You can now put a label on the figures to complete your flowchart. You can also customize the information you place on your chart by modifying its font style, color, and more when you right-click the info.
5
When you’re finally done with the flowchart, you may hit the icon located at the top of the File tab and choose Save As to export the file.
Method 1. Best Way to Create a Flowchart in Word
Microsoft Word comes with a SmartArt feature containing graphics that include templates for flowcharts. This way, users who don’t have the creativity to make charts can still succeed in creating an efficient and persuasive chart.
1
Click the Insert tab, and click the SmartArt option from various illustrations shown. Then, on the SmartArt window, go to the Process option. After that, choose the template that you want, and end it by clicking the OK button.
2
Modify the template by customizing the colors of the figures and arrows. How? Choose from the Layouts, Change Colors, and SmartArt Styles at the top of the chart. Then, put the information on the figure that will complete your flowchart in Word.
Part 2. Bonus: The Best Way to Make Flowchart Online
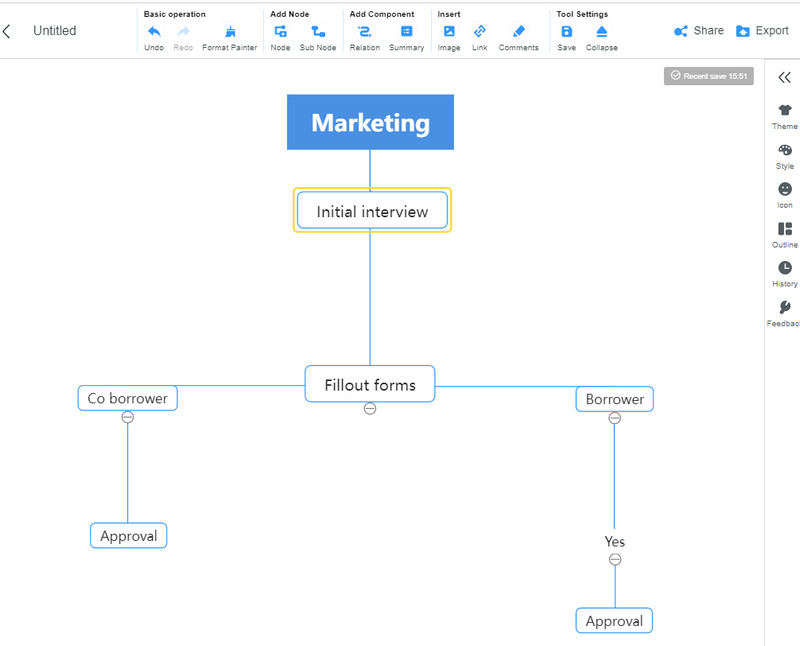
If you want to go for an online solution to create a flowchart, we give you the best tool that you can use, which is the MindOnMap. This online tool is not only the best for making mind maps, but it also has excellent capabilities to produce an eloquent flowchart within a particular procedure. Yes, it’s extraordinary, for it only takes a few clicks on your mouse to finish the chart! In addition, the MindOnMap provides conventional kits such as templates, themes, hotkeys, icons, colors, fonts, and styles that will give you the same vibes, just like when you make a flowchart in Microsoft Word.
Despite its great features, MindOnMap is proud to let you know about its chargeless endeavor for you! Yes, you read it right. You can use this fantastic flowchart maker without spending a dime! Not just that, even if it operates on the web, you can make sure that it won’t harm your device and secure your information as well as your files a hundred percent. What’s more? It gives no watermark on your projects, and you won’t ever experience ads that can annoy you! To prove all of this, try it. Otherwise, see the comprehensive steps to create a flowchart below.
1
Unlike creating flowcharts in Word, you don’t need to download and install anything to use the MindOnMap. All you need to do is, launch your browser and visit the official website. Once there, click the Login button and sign in using your email.

2
As you notice, on the main interface, this tool has its cloud in the My Mind Map folder, wherein you can keep your future projects. Anyways, click the New tab to see the template and theme selections. Then, choose the template for the charts, and you will be brought to the main canvas after.

3
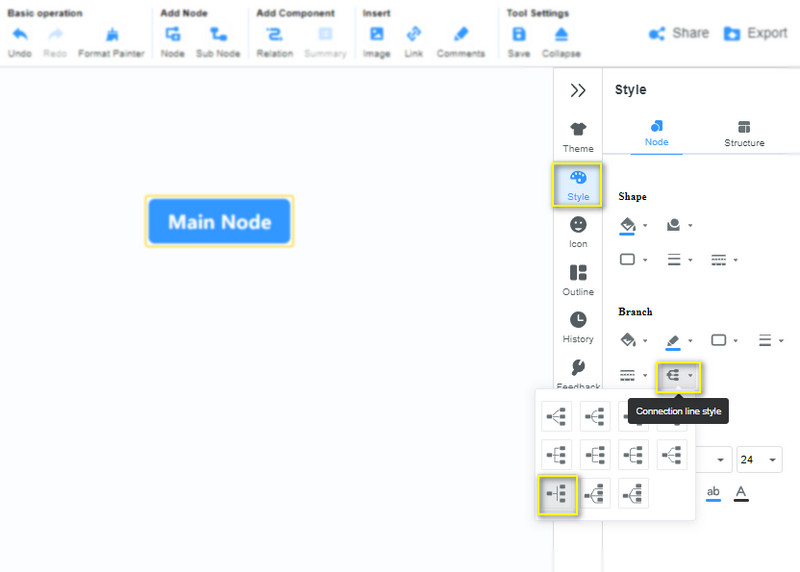
When you reach the main canvas, it will be nicer to locate the connection line style and choose one prior to the chart making, which you can’t find in Microsoft Word in a flowchart making. Go to the Menu Bar, and click the Style. Then from the Branch, click the Line Style icon and choose the one on the bottom left corner.
4
Start working on the flowchart. Click the ENTER key on your keyboard simultaneously to add figures. Then, use your mouse to align and set them based on your preference. Then, fill the figure with the information you need to imply.
5
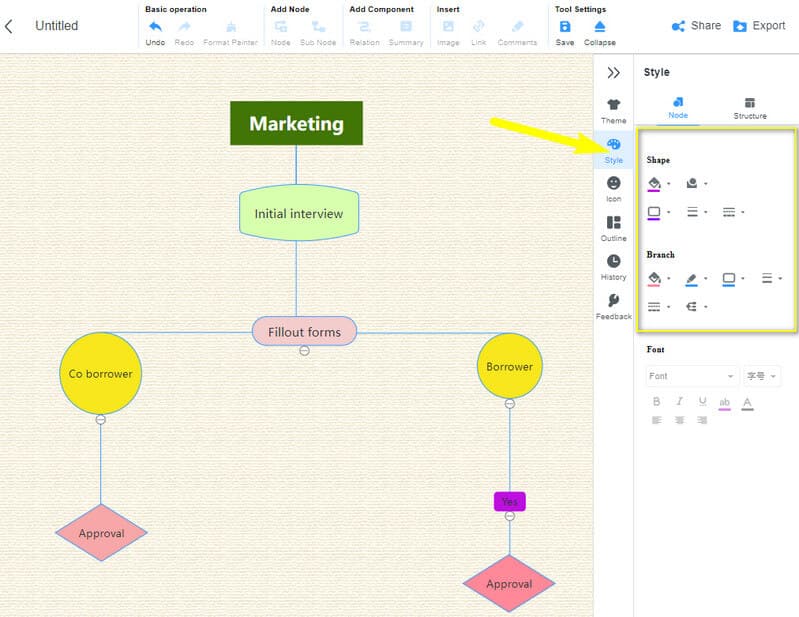
Personalize the flowchart’s shapes, fonts, and colors by clicking on the figure, then going to the Style of the Menu Bar. Navigate on the stencils to have the style of flowchart that you desire.
6
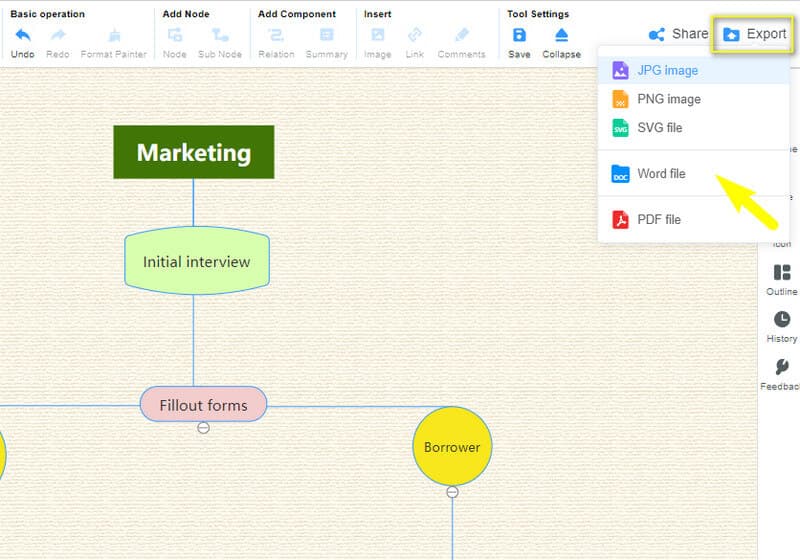
You can now save your flowchart! To do so, click CTRL+S if you want to save it on your cloud. Otherwise, click the Export button to download the file and keep it on your computer device. Note that you can export the file in Word, PDF, PNG, JPEG, and SVG.
Part 3. FAQs about Flowcharts and Microsoft Word
Can I export the flowchart in JPEG in Word?
No. Microsoft Word can only produce files in PDF and Word.
Can I use Word in Office 365?
Yes, but only if you have the subscription plan.
Can I share my flowchart to collaborate with my friends in Word?
Yes. Word has the share feature that requires users to save their flowchart to a web location to collaborate.
Conclusion
Using Microsoft Word to create a flowchart may be challenging for beginners because the procedure itself is pretty confusing. Therefore, if you want to work like a pro, even if it’s your first time, instead of creating a flowchart in Word, use the MindOnMap instead.
This article shows the process of creating a flowchart in Microsoft Word.
Of the standard Microsoft Office applications — Excel Word, PowerPoint — Excel is the most powerful and user friendly
for creating flowcharts (disclosure: we make a flowchart automation add-in for Excel),
but in some cases creating flowcharts in Word is handy.
This isn’t a step-by-step tutorial, but it does try to give a useful overview
of the Drawing tools in Word, as well as offer some tips and highlight a few quirks.
Excel Flowchart Wizard
FlowBreeze is a flowchart add-in for Microsoft Excel that makes creating flowcharts simple and pain free. Free 30-Day Trial.
Download
Note on Ribbon (Toolbar) Controls
You may want to maximize Word to full screen when using this tutorial. The ribbon takes a lot of screen space, and some of the controls referenced in this article may be hidden if the window is not maximized.
The next two section reference the image on the right. The screenshot is from Word 2013, but the following steps have remained consistent from Word 2007 through Word 2019.
Insert canvas and shapes
Insert a Canvas
Word flowcharts are best contained within a Drawing Canvas. You
can insert shapes directly into a Word document, but using a canvas
has several advantages:
- They act as a container for the shapes, making it easier to position (or re-position) a flowchart in a document.
- Certain features, like arrows that connect to shapes, only work in a canvas.
- You can add formatting to the canvas itself, giving the flowchart an attractive backdrop.
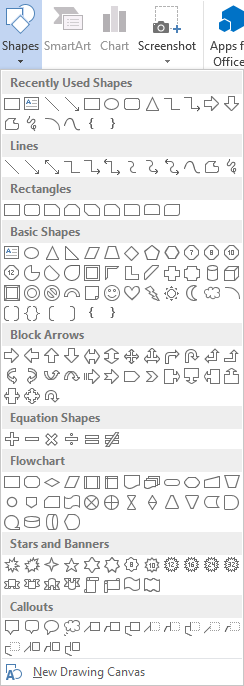
To insert a canvas, click the Insert tab on the Word ribbon and
click the Shapes dropdown button. Below the gallery of shape types,
select the bottom menu item labeled New Drawing Canvas, as shown to the right.
Side note: If you are using a laptop with a glossy monitor, the canvas border can
be difficult to see when viewed at a slight angle.
Adding a Flowchart Shape
Adding shapes is pretty straightforward:
- Click the Insert tab on the ribbon.
- Click the Shapes dropdown.
- Click on the shape type you want to add.
- Click in the canvas area, holding the left button down while dragging the mouse to add the shape.
You can also double-click on any shape in the gallery,
and Word will add it to the top left of the canvas. Typically you
will need to move and resize the shape if you use this method.
Displaying a Grid
Grids let you layout shapes to uniform widths and heights, as well as making it easier to align shapes if you need to edit a flowchart and move things around. Not only is the grid a visual indicator, but it also has a snap function that assists with alignment and sizing.
A quick way to enable a grid is to click the View tab and click the Gridlines checkbox. With enabled gridlines, the grid will appear only within the canvas (which we’ll get to next) when it is selected, but when any other part of the Word document outside the canvas is selected, the grid will be displayed over the entire document.
For more precise control of the gridlines, you can customize settings in the Grid and Guides screen, shown in the images below. Generally the default settings are sufficient, but checking the «Snap objects to grid when gridlines are not displayed» box is useful if you want the snap behavior without having gridlines cover the entire document. As shown below-right, a «Display alignment guides» option was added to this dialog. When checked the gridlines are not shown, so personally I do not find this option useful.
To access the Drawing Grid screen, follow these steps:
- Click on the drawing canvas.
- Click on the Drawing Tools Format tab that appears.
- Click the Align dropdown menu and select Grid Settings.

Grid and Guides Dialog — Word 2007
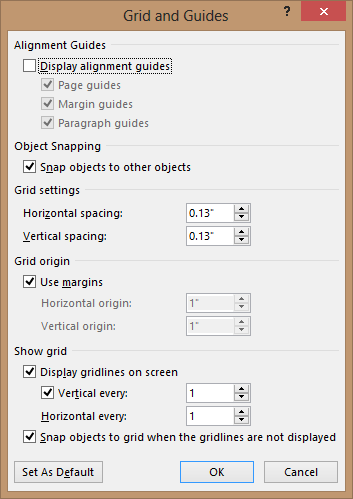
Grid and Guides Dialog — Word 2013
Adding Text to a Flowchart Shape
In Word 2007, if you click on a shape and start typing, you will
soon find out that text is added somewhere in the main document
body instead of within the shape. In order to add text, you need to
right-click on the shape and select «Add Text» from the
context menu. Once a shape contains text, you can click the text
and edit it normally.
In Word 2010 — 2019, by contrast, you can simply click on the shape and
start typing.

Adding Connector Arrows
Connectors are different from plain arrows in that they stay
connected to shapes if they are moved. Assuming you want to route a
connector line between two shapes, we will call these Shape 1 and
Shape 2 below.
- Click the Insert tab.
- Click the Shapes dropdown
- Click the desired line type from the gallery.
- Move your mouse near Shape 1 and little dots denoting connection points will appear on its border.
- Click on one of the dots and, while holding the left mouse button down, move the mouse over to Shape 2.
-
As you move the mouse over Shape 2, Word will highlight connection points and display a dashed line showing the
routing. - Select one of the connection points and release the left mouse button.
Quirk: In Word 2007 and previous versions, the elbow connector
would render as a straight line between two aligned shapes of the
same size. In Word 2010, the same elbow connectors render slightly
jagged and unaesthetic.
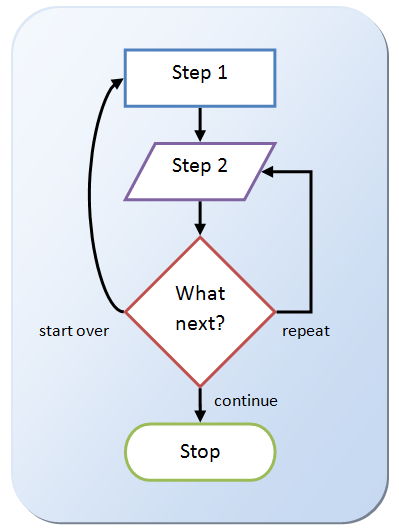
Tip: Right-click on a connector to change the connector type via
the context menu. The three types are straight, elbow, and curved,
as shown in the sample flowchart.
Adding Labels
To add branch labels next to connector lines, use the textbox symbol ![]() on the Insert > Shapes gallery. After inserting the textbox (label), type in the text. Click the Home tab in Word and format the text as needed. The easiest way to adjust the size is to click and drag the adjustment handles on the texbox edges. With the textbox still selected, click the Format tab, and then select the Shape outline drop down and toggle on the No Outline option for a cleaner look.
on the Insert > Shapes gallery. After inserting the textbox (label), type in the text. Click the Home tab in Word and format the text as needed. The easiest way to adjust the size is to click and drag the adjustment handles on the texbox edges. With the textbox still selected, click the Format tab, and then select the Shape outline drop down and toggle on the No Outline option for a cleaner look.
Adding labels is a multi-step process, so when adding more labels it’s usually easiest to copy and paste the first label and edit the text accordingly.
Selecting Multiple Shapes
There are several ways to select multiple objects. One method is
to click on one shape, hold the Shift key down, and click on the
remaining shapes. Another method is to click and drag your mouse
around all the shapes you want to select. This is faster, but
sometimes less useful if, for example, you want to select
the flowchart shapes without selecting the connector arrows.
Two non-recommended methods that you may be familiar with are
Select All and Select Objects. These tools are commonly used in
Excel and other Office programs, but they are not as useful in
Word. In Excel, for example, Select All will select only the shapes
on a worksheet, but in Word, it will select the entire document.
The Select Objects tool is a special cursor that allows you to
click on the shapes instead of the text, and does not add any value
above selecting them with the regular mouse cursor. Plus,
you need to toggle it off in order to resume normal Word
operations.

Align shapes menu
Aligning Shapes
With the grid enabled, the easiest way to keep shapes aligned is
to draw them with uniform widths at the time they are added to the
diagram. If you need to edit the alignment after the fact, you can
use several approaches. The first approach is to click on each
shape and drag it to its new location. (If you need to resize the
shape to get it aligned properly, see the next section.)
The next approach is to select all the shapes you want to align,
which will cause Word to display the Format tab. On the Format tab,
click the Align dropdown menu, shown below. Making sure the Align
Selected Objects item is checked, you can then use the alignment
tool to align the shapes automatically.
Moving Shapes
The most obvious way to move shapes is to click and drag them to
a new position. With the grid enabled, you can also move one or
more selected shapes using the keyboard arrow keys and they will
snap to the nearest gridline. You can nudge a shape by holding the
Ctrl key down while pressing the keyboard arrow keys.
Resizing and Rotating Shapes
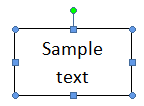
If you click on a shape, resize
handles appear on the shape’s border, allowing you to click
and drag a side or corner, as shown in the image.
The green dot at top is the rotation adjustment handle.
Alternately, you can right-click on the shape and select
«Format AutoShape» from the context menu. Clicking the
Size tab on the Format AutoShape window will allow you to set the
height, width and rotation angle to specific values.
Formatting Tips
Formatting shapes and connectors can be tedious if you try to do
them one at a time. It is best to wait until you are finished with
the flowchart and do the formatting in bulk. You can do this by
selecting multiple shapes and formatting them together. You should
format shapes and connectors separately because the styling tools
are different for each.
If you have a format that you would like to reuse, you can right-click
on a formatted shape and select «Set Autoshape Defaults».
Any shape added subsequently will have the same fill color and border style.
When you select a shape or connector in Work 2007, a Format tab
will appear on the ribbon, but you need to click to activate it. In
Word 2010, the Format tab is automatically activated.
Quirk: Word 2007 has two format tabs – Drawing Tools
Format and Text Box Tools Format. They are mostly the same. Word
displays the Text Box Tools Format tab when the selected shape
contains text and the Drawing Tools Format tab for all other
shapes. In fact, if you add a flowchart shape to a drawing,
selecting it will make the Drawing Tools Format tab appear, but
once you add text to the shape, the Text Box Tools Format tab will
appear. Fortunately, Word 2010 has only one Format tab.
Formatting Shapes
The formatting tools are located on the Format tab in Word 2007 and 2010. Starting in Word 2013, the formatting dialog has been replaced with side panels, and the Shape Fill and Shape Outline menus are disabled on the Format ribbon tab. Instead, you can access them by right-clicking on a shape.
There are too many formatting tools to cover them all in detail, but the primary ones are covered below.
Shape Styles: The style gallery allows you to apply formatting to one or more selected shapes. There is a significant difference
between Word 2007 and 2010. Word 2007 has a larger selection of styles, but they are not consistent with the Excel 2007 shape
styles. Starting with Word 2010, the styles are uniform across all Office appslication — Word, Excel, and PowerPoint.
Shape Fill: Allows you to set custom fill colors and gradients for the shapes.
Shape Outlines: Allows you to set the line color and weight (thickness) of a shape’s borders.
Change Shape: Allows you to change the type of the selected shape, e.g. from a process (rectangle) shape to a decision (diamond).
Tip: To access more formatting features (including vertical text
alignment), right-click on a shape and select Format AutoShape.
Formatting Connectors
Word 2007: There is a gallery of styles available, but unfortunately, these are the styles used for flowchart shapes
and do not work well for lines. To format connectors, you should use the color and weight settings available in the Shape Outline dropdown menu.
Word 2010 — 2019: Formatting connectors in Word 2010 — 2016 is straightforward. Just as with flowchart shapes, when you click a
connector, the Format tab will be active, and a list of built-in styles is available for quick selection. Unlike Word 2007, the styles in Word 2010 — 2019 are actually attractive.
Formatting and Aligning Text
The bad news about flowcharting in Word is that it can be difficult to customize the text formatting. Some changes can be done in bulk and some must be done one shape at a time.
- Font: The font family, size and attributes such as bold and italic can be set from the Home tab of Word. You can select multiple shapes and make the changes in bulk.
- Color: The font color is set on the Home tab, and it must be done one shape at a time.
- Horizontal text alignment: The horizontal alignment can be set on the Home tab, and it must be done one shape at a time.
- Vertical text alignment: Vertical text alignment can only be set in the Format AutoShape window, which is accessed via the context menu by right-clicking on a shape.
Note:In Word 2007, the default text alignment is top, left. In Word
2010, it is centered both horizontally and vertically.
Canvas Size and Alignment
When you are done with the flowchart your canvas may be much larger than the
diagram. If you want to shrink the canvas to the minimum footprint, right-click
on the canvas and select Fit from the context menu.
On the other hand, you may want the diagram centered on the page horizontally,
vertically, or both. If so, follow these steps:
- (Optional) Resize the canvas to the page width and/or height by clicking and dragging the edges or corners.
- Next, select all the shapes in the flowchart, including the connectors.
- On the Format tab, click the Group dropdown and select Group from the menu.
- Click the Align dropdown and verify that the Align to Margin item is checked.
- In the Align dropdown again, click Align Center and/or Align Middle.
- Click the Group dropdown and select Ungroup from the menu.
If you don’t Group the shapes before doing the alignment,
the shapes will stack on top of each in the center of the canvas.
Finally, you can spruce up the flowchart a bit by adding formatting
to the canvas. The Canvas shape itself can be changed — just like a
flowchart shape — using the tools on the Format tab. In the sample
flowchart above, the Change Shape tool was used to set the shape type to
Alternate Process, which makes it a rounded rectangle. A custom fill color
with a gradient scheme was applied. Finally, the Drop Shadow tool was used
to add depth.
Summary of Quirks
- If you do not use a canvas, connectors will not «connect».
-
You can copy a flowchart from Word (2007 — 2019) and Paste
Special into Excel as an editable Microsoft Office Drawing Object,
but you cannot copy a flowchart from Excel and Paste Special into
Word as an editable drawing. Earlier versions of Word (2003 and
prior) used to allow this. -
If you Group all the shapes within a canvas, the Fit feature
is disabled. If you ungroup the shapes, then right-click on the
canvas again, the Fit feature is re-enabled. -
Using Page Layout > Themes to change the document
formatting will change the flowchart styling as well, even if you
carefully customized the formatting of all your shapes. -
Using View > Gridlines will display a grid not only in the
canvas, but also over the entire document and any other open
document as well. When the canvas is selected, the grid will only
be displayed within the canvas. The quirk is that if you apply a
background style to the canvas, the grid will not display in the
canvas — perhaps the one place you did want it to show. - Word 2007 introduced vertical text alignment (it was not available in Word 2003 and previous versions), but centered text is skewed toward the top of the shape and the difference between it and top aligned text is barely noticably. You can set this in the Format AutoShape screen.
- The Format AutoShape dialog has a «Resize AutoShape to fit text» option. If you use it, remember that Word has an Undo function. You might need it.