
Excel for Microsoft 365 Excel for Microsoft 365 for Mac Excel for the web Excel 2021 Excel 2021 for Mac Excel 2019 Excel 2019 for Mac Excel 2016 Excel 2016 for Mac Excel 2013 Excel 2010 Excel 2007 More…Less
Although Excel includes a multitude of built-in worksheet functions, chances are it doesn’t have a function for every type of calculation you perform. The designers of Excel couldn’t possibly anticipate every user’s calculation needs. Instead, Excel provides you with the ability to create custom functions, which are explained in this article.
Custom functions, like macros, use the Visual Basic for Applications (VBA) programming language. They differ from macros in two significant ways. First, they use Function procedures instead of Sub procedures. That is, they start with a Function statement instead of a Sub statement and end with End Function instead of End Sub. Second, they perform calculations instead of taking actions. Certain kinds of statements, such as statements that select and format ranges, are excluded from custom functions. In this article, you’ll learn how to create and use custom functions. To create functions and macros, you work with the Visual Basic Editor (VBE), which opens in a new window separate from Excel.
Suppose your company offers a quantity discount of 10 percent on the sale of a product, provided the order is for more than 100 units. In the following paragraphs, we’ll demonstrate a function to calculate this discount.
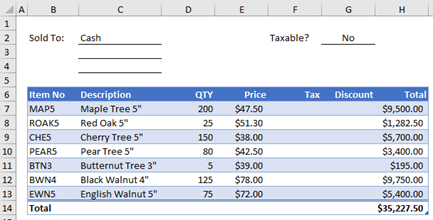
The example below shows an order form that lists each item, quantity, price, discount (if any), and the resulting extended price.
To create a custom DISCOUNT function in this workbook, follow these steps:
-
Press Alt+F11 to open the Visual Basic Editor (on the Mac, press FN+ALT+F11), and then click Insert > Module. A new module window appears on the right-hand side of the Visual Basic Editor.
-
Copy and paste the following code to the new module.
Function DISCOUNT(quantity, price)
   If quantity >=100 Then
     DISCOUNT = quantity * price * 0.1
   Else
     DISCOUNT = 0
   End If

 DISCOUNT = Application.Round(Discount, 2)
End Function
Note: To make your code more readable, you can use the Tab key to indent lines. The indentation is for your benefit only, and is optional, as the code will run with or without it. After you type an indented line, the Visual Basic Editor assumes your next line will be similarly indented. To move out (that is, to the left) one tab character, press Shift+Tab.
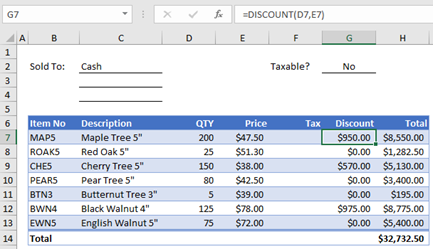
Now you’re ready to use the new DISCOUNT function. Close the Visual Basic Editor, select cell G7, and type the following:
=DISCOUNT(D7,E7)
Excel calculates the 10 percent discount on 200 units at $47.50 per unit and returns $950.00.
In the first line of your VBA code, Function DISCOUNT(quantity, price), you indicated that the DISCOUNT function requires two arguments, quantity and price. When you call the function in a worksheet cell, you must include those two arguments. In the formula =DISCOUNT(D7,E7), D7 is the quantity argument, and E7 is the price argument. Now you can copy the DISCOUNT formula to G8:G13 to get the results shown below.
Let’s consider how Excel interprets this function procedure. When you press Enter, Excel looks for the name DISCOUNT in the current workbook and finds that it is a custom function in a VBA module. The argument names enclosed in parentheses, quantity and price, are placeholders for the values on which the calculation of the discount is based.
The If statement in the following block of code examines the quantity argument and determines whether the number of items sold is greater than or equal to 100:
If quantity >= 100 Then
 DISCOUNT = quantity * price * 0.1
Else
 DISCOUNT = 0
End If
If the number of items sold is greater than or equal to 100, VBA executes the following statement, which multiplies the quantity value by the price value and then multiplies the result by 0.1:
Discount = quantity * price * 0.1
The result is stored as the variable Discount. A VBA statement that stores a value in a variable is called an assignment statement, because it evaluates the expression on the right side of the equal sign and assigns the result to the variable name on the left. Because the variable Discount has the same name as the function procedure, the value stored in the variable is returned to the worksheet formula that called the DISCOUNT function.
If quantity is less than 100, VBA executes the following statement:
Discount = 0
Finally, the following statement rounds the value assigned to the Discount variable to two decimal places:
Discount = Application.Round(Discount, 2)
VBA has no ROUND function, but Excel does. Therefore, to use ROUND in this statement, you tell VBA to look for the Round method (function) in the Application object (Excel). You do that by adding the word Application before the word Round. Use this syntax whenever you need to access an Excel function from a VBA module.
A custom function must start with a Function statement and end with an End Function statement. In addition to the function name, the Function statement usually specifies one or more arguments. You can, however, create a function with no arguments. Excel includes several built-in functions—RAND and NOW, for example—that don’t use arguments.
Following the Function statement, a function procedure includes one or more VBA statements that make decisions and perform calculations using the arguments passed to the function. Finally, somewhere in the function procedure, you must include a statement that assigns a value to a variable with the same name as the function. This value is returned to the formula that calls the function.
The number of VBA keywords you can use in custom functions is smaller than the number you can use in macros. Custom functions are not allowed to do anything other than return a value to a formula in a worksheet, or to an expression used in another VBA macro or function. For example, custom functions cannot resize windows, edit a formula in a cell, or change the font, color, or pattern options for the text in a cell. If you include “action” code of this kind in a function procedure, the function returns the #VALUE! error.
The one action a function procedure can do (apart from performing calculations) is display a dialog box. You can use an InputBox statement in a custom function as a means of getting input from the user executing the function. You can use a MsgBox statement as a means of conveying information to the user. You can also use custom dialog boxes, or UserForms, but that’s a subject beyond the scope of this introduction.
Even simple macros and custom functions can be difficult to read. You can make them easier to understand by typing explanatory text in the form of comments. You add comments by preceding the explanatory text with an apostrophe. For example, the following example shows the DISCOUNT function with comments. Adding comments like these makes it easier for you or others to maintain your VBA code as time passes. If you need to make a change to the code in the future, you’ll have an easier time understanding what you did originally.
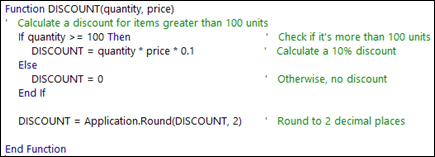
An apostrophe tells Excel to ignore everything to the right on the same line, so you can create comments either on lines by themselves or on the right side of lines containing VBA code. You might begin a relatively long block of code with a comment that explains its overall purpose and then use inline comments to document individual statements.
Another way to document your macros and custom functions is to give them descriptive names. For example, rather than name a macro Labels, you could name it MonthLabels to describe more specifically the purpose the macro serves. Using descriptive names for macros and custom functions is especially helpful when you’ve created many procedures, particularly if you create procedures that have similar but not identical purposes.
How you document your macros and custom functions is a matter of personal preference. What’s important is to adopt some method of documentation, and use it consistently.
To use a custom function, the workbook containing the module in which you created the function must be open. If that workbook is not open, you get a #NAME? error when you try to use the function. If you reference the function in a different workbook, you must precede the function name with the name of the workbook in which the function resides. For example, if you create a function called DISCOUNT in a workbook called Personal.xlsb and you call that function from another workbook, you must type =personal.xlsb!discount(), not simply =discount().
You can save yourself some keystrokes (and possible typing errors) by selecting your custom functions from the Insert Function dialog box. Your custom functions appear in the User Defined category:

An easier way to make your custom functions available at all times is to store them in a separate workbook and then save that workbook as an add-in. You can then make the add-in available whenever you run Excel. Here’s how to do this:
-
After you have created the functions you need, click File > Save As.
In Excel 2007, click the Microsoft Office Button, and click Save As
-
In the Save As dialog box, open the Save As Type drop-down list, and select Excel Add-In. Save the workbook under a recognizable name, such as MyFunctions, in the AddIns folder. The Save As dialog box will propose that folder, so all you need to do is accept the default location.
-
After you have saved the workbook, click File > Excel Options.
In Excel 2007, click the Microsoft Office Button, and click Excel Options.
-
In the Excel Options dialog box, click the Add-Ins category.
-
In the Manage drop-down list, select Excel Add-Ins. Then click the Go button.
-
In the Add-Ins dialog box, select the check box beside the name you used to save your workbook, as shown below.

-
After you have created the functions you need, click File > Save As.
-
In the Save As dialog box, open the Save As Type drop-down list, and select Excel Add-In. Save the workbook under a recognizable name, such as MyFunctions.
-
After you have saved the workbook, click Tools > Excel Add-Ins.
-
In the Add-Ins dialog box, select the Browse button to find your add-in, click Open, then check the box beside your Add-In in the Add-Ins Available box.
After you follow these steps, your custom functions will be available each time you run Excel. If you want to add to your function library, return to the Visual Basic Editor. If you look in the Visual Basic Editor Project Explorer under a VBAProject heading, you will see a module named after your add-in file. Your add-in will have the extension .xlam.
Double-clicking that module in the Project Explorer causes the Visual Basic Editor to display your function code. To add a new function, position your insertion point after the End Function statement that terminates the last function in the Code window, and begin typing. You can create as many functions as you need in this manner, and they will always be available in the User Defined category in the Insert Function dialog box.
This content was originally authored by Mark Dodge and Craig Stinson as part of their book Microsoft Office Excel 2007 Inside Out. It has since been updated to apply to newer versions of Excel as well.
Need more help?
You can always ask an expert in the Excel Tech Community or get support in the Answers community.
Need more help?
![]()
Download Article
![]()
Download Article
Microsoft Excel has many built-in functions, such as SUM, VLOOKUP, and LEFT. As you start using Excel for more complicated tasks, you may find that you need a function that doesn’t exist. That’s where custom functions come in! This wikiHow teaches you how to create your own functions in Microsoft Excel.
-
1
Open an Excel workbook. Double-click the workbook in which you want to use the custom-defined function to open it in Excel.
-
2
Press Alt+F11 (Windows) or Fn+⌥ Opt+F11 (Mac). This opens the Visual Basic Editor.
Advertisement
-
3
Click the Insert menu and select New Module. This opens a module window in the right panel of the editor.[1]
- You can create the user defined function in the worksheet itself without adding a new module, but that will make you unable to use the function in other worksheets of the same workbook.
-
4
Create your function’s header. The first line is where you will name the function and define our range.[2]
Replace «FunctionName» with the name you want to assign your custom function. The function can have as many parameters as you want, and their types can be any of Excel’s basic data or object types as Range:Function FunctionName (param1 As type1, param2 As type2 ) As return Type
- You may think of parameters as the «operands» your function will act upon. For example, when you use SIN(45) to calculate the Sine of 45 degree, 45 will be taken as a parameter. Then the code of your function will use that value to calculate something else and present the result.
-
5
Add the code of the function. Make sure you use the values provided by the parameters, assign the result to the name of the function, and close the function with «End Function.» Learning to program in VBA or in any other language can take some time and a detailed tutorial. However, functions usually have small code blocks and use very few features of the language. Some useful elements are:
- The If block, which allows you to execute a part of the code only if a condition is met. Notice the elements in an If code block: IF condition THEN code ELSE code END IF. The Else keyword along with the second part of the code are optional:
Function Course Result(grade As Integer) As String
  If grade >= 5 Then
    CourseResult = "Approved"
  Else
    CourseResult = "Rejected"
  End If
End Function
- The Do block, which executes a part of the code While or Until a condition is met. In the example code below, notice the elements DO code LOOP WHILE/UNTIL condition. Also notice the second line in which a variable is declared. You can add variables to your code so you can use them later. Variables act as temporary values inside the code. Finally, notice the declaration of the function as BOOLEAN, which is a datatype that allows only the TRUE and FALSE values. This method of determining if a number is prime is by far not the optimal, but I’ve left it that way to make the code easier to read.
Function IsPrime(value As Integer) As Boolean
  Dim i As Integer
  i = 2
  IsPrime = True
  Do
    If value / i = Int(value / i) Then
      IsPrime = False
    End If
    i = i + 1
  Loop While i < value And IsPrime = True
End Function
- The For block executes a part of the code a specified number of times. In this next example, you’ll see the elements FOR variable = lower limit TO upper limit code NEXT. You’ll also see the added ElseIf element in the If statement, which allows you to add more options to the code that is to be executed. Additionally, the declaration of the function and the variable result as Long. The Long datatype allows values much larger than Integer:
Public Function Factorial(value As Integer) As Long
  Dim result As Long
  Dim i As Integer
  If value = 0 Then
    result = 1
  ElseIf value = 1 Then
    result = 1
  Else
    result = 1
    For i = 1 To value
      result = result * i
    Next
  End If
  Factorial = result
End Function
- The If block, which allows you to execute a part of the code only if a condition is met. Notice the elements in an If code block: IF condition THEN code ELSE code END IF. The Else keyword along with the second part of the code are optional:
-
6
Close the Visual Basic Editor. Once you’ve created your function, close the window to return to your workbook. Now you can start using your user-defined function.
-
7
Enter your function. First, click the cell in which you want to enter the function. Then, click the function bar at the top of Excel (the one with the fx to its left) and type =FUNCTIONNAME(), replacing FUNCTIONNAME with the name you assigned your custom function.
- You can also find your user-defined formula in the «User Defined» category in the Insert Formula wizard—just click the fx to pull up the wizard.
-
8
Enter the parameters into the parentheses. For example, =NumberToLetters(A4). The parameters can be of three types:
- Constant values typed directly in the cell formula. Strings have to be quoted in this case.
- Cell references like B6 or range references like A1:C3. The parameter has to be of the Range datatype.
- Other functions nested inside your function. Your function can also be nested inside other functions. Example: =Factorial(MAX(D6:D8)).
-
9
Press ↵ Enter or ⏎ Return to run the function. The results will display in the selected cell.


Advertisement
Add New Question
-
Question
How can I use these functions in all Excel files?

Igal Livne
Community Answer
Save the workbook with the custom class as «Excel Add-In (*.xlam»),» by default Excel will take you to «Addins» folder. Go to Excel Options > Add-ins > Manage: «Excel Addins» — press «Go…» button. Browse for your newly create xlam file.
-
Question
How can I do well in exams?
Read the directions several times, leaving time for you to absorb between readings. Also practice writing VBA to do various things.
-
Question
How do I know what to write as the function code?
In order to create functions, you need a skill called «programming». Excel macros are written in a language called «Visual Basic for Applications», which you will need to learn to be able to write macros. It’s quite easy once you’ve got the hang of it though!
Ask a Question
200 characters left
Include your email address to get a message when this question is answered.
Submit
Advertisement
Video
-
Use a name that’s not already defined as a function name in Excel or you’ll end up being able to use only one of the functions.
-
Whenever you write a block of code inside a control structure like If, For, Do, etc. make sure you indent the block of code using a few blank spaces or the Tab key. That will make your code easier to understand and you’ll find a lot easier to spot errors and make improvements.
Show More Tips
Thanks for submitting a tip for review!
Advertisement
-
The functions used in this article are, by no means, the best way to solve the related problems. They were used here only to explain the usage of the control structures of the language.
-
VBA, as any other language, has several other control structures besides Do, If and For. Those have been explained here only to clarify what kind of things can be done inside the function source code. There are many online tutorials available where you can learn VBA.
-
Due to security measures, some people may disable macros. Make sure you let your colleagues know the book you’re sending them has macros and that they can trust they’re not going to damage their computers.
Advertisement
About This Article
Article SummaryX
1. Open Excel.
2. Press Alt + F11 to open the Visual Basic editor.
3. Create the function’s name and set the parameter types.
4. Use VB code to write your function.
5. Close the editor.
6. Run your function as you would other functions.
Did this summary help you?
Thanks to all authors for creating a page that has been read 640,161 times.
Is this article up to date?
Excel allows you to create custom functions using VBA, called «User Defined Functions» (UDFs) that can be used the same way you would use SUM() or other built-in Excel functions. They can be especially useful for advanced mathematics or special text manipulation or date calculations prior to 1900. Many Excel add-ins provide large collections of specialized functions.
This article will help you get started creating user defined functions with a few useful examples.
This Page (contents):
- How to Create a Custom User Defined Function
- Benefits of User Defined Excel Functions
- Limitations of UDFs
- User Defined Function Examples
NOTE: The new LAMBDA Function, available within «Production: Current Channel builds of Excel» is going to revolutionize how custom functions can be used in Excel without VBA.
Watch the Video
How to Create a Custom User Defined Function
- Open a new Excel workbook.
- Get into VBA (Press Alt+F11)
- Insert a new module (Insert > Module)
- Copy and Paste the Excel user defined function examples
- Get out of VBA (Press Alt+Q)
- Use the functions — They will appear in the Paste Function dialog box (Shift+F3) under the «User Defined» category
If you want to use a UDF in more than one workbook, you can save your functions to your personal.xlsb workbook or save them in your own custom add-in. To create an add-in, save your excel file that contains your VBA functions as an add-in file (.xla for Excel 2003 or .xlam for Excel 2007+). Then load the add-in (Tools > Add-Ins… for Excel 2003 or Developer > Excel Add-Ins for Excel 2010+).
Warning! Be careful about using custom functions in spreadsheets that you need to share with others. If they don’t have your add-in, the functions will not work when they use the spreadsheet.
Benefits of User Defined Excel Functions
- Create a complex or custom math function.
- Simplify formulas that would otherwise be extremely long «mega formulas».
- Diagnostics such as checking cell formats.
- Custom text manipulation.
- Advanced array formulas and matrix functions.
- Date calculations prior to 1900 using the built-in VBA date functions.
Limitations of UDF’s
- Cannot «record» an Excel UDF like you can an Excel macro.
- More limited than regular VBA macros. UDF’s cannot alter the structure or format of a worksheet or cell.
- If you call another function or macro from a UDF, the other macro is under the same limitations as the UDF.
- Cannot place a value in a cell other than the cell (or range) containing the formula. In other words, UDF’s are meant to be used as «formulas», not necessarily «macros».
- Excel user defined functions in VBA are usually much slower than functions compiled in C++ or FORTRAN.
- Often difficult to track errors.
- If you create an add-in containing your UDF’s, you may forget that you have used a custom function, making the file less sharable.
- Adding user defined functions to your workbook will trigger the «macro» flag (a security issue: Tools > Macros > Security…).
User Defined Function Examples
To see the following examples in action, download the file below. This file contains the VBA custom functions, so after opening it you will need to enable macros.
Download the Example File (CustomFunctions.xlsm)
Example #1: Get the Address of a Hyperlink
The following example can be useful when extracting hyperlinks from tables of links that have been copied into Excel, when doing post-processing on Excel web queries, or getting the email address from a list of «mailto:» hyperlinks.
This function is also an example of how to use an optional Excel UDF argument. The syntax for this custom Excel function is:
=LinkAddress(cell,[default_value])
To see an example of how to work with optional arguments, look up the IsMissing command in Excel’s VBA help files (F1).
Function LinkAddress(cell As range, _
                     Optional default_value As Variant)
  'Lists the Hyperlink Address for a Given Cell
  'If cell does not contain a hyperlink, return default_value
  If (cell.range("A1").Hyperlinks.Count <> 1) Then
      LinkAddress = default_value
  Else
      LinkAddress = cell.range("A1").Hyperlinks(1).Address
  End If
End Function
Example #2: Extract the Nth Element From a String
This example shows how to take advantage of some functions available in VBA to do some slick text manipulation. What if you had a bunch of telephone numbers in the following format: 1-800-999-9999 and you wanted to pull out just the 3-digit prefix?
This UDF takes as arguments the text string, the number of the element you want to grab (n), and the delimiter as a string (eg. «-«). The syntax for this example user defined function in Excel is:
=GetElement(text,n,delimiter)
Example: If B3 contains «1-800-333-4444″, and cell C3 contains the formula, =GetElement(B3,3,»-«), C3 will then equal «333». To turn the «333» into a number, you would use =VALUE(GetElement(B3,3,»-«)).
Function GetElement(text As Variant, n As Integer, _
                    delimiter As String) As String
    GetElement = Split(text, delimiter)(n - 1)
End Function
Example #3: Return the name of a month
The following function is based on the built-in visual basic MonthName() function and returns the full name of the month given the month number. If the second argument is TRUE, it will return the abbreviation.
=VBA_MonthName(month,boolean_abbreviate)
Example: =VBA_MonthName(3) will return «March» and =VBA_MonthName(3,TRUE) will return «Mar.»
Function VBA_MonthName(themonth As Long, _
   		Optional abbreviate As Boolean) As Variant
    VBA_MonthName = MonthName(themonth, abbreviate)
End Function
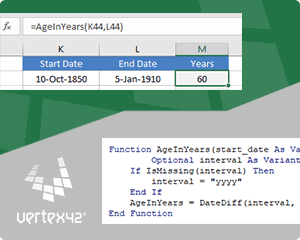
Example #4: Calculate Age for Years Prior to 1900
The Excel function DATEDIF(start_date,end_date,»y») is a very simple way to calculate the age of a person if the dates are after 1/1/1900. The VBA date functions like Year(), Month(), Day(), DateSerial(), DateValue() are able to handle all the Gregorian dates, so custom functions based on the VBA functions can allow you to work with dates prior to 1900. The function below is designed to work like DATEDIF(start_date,end_date,»y») as long as end_date >= start_date.
=AgeInYears(start_date,end_date)
Example: =AgeInYears(«10-Oct-1850″,»5-Jan-1910») returns the value 59.
Function AgeInYears(start_date As Variant, end_date As Variant) As Variant
    AgeInYears = Year(end_date) - Year(start_date) - _
    Abs(DateSerial(Year(end_date), Month(start_date), _
    Day(start_date)) > DateValue(end_date))
End Function
More Custom Excel Function Examples
For an excellent explanation of pretty much everything you need to know to create your own custom Excel function, I would recommend Excel 2016 Formulas. The book provides many good user defined function examples, so if you like to learn by example, it is a great resource.
- Rounding Significant Figures in Excel :: Shows how to return #NUM and #N/A error values.
- UDF Examples — www.ozgrid.com — Provides many examples of user defined functions, including random numbers, hyperlinks, count sum, sort by colors, etc.
- Build an Excel Add-In — http://www.fontstuff.com/vba/vbatut03.htm — An excellent tutorial that takes you through building an add-in for a custom excel function.
Note: I originally published most of this article in 2004, but I’ve updated it significantly and included other examples, as well as the download file.