
Write an equation or formula

-
Select Insert > Equation or press Alt + =.
-
Select the equation you need.
-
See the ribbon for more Structures and Convert options.
To type an equation from scratch, press Alt += on your keyboard.
or
Insert > Equation > Insert New Equation.
Use your finger, stylus, or mouse to write your equation.
See the ribbon for more Structures and Convert options.
Add an equation to the equation gallery
-
Select the equation you want to add.
-
Choose the down arrow and select Save as New Equation….
-
Type a name for the equation in the Create New Building Block dialog.
-
Select Equations in the gallery list.
-
Choose OK.
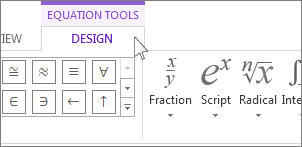
To change or edit an equation that was previously written,
-
Select the equation to see Equation Tools in the ribbon.

-
Choose Design to see tools for adding various elements to your equation. You can add or change the following elements to your equation.
-
In the Symbols group, you’ll find math related symbols. To see all the symbols, click the More button.
To see other sets of symbols, click the arrow in the upper right corner of the gallery.
-
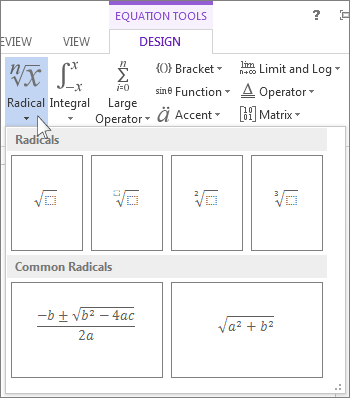
The Structures group provides structures you can insert. Just choose a structure to insert it and then replace the placeholders, the small dotted-line boxes, with your own values.
-
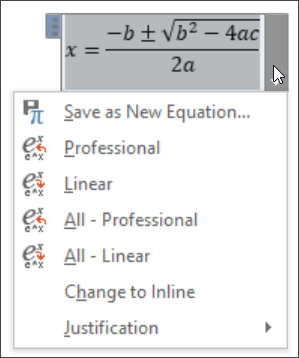
The Professional option displays the equation in a professional format optimized for display. The Linear option displays the equation as source text, which can be used to make changes to the equation if needed. The linear option will display the equation in either UnicodeMath format, or LaTeX format, which can be set in the Conversions chunk.
-
It is possible to convert all equations in a document to the Professional or Linear formats, or a single equation only, if the math zone is selected or the cursor is in the equation.
-
 To see other sets of symbols, click the arrow in the upper right corner of the gallery.
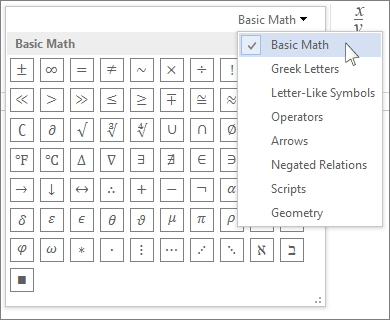

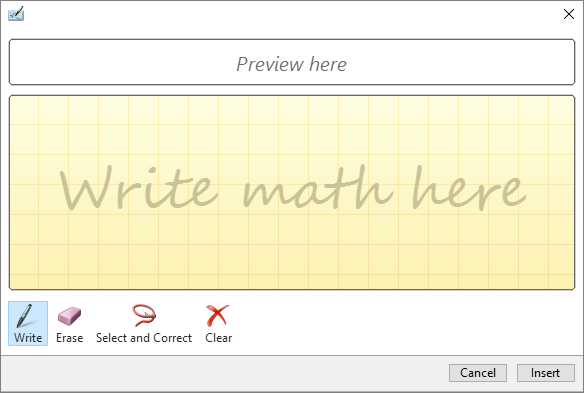
On touch- and pen-enabled devices you can write equations using a stylus or your finger. To write equations with ink,
-
Choose Draw > Ink to Math Convert and then click Ink Equation at the bottom of the built in gallery.
-
Use a stylus or your finger to write a math equation by hand. If you’re not using a touch device, use your mouse to write out the equation. You can select portions of the equation and edit them as you go, and use the preview box to make sure Word is correctly interpreting your handwriting.
-
When you’re satisfied, click Insert to convert the ink equation to an equation in your document.
See also
Linear format equations using UnicodeMath and LaTeX in Word
Where is Equation Editor?
Get Microsoft education templates
Need more help?
Want more options?
Explore subscription benefits, browse training courses, learn how to secure your device, and more.
Communities help you ask and answer questions, give feedback, and hear from experts with rich knowledge.
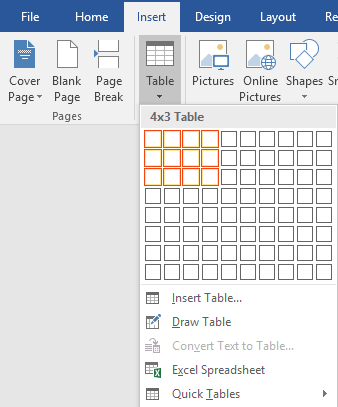
You can perform calculations and logical comparisons in a table by using formulas. The Formula command is found on the Table Tools, Layout tab, in the Data group.
A formula in Word automatically updates when you open the document that contains the formula. You can also update a formula result manually. For more information, see the section Update formula results.
Note: Formulas in Word or Outlook tables are a type of field code. For more information about field codes, see the See Also section.
In this article
-
Insert a formula in a table cell
-
Update formula results
-
Update the result of specific formulas
-
Update all the formula results in a table
-
Update all the formulas in a document
-
-
Examples: Sum numbers in a table by using positional arguments
-
Available functions
-
Use bookmarknames or cell references in a formula
-
RnCn references
-
A1 references
-
Insert a formula in a table cell
-
Select the table cell where you want your result. If the cell is not empty, delete its contents.
-
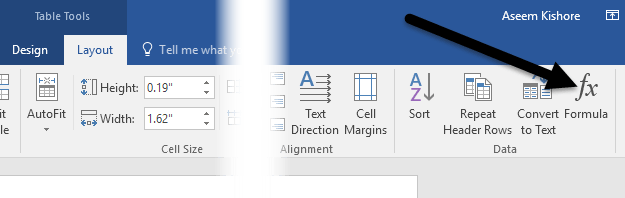
On the Table Tools, Layout tab, in the Data group, click Formula.
-
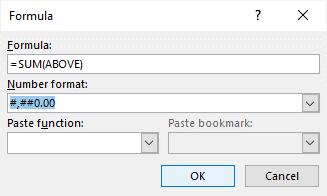
Use the Formula dialog box to create your formula. You can type in the Formula box, select a number format from the Number Format list, and paste in functions and bookmarks using the Paste Function and Paste Bookmark lists.
Update formula results
In Word, the result of a formula is calculated when it is inserted, and when the document containing the formula opens. In Outlook, the result of a formula is only calculated when it is inserted and won’t be available for the recipient of the email to edit.
You can also manually update:
-
The result of one or more specific formulas
-
The results of all formulas in a specific table
-
All the field codes in a document, including formulas
Update the result of specific formulas
-
Select the formulas that you want to update. You can select multiple formulas by holding down the CTRL key while you make selections.
-
Do one of the following:
-
Right-click the formula, then click Update field.
-
Press F9.
-
Update all the formula results in a table
-
Select the table that contains formula results that you want to update, and then press F9.
Update all the formulas in a document
Important: This procedure updates all the field codes in a document, not just formulas.
-
Press CTRL+A.
-
Press F9.
Examples: Sum numbers in a table by using positional arguments
You can use positional arguments (LEFT, RIGHT, ABOVE, BELOW) with these functions:
-
AVERAGE
-
COUNT
-
MAX
-
MIN
-
PRODUCT
-
SUM
As an example, consider the following procedure for adding numbers by using the SUM function and positional arguments.
Important: To avoid an error while summing in a table by using positional arguments, type a zero (0) in any empty cell that will be included in the calculation.
-
Select the table cell where you want your result. If the cell is not empty, delete its contents.
-
On the Table Tools, Layout tab, in the Data group, click Formula.
-
In the Formula dialog box, do one of the following:
|
To add the numbers… |
Type this in the Formula box |
|---|---|
|
Above the cell |
=SUM(ABOVE) |
|
Below the cell |
=SUM(BELOW) |
|
Above and below the cell |
=SUM(ABOVE,BELOW) |
|
Left of the cell |
=SUM(LEFT) |
|
Right of the cell |
=SUM(RIGHT) |
|
Left and right of the cell |
=SUM(LEFT,RIGHT) |
|
Left of and above the cell |
=SUM(LEFT,ABOVE) |
|
Right of and above the cell |
=SUM(RIGHT,ABOVE) |
|
Left of and below the cell |
=SUM(LEFT,BELOW) |
|
Right of and below the cell |
=SUM(RIGHT,BELOW) |
-
Click OK.
Available functions
Note: Formulas that use positional arguments (e.g., LEFT) do not include values in header rows.
The following functions are available for use in Word and Outlook table formulas:
|
Function |
What it does |
Example |
Returns |
|---|---|---|---|
|
ABS() |
Calculates the absolute value of the value inside the parentheses |
=ABS(-22) |
22 |
|
AND() |
Evaluates whether the arguments inside the parentheses are all TRUE. |
=AND(SUM(LEFT)<10,SUM(ABOVE)>=5) |
1, if the sum of the values to the left of the formula (in the same row) is less than 10 and the sum of the values above the formula (in the same column, excluding any header cell) is greater than or equal to 5; 0 otherwise. |
|
AVERAGE() |
Calculates the average of items identified inside the parentheses. |
=AVERAGE(RIGHT) |
The average of all values to the right of the formula cell, in the same row. |
|
COUNT() |
Calculates the count of items identified inside the parentheses. |
=COUNT(LEFT) |
The number of values to the left of the formula cell, in the same row. |
|
DEFINED() |
Evaluates whether the argument inside the parentheses is defined. Returns 1 if the argument has been defined and evaluates without error, 0 if the argument has not been defined or returns an error. |
=DEFINED(gross_income) |
1, if gross_income has been defined and evaluates without error; 0 otherwise. |
|
FALSE |
Takes no arguments. Always returns 0. |
=FALSE |
0 |
|
IF() |
Evaluates the first argument. Returns the second argument if the first argument is true; returns the third argument if the first argument is false. Note: Requires exactly three arguments. |
=IF(SUM(LEFT)>=10,10,0) |
10, if the sum of values to the left of the formula is at least 10; 0 otherwise. |
|
INT() |
Rounds the value inside the parentheses down to the nearest integer. |
=INT(5.67) |
5 |
|
MAX() |
Returns the maximum value of the items identified inside the parentheses. |
=MAX(ABOVE) |
The maximum value found in the cells above the formula (excluding any header rows). |
|
MIN() |
Returns the minimum value of the items identified inside the parentheses. |
=MIN(ABOVE) |
The minimum value found in the cells above the formula (excluding any header rows). |
|
MOD() |
Takes two arguments (must be numbers or evaluate to numbers). Returns the remainder after the second argument is divided by the first. If the remainder is 0 (zero), returns 0.0 |
=MOD(4,2) |
0.0 |
|
NOT() |
Takes one argument. Evaluates whether the argument is true. Returns 0 if the argument is true, 1 if the argument is false. Mostly used inside an IF formula. |
=NOT(1=1) |
0 |
|
OR() |
Takes two arguments. If either is true, returns 1. If both are false, returns 0. Mostly used inside an IF formula. |
=OR(1=1,1=5) |
1 |
|
PRODUCT() |
Calculates the product of items identified inside the parentheses. |
=PRODUCT(LEFT) |
The product of multiplying all the values found in the cells to the left of the formula. |
|
ROUND() |
Takes two arguments (first argument must be a number or evaluate to a number; second argument must be an integer or evaluate to an integer). Rounds the first argument to the number of digits specified by the second argument. If the second argument is greater than zero (0), first argument is rounded down to the specified number of digits. If second argument is zero (0), first argument is rounded down to the nearest integer. If second argument is negative, first argument is rounded down to the left of the decimal. |
=ROUND(123.456, 2) =ROUND(123.456, 0) =ROUND(123.456, -2) |
123.46 123 100 |
|
SIGN() |
Takes one argument that must either be a number or evaluate to a number. Evaluates whether the item identified inside the parentheses if greater than, equal to, or less than zero (0). Returns 1 if greater than zero, 0 if zero, -1 if less than zero. |
=SIGN(-11) |
-1 |
|
SUM() |
Calculates the sum of items identified inside the parentheses. |
=SUM(RIGHT) |
The sum of the values of the cells to the right of the formula. |
|
TRUE() |
Takes one argument. Evaluates whether the argument is true. Returns 1 if the argument is true, 0 if the argument is false. Mostly used inside an IF formula. |
=TRUE(1=0) |
0 |
Use bookmarknames or cell references in a formula
You can refer to a bookmarked cell by using its bookmarkname in a formula. For example, if you have bookmarked a cell that contains or evaluates to a number with the bookmarkname gross_income, the formula =ROUND(gross_income,0) rounds the value of that cell down to the nearest integer.
You can also use column and row references in a formula. There are two reference styles: RnCn and A1.
Note: The cell that contains the formula is not included in a calculation that uses a reference. If the cell is part of the reference, it is ignored.
RnCn references
You can refer to a table row, column, or cell in a formula by using the RnCn reference convention. In this convention, Rn refers to the nth row, and Cn refers to the nth column. For example, R1C2 refers to the cell that is in first row and the second column. The following table contains examples of this reference style.
|
To refer to… |
…use this reference style |
|---|---|
|
An entire column |
Cn |
|
An entire row |
Rn |
|
A specific cell |
RnCn |
|
The row that contains the formula |
R |
|
The column that contains the formula |
C |
|
All the cells between two specified cells |
RnCn:RnCn |
|
A cell in a bookmarked table |
Bookmarkname RnCn |
|
A range of cells in a bookmarked table |
Bookmarkname RnCn:RnCn |
A1 references
You can refer to a cell, a set of cells, or a range of cells by using the A1 reference convention. In this convention, the letter refers to the cell’s column and the number refers to the cell’s row. The first column in a table is column A; the first row is row 1. The following table contains examples of this reference style.
|
To refer to… |
…use this reference |
|---|---|
|
The cell in the first column and the second row |
A2 |
|
The first two cells in the first row |
A1,B1 |
|
All the cells in the first column and the first two cells in the second column |
A1:B2 |
Last updated 2015-8-29
See Also
Field codes in Word and Outlook
There are a lot of times when I need to include some simple data calculations in a Word document and a table is the best option. You can always try to insert an entire Excel spreadsheet into your Word doc, but that’s overkill sometimes.
In this article, I’m going to talk about how you can use formulas inside tables in Word. There are only a handful of formulas you can use, but it’s enough to get totals, counts, round numbers, etc. Also, if you are already familiar with Excel, then using the formulas in Word will be a piece of cake.
Insert Formulas into Word Tables
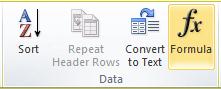
Let’s start out by creating a simple test table. Click on the Insert tab and then click on Table. Choose how many rows and columns you want from the grid.
Once your table has been inserted, go ahead and add in some data. I’ve just made a really simple table with a couple of numbers for my example.

Now let’s go ahead and insert a formula. In the first example, I’m going to add the first three values in the first row together (10 + 10 + 10). To do this, click inside the last cell in the fourth column, click on Layout in the ribbon and then click on Formula at the far right.
This will bring up the Formula dialog with a default of =SUM(LEFT).
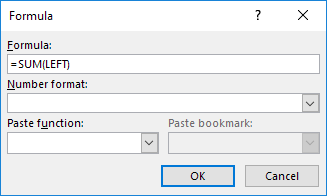
If you were to simply click OK, you will see the value we are looking for in the cell (30).

Let’s talk about the formula. Just like Excel, a formula starts with an equals sign, followed by a function name and arguments in parenthesis. In Excel, you only specify cell references or named ranges like A1, A1:A3, etc., but in Word, you have these positional terms you can use.
In the example, LEFT means all cells that are to the left of the cell in which the formula is entered. You can also use RIGHT, ABOVE and BELOW. You can use these positional arguments with SUM, PRODUCT, MIN, MAX, COUNT and AVERAGE.
In addition, you can use these arguments in combination. For example, I could type in =SUM(LEFT, RIGHT) and it would add all the cells that are to the left and right of that cell. =SUM(ABOVE, RIGHT) would add all numbers that are above the cell and to the right. You get the picture.
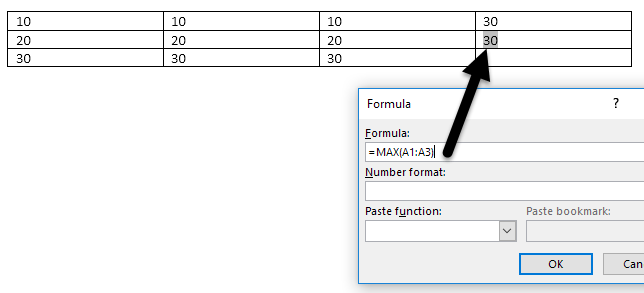
Now let’s talk about some of the other functions and how we can specify cells in a different manner. If I wanted to find the maximum number in the first column, I could add another row and then use the =MAX(ABOVE) function to get 30. However, there is another way you can do this. I could also simply go into any cell and type in =MAX(A1:A3), which references the first three rows in the first column.
This is really convenient because you can put the formulas anywhere you want in the table. You can also reference individual cells like writing =SUM(A1, A2, A3), which will give you the same result. If you write =SUM(A1:B3), it will add A1, A2, A3, B1, B2, and B3. Using these combinations, you can pretty much reference any data you like.
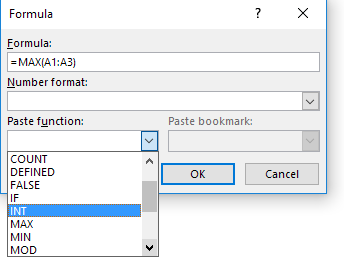
If you want to see a list of all the functions you can use in your Word formula, just click on the Paste Function box.
You can use IF statements, AND and OR operators and more. Let’s see an example of a more complex formula.
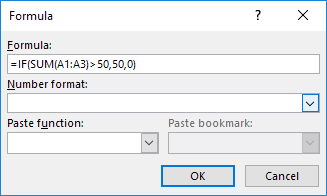
In the example above, I have =IF(SUM(A1:A3) > 50, 50, 0), which means that if the sum from A1 to A3 is greater than 50, show 50, otherwise show 0. It’s worth noting that all of these functions really only work with numbers. You can’t do anything with text or strings and you can’t output any text or string either. Everything has to be a number.
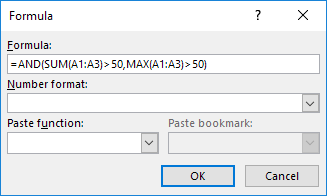
Here’s another example using the AND function. In this example, I am saying that if both the sum and max value of A1 to A3 is greater than 50, then true otherwise false. True is represented by a 1 and False by 0.
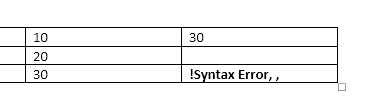
If you type in a formula and it’s got an error in it, you’ll see a syntax error message.
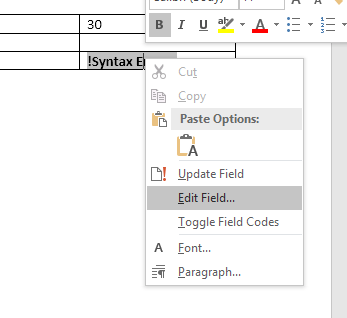
To fix the formula, just right click on the error and choose Edit Field.
This will bring up the Field dialog. Here you just have to click on the Formula button.
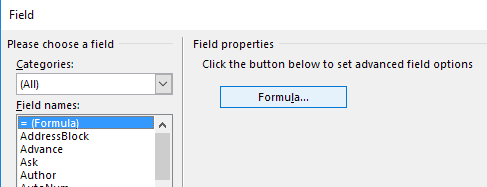
This will bring up the same Formula editing dialog that we’ve been working with since the beginning. That’s about all there is to inserting formulas into Word. You can also check out the online documentation from Microsoft that explains each function in detail.
Overall, it’s nothing even close to the power of Excel, but it’s enough for some basic spreadsheet calculations right inside Word. If you have any questions, feel free to comment. Enjoy!
![]()
Download Article
A descriptive guide to inserting equations in Word
![]()
Download Article
Modern versions of Word include almost all the symbols and structures a math professor could need. These can either be quickly typed with shortcuts or found in the convenient Equation menu, depending on your preference. The process is a little different if you’re on a Mac, or using Word 2003 or older. Note that the old «Insert Object» method from Word 2003 is not included in modern versions. You can also write equations in Word using the mobile app. This wikiHow shows you how to insert equations in MS Word in all cases.
-
1
Press Alt and =. This will insert an equation at the position of your cursor and open the editor.
-
2
Insert symbols by typing “symbolname” and press the space bar. If you know the name of a symbol, simply type «» followed by the symbol name. For example, for the Greek letter theta, type theta and press the space bar to convert it. You can also look at https://www.rapidtables.com/math/symbols/Basic_Math_Symbols.html to preview symbol names.
Advertisement
-
3
Insert fractions using /. For example, typing «a/b» (and then pressing the space bar) puts a on top of b as a fraction.
-
4
Group expressions using parentheses (). Brackets, or parentheses, (), are used to group parts of the equation in the editor. For example, «(a+b)/c» will put the expression a+b on the top of the fraction but will not display the brackets.
-
5
Use _ and ^ to insert subscripts and superscripts. For example, «a_b» makes b the subscript of a, and likewise, «a^b» makes b the exponent of a. Subscripts and superscripts can be used simultaneously and are also how the equation editor adds limits to integrals, for example, typing «int_a^b» and pressing the space bar gives the integral from a to b.
-
6
Insert functions by pressing the space bar after the function name. Trigonometric functions such as sin and arctan are recognized, as well as other functions such as log and exp; however, you must press the space bar after typing the function name in order for the editor to recognize it as a function.
-
7
Make font changes. Font changes can be made as you are going along. To toggle bold and italic text use the normal shortcuts: Ctrl+B or Ctrl+I. To type text within an equation that looks ‘normal’, enclose it in quotation marks. To make a character into a script character use «script». For example, «scriptF» would change the F into a script character.
-
8
Look up other shortcuts. Typing equations is much faster than selecting symbols and structures from the menu but does require learning the shortcuts. Using the steps above, you can probably guess most of the shortcuts you will need.[1]
[2]
[3]


Advertisement
-
1
Open your Word document. Since the app works the same on every platform, this method will work for any mobile device.
- If you don’t have Microsoft Word, you can download it for free from the Google Play Store (Android) or App store (iOS).
-
2
Tap Home. When you tap Home, a list of options appears.[4]
- To see this option on a phone, you will need to tap the pencil icon above the text area to edit the document. Tap the up arrow on the right side of the menu that appears above your keyboard. If you’re using a tablet, the ribbon with Home, Insert, Draw, and Layout appears above the text area.
-
3
Tap Insert.
-
4
Tap Equation or Insert New Equation. You might have to scroll down the list to see this on phones.
-
5
Type your equation. For example, if you want to achieve a²+b²=c², type “a2+b2=c2.” If you can’t find the symbol you need on your keyboard, you can always copy and paste it into the document from other sources.
-
6
Double-tap your typed equation. A box will pop up above your equation.
-
7
Tap Math Options.
-
8
Tap Professional. Your symbols and numbers will change into an equation format.


Advertisement
-
1
Select the Insert tab on the ribbon. The ribbon is the horizontal menu between your document title and the document itself.
-
2
Find the Equation icon (π). You’ll see this on the far right, in the Symbols group.
-
3
Click the icon to insert an equation. A box will appear at the position of your text cursor. You can start typing immediately to start your equation or continue to the next step for more options.
-
4
Insert special formatting. When you clicked the Equations icon, the ribbon menu changed to display a large array of new options. Browse through them to find what you need, then type to complete the equation. Here’s a step by step example:[5]
- Click the Script icon to open a drop-down menu. Hover over each button and a tooltip will appear telling you what it is.
- Select the basic subscript option, and two squares will appear in your equation, one below the other: □□
- Click the first square and type in the value you’d like to display: 5□
- Click the second square and type in the subscript value: 53
-
5
Continue typing to complete the equation. If you do not need any special formatting, just continue typing to extend the equation. Word will automatically insert spaces and italicize variables.
-
6
Move the equation on the page. Select the entire equation text box, and you’ll see a tab with an arrow on the right-hand side. Click this arrow to reveal a list of visual options, including whether to center, left-justify, or right-justify the equation.
- You can also highlight the text in the equation and alter the font size and style as usual.
-
7
Write equations by hand (2016 only). If you have Word 2016, you can create an «equation» by drawing it with a mouse or touchscreen tool. Select Ink Equation from the drop-down Equations menu to get started.[6]


Advertisement
-
1
Select the Document Elements tab. This tab is on the ribbon menu, just below the highest row of icons.
-
2
Select the Equations icon on the far right. With Document Elements selected, Equation is the option farthest to the right, with a π icon. There are three options here:
- Click the arrow next to the Equations icon for a drop-down selection of common equations.
- Click the arrow, then click «Insert New Equation» to type your own.
- Click the icon itself to open up a larger menu of equation options on the ribbon.
-
3
Use the top menu instead. If you prefer to use the top menu, select «Insert,» then scroll all the way down to «Equation» in the drop-down menu.
- Your text cursor must be at a blank point in the document to access this command. (For example, if you have an existing object selected, this command is greyed out.)
-
4
Choose display options. Click the downward-facing arrow to the right of the equation box. A drop-down menu will appear with options to alter how your equation is displayed.
- This menu also includes the «save as new equation» command, useful for equations you plan to use frequently. This adds the selected equation to the drop-down menu when you click the arrow next to the Equations icon.


Advertisement
-
1
Know the limitations. Equations written in Word 2003 or earlier cannot be edited in later versions of Word. If you are collaborating with other Word users, it’s best to upgrade to a more recent version.[7]
-
2
Attempt to insert an equation. From the top menu, select Insert → Object → Create New. If you see «Microsoft Equation 3.0» or «Math Type» in the Objects list, select it to insert an equation. Otherwise, go to the next step.
- Once you’ve inserted an equation, a small window will open with various symbols. Click these buttons and select the symbol you need to add it to the equation.
- Word 2003 does not have the same formatting options as later versions. Some equations may look less professional than you’re used to.
-
3
Install the add-on if necessary. If your copy of Word 2003 does not have one of the add-ons you mentioned above, you’ll need to install one. It’s not easy to locate these anymore, but fortunately the install package may already be waiting on your computer:
- Close all Microsoft Office programs.
- Navigate to Start → Control Panel → Add or Remove Programs.
- Select Microsoft Office → Change → Add or Remove Features → Next.
- Click the + symbol next to Office Tools.
- Select Equation Editor and click Run, then Update.
- Follow the onscreen instructions. If you’re unlucky, you may need the Word 2003 install CD.


Advertisement
Add New Question
-
Question
How could I type the elements of a 6 x 2 matrix?

Insert Tab > Equation > Design Tab > Matrix. First select a 3 x 2 matrix, then in each element select a 2 x 1 matrix.
-
Question
How do I insert a square root?
Go to «Insert.» Click on «Equation.» On the top ribbon there is a list of various math symbols including various forms of the square roots. It has the word «Structures» as a grouping.
-
Question
How do I escape from the equation when I want to keep typing on the same line in MS Word?
Press the Tab key and start typing on the same line.
Ask a Question
200 characters left
Include your email address to get a message when this question is answered.
Submit
Advertisement
Video
-
To create the second line of an equation, press Shift + Enter.[8]
Enter will exit the equation or start a new equation paragraph, depending on your version of Word. -
If you are using Word 2007 or later and trying to edit a document created in Word 2003 or earlier, use the File → Convert command to unlock equations and other editing features.[9]
-
The Office 365 subscription service typically includes the latest version of Word. Follow the instructions for the most recent version that works on your operating system.
Thanks for submitting a tip for review!
Advertisement
-
If you save the document as a .docx file, people with Word 2003 and earlier will not be able to edit the equations.[10]
Advertisement
About This Article
Article SummaryX
1. Press Alt and = to insert an equation.
2. Add letters and numbers.
3. Insert symbols in the ″symbolname″ format.
4. Press the spacebar to convert a symbol.
5. Insert fractions with ″/″ key.
6. Group expressions between parentheses.
7. Use ″_″ for subscript and ″^″ for superscript.
8. Type a function and press the spacebar to insert.
Did this summary help you?
Thanks to all authors for creating a page that has been read 851,172 times.
Is this article up to date?
Create Calculations in Word Tables Using Formulas
by Avantix Learning Team | Updated October 9, 2021
Applies to: Microsoft® Word® 2013, 2016, 2019 or 365 (Windows)
You can insert formulas in Word tables to perform calculations. These formulas can include functions such as SUM or AVERAGE or basic operators. When you insert formulas in Word tables, you are really inserting fields so the fields will need to be updated if the data in the table changes. For more complex calculations, it’s usually best to create formulas in Excel where they will update automatically.
Formulas and functions in Word tables only work with numbers. You can’t perform text calculations or output text.
Recommended article: 3 Simple Ways to Copy or Import Excel Data into Word (Linked or Unlinked)
Note: Buttons and Ribbon tabs may display in a different way (with or without text) depending on your version of Word, the size of your screen and your Control Panel settings. For Word 365 users, Ribbon tabs may appear with different names. For example, the Table Tools Design tab may appear as Table Design.
To insert a formula in a cell in a Word table, you’ll need to use the Function command on the Table Tools Layout or Table Layout tab in the Ribbon:
Do you want to learn more about Microsoft Word? Check out our virtual classroom or live classroom Word courses >
Understanding formula syntax
When you insert a table in Word, each column and row are identified like cells in Excel worksheets and each cell is assigned a cell reference. In a Word table, the first column would be column A and the first row would be row 1 so the first cell would be identified as A1. Therefore, you can create calculations that refer to cells (such as =A1+A2).
In Word and Excel, you can use the same basic operators:
- addition (+)
- subtraction (-)
- multiplication (*)
- division (/)
Typically, formulas in Word tables are created using common functions such as SUM, AVERAGE, MIN, MAX or COUNT and refer to a range. They must start with an equal sign (=).
You can refer to ranges of cells using ABOVE, LEFT, RIGHT or BELOW as the arguments for functions. If you’re trying to sum the cells at the bottom of a column, the formula would be =SUM(ABOVE). You can also combine these arguments. For example, you could enter a formula =SUM(ABOVE,LEFT) and it would sum all cells that are above and to the left of that cell. Functions can also refer to cell references such as =SUM(C1:C10). You can also refer to individual cells such =SUM(B1,C1,D5).
Word tables can also perform more complex calculations using the IF function with the syntax =IF(test,true,false). For example, =IF(A5>=1000,0,50) could be used to calculate a shipping cost of 50 if orders are less than 1000. You can also use the AND and OR functions with the IF function.
Inserting a formula in a table
To insert a formula in a table:
- Click in the cell where you want to enter a formula.
- Click the Table Tools Layout or Table Layout tab in the Ribbon.
- Select Function (fx) in the Data group. A dialog box appears. Word will typically insert a function and arguments in the Formula box.
- If you want to accept the suggested formula, click OK. If you want to change the formula, click in the Formula box and enter a formula (starting with =). You can also choose other functions from the Paste Function drop-down menu.
- If necessary, select a format from the Format drop-down menu.
- Click OK. Word inserts the formula as a field and displays the results.
The Function dialog box appears as follows with a formula and a format selected:
Updating a formula
If the original data changes, you can right-click the Formula field and select Update from the drop-down menu or press F9. If you want to update all formulas in a table, select all of the cells in the table and press F9. To select the entire table, click the four arrows on the top left of the table.
Changing a formula
To change a formula in a table:
- Right-click the formula or error. A drop-down menu appears.
- Select Edit field.
- Make the desired changes.
- Click OK.
Updating all fields
To update all fields in all tables:
- Press Ctrl + A to select all.
- Press F9.
Formula fields are just one type of field you can use in Word. There are many other fields that can insert variable information in Word documents.
Subscribe to get more articles like this one
Did you find this article helpful? If you would like to receive new articles, join our email list.
More resources
4 Ways to Create a Table in Word
How to Insert Fields in Word (Built-in or Custom)
5 Ways to Insert the Division Symbol in Word (Type or Insert ÷)
How to Insert Reusable Text Snippets in Word with Quick Parts
10 Microsoft Word Tips, Tricks and Shortcuts for Selecting in Tables
Related courses
Microsoft Word: Intermediate / Advanced
Microsoft Excel: Intermediate / Advanced
Microsoft PowerPoint: Intermediate / Advanced
Microsoft Word: Long Documents Master Class
Microsoft Word: Styles, Templates and Tables of Contents
Microsoft Word: Designing Dynamic Word Documents Using Fields
VIEW MORE COURSES >
Our instructor-led courses are delivered in virtual classroom format or at our downtown Toronto location at 18 King Street East, Suite 1400, Toronto, Ontario, Canada (some in-person classroom courses may also be delivered at an alternate downtown Toronto location). Contact us at info@avantixlearning.ca if you’d like to arrange custom instructor-led virtual classroom or onsite training on a date that’s convenient for you.
Copyright 2023 Avantix® Learning
Microsoft, the Microsoft logo, Microsoft Office and related Microsoft applications and logos are registered trademarks of Microsoft Corporation in Canada, US and other countries. All other trademarks are the property of the registered owners.
Avantix Learning |18 King Street East, Suite 1400, Toronto, Ontario, Canada M5C 1C4 | Contact us at info@avantixlearning.ca