
Содержание
- How to create multiple folders at once from Excel
- How to create multiple folders at once from Excel
- Create a folder and sub folder in Excel VBA
- 14 Answers 14
- Create folders from an Excel list
- VBA code to create, delete and manage folders
- Check if a folder exists
- Create a new folder
- Delete a folder
- Rename a folder
How to create multiple folders at once from Excel
If you have a spreadsheet and want to create multiple folders from the Excel spreadsheet’s values, you can follow this tutorial. Whether you use the Excel desktop app, Excel Online, or Google Sheets, you can use this tutorial to get the same results.
Let’s assume that you have a list of names alongside some other data in an Excel spreadsheet. Meanwhile, you want to make folders after each name mentioned in a column. Instead of creating them manually, which is very time-consuming, you can use a simple method to create multiple folders at once from Excel cell values. As you already have the Notepad app on your computer, you do not need anything else to get the job done.
Before getting started, you should know a few things that must be cleared. Let’s say you have a spreadsheet containing three columns and five rows. If you follow this method, you will end up creating five folders, and each folder will contain two sub-folders. It is possible to add or remove more sub-folders, but that requires manual work.
We have shown the steps in a demo spreadsheet. In other words, we have mentioned Column A, B, and so on to simplify the steps. However, you need to do the same in a specific column/row/cell according to your spreadsheet. As per this following guide, Column B will be the primary folder, and Column C, D, etc., will be sub-folders.
How to create multiple folders at once from Excel
To create multiple folders at once from Excel, follow these steps-
- Open the Excel spreadsheet.
- Right-click on Column A and select the Insert option.
- Enter MD in all cells.
- Enter as a prefix in all cells except Column A and B.
- Select all cells and paste them into Notepad.
- Select space and combination visible before all the C, D, or rest of the columns.
- Go to Edit > Replace.
- Enter the copied content in the Find what box.
- Enter in the Replace with box.
- Click the Replace All button.
- Go to File > Save As.
- Select a path, enter a name with .bat extension, and click the Save button.
- Move the .bat file to a place where you want to create all folders.
- Double-click on it.
Let’s check out these steps in detail.
At first, open your Excel spreadsheet. However, it is recommended to make a copy of this sheet as you are going to make a few changes to the original spreadsheet.
After opening, you have to enter a new column in the beginning. For that, right-click on the existing Column A and select the Insert option.
Now, enter MD in all the cells in Column A.
Next, you have to enter ‘’ as the prefix in all cells of Column C, D, and all the other columns that you want to include. For that, you can follow this detailed guide to enter prefixes in all cells in Excel.
Then, copy all the cells, open the Notepad app, and paste it there. You have to remove the space between Column B and C, and so forth. For that, copy the portion containing the space and > go to Edit > Replace, and paste it in the Find what box.
Enter in the Replace with box, and click the Replace All button.
Now, you can find the entries like this-
Click the File > Save As option, choose a path where you want to save the file, enter a name with .bat extension (for example, myfolders.bat), and click the Save button.
Now, move the .bat file to a location where you want to create all the folders and double-click on it. Depending upon how many cells you selected, it might take 10-15 seconds to get the job done.
That’s all! Do let us know if you have any doubt in the comments.
Источник
Create a folder and sub folder in Excel VBA
I have a pull down menu of companies that is populated by a list on another sheet. Three columns, Company, Job #, and Part Number.
When a job is created I need a folder for said company and a sub-folder for said Part Number.
If you go down the path it would look like:
If either company name or Part number exists don’t create, or overwrite the old one. Just go to next step. So if both folders exist nothing happens, if one or both don’t exist create as required.
Another question is there a way to make it so it works on Macs and PCs the same?
14 Answers 14
Another simple version working on PC:
One sub and two functions. The sub builds your path and use the functions to check if the path exists and create if not. If the full path exists already, it will just pass on by. This will work on PC, but you will have to check what needs to be modified to work on Mac as well.
I found a much better way of doing the same, less code, much more efficient. Note that the «»»» is to quote the path in case it contains blanks in a folder name. Command line mkdir creates any intermediary folder if necessary to make the whole path exist.

There are some good answers on here, so I will just add some process improvements. A better way of determining if the folder exists (does not use FileSystemObjects, which not all computers are allowed to use):
This works like a charm in AutoCad VBA and I grabbed it from an excel forum. I don’t know why you all make it so complicated?
Question: I’m not sure if a particular directory exists already. If it doesn’t exist, I’d like to create it using VBA code. How can I do this?
Answer: You can test to see if a directory exists using the VBA code below:
(Quotes below are omitted to avoid confusion of programming code)
For those looking for a cross-platform way that works on both Windows and Mac, the following works:
Never tried with non Windows systems, but here’s the one I have in my library, pretty easy to use. No special library reference required.
Here’s short sub without error handling that creates subdirectories:

I know this has been answered and there were many good answers already, but for people who come here and look for a solution I could post what I have settled with eventually.
The following code handles both paths to a drive (like «C:Users. «) and to a server address (style: «ServerPath..»), it takes a path as an argument and automatically strips any file names from it (use «» at the end if it’s already a directory path) and it returns false if for whatever reason the folder could not be created. Oh yes, it also creates sub-sub-sub-directories, if this was requested.
I hope someone may find this useful. Enjoy! 🙂

This is a recursive version that works with letter drives as well as UNC. I used the error catching to implement it but if anyone can do one without, I would be interested to see it. This approach works from the branches to the root so it will be somewhat usable when you don’t have permissions in the root and lower parts of the directory tree.
Источник
Create folders from an Excel list
Today we teach you how to create folders from an Excel list automatically, and for that we’re going to use a simple macro. Macros help us automate tasks that we perform repeatedly. If you had to create around 100 folders, would you do it manually or would you rather have a macro do the work for you?
Show the Programmer tab
To use Excel macros you need to have the Scheduler tab visible inside your ribbon.
If you don’t see this tab inside your ribbon, you must activate it first. To do this, right-click on any of the tabs and choose Customize ribbon from the drop-down menu.
In the box on the right, enable the option Programmer or Developer and click OK.
Check that the tab is included in your ribbon. 
Creating the Macro
To create the macro that allows you to create folders from an Excel list follow these steps:
Go to the Programmer tab →clica on the Visual Basic option.
In the window that has been opened, go to the top menu and click on the option Insert → Module.
In the module window paste the following code:
Sub CreateFolders()
path = InputBox(“Enter the path where you want to create the folders”)
cell = InputBox(“First cell”)
Range(cell).Select
Do While ActiveCell.Value <> “”
MkDir (path & “/” & ActiveCell.Value)
ActiveCell.Offset(1, 0).Select
Loop
End Sub
Closes the Visual Basic window. Now the module to create folders is available in your Excel sheet.
Before running the macro
Before you run the macro, note the following:
The macro you just created works to create folders from a column list. If you have the information in a row you can quickly move the rows to columns. We explain how in this tutorial.
Folder names must be in consecutive cells within the column, with no blank cells. If there are any blank cells the macro will stop running and will not finish creating the whole list of folders.
The location where you want to create the folders should not contain folders with names that match the ones you are going to create automatically. If this happens, an error will occur when running the macro.
Run the macro
Now you can start creating folders from an Excel list automatically.
To run the macro go to the Programmer tab → Macros. A pop-up window will appear with the CreateFolders macro, click on the Run button.
Next, you must enter the path and the start cell in the two pop-up windows that will appear.
First, a pop-up window appears asking you to enter the path where you want to create the folders. Enter the path and press Enter.
For example C:UsersDesktopExcel
You can copy the route from any location by clicking on the title bar, press CTRL+C to copy and CTRL+V to paste the route into the pop-up window.
A second window will then appear asking you to designate the first cell. Type the designation of the first cell.
In our A2 example and click OK.
Go to the folder and check that all the folders have been created automatically. Depending on how many folders Excel should create, it may take more or less time.
Save the Excel file with the macro
If you want to save the Excel file with the macro in order to be able to use it in other occasions. Go to File → Save as and in file type choose the option Excel Book enabled for macros.
As you have seen, following step by step the tutorial is really easy to create folders from a list of Excel
What happens if you add more names?
This macro simply helps you automate a repetitive task. After running the macro there is no connection between the folders and the Excel file containing the list.
If you change a name in the Excel file after creating the folders, you will only change the Excel file. The folders keep the names under which they were created.
If you add more names to the Excel file after running the macro, you will have to run it again to create the new folders. It is IMPORTANT that you change the designation of the initial cell because if the macro detects that in the specified path there are already folders with the names it should create, it will result in an error.
Источник
VBA code to create, delete and manage folders

Creating, deleting and renaming folders is a common requirement when automating processes with VBA. The code snippets below should be sufficient to complete the most common folder tasks.
All the code examples below use the built-in Dir() function and its derivatives. The File System Object methods are not covered in this post but will be covered at a future point.
Check if a folder exists
Referencing a folder which does not exist will result in an error, therefore it is often necessary to check if a folder exists before carrying out any other actions.
vbDirectory is the attribute of a folder. The code above can be adapted to check for other types of files too.
| VBA Name of attribute | Enumerator | Description |
| vbNormal | 0 | Files with no attributes (default setting) |
| vbReadOnly | 1 | Read-only files |
| vbHidden | 2 | Hidden files |
| vbSystem | 4 | System files |
| vbVolume | 8 | Volume label |
| vbDirectory | 16 | Directories |
For checking folder existence within another procedure, it is often easier to have a reusable function, which can be called upon when required.
The following VBA code calls the doesFolderExist function from above and prints True (the folder exists) or False (the folder does not exist) to the Immediate window.
The following VBA code calls the doesFolderExist function from above for use within an If statement.
Create a new folder
The VBA code below will create a new folder. If the folder already exists, it will not overwrite it, but it will display an error. The function will only create the last folder in the file path, all the parent folders must already exist.
The avoid an error, the code below will check if a folder exists before trying to create it.
As the Dir() function will only create a single folder, the code below loops through the individual folder names in the path and calls the Dir() function to create any missing folders and subfolders.
Delete a folder
The RmDir function will delete a folder. However, it is limited as it will only delete an empty folder. All the files within the folder will need to be deleted first. Using the File System Object method (which is not covered in this post) it is possible to delete folders and their contents.
If the folder does not exist the RmDir function will display an error. Refer to the first section of this post to check for existence
Rename a folder
The VBA code below will re-name a folder, and even move the contents of the entire folder to another location.
To use this example code, it may be necessary to check if the old folder name exists and the new folder name does not exist.

About the author
Hey, I’m Mark, and I run Excel Off The Grid.
My parents tell me that at the age of 7 I declared I was going to become a qualified accountant. I was either psychic or had no imagination, as that is exactly what happened. However, it wasn’t until I was 35 that my journey really began.
In 2015, I started a new job, for which I was regularly working after 10pm. As a result, I rarely saw my children during the week. So, I started searching for the secrets to automating Excel. I discovered that by building a small number of simple tools, I could combine them together in different ways to automate nearly all my regular tasks. This meant I could work less hours (and I got pay raises!). Today, I teach these techniques to other professionals in our training program so they too can spend less time at work (and more time with their children and doing the things they love).
Do you need help adapting this post to your needs?
I’m guessing the examples in this post don’t exactly match your situation. We all use Excel differently, so it’s impossible to write a post that will meet everybody’s needs. By taking the time to understand the techniques and principles in this post (and elsewhere on this site), you should be able to adapt it to your needs.
But, if you’re still struggling you should:
- Read other blogs, or watch YouTube videos on the same topic. You will benefit much more by discovering your own solutions.
- Ask the ‘Excel Ninja’ in your office. It’s amazing what things other people know.
- Ask a question in a forum like Mr Excel, or the Microsoft Answers Community. Remember, the people on these forums are generally giving their time for free. So take care to craft your question, make sure it’s clear and concise. List all the things you’ve tried, and provide screenshots, code segments and example workbooks.
- Use Excel Rescue, who are my consultancy partner. They help by providing solutions to smaller Excel problems.
What next?
Don’t go yet, there is plenty more to learn on Excel Off The Grid. Check out the latest posts:
Источник
Supposing you have a list of staff names in a range of a worksheet, and now you want to create some folders for each of them in the cells to record their information. If you create the folders one by one, it will waste a lot of time. But how could you quickly create these folders? Today, I will introduce you some quick tricks:
Create folders based on cell values with VBA code
Quickly create folders based on cell values with Kutools for Excel![]()
Create folders based on cell values with VBA code
For example, I have a range of names in a worksheet, I want to create folders for each of them, and save them to a specified path, with the VBA code, I can finish this task.
1. Put the active workbook into a specific directory which you will place the created folders into. Open the workbook and select the range of cells that you want to use.

2. Click Developer > Visual Basic, a new Microsoft Visual Basic for applications window will be displayed, click Insert > Module, and input the following code into the Module:
VBA code: create folders based on cell values
Sub MakeFolders()
Dim Rng As Range
Dim maxRows, maxCols, r, c As Integer
Set Rng = Selection
maxRows = Rng.Rows.Count
maxCols = Rng.Columns.Count
For c = 1 To maxCols
r = 1
Do While r <= maxRows
If Len(Dir(ActiveWorkbook.Path & "" & Rng(r, c), vbDirectory)) = 0 Then
MkDir (ActiveWorkbook.Path & "" & Rng(r, c))
On Error Resume Next
End If
r = r + 1
Loop
Next c
End Sub
3. Click ![]() button to execute the code. All the selected cells have been created to folders with their values. And the folders are placed into the path as same as the active workbook. See screenshot:
button to execute the code. All the selected cells have been created to folders with their values. And the folders are placed into the path as same as the active workbook. See screenshot:

Quickly create folders based on cell values with Kutools for Excel
It is easy and convenient for you to create folders based on cell vales if you use the tool- Kutools for Excel.
After installing Kutools for Excel, please do as below:(Free Download Kutools for Excel Now!)
1. Select the range that you want to create folders.
2. Click Kutools Plus > Import / Export > Create Folders from Cell Contents…, see screenshot:

3. In the Create Folders from Cell Contents dialog box, click ![]() button to specify the path you want to save the folders. Seen screenshot:
button to specify the path you want to save the folders. Seen screenshot:

4. Click OK. And a prompt box will remind you how many folders have been created. See screenshot:

5. Click OK. And all of the values in the selected range have been created folders in the specified folder.

List all file names from a folder into a sheet
to know more about this function.
Here is an utility in Kutools for Excel – Filename List can list all file names of a folder in a sheet, if you are interested in it, please go on reading.
After installing Kutools for Excel, please do as below:(Free Download Kutools for Excel Now!)
1. Click Kutools Plus > Import/Export > Filename List.
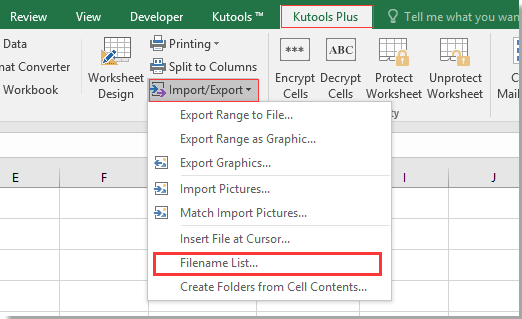
2. In the Filename List dialog, select a folder you want to list its files, the check All files or Specify option as you need in Files type section.
img src=»//cdn.extendoffice.com/images/stories/doc-excel/create-folders/doc-create-folder-6.png» alt=»doc create folder 6″ />
3. Click Ok, a new sheet is created with all file names and some relative information.

The Best Office Productivity Tools
Kutools for Excel Solves Most of Your Problems, and Increases Your Productivity by 80%
- Reuse: Quickly insert complex formulas, charts and anything that you have used before; Encrypt Cells with password; Create Mailing List and send emails…
- Super Formula Bar (easily edit multiple lines of text and formula); Reading Layout (easily read and edit large numbers of cells); Paste to Filtered Range…
- Merge Cells/Rows/Columns without losing Data; Split Cells Content; Combine Duplicate Rows/Columns… Prevent Duplicate Cells; Compare Ranges…
- Select Duplicate or Unique Rows; Select Blank Rows (all cells are empty); Super Find and Fuzzy Find in Many Workbooks; Random Select…
- Exact Copy Multiple Cells without changing formula reference; Auto Create References to Multiple Sheets; Insert Bullets, Check Boxes and more…
- Extract Text, Add Text, Remove by Position, Remove Space; Create and Print Paging Subtotals; Convert Between Cells Content and Comments…
- Super Filter (save and apply filter schemes to other sheets); Advanced Sort by month/week/day, frequency and more; Special Filter by bold, italic…
- Combine Workbooks and WorkSheets; Merge Tables based on key columns; Split Data into Multiple Sheets; Batch Convert xls, xlsx and PDF…
- More than 300 powerful features. Supports Office / Excel 2007-2021 and 365. Supports all languages. Easy deploying in your enterprise or organization. Full features 30-day free trial. 60-day money back guarantee.
")
Office Tab Brings Tabbed interface to Office, and Make Your Work Much Easier
- Enable tabbed editing and reading in Word, Excel, PowerPoint, Publisher, Access, Visio and Project.
- Open and create multiple documents in new tabs of the same window, rather than in new windows.
- Increases your productivity by 50%, and reduces hundreds of mouse clicks for you every day!
")
На чтение 3 мин. Просмотров 97 Опубликовано 21.05.2021
Вы когда-нибудь пытались создать несколько папок и подпапок на основе значений ячеек в Excel? Эта статья поможет вам создать сразу несколько папок и подпапок из списка значений ячеек.
Создание папок на основе значений ячеек с помощью Kutools for Excel
Создавайте папки и подпапки на основе значений ячеек с помощью Kutools for Excel
Содержание
- Создавайте папки на основе значений ячеек с помощью Kutools for Exce
- Создание папок и подпапок на основе значений ячеек с помощью Kutools для Excel
- Демо: создание папок и подпапок на основе значений ячеек с Kutools for Excel
Создавайте папки на основе значений ячеек с помощью Kutools for Exce
Если вы просто хотите для создания папок из списка значений ячеек, Kutools for Excel Create Folders from Cell Contents может помочь вам быстро и легко создавать папки.
| Kutools for Excel : с более чем 300 удобными надстройками Excel , попробуйте бесплатно без ограничений в течение 30 дней . |
|
Перейти к загрузке |
После установки Kutools for Excel , пожалуйста, сделайте следующее:
1 . Выберите значения ячеек, на основе которых вы хотите создать папки.
2 . Затем нажмите Kutools Plus > Импорт и экспорт > Создать папки из содержимого ячеек , см. Снимок экрана:

3 . В диалоговом окне Создание папок из содержимого ячеек нажмите кнопку  , чтобы выбрать каталог для размещения созданные папки, см. снимок экрана:

4 . Затем нажмите кнопку Ok , все папки были созданы на основе значений ячеек в указанном каталоге, см. Снимок экрана:

Создание папок и подпапок на основе значений ячеек с помощью Kutools для Excel
С помощью утилиты Создать папки из содержимого ячеек вы также можете создавать как папки, так и подпапки на основе содержимого ячейки.
Во-первых, вам нужно ввести содержимое ячейки в ячейки, разделенные знаком косой черты, на основе которых вам нужно создать папки и подпапки, см. следующий снимок экрана:

Затем вы можете применить функцию Создать папки из содержимого ячейки для создания папок и подпапок.
1 . Выберите значения ячеек, на основе которых вы хотите создать папки и подпапки.
2 . Затем нажмите Kutools Plus > Импорт и экспорт > Создать папки из содержимого ячеек , чтобы открыть Создать Диалоговое окно Папки из содержимого ячеек .
3 . В диалоговом окне нажмите кнопку , чтобы выбрать каталог для размещения созданных папок и подпапок, см. Снимок экрана:

4 . Затем нажмите кнопку Ok , папки и подпапки были созданы сразу на основе значений ячеек, см. Снимок экрана:

Демо: создание папок и подпапок на основе значений ячеек с Kutools for Excel
Kutools for Excel : с более чем 300 удобными надстройками Excel, бесплатно чтобы попробовать без ограничений в течение 30 дней. Скачать и бесплатную пробную версию прямо сейчас!
Dear LEM Readers,
Till now, I had published many articles on how to list files from a folder / sub folder, how to list folders and sub folders etc. You get a FREE excel workbook as well to play around.
In both above articles, You have learnt playing around an existing folders or files in folders. Then I thought of publishing an article where I can teach you how to CREATE a folder in windows using excel programming. There is a very simple VBA function which enables you to create a folder in windows:

Create folder – VBA code
MkDir(Path as String)
Where:
Path : This is the full path of folder which has to be created.Example: MkDir(“C:VishwaMyFoldersFolder1”)
In the above example, MkDir will first look for this Directory – C:VishwaMyFolders and then create a folder named “Folder1” inside that.
Note: If root directory i.e. C:VishwaMyFolders not found then, folder will not be created and this VBA function will throw an error (Path Not Found)
How to create a Folder in Windows using VBA
As explained above, I have created a function which will create a folder inside a root directory specified.
Note:
As you can see that it might be possible that you may give a path name which is already existing and then it will lead to an error. So before creating a folder, how do we make sure if this path already exists or not?
How to check if a directory is already existing ?
For the above CreateFolder Function to create a folder successfully there are two conditions which should be met:
1 . rootDirectory = “C:VishwaMyFolders” should be existing in windows.
2 . folderToBeCreated = “MyFolder1” should not be existing inside the rootDirectory already.
To check this you can use another VBA function called Dir(pathName, vbDirectory) as String
What will below statement do?
Dir(rootDirectory , vbDirectory)
In the above example, rootDirectory = “C:VishwaMyFolders”.
This function will return the name of the child folder i.e. MyFolders in the above directory full path if and only if this is an existing path in windows.
Therefore by below code you can make sure that rootFolderPath is existing and FolderName does not exists in the root folder before trying to create a new folder inside that.
    ' Check the root directory and folder path
    ' before creating it directly
        If Len(Dir(rootDirectory, vbDirectory)) <> 0 Then 'check if RootDirectory Exists?
            If Len(Dir(path, vbDirectory)) = 0 Then ' full path should not exist already
                VBA.MkDir (path)
                MsgBox "Folder is created successfully"
            Else
                MsgBox "Folder is already existing in the root directory"
            End If
        Else
            MsgBox "Root directory does not exist"
        End If
Therefore your complete code for creating a folder inside a directory will look like below which will give you correct error message:
    Sub CreateFolder()
    Dim rootDirectory As String
    Dim folderToBeCreated As String
    Dim path As String
    ' Set the root directory path
    ' where you want to create
    ' your folder
        rootDirectory = "C:VishwaMyFolders"
    ' give a valid name for your folder
        folderToBeCreated = "MyFolder1"
    ' Path for MkDir VBA function
    ' would be the concatination
    ' of above two
        path = rootDirectory & folderToBeCreated
    ' Check the root directory and folder path
    ' before creating it directly
        If Len(Dir(rootDirectory, vbDirectory)) <> 0 Then 'check if RootDirectory Exists?
            If Len(Dir(path, vbDirectory)) = 0 Then ' full path should not exist already
                VBA.MkDir (path) ' or VBA.MkDir ("C:VishwaMyFoldersMyFolder1")
                MsgBox "Folder is created successfully"
            Else
                MsgBox "Folder is already existing in the root directory"
            End If
        Else
            MsgBox "Root directory does not exist"
        End If
End Sub