
Создание файлов Excel методами Workbooks.Add, Worksheet.Copy и текстовых файлов с помощью оператора Open и метода CreateTextFile из кода VBA Excel. Создание документов Word рассмотрено в отдельной статье.
Метод Workbooks.Add
Описание
Файлы Excel можно создавать из кода VBA с помощью метода Add объекта Workbooks.
Workbooks.Add – это метод, который создает и возвращает новую книгу Excel. Новая книга после создания становится активной.
Ссылку на новую книгу Excel, созданную методом Workbooks.Add, можно присвоить объектной переменной с помощью оператора Set или обращаться к ней, как к активной книге: ActiveWorkbook.
Синтаксис
Workbooks.Add (Template)
Template – параметр, который определяет, как создается новая книга.
| Значение Template | Параметры новой книги |
|---|---|
| Отсутствует | Новая книга с количеством листов по умолчанию. |
| Полное имя существующего файла Excel | Новая книга с указанным файлом в качестве шаблона. |
| xlWBATChart | Новый файл с одним листом диаграммы. |
| xlWBATWorksheet | Новый файл с одним рабочим листом. |
Примеры
Пример 1
Создание новой книги Excel с количеством листов по умолчанию и сохранение ее в папку, где расположен файл с кодом VBA:
|
Sub Primer1() ‘Создаем новую книгу Workbooks.Add ‘Сохраняем книгу в папку, где расположен файл с кодом ActiveWorkbook.SaveAs (ThisWorkbook.Path & «Моя новая книга.xlsx») ‘Закрываем файл ActiveWorkbook.Close End Sub |
Файл «Моя новая книга.xlsx» понадобится для следующего примера.
Пример 2
Создание новой книги по файлу «Моя новая книга.xlsx» в качестве шаблона с присвоением ссылки на нее объектной переменной, сохранение нового файла с новым именем и добавление в него нового рабочего листа:
|
1 2 3 4 5 6 7 8 9 10 11 12 13 14 15 16 17 18 |
Sub Primer2() ‘Объявляем объектную переменную с ранней привязкой Dim MyWorkbook As Workbook ‘Создаем новую книгу по шаблону файла «Моя новая книга.xlsx» Set MyWorkbook = Workbooks.Add(ThisWorkbook.Path & «Моя новая книга.xlsx») With MyWorkbook ‘Смотрим какое имя присвоено новому файлу по умолчанию MsgBox .Name ‘»Моя новая книга1″ ‘Сохраняем книгу с новым именем .SaveAs (ThisWorkbook.Path & «Моя самая новая книга.xlsx») ‘Смотрим новое имя файла MsgBox .Name ‘»Моя самая новая книга» ‘Добавляем в книгу новый лист с именем «Мой новый лист» .Sheets.Add.Name = «Мой новый лист» ‘Сохраняем файл .Save End With End Sub |
Метод Worksheet.Copy
Описание
Если в коде VBA Excel применить метод Worksheet.Copy без указания параметра Before или After, будет создана новая книга с копируемым листом (листами). Новая книга станет активной.
Примеры
Пример 3
Создание новой книги с помощью копирования одного листа (в этом примере используется книга, созданная в первом примере):
|
Sub Primer3() ‘Если книга источник не открыта, ее нужно открыть Workbooks.Open (ThisWorkbook.Path & «Моя новая книга.xlsx») ‘Создаем новую книгу копированием одного листа Workbooks(«Моя новая книга.xlsx»).Worksheets(«Лист1»).Copy ‘Сохраняем новую книгу с именем «Еще одна книжица.xlsx» в папку, ‘где расположен файл с кодом ActiveWorkbook.SaveAs (ThisWorkbook.Path & «Еще одна книжица.xlsx») End Sub |
Также, как и при создании нового файла Excel методом Workbooks.Add, при создании новой книги методом Worksheet.Copy, можно ссылку на нее присвоить объектной переменной.
Пример 4
Создание новой книги, в которую включены копии всех рабочих листов из файла с кодом VBA:
|
Sub Primer4() ThisWorkbook.Worksheets.Copy End Sub |
Пример 5
Создание новой книги, в которую включены копии выбранных рабочих листов из файла с кодом VBA:
|
Sub Primer5() ThisWorkbook.Sheets(Array(«Лист1», «Лист3», «Лист7»)).Copy End Sub |
Создание текстовых файлов
Оператор Open
При попытке открыть несуществующий текстовый файл с помощью оператора Open, такой файл будет создан. Новый файл будет создан при открытии его в любом режиме последовательного доступа, кроме Input (только для чтения).
Пример
|
1 2 3 4 5 6 7 8 9 10 11 12 13 14 15 16 17 |
Sub Primer6() Dim ff As Integer, ws As Object ‘Получаем свободный номер для открываемого файла ff = FreeFile ‘Создаем новый текстовый файл путем открытия ‘несуществующего в режиме чтения и записи Open ThisWorkbook.Path & «Мой-новый-файл.txt» For Output As ff ‘Записываем в файл текст Write #ff, «Этот файл создан при его открытии оператором « & _ «Open по несуществующему адресу (полному имени).» ‘Закрываем файл Close ff ‘Открываем файл для просмотра Set ws = CreateObject(«WScript.Shell») ws.Run ThisWorkbook.Path & «Мой-новый-файл.txt» Set ws = Nothing End Sub |
В имени текстового файла пробелы заменены дефисами (знаками минус), так как метод Run объекта Wscript.Shell не способен открывать файлы с именами, содержащими пробелы.
Рекомендую открывать файлы для просмотра методом ThisWorkbook.FollowHyperlink. Пример и преимущества этого метода в статье VBA Excel. Открыть файл другой программы.
Метод FileSystemObject.CreateTextFile
Для создания нового текстового файла из кода VBA Excel по указанному имени, можно использовать метод CreateTextFile объекта FileSystemObject.
Пример
|
Sub Primer7() Dim fso, fl, ws ‘Создаем новый экземпляр объекта FileSystemObject Set fso = CreateObject(«Scripting.FileSystemObject») ‘Присваиваем переменной fl новый объект TextStream, ‘связанный с созданным и открытым для записи файлом Set fl = fso.CreateTextFile(ThisWorkbook.Path & «Еще-один-текстовый-файл.txt») ‘Записываем в файл текст fl.Write («Этот текстовый файл создан методом CreateTextFile объекта FileSystemObject.») ‘Закрываем файл fl.Close ‘Открываем файл для просмотра Set ws = CreateObject(«WScript.Shell») ws.Run ThisWorkbook.Path & «Еще-один-текстовый-файл.txt» End Sub |
Стоит отметить, что новый текстовый файл может быть создан и с помощью метода OpenTextFile объекта FileSystemObject при условии присвоения параметру create значения True.
Welcome back to the VBA blog! This week we are going to expand on our blog from last week, relating to file path selectors.
Today, we are going to create a VBA script that will create a text file based on a specific table in the Excel workbook. This is useful to create text templates for a range of purposes, such as uploading data into databases and other systems that only accept text files.
We would like to save the following table (Table1) in Excel:
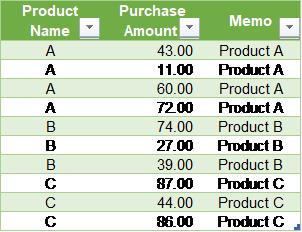
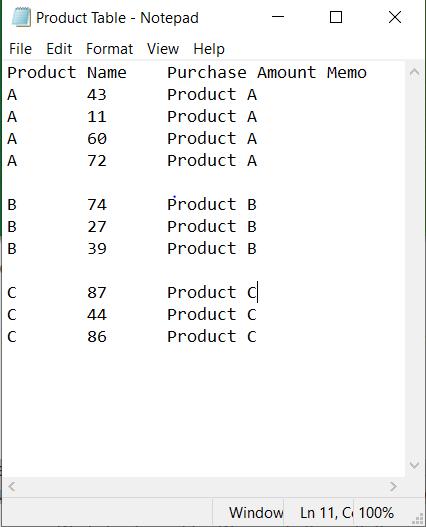
to a text file as below. More specifically, we want to generate a text file with the same content as listed in the Excel table above and insert blank rows between lines with different descriptions in Memo column. Also. We want to keep the structure of the Excel table unchanged:
The first step involves declaring relevant variables.
Dim filename As String, lineText As String
Dim myrng As Range
Dim i, j
Then, we define the file path in the local drive where we want the text file to be saved. The code “ThisWorkbook.path” defines the file path for the current workbook and we use this file path as the root directory for the text file. The code “Worksheets(«Product Table»).Name” defines the name of the text file to be saved.
filename = ThisWorkbook.path & «» & Worksheets(«Product Table»).Name & «.txt»
The next line of code sets up the output file and gives a file number for the output file. The file number allows us to distinguish between the different output files if we have more than one output text file.
Open filename For Output As #1
Then, we assign the target table (Table1) range to the pre-defined variable myrng and we will use this variable later on in the code.
Set myrng = Range(«Table1»)
The next several lines of code loops through the rows and columns of the table by using a For Loop. We’ve covered the For loop before in a previous blog, you can read about it here.
For i = 1 To myrng.Rows.Count + 1
For j = 1 To myrng.Columns.Count
Next j
Next
The line of code below is then inserted into the loop where we write the content of each row in Table1 to the text file. The code “IIf(j = 1, «», lineText & Chr(9))” defines that if j = 1, then print blank to ignore the content in the first column. If not, we use the combined context of “lineText” and Chr(9) which is equivalent to Horizontal Tab defined in ASCII codes. Chr(9) is used as the Tab delimited for the text file. The next code “myrng.Cells(i — 1, j)” finds the content of the previous row in the data table and then is concatenated to context defined before. Then the new concatenated context is assigned to the variable “lineText” which adds up the content of each column in the data table.
lineText = IIf(j = 1, «», lineText & Chr(9)) & myrng.Cells(i — 1, j)
After defining the content to be printed in the text file, we print out the content by using “Print” syntax. The code below inserts the content of “lineText” into the target text file line by line. Print # statement writes display-formatted data to a sequential file. The first parameter is mandatory and any valid file number could be applied. The next parameter is outputlist which is lineText in our case, it defines the expression to be printed. To view more details about “Print #” statement, please go to here.
In order to create the blank line between the two records with different memo descriptions, we have to write additional code. The code below identifies the contents in the third column of the data table. Firstly, we define the criteria “i > 2”, this is used to exclude the header row because we don’t want to insert a blank row between the header and the first row of the data table. If the content of the current row of data table at the third column is different from the content of the next row, a blank line is inserted. If not, then do nothing.
If i > 2 And Cells(i, 3).Value <> Cells(i + 1, 3) Then
lineText = «»
Print #1, lineText
Else
‘Do Nothing
End If
Next, we end the loop and close the text file which is defined as output #1:
Combining all the lines of code together, we get this:
Sub SaveAsTxtFile()
Dim filename As String, lineText As String
Dim myrng As Range
Dim i, j
filename = ThisWorkbook.path & «» & Worksheets(«Product Table»).Name & «.txt»
Open filename For Output As #1
Set myrng = Range(«Table1»)
For i = 1 To myrng.Rows.Count + 1
For j = 1 To myrng.Columns.Count
lineText = IIf(j = 1, «», lineText & Chr(9)) & myrng.Cells(i — 1, j)
Next j
Print #1, lineText
If i > 2 And Cells(i, 3).Value <> Cells(i + 1, 3) Then
lineText = «»
Print #1, lineText
Else
‘Do Nothing
End If
Next i
Close #1
End Sub
This way, we can create the required text file from the target table without changing the structure in the Excel file.
See you next week for more VBA tips!
На чтение 3 мин. Просмотров 11.1k.
Что делает макрос: Следующий макрос копирует диапазон ячеек из активного листа и вставляет данные в новую книгу.
Содержание
- Код макроса
- Как работает этот код
- Как использовать
Код макроса
Sub SozdatFajl()
'Шаг 1 - копируем данные с листа
Sheets("Продажи").Range("B4:C15").Copy

'Шаг 2 - создаем новую книгу
Workbooks.Add

'Шаг 3 - вставляем данные
ActiveSheet.Paste Destination:=Range("A1")

'Шаг 4 - отключаем системные сообщения
Application.DisplayAlerts = False

'Шаг 5 - сохраняем по нужному адресу
ActiveWorkbook.SaveAs _
Filename:="C:ОтчетыПродажиМесяц.xlsx"

'Шаг 6 - включаем системные сообщения
Application.DisplayAlerts = True
End Sub
Как работает этот код
- Копируем данные из ячеек B4:С15. Обратите внимание, что мы указываем полный адрес с именем листа и диапазона. Это позволит не допустить ошибки, если у Вас открыто несколько файлов Excel одновременно.
- Используем метод Add объекта Workbook, чтобы создать новую рабочую книгу. Это тоже самое, если бы мы вручную нажали Файл➜Создать➜Новый документ
- На этом этапе используется метод Paste, чтобы отправить данные, которые вы скопировали в ячейку А1 новой книги. Обратите внимание на то, что код ссылается на объект ActiveSheet. При создании новой книги она тут же становится активной. Если быть точнее, то становится активный лист в новой (только что созданной) книге.
- Далее используем метод DisplayAlerts. Используя свойство False — отключаем системные предупреждения Excel. Можно этого не делать, но мы можем запустить этот макрос несколько раз, и в этом случае Excel будет пытаться сохранить один и тот же файл несколько раз. Что происходит, когда вы пытаетесь сохранить книгу несколько раз? Правильно — Excel предупреждает, что в папке уже есть файл с таким же именем и спрашивает: «Хотите ли вы переписать ранее существующий файл?». Если мы не хотим, чтобы Excel при каждом сохранении спрашивал нас — подавляем это предупреждение.
- Сохраняем файл с помощью метода SaveAs. Обратите внимание, что мы пишем полный адрес, включая имя файла с расширением (при сохранении на рабочий стол
ActiveWorkbook.SaveAs CreateObject(«WScript.Shell»). SpecialFolders(«Desktop») & «Отчет на 2016.xlsx»). - Поскольку мы запретили показывать системные сообщения в пункте 4, мы должны включить их обратно. Если этого не сделать Excel будет подавлять все предупреждения, что не
допустимо.
Как использовать
Для реализации этого макроса, вы можете скопировать и вставить его в стандартный модуль:
- Активируйте редактор Visual Basic, нажав ALT + F11.
- Щелкните правой кнопкой мыши имя проекта / рабочей книги в окне проекта.
- Выберите Insert➜Module.
- Введите или вставьте код во вновь созданном модуле.
- Измените имя листа, диапазон ячеек, и место сохранения файла.
I have a file which is manually added or modified based on the inputs. Since most of the contents are repetitive in that file, only the hex values are changing, I want to make it a tool generated file.
I want to write the c codes which are going to be printed in that .txt file.
What is the command to create a .txt file using VBA, and how do I write to it
![]()
ashleedawg
20k8 gold badges73 silver badges104 bronze badges
asked Jul 16, 2012 at 11:20
![]()
2
To elaborate on Ben’s answer:
If you add a reference to Microsoft Scripting Runtime and correctly type the variable fso you can take advantage of autocompletion (Intellisense) and discover the other great features of FileSystemObject.
Here is a complete example module:
Option Explicit

' Go to Tools -> References... and check "Microsoft Scripting Runtime" to be able to use
' the FileSystemObject which has many useful features for handling files and folders
Public Sub SaveTextToFile()

    Dim filePath As String
    filePath = "C:tempMyTestFile.txt"

    ' The advantage of correctly typing fso as FileSystemObject is to make autocompletion
    ' (Intellisense) work, which helps you avoid typos and lets you discover other useful
    ' methods of the FileSystemObject
    Dim fso As FileSystemObject
    Set fso = New FileSystemObject
    Dim fileStream As TextStream

    ' Here the actual file is created and opened for write access
    Set fileStream = fso.CreateTextFile(filePath)

    ' Write something to the file
    fileStream.WriteLine "something"

    ' Close it, so it is not locked anymore
    fileStream.Close

    ' Here is another great method of the FileSystemObject that checks if a file exists
    If fso.FileExists(filePath) Then
        MsgBox "Yay! The file was created! :D"
    End If

    ' Explicitly setting objects to Nothing should not be necessary in most cases, but if
    ' you're writing macros for Microsoft Access, you may want to uncomment the following
    ' two lines (see https://stackoverflow.com/a/517202/2822719 for details):
    'Set fileStream = Nothing
    'Set fso = Nothing

End Sub
answered Apr 5, 2018 at 14:16
![]()
3
an easy way with out much redundancy.
    Dim fso As Object
    Set fso = CreateObject("Scripting.FileSystemObject")

    Dim Fileout As Object
    Set Fileout = fso.CreateTextFile("C:your_pathvba.txt", True, True)
    Fileout.Write "your string goes here"
    Fileout.Close
answered Feb 23, 2016 at 17:01
![]()
pelospelos
1,6743 gold badges24 silver badges32 bronze badges
2
Dim SaveVar As Object

Sub Main()

    Console.WriteLine("Enter Text")

    Console.WriteLine("")

    SaveVar = Console.ReadLine

    My.Computer.FileSystem.WriteAllText("N:A-Level Computing2017!PPESaveFileSaveData.txt", "Text: " & SaveVar & ", ", True)

    Console.WriteLine("")

    Console.WriteLine("File Saved")

    Console.WriteLine("")

    Console.WriteLine(My.Computer.FileSystem.ReadAllText("N:A-Level Computing2017!PPESaveFileSaveData.txt"))
    Console.ReadLine()

End Sub()
![]()
BDL
20.7k19 gold badges52 silver badges52 bronze badges
answered Feb 10, 2017 at 13:16
![]()
5