
Insert Fields in a Microsoft Word Document to Display Variable Content
by Avantix Learning Team | Updated January 10, 2021
Applies to: Microsoft® Word® 2010, 2013, 2016, 2019 or 365 (Windows)
You can insert built-in or custom fields in Word documents to display variable content that will change when you update the fields. Some fields (like page numbers, merge fields or cross-references) are inserted automatically when you use Microsoft Word features. If you want to insert custom fields, you will need to create custom document properties.
By default, Word displays the result of a field rather than its field codes. You can right-click a field and select Toggle Field Codes to display field codes or field results.
Recommended article: How to Hide Comments in Word (or Display Them)
Do you want to learn more about Microsoft Word? Check out our virtual classroom or live classroom Word courses >
If you are working with fields in Microsoft Word, you will be using quite a few function keys (such as F9). On some laptops, you will need to press the Fn key on your keyboard to enable your function keys. For example, instead of pressing F9 to update a field or fields, you would press Fn + F9.
Inserting built-in fields
To insert a field, click Quick Parts in the Text group on the Insert tab in the Ribbon. The Field command appears in the Quick Parts drop-down menu as follows:

Below is the Field dialog box in Microsoft Word with Page selected:

To insert a built-in field using the Field dialog box:
- Navigate to the location in the Word document where you want to insert a field.
- Click the Insert tab in the Ribbon and then click Quick Parts in the Text group. A drop-down menu appears.
- Select Field. A dialog box appears.
- In the list of Field names, select a field. You can filter the list by clicking the down arrow in the Categories list and selecting a category first. Select All to display all fields.
- Under Field properties, select any properties or options you want.
- To view the codes for a field in the Field box, click Field Codes. For some fields, this button is clicked by default.
- Ensure that Preserve Formatting During Updates is checked so that formatting you apply is not removed when the fields are updated.
- Click OK. The field is inserted into the document.
Format the field results by applying text formatting to the field using the Home tab in the Ribbon.
You can view or hide all field codes in your document by pressing Alt + F9. Field codes appear between braces or curly brackets { } and you cannot type these braces. Be sure to hide the field codes again by pressing Alt + F9.
To edit a built-in field in the Field dialog box:
- Right-click the field and then click Edit Field. A dialog box appears.
- Change the field properties and options.
- Click OK.
Understanding Word document properties
There are 3 different types of document properties in Word:
- Standard document properties (also called built-in document properties)
- Custom document properties
- Document library properties
Word documents contain a set of standard document properties such as Title, Author, Keywords and Comments. These properties are used to store metadata about your document. You cannot change the name of standard properties but you can edit the value of some of them (such as Title). Other standard properties that cannot be edited store data that is updated automatically (such as Size or Last Modified).
Document library properties are related to documents that are stored in a document library on a website or in a public folder (such as files in SharePoint).
In addition to the standard properties, you can create your own custom document properties. These properties can be created to store additional information in a document other than the standard document properties. For example, custom document properties could be created for Product1, Product2, Product3, Sponsor, Project Manager, Cell Phone or Disclaimer. Each custom document property must be assigned a name, a data type and a value. The four data types are Text, Date, Number and Yes or No.
After you create custom document properties for your Word document, you can then insert them as custom fields.
Adding a custom document property
To add a custom document property:
- Open the Word document in which you want to add a custom document property.
- Click the File tab in the Ribbon and then click Info on the left. Info is usually selected by default.
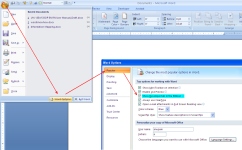
- On the right side of screen, click Properties. A drop-down menu appears.
- Select Advanced Properties. A dialog box appears.
- Click the Custom tab in the dialog box.
- Type a name for the custom document property in the Name box. You can also choose one of the other properties that appear in the drop-down list.
- Select Text, Date, Number or Yes or No as the data type for the custom property.
- Enter a value for the property in the Value box.
- Click Add. The custom property appears in the list at the bottom of the dialog box.
- Click OK.
After you have added a custom document property, you will be able to insert it into your document as a field.
In the example below, we’re adding a field for Project Manager:

After you click Add, the custom field appears in the Properties list:

Inserting custom document property fields
The value of a custom document property can be inserted in a Word document using DocProperty fields. Custom document properties that have been added to a document are saved with the document whether they are inserted as a DocProperty field or not. You can insert DocProperty fields multiple times in a document.
To insert a custom document property field using the Field dialog box:
Navigate to the location in the Word document where you want to insert a field.
- Click the Insert tab in the Ribbon and then click Quick Parts in the Text group. A drop-down menu appears.
- Select Field. A dialog box appears.
- In the list of Field names on the left, select DocProperty.
- Under Field properties, select a property name.
- To view the codes for a field in the Field box, click Field Codes. For some fields, this button is clicked by default.
- Ensure that Preserve Formatting During Updates is checked so that formatting you apply is not removed when the fields are updated.
- Click OK. The field is inserted into the document.
In the example below, we’re inserting the custom Project Manager field we created in Advanced Properties:

Updating built-in and custom fields
Word should automatically update fields when a document is opened. Many fields are also updated automatically when you go to Print Preview (click the File tab and then click Print). If you prefer, you can update fields manually.
To update a field manually, right-click the field and then click Update Field or press F9.
To update all fields manually in the main body of a document, press Ctrl + A to select all and then press F9.
Some fields in headers, footers or text boxes must be updated separately. Click in the header, footer or text box, press Ctrl + A to select all and then press F9. Page fields do not need to be updated manually because they update when you go the Print Preview.
If you want to edit a custom DocProperty field, you will need to edit it in the Advanced Properties dialog box.
Subscribe to get more articles like this one
Did you find this article helpful? If you would like to receive new articles, join our email list.
More resources
How to Create, Save, Edit and Use Templates in Word
How to Insert, Format and Update Cross-References in Word
5 Ways to Insert the Division Symbol in Word (Type or Insert ÷)
10 Microsoft Word Tips, Tricks and Shortcuts for Selecting in Tables
How to Create a Table of Contents in Word (Insert, Format and Update a TOC)
Related courses
Microsoft Word: Intermediate / Advanced
Microsoft Excel: Intermediate / Advanced
Microsoft PowerPoint: Intermediate / Advanced
Microsoft Word: Long Documents Master Class
Microsoft Word: Styles, Templates and Tables of Contents
Microsoft Word: Designing Dynamic Word Documents Using Fields
VIEW MORE COURSES >
Our instructor-led courses are delivered in virtual classroom format or at our downtown Toronto location at 18 King Street East, Suite 1400, Toronto, Ontario, Canada (some in-person classroom courses may also be delivered at an alternate downtown Toronto location). Contact us at info@avantixlearning.ca if you’d like to arrange custom instructor-led virtual classroom or onsite training on a date that’s convenient for you.
Copyright 2023 Avantix® Learning
Microsoft, the Microsoft logo, Microsoft Office and related Microsoft applications and logos are registered trademarks of Microsoft Corporation in Canada, US and other countries. All other trademarks are the property of the registered owners.
Avantix Learning |18 King Street East, Suite 1400, Toronto, Ontario, Canada M5C 1C4 | Contact us at info@avantixlearning.ca
Word for Microsoft 365 Word for Microsoft 365 for Mac Word 2021 Word 2021 for Mac Word 2019 Word 2019 for Mac Word 2016 Word 2016 for Mac Word 2013 Word 2010 Word for Mac 2011 More…Less
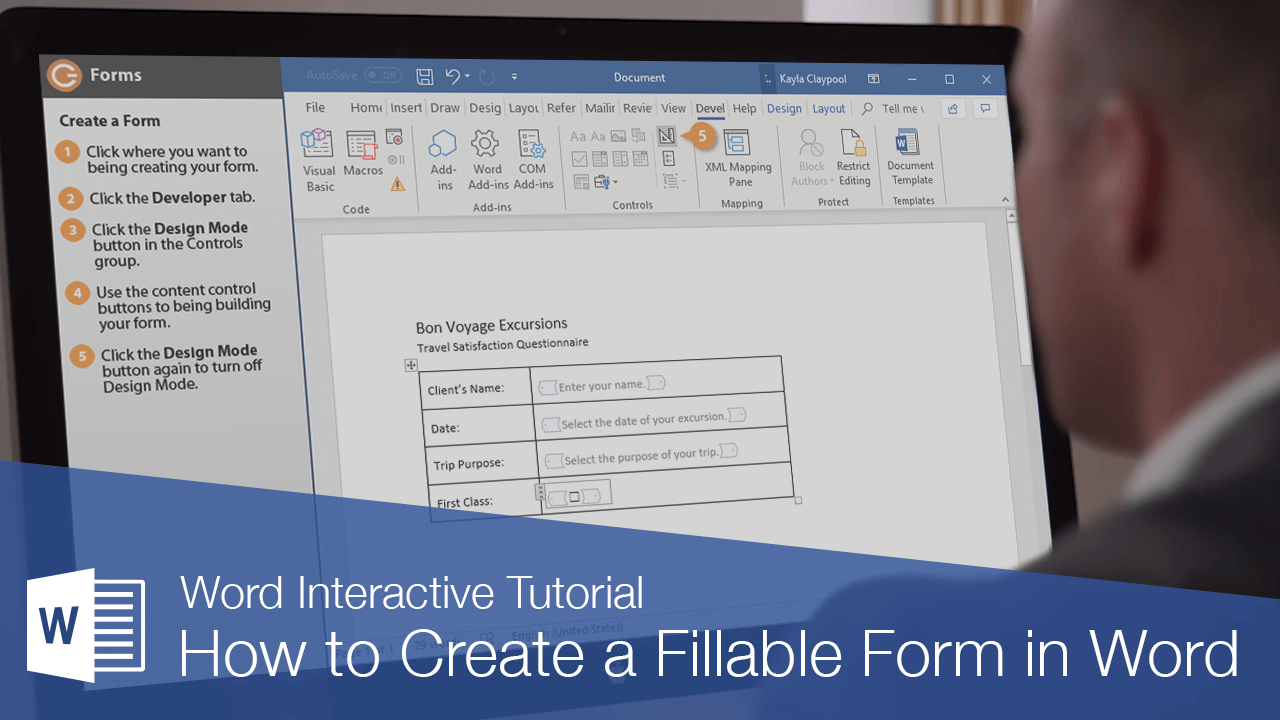
To create a form in Word that others can fill out, start with a template or document and add content controls. Content controls include things like check boxes, text boxes, date pickers, and drop-down lists. If you’re familiar with databases, these content controls can even be linked to data.
Show the Developer tab
If the developer tab isn’t displayed in the ribbon, see Show the Developer tab.
Open a template or a blank document on which to base the form
To save time, start with a form template or start from scratch with a blank template.
-
Go to File > New.
-
In Search online templates, type Forms or the type of form you want and press ENTER.
-
Choose a form template, and then select Create or Download.
-
Go to File > New.
-
Select Blank document.
Add content to the form
Go to Developer, and then choose the controls that you want to add to the document or form. To remove a content control, select the control and press Delete. You can set properties on controls once inserted.
Note: You can print a form that was created using content controls, but the boxes around the content controls will not print.
In a rich text content control, users can format text as bold or italic, and they can type multiple paragraphs. If you want to limit what users add, insert the plain text content control.
-
Click or tap where you want to insert the control.
-
Select Developer > Rich Text Content Control
 or Plain Text Content Control .
 or Plain Text Content Control
  .
.To set specific properties on the control, see Set or change properties for content controls.
A picture control is often used for templates, but you can also add a picture control to a form.
-
Click or tap where you want to insert the control.
-
Select Developer > Picture Content Control
.
 .
.To set specific properties on the control, see Set or change properties for content controls.
Use building block controls when you want people to choose a specific block of text. For example, building block controls are helpful when you need to add different boilerplate text depending on the contract’s specific requirements. You can create rich text content controls for each version of the boilerplate text, and then you can use a building block control as the container for the rich text content controls.
-
Click or tap where you want to insert the control.
-
Go to DeveloperBuilding Block Gallery Content Control
(or Building Block Content Control). -
Select Developer and content controls for the building block.
 (or Building Block Content Control).
-
Click or tap where you want to insert the control.
To set specific properties on the control, see Set or change properties for content controls.
In a combo box, users can select from a list of choices that you provide or they can type in their own information. In a drop-down list, users can only select from the list of choices.
-
Go to Developer > Combo Box Content Control
or Drop-Down List Content Control . -
Select the content control, and then select Properties.
-
To create a list of choices, select Add under Drop-Down List Properties.
-
Type a choice in Display Name, such as Yes, No, or Maybe.
Repeat this step until all of the choices are in the drop-down list.
-
Fill in any other properties that you want.
Note: If you select the Contents cannot be edited check box, users won’t be able to click a choice.
 or Drop-Down List Content Control
  .
.-
Click or tap where you want to insert the date picker control.
-
Select Developer > Date Picker Content Control
.
 .
.To set specific properties on the control, see Set or change properties for content controls.
-
Click or tap where you want to insert the check box control.
-
Select Developer > Check Box Content Control
.
 .
.To set specific properties on the control, see Set or change properties for content controls.
Legacy form controls are for compatibility with older versions of Word and consist of legacy form and Active X controls.
-
Click or tap where you want to insert a legacy control.
-
Go to Developer > Legacy Forms
drop-down. -
Select the Legacy Form control or Active X Control that you want to include.
 drop-down.
Set or change properties for content controls
Each content control has properties that you can set or change. For example, the Date Picker control offers options for the format you want to use to display the date.
-
Select the content control that you want to change.
-
Go to Developer > Properties.
-
Change the properties that you want.

Add protection to a form
If you want to limit how much others can edit or format a form, use the Restrict Editing command:
-
Open the form that you want to lock or protect.
-
Select Developer > Restrict Editing.
-
After selecting restrictions, select Yes, Start Enforcing Protection.


Advanced Tip:
If you want to protect only parts of the document, separate the document into sections and only protect the sections you want.
To do this, choose Select Sections in the Restrict Editing panel. For more info on sections, see Insert a section break.

Show the Developer tab
If the developer tab isn’t displayed in the ribbon, see Show the Developer tab.
Open a template or use a blank document
To create a form in Word that others can fill out, start with a template or document and add content controls. Content controls include things like check boxes, text boxes, and drop-down lists. If you’re familiar with databases, these content controls can even be linked to data.
-
Go to File > New from Template.
-
In Search, type form.
-
Double-click the template you want to use.
-
Select File > Save As, and pick a location to save the form.
-
In Save As, type a file name and then select Save.

-
Go to File > New Document.
-
Go to File > Save As.
-
In Save As, type a file name and then select Save.

Add content to the form
Go to Developer, and then choose the controls that you want to add to the document or form. To remove a content control, select the control and press Delete. You can set Options on controls once inserted. From Options, you can add entry and exit macros to run when users interact with the controls, as well as list items for combo boxes, .
-
In the document, click or tap where you want to add a content control.
-
On Developer, select Text Box, Check Box, or Combo Box.
-
To set specific properties for the control, select Options, and set .
-
Repeat steps 1 through 3 for each control that you want to add.

Options let you set common settings, as well as control specific settings. Select a control and then select Options to set up or make changes.
-
Set common properties.
-
Select Macro to Run on lets you choose a recorded or custom macro to run on Entry or Exit from the field.
-
Bookmark Set a unique name or bookmark for each control.
-
Calculate on exit This forces Word to run or refresh any calculations, such as total price when the user exits the field.
-
Add Help Text Give hints or instructions for each field.
-
OK Saves settings and exits the panel.
-
Cancel Forgets changes and exits the panel.
-
-
Set specific properties for a Text box
-
Type Select form Regular text, Number, Date, Current Date, Current Time, or Calculation.
-
Default text sets optional instructional text that’s displayed in the text box before the user types in the field. Set Text box enabled to allow the user to enter text into the field.
-
Maximum length sets the length of text that a user can enter. The default is Unlimited.
-
Text format can set whether text automatically formats to Uppercase, Lowercase, First capital, or Title case.
-
Text box enabled Lets the user enter text into a field. If there is default text, user text replaces it.
-
-
Set specific properties for a Check box.
-
Default Value Choose between Not checked or checked as default.
-
Checkbox size Set a size Exactly or Auto to change size as needed.
-
Check box enabled Lets the user check or clear the text box.
-
-
Set specific properties for a Combo box
-
Drop-down item Type in strings for the list box items. Press + or Enter to add an item to the list.
-
Items in drop-down list Shows your current list. Select an item and use the up or down arrows to change the order, Press — to remove a selected item.
-
Drop-down enabled Lets the user open the combo box and make selections.
-
-
Go to Developer > Protect Form.
Note: To unprotect the form and continue editing, select Protect Form again.
-
Save and close the form.

If you want, you can test the form before you distribute it.
-
Protect the form.
-
Reopen the form, fill it out as the user would, and then save a copy.
Show the Developer tab
-
On the right side of the ribbon, select
, and then select Ribbon Preferences. -
Under Customize, select Developer .
 , and then select Ribbon Preferences.
Open a template or a document on which to base the form
You can start with a blank document and create your own form. Or, to save time, you can start with a form template.
-
Go to File > New from Template.
-
In the left pane, expand Online Templates, and then select Forms.
-
Double-click the form template that you want to use.
Add content controls to the form
-
In the document, click where you want to add the control.
-
On the Developer tab, under Form Controls, select Text Box, Check Box, or Combo Box.
-
To set specific properties for the control, select Options, and then configure the properties that you want.
Note: To create a list of drop-down items in a combo box, select the combo box placeholder, click Options, and then add the items that you want to appear in the drop-down list.
-
Repeat steps 1 through 3 for each control that you want to add.
Add instructional text (optional)
Instructional text (for example, «Type First Name») in a text box can make your form easier to use. By default, no text appears in a text box, but you can add it.
-
Select the text box control that you want to add instructional text to.
-
On the Developer tab, under Form Controls, select Options.
-
In Default Text, type the instructional text.
-
Make sure that Fill-in enabled is selected, and then select OK.
Protect the form
-
On the Developer tab, under Form Controls, select Protect Form.
Note: To unprotect the form and continue editing, click Protect Form again.
-
Save and close the form.
Test the form (optional)
If you want, you can test the form before you distribute it.
-
Protect the form.
-
Reopen the form, fill it out as the user would, and then save a copy.
Creating fillable forms isn’t available in Word for the web.
You can create the form with the desktop version of Word with the instructions in Create a fillable form.
When you save the document and reopen it in Word for the web, you’ll see the changes you made.
Need more help?
Word has this nice feature which enables insertion of text fields, check boxes, drop-down lists, etc. You can use these elements to create a form in Word.
These elements are available under the tab menu Developer in the Word Ribbon. If you are unable to find this tab in the Ribbon, most likely you need to enable this using the Word Options dialog box.
To enable the Developer tab (Word 2007)
1. Click the Office button ![]() . A drop-down list appears.
. A drop-down list appears.
2. Click the Word Options button from the bottom of the list. Word Options dialog box appears.
3. On the dialog box, under the category Popular (see on the left hand side), select the option Developer tab in the Ribbon. Now, you can view the Developer tab in the Ribbon. See below image.
To insert a legacy check box
1. Click the Developer tab.
2. Under the group Controls, click the Legacy Tools button. A drop-down list of icons appears. See below image.
3. Under the section Legacy Form, click the check box icon as shown in the below image. Word creates a check box at the cursor position. By default, the checkbox is in design mode (you can see the Design Mode icon being enabled within the Controls group)

Note: If you wish, you can remove the shading of the check box by clicking the Form Field Shading icon under Legacy Form.
4. By the way, you cannot use the checkbox in design mode. To disable design mode, click the Design Mode icon within the Controls group.
Also, you should enforce protection to the document (or form) before you share it with others to capture information.
This step is applicable to all other controls as well.
To enforce protection
1. Under the Developer tab, within the group Protect, click icon Protect Document. A drop-down list appears.
2. From the drop-down menu, click Restrict Formatting and Editing. Restrict Formatting and Editing task pane appears on the right hand side.
3. From this dialog box, select option Allow only this type of editing in the document option. A drop-down is enabled. Select Filling in forms option from the drop-down list. See below image.
4. Click button Yes, Start Enforcing Protection. The Start Enforcing Protection dialog box appears, which prompts you to enter a password.
5. Enter a password and retype password. Your document is protected and the check box is now clickable.

Important: Remember that you cannot edit a protected document. If you wish to make changes in the document, you have to remove protection by entering the valid password.
To stop protection
1. Under the Developer tab, within the group Protect, click Protect Document. The Restrict Formatting and Editing task pane appears.
2. From the bottom of the dialog box, click the button Stop Protection. Enter valid password to remove protection.
To insert a drop-down list
1. Under the Developer tab, within the group Controls, click the Drop-Down List icon. A drop-down list appears in the document. See below image.

2. You can see the Properties button being enabled within the Controls group. Click Properties. The Content Control Properties dialog box appears.
3. In the dialog box, under section General, enter a Title of the drop-down list.
4. Under section Drop-Down List Properties , click button Add to enter the display name and value for the first list item in the Add Choice dialog box and then click OK. Item is added to the list.
In the similar way, you can keep adding items to the list.
5. Click the Modify/Remove button to edit/delete list items.
6. Finally, click OK to close the Content Control Properties dialog box. You can view the drop-down list displays all the list items. See below image.

7. Enforce protection to the document, so that list values cannot be modified.
To insert an ActiveX Control check box
1. Click the Developer tab.
2. Under the group Controls, click the Legacy Tools button.
3. From category ActiveX Controls, click the check box icon. A check box is created at the insertion point. See below image.
You can notice that the Design Mode icon being enabled within the Controls group. This is important to edit the check box properties.
4. Right-click the check box. From the right-click menu, click CheckBox Object and then click Edit. The check is in edit mode. You can enter a name of the checkbox.
5. From the right-click menu, click Properties to control properties of the check box.
6. Click Design Mode to disable. The check box is now clickable.

Note: The difference between a legacy and ActiveX control check box is that, ActiveX checkbox provides advanced or extended features, i.e. you can write program for it in visual basic to make the check box behave in different ways.
Insert text fields
1. Click the Developer tab.
2. Under the group Controls, click the icon Rich Text or Text. A text field is created in the document. See below image.
3. You can change the default text appearing in the text box by enabling the Design Mode button in the Control Group.

Insert a Combobox
- Under the Developer tab, within the group Controls, click the Combobox icon . A combobox is created at the cursor position.
- Select the combobox and then click Properties (available within the group Controls. The Content Control Properties dialog box appears.
- In the dialog box, under the section General, enter a Title of the combobox.
- In the dialog box, under the section Drop-down List Properties, click the Add button. Add Choice dialog box appears.
- Enter a display name and value for the first list item. Click OK.
- Click Add again to enter a second list item. Click OK. You can keep adding as many item as you need.
- Finally, click OK.
 . A combobox is created at the cursor position.
The combobox list is populated with the list items. Remember, the combobox should not be in Design Mode to view the list of items. You can find the Design Mode icon within the group Controls . See below image.

Also See:
https://wordknowhow.wordpress.com/2014/04/03/how-to-create-radio-buttons-option-buttons-in-ms-word/
https://wordknowhow.wordpress.com/2014/04/03/how-to-create-or-add-checkboxes-checkbox-controls-to-your-word-document/
https://wordknowhow.wordpress.com/2014/04/08/how-to-add-a-text-field-in-word/
You can use Word to create interactive digital forms that other people can fill out on their computers before printing or sending them back to you. It takes a little preparation but keeps you from having to decipher messy handwriting! Some of the tools you will use when creating a form include:
- Templates: Forms are normally saved as templates so that they can be used again and again.
- Content controls: The areas where users input information in a form.
- Tables: Tables are often used in forms to align text and form fields, and to create borders and boxes.
- Protection: Users can complete the form fields without being able to change the form’s text and/or design.
Show the Developer Tab
Before you can create a form, you’ll need to turn on the Developer tab to get access to the advanced tools.
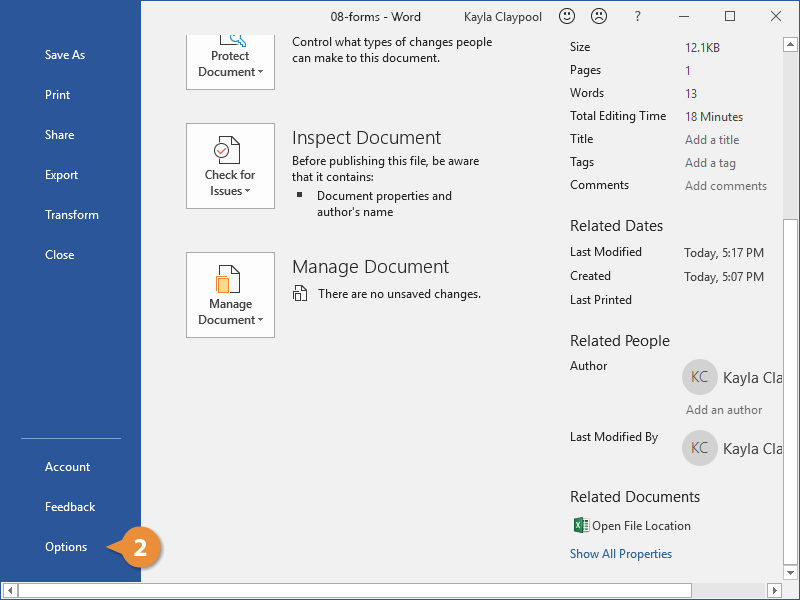
- Click the File tab.

- Select Options.

The Word Options window opens.
- Click the Customize Ribbon tab on the left.
The column on the right controls which ribbon tabs are enabled.
- Check the Developer check box.
- Click OK.
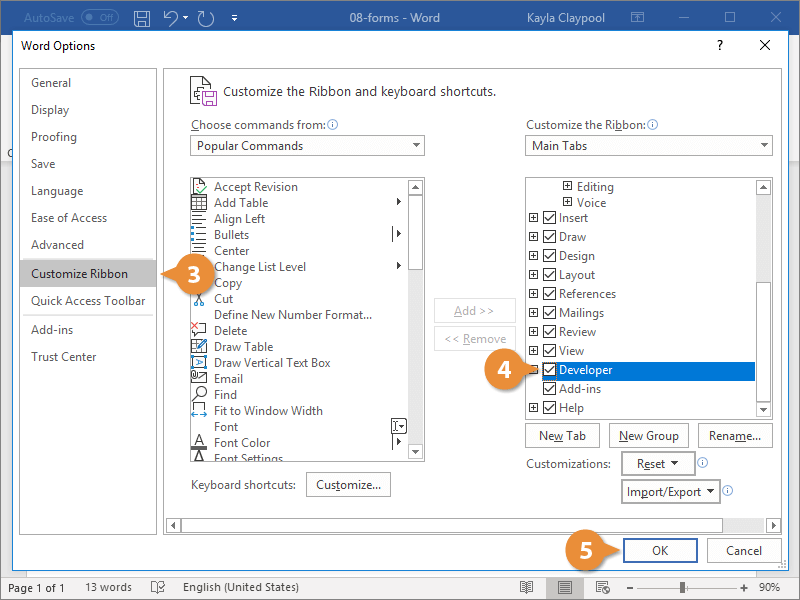
The Developer tab now appears on the ribbon. In addition to advanced tools for macro recording, add-ins, and document protection, we now have access to form controls.
Create a Form
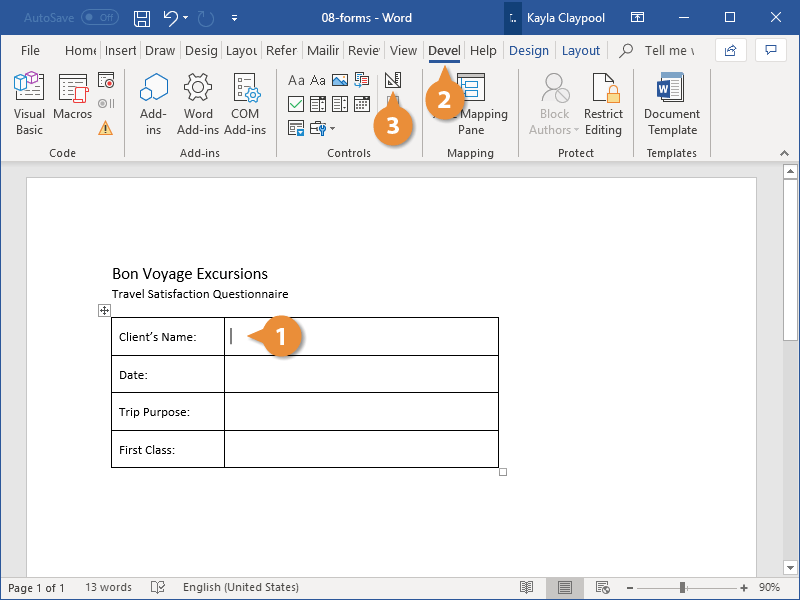
Once you’ve enabled the Developer tab, and created the layout and structure of the form, you can start adding form fields to your document with Content Controls.
- Place the text cursor where you want to insert the form field.
- Click the Developer tab on the ribbon.
The Controls group contains the different kinds of content controls you can add to a form, as well as the toggle button for Design Mode.
- Click the Design Mode button in the controls group.
While Design Mode is active, controls you insert won’t be active, so clicking a check box to move it around won’t also check it. You can also customize placeholder text for some controls.
- Click a Content Control buttons to insert the selected type of control.
The content control is inserted.
Select a form field and click the Properties button on the ribbon to edit a control’s options. Depending on the type of control you’ve inserted, you can change its appearance, set up the options in a list, or lock the control once edited.
- When you’re done, click the Design Mode button again to exit Design Mode.
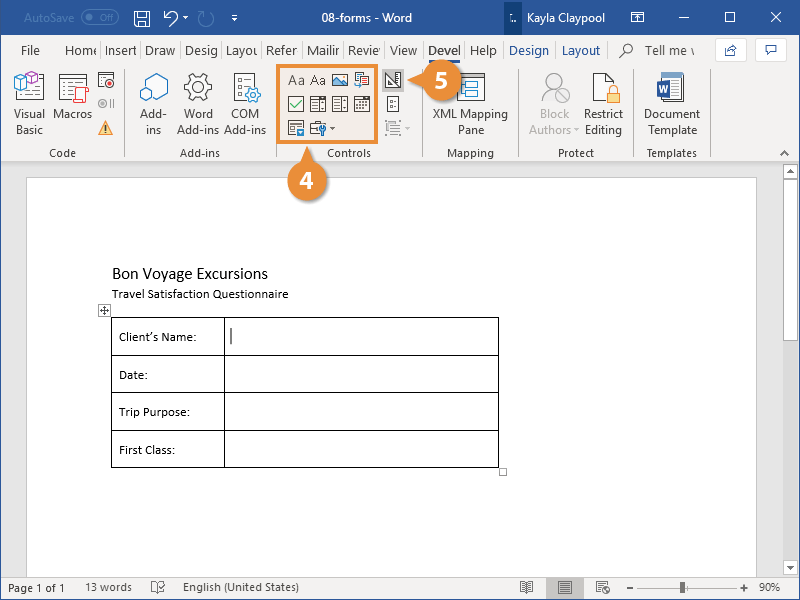
You leave Design Mode, and the content controls that you’ve inserted can now be used.
Types of Form Controls
There are many different types of form controls you can add to a form that will allow people to add different types of responses.
Finalize a Form
When you’re ready to distribute a form so others can fill it out, you can restrict the form so that content controls cannot be removed or changed by those filling it out.
- Click the Restrict Editing button on the Developer tab.
The Restrict Editing pane appears on the right.
- Check the Editing restrictions check box.
- Click the Editing restriction list arrow.
- Select Filling in forms.
When this option is enabled, the only change that anyone else can make to this document is the filling in of form fields. They won’t be able to move, delete, or edit the fields themselves until protection is turned off.
- Click the Yes, Start Enforcing Protection button.
A password is not required to start enforcing protection, but you can add one if you’d like to prevent just anyone from turning this protection off.
- Enter a password (optional), then click OK.
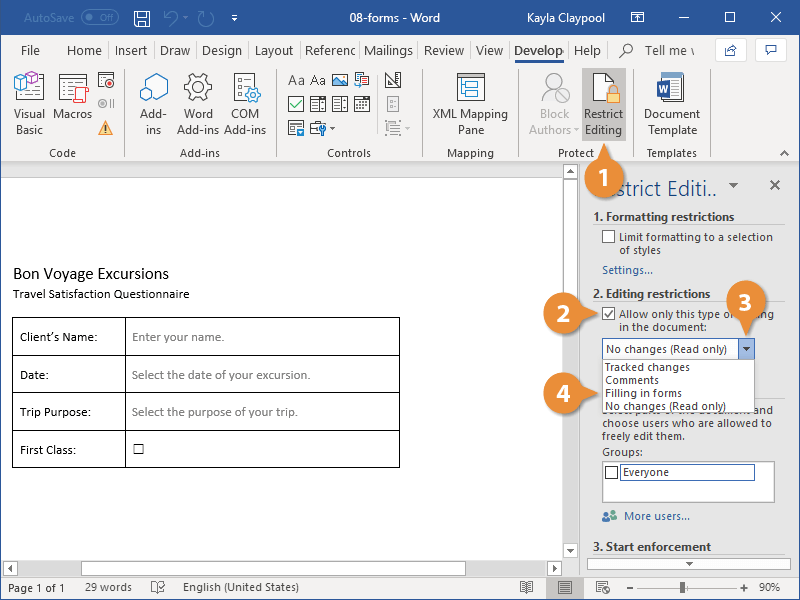
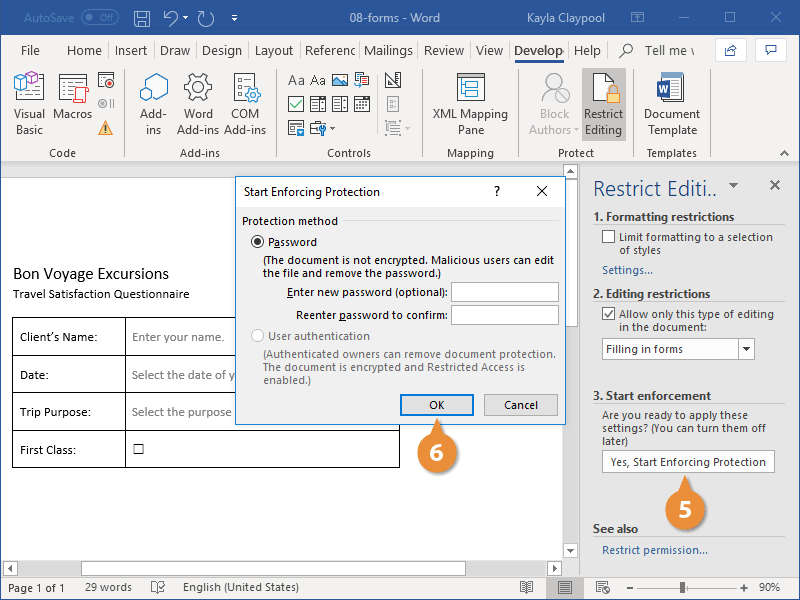
The document is now restricted, and anyone you send it to will only be able to fill in the forms.

FREE Quick Reference
Click to Download
Free to distribute with our compliments; we hope you will consider our paid training.