
Improve Article
Save Article
Like Article
Improve Article
Save Article
Like Article
XlsxWriter is a Python module for writing files in the XLSX file format. It can be used to write text, numbers, and formulas to multiple worksheets. Also, it supports features such as formatting, images, charts, page setup, auto filters, conditional formatting and many others.
Use this command to install xlsxwriter module:
pip install xlsxwriter
Note: Throughout XlsxWriter, rows and columns are zero indexed. The first cell in a worksheet, A1 is (0, 0), B1 is (0, 1), A2 is (1, 0), B2 is (1, 1) ..similarly for all.
Let’s see how to create and write to an excel-sheet using Python.
Code #1 : Using A1 notation(cell name) for writing data in the specific cells.
Python3
import xlsxwriter
workbook = xlsxwriter.Workbook('hello.xlsx')
worksheet = workbook.add_worksheet()
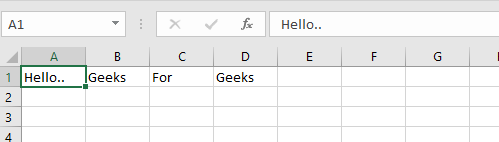
worksheet.write('A1', 'Hello..')
worksheet.write('B1', 'Geeks')
worksheet.write('C1', 'For')
worksheet.write('D1', 'Geeks')
workbook.close()
Output:
Code #2 : Using the row-column notation(indexing value) for writing data in the specific cells.
Python3
import xlsxwriter
workbook = xlsxwriter.Workbook('Example2.xlsx')
worksheet = workbook.add_worksheet()
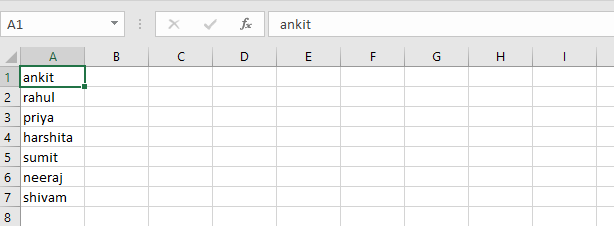
row = 0
column = 0
content = ["ankit", "rahul", "priya", "harshita",
"sumit", "neeraj", "shivam"]
for item in content :
worksheet.write(row, column, item)
row += 1
workbook.close()
Output:
Code #3 : Creating a new sheet with the specific name
Python3
import xlsxwriter
workbook = xlsxwriter.Workbook('Example3.xlsx')
worksheet = workbook.add_worksheet("My sheet")
scores = (
['ankit', 1000],
['rahul', 100],
['priya', 300],
['harshita', 50],
)
row = 0
col = 0
for name, score in (scores):
worksheet.write(row, col, name)
worksheet.write(row, col + 1, score)
row += 1
workbook.close()
Output:

XlsxWriter has some advantages and disadvantages over the alternative Python modules for writing Excel files.
Advantages:
- It supports more Excel features than any of the alternative modules.
- It has a high degree of fidelity with files produced by Excel. In most cases the files produced are 100% equivalent to files produced by Excel.
- It has extensive documentation, example files and tests.
- It is fast and can be configured to use very little memory even for very large output files.
Disadvantages:
- It cannot read or modify existing Excel XLSX files.
Like Article
Save Article
Last Updated on March 11, 2022 by
We can use the openpyxl library to create an Excel File in Python. This ability is an essential step for any Excel process automation. The best part – we don’t even need to have the Excel program installed.
Library
Open up a command prompt, and use pip install to download openpyxl library:
pip install openpyxlCreate Excel Workbook and Add Worksheets using Python
For this step, we are creating an Excel file in Python and don’t need to open the Excel program. The below code creates an Excel file in memory, then adds two sheets, namely “Sheet_one” and “Sheet_two”.
Note:
- When a Workbook is created, by default it contains at least one sheet. So this file will contain three (3) sheets in total.
- This Excel file doesn’t exist on the hard drive yet and it doesn’t have a name.
from openpyxl import Workbook

wb = Workbook()
wb.create_sheet("Sheet_one")
wb.create_sheet("Sheet_two")

wb.sheetnames
['Sheet', 'Sheet_one', 'Sheet_two']
We can change the sheet name any time by setting the ws.title attribute:
wb['Sheet'].title = 'Sheet_zero'

wb.sheetnames
['Sheet_zero', 'Sheet_one', 'Sheet_two']
Copy A Worksheet
To copy a worksheet, call the wb.copy_worksheet() method:
ws0 = wb['Sheet_zero']
wb.copy_worksheet(ws0)

wb.sheetnames
['Sheet_zero', 'Sheet_one', 'sheet_two', 'Sheet_zero Copy']
Note that openpyxl has limitations and can not copy everything on a sheet. For example, Images and Charts will not be copied.
Changing Sheet/tab Color
We can use the .sheet_properties.tabColor attribute to set tab colors. The value has to be a RGB hex value, and the easiest way to get those values is from the “Hex” box on Excel’s color palette.
wb['Sheet_zero'].sheet_properties.tabColor ='00FF00'
Write Some Data Into Excel
Check out this tutorial to learn how to access Sheets and Cells.
Let’s put some values into “Sheet_one”. As the below code shows, it’s easy to access a cell using the column-row notation.
ws1 = wb['Sheet_one']

ws1['B2'] = 'Fruits'
ws1['C2'] = 'Sales'
To enter values into Sheet programmatically, it’s easier to use the cell() method, which takes two arguments: row and column, both starting from an index of 1.
fruits = ['Apple','Peach','Cherry','Watermelon']
sales = [100,200,300,400]

row_start = 3  #start below the header row 2
col_start = 2  #starts from column B
for i in range(0,len(fruits)):
    ws1.cell(row_start+i, col_start).value = fruits[i]
    ws1.cell(row_start+i, col_start+1).value = sales[i]
Saving Excel File
Up to this point, the entire Excel file including everything we’ve done is still inside our computer’s memory. We need to save the file to our disk by calling the wb.save() method. If we don’t do this step, our Excel file will disappear after shutting down the Python environment.
wb.save('book_eg.xlsx')This is how we can create an Excel file using Python. Check the below for more resources.
Additional Resoruces
How to Access Excel File In Python
How to Use Python to Read Excel Formula
Work with Excel Named Range in Python
Reading Excel spreadsheets is all well and good. However, you also need to be able to create or edit a spreadsheet. The focus of this chapter will be on learning how to do that! OpenPyXL lets you create Microsoft Excel spreadsheets with a minimum of fuss.
Creating Excel spreadsheets using Python allows you to generate a new type of report that your users will use. For example, you might receive your data from a client in the form of JSON or XML. These data formats are not something that most accountants or business people are used to reading.
Once you learn how to create Excel spreadsheets with Python, you can leverage that knowledge to transform other data into Excel spreadsheets. This knowledge also allows you to do the reverse, taking in an Excel spreadsheet and output a different format, such as JSON or XML.
In this article, you will learn how to use OpenPyXL to do the following:
- Create a spreadsheet
- Write to a spreadsheet
- Add and remove sheets
- Insert and delete rows and columns
- Edit cell data
- Create merged cells
- Fold rows and columns
Let’s get started by creating a brand new spreadsheet!
Editor’s note: This article is based on a chapter from the book: Automating Excel with Python. You can order a copy on Gumroad or Kickstarter.
Creating a Spreadsheet
Creating an empty spreadsheet using OpenPyXL doesn’t take much code. Open up your Python editor and create a new file. Name it creating_spreadsheet.py.
Now add the following code to your file:
# creating_spreadsheet.py

from openpyxl import Workbook


def create_workbook(path):
    workbook = Workbook()
    workbook.save(path)


if __name__ == "__main__":
    create_workbook("hello.xlsx")
The critical piece here is that you need to import the Workbook class. This class allows you to instantiate a workbook object that you can then save. All this code does is create the file that you pass to it and save it.
Your new spreadsheet will look like this:
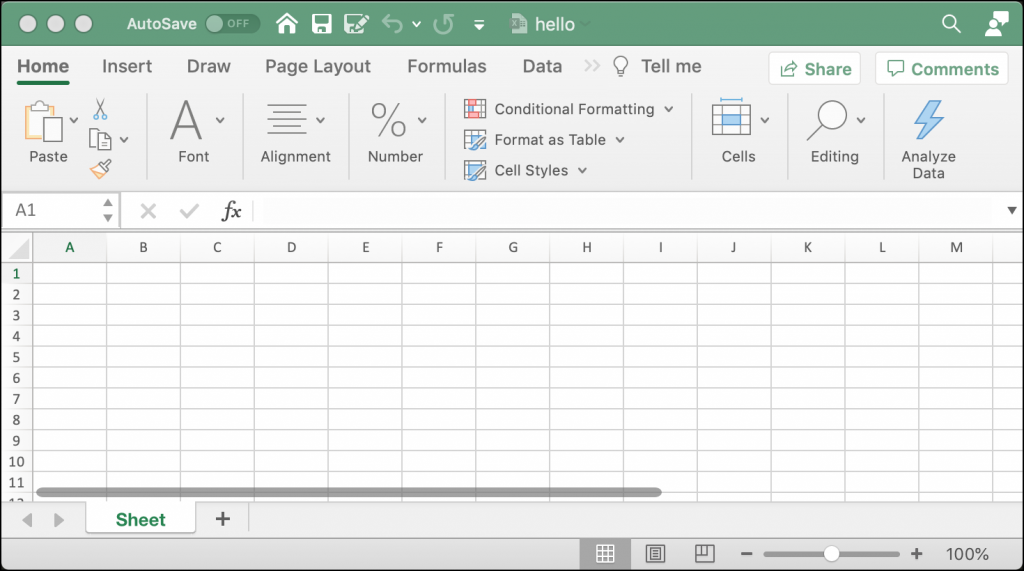
Now you’re ready to learn how to add some data to the cells in your spreadsheet.
Writing to a Spreadsheet
When writing data in a spreadsheet, you need to get the “sheet” object. You learned how to do that in the previous chapter using workbook.active, which gives you the active or currently visible sheet. You could also explicitly tell OpenPyXL which sheet you want to access by passing it a sheet title.
For this example, you will create another new program and then use the active sheet. Open up a new file and name it adding_data.py. Now add this code to your file:
# adding_data.py
from openpyxl import Workbook
def create_workbook(path):
workbook = Workbook()
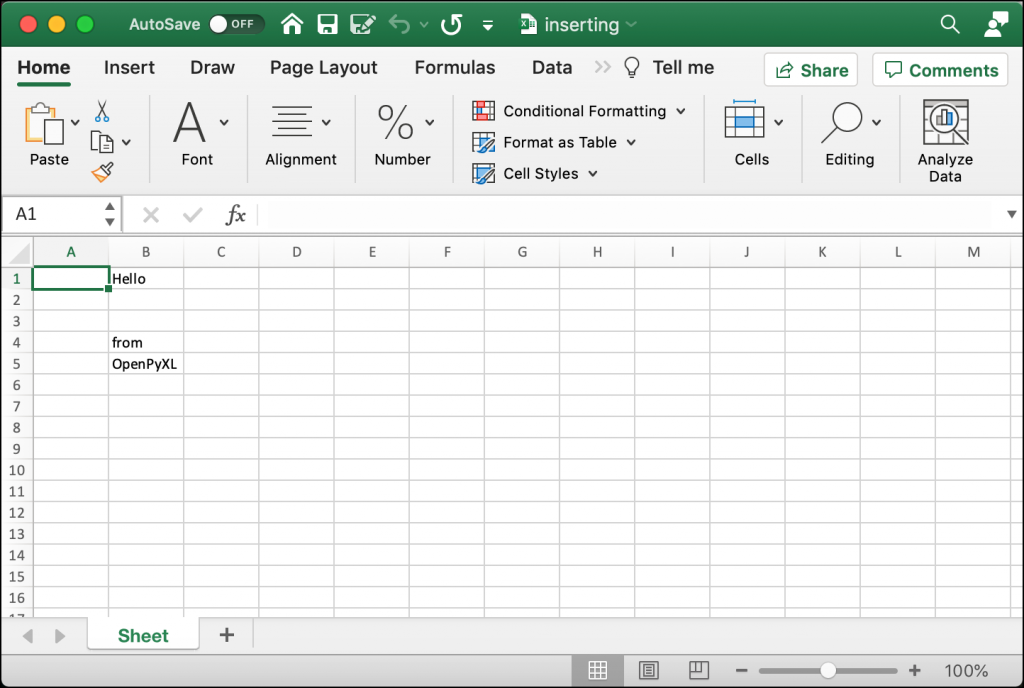
sheet = workbook.active
sheet["A1"] = "Hello"
sheet["A2"] = "from"
sheet["A3"] = "OpenPyXL"
workbook.save(path)
if __name__ == "__main__":
create_workbook("hello.xlsx")
This code will overwrite the previous example’s Excel spreadsheet. After you create the Workbook() object, you grab the active Worksheet. Then you add text strings to the cells: A1, A2, and A3. The last step is to save your new spreadsheet.
When you run this code, your new spreadsheet will look like this:

You can use this technique to write data to any cell in your spreadsheet.
Now let’s find out how to add and remove a worksheet!
Adding and Removing Sheets
Adding a worksheet to a workbook happens automatically when you create a new Workbook. The Worksheet will be named “Sheet” by default. If you want, you can set the name of the sheet yourself.
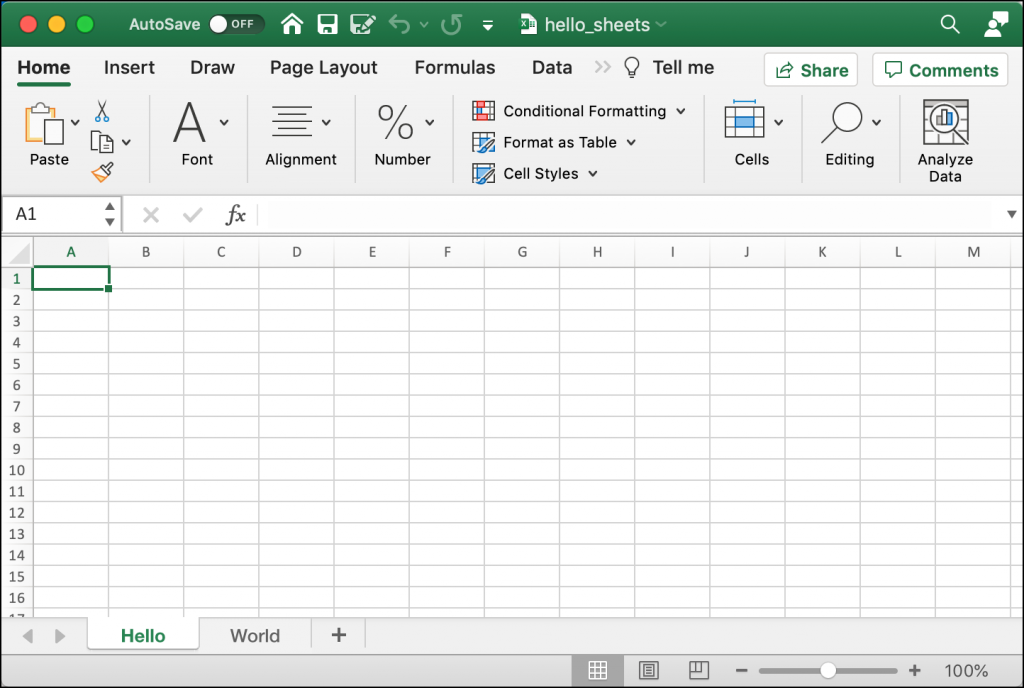
To see how this works, create a new file named creating_sheet_title.py and add the following code:
# creating_sheet_title.py

from openpyxl import Workbook


def create_sheets(path):
    workbook = Workbook()
    sheet = workbook.active
    sheet.title = "Hello"
    sheet2 = workbook.create_sheet(title="World")
    workbook.save(path)


if __name__ == "__main__":
    create_sheets("hello_sheets.xlsx")
Here you create the Workbook and then grab the active Worksheet. You can then set the Worksheet’s title using the title attribute. The following line of code adds a new worksheet to the Workbook by calling create_sheet().
The create_sheet() method takes two parameters: title and index. The title attribute gives a title to the Worksheet. The index tells the Workbook where to insert the Worksheet, from left to right. If you specify zero, your Worksheet gets inserted at the beginning.
If you run this code, your new spreadsheet will look like this:
Sometimes you will need to delete a worksheet. Perhaps that sheet no longer has valid information, or it was created by accident.
To see how to delete a worksheet, create another new file and name it delete_sheets.py. Then add this code:
# delete_sheets.py

import openpyxl


def create_worksheets(path):
    workbook = openpyxl.Workbook()
    workbook.create_sheet()
    print(workbook.sheetnames)
    # Insert a worksheet
    workbook.create_sheet(index=1, title="Second sheet")
    print(workbook.sheetnames)
    del workbook["Second sheet"]
    print(workbook.sheetnames)
    workbook.save(path)


if __name__ == "__main__":
    create_worksheets("del_sheets.xlsx")
In this example, you create two new sheets. The first Worksheet has no title specified, so it defaults to “Sheet1”. You supply a title to the second sheet, and then you print out all the current worksheet titles.
Next, you use Python’s del keyword to delete the Worksheet’s name from the workbook, which removes the sheet. Then you print out the current worksheet titles again.
Here is the output from running the code:
['Sheet', 'Sheet1']
['Sheet', 'Second sheet', 'Sheet1']
['Sheet', 'Sheet1']
The first Worksheet gets created automatically when you instantiate the Workbook. The Worksheet is named “Sheet”. Then you make “Sheet1”. Lastly, you create “Second sheet”, but you insert it at position 1, which tells the Workbook to shift ‘Sheet1’ to the right by one position.
You can see from the output above how the worksheets are ordered before and after you add and delete the “Second sheet”.
Now let’s learn about inserting and removing rows and columns!
Inserting and Deleting Rows and Columns
The OpenPyXL package provides you with several methods that you can use to insert or delete rows and columns. These methods are a part of the Worksheet object.
You will learn about the following four methods:
.insert_rows().delete_rows().insert_cols().delete_cols()
Each of these methods can take these two arguments:
idx– The index to insert into (or delete from)amount– The number of rows or columns to add (or delete)
You can use the insert methods to insert rows or columns at the specified index.
Open up a new file and name it insert_demo.py. Then enter this code in your new file:
# insert_demo.py

from openpyxl import Workbook


def inserting_cols_rows(path):
    workbook = Workbook()
    sheet = workbook.active
    sheet["A1"] = "Hello"
    sheet["A2"] = "from"
    sheet["A3"] = "OpenPyXL"
    # insert a column before A
    sheet.insert_cols(idx=1)
    # insert 2 rows starting on the second row
    sheet.insert_rows(idx=2, amount=2)
    workbook.save(path)


if __name__ == "__main__":
    inserting_cols_rows("inserting.xlsx")
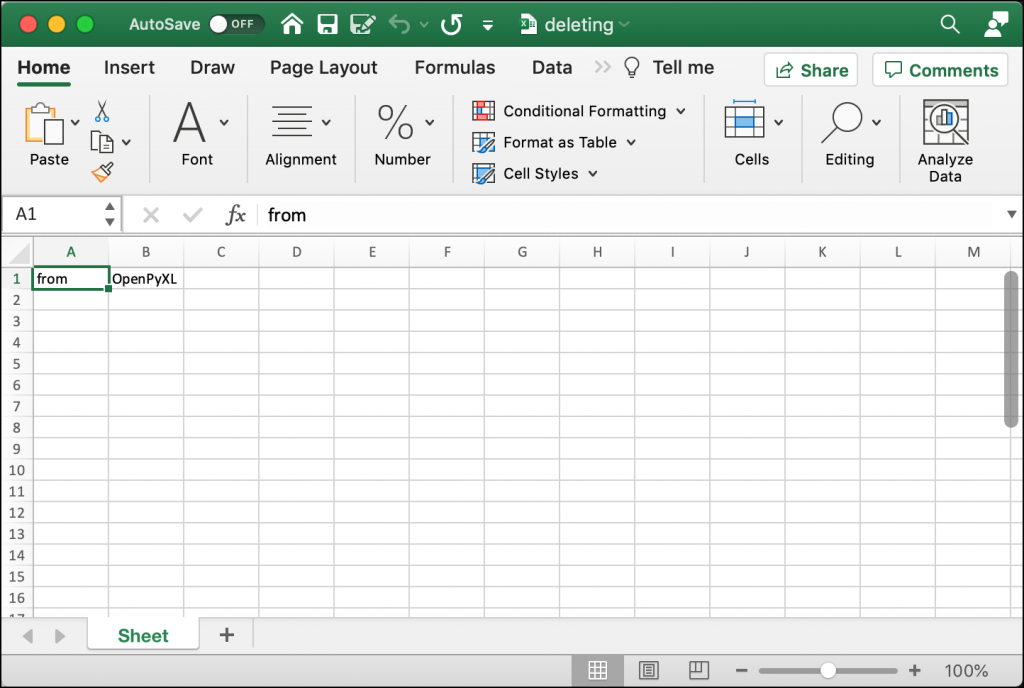
Here you create another new Spreadsheet. In this case, you add text to the first three cells in the “A” column. Then you insert one column at index one. That means you inserted a single column before “A”, which causes the cells in column “A” to shift to column “B”.
Next, you insert two new rows starting at index two. This code will insert two rows between the first and second rows.
You can see how this changes things by taking a look at the following screenshot:
Try changing the indexes or number of rows and columns that you want to insert and see how it works.
You will also need to delete columns and rows from time to time. To do that you will use .delete_rows() and .delete_cols().
Open up a new file and name it delete_demo.py. Then add this code:
# delete_demo.py

from openpyxl import Workbook


def deleting_cols_rows(path):
    workbook = Workbook()
    sheet = workbook.active
    sheet["A1"] = "Hello"
    sheet["B1"] = "from"
    sheet["C1"] = "OpenPyXL"
    sheet["A2"] = "row 2"
    sheet["A3"] = "row 3"
    sheet["A4"] = "row 4"
    # Delete column A
    sheet.delete_cols(idx=1)
    # delete 2 rows starting on the second row
    sheet.delete_rows(idx=2, amount=2)
    workbook.save(path)


if __name__ == "__main__":
    deleting_cols_rows("deleting.xlsx")
In this example, you add text to six different cells. Four of those cells are in column “A”. Then you use delete_cols() to delete column “A”! That means you got rid of four values. Next, you delete two rows, starting at row number two.
When you run this code, your result should look like this:
Try editing the index or amount values to get familiar with deleting rows and columns.
Now you are ready to learn about editing a spreadsheet’s values!
Editing Cell Data
You can use OpenPyXL to change the values in a pre-existing Excel spreadsheet. You can do that by specifying the cell you want to change and then setting it to a new value.
For this example, you will use the inserting.xlsx file you created in the previous section. Now create a new Python file named editing_demo.py. Then add the following code:
# editing_demo.py

from openpyxl import load_workbook


def edit(path, data):
    workbook = load_workbook(filename=path)
    sheet = workbook.active
    for cell in data:
        current_value = sheet[cell].value
        sheet[cell] = data[cell]
        print(f'Changing {cell} from {current_value} to {data[cell]}')
    workbook.save(path)

if __name__ == "__main__":
    data = {"B1": "Hi", "B5": "Python"}
    edit("inserting.xlsx", data)
This code loads up the Excel file that you created in the previous section. It then loops over each value in the data dictionary that you passed to the edit() function. You get the current value for the cell using a key in the dictionary. Then you change that cell’s value to match the value in the dictionary.
To make it more obvious what is going on, you print out the old and new values of the cell.
When you run this code, you will see the following output:
Changing B1 from Hello to Hi
Changing B5 from OpenPyXL to Python
Open up the new version of the inserting.xlsx file, and it should now look like this:

Here you can see how the cell values have changed to match the one specified in the data dictionary.
Now you can move on and learn how to create merged cells!
Creating Merged Cells
A merged cell is where two or more cells get merged into one. To set a MergedCell’s value, you have to use the top-left-most cell. For example, if you merge “A2:E2”, you would set the value of cell “A2” for the merged cells.
To see how this works in practice, create a file called merged_cells.py and add this code to it:
# merged_cells.py
from openpyxl import Workbook
from openpyxl.styles import Alignment
def create_merged_cells(path, value):
workbook = Workbook()
sheet = workbook.active
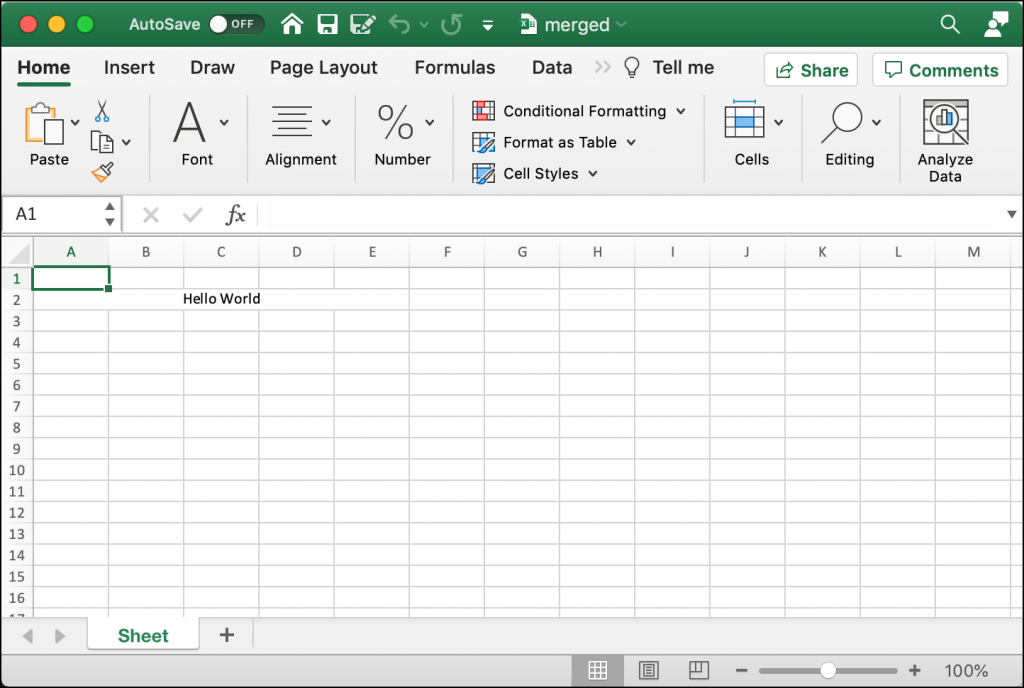
sheet.merge_cells("A2:E2")
top_left_cell = sheet["A2"]
top_left_cell.alignment = Alignment(horizontal="center",
vertical="center")
sheet["A2"] = value
workbook.save(path)
if __name__ == "__main__":
create_merged_cells("merged.xlsx", "Hello World")
OpenPyXL has many ways to style cells. In this example, you import Alignment from openpyxl.styles. You will learn more about styles and formatting cells in a later chapter.
Here you merge the cells “A2:E2” and set the alignment to the center of the cell. Then you set the value of “A2” to a string that you passed to the create_merged_cells() function.
When you run this example, your new Excel spreadsheet will look like this:
To get some hands-on experience, change the range of cells you want to merge and try it with and without the alignment set.
Now you are ready to learn about folding columns or rows!
Folding Rows and Columns
Microsoft Excel supports the folding of rows and columns. The term “folding” is also called “hiding” or creating an “outline”. The rows or columns that get folded can be unfolded (or expanded) to make them visible again. You can use this functionality to make a spreadsheet briefer. For example, you might want to only show the sub-totals or the results of equations rather than all of the data at once.
OpenPyXL supports folding too. To see how this works, create a new file named folding.py and enter the following code:
# folding.py

import openpyxl


def folding(path, rows=None, cols=None, hidden=True):
    workbook = openpyxl.Workbook()
    sheet = workbook.active

    if rows:
        begin_row, end_row = rows
        sheet.row_dimensions.group(begin_row, end_row, hidden=hidden)

    if cols:
        begin_col, end_col = cols
        sheet.column_dimensions.group(begin_col, end_col, hidden=hidden)

    workbook.save(path)


if __name__ == "__main__":
    folding("folded.xlsx", rows=(1, 5), cols=("C", "F"))
Your folding() function accepts a tuple of rows or columns or both. You can tell OpenPyXL whether or not you want those rows and columns to be hidden, or folded. In this example, you fold rows 1-5 and columns C-F. To cause the folding to occur, you need to call sheet.row_dimensions.group().
When you run this code, your spreadsheet will look like this:

You can see in this spreadsheet that some of the rows and columns are folded or hidden. There is a “+” symbol next to row 6 and another “+” symbol above column “G”. If you click on either of those buttons, it will expand the folded rows or columns.
Give this code a try. You can also experiment with different row or column ranges.
Now you are ready to learn how to freeze a pane!
Freezing Panes
Microsoft Excel allows you to freeze panes. What that means is that you can freeze one or more columns or rows. One popular use case is to freeze a row of headers so that the headers are always visible while scrolling through a lot of data.
OpenPyXL provides a freeze_panes attribute on the Worksheet object that you can set. You need to select a cell below and to the right of the columns that you want to freeze. For example, if you want to freeze the first row in your spreadsheet, then you would select cell at “A2” to apply the freeze to that row.
You can see how this works by writing some code. Open up a new file and name it freezing_panes.py. Then enter the following into it:
# freezing_panes.py

from openpyxl import Workbook


def freeze(path, row_to_freeze):
    workbook = Workbook()
    sheet = workbook.active
    sheet.title = "Freeze"
    sheet.freeze_panes = row_to_freeze
    headers = ["Name", "Address", "State", "Zip"]
    sheet["A1"] = headers[0]
    sheet["B1"] = headers[1]
    sheet["C1"] = headers[2]
    sheet["D1"] = headers[3]
    data = [dict(zip(headers, ("Mike", "123 Storm Dr", "IA", "50000"))),
            dict(zip(headers, ("Ted", "555 Tornado Alley", "OK", "90000")))]
    row = 2
    for d in data:
        sheet[f'A{row}'] = d["Name"]
        sheet[f'B{row}'] = d["Address"]
        sheet[f'C{row}'] = d["State"]
        sheet[f'D{row}'] = d["Zip"]
        row += 1
    workbook.save(path)


if __name__ == "__main__":
    freeze("freeze.xlsx", row_to_freeze="A2")
Here you create a new Workbook and set the active sheet’s title to “Freeze”. Then you set the freeze_panes attribute to “A2”. The rest of the code in the function adds a couple of rows of data to the Worksheet.
When you run this code, the spreadsheet that you create will look like this:
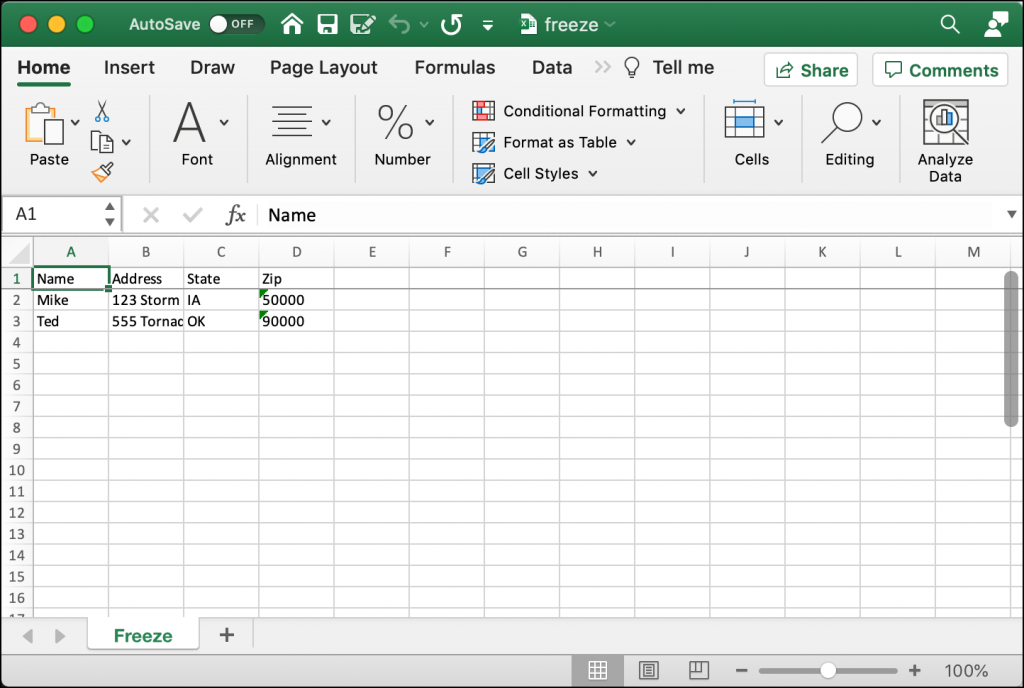
Try scrolling down through some rows in the spreadsheet. The top row should always remain visible because it has been “frozen”.
Wrapping Up
You can use OpenPyXL not only to create an Excel spreadsheet, but modify a pre-existing one. In this chapter, you learned how to do the following:
- Create a spreadsheet
- Write to a spreadsheet
- Add and remove sheets
- Insert and delete rows and columns
- Edit cell data
- Create merged cells
- Freeze panes
Give the examples in this chapter a try. Then modify them a bit to see what else you can do on your own.
Project description
XlsxWriter is a Python module for writing files in the Excel 2007+ XLSX
file format.
XlsxWriter can be used to write text, numbers, formulas and hyperlinks to
multiple worksheets and it supports features such as formatting and many more,
including:
-
100% compatible Excel XLSX files.
-
Full formatting.
-
Merged cells.
-
Defined names.
-
Charts.
-
Autofilters.
-
Data validation and drop down lists.
-
Conditional formatting.
-
Worksheet PNG/JPEG/GIF/BMP/WMF/EMF images.
-
Rich multi-format strings.
-
Cell comments.
-
Integration with Pandas and Polars.
-
Textboxes.
-
Support for adding Macros.
-
Memory optimization mode for writing large files.
It supports Python 3.4+ and PyPy3 and uses standard libraries only.
Here is a simple example:
import xlsxwriter


# Create an new Excel file and add a worksheet.
workbook = xlsxwriter.Workbook('demo.xlsx')
worksheet = workbook.add_worksheet()

# Widen the first column to make the text clearer.
worksheet.set_column('A:A', 20)

# Add a bold format to use to highlight cells.
bold = workbook.add_format({'bold': True})

# Write some simple text.
worksheet.write('A1', 'Hello')

# Text with formatting.
worksheet.write('A2', 'World', bold)

# Write some numbers, with row/column notation.
worksheet.write(2, 0, 123)
worksheet.write(3, 0, 123.456)

# Insert an image.
worksheet.insert_image('B5', 'logo.png')

workbook.close()
See the full documentation at: https://xlsxwriter.readthedocs.io
Release notes: https://xlsxwriter.readthedocs.io/changes.html
Download files
Download the file for your platform. If you’re not sure which to choose, learn more about installing packages.