
How to Convert Excel to XML – Step-by-Step Tutorial (2023)
We all know basic excel skills that help us work in excel spreadsheets with extensive data. But what if you need to transfer the excel file somewhere and change it into other formats?
The extensible markup language or XML comes in handy for this. Simply put, it is a markup language that helps store data in an excel spreadsheet and changes its format.
You can easily convert excel data into XML data – but how do you do that?
For that, download our FREE Exercise Workbook here and continue reading the article below. 😀
What is the XML file format?
The XML file format is a way to write text in a document using tags. These tags are customizable and represent the structure of the document.
It also tells how the XLS file can be converted to an XML file and transferred to another application.
XML format uses the DOM or Document Object Model as its basic structure and can help separate text in HTML.
For instance, XML data for a company employee might be:

The tags ‘Name, ID No., Post, Salary, and Status’ consist of the document’s data. You can customize the tags as we did here for an employee’s data.
Create the Excel File
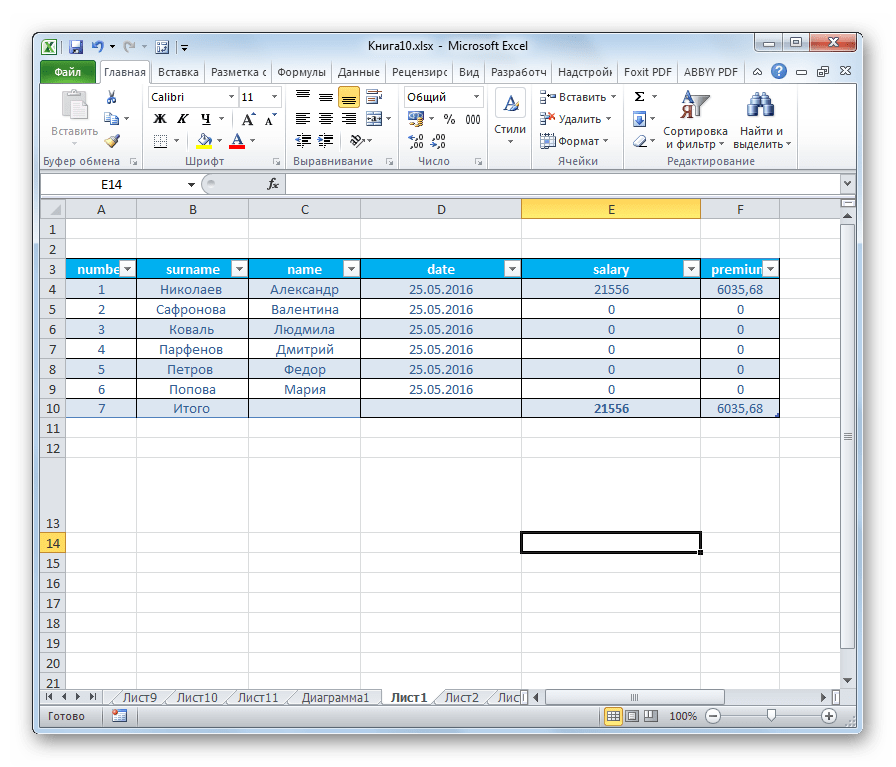
To convert Excel to XML, you need to create an XLS file containing all the data. I have created an example below that lists the members of a company and their details.

Each field contains certain information about every employee.
How to Create the XML Schema?
The XML Schema will structure each spreadsheet field and its appearance in the XML file.
Our spreadsheet has five columns with different data types setting the base for our XML file.
1. To create the XML file, open any text editor and begin entering the standard XML elements.

Don’t fret just yet; We’ll explain all the alien-like items in this image one by one. 😄
The first line in the image is the standard XML line. It is used each time you create XML documents.
The version 1.0 encoding UTF specifies that it is an XML format.
The second line indicates the type of text. For example, this data was about employees of a company, hence <employee-data>. The remaining line is the default.
Since this statement starts with <employee-data>, it is the root element here. The remaining elements of the argument make up for the child element.

The third line, containing the record tag, indicates the beginning and end of a single field. It consists of the information in each field of the spreadsheet.
For instance, the first field is about Alice A. So it will include all the information about Alice on each tag.

The TAG NAME specifies the items in each column, whereas the data contains the corresponding value.
You don’t have to manually input the exact and each column name; they just need to be in the correct order. Excel can help us do the rest.

For the TAG NAME, say we want the first employee’s name.
So, we will write – <Name>Alice A.</Name> – Similarly, for her ID, we will write – <ID No.>2854</ID No.> – .
Pro Tip!
Must note the opening and closing tag identified by a forward slash (/).
These are to be used at the beginning and each of each statement. Also, the closing and opening tags must be in the correct order, as the data between the two tags make for the XML elements.

The last closing tag </employee-data> marks the end of the file. In the last step, save the XML data file as “employee-data.xml.”
Enable the Developer Tab
Now that your schema markup is prepared, let’s add it to Excel.
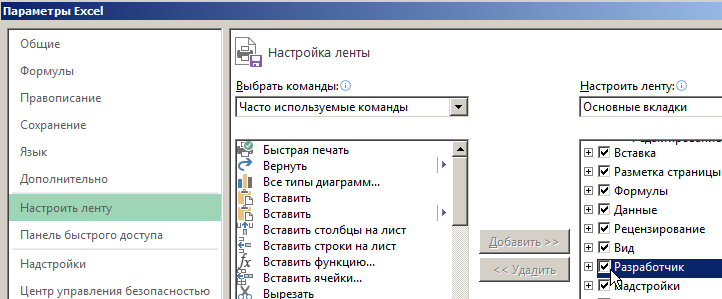
1. Make sure the developer tab is enabled on your Excel spreadsheet. If it is not visible, right-click on the ribbon and select Customize the ribbon.

2. A dialog box will appear on the screen. On the bottom right side, mark the develop option as shown and click ok.

3. Now, you should be able to view the developer’s tab on the ribbon like this:

That’s it – now what? Now we add the Schema file to Microsoft Excel. 😃
Open the XML Source Task Pane & Add XML Maps
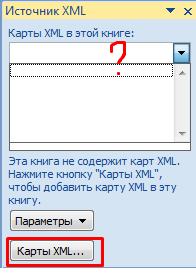
1. Click on Developer from the ribbon, and you will see a number of options. Select the Source icon:

The XML source pane will appear on the Excel spreadsheet.
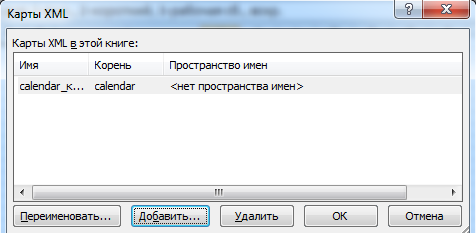
2. Click XML Maps at the bottom right corner.

It shows a dialog box that searches for the XML map in the workbook.
3. Click the add button and select the XML map stored on your desktop.
You will see a warning like this one below from Microsoft Excel upon adding the map.

There’s nothing to worry about.
4. Simply press ‘Ok’.
5. You will now see the XML map in the workbook.

6. Click ‘Okay’ and move to the XML source pane, which looks like this.

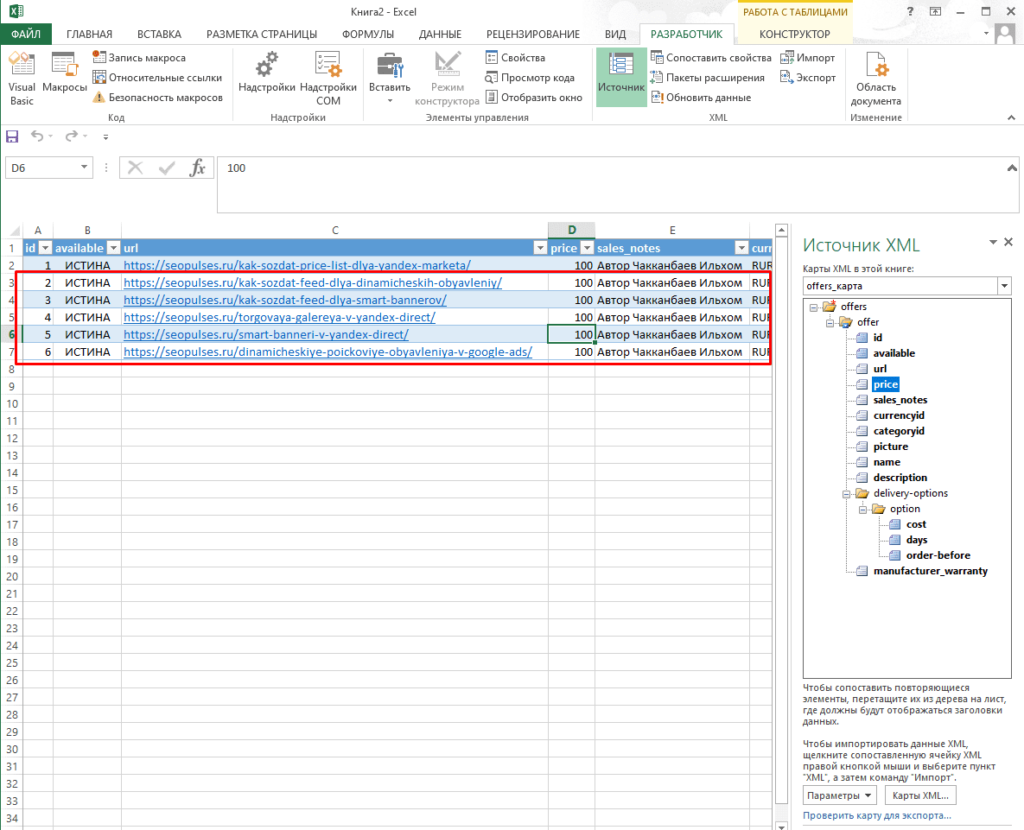
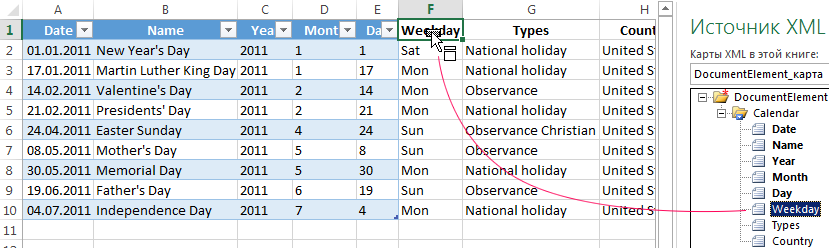
7. Now, mark the data on the XML Map.
Assign XML Elements
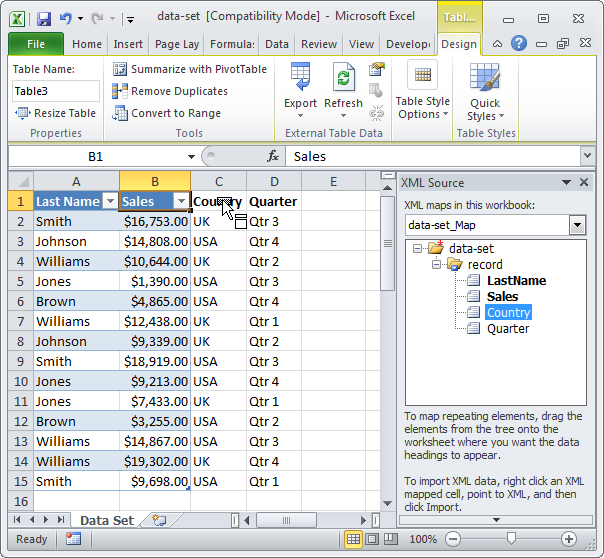
Now that you have the XML schema and the XLSX ready, mark the XML tags to the spreadsheets’ data.
All you need to do now is drag one XML element from the source pane. Then drop it on the corresponding spreadsheets’ column name.
For instance, I will drop the “Name” XML element on the “Name” column, and a blue table will appear.

Apply the same process to the remaining columns. If you have been successful till now, your spreadsheet will look like this:

If you’ve achieved this form, it means all your data is perfectly mapped with XML tags.
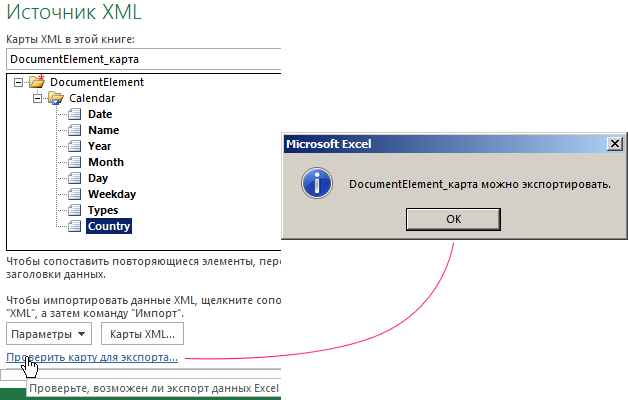
Now that we’ve come this far, it is only fair we export it. So, onto the next step.
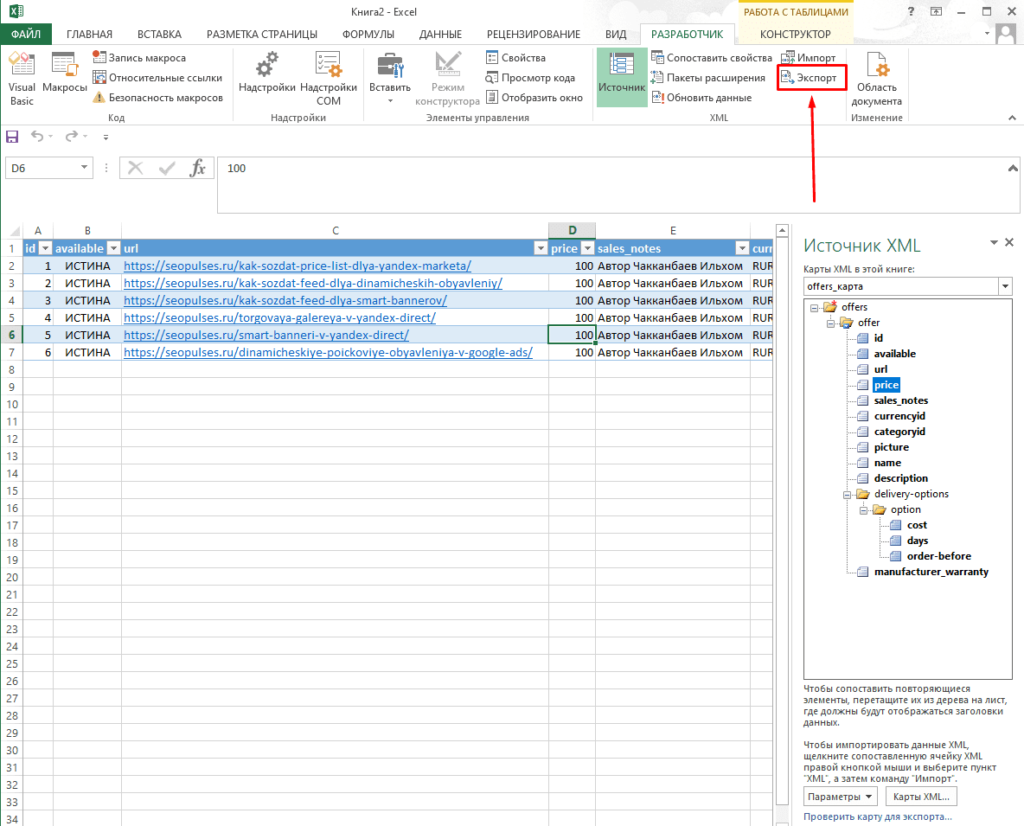
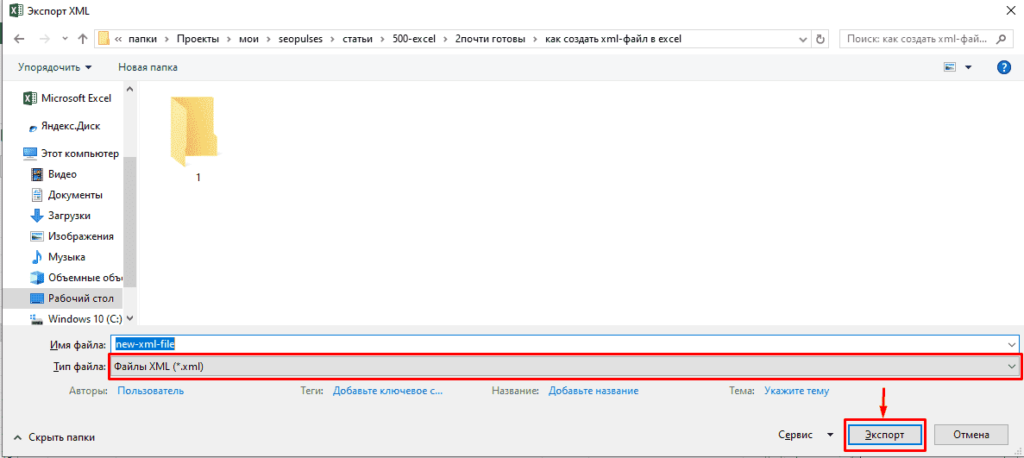
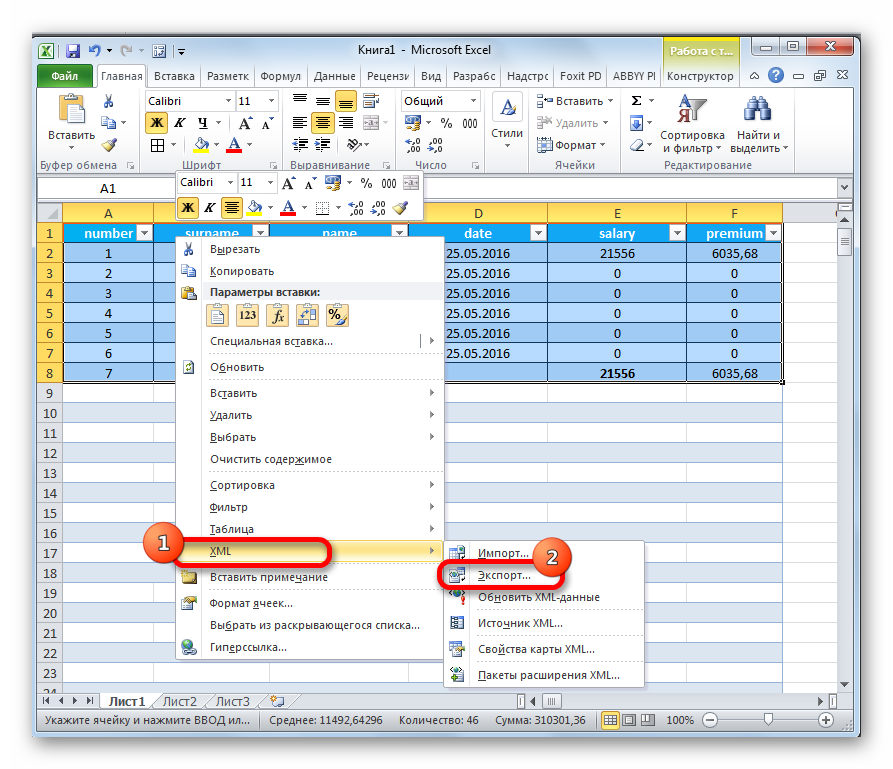
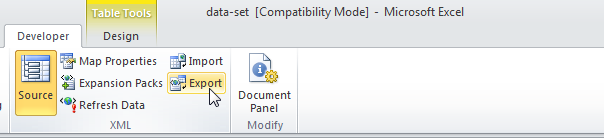
Export the XML File
1. To convert Excel to XML file formats, open the developer tab and click the export command.

A dialog box will appear, asking the location to save the file. The file type should be set by default.
2. Select a location, enter the name and click export.
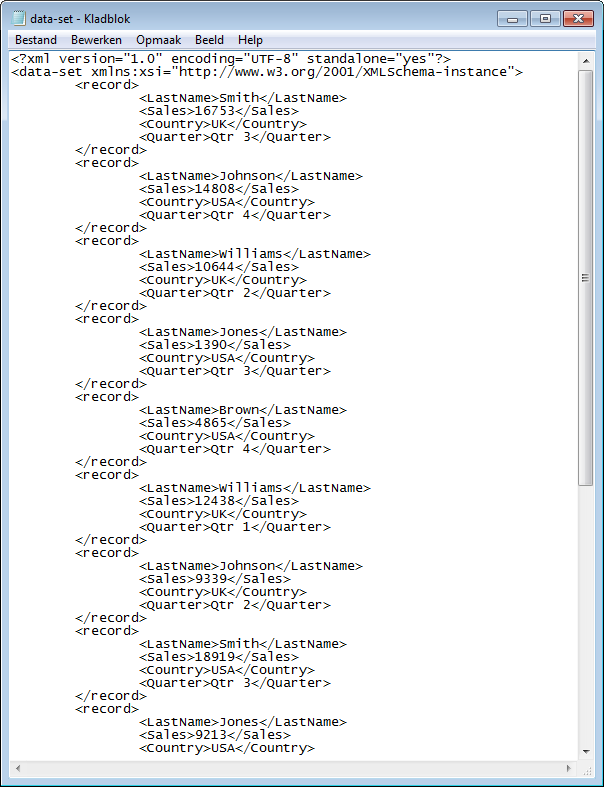
The file is now saved on your desktop with all your XML data. You can open the file from the XML section on a Wordpad or other apps.
The XML file will show up like this:

You might receive a warning from Microsoft office. Exporting the file may cause loss of pictures, formatting, or other non-XML objects.
That’s not an issue. Go ahead and hit ‘Ok’. 🙂
That’s it — Now What
Beginning to convert Excel to XML files can be challenging at the start. But once you get hold of it, you can do it with your eyes closed.
In the above article, we not only learned about creating an XML schema but also to convert an Excel file into XML format and export it.
But that’s only about creating and retaining your Excel file in different formats. There’s so much more to Excel that you’d still want to learn like the VLOOKUP, SUMIF and IF functions.
Want to learn them all? Click here to sign up for my free 30-minute email course to master these functions.
Kasper Langmann2023-01-19T12:23:02+00:00
Page load link
In this example, let’s create a demo console project in Visual Studio by selecting File -> New -> Project. From the project window, select Console template and type name and select path for the project, as shown below.
After creating the project, create a Model Class and give a name as TestModel, as shown below.
- public class TestModel
- {
- public int TestId { get; set; }
- public string TestName { get; set; }
- public string TestDesc { get; set; }
- public DateTime TestDate { get; set; }
- }
Create one more class and give name as TestModelList.
- public class TestModelList
- {
- public List<TestModel> testData { get; set; }
- }
Let’s add some hard coded data into this model. For that, write the below code in the main method of Program.cs file.
- class Program
- {
- static void Main(string[] args)
- {
- TestModelList tmList = new TestModelList();
- tmList.testData = new List<TestModel>();
- TestModel tm = new TestModel();
- tm.TestId = 1;
- tm.TestName = «Test1»;
- tm.TestDesc = «Tested 1 time»;
- tm.TestDate = DateTime.Now.Date;
- tmList.testData.Add(tm);
- TestModel tm1 = new TestModel();
- tm1.TestId = 2;
- tm1.TestName = «Test2»;
- tm1.TestDesc = «Tested 2 times»;
- tm1.TestDate = DateTime.Now.AddDays(-1);
- tmList.testData.Add(tm1);
- TestModel tm2 = new TestModel();
- tm2.TestId = 3;
- tm2.TestName = «Test3»;
- tm2.TestDesc = «Tested 3 times»;
- tm2.TestDate = DateTime.Now.AddDays(-2);
- tmList.testData.Add(tm2);
- TestModel tm3 = new TestModel();
- tm3.TestId = 4;
- tm3.TestName = «Test4»;
- tm3.TestDesc = «Tested 4 times»;
- tm3.TestDate = DateTime.Now.AddDays(-3);
- tmList.testData.Add(tm);
- }
- }
Now, we have got a Model ready. So, let’s start writing functions for creating an Excel file using OpenXml. For this, add OpenXml from NuGet Packages by right-clicking the project and selecting «Manage NuGet Package» and search openxml. From the list, select DocumentFormat.OpenXml as shown below and install it.

Next, create functions for creating an Excel package using OpenXml as shown below.
-
First, import OpenXml packages as shown below.
- using DocumentFormat.OpenXml;
- using DocumentFormat.OpenXml.Packaging;
- using DocumentFormat.OpenXml.Spreadsheet;
- using X14 = DocumentFormat.OpenXml.Office2010.Excel;
- using X15 = DocumentFormat.OpenXml.Office2013.Excel;
Then, add the below code for creating an Excel file into given path.
- public void CreateExcelFile(TestModelList data, string OutPutFileDirectory)
- {
- var datetime = DateTime.Now.ToString().Replace(«/», «_»).Replace(«:», «_»);
- string fileFullname = Path.Combine(OutPutFileDirectory, «Output.xlsx»);
- if (File.Exists(fileFullname))
- {
- fileFullname = Path.Combine(OutPutFileDirectory, «Output_» + datetime + «.xlsx»);
- }
- using (SpreadsheetDocument package = SpreadsheetDocument.Create(fileFullname, SpreadsheetDocumentType.Workbook))
- {
- CreatePartsForExcel(package, data);
- }
- }
-
Write functions for creating workbook and worksheet into Excel.
- private void CreatePartsForExcel(SpreadsheetDocument document, TestModelList data)
- {
- SheetData partSheetData = GenerateSheetdataForDetails(data);
- WorkbookPart workbookPart1 = document.AddWorkbookPart();
- GenerateWorkbookPartContent(workbookPart1);
- WorkbookStylesPart workbookStylesPart1 = workbookPart1.AddNewPart<WorkbookStylesPart>(«rId3»);
- GenerateWorkbookStylesPartContent(workbookStylesPart1);
- WorksheetPart worksheetPart1 = workbookPart1.AddNewPart<WorksheetPart>(«rId1»);
- GenerateWorksheetPartContent(worksheetPart1, partSheetData);
- }
-
Write functions for creating workbook and work sheet content in Excel, as shown below.
- private void GenerateWorkbookPartContent(WorkbookPart workbookPart1)
- {
- Workbook workbook1 = new Workbook();
- Sheets sheets1 = new Sheets();
- Sheet sheet1 = new Sheet() { Name = «Sheet1», SheetId = (UInt32Value)1U, Id = «rId1» };
- sheets1.Append(sheet1);
- workbook1.Append(sheets1);
- workbookPart1.Workbook = workbook1;
- }
- private void GenerateWorksheetPartContent(WorksheetPart worksheetPart1, SheetData sheetData1)
- {
- Worksheet worksheet1 = new Worksheet() { MCAttributes = new MarkupCompatibilityAttributes() { Ignorable = «x14ac» } };
- worksheet1.AddNamespaceDeclaration(«r», «http://schemas.openxmlformats.org/officeDocument/2006/relationships»);
- worksheet1.AddNamespaceDeclaration(«mc», «http://schemas.openxmlformats.org/markup-compatibility/2006»);
- worksheet1.AddNamespaceDeclaration(«x14ac», «http://schemas.microsoft.com/office/spreadsheetml/2009/9/ac»);
- SheetDimension sheetDimension1 = new SheetDimension() { Reference = «A1» };
- SheetViews sheetViews1 = new SheetViews();
- SheetView sheetView1 = new SheetView() { TabSelected = true, WorkbookViewId = (UInt32Value)0U };
- Selection selection1 = new Selection() { ActiveCell = «A1», SequenceOfReferences = new ListValue<StringValue>() { InnerText = «A1» } };
- sheetView1.Append(selection1);
- sheetViews1.Append(sheetView1);
- SheetFormatProperties sheetFormatProperties1 = new SheetFormatProperties() { DefaultRowHeight = 15D, DyDescent = 0.25D };
- PageMargins pageMargins1 = new PageMargins() { Left = 0.7D, Right = 0.7D, Top = 0.75D, Bottom = 0.75D, Header = 0.3D, Footer = 0.3D };
- worksheet1.Append(sheetDimension1);
- worksheet1.Append(sheetViews1);
- worksheet1.Append(sheetFormatProperties1);
- worksheet1.Append(sheetData1);
- worksheet1.Append(pageMargins1);
- worksheetPart1.Worksheet = worksheet1;
- }
-
Write code for workbook styles by giving your own font size, color, font name, border properties, cell style formats etc. as shown below.
- private void GenerateWorkbookStylesPartContent(WorkbookStylesPart workbookStylesPart1)
- {
- Stylesheet stylesheet1 = new Stylesheet() { MCAttributes = new MarkupCompatibilityAttributes() { Ignorable = «x14ac» } };
- stylesheet1.AddNamespaceDeclaration(«mc», «http://schemas.openxmlformats.org/markup-compatibility/2006»);
- stylesheet1.AddNamespaceDeclaration(«x14ac», «http://schemas.microsoft.com/office/spreadsheetml/2009/9/ac»);
- Fonts fonts1 = new Fonts() { Count = (UInt32Value)2U, KnownFonts = true };
- Font font1 = new Font();
- FontSize fontSize1 = new FontSize() { Val = 11D };
- Color color1 = new Color() { Theme = (UInt32Value)1U };
- FontName fontName1 = new FontName() { Val = «Calibri» };
- FontFamilyNumbering fontFamilyNumbering1 = new FontFamilyNumbering() { Val = 2 };
- FontScheme fontScheme1 = new FontScheme() { Val = FontSchemeValues.Minor };
- font1.Append(fontSize1);
- font1.Append(color1);
- font1.Append(fontName1);
- font1.Append(fontFamilyNumbering1);
- font1.Append(fontScheme1);
- Font font2 = new Font();
- Bold bold1 = new Bold();
- FontSize fontSize2 = new FontSize() { Val = 11D };
- Color color2 = new Color() { Theme = (UInt32Value)1U };
- FontName fontName2 = new FontName() { Val = «Calibri» };
- FontFamilyNumbering fontFamilyNumbering2 = new FontFamilyNumbering() { Val = 2 };
- FontScheme fontScheme2 = new FontScheme() { Val = FontSchemeValues.Minor };
- font2.Append(bold1);
- font2.Append(fontSize2);
- font2.Append(color2);
- font2.Append(fontName2);
- font2.Append(fontFamilyNumbering2);
- font2.Append(fontScheme2);
- fonts1.Append(font1);
- fonts1.Append(font2);
- Fills fills1 = new Fills() { Count = (UInt32Value)2U };
- Fill fill1 = new Fill();
- PatternFill patternFill1 = new PatternFill() { PatternType = PatternValues.None };
- fill1.Append(patternFill1);
- Fill fill2 = new Fill();
- PatternFill patternFill2 = new PatternFill() { PatternType = PatternValues.Gray125 };
- fill2.Append(patternFill2);
- fills1.Append(fill1);
- fills1.Append(fill2);
- Borders borders1 = new Borders() { Count = (UInt32Value)2U };
- Border border1 = new Border();
- LeftBorder leftBorder1 = new LeftBorder();
- RightBorder rightBorder1 = new RightBorder();
- TopBorder topBorder1 = new TopBorder();
- BottomBorder bottomBorder1 = new BottomBorder();
- DiagonalBorder diagonalBorder1 = new DiagonalBorder();
- border1.Append(leftBorder1);
- border1.Append(rightBorder1);
- border1.Append(topBorder1);
- border1.Append(bottomBorder1);
- border1.Append(diagonalBorder1);
- Border border2 = new Border();
- LeftBorder leftBorder2 = new LeftBorder() { Style = BorderStyleValues.Thin };
- Color color3 = new Color() { Indexed = (UInt32Value)64U };
- leftBorder2.Append(color3);
- RightBorder rightBorder2 = new RightBorder() { Style = BorderStyleValues.Thin };
- Color color4 = new Color() { Indexed = (UInt32Value)64U };
- rightBorder2.Append(color4);
- TopBorder topBorder2 = new TopBorder() { Style = BorderStyleValues.Thin };
- Color color5 = new Color() { Indexed = (UInt32Value)64U };
- topBorder2.Append(color5);
- BottomBorder bottomBorder2 = new BottomBorder() { Style = BorderStyleValues.Thin };
- Color color6 = new Color() { Indexed = (UInt32Value)64U };
- bottomBorder2.Append(color6);
- DiagonalBorder diagonalBorder2 = new DiagonalBorder();
- border2.Append(leftBorder2);
- border2.Append(rightBorder2);
- border2.Append(topBorder2);
- border2.Append(bottomBorder2);
- border2.Append(diagonalBorder2);
- borders1.Append(border1);
- borders1.Append(border2);
- CellStyleFormats cellStyleFormats1 = new CellStyleFormats() { Count = (UInt32Value)1U };
- CellFormat cellFormat1 = new CellFormat() { NumberFormatId = (UInt32Value)0U, FontId = (UInt32Value)0U, FillId = (UInt32Value)0U, BorderId = (UInt32Value)0U };
- cellStyleFormats1.Append(cellFormat1);
- CellFormats cellFormats1 = new CellFormats() { Count = (UInt32Value)3U };
- CellFormat cellFormat2 = new CellFormat() { NumberFormatId = (UInt32Value)0U, FontId = (UInt32Value)0U, FillId = (UInt32Value)0U, BorderId = (UInt32Value)0U, FormatId = (UInt32Value)0U };
- CellFormat cellFormat3 = new CellFormat() { NumberFormatId = (UInt32Value)0U, FontId = (UInt32Value)0U, FillId = (UInt32Value)0U, BorderId = (UInt32Value)1U, FormatId = (UInt32Value)0U, ApplyBorder = true };
- CellFormat cellFormat4 = new CellFormat() { NumberFormatId = (UInt32Value)0U, FontId = (UInt32Value)1U, FillId = (UInt32Value)0U, BorderId = (UInt32Value)1U, FormatId = (UInt32Value)0U, ApplyFont = true, ApplyBorder = true };
- cellFormats1.Append(cellFormat2);
- cellFormats1.Append(cellFormat3);
- cellFormats1.Append(cellFormat4);
- CellStyles cellStyles1 = new CellStyles() { Count = (UInt32Value)1U };
- CellStyle cellStyle1 = new CellStyle() { Name = «Normal», FormatId = (UInt32Value)0U, BuiltinId = (UInt32Value)0U };
- cellStyles1.Append(cellStyle1);
- DifferentialFormats differentialFormats1 = new DifferentialFormats() { Count = (UInt32Value)0U };
- TableStyles tableStyles1 = new TableStyles() { Count = (UInt32Value)0U, DefaultTableStyle = «TableStyleMedium2», DefaultPivotStyle = «PivotStyleLight16» };
- StylesheetExtensionList stylesheetExtensionList1 = new StylesheetExtensionList();
- StylesheetExtension stylesheetExtension1 = new StylesheetExtension() { Uri = «{EB79DEF2-80B8-43e5-95BD-54CBDDF9020C}» };
- stylesheetExtension1.AddNamespaceDeclaration(«x14», «http://schemas.microsoft.com/office/spreadsheetml/2009/9/main»);
- X14.SlicerStyles slicerStyles1 = new X14.SlicerStyles() { DefaultSlicerStyle = «SlicerStyleLight1» };
- stylesheetExtension1.Append(slicerStyles1);
- StylesheetExtension stylesheetExtension2 = new StylesheetExtension() { Uri = «{9260A510-F301-46a8-8635-F512D64BE5F5}» };
- stylesheetExtension2.AddNamespaceDeclaration(«x15», «http://schemas.microsoft.com/office/spreadsheetml/2010/11/main»);
- X15.TimelineStyles timelineStyles1 = new X15.TimelineStyles() { DefaultTimelineStyle = «TimeSlicerStyleLight1» };
- stylesheetExtension2.Append(timelineStyles1);
- stylesheetExtensionList1.Append(stylesheetExtension1);
- stylesheetExtensionList1.Append(stylesheetExtension2);
- stylesheet1.Append(fonts1);
- stylesheet1.Append(fills1);
- stylesheet1.Append(borders1);
- stylesheet1.Append(cellStyleFormats1);
- stylesheet1.Append(cellFormats1);
- stylesheet1.Append(cellStyles1);
- stylesheet1.Append(differentialFormats1);
- stylesheet1.Append(tableStyles1);
- stylesheet1.Append(stylesheetExtensionList1);
- workbookStylesPart1.Stylesheet = stylesheet1;
- }
-
Write a function for generating workbook content, as shown below.
- private void GenerateWorkbookPartContent(WorkbookPart workbookPart1)
- {
- Workbook workbook1 = new Workbook();
- Sheets sheets1 = new Sheets();
- Sheet sheet1 = new Sheet() { Name = «Sheet1», SheetId = (UInt32Value)1U, Id = «rId1» };
- sheets1.Append(sheet1);
- workbook1.Append(sheets1);
- workbookPart1.Workbook = workbook1;
- }
- Write the below functions to add data into Excel.
- private SheetData GenerateSheetdataForDetails(TestModelList data)
- {
- SheetData sheetData1 = new SheetData();
- sheetData1.Append(CreateHeaderRowForExcel());
- foreach (TestModel testmodel in data.testData)
- {
- Row partsRows = GenerateRowForChildPartDetail(testmodel);
- sheetData1.Append(partsRows);
- }
- return sheetData1;
- }
The below function is created for creating Header rows in Excel.
- private Row CreateHeaderRowForExcel()
- {
- Row workRow = new Row();
- workRow.Append(CreateCell(«Test Id», 2U));
- workRow.Append(CreateCell(«Test Name», 2U));
- workRow.Append(CreateCell(«Test Description», 2U));
- workRow.Append(CreateCell(«Test Date», 2U));
- return workRow;
- }
Below function is used for generating child rows.
- private Row GenerateRowForChildPartDetail(TestModel testmodel)
- {
- Row tRow = new Row();
- tRow.Append(CreateCell(testmodel.TestId.ToString()));
- tRow.Append(CreateCell(testmodel.TestName));
- tRow.Append(CreateCell(testmodel.TestDesc));
- tRow.Append(CreateCell(testmodel.TestDate.ToShortDateString()));
- return tRow;
- }
Below function is used for creating cell by passing only cell data and it adds default style.
- private Cell CreateCell(string text)
- {
- Cell cell = new Cell();
- cell.StyleIndex = 1U;
- cell.DataType = ResolveCellDataTypeOnValue(text);
- cell.CellValue = new CellValue(text);
- return cell;
- }
Below function is used for creating a cell by passing cell data and cell style.
- private Cell CreateCell(string text, uint styleIndex)
- {
- Cell cell = new Cell();
- cell.StyleIndex = styleIndex;
- cell.DataType = ResolveCellDataTypeOnValue(text);
- cell.CellValue = new CellValue(text);
- return cell;
- }
Below function is created for resolving the data type of numeric value in a cell.
- private EnumValue<CellValues> ResolveCellDataTypeOnValue(string text)
- {
- int intVal;
- double doubleVal;
- if (int.TryParse(text, out intVal) || double.TryParse(text, out doubleVal))
- {
- return CellValues.Number;
- }
- else
- {
- return CellValues.String;
- }
- }
Now, let’s call the main function for generating Excel file into main method with passing our model into it.
- static void Main(string[] args)
- {
- TestModelList tmList = new TestModelList();
- tmList.testData = new List<TestModel>();
- TestModel tm = new TestModel();
- tm.TestId = 1;
- tm.TestName = «Test1»;
- tm.TestDesc = «Tested 1 time»;
- tm.TestDate = DateTime.Now.Date;
- tmList.testData.Add(tm);
- TestModel tm1 = new TestModel();
- tm1.TestId = 2;
- tm1.TestName = «Test2»;
- tm1.TestDesc = «Tested 2 times»;
- tm1.TestDate = DateTime.Now.AddDays(-1);
- tmList.testData.Add(tm1);
- TestModel tm2 = new TestModel();
- tm2.TestId = 3;
- tm2.TestName = «Test3»;
- tm2.TestDesc = «Tested 3 times»;
- tm2.TestDate = DateTime.Now.AddDays(-2);
- tmList.testData.Add(tm2);
- TestModel tm3 = new TestModel();
- tm3.TestId = 4;
- tm3.TestName = «Test4»;
- tm3.TestDesc = «Tested 4 times»;
- tm3.TestDate = DateTime.Now.AddDays(-3);
- tmList.testData.Add(tm);
- Program p = new ExelConvertDemo.Program();
- p.CreateTaktExcelFile(tmList, «d:\»);
- }
Output of the Excel file would be similar to the below image.

Возможность конвертировать XML файлы в Excel позволяет открывать и обрабатывать документы этого формата.
- Подготовка;
- Конвертация;
- Создание.
Видеоинструкция
Как открыть файл XML в Excel
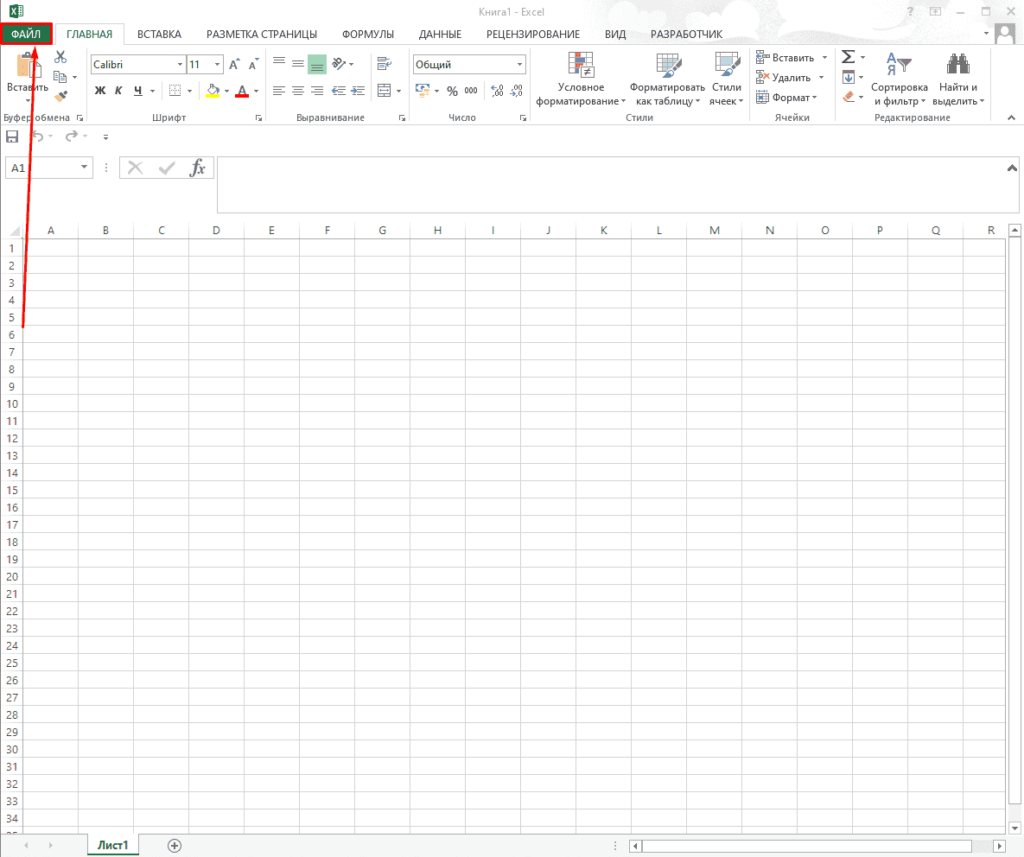
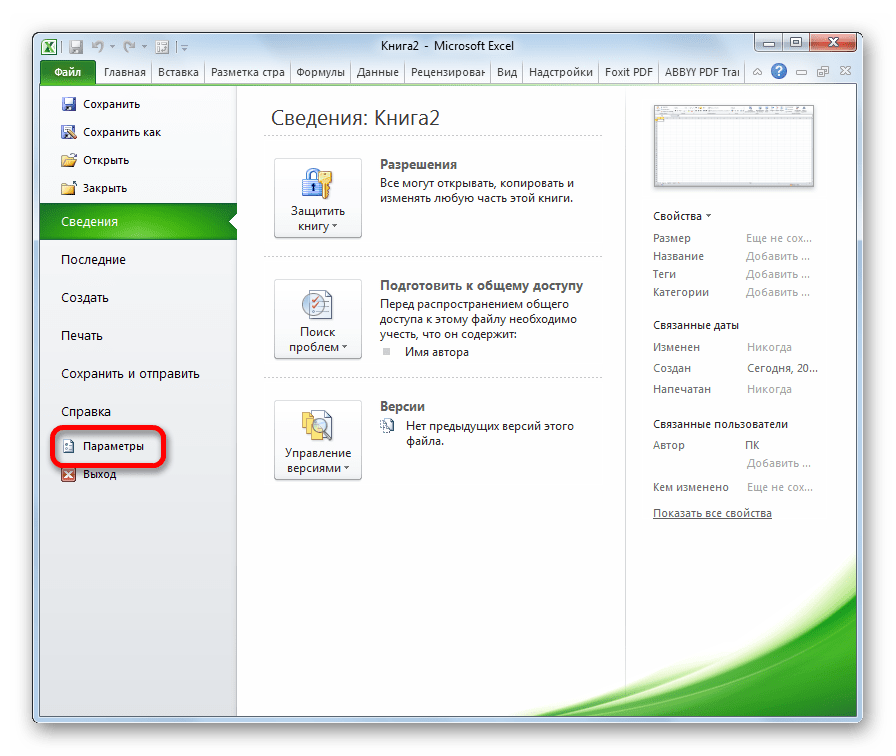
Для того, чтобы в MS Excel потребуется первоначально включить данную функцию нажав на «Файл» в левом-верхнем углу экрана.
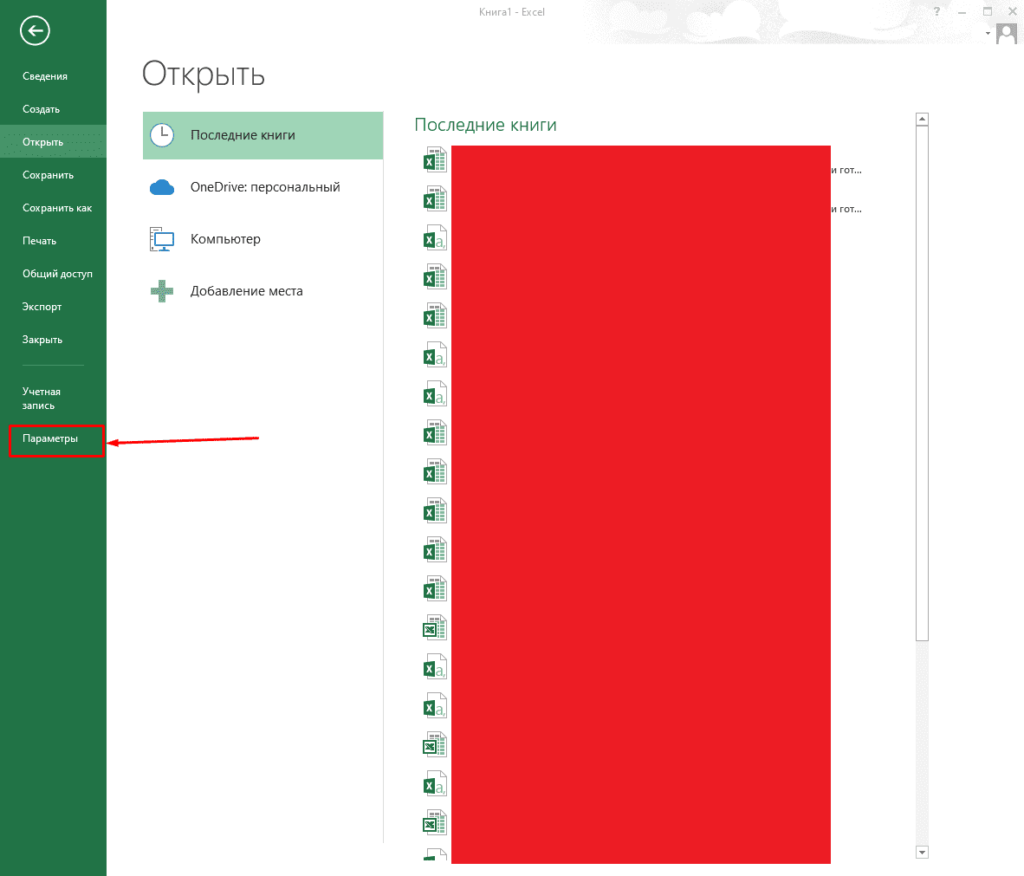
После открываем «Параметры».
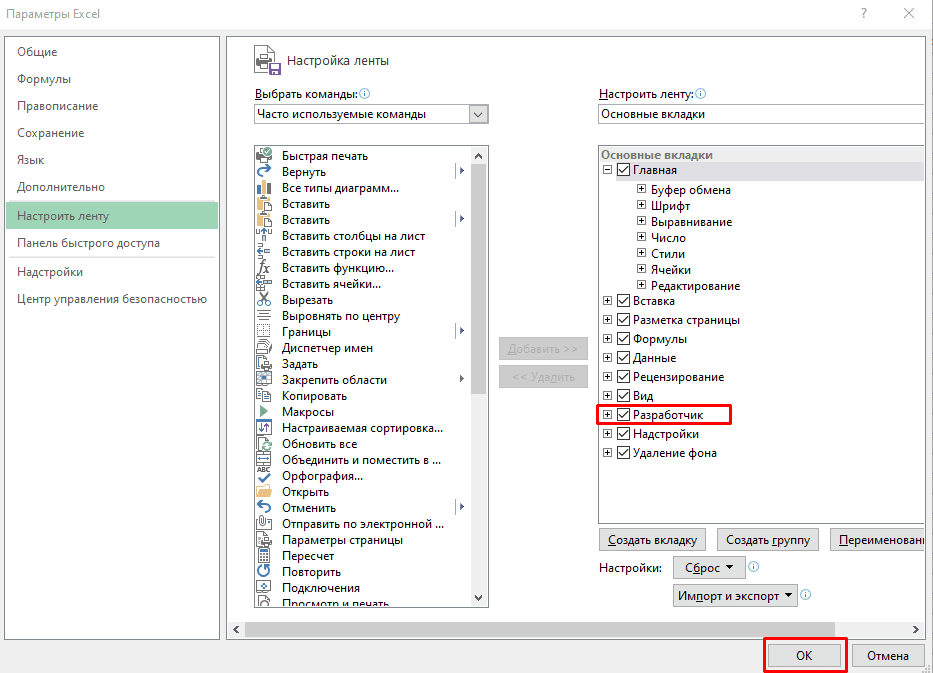
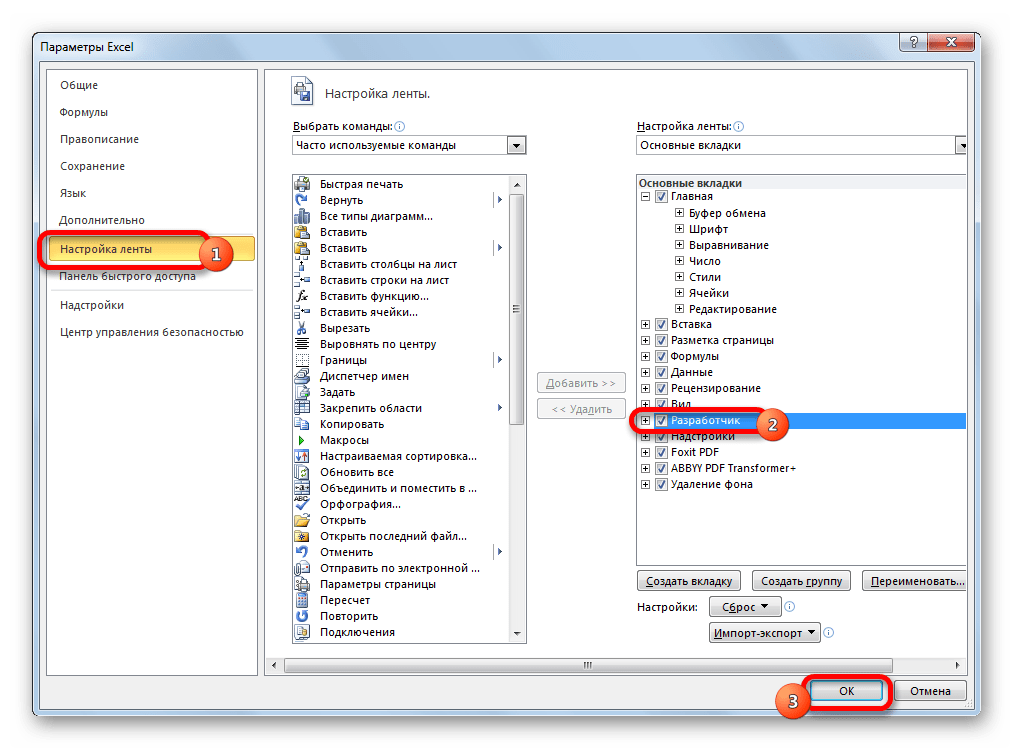
В открывшемся окне открываем «Настроить ленту» и ставим галочку у пункта «Разработчик».
Все готово, теперь можно открывать файлы нужного формата.
Как конвертировать XML в Эксель
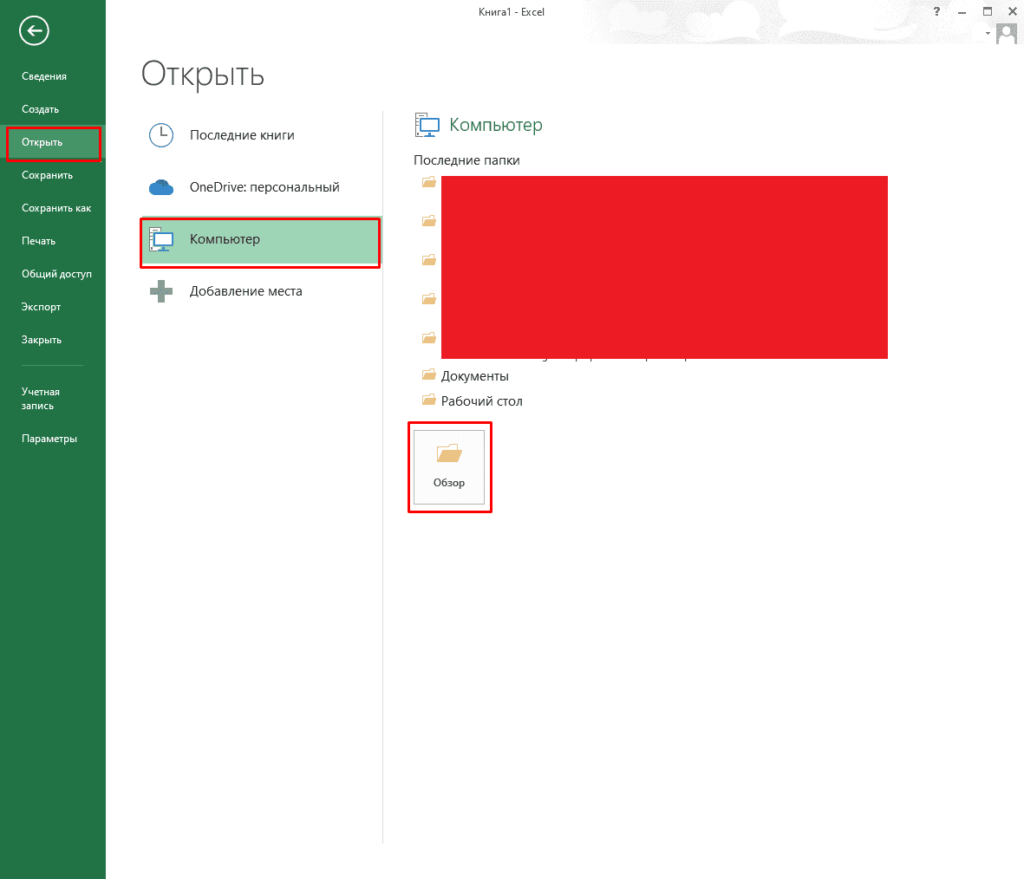
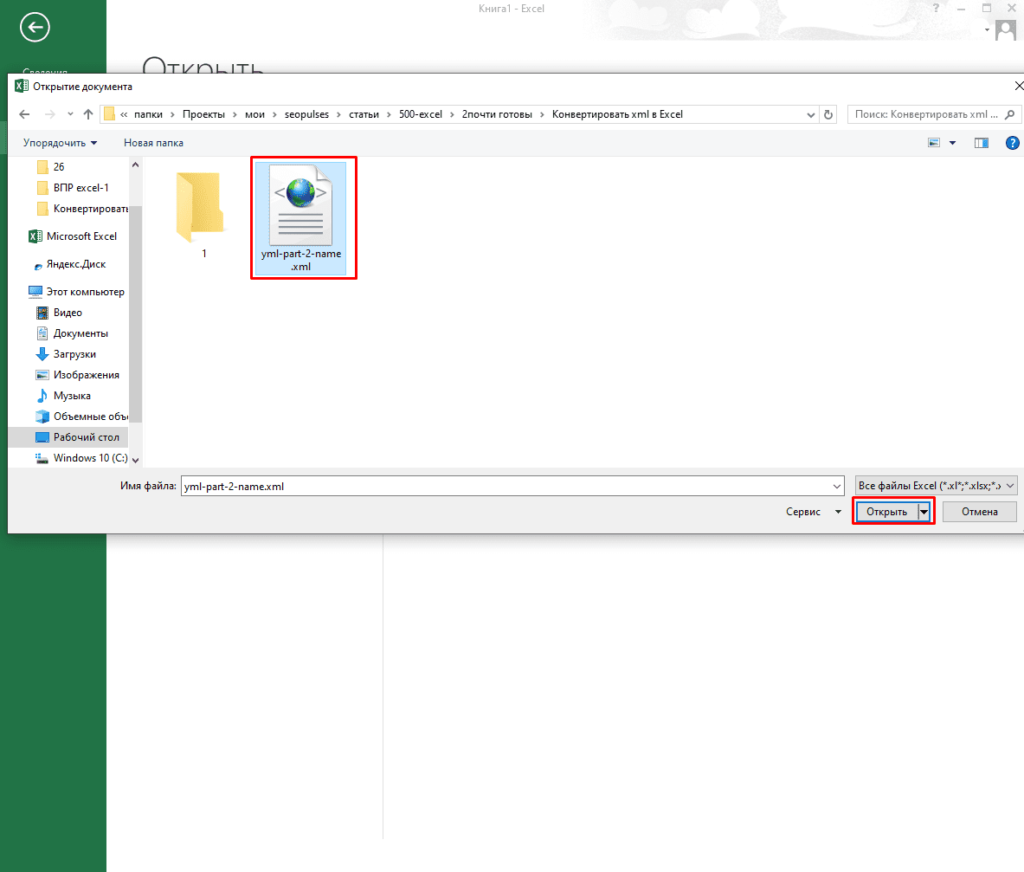
Выполнить эту задачу можно кликнуть на «Файл» в левом-верхнем углу.
Теперь выбираем «Открыть».
Осталось выбрать файл формата XML и открыть его. Для примера можно скачать файлы здесь.
https://drive.google.com/drive/u/0/folders/1ODb0l3zDaPfcnvwcLdciIEZDODkcDlpj
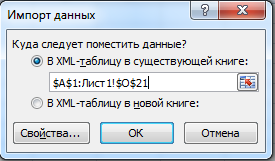
Система выдаст предупреждение и нужно будет оставить основной пункт по умолчанию (XML-таблица).
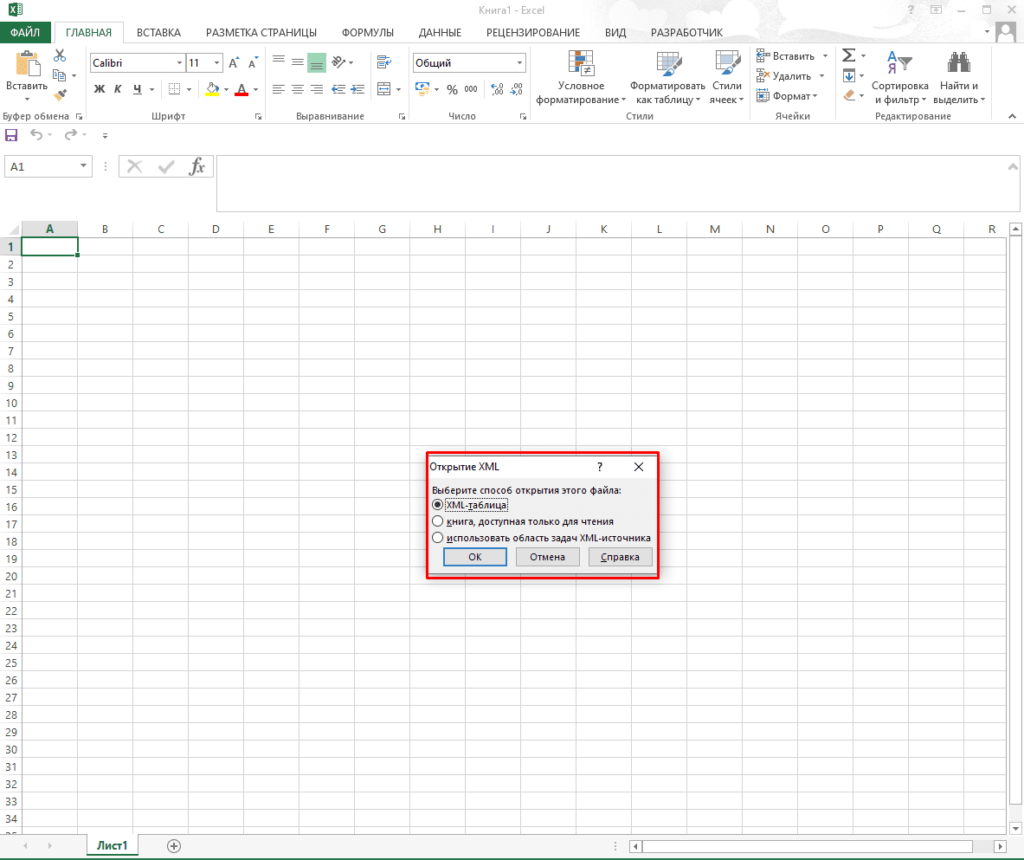
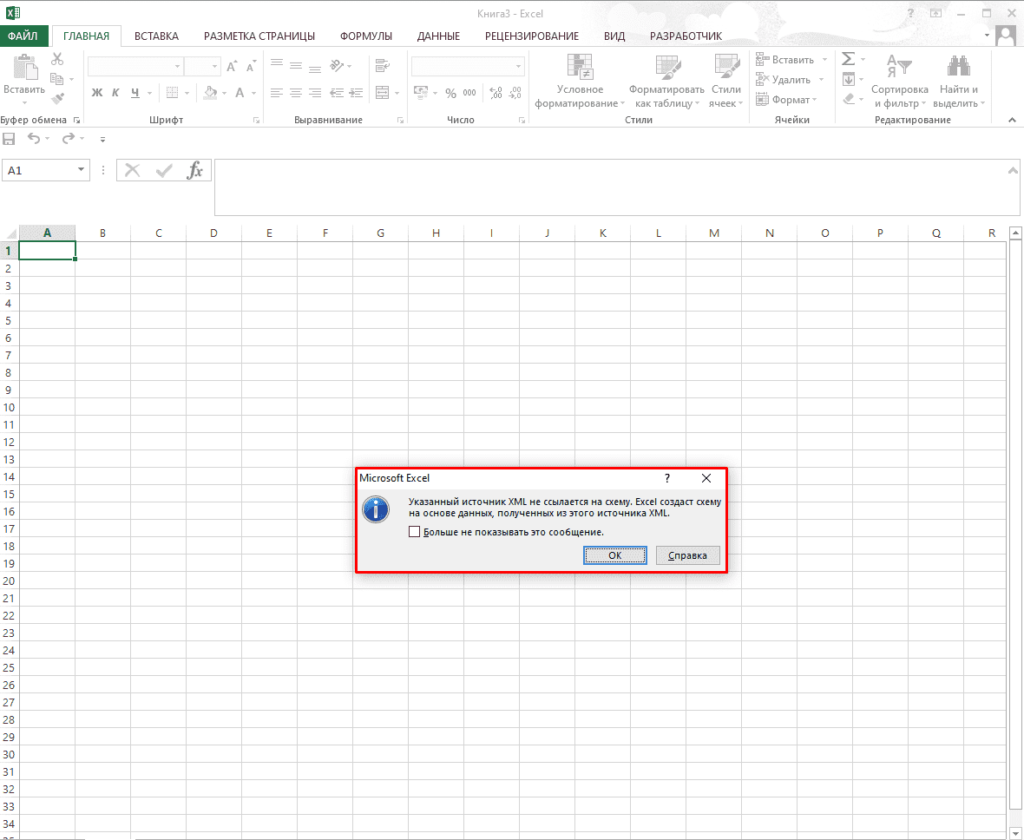
Таблица укажет, что будет создана схема, где нужно кликнуть на «Ок».
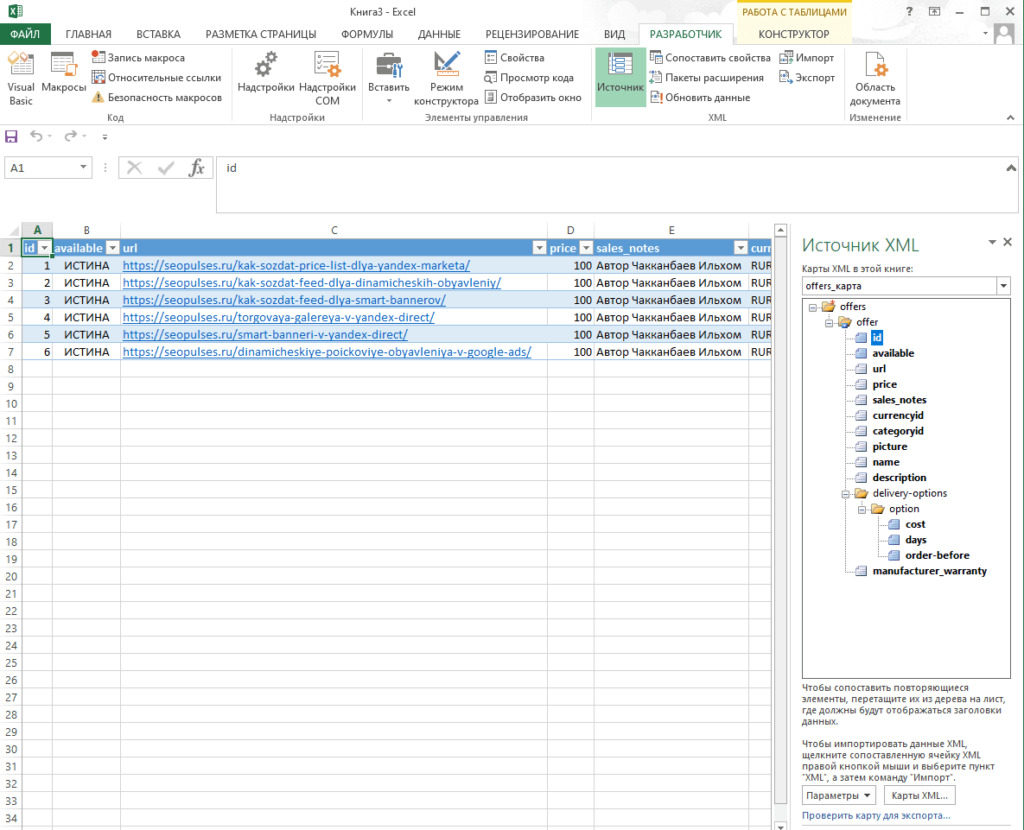
Готово, файл открыт.
Создание нового файла XML в Excel
Теперь потребуется удалить лишние строки и заменить их на нужные данные, после чего создать новые
Далее можно изменить его и снова преобразовать из Excel в XML.
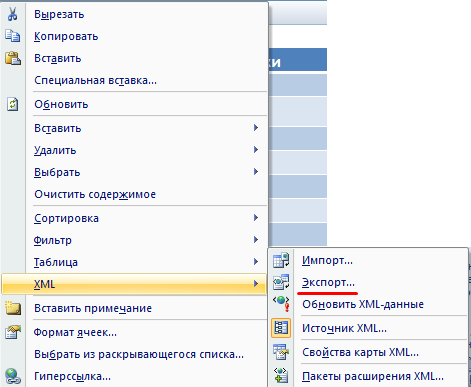
Для этого кликаем на «Экспорт» в панели разработчика.
По умолчанию система предложит нужный формат и сохраняем файл с новым названием.
Все готово, документ создан.
Конвертация форматов Microsoft Excel в XML
XML – это универсальный формат работы с данными. Его поддерживает множество программ, в том числе из сферы СУБД. Поэтому конвертация информации в XML важна именно с точки зрения взаимодействия и обмена данными между различными приложениями. Excel как раз входит в число программ, которые работают с таблицами, и даже может выполнять манипуляции с базами данных. Разберемся, как конвертировать файлы Эксель в XML.
Процедура конвертации
Конвертация данных в формат XML не такой уж простой процесс, так как в его ходе должна быть создана специальная схема (schema.xml). Впрочем, для преобразования информации в простейший файл данного формата достаточно иметь под рукой обычные инструменты сохранения в Excel, а вот для создания хорошо структурированного элемента придется основательно повозиться с составлением схемы и её подключением к документу.
Способ 1: простое сохранение
В Excel можно сохранить данные в формате XML, просто воспользовавшись меню «Сохранить как…». Правда, нет гарантии, что потом все программы будут корректно работать с файлом, который был создан таким способом. Да и не во всех случаях этот способ работает.
- Запускаем программу Excel. Для того, чтобы открыть элемент, подлежащий конвертации переходим во вкладку «Файл». Далее жмем по пункту «Открыть».
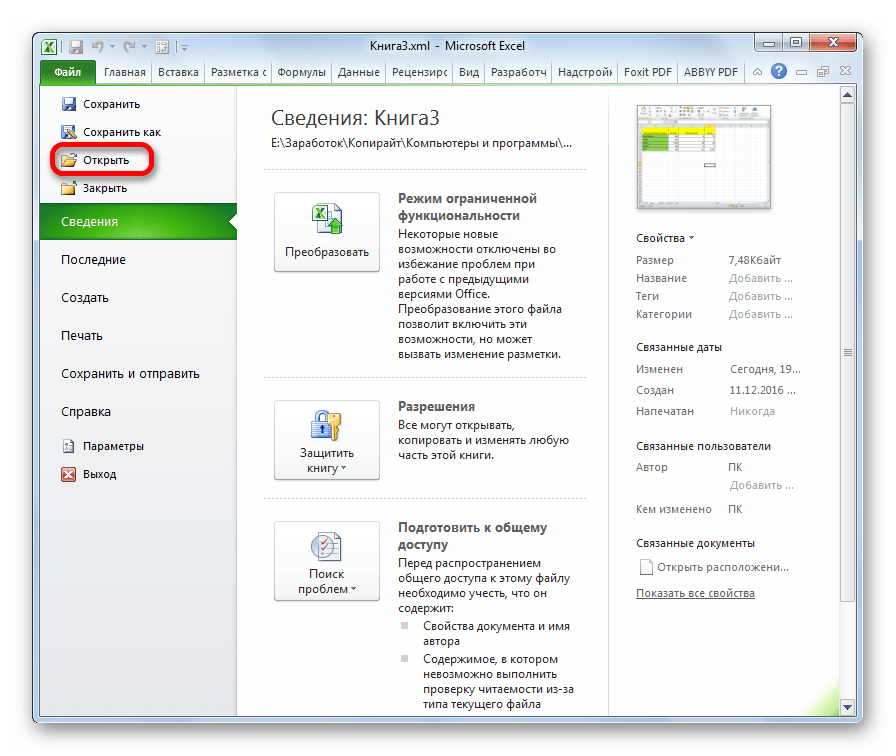
Запускается окно открытия файлов. Переходим в директорию, где содержится файл, который нам нужен. Он должен быть в одном из форматов Эксель – XLS или XLSX. Выбираем его и жмем на кнопку «Открыть», расположенную в нижней части окна.
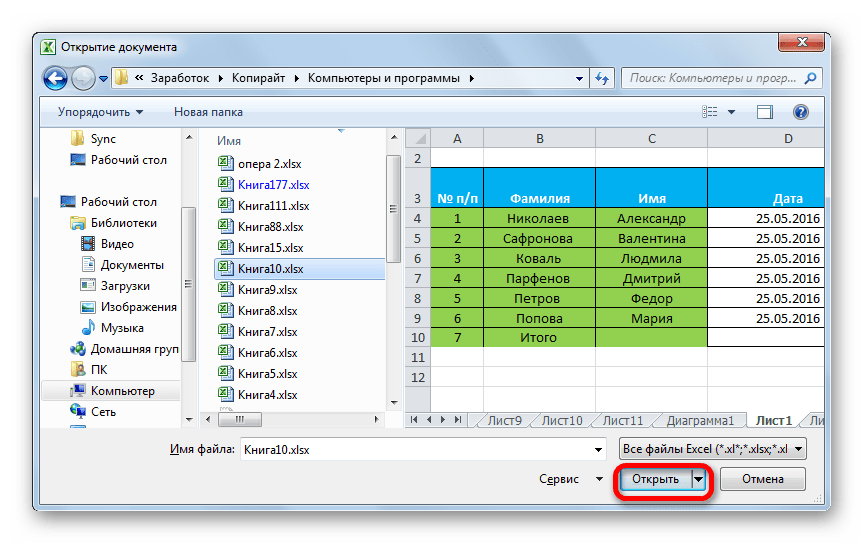
Как видим, файл был открыт, а его данные отобразились на текущем листе. Опять переходим во вкладку «Файл».

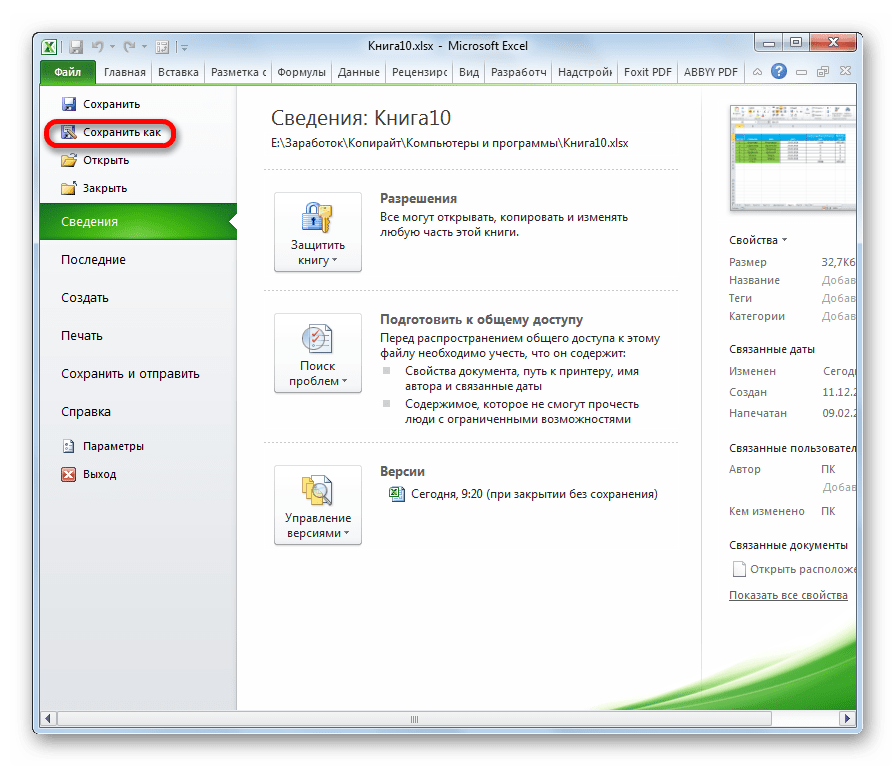
Открывается окно сохранения. Переходим в ту директорию, в которой желаем, чтобы хранился конвертированный файл. Впрочем, можно оставить и директорию по умолчанию, то есть ту, что предложила сама программа. В этом же окне, если возникнет желание, можно изменить наименование файла. Но основное внимание нужно обратить на поле «Тип файла». Раскрываем перечень кликом по данному полю.
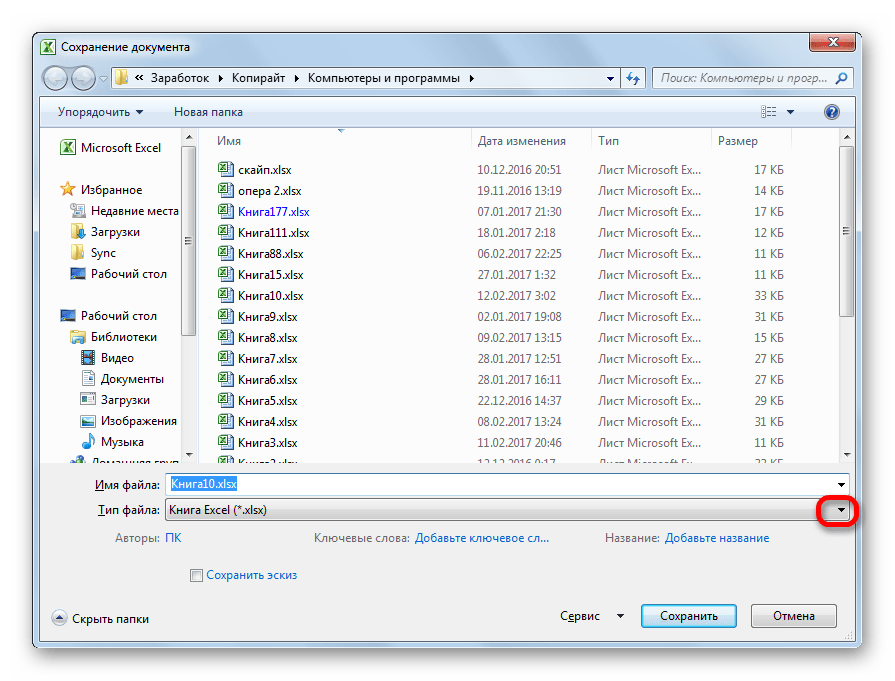
Среди вариантов сохранения ищем наименование «Таблица XML 2003» или «XML-данные». Выбираем один из этих пунктов.
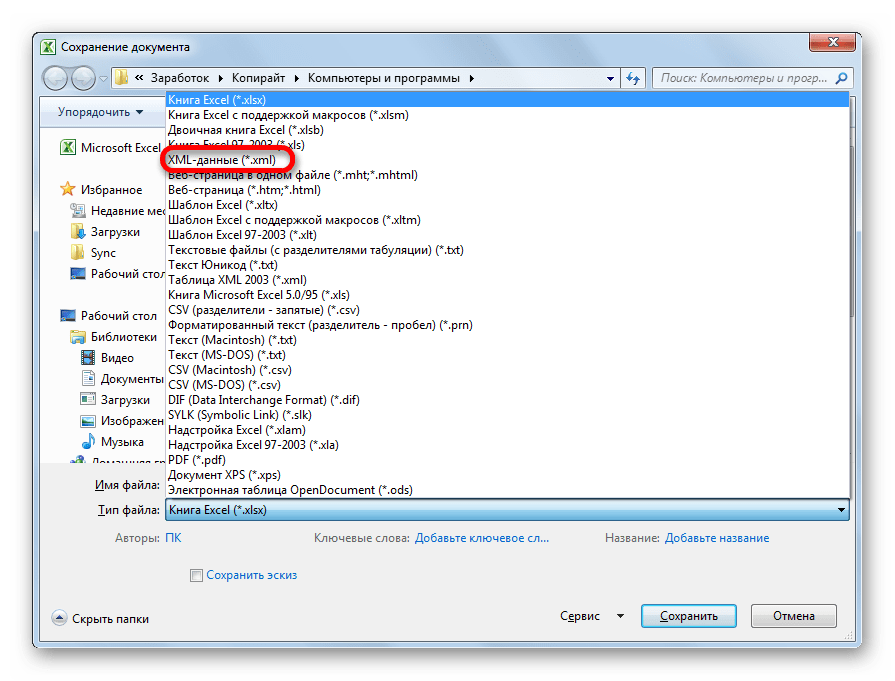
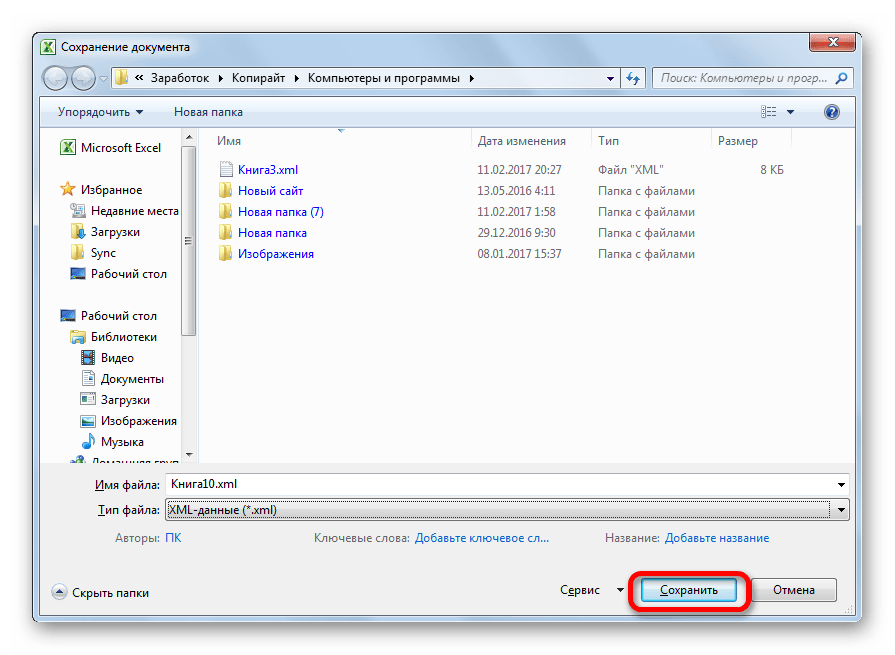
Таким образом, преобразование файла из формата Excel в XML будет совершено.
Способ 2: инструменты разработчика
Конвертировать формат Excel в XML можно с помощью инструментов разработчика на вкладке программы. При этом, если пользователь все выполнит правильно, то на выходе он получит, в отличие от предыдущего способа, полноценный XML-файл, который корректно будет восприниматься сторонними приложениями. Но сразу нужно сказать, что не каждому новичку может хватить знаний и умений сразу научится конвертировать данные таким способом.
-
По умолчанию вкладка инструментов разработчика отключена. Поэтому, прежде всего, нужно её активировать. Переходим во вкладку «Файл» и кликаем по пункту «Параметры».
В открывшемся окне параметров перемещаемся в подраздел «Настройка ленты». В правой части окна устанавливаем галочку около значения «Разработчик». После этого жмем на кнопку «OK», размещенную в нижней части окна. Вкладка инструментов разработчика теперь включена.
Далее открываем таблицу Excel в программе любым удобным способом.
На её основе нам предстоит создать схему, которая формируется в любом текстовом редакторе. Для этих целей можно использовать и обычный Блокнот Windows, но лучше применять специализированное приложение для программирования и работы с языками разметки Notepad++. Запускаем эту программу. В ней создаем схему. На нашем примере она будет выглядеть, как показано внизу на скриншоте окна Notepad++.
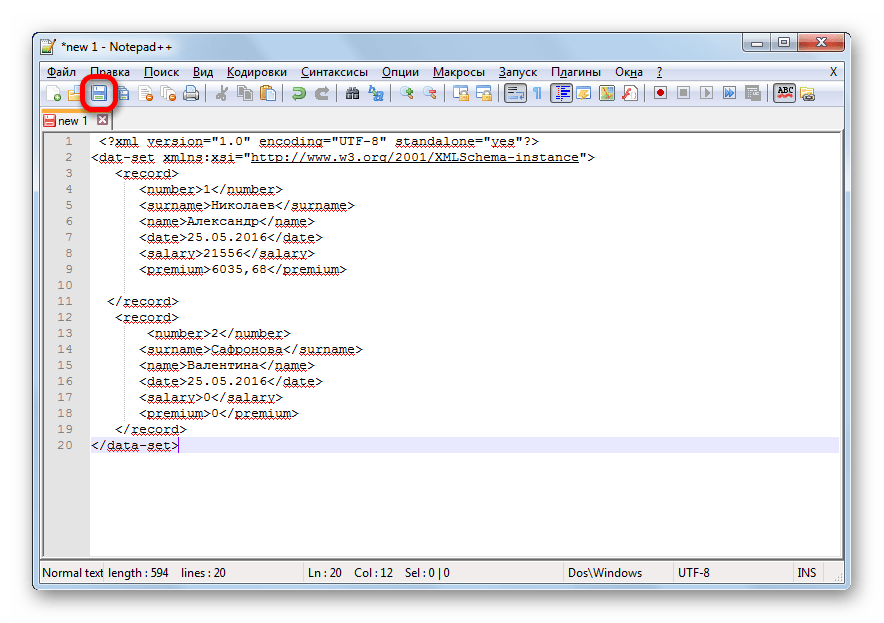
Как видим, открывающим и закрывающим тегом для документа в целом служит «data-set». В этой же роли для каждой строки выступает тег «record». Для схемы вполне будет достаточно, если мы возьмем всего две строки таблицы, а не будем переводить её всю вручную в XML. Название открывающего и закрывающего тега столбца может быть произвольным, но в данном случае для удобства мы предпочли просто перевести русскоязычные наименования колонок на английский язык. После того, как данные внесены, просто сохраняем их через функционал текстового редактора в любом месте на жестком диске в формате XML под названием «schema».
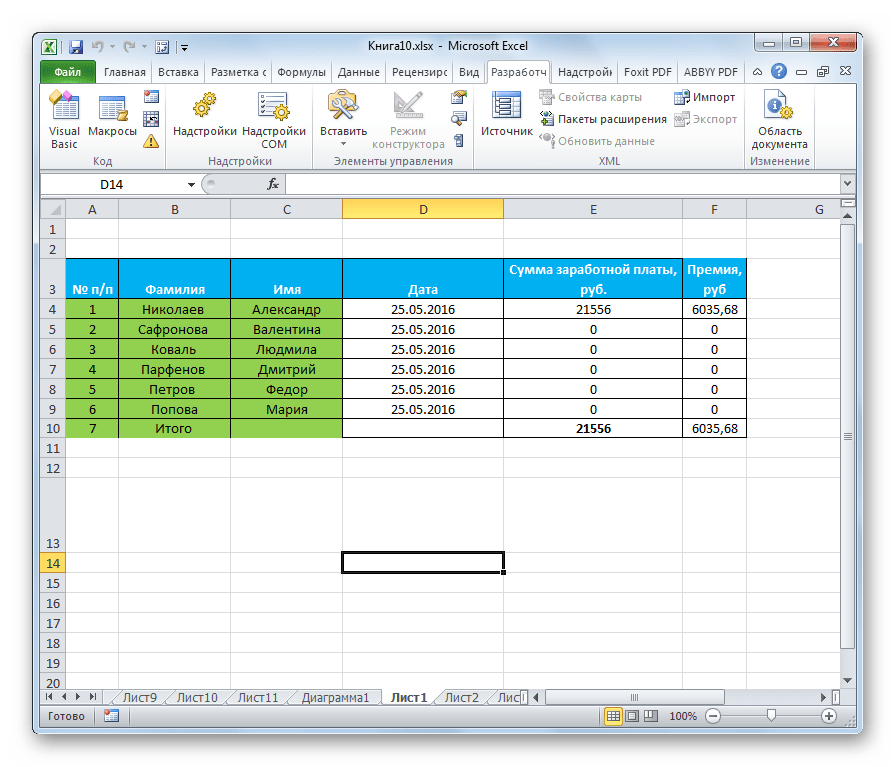
Опять переходим к программе Excel с уже открытой таблицей. Перемещаемся во вкладку «Разработчик». На ленте в блоке инструментов «XML» кликаем по кнопке «Источник». В открывшемся поле в левой части окна жмем на кнопку «Карты XML…».
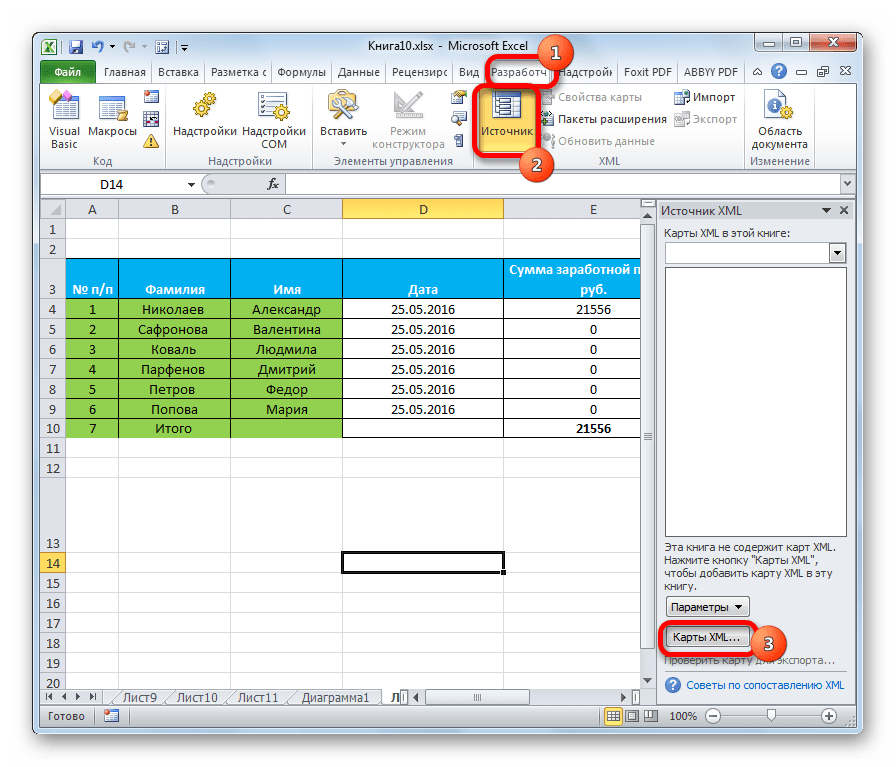
В открывшемся окне кликаем по кнопке «Добавить…».

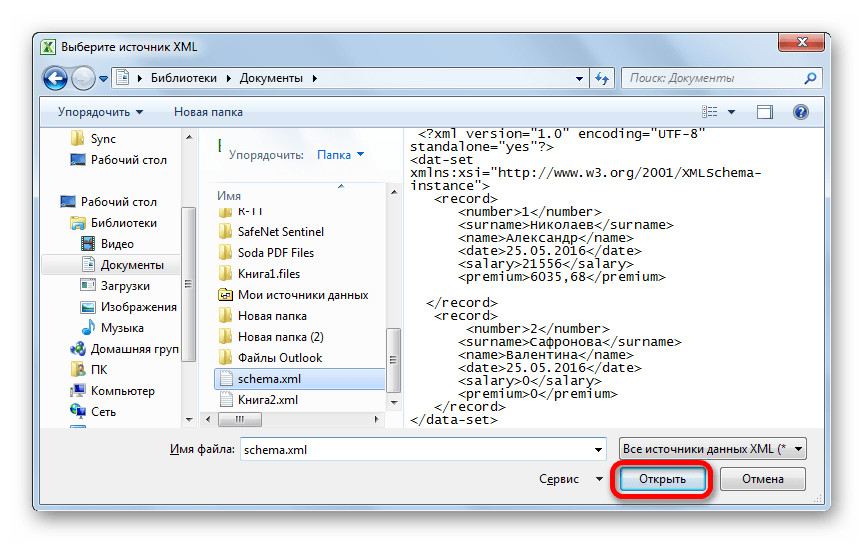
Запускается окно выбора источника. Переходим в директорию расположения схемы составленной ранее, выбираем её и кликаем по кнопке «Открыть».
После того, как элементы схемы появились в окне, перетаскиваем их с помощью курсора в соответствующие ячейки наименования столбцов таблицы.
Как видим, существуют два основных способа конвертации файлов XLS и XLSX в формат XML программой Microsoft Excel. Первый из них предельно простой и заключается в элементарной процедуре сохранения с заданным расширением через функцию «Сохранить как…». Простота и понятность данного варианта, несомненно, являются преимуществами. Но у него есть один очень серьезный недостаток. Преобразование выполняется без учета определенных стандартов, и поэтому файл, конвертируемый таким способом, сторонними приложениями может просто не распознаваться. Второй вариант предполагает составление карты XML. В отличие от первого способа, таблица, преобразованная по данной схеме, будет соответствовать всем стандартам качества XML. Но, к сожалению, не каждый пользователь сможет быстро разобраться с нюансами этой процедуры.
Отблагодарите автора, поделитесь статьей в социальных сетях.
Собрать данные из XML файлов в Excel и экспортировать
Microsoft Excel – удобный инструмент для организации и структурирования самых разнообразных данных. Он позволяет обрабатывать информацию разными методами, редактировать массивы данных.
Рассмотрим возможности использования его для формирования и обработки файлов веб-приложений. На конкретном примере изучим основы работы с XML в Excel.
Как создать XML-файл из Excel
XML – стандарт файла для передачи данных в Сети. Excel поддерживает его экспорт и импорт.
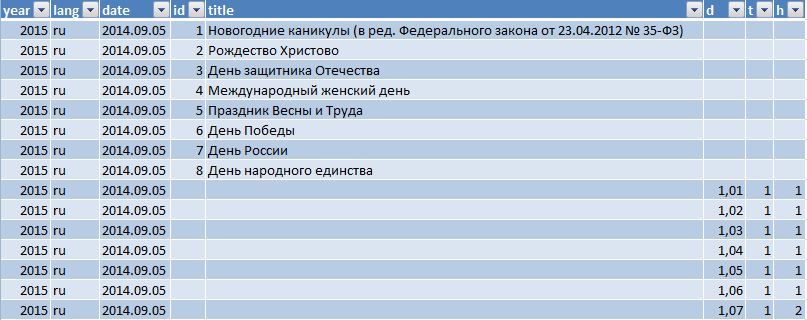
Рассмотрим создание XML-файла на примере производственного календаря.
- Сделаем таблицу, по которой нужно создать XML файл в Excel и заполним ее данными.
- Создадим и вставим карту XML с необходимой структурой документа.
- Экспортируем данные таблицы в XML формат.
- Наша таблица – производственный календарь.

- Создаем в любом текстовом редакторе (например, «Блокнот») желаемую карту XML структуры для генерации файла сохраним. В данном примере буде использовать следующую карту структуры:


Сохраняем в XML файл.
Другие способы получения XML-данных (схемы):
- Скачать из базы данных, специализированного бизнес-приложения. Схемы могут предоставляться коммерческими сайтами, службами. Простые варианты находятся в открытом доступе.
- Использовать готовые образцы для проверки карт XML. В образцах – основные элементы, структура XML. Копируете – вставляете в программу «Блокнот» — сохраняете с нужным расширением.
Как сохранить файл Excel в формате XML
Один из вариантов:
- Нажимаем кнопку Office. Выбираем «Сохранить как» — «Другие форматы».
- Назначаем имя. Выбираем место сохранения и тип файла – XML.
Если выдает ошибку, книгу можно сохранить в виде таблицы XML 2003 либо веб-страницы. С этими форматами проблем, как правило, не возникает.
- Скачать конвертер XLC в XML. Либо найти сервис, с помощью которого можно экспортировать файл онлайн.
- Скачать с официального сайта Microsoft надстройку XML Tools Add-in. Она в бесплатном доступе.
- Открываем новую книгу. Кнопка Office – «Открыть».
Как открыть XML файл в Excel
- Меняем формат на «файлы XML». Выбираем нужный файл. Жмем «Открыть».
- Способ открытия – XML-таблица. ОК.
- Появляется оповещение типа


Жмем ОК. С полученной таблицей можно работать, как с любым файлом Excel.
Как преобразовать файл XML в Excel
- Меню «Разработчик» — вкладка «Импорт».
- В диалоговом окне выбираем файл XML, который хотим преобразовать.
- Нажимаем «Импорт». Программа Excel предложит самостоятельно создать схему на основе полученных данных. Соглашаемся – ОК. Откроется окно, где нужно выбрать место для импортируемого файла.
- Назначаем диапазон для импорта. Лучше брать с «запасом». Жмем ОК.

Созданную таблицу редактируем и сохраняем уже в формате Excel.
Как собрать данные из XML файлов в Excel
Принцип сбора информации из нескольких XML-файлов такой же, как и принцип преобразования. Когда мы импортируем данные в Excel, одновременно передается карта XML. В эту же схему можно переносить и другие данные.
Каждый новый файл будет привязываться к имеющейся карте. Каждому элементу в структуре таблицы соответствует элемент в карте. Допускается только одна привязка данных.
Чтобы настроить параметры привязки, откройте в меню «Разработчик» инструмент «Свойства карты».
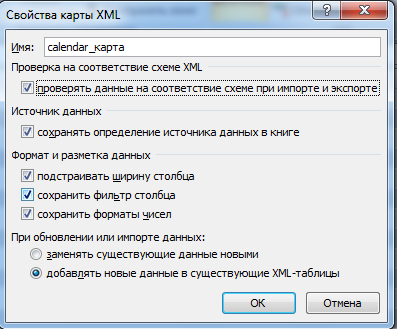
- Каждый новый файл будет проверяться программой Excel на соответствие установленной карте (если поставим галочку напротив этого пункта).
- Данные могут обновляться. Либо новая информация добавится в существующую таблицу (имеет смысл, если нужно собрать данные из похожих файлов).
Это все ручные способы импорта и экспорта файлов.
Преобразование файлов Excel в XML и обратно
Немного об Excel и XML
Итак, прежде чем узнать, как открыть, создать или перевести файл XML в Excel и обратно, давайте поближе познакомимся с типами этих файлов. Здесь нужно сразу отметить, что документы Excel имеют множество форматов, в то время, как XML — и есть формат файла. Поэтому не стоит путать эти два понятия.
Microsoft Excel является мощной программой для вычислений с множеством полезных функций
Программа Microsoft Excel является специальной утилитой, предназначенной для создания и редактирования таблиц. С ними вы уже можете делать всё что угодно: создавать базы, диаграммы, формулы и другие типы данных. Это очень мощный инструмент, поэтому все его возможности мы обсуждать не будем. Сегодня наша цель несколько другая, и мы не станем отходить от темы сегодняшней дискуссии.
Файлы XML, для более простого понимания, предназначены для хранения, обмена различных данных между утилитами. Особенно часто пользуются этим языком разметки при передаче информации через интернет. И когда вам нужно перенести табличные данные из Экселя на сайт, например, то вам нужно будет преобразовать свой документ, чтобы он правильно отображался. Поэтому давайте не будем оттягивать момент истины и сразу приступим к выполнению операции.
Как преобразовать Excel в XML
Дорогие друзья, на самом деле преобразование файлов является достаточно простым занятием. Однако, у некоторых пользователей могут возникнуть проблемы при переносе данных, поэтому сегодня мы с вами рассмотрим несколько способов для осуществления нашего замысла. Поэтому набираемся терпения и приступаем к действиям:
- Самый простой способ, который может не сработать в некоторых случаях, это сохранение файла в нужном формате в самой программе Microsoft Excel. Для этого откройте необходимый документ в этом приложении. Затем нажмите на кнопку «Файл» (рассматривается на примере Office 2013, в других версиях процесс сохранения может несколько отличаться) в верхнем левом углу окна Экселя, затем пункт «Сохранить как», после чего выберите место сохранения документа, дайте ему имя и во вкладке типа файла укажите «XML данные». После этого проверьте, правильно ли всё у вас получилось. Если нет, то пробуем следующие способы.
- Итак, если возникает ошибка в предыдущем случае, то, возможно, в вашей копии программы не предусмотрена поддержка и соответствующие надстройки. Чтобы их установить перейдите на сайт компании Microsoft http://www.microsoft.com/en-us/download/details.aspx?displaylang=en&id=3108, скачайте и инсталлируйте этот файл к себе на компьютер или ноутбук. Далее, запустите программу Microsoft Excel и нажмите на большую цветную кнопку в левом верхнем углу окна приложения (здесь мы уже смотрим пример на версии 2007-го года). В появившемся блоке кликните по параметрам, слева от выхода из утилиты. Теперь зайдите в пункт надстроек и нажмите на кнопку «Перейти» напротив пункта «Управление». Выскочит диалоговое окно, где нужно кликнуть по обзору и найти документ, который вы скачали с сайта Майкрософта ранее. Теперь кликаем ОК и переходим в основное окно программы, где у вас теперь есть вкладка XML Tools — с помощью него теперь вы спокойно можете создать файл XML из существующей таблицы. Сохранять его нужно аналогично предыдущему пункту.
- Если вам совсем не хочется загружать и себя, и свой компьютер такой информацией, то можете прибегнуть к помощи специальных утилит-конвертеров или онлайн-версий этих программ. К примеру, вы можете загрузить приложение Format Factory, которое позволит вам совершить все необходимые действия. Но стоит помнить, что сохранённые и преобразованные таким образом файлы не всегда работают в дальнейшем. То есть во время операции могут повредиться сектора или области в памяти документа, что негативно скажется на нём — он попросту может не открыться в XML-редакторе, например. Поэтому рекомендуется использовать либо профессиональные программы, либо сам Microsoft Excel.
Как перевести XML в Excel
Прежде чем перевести XML в Excel, нужно его для начала открыть. Рассмотрим весь этот непродолжительный процесс ниже. Итак, приступаем:
- Запустите программу Microsoft Excel с помощью ярлыка на рабочем столе или через меню проводника.
- Нажмите на «Открыть другие книги» внизу главной страницы, если вы используете Office В других версиях процесс может несколько отличаться.
- Далее, нажимаем на «Компьютер» или другое место, где расположен ваш XML-файл, затем кликните «Обзор» и смените в появившемся окне тип данных на «Файлы XML».
- Теперь ищем необходимый файл и открываем его в нашей программе с помощью одноимённой кнопки.
- Далее, обсудим то, как преобразовать наш документ. Перейдите во вкладку разработчика, затем нажмите на кнопку импорта.
- В открывшемся окне нужно будет снова найти и выбрать наш документ, над которым вы и хотите произвести действие, затем кликаем на кнопку «Импорт».
- Затем настраиваете всё под себя: область для импорта, место сохранения и другие параметры. После чего вы получите таблицу, которую позже можно сохранить в нужном для вас формате. Как видите, ничего сложного нет.
Подведём итоги
Дорогие читатели, сегодня мы с вами узнали не только как преобразовать файлы XML в Excel и обратно, но и как создать и открыть их при несовместимости версий. Надеемся, что у вас всё получилось и больше не осталось никаких вопросов. Не забываем делиться в комментариях своим мнением и опытом: возможно, вы знаете простой способ конвертации. Расскажите другим пользователям, получилось ли у вас перевести один тип документа. Если сработало, то поделитесь тем, каким способом воспользовались вы.
Конвертируем xls в xml

Расскажу вам быстрый способ создания xml-файла из таблицы экселя!
XML документы — это очень сильная и мощная вещь. С помощью одного XML файла можно наполнить сайт информацией за считанные секунды! Ведь во всех современных движках (CMS) присутствует возможность импорта из хмл файла. Так к чему это я.
Файлы формата XML используются не только для наполнения сайтов, каждый может использовать их в своих целях (о них в последующих статьях поведаю). Совсем недавно мне потребовалось экспортировать файл XLS в XML. Сначала я начал искать конверторы для этого, но ненайдя ничего стоящего, попробовал сделать операцию конвертирования с помощью самого экселя. И теперь хочу с вами поделиться этим «тайным» знанием!
Офф-топ, о том, как из djvu сделать pdf, можно прочесть тут.
Как известно, форматы *.xls (*.xlsx в 2007 офисе) — это форматы Microsoft Office Excel. 2003 офис ушел в прошлое, уже есть 2010, но я работаю на 2007, а, следовательно, рассказывать буду, основываясь на нем. Погнали!
1. Заходим на сайт Microsoft, и скачиваем надстройку для работы с XML. Скачать Excel 2003 Add-in: XML Tools Add-in. Весит она не много, 397 KB.

2. Устанавливаем ее к себе на компьютер. Сложного в установке ничего нет. По умолчанию надстройка устанавливается вот сюда: c:Office SamplesOfficeExcel2003XMLToolsAddin
3. Теперь открываем Excel, заходим в меню и выбираем пункт «Параметры Excel».

4. В появившемся окне, слева, выбираем пункт «Надстройки», а внизу окна, нажимаем на кнопку «Перейти…»

5. Перед вами откроется новое окно, в нем вам необходимо нажать кнопку «Обзор…». Как оно выглядит, показано ниже.

6. Теперь вам необходимо найти установленную надстройку XmlTools (смотреть пункт 2). Выбрать ее и нажать ОК!

7. Если вы все сделали правильно, вы увидите следующее окно! Смело жмем ОК, установка завершена!

8. У вас появилось в верхнем меню вкладка надстройка, а слева пункт XML Tools.

С установкой разобрались, а теперь переходим непосредственно к конвертированию (экспорту) xls в xml.
1. Для этого открываем файл с данными, которые необходимо перегнать. Затем выбираем первый пункт в раскрывающемся меню «Convert a Range to an XML List…»

2. Перед вами откроется небольшое окошко, что вам в нем необходимо? Там есть радио кнопки, No и Yes, для чего они? Все просто, если у вас есть заголовок к данным (в моем случае он есть) выбираем Yes, а если его нет, то соответственно No. Затем нажимаем на маленький прямоугольник в верхней строке.

3. Выделяем область данных, которые конвертируем и нажимаем на кнопку справа в появившемся окне. Возвращается предыдущее окно, в котором жмем ОК.

4. Ваша табличка должна измениться, можно сказать преобразиться, у меня это выглядит вот так:

5. Все готово, осталось только сохранить готовый xml документ. Заходим в меню, выбираем «Сохранить как…», «Другие форматы».

6. В раскрывающемся списке «Тип файла» выбираем XML-данные, нажимаем «Сохранить».

Я вас поздравляю, ваш файл создан!
Надеюсь, все было изложено подробно и понятно, однако если возникнут вопросы, пишите!
Экспорт Excel в XML и наоборот
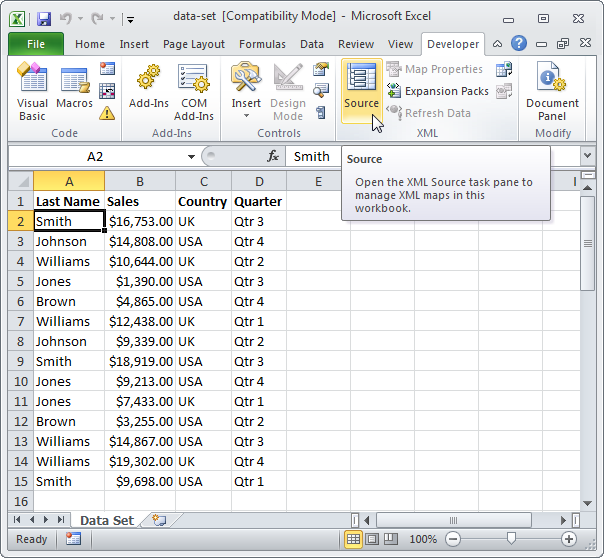
Вы можете конвертировать файл Excel в файл данных XML или наоборот. Это позволяет обмениваться информацией между различными приложениями. Для начала откройте вкладку Developer (Разработчик).
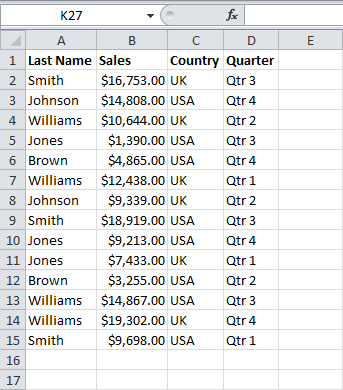
Вот данные, которые мы хотим преобразовать в файл XML:
Сперва создадим схему, основанную на исходных данных в формате XML. Схема определяет структуру XML-файла.
-
Excel для этой цели не подойдёт, поэтому откройте, к примеру, Блокнот и вставьте следующие строки:
Примечание: Теги названы по именам столбцов, но вы можете дать им любое название. Например, вместо – .
- Сохраните файл как schema.xml.
- Откройте книгу Excel.
- Кликните по Source (Источник) на вкладке Developer (Разработчик). Откроется XML панель задач.
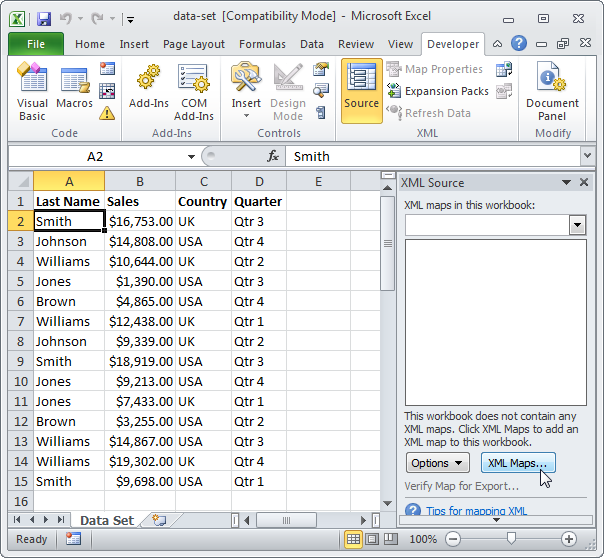
- Чтобы добавить карту XML, нажмите кнопку XML Maps (XML карты).Появится диалоговое окно XML Maps (Карты XML).
- Нажмите Add (Добавить).
- Выберите schema.xml и дважды кликните ОК.
- Теперь просто перетащите 4 элемента из дерева в XML панели задач на лист (строка 1).
- Нажмите кнопку Export (Экспорт) в разделе XML на вкладке Developer (Разработчик).
- Сохраните файл и нажмите Enter.
 Появится диалоговое окно XML Maps (Карты XML).
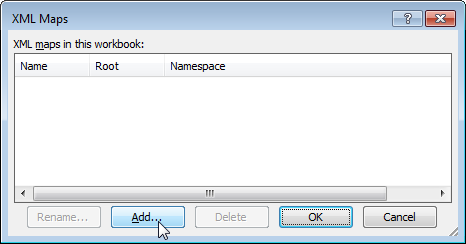
Это экономит немало времени!
Примечание: Для импорта XML-файла откройте пустую книгу. На вкладке Developer (Разработчик) нажмите кнопку Import (Импорт) и выберите XML-файл.
- Download ExcelOpenXMLBasics_CSharp.zip — 19.5 KB
- Download ExcelOpenXMLBasics_VB.zip — 26.1 KB
Introduction
The purpose of this article is to describe how to create an Excel workbook using solely DocumentFormat.OpenXml.dll (namespace is DocumentFormat.OpenXml).
In order to test the samples you have to download and install the Open XML SDK 2.0 from Download Center.
The demo is created for both C# and Visual Basic.
When creating an Excel file with Open XML SDK, there’s no need to install Microsoft Office, so this library can be used without Excel installation. However, the demo project starts the xlsx document after it hsa been created so in order to view the file created, a program that can open xlsx files should be installed to view the file.
Little bit of explanation about Open XML
Open XML is an open and standardized format for Office files. The standards used are:
- ECMA-376
- ISO/IEC 29500-1:2008
These standards define the structure and the elements for the Office files. The Office files (like xlsx for Excel) themselves are zipped files that contain a specific directory and file structure. The files that hold the content of a spreadsheet are xml files like any other xml files.
In case of Excel files a basic xlsx file contains for example following files:
/[Content_Types].xml: Defines parts and extensions for the spreadsheet/xl/workbook.xml: For e xample sheets that are included in the workbook/xl/styles.xml: Styles used in the worksheets/xl/sharedStrings.xml: Strings that are shared among cells/xl/worksheets/sheet1.xml...: The actual worksheets
The actual package contains more files but in the scope of this article these are the most interesting ones. The demo projects included show few operations that are done to produce and modify these files.
About the project
The project itself is very simple. It consists of two classes: MainWindow class and a static Excel Class. The Excel class is responsible of all the operations done against the Excel spreadsheet. It’s kinda utility class, but note that it’s nowhere near ready. It’s supposed to be used as a learning tool or a seed to an actual implementation.
When writing this demo I found out that Excel is very picky on the XML files. One surprise was that the order of the elements in XML files is very important. For example elements in style sheet such as fonts, fills, borders, cellStyleXfs, cellXfs etc must be in specific order. Otherwise the document is interpreted as corrupted.
Another observation was that the indexes of the elements are quite often used (for example the index of a shared string). However there is no support in the library to fetch the indexes so the collections have to be looped in order to calculate the index of a desired element.
So one of the best tools when building this was a utility to extract data from the xlsx (=zip) file to see what is the actual content.
If you download the project, you’ll notice that fully qualified class names are used. In this article I have removed the namespaces before the classes in order to enhance readability. So if you are copying code from the code snippets, don’t forget to define using (in C#) or Imports (in VB) for the two namespaces:
- DocumentFormat.OpenXml.Packaging
- DocumentFormat.OpenXml.Spreadsheet
To create the spreadsheet
Now to the code. The first thing is to create the spreadsheet. This is actually the xlsx file. The spreadsheet is created in C# as follows
public static SpreadsheetDocument CreateWorkbook(string fileName) {
   SpreadsheetDocument spreadSheet = null;
   SharedStringTablePart sharedStringTablePart;
   WorkbookStylesPart workbookStylesPart;

   try {

      spreadSheet = SpreadsheetDocument.Create(fileName, SpreadsheetDocumentType.Workbook, false);


      spreadSheet.AddWorkbookPart();
      spreadSheet.WorkbookPart.Workbook = new Workbook();
      spreadSheet.WorkbookPart.Workbook.Save();


      sharedStringTablePart = spreadSheet.WorkbookPart.AddNewPart<SharedStringTablePart>();
      sharedStringTablePart.SharedStringTable = new SharedStringTable();
      sharedStringTablePart.SharedStringTable.Save();


      spreadSheet.WorkbookPart.Workbook.Sheets = new Sheets();
      spreadSheet.WorkbookPart.Workbook.Save();


      workbookStylesPart = spreadSheet.WorkbookPart.AddNewPart<WorkbookStylesPart>();
      workbookStylesPart.Stylesheet = new Stylesheet();
      workbookStylesPart.Stylesheet.Save();
   } catch (System.Exception exception) {
      System.Windows.MessageBox.Show(exception.Message, "Excel OpenXML basics", System.Windows.MessageBoxButton.OK, System.Windows.MessageBoxImage.Hand);
   }

   return spreadSheet;
}
And in Visual Basic
Public Shared Function CreateWorkbook(fileName As String) As SpreadsheetDocument
    Dim spreadSheet As SpreadsheetDocument = Nothing
    Dim sharedStringTablePart As SharedStringTablePart
    Dim workbookStylesPart As WorkbookStylesPart

    Try

        spreadSheet = SpreadsheetDocument.Create(fileName, SpreadsheetDocumentType.Workbook, False)


        spreadSheet.AddWorkbookPart()
        spreadSheet.WorkbookPart.Workbook = New Workbook()
        spreadSheet.WorkbookPart.Workbook.Save()


        sharedStringTablePart = spreadSheet.WorkbookPart.AddNewPart(Of SharedStringTablePart)()
        sharedStringTablePart.SharedStringTable = New SharedStringTable()
        sharedStringTablePart.SharedStringTable.Save()


        spreadSheet.WorkbookPart.Workbook.Sheets = New DocumentFormat.OpenXml.Spreadsheet.Sheets()
        spreadSheet.WorkbookPart.Workbook.Save()


        workbookStylesPart = spreadSheet.WorkbookPart.AddNewPart(Of WorkbookStylesPart)()
        workbookStylesPart.Stylesheet = New Stylesheet()
        workbookStylesPart.Stylesheet.Save()
    Catch exception As System.Exception
        System.Windows.MessageBox.Show(exception.Message, "Excel OpenXML basics", System.Windows.MessageBoxButton.OK, System.Windows.MessageBoxImage.Hand)
    End Try

    Return spreadSheet
End Function
After the spreadsheet document is created, four elemental parts common to all worksheets are added:
- Workbook: Contains definition of the workbook itself
- SharedStringTable: A table of strings that are shared among cells
- Sheets collection: Collection of sheets in the workbook
- Stylesheet: Style definitions for the cells. Such as borders, fonts etc.
When creating each of these, first a part is created and after that the object itself. Note that parts are found in DocumentFormat.OpenXml.Packaging namespace while Excel objects are in DocumentFormat.OpenXml.Spreadsheet namespace. So the parts describe the ‘storage’ while the objects from the Spreadsheet namespace describe the content elements in the xml files.
Creating the styles
Creating using the code
One way to create the style definitions is to create them from the code. In the demo, the following basic styles are created:
- Numbering format (in
x:numFmts): This is used to properly format a currency value - Font (in
x:fonts): Calibri with font size 11 is used - Fill (in
x:fills): A fill with no pattern is defined - Border (in
x:borders): A border definition with no borders is defined - Cell style format (in
x:CellStyleXfs): A general cell style format definition is used - Cell formats (in
x:CellXfs) - General text
- Date: NumberFormatId 22
- Currency: NumberFormatId 164, references the numbering format
- Percentage: NumberFormatId 10
The funny thing is that many of the numbering formats are predefined. So in order to use a correct formatting one has to discover the id’s. One way to do this is to find the information by creating an Excel file containing the desired format and to examine the contents of the xlsx file.
Another thing is that, as mentioned before, the order of the style sheet elements is critical. If the order isn’t correct, Excel will very easily interpret the document as corrupted.
An excerpt from the style creation is the creation of CellStyleFormats element and a CellFormat element inside the formats:
Stylesheet stylesheet = spreadsheet.WorkbookPart.WorkbookStylesPart.Stylesheet;


stylesheet.InsertAt<CellFormats>(new CellFormats(), 5);


stylesheet.GetFirstChild<CellFormats>().InsertAt<CellFormat>(
   new CellFormat() {
      FormatId = 0,
      NumberFormatId = 0
   }, 0);
And in Visual Basic
Dim stylesheet As Stylesheet = spreadsheet.WorkbookPart.WorkbookStylesPart.Stylesheet


stylesheet.InsertAt(Of CellFormats)(New CellFormats(), 5)


stylesheet.GetFirstChild(Of CellFormats)().InsertAt(Of CellFormat)(
   New CellFormat() With {
      .FormatId = 0,
      .NumberFormatId = 0
   }, 0)
Using a predefined stylesheet
Another way to define the styles is to use an existing XML file that holds the style definition. In the project theres a PredefinedStyles.xml file included in the build output. The contents of this file are read into a string which is then added to the empty stylesheet created previously.
The style definitions look as following (it’s actually the same that is also created using the code):
<x:numFmts> <x:numFmt numFmtId="164" formatCode="#,##0.00 "€"" /> </x:numFmts> <x:fonts> <x:font> <x:sz val="11" /> <x:name val="Calibri" /> </x:font> </x:fonts> <x:fills> <x:fill> <x:patternFill patternType="none" /> </x:fill> </x:fills> <x:borders> <x:border> <x:left /> <x:right /> <x:top /> <x:bottom /> <x:diagonal /> </x:border> </x:borders> <x:cellStyleXfs> <x:xf numFmtId="0" fontId="0" fillId="0" borderId="0" /> </x:cellStyleXfs> <x:cellXfs> <x:xf numFmtId="0" xfId="0" /> <x:xf numFmtId="22" fontId="0" fillId="0" borderId="0" xfId="0" applyNumberFormat="1" /> <x:xf numFmtId="164" fontId="0" fillId="0" borderId="0" xfId="0" applyNumberFormat="1" /> <x:xf numFmtId="10" fontId="0" fillId="0" borderId="0" xfId="0" applyNumberFormat="1" /> </x:cellXfs>
And it’s added using the following method in C#
                                          public static bool AddPredefinedStyles(SpreadsheetDocument spreadsheet, string xml) {
         spreadsheet.WorkbookPart.WorkbookStylesPart.Stylesheet.InnerXml = xml;
         spreadsheet.WorkbookPart.WorkbookStylesPart.Stylesheet.Save();

         return true;
      }
And the function in Visual Basic
                            Public Shared Function AddPredefinedStyles(spreadsheet As SpreadsheetDocument, xml As String) As Boolean
        spreadsheet.WorkbookPart.WorkbookStylesPart.Stylesheet.InnerXml = xml
        spreadsheet.WorkbookPart.WorkbookStylesPart.Stylesheet.Save()

        Return True
    End Function
As a matter of fact basically any element can be filled by just adding an XML into it. For example a worksheet can be filled by adding a proper XML as the inner text of the worksheet.
Adding a worksheet
Next step is to add a worksheet. Adding a worksheet is straight-forward. However, one gotcha is to remember to define the relation to the workbook. Otherwise the sheet isn’t included when the workbook is opened.
The creation of the workbook looks as following in C#
public static bool AddWorksheet(SpreadsheetDocument spreadsheet, string name) {
  Sheets sheets = spreadsheet.WorkbookPart.Workbook.GetFirstChild<Sheets>();
  Sheet sheet;
  WorksheetPart worksheetPart;


  worksheetPart = spreadsheet.WorkbookPart.AddNewPart<WorksheetPart>();
  worksheetPart.Worksheet = new Worksheet(new SheetData());
  worksheetPart.Worksheet.Save();


  sheet = new DocumentFormat.OpenXml.Spreadsheet.Sheet() {
     Id = spreadsheet.WorkbookPart.GetIdOfPart(worksheetPart),
     SheetId = (uint)(spreadsheet.WorkbookPart.Workbook.Sheets.Count() + 1),
     Name = name
  };
  sheets.Append(sheet);
  spreadsheet.WorkbookPart.Workbook.Save();

  return true;
}
And the Visual Basic equivalent function
Public Shared Function AddWorksheet(spreadsheet As SpreadsheetDocument, name As String) As Boolean
    Dim sheets As Sheets = spreadsheet.WorkbookPart.Workbook.GetFirstChild(Of Sheets)()
    Dim sheet As Sheet
    Dim worksheetPart As WorksheetPart


    worksheetPart = spreadsheet.WorkbookPart.AddNewPart(Of WorksheetPart)()
    worksheetPart.Worksheet = New Worksheet(New SheetData())
    worksheetPart.Worksheet.Save()


    sheet = New Sheet With {
       .Id = spreadsheet.WorkbookPart.GetIdOfPart(worksheetPart),
       .SheetId = (spreadsheet.WorkbookPart.Workbook.Sheets.Count() + 1),
       .Name = name}
    sheets.Append(sheet)
    spreadsheet.WorkbookPart.Workbook.Save()

    Return True
End Function
Another thing is to remember to number the sheets correctly. Because of this the amount of sheets is queried when defining the SheetId.
One more common thing, the shared strings
A workbook contains a table of shared strings. The idea is that the worksheets can reference a shared string without actually storing the string value inside the worksheet.
As this sounds a good idea and is the proposed way, the effect on the file size isn’t very huge. When I tested this with 10,000 repetitions with a single (short) string the difference between using a shared string compared to repeating the string inside the worksheet was only few hundred bytes. Largely this is because of the compression algorithm compresses the strings quite nicely even if they are repeated. Of course the structure of the workbook and the location of the strings affect this quite much.
In order to add a shared string to the table I use the following method in C#
public static bool AddSharedString(SpreadsheetDocument spreadsheet, string stringItem, bool save = true) {
   SharedStringTable sharedStringTable = spreadsheet.WorkbookPart.SharedStringTablePart.SharedStringTable;

   if (0 == sharedStringTable.Where(item => item.InnerText == stringItem).Count()) {
      sharedStringTable.AppendChild(
         new DocumentFormat.OpenXml.Spreadsheet.SharedStringItem(
            new DocumentFormat.OpenXml.Spreadsheet.Text(stringItem)));


      if (save) {
         sharedStringTable.Save();
      }
   }

   return true;
}
And in Visual Basic
Public Shared Function AddSharedString(spreadsheet As SpreadsheetDocument, stringItem As String, Optional save As Boolean = True) As Boolean
    Dim sharedStringTable As SharedStringTable = spreadsheet.WorkbookPart.SharedStringTablePart.SharedStringTable

    Dim stringQuery = (From item In sharedStringTable
                      Where item.InnerText = stringItem
                      Select item).Count()

    If 0 = stringQuery Then
        sharedStringTable.AppendChild(
           New DocumentFormat.OpenXml.Spreadsheet.SharedStringItem(
              New DocumentFormat.OpenXml.Spreadsheet.Text(stringItem)))


        If save Then
            sharedStringTable.Save()
        End If
    End If

    Return True
End Function
First, the existence of the string is checked and if it doesn’t exist, it’s added to the table.
In many methods, I have an optional save parameter. This is because saving the changes is quite slow so when the data is added for example in a loop, the saving is deferred.
Now to the data
The demo adds the following data to the worksheet
- A shared string, 3 times
- A decimal number
- An integer number
- A currency value
- A date
- A percentage
- And a boolean value
All the data is added through specific methods but they all use a common method to actually store the value inside the worksheet.
I wont list adding the cell value since it’s a bit bigger method but it contains the following operations:
- Check the existence of the defined row. If it isn’t found a row is created
- Check the existence of the defined cell (based on the column index). If it isn’t found a cell is created
- Check if the column is defined in the columns collection. Added if necessary. Actually this isn’t mandatory but by defining the columns, their width can be set.
- And at last the value is added to the cell
Few important things:
- Again, take care about the order. Rows and cells must be in correct order in the xml
- The date data type isn’t used. This is because Office 2007 doesn’t support date type.
- The references in cells are defined as A1, B3 etc. This is quite cumbersome way from the code point of view. This is why I use indexes for both columns and rows.
The column string is constructed as follows
public static string ColumnNameFromIndex(uint columnIndex) {
   uint remainder;
   string columnName = "";

   while (columnIndex > 0) {
      remainder = (columnIndex - 1) % 26;
      columnName = System.Convert.ToChar(65 + remainder).ToString() + columnName;
      columnIndex = (uint)((columnIndex - remainder) / 26);
   }

   return columnName;
}
And in VB.Net
Public Shared Function ColumnNameFromIndex(columnIndex As UInt32) As String
    Dim remainder As UInt32
    Dim columnName As String = ""

    While (columnIndex > 0)
        remainder = (columnIndex - 1) Mod 26
        columnName = System.Convert.ToChar(65 + remainder).ToString() + columnName
        columnIndex = ((columnIndex - remainder) / 26)
    End While

    Return columnName
End Function
Adding a string or a shared string
As explained before a shared string uses just an index in the worksheet to point to a string in the shared strings table. What was quite amazing was that I didn’t find a mechanism to get the index of a string from the table directly. Instead I had to build a loop to calculate the index.
public static int IndexOfSharedString(SpreadsheetDocument spreadsheet, string stringItem) {
   SharedStringTable sharedStringTable = spreadsheet.WorkbookPart.SharedStringTablePart.SharedStringTable;
   bool found = false;
   int index = 0;

   foreach (SharedStringItem sharedString in sharedStringTable.Elements<SharedStringItem>()) {
      if (sharedString.InnerText == stringItem) {
         found = true;
         break; ;
      }
      index++;
   }

   return found ? index : -1;
}
And in Visual Basic
Public Shared Function IndexOfSharedString(spreadsheet As SpreadsheetDocument, stringItem As String) As Int32
    Dim sharedStringTable As SharedStringTable = spreadsheet.WorkbookPart.SharedStringTablePart.SharedStringTable
    Dim found As Boolean = False
    Dim index As Int32 = 0

    For Each sharedString As SharedStringItem In sharedStringTable.Elements(Of SharedStringItem)()
        If sharedString.InnerText = stringItem Then
            found = True
            Exit For
        End If
        index = index + 1
    Next

    If found Then
        Return index
    Else
        Return -1
    End If
End Function
The method for adding the string is quite simple. It gives the option of adding a shared string or a normal string.
public static bool SetCellValue(SpreadsheetDocument spreadsheet, Worksheet worksheet, uint columnIndex, uint rowIndex, string stringValue, bool useSharedString, bool save = true) {
   string columnValue = stringValue;
   CellValues cellValueType;


   if (useSharedString) {
      if (Excel.IndexOfSharedString(spreadsheet, stringValue) == -1) {
         Excel.AddSharedString(spreadsheet, stringValue, true);
      }
      columnValue = Excel.IndexOfSharedString(spreadsheet, stringValue).ToString();
      cellValueType = CellValues.SharedString;
   } else {
      cellValueType = CellValues.String;
   }

   return SetCellValue(spreadsheet, worksheet, columnIndex, rowIndex, cellValueType, columnValue, null, save);
}
And in VB.Net
Public Shared Function SetStringCellValue(spreadsheet As SpreadsheetDocument, worksheet As Worksheet, columnIndex As UInt32, rowIndex As UInt32, stringValue As String, useSharedString As Boolean, Optional save As Boolean = True) As Boolean
    Dim columnValue As String = stringValue
    Dim cellValueType As CellValues


    If (useSharedString) Then
        If (Excel.IndexOfSharedString(spreadsheet, stringValue) = -1) Then
            Excel.AddSharedString(spreadsheet, stringValue, True)
        End If
        columnValue = Excel.IndexOfSharedString(spreadsheet, stringValue).ToString()
        cellValueType = CellValues.SharedString
    Else
        cellValueType = CellValues.String
    End If

    Return SetCellValue(spreadsheet, worksheet, columnIndex, rowIndex, cellValueType, columnValue, Nothing, save)
End Function
Adding a numeric value
Adding a numeric value is much like adding a non-shared string value. The only concern is to use proper decimal separator (.) inside the xml so the decimal separator may need to be replaced. Another way is to set the current threads culture to en-US. If you compile the project with EN_US_CULTURE compilation symbol (default in the project) the threads UI culture will be set to local culture, but the CurrentCulture of the thread will be replaced with en-US. This eliminates the need to reformat decimals. However, keep in mind that if you are getting for example regional settings like CurrencySymbol, it must be fetched from CurrentUICulture.
The code looks like
public static bool SetCellValue(SpreadsheetDocument spreadsheet, Worksheet worksheet, uint columnIndex, uint rowIndex, double doubleValue, uint? styleIndex, bool save = true) {
#if EN_US_CULTURE
   string columnValue = doubleValue.ToString();
#else
   string columnValue = doubleValue.ToString().Replace(System.Globalization.CultureInfo.CurrentUICulture.NumberFormat.NumberDecimalSeparator, ".");
#endif

   return SetCellValue(spreadsheet, worksheet, columnIndex, rowIndex, CellValues.Number, columnValue, styleIndex, save);
}
The Visual Basic version is
Public Shared Function SetDoubleCellValue(spreadsheet As SpreadsheetDocument, worksheet As Worksheet, columnIndex As UInt32, rowIndex As UInt32, doubleValue As Double, styleIndex As UInt32?, Optional save As Boolean = True) As Boolean
#If EN_US_CULTURE Then
    Dim columnValue As String = doubleValue.ToString()
#Else
    Dim columnValue As String = doubleValue.ToString().Replace(System.Globalization.CultureInfo.CurrentUICulture.NumberFormat.NumberDecimalSeparator, ".")
#End If

    Return SetCellValue(spreadsheet, worksheet, columnIndex, rowIndex, CellValues.Number, columnValue, styleIndex, save)
End Function<span style="font-size: 12px; white-space: pre;">
</span>
Adding a date value
Date value is a bit more tricky. Things to keep in mind with dates:
- A style needs to be specified. I’ve used a predefined format id 22 to format the date correctly
- In the style definition ApplyNumberFormat has to be true.
- The date is expressed as a double value
- Excel starts to count the dates from 1.1.1900. This is different from .Net so OLE automation date has to be used
- The decimal separator may need to be corrected (depending on the culture settings). For example my decimal separator is , so it has to be replaced with . Or as explained earlier with numbers, en-US culture may be used.
The addition of a date value looks as following
public static bool SetCellValue(SpreadsheetDocument spreadsheet, Worksheet worksheet, uint columnIndex, uint rowIndex, System.DateTime datetimeValue, uint? styleIndex, bool save = true) {
#if EN_US_CULTURE
   string columnValue = datetimeValue.ToOADate().ToString();
#else
   string columnValue = datetimeValue.ToOADate().ToString().Replace(System.Globalization.CultureInfo.CurrentUICulture.NumberFormat.NumberDecimalSeparator, ".");
#endif

   return SetCellValue(spreadsheet, worksheet, columnIndex, rowIndex, CellValues.Date, columnValue, styleIndex, save);
}
And the Visual Basic equivalent
Public Shared Function SetDateCellValue(spreadsheet As SpreadsheetDocument, worksheet As Worksheet, columnIndex As UInt32, rowIndex As UInt32, datetimeValue As System.DateTime, styleIndex As UInt32?, Optional save As Boolean = True) As Boolean
#If EN_US_CULTURE Then
    Dim columnValue As String = datetimeValue.ToOADate().ToString()
#Else
    Dim columnValue As String = datetimeValue.ToOADate().ToString().Replace(System.Globalization.CultureInfo.CurrentUICulture.NumberFormat.NumberDecimalSeparator, ".")
#End If

    Return SetCellValue(spreadsheet, worksheet, columnIndex, rowIndex, CellValues.Date, columnValue, styleIndex, save)
End Function
Currency, percentage and boolean values
The next methods for adding different value types look very much the same as the previous so I won’t include them in the article. However, few things to keep in mind:
- Percentage is like a decimal number but with different format. I’ve used format id 10.
- Currency is much like a percentage, but this time also a
numFmtneeds to be defined. - Excel uses 0 and 1 for boolean values. If
TrueorFalseis used they are interpreted as text. In Visual Basic the value of true (-1) needs to be changed to 1.
Last words
Hopefully this article helps to work with Open XML Excel files. The best way to get to know the code is to debug it and make small changes to see what happens  Have fun!
History
- 22th April, 2012: Created
- 25th April, 2012: Readability modification, added alternative way to format numbers when writing to xlsx