
![]()
Download Article
![]()
Download Article
This wikiHow teaches you how to create a database using data from a Microsoft Excel spreadsheet by importing the data directly into Access, which is Microsoft’s database management software, or by exporting the Excel data into a format that works with most database software. Microsoft Access is a part of the Microsoft Office software bundle and is only available for Windows.
-

1
Open Microsoft Access. It’s the red app with an A. Doing so opens the Access template page.
- Access is designed for use with Excel and comes bundled with Excel in Microsoft Office Professional and is only available for Windows.
-
2
Click Blank database. This option is in the upper-left side of the window.
- If you want to use a different template for your Access database, select the template that you want instead.
Advertisement
-
3
Click Create when prompted. This option is in the bottom-right corner of the pop-up window. Your Access database will open.
-
4
Click the External Data tab. It’s in the menu bar at the top of the Access window.
-
5
Click Saved Imports. You’ll find this in the far-left side of the External Data toolbar. A drop-down menu will appear.
-
6
Select File. It’s in the drop-down menu. Selecting this option prompts a pop-out menu.
-
7
Click Excel. This option is in the pop-out menu. Clicking it prompts the import window to open.
-
8
Click Browse. It’s in the upper-right part of the window.
-
9
Select an Excel spreadsheet. Go to the folder in which your Excel spreadsheet is located, then click the Excel spreadsheet which you want to open.
-
10
Click Open. It’s in the bottom-right corner of the window.
-
11
Specify how to transfer to the data. Click the radio button to the left of one of the following:
- Import the source data into a new table in the current database — Choose this option if you created a new database with no tables or if you want to add a new table to an existing database. By creating a new table you can edit the information in Access.
- Append a copy of the records to the table — Choose this option if you are using an existing database and want to add the data to one of the tables in the database. By appending an existing table, you can edit the information in Access.
- Link to the data source by creating a linked table — Choose this option to create a hyperlink in the database, which will open the Excel database in Excel. With this method, you cannot edit the information in Access.
-
12
Click OK. You’ll find this at the bottom of the window.
-
13
Select a sheet. At the top of the window, click the name of the sheet that you want to import from your selected Excel document.
- By default, Excel creates workbooks with three spreadsheets labeled «Sheet 1,» «Sheet 2,» and «Sheet 3.» You can only transfer one sheet at a time; if you have information on all three sheets, you must complete the transfer with one sheet and then go back to the «External Data» tab and repeat all the steps for each remaining sheet.
- You can delete, add, and edit the names of these sheets in Excel, and whatever changes you make will appear in the Access database.
-
14
Click Next. It’s in the bottom-right corner of the window.
-
15
Enable column headings. Check the «First Row Contains Column Headings» box if your Excel sheet has its own column headings in the top row (e.g., the A row).
- Uncheck the box if you want Access to create the column headings.
-
16
Click Next.
-
17
Edit your spreadsheet’s columns and fields if needed. If you want to import all the fields from the spreadsheet without change, skip this step:
- To edit a field, click the column header you want to change, then edit the name of the field, the data type, and/or whether or not it is indexed.
- If you don’t want to import a field, check the «Do Not Import Field (Skip)» box.
-
18
Click Next.
-
19
Set the primary key for the database. For best results, leave the default setting here as-is to let Access set the key.
- You can also set your own key by checking «Choose my own primary key» and entering it in the field next to that option, or you can select «No primary key» (not recommended).
-
20
Click Next.
-
21
Add a name. Type a name for the sheet into the «Import to Table» field.
- Skip this step to leave the database set to its default name.
-
22
Click Finish. This option is in the lower-right side of the window.
-
23
Click Close. It’s in the bottom-right corner of the window. This will close the import window and create your database.
- You can first check the «Save import steps» box if you want to ensure that Access will remember your settings for this database.


Advertisement
-
1
Open your Excel document. Double-click the Excel document which you want to convert into a database.
- If you haven’t yet created your document, open Excel, click Blank workbook, and create your document before proceeding.
-
2
Click File. It’s in the menu bar that’s either at the top of the Excel window (Windows) or at the top of the screen (Mac).
-
3
Click Save As. You’ll find this option in the File menu.
-
4
Double-click This PC. It’s in the middle of the page.
- Skip this step on a Mac.
-
5
Select a file format. Click the «Save as type» (Windows) or «File Format» (Mac) drop-down box, then select one of the following:
- If you’re using a computer-based database application, click a .CSV (comma separated values) format.
- If you’re using a Web-based database application, click an .XML format.
- If your Excel document doesn’t have any XML data in it, you won’t be able to choose XML.
-
6
Click Save. It’s at the bottom of the window. This will save your document using your selected preferences.
-
7
Create a new database in your database application. This process will vary depending on the application that you’re using, but you’ll usually open the application, click New (or File > New), and follow any on-screen instructions.
-
8
Locate the Import… button. It’s often found by clicking the File option, but your database application may vary.
-
9
Select your Excel file. Locate and double-click the file you exported from Excel.
-
10
Follow the database app’s prompts to import the data.
-
11
Save the database. You can usually open the «Save» menu by pressing Ctrl+S (Windows) or ⌘ Command+S (Mac).


Advertisement
Add New Question
-
Question
What is the difference between a database and a spreadsheet?

This answer was written by one of our trained team of researchers who validated it for accuracy and comprehensiveness.
wikiHow Staff Editor
Staff Answer
A spreadsheet stores information organized into rows and columns and is usually best used by one person at a time. A database might also have information organized into rows and columns, but it isn’t limited to just that and can store information according to a variety of different methodologies. Databases are typically made with multiple simultaneous users in mind and security features. Databases also allow for more complex and time consuming searches or operations and can eliminate some of the redundancy that becomes necessary when using spreadsheets extensively.
-
Question
How do I view this page in French?
Copy and paste onto Google Translate; when you copy the translated words onto Excel, it will automatically format it to its original form.
-
Question
I’ve imported data from Excel, but where does it go, and how do I access the information to populate my database?
You can go to «Insert > Pivot Table» and select «Use external connection» and pick the connection you’ve established. This will allow you to create a pivot table based on that external Access database.

Ask a Question
200 characters left
Include your email address to get a message when this question is answered.
Submit
Advertisement
-
There are several free online database websites that you can use to create a database, though you’ll have to sign up for an account with most of these services.
-
If you don’t have fully functional database software, you may also need a separate program to open database files on PC or Mac.
Thanks for submitting a tip for review!
Advertisement
-
Excel data doesn’t always transfer over to a database as neatly as you might hope for.
Advertisement
About This Article
Article SummaryX
To create a database from an Excel spreadsheet, you can use Microsoft Access, which is Microsoft’s database management software. When you have Microsoft Access, open the program and click “Blank database.” After creating your blank database, click the “External Data” tab at the top and then “New Data Source.” Then, select “File” from the drop-down menu and click “Excel.” Use the “Browse” button to locate your Excel spreadsheet. Once you’ve selected the spreadsheet, click “Open” and choose how you want to transfer the data. Select a sheet and enable column headings. To complete your database, set the primary key and click “Finish.” For best results, you can leave the default primary key setting as is. For more information, including how to use a third-party software to create a database from an Excel spreadsheet, read on!
Did this summary help you?
Thanks to all authors for creating a page that has been read 1,118,801 times.
Reader Success Stories
-

«Step-by-step help with pictures made this task easy for me. I’d still be attempting to achieve this task, but this…» more
Is this article up to date?

A database is an organized collection of rows and columns with data that are related to each other. Sometimes you have an excel worksheet and would like to query it using SQL. This post takes you through using Pandas to create an SQLite database from an excel sheet. So let’s jump into it .
Step 1:Load the dataset to Pandas
To load the dataset from excel to pandas use the following commands:
   ```python
      import pandas as pd
      import sqlite3
      df=pd.read_excel('path to file')```
Enter fullscreen mode
Exit fullscreen mode
Import pandas as pd tells python to bring the pandas data analysis library into your current environment. pd portion of the code tells python to give pandas the alias pd. This means you can use pandas by typing pd. Import sqlite3 provides an SQL-like interface to read,query and write SQL databases from python.df=pd.read_excel(‘path to file’) tells pandas to read the excel document in a specific location.
Step 2: Create SQLite database using sqlite3.connect()
The following sample code creates an empty database file called Day.db and assigns it to a variable db_conn
```db_conn=sqlite3.connect('Day.db')```
Enter fullscreen mode
Exit fullscreen mode
This provides an interface for working with the SQLite database.
Step 3:Create a cursor object to run the SQL code that will create the data tables.
Cursor is an instance using which you can invoke methods that execute SQLite statements from the result sets of the queries i.e makes the connection for executing SQL queries on the SQLite database.
```cur=db_conn.cursor()```
Enter fullscreen mode
Exit fullscreen mode
Step 4:Create a table
This is a command used to create a table called DayofWeeek with new columns Day and Sum.The data type for each column is specified to the right of the column name.
```create_table="CREATE TABLE DayofWeek(Day TEXT,Sum INT)```
Enter fullscreen mode
Exit fullscreen mode
The column names must match those stored in the dataframe.
Step 6:Moving from pandas dataframe to SQL table
.to_sql command is used to write records stored in a dataframe to a SQL database.DayofWeek specifies the the name of SQL table created.
if_exists=’append’ inserts new values into the existing table DayofWeek.index=False to avoid bringing the dataframe index as a column.
```df.to_sql('DayofWeek',db_conn,if_exists='append', index=False)```
Enter fullscreen mode
Exit fullscreen mode
You can run your sql commands on pandas for example:
pd.read_sql("SELECT * FROM DayofWeek",db_conn)
Enter fullscreen mode
Exit fullscreen mode
Steps to create a database in Excel
- Create a data spreadsheet
- Add or import data
- Convert your data into a table
- Customize the table design and assign a name
- Interact with the data
Every business has numbers to crunch, but not every CEO is a math wiz. That’s why small business owners often outsource their accounting or let their bookkeeper deal with it.
However, there are many other ways you can process data to make operations more efficient. Plus, you probably want to avoid constantly running to someone else for help.
That’s where a basic knowledge of Excel databases comes in handy.
Excel is one of those tools that almost everyone has on their desktop, and you can enjoy its benefits without being a numbers wizard.
Excel databases provide a simple way to analyze data (such as sales numbers and forecasts), look at various calculations, and compare different data sets. Of course, there are advanced formulas and functions if you dive deeper and invest time in becoming a pro. But for many business owners, just knowing how to create a database in Excel will give them a lot of power.
Let’s take a step-by-step tour of using Excel to create a database.
Just so you know
Learn how to make the most of your data with Jotform’s detailed Microsoft Excel tutorial. You can even integrate Jotform with Excel to sync form data to your spreadsheets!
1. Create a data spreadsheet
Start by opening a new Excel sheet.
The Excel sheet is made up of vertical columns and horizontal rows, with each row representing a different line of data. Columns are labeled with letters, and rows are labeled with numbers.
The first row should display the names for each column. Click on a cell in the first row and begin typing to insert header names. The Tab button is a quick way to navigate the table; each time you press the Tab button, you’ll jump to the next column in a row. When you reach the end of a row, the cursor will jump to the first column of the next row, and so on.
2. Add or import data
You can add data in two ways: by entering it manually or importing data from other files, such as text or CSV files.
To add data manually, click on a cell and begin typing. To insert a new row or column, go to the Home tab and look for the Cells section. There you’ll find the Insert dropdown arrow. By clicking on the arrow, you can select the item you want to insert (i.e., column, row, etc.).
To import data from outside sources, click on the Data tab, go to the Get/Transform Data section, and select the source destination. In order to import data successfully, you must ensure that the data has the correct formatting, and formatting depends on the type of source file.
3. Convert your data into a table
To get the functionality of a database, you must convert the data into a table.
Click your mouse on any cell of the data you entered, and then click on Insert >Table. A popup box will appear, showing you the data fields to be included in the table. The table will automatically incorporate all the rows and columns in the block. It’s important not to leave any blank rows in your data block — these act as “breaks” and indicate to the software that they aren’t part of the table.
If the correct fields are shown in the dialog box and your headers are in order, click OK.
Remember, any blank rows are not automatically integrated into the table. To include newly entered data in the table, hover on the small triangle nestled in the bottom right corner of the current table and drag the table border down to include the new data rows.
4. Customize the table design and assign a name
There are several options for table design, but don’t spend a lot of time on this. Making your table easily viewable is the aim of the game.
Click the Design tab on the main menu. Change the table colors with a quick click on one of the predefined color themes. The default table design features banded rows, meaning every second row has a background fill. Many users like this style, as it makes the data easier to view. Uncheck the Banded Rows box if you prefer a clean, white table.
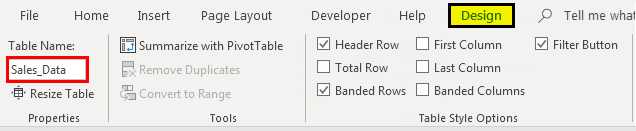
In the far left section of the Design toolbar, you can change the table name. Give it a name that is specific and easy to identify. This will help later down the road when you’re working with many Excel databases.
5. Interact with the data
Once your table is set up, it’s time to start interacting with it and getting the insights you need. Several formulas are predefined in Excel software, including Average, Count, and Sum, among others.
Click on the cell at the base of any data column you want to work with. The cell displays a clickable arrow that opens a dropdown menu of available formulas. Select the formula, and the calculation will automatically appear in the cell.
In the example below, we’re calculating the average number of units sold. The Average formula is an option in the dropdown menu.
The average number of units sold is calculated and appears in the cell.
There are so many ways you can use Excel to perform calculations and derive useful data for decision-making. Now that you’ve created a database in Excel, you can explore all the available features and functionality.
Go beyond Excel: Working with Jotform Tables
While Excel is a longstanding favorite for number crunching, tools like Jotform Tables can give you much more than a spreadsheet. Jotform Tables provides a full workspace for managing, tracking, and processing data, and integrating it into workflows and collaboration for smoother operations.
If you work with Excel databases, you can easily import them into Jotform Tables and continue your data management there. And as a free tool, Jotform Tables requires none of the investment and licenses you need with Excel.
For companies already using Jotform, Jotform Tables is the next step, as it enables you to build effective data-based strategies so your business can truly excel.
This article is originally published on Nov 10, 2020, and updated on Feb 24, 2023.
Excel is a combination of rows and columns, and these rows and columns store our data, which in other terms are named records. As Excel is the most common tool, we reserve the data in Excel, making it a database. Therefore, when we put data in Excel in some form of tables in rows and columns and give the table a name, that is a database in Excel. We can also import data from other sources in Excel, given the data format is proper with the Excel format.
For example, you may create a company’s sales report of different regions on a database in Excel for easy access and complete control over data management while working with the program.
Creating an Excel Database
Having the data in Excel will make life easier for you because Excel is a powerful tool where we can play with the data. If you maintain the data in other sources, you may not correctly get all the formulas, dates, and time format. I hope you have experienced this in your daily work. Having the data in the right database platform is very important. Having the data in Excel has its pros and cons. However, if you are a regular user of Excel, it is much easier to work with Excel. This article will show you how to create a database in Excel.
Table of contents
- Creating an Excel Database
- How to Create a Database in Excel?
- Things to Remember While Creating a Database in Excel
- Recommended Articles
How to Create a Database in Excel?
We do not see any of the schools are colleges teaching us to Excel as the software in our academics. Whatever business models, we learn a theory until joining the corporate company.
The biggest problem with this theoretical knowledge is it does not support real-time life examples. But, nothing to worry about; we will guide you through the process of creating a database in Excel.
We need to design the Excel worksheet carefully to have accurate data in the database format.
You can download this Create Database Excel Template here – Create Database Excel Template
Follow the below steps to create a database in Excel.
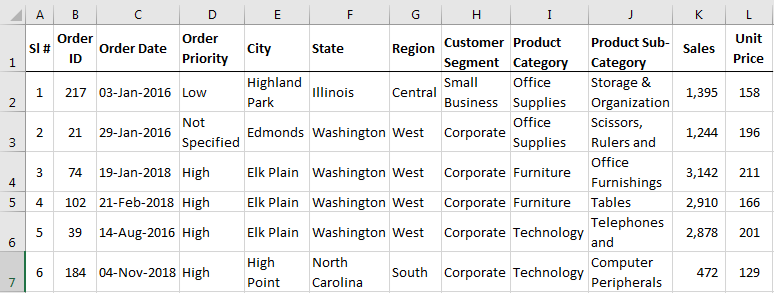
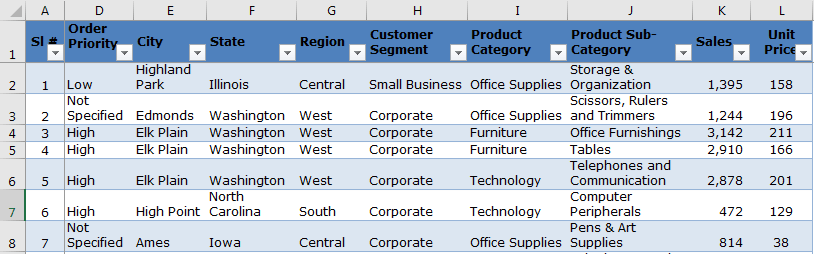
- We must first ensure all the required columns and name each heading properly.

- Once the headers of the data table are clear, we can easily start entering the data just below the respective column headings.

In database terminology, rows are called Records, and columns are called Fields.
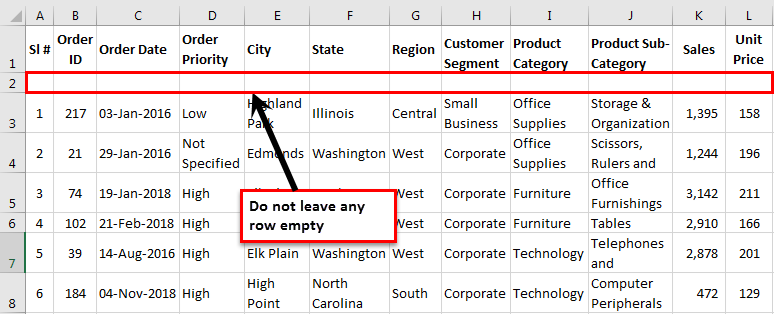
- We cannot leave a single row empty when entering the data. For example, we have entered the headings in the first row, and if we start entering the data from the third row by leaving the 2nd row empty, we are gone.

Not only the first or second row, but we also cannot leave any row empty after entering certain data into the database field.
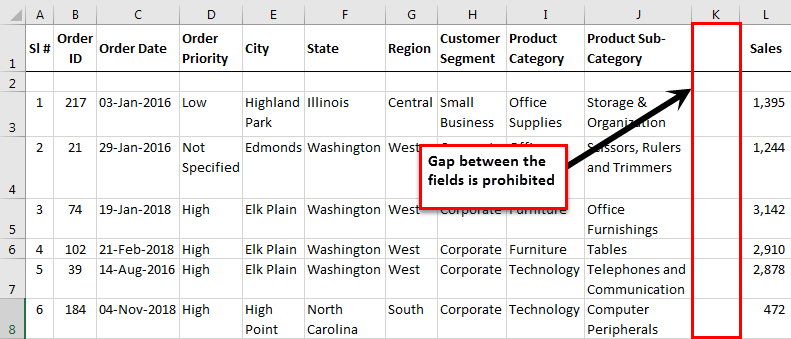
- As we said, each column is called Fields in the database. Similarly, we cannot have an empty field between the data.
We need to enter the fields one after the other. Having a gap of even one column or field is strictly prohibited.

I am so stressed about not having an empty record or field because when the data needs to be exported to other software or the web, as soon as the software sees the blank record or field, it assumes that it is the end of the data. Therefore, it may not consider the full data.
- We must fill in all the data carefully.
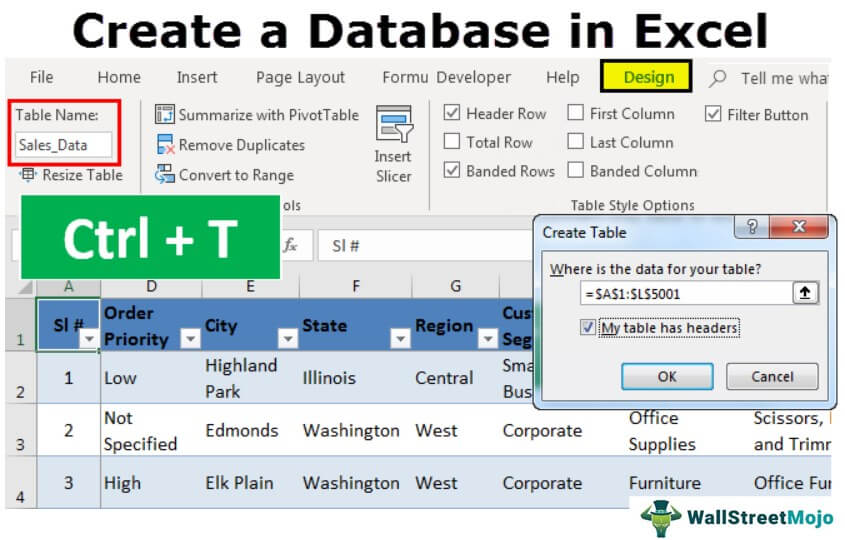
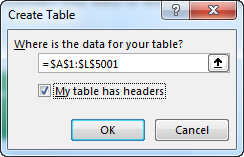
In the above image, I have data all the way from row 1 to row 5001. - The final thing we need to do is convert this data to an excel table. By selecting the data, press Ctrl + T.

- Here, we need to make sure the My table has a header checkbox is ticked and the range is selected properly.

- Then, we must click on OK to complete the table creation. As a result, we may have a table like this now.

- We must now give a proper name to the table under the table Design tab.

- Since we have created a table, automatically, it would expand whenever we enter the data after the last column.
We have the database ready now. Follow the pros and cons below to have a good hand on your database.


Things to Remember While Creating a Database in Excel
- We can upload the file to MS Access to have a secure database and back up a platform.
- Since we have all the data in Excel, it is very easy for your calculations and statistics.
- Excel is the best tool for database analysis.
- Easy to read and not complicated because of clear fields and records.
- We can filter out the records by using auto filters.
- If possible, sort the data according to date-wise.
- As the data keeps growing, Excel will slow down considerably.
- We cannot share more than 34 MB files with others in an email.
- We can Apply the Pivot tableA Pivot Table is an Excel tool that allows you to extract data in a preferred format (dashboard/reports) from large data sets contained within a worksheet. It can summarize, sort, group, and reorganize data, as well as execute other complex calculations on it.read more and give a detailed analysis of the database.
- We can download the workbook and use it for your practice purpose.
Recommended Articles
This article is a guide to Databases in Excel. Here, we discuss creating a database in Excel with examples and downloadable Excel templates. You may also look at these useful functions in Excel: –
- Excel Database Template
- Match Data using Excel Functions
- Forms for Data Entry in Excel
- Create a Data Table in Excel
- SUMIFS with Dates
How to Import an Excel Spreadsheet into a SQL Server Database Table Using the SQL Server Import and Export Wizard
Create a new SQL database table from an Excel spreadsheet in nine steps.
You can easily import a Microsoft SQL Server table from an Excel Spreadsheet by
using the SQL Server Import and Export Wizard. (You can also use the Import
and Export Wizard to
export data from a SQL Server table to an Excel spreadsheet.)
You can use the Wizard in the SQL Server Standard, Enterprise, Developer, or Evaluation
editions.
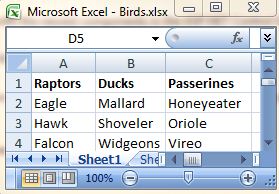
1. Enter the data into an Excel spreadsheet
- First, enter the data into an Excel spreadsheet.
- In this example, the default spreadsheet name, Sheet1, has been retained,
but if you rename the sheet (to the name you want for the table in the database,
for example), that name will be automatically used in the import process (at Step
6).
Small demonstration Excel spreadsheet ready for transfer to a SQL database
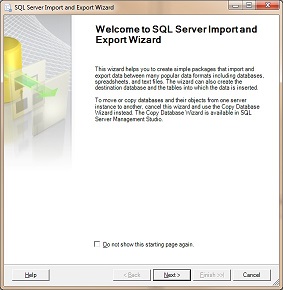
2. Start the SQL Import and Export Wizard
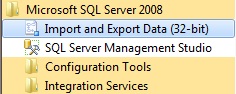
- Next, in Windows, start the Import and Export Wizard at Start / All
Programs / Microsoft SQL Server 2008/ Import and Export Data. - The Welcome page appears. Click Next.
SQL Import and Export Wizard in the Windows Start menu
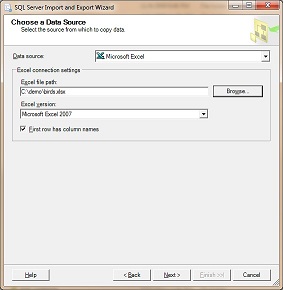
3. Chose your Excel spreadsheet as the Data Source
- In the Data Source dropdown of the Choose a Data Source page, select
Microsoft Excel. - In the Excel file path box, specify the file path to the Excel spreadsheet.
- Select the the version in the Excel version dropdown.
- Make sure that First row has column names is checked.
- Click Next.
4. Chose your SQL database as the destination
- In the Destination dropdown list, accept the default setting of SQL Server
Native Client 10.0. - In the Server name dropdown list, enter the name of the server. The example
is a remote server, so the IP address and port of the server were specified. - Chose the Authentication type. The example is a remote server, so SQL Server
authentication, with a user name and password, is required. - In the Database dropdown list, select or type the name of the database.
- Click Next.

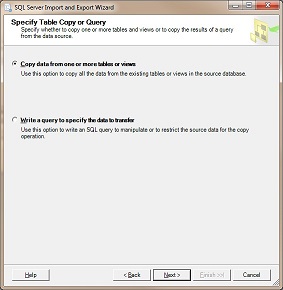
5. Specify how to copy the data
- The default option, Copy data from one or more tables or views, works for
this example. - If you want to try the second option, Write a query to specify the data to transfer,
the following lolcode snippet may be instructive:
CAN HAS SQL?
DBASE IZ GETDB(‘db/demo.db’)
FUNNAHS IZ DBUCKET(&DBASE&,»CAN I PLZ GET * ALL UP IN lollit»)
IM IN UR FUNNAHS ITZA TITLE
VOTEZ IZ &TITLE#ups& — &TITLE#downs&
- Click Next.
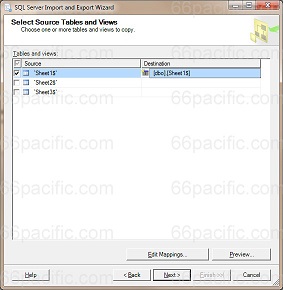
6. Select the source tables and views
- The default settings as shown work in this example.
- In the Destination column, you can specify a different name for the table
in the SQL database if you choose. - Click Preview to see how your data will appear in the destination table.
- You can click Edit Mappings to change how your data is assigned at the destination
table, but it shouldn’t be necessary in this example since you entered the data
into the Excel spreadsheet yourself. - Click Next.
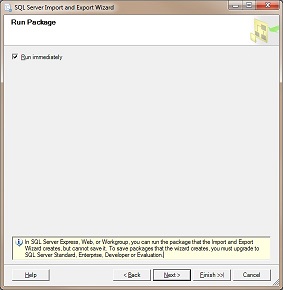
7. Run the «Package»
The following message appears at the bottom of the Run Package page: In SQL
Server Express, Web, or Workgroup, you can run the package that the Import and Export
Wizard creates, but cannot save it. To save packages that the wizard creates, you
must upgrade to SQL Server Standard, Enterprise, Developer or Evaluation.
A «package» is all of the settings that your have configured so far. In
the commercial versions of SQL Server, you can save the package for reuse so you
don’t have to enter all of the settings the next time you run the wizard. In
the Express (free) version of Microsoft SQL Server 2008 Management Studio,
you must re-enter all of the settings every time you run the SQL Server Import and
Export wizard.
- Click Next.
8. Verify that the package executed successfuly
- Click Report to view useful information about the data transfer process.
- Click Close.

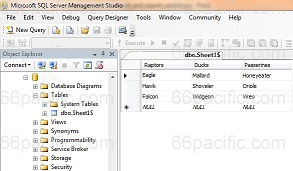
9. View the new table in SQL Server Management Studio
- View your new table by opening Microsoft SQL Server 2008 Management Studio
at Start / All Programs / Microsoft SQL Server 2008/ Import and Export Data.
The new table, dbo.Sheet1$, in Microsoft SQL Server Management Studio
You can also use the Import and Export Wizard to
export data from a table in SQL Server to an Excel spreadsheet.
Please send any suggestions or comments about this page to feedback at 66pacific.com.