
It only takes 3 steps to convert your Excel spreadsheet to an app! We´ll tell you how!
Microsoft Excel remains the go-to software solution for millions of businesses across the globe. It is favored for its versatility and flexibility and for the depth of data manipulation and analysis that it allows. And thanks to the Open as App platform that turns Excel spreadsheets into apps within minutes, some of the challenges in using Excel have been overcome.
Download your checklist to get started
Just enter your contact data, and we´ll send you our checklist. This list will help you take everything into account when choosing a platform to build your app. Check it out for free!
Excel to app: How to convert spreadsheets
Whether you need Excel to collect data, plan projects and analyze risks, report metrics, generate quotes, predict financial outcomes, or something as big as production planning or order management, you know it will be there for you.
But when it comes to using Excel collaboratively or protecting the data efficiently, that’s when things can get really messy. Suddenly, your Excel sheet is crashing, data is corrupt, and you have no idea whether you’re looking at the latest version or not. While this is quite characteristic of unmanaged Excel files, it can frequently occur with managed ones as well.
In this case, you may want to consider turning your Excel spreadsheet into a native or web application. This will allow you to reduce some of the common errors related to data management, distribution, and protection. Another benefit is that your Excel will look like an app – this offers greater usability and variety in terms of design.
Here are some reasons you should turn your Excel spreadsheet into an app and how to go about that.
Why should you turn your Excel into an app?
For all their usefulness, spreadsheets can quickly turn into what’s known as “Excel Hell” due to one or two simple mistakes. Such as when JP Morgan lost about $6.5 billion during the so-called “London Whale” incident because of several faulty equations and copy-pasted cells.
So, when do spreadsheets fail, and how can turning them into an app help you avoid their pitfalls?
Spreadsheet version control is hard
With spreadsheets constantly circulating around, chances are the latest version will get lost sooner or later. Moreover, updates by different people can end up damaging the core data and make the file unusable.
When you move your data to an app, you can limit user’s access to the “master version” of your spreadsheet and only allow admins to access it. Under this setup, users are only given access to specific data and fields, with everything else remaining hidden. This allows them to conduct the necessary operations without inadvertently corrupting the native spreadsheet.
Excel does not work like a database and is difficult to scale
While Excel is a good place to store and manipulate data, it does not offer the functionalities of a database or a data management system. Excel does not support complex data types, relations between files and records, or different data sets. This limits the types of operations you can perform.
Moreover, spreadsheets don’t allow for real-time multi-user input when used on a desktop and not online. Your spreadsheet then soon becomes a hindrance to scaling operations and improving efficiency. This is further compounded by the fact that as files grow in size, operations become slower and more cumbersome.
Reversely, by making an app out of your spreadsheet, you can offer your users the advantage of flexible and easy access to data and data collection from various sources, not just Excel. Plus, you can give multiple users access to your know-how without the risk of them overwriting your work or exposing your data.
Apps offer greater security
Even though a certain level of security, such as password protection, is available in Excel, this can fairly easily be bypassed. If you want to keep your data safe, then retaining it in a spreadsheet that is widely accessible is not a good idea.
By turning your Excel spreadsheet into an app, you are effectively removing user access to the source file, encrypting the data, and hosting it securely in your own environment. There, it will be accessible only to users at the admin level. This guarantees the safety and integrity of the data. It also allows you to specifically determine who can see your data and entirely limit third parties from gaining access. You can even set an expiry date for your app, after which it will simply stop being accessible to users.
For even greater security, you can initially create your app with dummy data and populate it with your original data later on.
Present your data more user-friendly
An Excel sheet is not the perfect asset to share with your customers or the management team or embed into your website. With an app, you provide an easy-to-use tool that shows you all relevant data in a user-friendly way, which can be used on mobile, desktop, and tablets.
How can no-code apps help to improve your business?
No-code app creation has benefits that go beyond spreadsheet trouble and will affect your business even more. That’s because with no-code apps, innovation and optimization are no longer only dedicated to the IT department or an external service provider – now, everyone who knows Excel can jump in and start creating, deploying, and managing an app.
No programming skills needed – everyone can contribute
Unlike with a custom software solution that is coded by hand, you don’t need any programming skills to turn your Excel sheet into an app. This is the case regardless of which of the myriad functions of Excel you’re using.
Innovation at low cost
Turning your spreadsheet into an app is not as costly as a custom solution either. Say you want to develop a web or native app that allows users to perform various types of calculations. This can be very time-consuming and expensive to code.
Instead, creating these calculations in Excel and then converting them into an app is highly cost and time-efficient and allows you to mobilize your data without switching your already existing system or files stored online.
People who know the business create apps
The people who will be working with the app know best what they want. A no-code app is created by business experts who previously created the Excel solution. They know the processes, the needs of their users, and how the app should be used. Briefing a developer and explaining what is vital for your business takes a long time and is an iterative process.
When the app is directly created based on the previously used Excel solution, creation, roll-out, and updating are amazingly fast. Once the business experts know what’s possible, they usually devise many innovative ideas that can be realized in almost no time.
Great service improvements – easily done
For your customers, partners, and your team, an app is always easier to use than an Excel spreadsheet. An app can typically be accessed anytime and anywhere, whereas an Excel spreadsheet can be quite cumbersome to work with on your mobile.
Keep operating costs down
An additional benefit of having an app is that you can automatically roll out updates to your entire network of users. That helps you to reduce the cost around the life cycle of an app. With in-built email and push notifications, you can easily notify users of changes and updates, improving your brand’s communication.
If you’re curious about the kinds of apps you can create by turning a spreadsheet into an app, see the next section for a list and overview of various use cases!
What kind of apps can you create from a spreadsheet?
The possibilities for creating an app from a spreadsheet are mostly limited by what you can imagine creating in Excel. The range within which you can create apps varies from data-heavy industries like finance, insurance, healthcare, and real estate to simple directory and personal budget apps.
Some of the possible applications of native app and web app development platforms include:
Excel-based app examples
- Business apps that include checklists, calculators, manuals, an address book, or simple CRM
- Embedded web calculators for finance, mortgages, insurance, interest, personal finances, and more
- Medical practice apps for patient experience, operations and administration, and more
- Reporting apps with forecasts, break-even, profit and loss, and high-level economics
- Dashboards for sales and marketing, such as ROI for B2B sales or advertising campaigns
- Production and logistics dashboards and stock inventory lists
- …and many more
These are only some of the possible applications of app development platforms. So, what platforms and tools are available to turn a spreadsheet into an app, and how do they work? Here is Open as App in more detail.
How to prepare your Excel sheet before you turn it into an app?
Before you submit your spreadsheet to the Open as App platform, you have to make sure that it’s formatted right. This will ease the process of converting it into an app and eliminate possible errors. There are several simple rules to follow when doing this.
The 5 Basic rules:
- Your lists must have headings at the top of the column. This guarantees that the list will be recognized as one by the app wizard and assigned the proper values.
- Your data must be clear. Any highlights, crossed-out data, comments or anything else will not be considered when your spreadsheet is processed.
- Any cells outside a list area will not be taken into account by the wizard. Neither can merged cells be analyzed properly. One cell should always have only one input and be within the space of the list it belongs to.
- Format your cells accordingly to have their values displayed. The Open as App platform will consider any values you ascribed to your cells and add them to your app. Examples of values include the date, currency, phone number, drop-down menu, etc.
- Avoid pivot tables (when using Google Sheets) and macros. Macros cannot be included, as that would make apps impossible to use on iOS.
Rules for more complex Excel sheets:
- Use explicit cell references rather than structured references; i.e., do not use table or column names but simply direct cell number references.
- References to external files cannot be accessed: Any references you make in your Excel file must be part of that file, even if not on the same sheet.
- Ensure you’re using supported formulas: Over 90% of common formulas are supported by Open as App. However, if you find an error in your app, see if the formulas you have used are supported. Array formulas and certain formulas specific to Google Sheets are not currently supported by the platform.
- Always specify all the arguments in a formula: Optional arguments with a default value given to them by Excel cannot be evaluated.
Keeping these rules in mind, you can create your own app within minutes without any difficulties.
How to design your app?
Once you have prepared your spreadsheet and uploaded it to the Open as App platform, you will get a recommendation for your app. Then, you can pick a design theme you like and manually design your app as you imagine it.
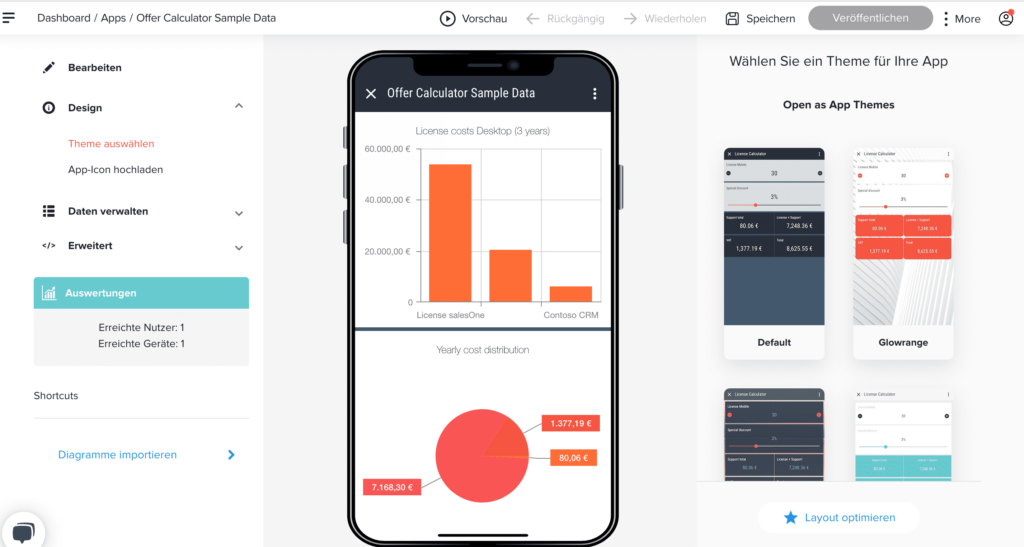
With the Open as App platform, you can customize the design of your app to your brand identity and, more specifically, configure how cells function. You can also add additional functionalities.
Once you are in the App Designer, you are given several options.
- Preview – this option allows you to preview how your app will look, but you can also edit or delete individual items, such as the app header and name.
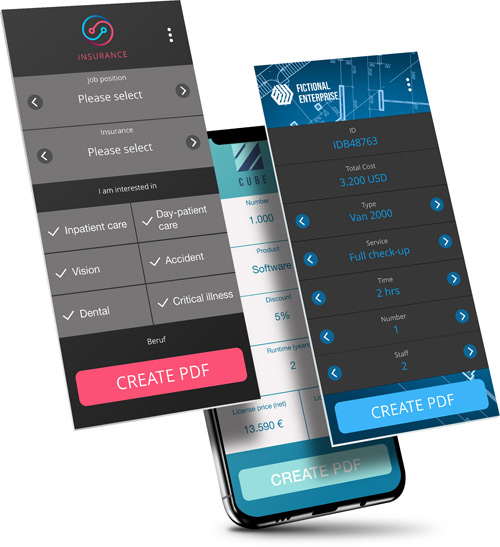
- Add elements – these options permit you to add new types of content such as cells – if you have additional data to incorporate into your app, charts – if you’d like to make your app more interactive and engaging, or lists – if you want to add sub-lists to your calculations. You can also add headers, spacers, images, info buttons, image upload or signature fields, a map, or action buttons
- Rearrange elements – with this, you can rearrange the elements in your app, group them together as you wish, and even add new pages to fill with extra elements.
- Design – change theme – with this function, you can change the whole theme of your app using a predefined layout provided by Open as App.
- Add print functionality – allows you to generate a PDF file through your app and send it via email.
Using the App Designer, you can stylize your app visually and functionally to match your desired result. You can fine-tune to what extent users can interact with the different contents and enrich the presentation of data thanks to different visual elements such as charts and graphs. All of this takes a minimal amount of time, and the simplicity or complexity of your final app depends entirely on what you want.
So what happens once you design and publish your app? Thanks to the way Open as App functions, there is a two-way connection between the sheet and the app. This means that both the sheet and the app are always updated in both ways. At the same time, access to your app and its functionalities is easy for all users while all the data remains protected to the extent you want it to.
Don’t forget to download your checklist
Just enter your contact data, and we´ll send you our checklist. This list will help you take everything into account when choosing a platform to build your app. Check it out for free!
Ready to turn your Excel sheet into an app?
Are you ready to give it a try? Simply open our App Creation Wizard, watch a short tutorial video (2 minutes), and follow the instructions to create your first app!

Posted on Wednesday, April 2nd, 2014 at 9:56 am by .
About a week ago we explored the aspects of extending Google Spreadsheets by creating Apps scripts. In that example, we created a sidebar and custom menus with which the user could specify the orientation their current selection could be changed to.
In today’s article, we’ll attempt the same functionality, but this time using the Napa development tools for Office 365. I’m slightly disappointed in saying that the Office Apps object model let me down a little bit with this example. For one, I would love to have seen a function with which I could get a reference to a specific range in the Excel sheet. At the moment the Office.js development model only provides us with access to the currently selected values.
None the less, with some creative maneuvers we will manage to make this example work. Let’s get started!
Creating an Office App for Excel
First, log into your Office 365 Developer site and click on the “Add new Project” button.

When prompted to select the type of app you want to build, select Task pane app for Office from the list, type a project name and click Create.

Opening a “Napa” project in Visual Studio
After your initial project has been created, you have a choice to either use the web-based IDE or to open the project in Visual Studio. To open the project in Visual Studio (after it was created using Napa), click on the “Open in Visual Studio” item in the left hand navigation menu.

This will download an executable and automatically create the project for you in your Visual Studio Projects folder, after it is run.
Creating the user interface
Since we are creating an app for Microsoft Excel, we want our UI color to be a shade of Excel-Green. By default, the Office Apps project’s default color is blue. To change this, open the App.css file that is located in the App folder. Locate the #content-header item and set its background property to #207144.
Next, we need to add instruction for the user on how to use the app. The user will need to select the range whose orientation they wish to change, click a button to copy the range, select a new range and click another button to insert the copied range into this newly selected range. We’ll add the instructions and the buttons to the “padding” div. The mark-up for the Home.html <body> element file looks as follows:
<body>
    <div id="content-header">
        <div class="padding">
            <h1>Orientation Change/Copier</h1>
        </div>
    </div>
    <div id="content-main">
        <div class="padding">
            <p><strong>Highlight either the row or column cells you want to change and click "Copy Selection".</strong></p>
            <button id="copy-selection">Copy Selection</button>
            <p><strong>Once complete, highlight the new destination and click "Paste Selection".</strong></p>
            <button id="paste-selection">Paste Selection</button>
            <p id="target" style="background-color: lightblue;min-height: 50px;"></p>
        </div>
    </div>
</body>
Responding to button clicks
Next, let’s add the code to hook up the functions that needs to run when the user clicks the buttons. Open the Home.js file and change the Office.initialize function to the following:
Office.initialize = function (reason) {
    $(document).ready(function () {
        app.initialize();
        $('#copy-selection').click(copySelection);
        $('#paste-selection').click(pasteSelection);
    });
};
We didn’t do much in the above code, we simply assigned the click handlers for the two buttons. Next, we need to create the code that will be used to get the user’s selection. The copySelection function will copy the user’s current selection to a variable for later use:
function copySelection() {
    Office.context.document.getSelectedDataAsync(Office.CoercionType.Matrix,
     function (result) {
         if (result.status == Office.AsyncResultStatus.Succeeded) {
             selection = result.value;
             app.showNotification("Copied selection. " + result.value.length);
         }
         else {
             app.showNotification("Error:" + result.error);
         }
     });
}
The above code retrieves the current selected data. You will notice that the CoercionType is set to Matrix. This is important to note, as this coercion type return the selected data as an array of arrays e.g. [[“Row1Col1”, “Row1Col2”], [“Row2Col1”, “Row2Col2”], [“Row3Col1”, “Row3Col2”]]
Once the user has copied their current selection, they can paste it after selecting the target range. The range would have to be the same size as the copied selection for this to work. If the user does not choose a range of equal size, we’ll display a notification to inform them.
The selection is then copied to a new array using the JavaScript map function. We then use this new array to set the current selection’s data. All this is accomplished in the pasteSelection function:
function pasteSelection() {
    var newSelection = selection[0].map(function (col, i) {
        return selection.map(function (row) {
            return row[i];
        });
    });

    Office.context.document.setSelectedDataAsync(newSelection, { valueFormat: Office.ValueFormat.Formatted }, function (result) {
        if (result.status == "succeeded") {
            app.showNotification(newSelection.length + " values copied.");
        }
        else {
            app.showNotification("Could not paste selection. Ensure you only have " + newSelection.length + " rows or columns selected.");
        }
    });
}
The result would look similar to the following screenshot in Excel:

Of course the app’s functionality will also work in the exact same way for the web version of. In the following screenshot you can see our Excel App running inside the web version of Excel inside of Google Chrome:

There you go. Unfortunately, there is no way to erase the original selection as the object model does not provide any functions for this. The Office.js library has seen some improvement and a lot is possible when employing creative workarounds. However, I do hope Microsoft will start investing heavily into this new extensibility model.
Who knows maybe Office for iPad will be the driving force to improving this new API even more.
Thank you for reading. Until next time, keep coding!
Available downloads:
Selection Switcher app for Excel
Все привет, в этой статье опишу исчерпывающие примеры работы с excel на языке C#.
Для начала работы нам необходимо подключить библиотеку COM как на рисунке ниже:
Для этого добавляем ссылку в проект, надеюсь вы знаете как это делается) Выбираем пункт COM ищем библиотеку Microsoft Excel 16.0 Object Library ставим галочку и жмем Ок.
Далее нам не обходимо для сокращения записи и удобства создать алиас.
|
using Excel = Microsoft.Office.Interop.Excel; |
Теперь нам нужно объявить объект Excel задать параметры и приступать к работе.
|
//Объявляем приложение Excel.Application app = new Excel.Application { //Отобразить Excel Visible = true, //Количество листов в рабочей книге SheetsInNewWorkbook = 2 }; //Добавить рабочую книгу Excel.Workbook workBook = app.Workbooks.Add(Type.Missing); //Отключить отображение окон с сообщениями app.DisplayAlerts = false; //Получаем первый лист документа (счет начинается с 1) Excel.Worksheet sheet = (Excel.Worksheet)app.Worksheets.get_Item(1); //Название листа (вкладки снизу) sheet.Name = «Имя должно быть не больше 32сим»; |
Пример заполнения ячейки:
|
//Пример заполнения ячеек №1 for (int i = 1; i <= 9; i++) { for (int j = 1; j < 9; j++) sheet.Cells[i, j] = String.Format(«nookery {0} {1}», i, j); } //Пример №2 sheet.Range[«A1»].Value = «Пример №2»; //Пример №3 sheet.get_Range(«A2»).Value2 = «Пример №3»; |
Захват диапазона ячеек:
|
//Захватываем диапазон ячеек Вариант №1 Excel.Range r1 = sheet.Cells[1, 1]; Excel.Range r2 = sheet.Cells[9, 9]; Excel.Range range1 = sheet.get_Range(r1, r2); //Захватываем диапазон ячеек Вариант №2 Excel.Range range2 = sheet.get_Range(«A1»,«H9» ); |
Оформление, шрифт, размер, цвет, толщина.
|
//Шрифт для диапазона range.Cells.Font.Name = «Tahoma»; range2.Cells.Font.Name = «Times New Roman»; //Размер шрифта для диапазона range.Cells.Font.Size = 10; //Жирный текст range.Font.Bold = true; //Цвет текста range.Font.Color = ColorTranslator.ToOle(Color.Blue); |
Объединение ячеек в одну
|
//Объединение ячеек с F2 по K2 Excel.Range range3 = sheet.get_Range(«F2», «K2»); range3.Merge(Type.Missing); |
Изменяем размеры ячеек по ширине и высоте
|
//увеличиваем размер по ширине диапазон ячеек Excel.Range range2 = sheet.get_Range(«D1», «S1»); range2.EntireColumn.ColumnWidth = 10; //увеличиваем размер по высоте диапазон ячеек Excel.Range rowHeight = sheet.get_Range(«A4», «S4»); rowHeight.EntireRow.RowHeight = 50;range.EntireColumn.AutoFit();range.EntireColumn.AutoFit(); //авторазмер |
Создаем обводку диапазона ячеек
|
Excel.Range r1 = sheet.Cells[countRow, 2]; Excel.Range r2 = sheet.Cells[countRow, 19]; Excel.Range rangeColor = sheet.get_Range(r1, r2); rangeColor.Borders.Color = ColorTranslator.ToOle(Color.Black); |
Производим выравнивания содержимого диапазона ячеек.
|
Excel.Range r = sheet.get_Range(«A1», «S40»); //Оформления r.Font.Name = «Calibri»; r.Cells.Font.Size = 10; r.VerticalAlignment = Excel.XlVAlign.xlVAlignCenter; r.HorizontalAlignment = Excel.XlHAlign.xlHAlignCenter; |
Примеры вычисления формул, все вставки формул были скопированы из самой Excel без изменений. Позиция ячейки взята из счетчика переменно и подставлен к букве ячейки
|
sheet.Cells[countRow, countColumn] = $«=G{countRow}-F{countRow}»; sheet.Cells[countRow, countColumn].FormulaLocal = $«=ЕСЛИ((H{countRow}*O{countRow})+(I{countRow}*P{countRow})/100<=0;J{countRow}*O{countRow}/100;((H{countRow}*O{countRow})+(I{countRow}*P{countRow}))/100)»; sheet.Cells[countRow, countColumn] = $«=K{countRow}+N{countRow}-R{countRow}»; sheet.Cells[33, 22].FormulaLocal = «=СУММ(V3:V32)»; |
Добавляем разрыв страницы.
|
//Ячейка, с которой будет разрыв Excel.Range razr = sheet.Cells[n, m] as Excel.Range; //Добавить горизонтальный разрыв (sheet — текущий лист) sheet.HPageBreaks.Add(razr); //VPageBreaks — Добавить вертикальный разрыв |
Как открыть фаил Excel
|
app.Workbooks.Open(@»C:UsersUserDocumentsExcel.xlsx», Type.Missing, Type.Missing, Type.Missing, Type.Missing, Type.Missing, Type.Missing, Type.Missing, Type.Missing, Type.Missing, Type.Missing, Type.Missing, Type.Missing, Type.Missing, Type.Missing); |
Сохраняем документ Excel
|
app.Application.ActiveWorkbook.SaveAs(«MyFile.xlsx», Type.Missing, Type.Missing, Type.Missing, Type.Missing, Type.Missing, Excel.XlSaveAsAccessMode.xlNoChange, Type.Missing, Type.Missing, Type.Missing, Type.Missing, Type.Missing); |
Завершение работы с объектом Excel.Application
|
app.Quit(); System.Runtime.InteropServices.Marshal.ReleaseComObject(app); |
Пример как выбрать фаил и загрузив его и узнать количество заполненных строк и колонок в одном конкретном листе по имени.
|
1 2 3 4 5 6 7 8 9 10 11 12 13 14 15 16 17 18 19 20 21 22 23 24 25 |
//поиск файла Excel OpenFileDialog ofd = new OpenFileDialog(); ofd.Multiselect =false; ofd.DefaultExt = «*.xls;*.xlsx»; ofd.Filter = «Microsoft Excel (*.xls*)|*.xls*»; ofd.Title = «Выберите документ Excel»; if (ofd.ShowDialog() != DialogResult.OK) { MessageBox.Show(«Вы не выбрали файл для открытия», «Внимание», MessageBoxButtons.OK, MessageBoxIcon.Information); return; } string xlFileName = ofd.FileName; //имя нашего Excel файла //рабоата с Excel Excel.Range Rng; Excel.Workbook xlWB; Excel.Worksheet xlSht; int iLastRow, iLastCol; Excel.Application xlApp = new Excel.Application(); //создаём приложение Excel xlWB = xlApp.Workbooks.Open(xlFileName); //открываем наш файл xlSht = xlWB.Worksheets[«Лист1»]; //или так xlSht = xlWB.ActiveSheet //активный лист iLastRow = xlSht.Cells[xlSht.Rows.Count, «A»].End[Excel.XlDirection.xlUp].Row; //последняя заполненная строка в столбце А iLastCol = xlSht.Cells[1, xlSht.Columns.Count].End[Excel.XlDirection.xlToLeft].Column; //последний заполненный столбец в 1-й строке |
Получаем список всех загруженных книг «листов» из файла
|
1 2 3 4 5 6 7 8 9 10 11 12 13 14 15 16 17 18 19 |
//поиск файла Excel OpenFileDialog ofd = new OpenFileDialog(); ofd.Multiselect = false; ofd.DefaultExt = «*.xls;*.xlsx»; ofd.Filter = «Microsoft Excel (*.xls*)|*.xls*»; ofd.Title = «Выберите документ Excel»; if (ofd.ShowDialog() != DialogResult.OK) { MessageBox.Show(«Вы не выбрали файл для открытия», «Внимание», MessageBoxButtons.OK, MessageBoxIcon.Information); return; } string xlFileName = ofd.FileName; //имя нашего Excel файла Excel.Workbook xlWB = ex.Workbooks.Open(xlFileName); ///загружаем список всех книг foreach (object item in xlWB.Sheets) { Excel.Worksheet sheet = (Excel.Worksheet)item; } |
Содержание
- Введение
- Добавление необходимых ссылок в решение
- Работа с объектом Application (Excel)
- Запуск и остановка Microsoft Excel в C#
- Создание рабочей книги Excel в C#
- Работа с листами Excel в C#. Hello Excel
- Итого
уважаемые посетители блога, если Вам понравилась, то, пожалуйста, помогите автору с лечением. Подробности тут.
При разработки различных программ для анализа данных нередко требуется не только обрабатывать большие массивы данных, но и предоставить конечному пользователю удобно оформленный отчёт о работе программного обеспечения. В сегодняшних реалиях экономия килобайт оперативной памяти при разработке программного обеспечения уже не так важна по сравнению с удобством работы программного продукта. Не секрет, что при работе в Windows для наиболее удобного представления табличных данных является Microsoft Excel. В этой и других статьях, посвященных работе с Excel в .NET Core и C# я постараюсь рассмотреть наиболее частые задачи по импорту и экспорту данных между приложением и Microsoft Excel. Сегодня мы рассмотрим как использовать MS Excel в .NET Core, используя технологию COM.
Введение
Разработка программ, взаимодействующих с пакетом Microsoft Office, вне зависимости от среды разработки, будь то Visual Studio С# или Delphi, основана на применении так называемой объектной модели Microsoft Office. Взаимодействие с объектами такой модели базируется на технологии OLE (Object Linking and Embedding, связывание и внедрение объектов), которая, в свою очередь, использует технологический стандарт COM (Component Object Model — модель компонентного объекта).
Существует достаточно много решений, позволяющих работать с Microsoft Excel в Visual Studio .NET о которых мы, вполне возможно, поговорим позднее. Сейчас же мы будем учиться использовать возможности Microsoft Excel, опираясь исключительно на объектную модель Microsoft Office и те возможности, которые она предоставляет разработчикам, так сказать, «из коробки».
Добавление необходимых ссылок в решение
Для подключения в решение библиотек для взаимодействия с Microsoft Excel необходимо добавить добавьте следующие ссылки:
- Microsoft Excel 16.0 Object Library
- Microsoft Office 16.0 Object Library
В Visual Studio это делается следующим образом:
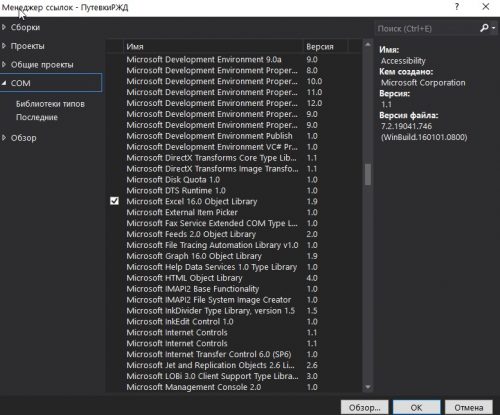
1. В «Обозревателе решений» кликаем правой кнопкой мыши по строке «Зависимости» и выбираем пункт «Добавить ссылку на модель COM»

2. В открывшемся окне в строке поиска набираем «Microsoft», выбираем необходимые ссылки, то есть Microsoft Excel 16.0 Object Library и Microsoft Office 16.0 Object Library и жмем «Ok»:

После этого, в обозревателе решений для нашего проекта в зависимостях появятся следующие ссылки:
Зависимости
COM
Interop.Microsoft.Office.Core
Interop.Microsoft.Office.Interop.Excel
Платформы
Microsoft.NetCore.App

Теперь, чтобы наше решение для .NET Core могло полноценно использовать возможности Microsoft Excel необходимо указать в решении, что все типы, используемые в объектной модели Microsoft Office будут использоваться в нашей сборке. Чтобы это сделать выбираем в зависимостях нашего решения каждую ссылку из раздела COM и в разделе «Свойства» указываем напротив пункта «Внедрить типы взаимодействия» значение «Да». На рисунке ниже представлен пример для ссылки Interop.Microsoft.Office.Core

Если не выполнить эти действия, то при разработки приложения .NET Core при попытке работы с Excel вы получите следующую ошибку:
System.IO.FileNotFoundException HResult=0x80070002
Сообщение = Could not load file or assembly ‘office, Version=15.0.0.0, Culture=neutral, PublicKeyToken=71e9bce111e9429c’. Не удается найти указанный файл.
Источник = <Не удается определить источник исключения>
Трассировка стека: <Не удается определить трассировку стека исключения>
Работа с объектом Application (Excel)
Объект Application представляет всё приложение Microsoft Excel. С помощью этого объекта в C# мы можем запускать и останавливать работу Excel, получать доступ к рабочим книгам Excel и так далее. Посмотрим, как можно взаимодействовать с Excel в C#, используя объект Application.
Запуск и остановка Microsoft Excel в C#
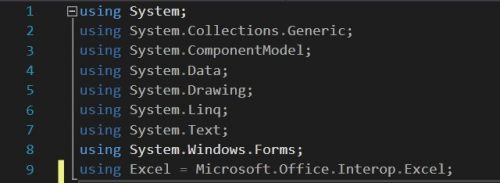
Чтобы продемонстрировать запуск и остановку Excel в C# подключим в наше решение пространство имен Microsoft.Office.Interop.Excel, используя псевдоним:
using Excel = Microsoft.Office.Interop.Excel;
Теперь напишем следующий код для метода Main():
using System;
using Excel = Microsoft.Office.Interop.Excel;
using System.Runtime.InteropServices;

namespace ExcelApp
{
    class Program
    {
        static void Main(string[] args)
        {
            Excel.Application application = new Excel.Application();
            Console.WriteLine("Объект Excel.Application создан");
            Console.ReadKey();
            application.Visible = true;
            Console.WriteLine("Окно Excel видно пользователю");

            Console.ReadKey();
            Console.WriteLine("Закрываем Excel");

            application.Quit();
            Marshal.ReleaseComObject(application);
        }
    }
}
Разберемся с тем, что происходит в нашем приложении при запуске. Вначале мы создаем объект application типа Excel.Application (Excel — псевдоним пространства имен Microsoft.Office.Interop.Excel). После выполнения этой строки кода происходит запуск процесса Microsoft Excel. Убедиться в этом можно, открыв диспетчер задач Windows и заглянув в раздел «Фоновые процессы»:

Чтобы показать главное окно Excel пользователю, мы устанавливаем значение true свойству Visible:
application.Visible = true;
И, наконец, для того, чтобы закрыть Excel и освободить память, занятую процессом Excel мы вызываем метод Quit().
application.Quit()
Таким образом, всё, что пока делает наше приложение .NET Core — это запускает процесс Microsoft Excel, показывает окно Excel и закрывает приложение. При этом, стоит обратить внимание на следующий момент: так как чаще всего мы будем взаимодействовать с Excel в C# в фоновом режиме без показа главного окна, то по окончанию взаимодействия необходимо обязательно вызывать метод Quit() объекта Application и вызвать метод объекта Marshal.ReleaseComObject(application) из пространства имен System.Runtime.InteropServices. Если этого не сделать, то после N запусков нашего приложения мы рискуем «забить» оперативную память компьютера неиспользуемыми процессами Excel, так как после остановки нашего приложения и вызова Quit() внешний процесс (Excel) автоматически не завершается. Продемонстрировать это можно, написав всего две строки кода:
static void Main(string[] args)
  {
      Excel.Application application = new Excel.Application();
      application.Quit();
  }
и запустить приложение несколько раз. Например, на рисунке ниже показан диспетчер задач после трех запусков нашего приложения:

Создание рабочей книги Excel в C#
Следующий пример демонстрирует создание новой рабочей книги Excel в C#:
using System;
using Excel = Microsoft.Office.Interop.Excel;
using System.Runtime.InteropServices;

namespace ExcelApp
{
    class Program
    {
        static void Main(string[] args)
        {
            //Объявляем переменную приложения Excel
            Excel.Application application = null;
            //объявляем переменные для коллекции рабочих книг
            //и одной рабочей книги
            Excel.Workbooks workbooks = null;
            Excel.Workbook workbook = null;
            try
            {
                //создаем объект Application
                application = new Excel.Application();
                Console.WriteLine("Объект Excel.Application создан");
                Console.ReadKey();
                //показываем окно Excel пользователю
                application.Visible = true;
                Console.WriteLine("Окно Excel видно пользователю");
                //получаем ссылку на коллекцию рабочих книг
                workbooks = application.Workbooks;
                //добавляем новую рабочую книгу в коллекцию
                workbook = workbooks.Add();
                Console.ReadKey();
                Console.WriteLine("Закрываем Excel");
                application.Quit();
            }
            finally
            {
                //освобождаем память, занятую объектами
                Marshal.ReleaseComObject(workbook);
                Marshal.ReleaseComObject(workbooks);
                Marshal.ReleaseComObject(application);

            }
        }
    }
}
На первый взгляд, может показаться, что этот код вполне можно упростить, например, избавившись от «лишних» переменной workbooks, например так:
workbook = application.Workbooks.Add();
Такой код, безусловно, будет короче и рабочая книга также будет создана, НО при этом, память выделенная для процесса Excel не будет освобождена по причине того, что в приведенной выше строке кода мы на самом деле создаем не один, а два объекта: объект типа Excel.Workbooks и объект типа Excel.Workbook и, соответственно, оба эти объекта нам необходимо освободить после работы с ними.
Исходя из вышеизложенного, можно определить для себя два следующих правила работы с COM в C#:
Никогда не использовать две и более точек при работе с COM
О том, из-за чего процесс Excel может зависать — смотрите в этой статье.
Работа с листами Excel в C#. Hello Excel
В следующем примере демонстрируется то, как получить доступ к первому листу рабочей книги и записи в ячейку A1 строки «Hello Excel«:
using Excel = Microsoft.Office.Interop.Excel;
using System.Runtime.InteropServices;

namespace ExcelApp
{
    class Program
    {
        static void Main(string[] args)
        {
            Excel.Application application = null;
            Excel.Workbooks workbooks = null;
            Excel.Workbook workbook = null;
            Excel.Sheets worksheets = null;
            Excel.Worksheet worksheet = null;
            //переменная для хранения диапазона ячеек
            //в нашем случае - это будет одна ячейка
            Excel.Range cell = null;
            try
            {
                application = new Excel.Application
                {
                    Visible = true
                };
                workbooks = application.Workbooks;
                workbook = workbooks.Add();
                worksheets = workbook.Worksheets; //получаем доступ к коллекции рабочих листов
                worksheet = worksheets.Item[1];//получаем доступ к первому листу
                cell = worksheet.Cells[1, 1];//получаем доступ к ячейке
                cell.Value = "Hello Excel";//пишем строку в ячейку A1
                application.Quit();
            }
            finally
            {
                //освобождаем память, занятую объектами
                Marshal.ReleaseComObject(cell);
                Marshal.ReleaseComObject(worksheet);
                Marshal.ReleaseComObject(worksheets);
                Marshal.ReleaseComObject(workbook);
                Marshal.ReleaseComObject(workbooks);
                Marshal.ReleaseComObject(application);

            }
        }
    }
}
После запуска этого приложения откроется Excel, создастся рабочая книга, на первом листе рабочей книги в ячейке А1 появится строка «Hello Excel» после чего Excel попросит сохранить книгу. После отказа сохранения Excel закроется и память процесса Microsoft Excel будет освобождена.
Итого
Итак, сегодня мы рассмотрели основные моменты по работе с Microsoft Excel в C# и .NET Core: научились создавать процесс Microsoft Excel, создавать рабочую книгу, записывать текст в ячейки листа Excel и корректно освобождать память после работы с Excel в C#. В следующий раз мы продолжим разбираться с темой использования возможностей Excel в .NET Core и более детально познакомимся с объектной моделью Microsoft Office.
уважаемые посетители блога, если Вам понравилась, то, пожалуйста, помогите автору с лечением. Подробности тут.
In This Chapter
Developing spreadsheets for yourself and for other people Knowing what makes a good spreadsheet application Using guidelines for developing applications for others
Excel programmers develop two basic types of spreadsheets: spreadsheets that only they use and spreadsheets that other people use. This distinction often determines how much effort you need to put into creating a spreadsheet. Usually, developing spreadsheets for your use is much easier than developing spreadsheets that others will use.
In this chapter, I provide general guidelines for developing spreadsheets for someone other than yourself. But even if you’re the only person who uses your spreadsheet creations, you might discover some helpful hints.
What’s a Spreadsheet Application?
Excel programming is essentially the process of building applications that use a spreadsheet rather than a traditional programming language. In many cases, people other than the application developer use these applications.
My working definition of a spreadsheet application is this: A spreadsheet file (or group of related files) designed so that someone other than the developer can perform useful work without extensive training. Based on this definition, most of the spreadsheet files you’ve developed probably don’t qualify as spreadsheet applications. You may have hundreds of spreadsheet files on your hard drive, but you probably didn’t design most of them so that others can use them.
The qualities of a good application
Like witches, there are good spreadsheet applications and bad spreadsheet applications. How can you tell them apart? A good spreadsheet application does these things:
Enables end users to perform a task they probably couldn’t otherwise do.
Provides an appropriate solution to a problem. The optimal approach for solving a problem doesn’t always involve designing an application that works in a spreadsheet environment.
Does what it’s supposed to do. This might be an obvious prerequisite, but many applications fail to meet this test.
Produces accurate results and is bug-free.
Performs its job using appropriate, efficient methods and techniques.
Traps errors and helps the user correct them.
Does not allow the user to accidentally (or intentionally) delete or modify important components.
Offers a clear, consistent user interface, so the user always knows how to proceed.
Contains formulas, macros, and user interface elements that are well documented.
Provides a design that enables developers to make simple modifications without making major structural changes.
Presents an easily accessible Help system that offers useful information on at least the major procedures.
Is based on a portable design — that is, the application runs on any system that has the proper software (in this case, a copy of Excel 2003 and possibly earlier versions).
You can create spreadsheet applications at many different levels, ranging from simple fill-in-the-blanks templates to extremely complex applications that use custom menus and dialog boxes — and may not even look like spreadsheets.
Throughout this chapter, I use the terms developer and end users. The developer is the person who creates and maintains the application (that’s you!), and the end users are the folks who benefit from your efforts (this could include you).
Developing Applications, Step by Step
No simple recipe exists for developing a spreadsheet application. Besides, this isn’t a cookbook. Fact is, everyone develops his or her own style for creating spreadsheet applications. In this section I provide you with some general guidelines that I find useful. At the very least, this information can help you improve your own development style.
Spreadsheet developers typically perform some of the following activities. You won’t necessarily perform all these steps for every application, and the order in which you perform them may vary from project to project.
Determine the user’s needs.
Plan an application that meets those needs.
Determine the most appropriate user interface.
Create the spreadsheet, formulas, macros, and user interface.
Test and debug the application.
Make the application bulletproof (prevent your app from being mangled).
Make the application aesthetically appealing and intuitive.
Document the development effort.
Develop user documentation and online Help.
Distribute the application to the user.
Update the application when necessary.
I describe these activities in the following sections.
Determining user needs
The first step in developing an application usually involves identifying exactly what the end users require. Skipping this step (or guessing what the users might need) often results in additional work later.
In some cases you know the end users very well — you may be one yourself. In other cases (for example, a consultant developing projects for a client), you know little or nothing about the users or their situation.
These tips make this phase easier:
Don’t assume that you know what the users need. Second-guessing at this stage almost always causes problems later in development.
If possible, talk directly to the application end users, not only to their supervisor or manager.
Learn what, if anything, the users currently do to solve the problem. You may save some work by adapting an existing application.
Identify the resources available at the users’ site. For example, try to determine whether you must work around any hardware or software limitations.
If possible, find out which systems will run your application. Consider whether your application must run on slower systems or on systems that aren’t connected to a network.
Understand the end users’ skill levels. This information helps you design the application appropriately.
Determine the anticipated lifespan of the application. This often influences the amount of effort you put into the project.
One final note: Don’t be surprised if the project specifications change before you complete the application. This often happens, and you’re better off expecting changes rather than being surprised by them.
Planning an application that meets user needs
After you determine the end users’ needs, you might be tempted to jump right in and start fiddling around in Excel. Take it from someone who suffers from this problem: Try to restrain yourself. Builders don’t construct a house without a set of blueprints, and you shouldn’t develop a spreadsheet application without a plan.
How formal you make your plan depends on the project scope and your general working style. You should, however, spend at least some time thinking about what you need to do and come up with a plan of action. Take some time to consider the various ways you can approach the problem. A thorough knowledge of Excel pays off here by helping you avoid blind alleys.
More specifically, you need to consider some general options at this stage, including the following:
File structure: Should you use one workbook with multiple sheets, several single-sheet workbooks, or a template file?
Data structure: Should the application use external database files or store everything in worksheets?
Formulas or VBA: Should formulas perform calculations or should you write VBA procedures? Both have advantages and disadvantages.
Add-in or XLS file: In most cases, you probably want your final product to be an XLA add-in. Sometimes an XLS file is preferable.
Excel version: Does your application need to work with older versions of Excel? If so, use such a version for your development work. (And you can’t use any native Excel 2003 features.) If the application must work also with Excel for the Macintosh, test it using both products.
Error handling: Anticipate possible errors and determine how your application will detect and deal with error conditions.
Special features: Don’t reinvent the wheel. For example, if your application needs to summarize lots of data, consider using Excel’s built-in pivot table feature.
Performance issues: Your approach ultimately determines your application’s overall performance. Start thinking about the speed and efficiency of your application now. Don’t wait until the application is complete and users are complaining about it.
Security level: Excel provides several protection options for restricting access to particular workbook elements. Make your job easier by determining upfront exactly what you need to protect — and what level of protection is required.
You have to deal with many other project-dependent considerations in this phase. The important point is that you should consider all options and avoid settling on the first solution that comes to mind.
I’ve learned from experience that you shouldn’t let the end user completely guide your approach to solving the problem. For example, suppose that you meet with a manager who tells you the department needs an application that writes text files, which will be imported into another application. Don’t confuse the user’s perceived need with the solution. In this example, the real need is to share data — using an intermediate text file is just one possible solution. In other words, don’t let the users define their problem by stating it in terms of a solution approach. Finding the right approach is your job.
Determining the most appropriate user interface
When you develop spreadsheets that others will use, pay special attention to the user interface. By user interface, I mean the method by which the user interacts with the application: clicking buttons, using menus, pressing keys, accessing toolbars, and so on.
Excel provides several features that relate to user-interface design:
Dialog box controls placed directly on a worksheet Custom dialog boxes (UserForms) Custom menus Custom toolbars Custom shortcut keys
Consider all your options, as well as the skill level and motivation of the end users. Then decide on the interface elements that make the most sense.
Developing the application
You’ve identified user needs, determined your approach, and decided on the user interface. Now you can get down to the nitty-gritty and start creating the application — the step that comprises most of the time spent on a project.
The approach you take when developing the application depends on your personal style and the nature of the application. Except for simple template-type applications, your application will probably use VBA macros.
I can’t be more specific here, because each application is different. In general, try to keep your VBA procedures short and modular. In a modular application, each procedure performs one task. Limiting your procedures to a single task makes it much easier to make changes later on. For example, if you write a procedure that collects data from the user, formats the data, and creates a text file from that data, you probably should have created four procedures (three procedures to perform the tasks, and another procedure to call the other procedures).
Testing the application
Every computer user encounters software bugs. In most cases, such problems result from insufficient testing, which fails to catch all the bugs.
After you create your application, you need to test it. This step is crucial and you might spend as much time testing and debugging an application as you do creating the application in the first place. Actually, you should test extensively during the development phase. After all, while you write a VBA routine or create formulas in a worksheet, you want to make sure that the application works as it should.
Try to recruit one or more users to help with the testing. I’ve found that using a few good beta testers is an excellent way to uncover problems that I have overlooked.
Although you can’t test for all possibilities, your macros should handle common types of errors. Some examples:
What if the user enters a text string instead of a value?
What if the user cancels a dialog box without making any selections?
What happens if the user presses Ctrl+F6 and jumps to the next window?
As you gain experience, issues like these become second nature and you account for them with little effort.
Bulletproofing an application
A user can easily destroy a worksheet. Erasing one critical formula or value often causes errors that ripple through the entire worksheet — and perhaps in other dependent worksheets. Even worse, if the user saves the damaged workbook, the corrupt version replaces the good copy on disk. Unless the person using your application has a backup procedure in place, the user could be in trouble — and you’ll probably be blamed!
Add some protection if other users, especially novices, use your worksheets. Excel provides several techniques for protecting worksheets and parts of worksheets. Table 1 reveals how you can do some of these things.
| Table 1 | Protecting Users |
| What to Do | How to Do It |
| Lock specific cells (using the | Doing so takes effect only when you |
| Protection tab in the Format Cells | protect the document with the Tools |
| dialog box) so that they can’t be | Protection Protect Sheet command. |
| changed. | |
| Protect an entire workbook: | This takes effect when you use the ToolsO |
| the workbook structure, the | Protection Protect Workbook command. |
| window position and size, | |
| or all three. | |
| Hide the formulas in specific | This takes effect only when you protect |
| cells (using the Protection tab | the document with the ToolsOProtectionO |
| in the Format Cells dialog box) | Protect Sheet command. |
| so other users can’t see them. | |
| Lock objects on the worksheet | This takes effect only when you protect |
| (using the Protection tab in the | the document with the ToolsOProtectionO |
| Format Object dialog box). | Protect Sheet command. |
| Hide rows. | This helps prevent the worksheet from |
| looking cluttered and provides some | |
| protection against prying eyes. FormatO | |
| RowOHide | |
| Hide columns. | This helps prevent the worksheet from |
| looking cluttered and provides some pro- | |
| tection against prying eyes. Format | |
| Column Hide | |
| Table 1 (continued) | |
| What to Do | How to Do It |
| Hide sheets. | This helps prevent the worksheet from |
| looking cluttered and provides some pro- | |
| tection against prying eyes. | |
| Format Sheet Hide | |
| Hide documents. | This helps prevent the worksheet from |
| looking cluttered and provides some pro- | |
| tection against prying eyes. Window Hide | |
| Designate workbooks as read-only. | This ensures that they cannot be overwrit- |
| ten with any changes. Choose Save As | |
| Options. | |
| Assign a file password. | This prevents unauthorized users from |
| opening your file. Choose Save As | |
| Options. |
Using an add-in, which doesn’t allow the user to change anything on the add-in’s worksheets, is another option.
The appropriate level of protection and how you implement it depend on the application and who will use it.
Excel’s protection features are not really secure. In other words, if someone really wants to defeat your protection, they can probably find a way to do it.
Looking good
You’ve undoubtedly seen examples of poorly designed user interfaces, diffi-cult-to-use programs, and just plain ugly screens. If you develop spreadsheets for other people, you should pay particular attention to how the application looks.
The way a computer program looks can make all the difference in the world to users. And so it goes with the applications you develop with Excel. End users appreciate a good-looking user interface. You can give your applications a much more polished and professional look if you devote some time to design and aesthetics.
Evaluating aesthetic qualities is very subjective. When in doubt, keep your worksheets simple and generic with these tips:
Strive for consistency. This includes fonts, text sizes, and formatting. When designing custom dialog boxes, for example, try to emulate the look and feel of the Excel dialog boxes as much as possible.
Avoid the gaudy. Just because Excel lets you work with 56 colors doesn’t mean that you have to use them all. In general, use only a few colors and no more than two fonts. Better yet, stick to a single font and use bold formatting or larger font sizes for variation.
Keep it simple. Developers often make the mistake of trying to cram too much information into a single screen or dialog box. Present only one or two chunks of information at a time.
Think modular. Make it easy for the user to figure out what’s what. For example, you can separate different parts of a worksheet by using background colors or borders.
Give users what they expect. For example, most applications have a File menu. If you name your File menu something else, it can be confusing to users. Think about how programs that you use are consistent, not only internally, but with other programs.
Documenting your efforts
You can easily assemble a spreadsheet application. The hard part is making it understandable to other people. You must thoroughly document your work. Doing so helps you if you need to modify the application (and you will), and it helps anyone else who needs to work on the application (after you get that big promotion).
How do you document a workbook application? Store the information in a worksheet or use another file. Use a paper document if you prefer. Perhaps the easiest way to document a workbook application is to create a separate worksheet in which you store comments and key information about the project.
Use comments liberally throughout your VBA code. An elegant piece of VBA code may seem perfectly understandable to you today — but come back to it in a few months and you may be scratching your head.
Developing user documentation and Help files
In addition to your programming documentation, you need to develop user documentation. You have two basic choices: paper-based documentation or electronic documentation.
Help screens are standard fare in Windows applications. Fortunately, your Excel applications can provide tutelage — even in context. You can develop Help files and display a particular topic on demand.
Although developing Help files requires quite a bit of additional effort, the effort may be worthwhile for a large project. To simplify the process, I suggest that you acquire any of several software products designed for creating Windows Help files.
Distributing the application to the user
You’ve completed your project and you’re ready to release it to the end users. How do you do this?
It depends entirely on the project and who will be using it. You could simply hand over a CD, scribble a few instructions, and be on your way. Or you may install the application yourself. Another option is to develop an official setup program that automatically installs your application. You can write such a program in a traditional programming language, purchase a generic setup program, or write your own setup program in VBA.
You also need to consider the issue of providing support for your application. In other words, who gets the phone call if the user encounters a problem? If you aren’t prepared to handle routine questions, identify someone who is. In some cases, you may specify that the developer handles only highly technical problems or bug-related issues.
Updating the application when necessary
You’re finished with your application after you distribute it, right? You can sit back, enjoy yourself, and try to forget about the problems you encountered (and solved) during development. In rare cases, yes, you may be finished. More often, however, your application’s users will not be completely satisfied.
Sure, your application adheres to all original specifications, but things change. After seeing an application work, users often think of other things the application could be doing. That’s right, I’m talking about updates. When you need to update or revise your application, you’ll appreciate the fact that you designed it well the first time and fully documented your efforts. If not, well . . . you learn from your experiences.