
Contents
- 1 How do you create a worksheet?
- 2 What is worksheet in Word?
- 3 How do I create and save a worksheet?
- 4 How does a worksheet look like?
- 5 What are the examples of worksheet?
- 6 How do I create a fillable PDF form in Word?
- 7 What is the difference between spreadsheet worksheet and sheet?
- 8 What is another name for a worksheet?
- 9 Which option is used to save the worksheet created?
- 10 What is worksheet PDF?
- 11 How do you layout a spreadsheet?
- 12 What is worksheet in a computer?
- 13 What is worksheet formatting?
- 14 What are the types of worksheet?
- 15 What is worksheet accounting?
- 16 How do I turn a Word document into a fillable form?
- 17 Can you make a Word document fillable?
- 18 What is a interactive worksheet?
- 19 How do you share an interactive worksheet?
- 20 How do I convert a PDF to an interactive worksheet?
How to create a worksheet template
- Select the worksheet that you want to use as a template.
- Click the File tab.
- Under Info, click Save As.
- In the File name box, type the name of the worksheet template. To create a custom worksheet template, type the file name that you want to use.
- Do one of the following:
- Click Save.
What is worksheet in Word?
A worksheet, in the word’s original meaning, is a sheet of paper on which one performs work.In accounting, a worksheet is, or was, a sheet of ruled paper with rows and columns on which an accountant could record information or perform calculations.
How do I create and save a worksheet?
Save a worksheet
- Right-click the worksheet name tab.
- Click select Move or Copy.
- Click on the Move selected sheets to Book drop-down menu. Select (new book).
- Click OK. Your new workbook opens with your moved worksheet.
- Click File > Save in your new workbook.
How does a worksheet look like?
The term Worksheet used in Excel documents is a collection of cells organized in rows and columns. It is the working surface you interact with to enter data. Each worksheet contains 1048576 rows and 16384 columns and serves as a giant table that allows you to organize information.
What are the examples of worksheet?
Examples of spreadsheet programs
- Google Sheets – (online and free).
- iWork Numbers – Apple Office Suite.
- LibreOffice -> Calc (free).
- Lotus 1-2-3 (discontinued).
- Lotus Symphony – Spreadsheets.
- Microsoft Excel.
- OpenOffice -> Calc (free).
- VisiCalc (discontinued).
How do I create a fillable PDF form in Word?
Create a Word document and save it in Word, then open Acrobat. Click the “Tools” menu and click “Prepare Form.” Select the Word file to import. Acrobat will detect potential form fields and add them automatically, but you can use the tools in the right editing pane to adjust them, delete them or add new form fields.
What is the difference between spreadsheet worksheet and sheet?
A spreadsheet is primarily designed to provide a digital form of the paper-based worksheet. Spreadsheets work through spreadsheet application software. The rows and columns within the spreadsheet contain cells that are filled with data to create unique operations.
What is another name for a worksheet?
In this page you can discover 12 synonyms, antonyms, idiomatic expressions, and related words for worksheet, like: worksheets, photocopyable, writing-frame, flashcard, spreadsheet, handout, photocopiable, workbooks, workbook, ohts and tutorial.
Which option is used to save the worksheet created?
You can easily save a file at any time using the keyboard shortcuts. Ctrl + S will save the workbook using the previous name and location if your workbook has already been saved (i.e. it will overwrite the previous version).
What is worksheet PDF?
worksheetspdf.com·@worksheetsPDF· WorksheetsPDF.com is a page where you can download files and educational resources to print PDF or DOC, you will find math, communication, 19,5mil seguidores.
How do you layout a spreadsheet?
How to Create a Simple Budget Spreadsheet in Excel
- Step 1: Create a Workbook.
- Step 2: Plan Your Needed Data.
- Step 3: Create Headings.
- Step 4: Label the Rows.
- Step 5: Add Boundaries.
- Add boundaries to the spreadsheet using the icon in the above graphic.
- Step 7: Format and Write Formulas.
- E.
What is worksheet in a computer?
A worksheet or sheet is a single page in a file created with an electronic spreadsheet program such as Microsoft Excel or Google Sheets. A workbook is the name given to an Excel file and contains one or more worksheets.
What is worksheet formatting?
A cell style is a defined set of formatting characteristics, such as fonts and font sizes, number formats, cell borders, and cell shading. To prevent anyone from making changes to specific cells, you can also use a cell style that locks cells. Excel has several predefined cell styles that you can apply.
What are the types of worksheet?
3 Types of Worksheet are;
- General worksheet,
- Detailed worksheet,
- Audit worksheet.
What is worksheet accounting?
An accounting worksheet is a document used within the accounting department to analyze and model account balances. A worksheet is useful for ensuring that accounting entries are derived correctly. It can also be helpful for tracking the changes to an account from one period to the next.
How do I turn a Word document into a fillable form?
Creating Fillable Forms Using Microsoft Word
- Enable Developer Tab. Open Microsoft Word, then go to the File Tab > Options > Customize Ribbon > check the Developer Tab in the right column > Click OK.
- Insert a Control.
- Edit Filler Text.
- Design Mode button again to exit the mode.
- Customize Content Controls.
Can you make a Word document fillable?
To do this, click on “File” tab > “Options” > “Customize Ribbon“. Then under the “Customize Ribbon”, select the “Developer” checkbox and click “OK”. Step 2: Open a Word document and you will be able to make the Word document fillable.
What is a interactive worksheet?
What are Interactive Worksheets? Interactive worksheets, or “interactivities” as we like to call them, are made with educational apps that take your favorite PDF worksheets and convert them into engaging digital materials delivered online to your students.
It’s possible to share your workbooks with the teachers linked to the same school. For this, go to my workbooks and click “Share workbook” under each workbook. Then choose your linked school and select if you want to allow other linked teachers to modify your workbook (add worksheets, edit options…)
How do I convert a PDF to an interactive worksheet?
6 Steps to an Interactive Worksheet With Google Slides
- Use your cell phone camera to take a picture of the worksheet.
- Save your PDF as an image (.
- Use an online tool, such as this free “drag and drop” JPG converter by Adobe, or this one that’s available as Chrome extension.
How to Make Worksheets in Word? In this article, we will give you a comprehensive and up-to-date guide for making your worksheets in Word.
Interactive content, such as worksheets and workbooks, is what all educators need to grab the attention of their pupils and what bloggers and other infopreneurs need to engage their followers on social media. Creating such worksheets doesn’t appear to be a simple process either. How to make worksheets in Word? In this post, we will provide you with a comprehensive guide to making your own worksheets that are ready to use from Word.
Step 1: Choose a Border
Open a new document -> go to Page Layout
Select Margins to set the border. To remove the border, click Custom Margins in the bottom corner of the menu, and set the value to 0.

Select Size for the poster size. There are standard sizes suitable for each type of text here, but if you want to customize the size, click More Paper Size at the bottom of the menu and choose a measurement.

Step 2: Add Text
Type directly into the poster frame, or insert a Text Box (from Insert) and then type the text. Using a Text box allows you to customize each part of the text, and is easy to navigate, but only beneficial when worksheets have a small amount of text.
After entering the content, you can customize the text as usual: font, font size, effects, text color, etc. To remove the background color of the text, click on the Format tab and then select Shape Fill. → choose the No Fill command. To remove the border around the text input box, select the Format tab → select Shape Outline → select No Outline.
Step 3: Format Your Worksheets
Usually, after completing the input of text, we will need to perform operations to align margins, change formatting, and change the font for the entire text. Or some text will require more than artistic word decoration to create vividness for the content. So how can you change the format of the content in the article?
Format fonts in Word
Step 1: First, you open the text content you want to format the font. Next, highlight the text or text to be formatted, right-click and select Font. Or we can also press Ctrl + D.
Step 2: Next, in the Font window interface, there are many text formatting items for us to choose from.
- Font: users can choose different font styles to apply to their text. However, you need to note, the choice of font format in Word needs to match the Code Table and Typing of Vietnamese percussion, to avoid errors when typing.
- Font style: choose font styles such as bold, italic, underline or just use lowercase. After highlighting the text, you can use the keyboard shortcut Word Ctrl + B to make text bold, Ctrl + I to make text italic, Ctrl + U to create underlined letters, or combine 2 or all 3 groups. Combine this shortcut to make text bold, italic, or bold and underline,…
- Size: choose the size for the entire highlighted paragraph.
- Font color: choose the color for the text.
- Underline style: use lines to underline text.
- Underline color: select the color for the underline line.
The above 6 items are 6 basic customizations when users want to format text. In addition, you can also use some other effects in the Effects section, with 11 different types of effects, including:
- Strikethrough: Strikethrough between letters.
- Double strikethrough: Double strikethrough between letters.
- Superscript: Superscript or use Ctrl + Shift + =.
- Subscript: Subscript or Ctrl + =.
- Shadow: Create shadow text.
- Outline: The stroke has an outline.
- Emboss: Embossed (white) first.
- Engrave: Blurred (white) after.
- Small caps: Small capital letters.
- All caps: Large capital letters.
- Hidden: Hide text in text.
Step 3: We have the Preview section so that we can preview the text format when applied. Finally, click OK to save the formatting changes for that highlighted text.
Step 4: After we have finished entering the text, you can also proceed to change the spacing between the letters, to make a difference that makes the text stand out in the entire content.
Create Artistic Typography for Word
- Step 1: First, we will also highlight the text to be styled. At the Ribbon, click Insert and select WordArt.
- Step 2: As soon as we click on it, you will see a list of many artistic fonts: shading, italic, bold, etc. You can choose a font to apply.
- Step 3: Next will appear the Edit WordArt Text window interface. Here, users can re-select the font, font style, and font size format. Then click OK to apply. Soon, the typeface will appear in the content. You can stretch or shrink the text by clicking on the two-way arrows at the corners and edges of the letter art, and then dragging it in the direction you like.
Favorite Fonts in Words
- Arial
Arial is one of the most commonly used fonts when designing worksheets. This is a sans serif font, popularly used by many design services as a standard font. They are often used for publications with a chic, modern and serious style.
- Helvetica
Like Arial, Helvetica is a sans serif font that is used a lot in worksheets and educational publications today. Many experienced designers often use Helvetica as a fallback font for other typefaces. Its advantage is to help the content of the worksheets be presented clearly, easy to read, and create a user-friendly feeling.
- Calibri
This is the default font type in word processing programs. Therefore, it is also often used in the design of worksheets because of its familiar, easy-to-read, and comfortable properties for the viewer. When designing a worksheet, using strange, confusing fonts can annoy your students. So, to make worksheets friendlier and simpler, why not use a familiar font like Calibri?
- Tahoma
In addition to Arial, Times New Roman, Calibri, etc., Tahoma is also one of the most common fonts used by teachers when designing worksheets. Its lines are quite nice and clear, easy to read, satisfying the user experience well. Font Tahoma can be used multi-function in menus, main and subheadings, article content, etc.
Above are the basic instructions for you to change the font and create text art in Word document content. With these changes, the text content will look more beautiful, unique, and strange when we have new font combinations by changing the text format above.
Step 4: Insert Pictures into Worksheets
- Click on the location where you need to insert the picture into Word.
- Click Insert => Select Picture => Next, select From File and then select the image you want to insert. Then click Insert to perform the image insertion.
- After inserting the image, please move the image to the side of the text. To do this, right-click on the image and then click Format Picture.
- Click the Layout item. In the Wrapping style section, select Square. Next in the Horizontal alignment section, click Left so that the text is on the left or Right for the text to be on the right. That means your image will be on the other side of the text.
- Finally, drag, drop and move the image so that the image is on the left or right side.
To insert text into images in Word, we use the Text Box tool. Select the Insert tab, select the Text Box command, and select Draw Text Box. Then, hold down the left mouse button at the starting position to insert text and drag to select the writing area on the image. Or you can insert text into the image by clicking Insert → Shapes → Text box.
Step 5: Add Worksheets Background (if needed)
Create a backdrop for your poster to grab the attention of your audience. Although there is a custom background color on Word, when printed, the color quality changes, even losing color. Instead, go to Insert -> Shapes and choose Rectangle (for rectangular posters).

Customize the size and choose the background color for the Poster. At this time, the background will overlap the main content and image of the poster. To make the background appear behind the content and images, hover your mouse over an empty part of the background and then right-click, select Send to Back, and then click Send Behind Text.
Are You Ready to Make Worksheets?
How to make worksheets in Word? Here you have the answer. The procedure is not nearly as difficult as it may seem at first glance. You can produce worksheets for your kids, your teaching team, or instructors all across the globe in a matter of minutes and with very little effort. When you first look at some of the items you make after you have formed your own creative process, you will be astounded at what you have made.
Besides, we’ve released an amazing and free worksheet generator for you to make a worksheet in just a minute. There are thousands of available worksheet templates and elements to allow you to customize your own one. Let’s give it a try!
Do you make assignments in Microsoft Word? It’s easy at the beginning, but you can run into some snags. You can print it off and copy it. It takes time, and you have to collect and grade each assignment. If you post the DOCX file to your Google Classroom and ask students to complete it, chaos ensues. Students may change their questions or reformat the document.
If you do your best work in Microsoft Word, don’t worry. TeacherMade converts your Microsoft Word documents to digital worksheets.

How do I use the worksheets and handouts I already have as online worksheets?
It takes just a few minutes to convert your Microsoft DOCX files to interactive worksheets. Take the files you have on your computer and upload them to TeacherMade. We do the heavy lifting. We make it possible to keep your questions permanent while students add their responses to the top of the document.
How do I make Microsoft Doc into a worksheet that my students can’t edit?
We take your Microsoft Doc worksheet and turn it into a background image. From there, students can complete the digital worksheet on top of their Microsoft Word Document. They have no access to the original copy and can’t make a single change.
TeacherMade converts Docx into interactive digital worksheets in minutes.
Here are the few simple steps to convert Docx files into interactive worksheets for your students. Get started today!
Step 1: Upload your file.
This is the screen that you will see when you upload your file. With TeacherMade’s versatile system, you can upload a pdf, jpg, png, gif, and Docx file.
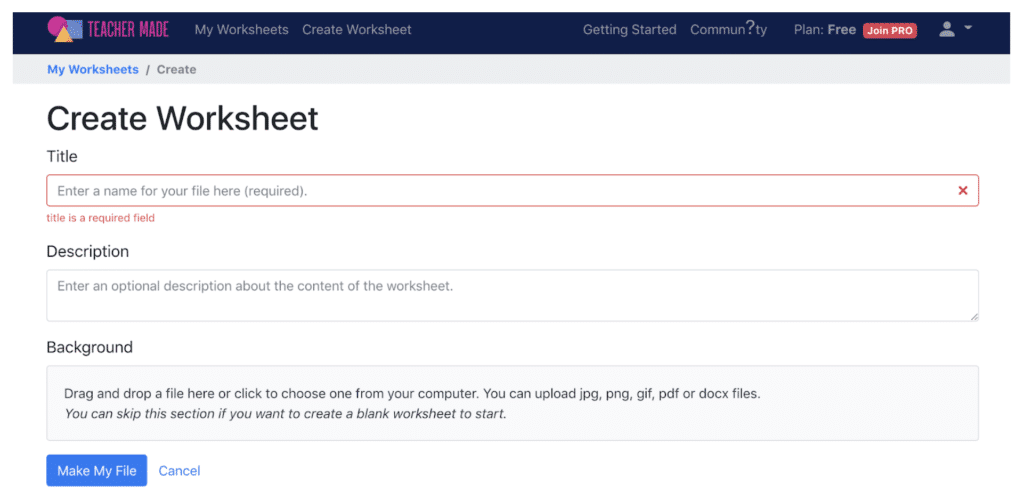
You will need to fill in some information at the beginning as well, and this will keep you organized when you start using TeacherMade all the time and stack up many assignments on our system.
You can choose which pages you include in your digital assignment. So there is no need to edit your original assignment.
Click “Make My File” to continue!
Step 2: Add fields for student responses.
This is the step to make your Docx file into a true digital worksheet. The Microsoft Docx file acts as a background image, and you can place your question fields on top of the image.
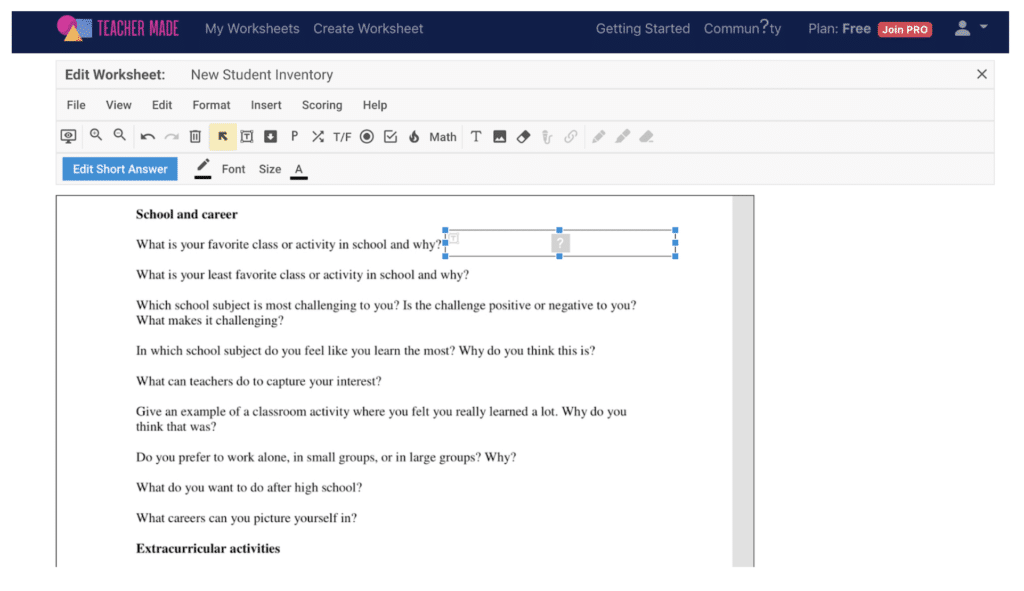
With TeacherMade you have a variety of question types to work with:
-
- Short answer
- Dropdown
- Open answer
- Matching
- True/ false
- Multiple- choice
- Checkboxes
- Hot spots
- Integers
- Fractions
- Mixed numbers
- Algebraic expressions
…and more!
Choose the question types to work best for your assignment and students. You no longer have to adapt your worksheets to fit technology. TeacherMade’s flexible tech makes it possible to assign the exact questions that you intend for your students.
Step 3: Add answers for self-scoring.
With TeacherMade, you can even add answers for auto-scoring. Below. We are adding answers to a short answer.
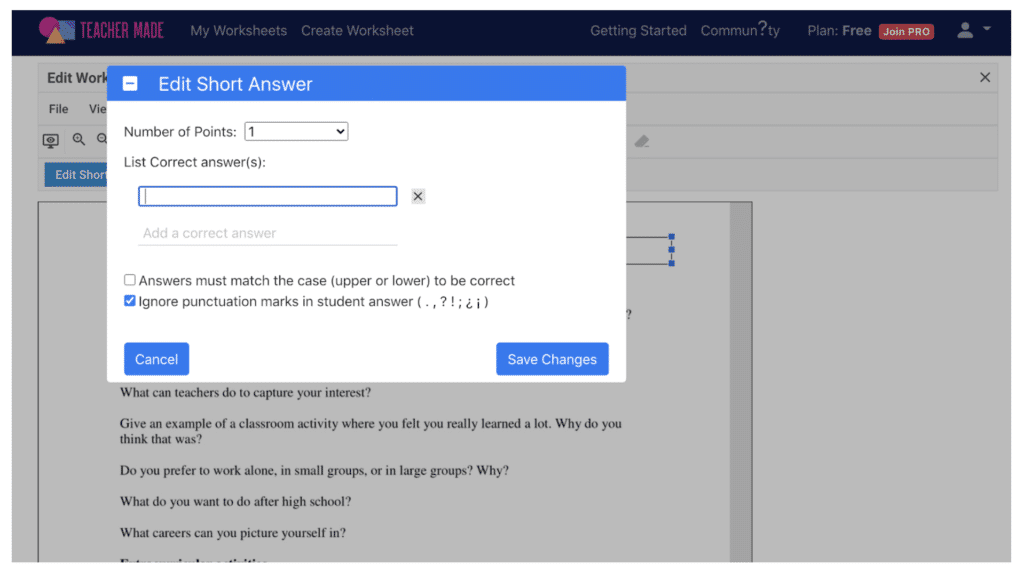
When the popup box appears, you can add answers and point values for each question. You may need some questions to be worth more than others. You also have the option of adding multiple correct answers.
You can set up self-scoring so that it grades the whole assignment, part of the assignment, or none at all. This gives you the flexibility to insert your personalized flexibility where it counts.
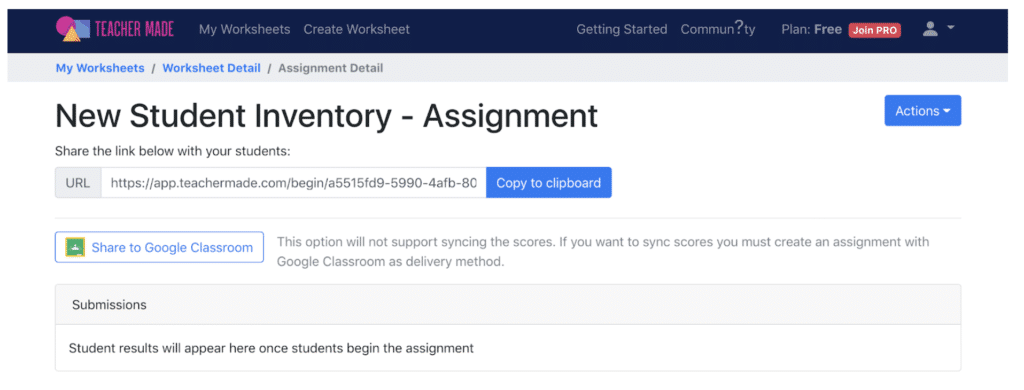
Step 4: Send assignment link through your LMS platform
You have a few options when sharing your worksheets. Our PRO version integrates effortlessly with major LMS platforms like Google Classroom, Schoology, and Canvas.
Sharing assignments with the free TeacherMade version takes an additional step. Simply grab the link to the assignment, and post it into your preferred platform.
Step 5: Examine your instant feedback and results
TeacherMade frees up your time so that you can teach. Instead of grading the Microsoft Word worksheet, you can now just look at the feedback and results. Focus on the parts that need work, and teach the lesson!
Why do you need TeacherMade for your Microsoft Word worksheets?
TeacherMade saves you time at each step of the assignment process.
-
- Your online assignments only take minutes to create. You no longer have to reinvent the wheel to create a digital worksheet. Instead, just look through the arsenal of teaching tools you already have, select a worksheet, and digitize it.
- Stop copying worksheets. It can be so hard to get to the copy room in the day. Once you’re there, it’s a hassle to load paper and toner. Then you have to wrestle with a paper jam. It’s a time suck. Instead, distribute a digital worksheet to your students instantly.
- You never have to deal with lost assignments. Lost assignments steal your time too. It leads to more parent emails, more late work, and more headaches. Students can’t lose digital worksheets.
- Never take a stack of papers home. You don’t need to grade work with TeacherMade. Our auto-scoring feature saves you hours. When you do grade an assignment, your feedback becomes more valuable.
- Grades get into your grade book faster.
Eliminate the headaches of sharing Microsoft Word worksheets with students by using TeacherMade

Microsoft Word contains useful tools for the academic field. In this sense, a worksheet fulfills the mission of organizing investigative information for rapid access. If you are wondering how to easily create spreadsheets in Word step by step ?, This article will be very useful to you
When developing a research work , it is convenient to organize the sources that serve as support for a specific topic. For this reason, spreadsheets are widely used to archive documentary information.
Next, we explain everything you need to know about the Job Ticket and a simple procedure to create this tool from Word. Remember you can use the best keyboard shortcuts in Word in order to work faster and get your file in no time.

What is a work ticket?
A worksheet or an electronic file is a tool for presenting information about the sources of a specific research work. Usually, a spreadsheet contains the name of the author, the title, the number of pages where the information appears, the subject, the date and additional data of the publication (publisher, volume, among others)
Who can create a working date?
In the workplace, work cards are created by a person responsible for processing a large number of documents in a company. The writer should maintain direct and clear contact with staff in other areas in order to access products and information.
However, in the academic field , the worksheet should be prepared by the researcher who is familiar with the sources he has used to support his scientific work.
What is a work form for?
A worksheet is used to compile or summarize the content of sources used in a survey. In addition, it facilitates trade union actions as it enables reporting of relevant activities that occur in any organization.

How to make a working form?
A worksheet requires the researcher to spend some time organizing specific information that will be reflected in this useful tool. Next, we present the actions you need to take to create a job card.
- Define and organize information: first you need to define what information the file will contain. For this reason, it is necessary to inquire about the published editions of a specific source, whether it is a manual, an online document or a magazine.
- Identify the name of the author, the title of his work and additional information: You must enter the name of the author and the title of his work, specifying that there is no error when identifying the source and its creator . In addition, it is necessary to establish the publisher and the number of pages containing the information which served as the source of the research work.
- Set the date: It is very important to specify the date on which the work order is created. This refers to when the search was performed.
How to create a worksheet in Word — step by step
-
- Step 1. Open the Microsoft Word application. You can also use Microsoft Office online if you don’t have this office suite on your PC. Next, look for the «Layout» option. Click on «Size» and choose «Letter» ou «Letter».
- Step 2. Once you have chosen the size, the window will be reduced to the size of a tile. Then you need to go to the toolbar and change the orientation to “Landscape”.
- Step 3. Write the contents of the card in which you can include a scientific fact, the interpretation of a work or the meaning of a word to create a vocabulary. In this step you can customize text style if you wish it.
- Step 4. Edit the job ticket by changing the font, size, and highlighting text to your preference. In this sense, you must format text in Word .
- Step 5. Save the work order on your hard drive by giving it a name that identifies this document.

Interactive content, such as worksheets and workbooks, is what all educators need to draw the attention of their students and what bloggers and other infopreneurs need to engage their followers on social media. Creating such documents doesn’t seem to be an easy task though. In this article, you will learn why it’s a good idea to create a digital workbook for educational or any other purposes and even how to create a fillable template online using ONLYOFFICE Docs.

What is a workbook/worksheet?
Although the words “workbook” and “worksheet” have a lot in common and are usually used for similar purposes, they aren’t synonyms. As a rule, a worksheet is a page with blank gaps where readers need to enter information to complete a certain task. It can be a list of questions or a questionnaire with interactive fields that you need to fill out to achieve a goal.
When it comes to workbooks, it’s necessary to point out that this is a more complex notion. Usually, this is a document with several pages that contain interactive elements to help readers find out more about a specific topic and learn new skills. Roughly said, it’s more like the digital version of a paper book that is designed to enhance the learning experience.
In some cases, a workbook can even consist of several worksheets, which gives readers an opportunity to interact with different types of digital content within a single file.
Why create a workbook/worksheet?
There are different reasons why you might want to create your own workbook or worksheet. Generally, educators and infopreneurs make such interactive content to visualize the core message they want to deliver to their readers or followers. Another common reason is to make other people interact with the content by allowing them to fill out certain fields, add images or enter information.
For example, if you need to identify and list all the resources to deliver a project (e.g, materials and equipment), you definitely must know how to create a budget worksheet. After filling out all the fields, you will know how many resources your project requires and how expensive it is. Other popular examples for adults and kids include:
- character worksheets;
- superhero worksheets;
- new habits worksheets;
- questionnaires;
- calendars;
- schedules, etc.
Of course, you can find plenty of online template libraries with ready-to-use worksheets and workbooks. However, they are usually paid and look quite standard. If you want unique content, It might be a good idea to create your own worksheet and adapt it according to what you need.
How to create workbooks and worksheets
If you want to create a customized document with fillable fields, there are several ways. You can either use a text processor like Microsoft Office or SoftMaker or professional software like Canva and Adobe InDesign. Let’s find out what advantages and disadvantages each method has.
Create in Word documents
Using a word processor, you can create a Word document with various elements. For example, you can add tables, diagrams, shapes, images and other objects to create a unique layout of your workbook or worksheet. Then you can save your piece of content to other formats. For example, PDF.
The most evident advantage of this method is that it’s simple, and you don’t need any special knowledge or expertise because even the most average users know the basics of how to create a worksheet using a word processor. Although today there are plenty of office packages, they usually use the same approach, and migrating from one app to another is not a challenge.
At the same time, not all office apps can effectively deal with visual objects, so it might be a problem to find the appropriate software if you want to create complex workbooks and worksheets.
Create with Canva
Content creators know that creating a digital workbook is possible in Canva. This is an online service that allows you to create materials right in your browser, without having to install anything. You can create a free account within seconds.
A big advantage of using Canva is that you can start from scratch or use any of the available templates. The good news is that there is a big number of templates to any taste, so you will definitely find what you need.
Canva allows you to add content and customize as you wish by changing fonts, colors and images. You can insert multiple elements to make your document unique and create sections with different sized boxes within your workbook or worksheet and make them digitally fillable later.
The drag-and-drop approach used in Canva is a blessing for some people and a curse for others. Moreover, given the huge amount of different templates, sometimes it’s very difficult to choose one for your purpose.
Create with Adobe InDesign
A great example of professional software that can be used to create visually appealing workbooks and worksheets is Adobe InDesign. This is a layout and page design program for print and digital media. Using this tool, you can create posters, flyers, brochures, magazines, presentations, books, ebooks, etc.
Adobe InDesign is a perfect choice if you want to create complex interactive content. It offers a vast set of tools that you can use to make professional documents. If you wonder how to create a workbook for a workshop or how to create a workbook for training, Adobe InDesign is able to perform any task with ease.
Despite the rich functionality, this software has some disadvantages. Many users might find it difficult to master Adobe Design since it’s designed for professional purposes. Also, it’s a paid solution, and the cheapest subscription costs 20.99 US dollars a month. This is not an affordable price for many of us.
Why use online form filling?
To make your content more engaging, you can create fillable forms. In other words, you can add fillable fields to your documents. This feature allows you to create interactive documents where other users can enter the required information, for example, email addresses, mobile phone numbers, dates or simple text.
There are different types of fillable fields that can be used in workbooks and worksheets. If you want to get some information, you can insert text fields where it’s possible to type something. If you create a questionnaire, checkboxes give the best fit because they allow users to choose one or several options from a predefined set. Image fields make it possible to insert pictures or photos where necessary. Drop-down lists display all options that can be selected.
Fillable forms help you reduce the amount of time you spend on creating a workbook and optimize the process of electronic document management. This feature is available in ONLYOFFICE Docs starting from version 7.0.
Read this article to find out more about fillable forms in ONLYOFFICE or watch this video to learn how to create them online:
Let’s see how to create a digital workbook using ONLYOFFICE fillable forms.
How to create a workbook with fillable fields with ONLYOFFICE
For illustrative purposes, we will create a marketing workbook using ONLYOFFICE Docs. You will see how to add text fields, insert images, create checklists and save your document into a fillable PDF file. All you need to do is to follow a series of simple steps.
Step 1. Create a template
To get started, you need to create a form template. You can start from scratch and create a blank document. Alternatively, are also allowed to use an existing DOCX file as a template. Choose the preferred option and start the editing process.
Step 2. Edit your document
Create the desired layout of your workbook. Open the Layout tab, choose the required page orientation, change the page size and adjust the size of margins.
Add any objects you need, including tables, shapes, images, charts, text boxes, etc., using the corresponding tools on the Insert tab. Insert footers or headers if necessary.
When your workbook looks like it’s supposed to, it’s time to proceed with the next step.
Step 3. Insert fillable fields
When the layout of your workbook is ready, you can insert fillable fields where necessary. Currently, ONLYOFFICE supports:
- Text fields to enter text information;
- Radio buttons to choose an option from a set of mutually exclusive choices;
- Images to insert pictures or photos;
- Checkboxes to select one or more possible options;
- Drop-down lists to choose an item from a predefined list;
- Combo boxes to input information or select the desired option.
All fields can be added using the corresponding buttons on the Forms tab. For example, if you add a text field, you will see its properties on the right sidebar. You are allowed to set a limit of characters for the field, enable multi-line input, make the field size fixed or simply divide the field into several cells for each character.
Additionally, you can specify a placeholder and a tip for the text field. They will inform readers about what they have to enter in the field. For example, their mobile number or email address.
In the same way, you can add other fields and adjust their settings — drop-down lists, checkboxes, combo boxes, images and radio buttons.
Step 4. Share your workbook for collaborative work (optional)
What makes ONLYOFFICE Docs a powerful online collaboration tool is that it allows you to share your workbook with other users using different access permissions:
- Full access to edit the document without limitations;
- Review to leave suggestions that can be accepted or rejected;
- Comment to leave comments without editing the file;
- Read only to open the file for viewing;
- Deny access to prevent the user from being able to open and edit the document.
To share your workbook, open the Collaboration tab and select Sharing. You will see a new window with two options — external sharing via a link or internal sharing with the users of your ONLYOFFICE portal. Choose the desired option and share your document.
During the collaboration process, you can enjoy a vast array of tools — Fast and Strict co-editing modes, Version history and control, Track changes, comments, real-time communication and more.
Step 5. Make your workbook editable
When your form template is ready, it’s time to save it to PDF. Why this format? The reason is simple: PDF allows you to preserve the original layout of your document and prevents its contents from being edited or modified by someone else. Another advantage is that all the fields remain interactive. That means that other people can open the file and enter what they are supposed to.
For this purpose, go to the File tab. Select PDF and save your workbook to your PC or laptop.
Step 6. Fill out your workbook online
You don’t have to convert your form template into a PDF file. There is also an option to save it as OFORM. This is ONLYOFFICE’s native format for online forms that is used to store and share fillable documents. OFORMs can be opened and filled out in real-time in the web browser.
When you open an OFORM file, you can navigate among the fields, enter the required information or clear all the fields using the corresponding option. When all the fields are filled out, you can save the completed form as DOCX or PDF.
That’s it. You have just created a fillable PDF workbook using ONLYOFFICE Docs. This method is very simple because all the steps described above are taken with a text editor that not only allows you to create and edit Word documents but also add fillable fields and convert your files into interactive workbooks with a couple of clicks. Download ONLYOFFICE now and try to create a workbook online:
ON-PREMISES IN THE CLOUD
Conclusion
Now you know how to create your own worksheets. As you can see, interactive documents with fillable fields can be created in different ways. There is professional-grade software like Adobe InDesign that easily deals with this challenge but requires certain skills and experience. There is less complicated software like Canva that is also perfect for creating digital content.
However, a simple text processor like ONLYOFFICE Docs is enough to create workbooks and worksheets out of Word documents in most cases. Such tools offer a familiar editing experience and have an intuitive interface. What’s more, they are universal because they also allow you to create text documents, worksheets and presentations. Not only fillable forms.