
Нельзя отрицать, что WordArt играет важную роль в привлечении внимания людей с первого взгляда. В маркетинге или презентации WordArt может быть отличным помощником в донесении сообщения до аудитории инновационным способом.
Сложно ли создать WordArt? WordArt — это часть искусства; для создания Word Art может потребоваться определение эстетики и тенденций. Но это старая история; в настоящее время, с развитием интеллектуального анализа данных и бесплатными генераторами WordArt, любой может создать уникальный WordArt, который всем нравится.
Каковы лучшие бесплатные генераторы Word Art для вас? Эта статья позволяет вам узнать новые идеи о Word Art в благородном и адаптивном облаке слов. Мы предоставим вам целостное представление о плюсах и минусах семи лучших бесплатных генераторов WordArt и определим, какое приложение поможет вам добиться максимального качества вашей работы.
Проверьте больше идей искусства слова, доступных в Интернете!
Дополнительные советы с AhaSlides
- Случайные английские слова
- Процесс генерации идей
- АгаСлайды Живой генератор облака слов
Содержание
- Генератор облаков слов AhaSlides
- Inkpx WordArt — онлайн-генератор модной трехмерной текстовой графики
- Monkeylearn Word Cloud Generator — генератор словесных рисунков на базе искусственного интеллекта
- WordArt.com – Лучшая футболка для печати Word Art
- Облака слов. com — расширенный редактор Word Art
- TagCrowd – Визуализация частоты слов
- Сделать WordArt.com — базовое искусство Word
- Выводы
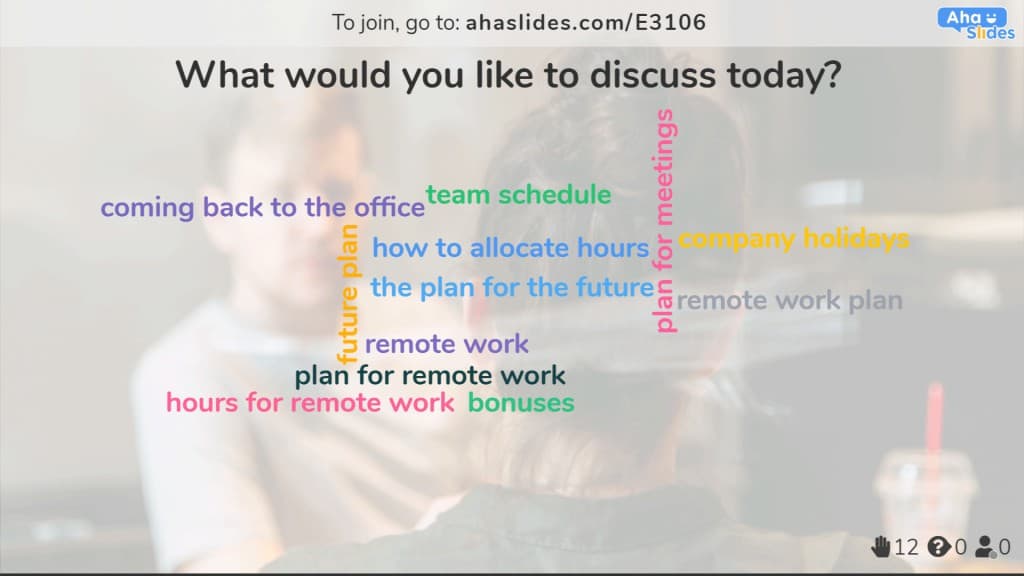
№1. Генератор облака слов AhaSlides — бесплатные генераторы Word Art
Плюсы: Вы можете настроить свой Word Art с помощью простых шагов с помощью AhaSlides Word Cloud Generator. Его встроенная функция Word Cloud может быть творчески настроена с поддержкой интерактивных и интеллектуальных пользовательских интерфейсов и возможностей. В отличие от других бесплатных генераторов Word Art, AhaSlides Генератор облака слов может воспроизводить длинные фразы и располагать их случайным образом, как по вертикали, так и по горизонтали в привлекательной цветовой гамме радуги.
Его лучшим преимуществом является визуализация живых опросов в презентациях, что позволяет участникам взаимодействовать с размещенными викторинами, например, «Что такое случайные английские слова?». Аудитория может быстро реагировать и одновременно получать доступ к живому отображению Word Cloud со всеми ответами в режиме реального времени.
Минусы: его основная функция — создавать привлекательные объекты Word Art во время интерактивного обучения, поэтому не так много фигур можно настроить.
№ 2. Inkpx WordArt — бесплатные генераторы Word Art
Плюсы: Inkpx WordArt предлагает различную превосходную текстовую графику, которая может немедленно преобразовать ваш вводимый текст в визуальное искусство слова, и вы можете скачать его бесплатно в формате PNG. Если вы хотите создать тематические Word Art, такие как поздравительные открытки и приглашения на день рождения, в течение ограниченного времени, вы можете найти много доступных работ в его библиотеке. Его впечатляющие категории, основанные на стилях, довольно функциональны и удобны для вас, например, натуральные, животные, наложение, фрукты и многое другое, так что вы можете сэкономить время и усилия.
Минусы: функция дизайна карт предлагает 41 шрифт, но когда дело доходит до рисунка из одного слова, шрифты ограничены 7 стилями, поэтому вам довольно сложно создать более сложный шрифт.
№3. Генератор облака слов Monkeylearn — Бесплатный генератор Word Art
Плюсы: Вы можете настроить Word Art в Word Cloud с помощью Генератор облака слов Monkeylearn гибко изменяя тематические фоны с белого и светлого на темный яркий. Кроме того, словесные шрифты ограничены 7 современными и чистыми стилями, поэтому вы не будете злоупотреблять цветами и шрифтами, что может привести к путанице для зрителей. Кроме того, он предоставляет новые возможности для обнаружения сентиментальных текстов и форматирования неструктурированного текста, такого как статьи, социальные сети и электронные письма… более привлекательные.
Минусы: Несмотря на то, что они могут распознавать пары слов или связанные фразы, если в разных фразах со слишком большим количеством слов есть повторяющиеся слова, повторяющееся слово может исчезнуть или быть отделенным. Вы также не можете изменить стиль шрифта каждого слова. Результат облака слов также отделен от экрана поля ввода текста, поэтому вам нужно снова открыть окно, и облако слов отображается снова и снова.
№ 4. WordArt.com — бесплатный генератор изображений Word Art
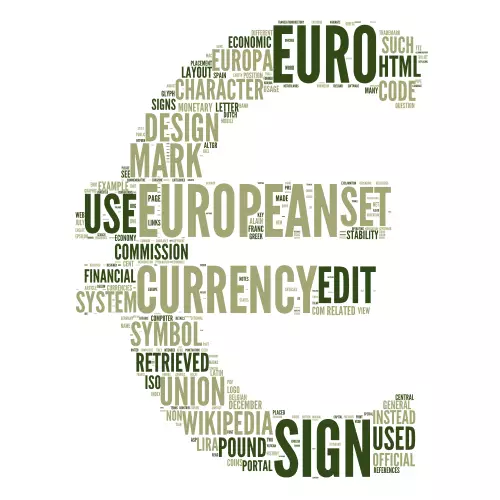
Плюсы: Цель WordArt.com заключается в том, чтобы помочь клиентам достичь наилучших результатов с легкостью, весельем и индивидуальной настройкой одновременно. Это бесплатный генератор Word Art, который подходит для новичков, которые ищут профессиональный Word Art за пару шагов. Самая выгодная функция — формировать облако слов так, как вам нравится. Существуют различные формы, которые вы можете редактировать и адаптировать в кратчайшие сроки.
Минусы: Вы можете загрузить образцы фотографий HQ перед покупкой. Их высокое качество используется для преобразования визуально рассчитанных изображений в реальные материалы, такие как наряды, чашки для кружек и многое другое, за которое нужно платить.
№ 5. Облака слов. com — Бесплатные генераторы Word Art
Плюсы: Очень похоже на функции WordArt.com, wordclouds.com также фокусируется на превращении скучных отдельных текстов и фраз в изобразительное искусство. Вы можете перейти в галерею, чтобы найти образцы и настроить их прямо на основной странице. Это так интересно, что есть сотни форм значков, букв и даже загруженных форм, чтобы вы могли создавать Word Cloud все, что вам нравится.
Минусы: если вы хотите найти интерактивную платформу Word Cloud для обучения, возможно, это не лучший вариант.
№ 6. TagCrowd — бесплатные генераторы Word Art
Плюсы: чтобы визуализировать частотность слов в любом текстовом источнике, таком как обычный текст, веб-URL или просмотр, вы можете использовать ТегТолпа. Основная функция сосредоточена на преобразовании текстов в элегантный и информативный формат, включая облако слов, текстовое облако или облако тегов. Вы можете проверить частоту появления текста и при необходимости исключить его. Кроме того, приложение поддерживает более 10 языков и автоматически группирует слова в кластеры.
Минусы: минимализм и эффективность являются целями TagCrowd, поэтому вы можете обнаружить, что Word Art довольно монохроматичен или скучен без множества форм, фона, шрифтов и стилей.
№ 7. Make WordArt.com — бесплатные генераторы Word Art
Плюсы: Еще один бесплатный генератор Word Art, который вы можете попробовать, это Сделать WordArt.com если вы знакомы со стилями Microsoft Word Art. Вы можете создавать простые объекты Word Art с редактируемыми шрифтами, цветами, позициями, размерами и фоном, чтобы печатать их на реальных вещах, таких как футболки. Он прост в использовании и не требует высокотехнологичных навыков.
Минусы: По сравнению с другими генераторами Free Word Art, перечисленными выше, он немного классический и простой и может быть не лучшим выбором для тех, кто любит модный стиль.
Выводы
Вы, наконец, определились со своими любимыми бесплатными генераторами словесных рисунков? Помните, что у каждого свои взгляды на Word Art и методы обучения. В зависимости от ваших мотивов и ресурсов вы можете выбрать лучшие бесплатные генераторы Word Art, которые помогут вам раскрыть свой потенциал и повысить производительность.
Теперь, когда вы четко определили свое восприятие различных генераторов Word Art, вы можете начать создавать свой собственный Word Art. Просто выполните несколько простых кликов, и ваш шедевр ждет вас, чтобы показать. Если вы хотите сочетать совместное изучение словарного запаса с Word Art, Генератор облаков слов AhaSlides является перспективной и выгодной платформой.
Давайте зарядимся энергией и расширим кругозор прямо сейчас с помощью удобного АгаСлайды особенности.
![]()
Download Article
![]()
Download Article
This wikiHow teaches you how to create a complex picture using text. The easiest way to create text pictures—also known as ASCII art—is by uploading an existing photo to a generator, but you can also create text pictures manually by importing an image into Microsoft Word. Keep in mind that this process is more advanced than simply creating keyboard art in a text editor.
-

1
Open the ASCII Art Generator page. Go to https://www.ascii-art-generator.org/ in your computer’s web browser. This website will allow you to turn any image on your computer into a text picture using special formatting.
-
2
Select an image option. Check the box to the left of one of the following options in the «Convert» section of the page:
- Image to Monochrome Ascii Art — Creates a black-and-white ASCII picture.
- Image to Color Ascii Art — Creates a colored ASCII picture.
Advertisement
-
3
Click Choose file. You’ll find this grey button near the top of the page. Doing so opens a File Explorer (Windows) or Finder (Mac) window.
- If you want to convert an online image into ASCII art instead, enter the address for the image in the «Or enter a URL» text box, then skip the next two steps.
-
4
Select a picture. Go to the location of the picture you want to turn into text, then click the picture.
-
5
Click Open. It’s in the bottom-right corner of the window. The picture will open in the ASCII editor’s page.
-
6
Select an output format. If you’re creating an «Image to Color» file, you’ll need to specify your preferred file format by clicking the «Select output format» drop-down box and clicking one of the following options:
- UTF8 with CR — A file type with specifies line breaks and can be used with Windows and Mac text editors.
- UTF8 with CLRF (MS Windows) — A file type which specifies line breaks in text editors. Used for Windows computers.
- HTML with DIV and CSS or HTML with tables — Variants of an HTML file type which can be opened in your browser.
- Scalable Vector Graphics — An SVG file which can be opened in Adobe products and GIMP, as well as in your browser.
- Targa Image — A file type which can be opened in programs such as Photoshop, GIMP, and Paint.NET.
-
7
Click Start. It’s at the bottom of the page. Doing so will prompt ASCII Art Generator to begin creating an text version of your picture.
-
8
Wait for the image to render. Once you see your image appear in text form in the middle of the page, you can proceed.
-
9
Download your image file. Click the linked file name to the right of the «Download result» heading near the top of the page.


Advertisement
-
1
Open Microsoft Word. A rich-text editor such as Word is optimal for creating text pictures.
- If you’re using a Mac, you can also use Pages for this step if you don’t have Microsoft Word.
- If you want to use a simple text editor like Notepad or TextEdit, you’ll have better luck creating simple keyboard art instead.
-
2
Select your font. You will want to pick a fixed-width font, such as Courier. Fixed width fonts will make it easier to design your pictures since each letter or symbol will be the same size as the rest.[1]
-
3
Decide on a picture. If you would like to reproduce an image file, you can copy the image to the file and open a text box to type letters over the shape of the image. You can also try to make an image from scratch.
- When you are first getting started, it is easiest to try some simpler pictures. Once you learn more about how to shade and shape your pictures you can move on to more complex images.
-
4
Add the image to the text editor. In Word, click the Insert tab, then click Pictures, select your picture, and click Insert or Choose, then click the picture, click Wrap Text, and click Behind Text in the drop-down menu.
- If you’re using Pages on a Mac, just click and drag a photo into the Pages window.[2]
- If you’re using Pages on a Mac, just click and drag a photo into the Pages window.[2]
-
5
Resize your image. Click on the picture, then place your cursor on one of the corners and click and drag. The more complicated the picture is, the larger you’ll want it to be.
-
6
Insert a text box. Click your photo, click Insert, click Text Box, and click Simple Text Box to insert your text box on top of the photo, then right-click (or Control-click) the text box (not the text itself), click Format Shape…, click the Fill heading if it isn’t expanded, and check the «No fill» box.
- If you’re using Pages, click T, then drag the text box to hover over your image.
-
7
Resize your text box. Click and drag the corners of your text box until the text box is covering the photo. At this point, you’re ready to begin adding text to your picture.
-
8
Type your text. With your text box arranged over the top of the area to which you want to add text, begin filling the spaces in which you want to use text.
- There are many way to style your image using letters and symbols in various ways. You might choose to make the text cover the entire background and change the colors to form your picture, or you might simply type letters over the shape of the image itself. The possibilities are endless.
- Decide what you want to say. You may choose to make your text spell something relevant to the image you are creating. For example, if you are making a picture of the Eiffel Tower, you might decide to use the letters P-A-R-I-S or F-R-A-N-C-E to create the shape.
-
9
Leave white space blank. If your image has «white space» (e.g., space which is unoccupied by the photo’s subject itself), use spaces instead of filling it in with letters.
-
10
Design your art in various shades using solid art techniques. Some letters like M and W can make an area look darker when used repeatedly. Other characters like «.» take up relatively little space.
- To form solid images, shape your design by using a combination of characters to create a silhouette.
- Use variations of «heavy» and «light» letters to create your shapes and refine the curves.
- Rounded letters (like «e» and «u») or symbols and punctuation can help shape curved areas of the image.
-
11
Shape your image using line art techniques. Line art is created by spacing letters and characters on the screen to draw just an outline of your image. The end result will be similar to solid art, but the spaces within the outline are typically left blank or other characters are added to create additional detail or characteristics.[3]
- For example, you can use rounded shapes or zeroes to create eyes for your character.
-
12
Remove the picture when you’re finished. Since the picture only acts as a stencil for your text, you can remove it once you’ve entered the text you need.


Advertisement
Add New Question
-
Question
How long does it take?

It kind of depends on how long you want to spend on drawing something. If you want it to be a masterpiece, it is very likely that you will have to spend longer than you will have to if you just want to doodle. It also depends ion whether you want to color it as well. Coloring takes time, and you need to choose the right colors. Sometimes, there is even blending involved.
Ask a Question
200 characters left
Include your email address to get a message when this question is answered.
Submit
Advertisement
-
Make sure you save your work as a text document file in case you want to edit or print it. Saving the picture as an image file is useful for many things, but editing is only possible in a text document and printing tends to be better.
-
Try using a picture that doesn’t have a whole lot of detail and working your way up if necessary.
Thanks for submitting a tip for review!
Advertisement
-
Your picture most likely won’t look very promising if you’re standing right next to it. Try standing back a bit for the best results.
-
Simple text editors such as Notepad and TextEdit have trouble displaying the large text versions of complex ASCII art.
Advertisement
About This Article
Thanks to all authors for creating a page that has been read 1,029,275 times.
Did this article help you?
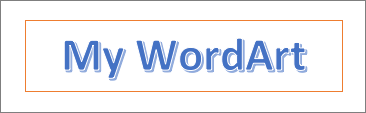
WordArt is a quick way to make text stand out with special effects. You begin by picking a WordArt style from the WordArt gallery on the Insert tab, and then customize the text as you wish.


Try it!
-
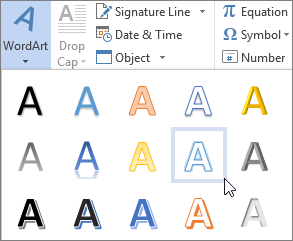
Click Insert > WordArt, and pick the WordArt style you want.
In the WordArt gallery, the letter A represents the different designs that are applied to all text you type.
Note: The WordArt icon is located in the Text group, and it may appear different depending on the program you’re using and the size of your screen. Look for one of these icons:
-
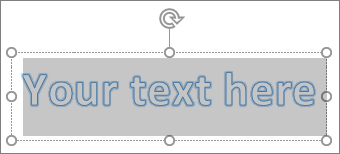
The placeholder text «Your text here» appears, with the text highlighted.
Enter your own text to replace the placeholder text.


Tips:
-
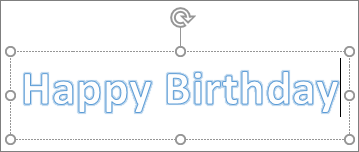
You can enter entire sentences, and even paragraphs, as WordArt. (You may have to change the font size for longer text.) And in Word, you can also convert existing text to WordArt in Word.
-
You can include symbols as WordArt text. Click the location for the symbol, and on the Insert tab, click Symbol, and pick the symbol you want.
Do more things with WordArt
Select a heading below to open it and see the detailed instructions.
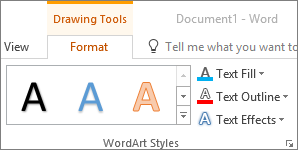
You might have tried using shape styles to change the shape of WordArt and then were puzzled that the text didn’t change. Use the text options in the WordArt Styles group instead. Shape styles and effects apply to the box and background surrounding your WordArt, not to the WordArt text. So, to add effects to your WordArt, such as shadows, rotation, curves, and fill and outline colors, you use the options in the WordArt Styles group, including Text Fill, Text Outline, and Text Effects.
Note: Depending on your screen size, you might only see the icons for WordArt Styles.

-
Select the WordArt text or letters to change.
The Drawing Tools Format tab appears.
-
On the Drawing Tools Format tab, click Text Fill or Text Outline, and pick the color you want.
-
Click outside of your text box to see the effect.
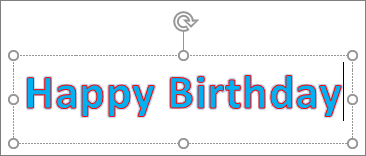
In this example, a light blue text fill and a red text outline were applied.

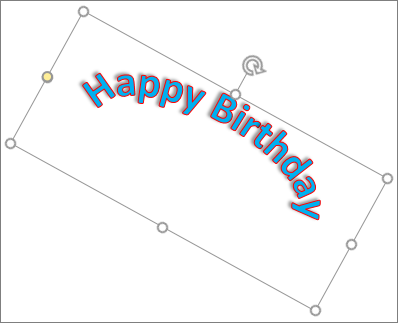
You can curve text around a circular object.
90 seconds
-
Select the WordArt text or letters to change.
The Drawing Tools Format tab appears.
-
To create a curved effect, on the Drawing Tools Format tab, click Text Effects >Transform and pick the one you want.
Important: The Text Effects
menu is not the same as the Shape Effects menu. If you don’t see Transform at the bottom of the menu, make sure you’ve clicked the Text Effects menu.In this example, the first curved transform effect is selected.
-
Click outside of your text box to see the effect.
Use the Text Effects menu to create other effects, such as shadow, reflection, glow, bevels, and 3-D rotation. This example shows WordArt with a curved transform effect and a shadow applied.
 menu is not the same as the Shape Effects
  menu. If you don’t see Transform at the bottom of the menu, make sure you’ve clicked the Text Effects menu.

-
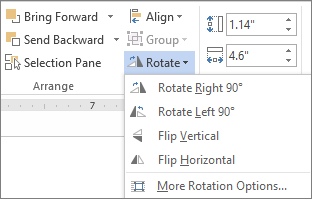
To rotate WordArt text to any angle, select it, and then drag the circular rotation handle at the top of the box.
-
To flip WordArt or rotate it 90 degrees, click the Drawing Tools Format tab, click Rotate in the Arrange group, and then select an option.
To change the font size or style of your WordArt text:
-
Select the WordArt text or letters to change.
-
On the Home tab, select options in the Font group, such as font style, font size, or underline.
-
In your Word document, select the text to convert to WordArt.
-
On the Insert tab, click WordArt, and then pick the WordArt you want.
Double-click the WordArt that you want to remove, and then press Delete.
Insert WordArt
-
Click where you want to insert decorative text in a document.
-
On the Insert tab, in the Text group, click WordArt.
-
Click any WordArt style, and start to type.
Do more things with WordArt
Select a heading below to open it and see the detailed instructions.
-
Click anywhere in the WordArt text that you want to change.
-
Under Drawing Tools, on the Format tab, click any option.
For example, you can change the direction of the WordArt text by clicking Text Direction in the Text group and choosing a new direction for the text.
Double-click the WordArt that you want to remove, and then press Delete.
Add WordArt
Excel
-
On the Insert tab, in the Text group, click WordArt, and then click the WordArt style that you want.
-
Enter your text.
-
You can add a fill or effect to a shape or text box as well as the text in the WordArt.
-
If you have a chart in your 2007 Office release document, you can replace the chart title with WordArt to give the title additional emphasis.
-
Outlook
-
On the Insert tab, in the Text group, click WordArt, and then click the WordArt style that you want.
-
Type your text in the Text box.
You can add a fill or effect to a shape or text box as well as the text in the WordArt.
PowerPoint
-
On the Insert tab, in the Text group, click WordArt, and then click the WordArt style that you want.
-
Enter your text.
-
You can add a fill or effect to a shape or text box as well as the text in the WordArt.
-
If you have a chart in your 2007 Office release document, you can replace the chart title with WordArt to give the title additional emphasis.
-
Publisher
-
On the Objectstoolbar, click Insert WordArt
. -
In the WordArt Gallery, click the WordArt that you want, and then click OK.
-
Type your text in the Text box.
If you want to change the text in the WordArt, double-click the WordArt that you want to change, and then type the new text in the Text box.
 .
.Word
-
On the Insert tab, in the Text group, click WordArt, and then click the WordArt style that you want.
-
Type your text in the Text box.
You can add a fill or effect to a shape or text boxas well as the text in the WordArt.
Do more things with WordArt
Select a heading below to open it and see the detailed instructions.
Excel
Do one or more of the following:
-
To change the text, select it, and then make the changes that you want.
-
To change the font, see Change the font or font size in Excel or Change the color of text in a worksheet.
-
To add an effect to WordArt, see Add or delete a fill, outline, or effect for text or WordArt.
-
To rotate the WordArt, see Rotate or flip a picture, shape, text box, or WordArt in Excel 2007.
-
To resize the WordArt, see Change the size of a picture, shape, text box, or WordArt.
-
To align the WordArt, see Align or arrange a picture, shape, text box, or WordArt.
-
To move the WordArt, see Move a picture, shape, text box, or WordArt.
For more information about selecting WordArt, see Select a shape or other object.
Outlook
Do one or more of the following:
-
To change the text, select it, and then make the changes that you want.
-
To change the font, see Change the size or formatting of text.
-
To add an effect to WordArt, see Add or delete a fill, outline, or effect for text or WordArt.
-
To rotate the WordArt, see Rotate or flip a picture, shape, text box, or WordArt in Outlook 2007.
-
To resize the WordArt, see Change the size of a picture, shape, text box, or WordArt.
-
To align the WordArt, see Align or arrange a picture, shape, text box, or WordArt.
-
To move the WordArt, see Move a picture, shape, text box, or WordArt.
For more information about selecting WordArt, see Select a shape or other object.
PowerPoint
Do one or more of the following:
-
To change the text, select it, and then make the changes that you want.
-
To add an effect to WordArt, see Add or delete a fill, outline, or effect for text or WordArt.
-
To rotate the WordArt, see Rotate or flip a picture, shape, text box, or WordArt in PowerPoint 2007.
-
To resize the WordArt, see Change the size of a picture, shape, text box, or WordArt.
-
To align the WordArt, see Align or arrange a picture, shape, text box, or WordArt.
-
To move the WordArt, see Move a picture, shape, text box, or WordArt.
For more information about selecting WordArt, see Select a shape or other object.
Publisher
Do one or more of the following:
-
To change the text, select it, and then make the changes that you want.
-
To change the font, see Change the font size or Change the color of text.
-
To add an effect to WordArt, see Add or delete a fill, outline, or effect for text or WordArt.
-
To resize the WordArt, see Change the size of a picture, shape, text box, or WordArt.
-
To align the WordArt, see Align or arrange a picture, shape, text box, or WordArt.
-
To move the WordArt, see Move a picture, shape, text box, or WordArt.
For more information about selecting WordArt, see Select a shape or other object.
Word
Do one or more of the following:
-
To change the text, select it, and then make the changes that you want.
-
To change the font, see Change the font size.
-
To add an effect to WordArt, see Add or delete a fill, outline, or effect for text or WordArt.
-
To rotate the WordArt, see Rotate or flip a picture, shape, or WordArt.
-
To resize the WordArt, see Change the size of a picture, shape, text box, or WordArt.
-
To align the WordArt, see Align or arrange a picture, shape, text box, or WordArt.
-
To move the WordArt, see Move a picture, shape, text box, or WordArt.
For more information about selecting WordArt, see Select a shape or other object.
Excel
When you remove the WordArt style from your text, the text remains and changes to plain text.
-
Select the WordArt text that you want to remove the WordArt style from.
-
Under Drawing Tools, on the Format tab, in the WordArt Styles group, click the More button
, and then click Clear WordArt.To remove the WordArt style from part of your text, select the text that you want to remove the WordArt style from, and then follow the steps above.
 , and then click Clear WordArt.
PowerPoint
When you remove the WordArt style from your text, the text remains and changes to plain text.
-
Select the WordArt text that you want to remove the WordArt style from.
-
Under Drawing Tools, on the Format tab, in the WordArt Styles group, click the More button
, and then click Clear WordArt.To remove the WordArt style from part of your text, select the text that you want to remove the WordArt style from, and then follow the steps above.
Do the following for all programs listed in the Applies To at the top of the article.
-
Double-click the WordArt that you want to remove to select it, and then press Delete.
-
In Office for Mac 2016 or later, select the Insert tab on the Ribbon.
or
In Office for Mac 2011, select Insert on the toolbar.
-
Select WordArt, and pick the WordArt style you want.
In the WordArt gallery, the letter A represents the different designs that are applied to all text you type.
-
Enter your text.

Tip: You can also include symbols as WordArt text. To do so, click the location in your document for the symbol, and on the Insert tab, click Advanced Symbol, and pick the symbol you want.
Do more things with WordArt
Select a heading below to open it and see the detailed instructions.
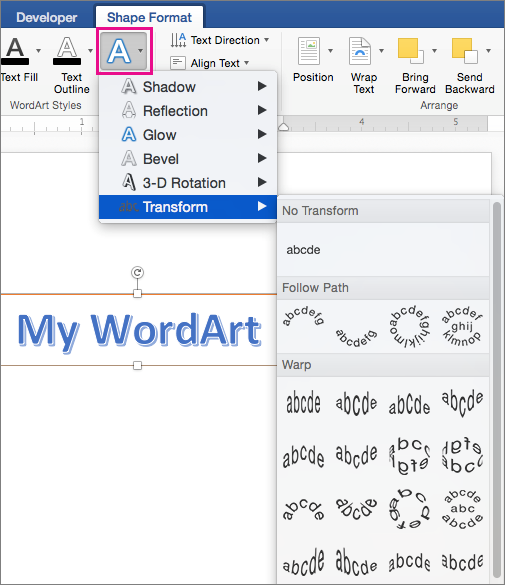
To create curved or circular WordArt text, you add a Transform text effect.
-
Select the WordArt.
When you do that, the Shape Format tab appears.
-
Click Text Effects > Transform and pick the effect you want.
To change the color of the WordArt text, you change the Text Fill.
-
Select the WordArt text or letters to change.
When you do that, the Shape Format tab appears.
-
Click Text Fill, and pick the color you want.
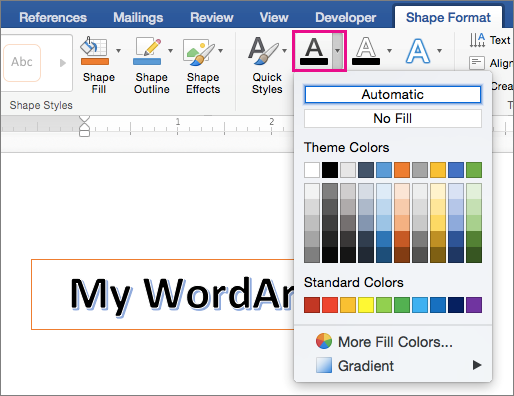
Tip: To change the outline of the WordArt text, on the Shape Format tab, click Text Outline.
-
Select the text to convert to WordArt.
-
On the Insert tab, click WordArt, and then pick the WordArt style you want.
In Microsoft 365 for the web you can see WordArt that’s already in your document, presentation, or worksheet, but to add more WordArt you need to open or edit the doc in the desktop version of Word, PowerPoint, or Excel.
In Microsoft 365 for the web, you can use the Font features on the Home tab to change the font color and size, and apply bolding, italics, or underlines to your text.
If you don’t have the desktop version of Word or PowerPoint, you can try it or buy it in the latest version of Office now.
# What is this site about?
WordArt.com is an online word art creator that enables you to create amazing and unique word art with ease. Professional quality results can be achieved in no time at all, even for users with no prior knowledge of graphic design.
# How to change word size?
There are 3 options to change the size of a word:
- Use up / down buttons in the words section to change its position. Words are placed from top to bottom, therefore the closer a word to the top, the bigger it will be. You can also change a word’s size value, but by default it will only have impact on its position in the table.
- If you want words sizes to be more precise according to the values in the size column then click on the options button in the words section and choose «use size column» for the size parameter. Then close the options dialog and re-visualize your word art.
- You can also switch to the edit mode and change the size of a word directly.
HINT: Words in your word artwork cannot be bigger than the biggest word (first in the words table). Therefore you can reduce the size of the biggest word in the edit mode thus making all other words proportionally smaller. For example you can use this technique to make all words the same size. Just keep making the biggest word smaller (re-visualize after each change) until all the words are more or less equal.
# How to make all words the same size?
Unfortunately (due to WordArt.com algorithm’s nature) it is not possible to make all words *exactly* the same size. The algorithm tries to fill the selected shape at the first place in the meantime sacrificing the accuracy of words sizes. The best you can do is to choose «use size column for the size parameter in the words options and then make all sizes equal to 1 in the words table. This will keep all the words the same size as much as possible during visualization. Also you can try the hint from the previous question.
# How to set a minimal fonts size and remove small words?
You cannot set a minimal font size but you can remove small words from your word cloud art. The words are placed from largest to smallest therefore you can use the «define» slider for «words amount» parameter (in the layout section) to reduce the amount of words placed. By reducing the amount you are actually removing the small words.
# How to print a word art?
To print a word art click on the print item from the top menu.
If you are not satisfied with the result you can try more robust method: download your world art in PNG format and print it as any other image or picture using your image viewing / printing software.
# I need my word art print to fit into a 4×6 frame. How do I do that?
You need to create a word art with 4/6 = 0.67 aspect ratio.
To achieve that do the following:
- Select the square shape in the Geometric category in the Shapes section
- Click on the gear at the bottom right corner
- Set aspect ratio to 0.67 and click OK
- Visualize
- Download your word art image in PNG format and print it
# I tried to print a word art but it doesn’t fit into a page, how do I fix it?
Download your word art image in PNG format and then print it as any other image or picture. Your printing software should allow you to size and position an image to fit paper size. If it doesn’t we suggest you to try GIMP image editor.
# I’ve just downloaded a word art to my computer. Where can I find it?
Your browser may have saved your word art image to Downloads folder without notifying you. Please have a look there. This behavior can be changed in your browser settings.
# How to create a word art with a custom shape?
- If you wish to use a shape that is not in the default list then you need to find a suitable image first.
- Once you found the image save it to your computer (or copy its URL if it is found on the internet) and then click on the add image button in the shapes section.
- In the popup window choose the saved image or paste its URL and click «Load».
- Once the image is loaded adjust it if necessary and click OK.
That’s it. Your custom image is ready to be used. Visualize your word art to see the results.
# How to make a word art in the shape of a number or a word?
In the shapes section click on the «add text» button and input your text and numbers there.
# How to use icons (special characters) in my word art?
Please read Icons in word clouds blog post. You can also use emojis icons in your word art.
# How can I make words links to point to my site?
In words section click on the options button. Then choose the pattern option for the links parameter, change it accordingly and click apply. Also you can choose the manual option for links column to appear, and manually input the links.
# Can I import my list of words?
Prepare words data in CSV format with semicolon as the separator using «word;weight;color;angle;font;repeat;url» format (see example below). Then click the «Import» button in words section and paste words data into the text field to load them into your word art.
CSV example (all columns except the first one are optional, you can leave them empty):Cloud;36;ffff00;0;Teen bold;1;http://www.google.com/search?q=Cloud
Demo;32;00ff00;0;Bangers Regular;0;http://www.google.com/search?q=Demo
non;12;;;;;http://www.google.com/search?q=Demo
eget;10;
sed;8
# Can I use Excel for editing my words list?
Yes you can. Create an excel spreadsheet with your words data (see the screenshot below).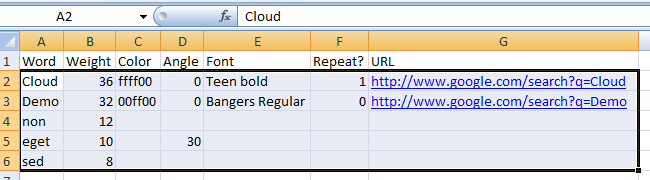
Then paste the text without header into the text field in the import dialog (from the words section). Please enable «CSV format» check box and click «Import words» button to finish.
# Can I download my word art with the animation and add the animated version to a powerpoint presentation?
You cannot download your word art with the animation. Animation works only in your browser. But you can share your word art’s link. Anyone who opens it will be able to see your word art with the animation.
# How can I ask a question?
Post it in the Forums or send it using Contact Form or email your question to
Is there anything artificial intelligence can’t do? It seems like there’s a mesmerizing new technological breakthrough every month. The trending breakthrough is how AI can now take a sentence you type and turn it into a painting or an image. And you can try it right now.
If you want to create AI art from your writing, here are some of the best free AI text-to-image generators.
1. Nightcafe (Web): The Simplest Free Text-to-Image AI Converter
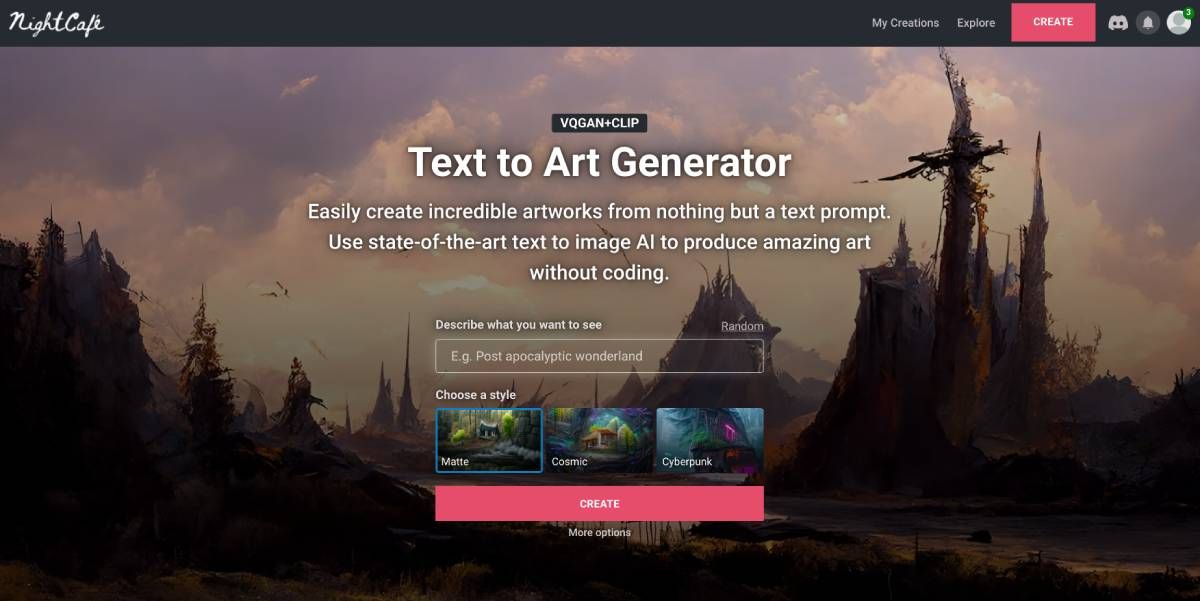
Nightcafe is the perfect example of these text-to-image apps to make your jaw drop by seeing the kind of mind-blowing creations AI can do. Type any simple English sentence, and Nightcafe will use AI to turn it into a painting.
When creating a new image, you can choose from various artistic styles, including cubist, oil painting, matte, surreal, steampunk, etc. You can also add modifiers of artists, techniques, and cultural genres. Then you have to choose between two AI styles: Artistic and Coherent.
You can read about the tech jargon behind each on the website, but there’s a basic difference for the lay user. The Artistic variant is better for abstract creations like showing buildings in the sky or other imaginative sentences. The Coherent version is better for realistic images with your own customizations.
Select the aspect ratio, the output resolution, and a few other settings, and you’re good to go. Nightcafe will give you original artwork based on your choices in a few minutes. All your creations are saved in your account.
When you create an account, you get five credits free, with five daily credits too. Credits determine the number of tweaks you can make in the settings of an artwork. You can also use an artwork as a base to refine it, which costs more credits. And yes, you can download your artwork for free in small resolution.
2. Starry AI (Web, Android, iOS): Text-to-Image AI Art With Granular Control
Starry AI turns text into AI artwork images like the other apps in this list. But unlike many others, it offers granular control over certain aspects that make the results a lot more personal.
You’ll start by entering a random phrase and choosing between two AI engines: Altair (produces dream-like images, more abstract) and Orion (produces «unreal reality,» often more cohesive). Then choose from 16 art styles, canvas size, and aspect ratio, and optionally add your own custom image to use as a base. Selecting a custom image is usually a good idea in these apps.
Starry AI lets you use extra credits to lengthen the AI’s runtime so that you get a better final image. Similarly, you can spend credits to tell the AI how closely to stick to your text. And finally, when the image is generated, you can spend credits to upscale the image to download high-resolution AI artwork.
Plus, you don’t always have to pay for these credits. Starry AI lets you earn free credits every day or week by watching ads or sharing your creations on different social media.
Download: Starry AI for Android | iOS (Free)
3. Craiyon (Web): Get a Taste of the Famous OpenAI DALL-E
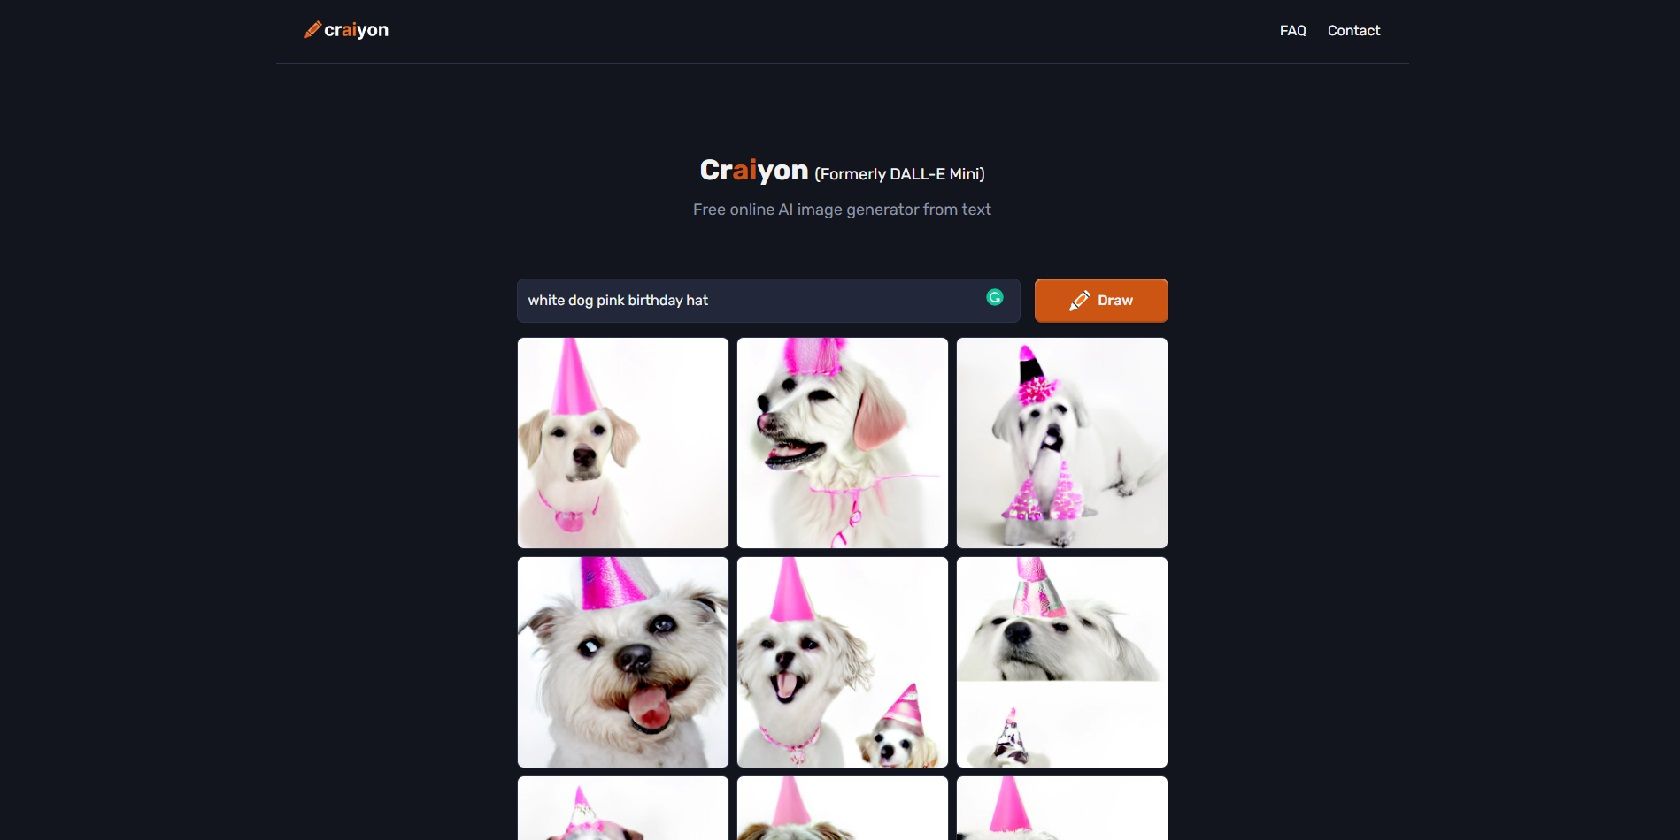
AI research lab OpenAI created the original and most popular version of an AI text-to-image generator, the DALL-E. Netizens are wowed by DALL-E 2’s ability to turn natural language into images.
If you don’t want to sign up, you can use Craiyon (formerly DALL-E Mini), an open-source version of the original AI model available for public use.
The machine learns descriptions by reading captions of other images on the internet and applying them to whatever phrase you type. You don’t need to register for an account, and you get unlimited tries for your images.
Type your sentence (and be as specific as possible) and hit Draw. It’ll take some time, but Craiyon will soon give you nine different images made from your sentence. You can save any or all images to your hard drive.
Unlike other apps, there are no further enhancements or customizations in Craiyon, but it is the simplest text-to-image AI generator and offers unlimited tries for free.
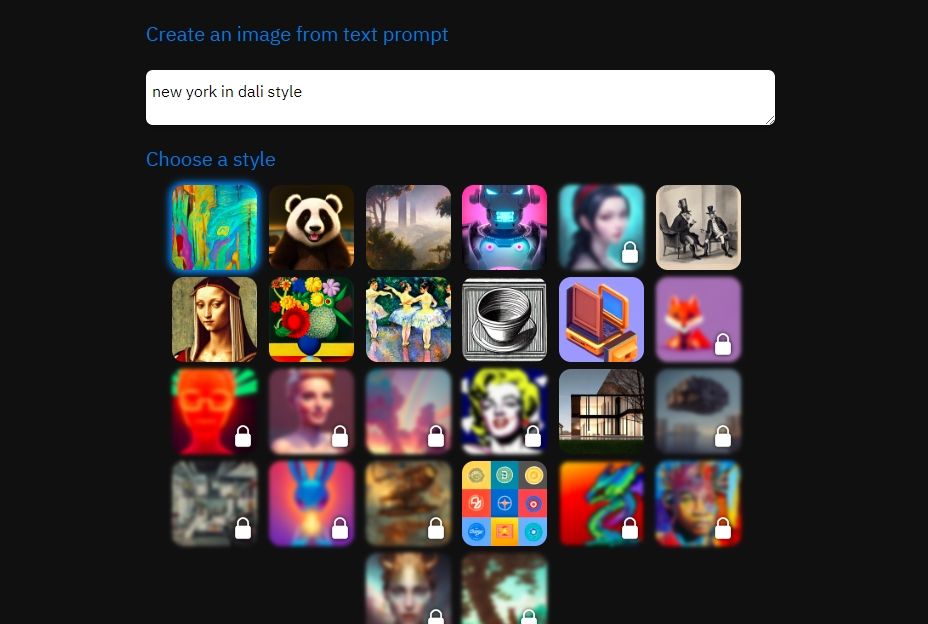
4. Dream by Wombo (Android, iOS): Simple, Free, Unlimited AI Text-to-Image Art Generator

Every AI-based text-to-image art generator is either paid, runs on a credit system, or has other restrictions. Dream by Wombo bucks all those limitations to let you create unlimited artwork from your text in many styles.
It’s as simple as creating an account, writing a sentence, and selecting a style. Current styles include, among others, Ghibli, Dali, Love, Robots, Psychic, Synthwave, Baroque, and Dark Fantasy. Let Wombo generate the image, and you can immediately ask it to develop another or download the one you liked.
You can use either the web app or the mobile app, but as our detailed Dream by Wombo review shows, the mobile version offers a few more features. Specifically, you can add a base image for the AI to use as a reference, which always helps in refining what you want.
Download: Dream by Wombo for Android | iOS (Free)
5. Pixray (Web): AI Text-to-Image Generator With Custom Codes for Geeks
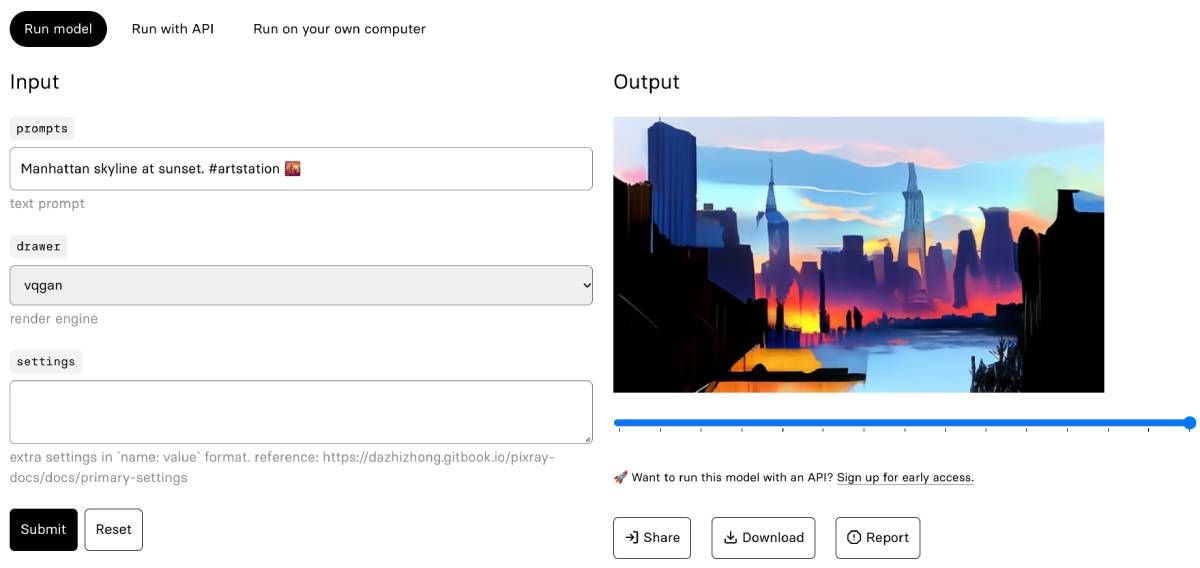
Pixray is a text-to-art generator that you can run in a browser, on your computer, or with an API, all for free. It has a simple interface, but with its customizable AI engines and extensive documentation for custom codes, geeks will have a great time with it.
The default interface is simple. First, add your sentence as you normally would in any app. Then choose from the different AI render engines in the «drawer». Pixel generates pixel art, vqgan generates GAN-images (often trippy or realistic), and clipdraw and line_sketch generate stroke-based images as if it was a drawing and strokes were drawn down.
This in itself will give you fantastic images, but the fun part is the last section, Settings.
In the extensive Pixray documentation, you’ll find that you can tweak the AI settings in several ways. For example, you can add artists or styles, define quality, iterations, or scale, and discover detailed ways to change your artwork through the drawer, display, filter, video, and image settings. It’s a bit of heavy reading, but no coding is involved.
6. DeepAI (Web): Quick and Simple AI Text-to-Image Generator
DeepAI offers an easy-to-use text-to-image generator that produces decent results with the right prompts. There are many image styles on offer, and almost half of those are free. The free ones include basic text-to-image, cute creatures, fantasy worlds, cyberpunk, old, renaissance painting, and abstract, among a few others.
All of these styles produce images according to that theme, pretty much like the other tools on this list. However, among these styles, there is a logo generator as well that you can use to produce interesting logo ideas. It’s particularly useful for artists who are looking for inspiration to build on or to overcome a block.
So Is AI Killing Artists?
The different AI text-to-image generators in this article are all impressive in their own way. But just like AI writing tools, while the end product seems «real» enough, it still misses some things. Artists can add creativity, emotion, and a self-defined style that makes an artwork personal and original. However, AI is quickly on its way to doing the same.