
Create User Entry Form in Word 2013
- Go to the “File Tab” and choose “Options”.
- Choose “Customize Ribbon Tab”.
- Choose “Developer” from “Customize the Ribbon column”.
- Now write a simple user entry form in Word 2013.
- Add the Content Control that satisfies the user entry form reuirements.
Contents
- 1 How do I create a fillable form in Word 2013?
- 2 How do I insert a form field in Word 2013?
- 3 How do you create forms in Word?
- 4 How do I make an editable form?
- 5 How do I create a fillable form in Word with lines?
- 6 How do I create a form line in Word?
- 7 Where is the Forms toolbar in Word?
- 8 How do I insert a text form field in Word?
- 9 How do you insert a custom field in Word?
- 10 How do I get Microsoft Forms?
- 11 What is the best program to create a form?
- 12 How do I create a form in Word 2016?
- 13 How do I create a fillable PDF form in Word?
- 14 How do I save a Word document as a fillable template?
- 15 How do I make a fillable form in word and not editable?
- 16 How do I create a fillable form in Word for Mac?
- 17 Where is tools on Word 2013?
- 18 How do I pin a form to the taskbar?
- 19 How do I turn on the Developer tab in Word?
- 20 What are form fields in Word?
How do I create a fillable form in Word 2013?
Tech Tip: How to Create Fillable Forms in Microsoft Word
- Enable Developer Tab. Open Microsoft Word, then go to the File Tab > Options > Customize Ribbon > check the Developer Tab in the right column > Click OK.
- Insert a Control.
- Edit Filler Text.
- Design Mode button again to exit the mode.
- Customize Content Controls.
How do I insert a form field in Word 2013?
To insert a field, follow these steps:
- Position the insertion point where you want the field to be inserted.
- On the Insert tab, click Quick Parts and then click Field.
- (Optional) On the Categories list, select a category to narrow the list of field names.
- On the Field Names list, click the desired field name.
How do you create forms in Word?
To create a form in Word that others can fill out, start with a template or document and add content controls.
Start with a form template
- Go to File > New.
- In Search online templates, type Forms or the type of form you want and press ENTER.
- Choose a form template, and then select Create or Download.
How do I make an editable form?
How to create fillable PDF files:
- Open Acrobat: Click on the “Tools” tab and select “Prepare Form.”
- Select a file or scan a document: Acrobat will automatically analyze your document and add form fields.
- Add new form fields: Use the top toolbar and adjust the layout using tools in the right pane.
- Save your fillable PDF:
How do I create a fillable form in Word with lines?
Firstly, click “Underline” under “Home” tab and choose one line style. Then press “Shift+ Underscore” to get a line. Then place cursor above the line and type the content. As you type, you will find the line gets longer and longer.
How do I create a form line in Word?
Click the “Insert” tab, then click the “Shapes” button. Click the basic Line shape. When the cursor changes to a plus sign, hold down the “Ctrl” key to give you a straight drawing line, and drag the cursor to the right of the text you just typed, giving your form recipients a place to write.
Where is the Forms toolbar in Word?
Go to the Developer tab; Move to the Control group; Click the Legacy drop down button, then you will view the Legacy Forms buttons. These buttons are Form Toolbar buttons.
How do I insert a text form field in Word?
Working with Form Fields
- Position the insertion point where you want the field to appear.
- Display the Developer tab of the ribbon.
- In the Controls group click Legacy Tools and then click the Text Form Field tool.
- Right-click the form field just entered and choose Properties from the resulting Context menu.
How do you insert a custom field in Word?
Inserting built-in fields
- Navigate to the location in the Word document where you want to insert a field.
- Click the Insert tab in the Ribbon and then click Quick Parts in the Text group.
- Select Field.
- In the list of Field names, select a field.
- Under Field properties, select any properties or options you want.
How do I get Microsoft Forms?
Start a new form
- Sign in to Microsoft 365 with your school or work credentials.
- Select. New > Forms for Excel.
- Enter a name for your form, and then select Create. A new tab for Microsoft Forms will open in your web browser.
What is the best program to create a form?
Best online form builders of 2021
- Hubspot Free Online Form Builder.
- Gravity Forms.
- Typeform.
- Wufoo.
- Microsoft Forms.
- Formstack.
- Paperform.
- Formsite.
How do I create a form in Word 2016?
Creating a computerized form
- Press Ctrl+N to create a new document.
- On the File tab, choose Save As. You see the Save As window.
- Click the Browse button. The Save As dialog box opens.
- Open the Save As Type menu and choose Word Template.
- Enter a descriptive name for your template and click the Save button.
How do I create a fillable PDF form in Word?
Create a Word document and save it in Word, then open Acrobat. Click the “Tools” menu and click “Prepare Form.” Select the Word file to import. Acrobat will detect potential form fields and add them automatically, but you can use the tools in the right editing pane to adjust them, delete them or add new form fields.
How do I save a Word document as a fillable template?
Saving and Using a Form
- Press F12. Word displays the Save As dialog box.
- Using the Save As Type drop-down list, select Word Template.
- If necessary, change to the directory where the template is to be stored.
- In the File Name field, enter the name under which you want this template saved.
- Click on Save.
How do I make a fillable form in word and not editable?
To make a document un-editable, first, select all the text in the document by pressing Ctrl+A. Once all of the text is highlighted, click “Restrict Editing” in the “Protect” group on the “Developer” tab.
How do I create a fillable form in Word for Mac?
To do this, click on “File” tab > “Options” > “Customize Ribbon”. Then under the “Customize Ribbon”, select the “Developer” checkbox and click “OK”. Step 2: Open a Word document and you will be able to make the Word document fillable.
Where is tools on Word 2013?
MS Word 2013 as a Quick Access Toolbar that is by default placed just next to the Microsoft orb that is available at the top left corner of the interface. The Quick Access Toolbar, as the name suggests, provides tools to quickly access a few commands that are frequently used by most users.
How do I pin a form to the taskbar?
In the first place please open Microsoft forms in Edge. Then click on Apps> install this site as an app. Finally, the app will appear in the start menu. Now, to pin it to the taskbar, do a right-click under the app and then proceed to pin it to the taskbar.
How do I turn on the Developer tab in Word?
The Developer tab isn’t displayed by default, but you can add it to the ribbon.
- On the File tab, go to Options > Customize Ribbon.
- Under Customize the Ribbon and under Main Tabs, select the Developer check box.
What are form fields in Word?
You can use a text form field to collect basic text information such as a name or address. Alternatively you can also use text form fields to request other types of data such as numbers, dates, times, phone numbers, zip codes, percentages etc. Text form fields can also be used to perform calculations.
Word for Microsoft 365 Word for Microsoft 365 for Mac Word 2021 Word 2021 for Mac Word 2019 Word 2019 for Mac Word 2016 Word 2016 for Mac Word 2013 Word 2010 Word for Mac 2011 More…Less
To create a form in Word that others can fill out, start with a template or document and add content controls. Content controls include things like check boxes, text boxes, date pickers, and drop-down lists. If you’re familiar with databases, these content controls can even be linked to data.
Show the Developer tab
If the developer tab isn’t displayed in the ribbon, see Show the Developer tab.
Open a template or a blank document on which to base the form
To save time, start with a form template or start from scratch with a blank template.
-
Go to File > New.
-
In Search online templates, type Forms or the type of form you want and press ENTER.
-
Choose a form template, and then select Create or Download.
-
Go to File > New.
-
Select Blank document.
Add content to the form
Go to Developer, and then choose the controls that you want to add to the document or form. To remove a content control, select the control and press Delete. You can set properties on controls once inserted.
Note: You can print a form that was created using content controls, but the boxes around the content controls will not print.
In a rich text content control, users can format text as bold or italic, and they can type multiple paragraphs. If you want to limit what users add, insert the plain text content control.
-
Click or tap where you want to insert the control.
-
Select Developer > Rich Text Content Control
 or Plain Text Content Control .
 or Plain Text Content Control
  .
.To set specific properties on the control, see Set or change properties for content controls.
A picture control is often used for templates, but you can also add a picture control to a form.
-
Click or tap where you want to insert the control.
-
Select Developer > Picture Content Control
.
 .
.To set specific properties on the control, see Set or change properties for content controls.
Use building block controls when you want people to choose a specific block of text. For example, building block controls are helpful when you need to add different boilerplate text depending on the contract’s specific requirements. You can create rich text content controls for each version of the boilerplate text, and then you can use a building block control as the container for the rich text content controls.
-
Click or tap where you want to insert the control.
-
Go to DeveloperBuilding Block Gallery Content Control
(or Building Block Content Control). -
Select Developer and content controls for the building block.
 (or Building Block Content Control).
-
Click or tap where you want to insert the control.
To set specific properties on the control, see Set or change properties for content controls.
In a combo box, users can select from a list of choices that you provide or they can type in their own information. In a drop-down list, users can only select from the list of choices.
-
Go to Developer > Combo Box Content Control
or Drop-Down List Content Control . -
Select the content control, and then select Properties.
-
To create a list of choices, select Add under Drop-Down List Properties.
-
Type a choice in Display Name, such as Yes, No, or Maybe.
Repeat this step until all of the choices are in the drop-down list.
-
Fill in any other properties that you want.
Note: If you select the Contents cannot be edited check box, users won’t be able to click a choice.
 or Drop-Down List Content Control
  .
.-
Click or tap where you want to insert the date picker control.
-
Select Developer > Date Picker Content Control
.
 .
.To set specific properties on the control, see Set or change properties for content controls.
-
Click or tap where you want to insert the check box control.
-
Select Developer > Check Box Content Control
.
 .
.To set specific properties on the control, see Set or change properties for content controls.
Legacy form controls are for compatibility with older versions of Word and consist of legacy form and Active X controls.
-
Click or tap where you want to insert a legacy control.
-
Go to Developer > Legacy Forms
drop-down. -
Select the Legacy Form control or Active X Control that you want to include.
 drop-down.
Set or change properties for content controls
Each content control has properties that you can set or change. For example, the Date Picker control offers options for the format you want to use to display the date.
-
Select the content control that you want to change.
-
Go to Developer > Properties.
-
Change the properties that you want.

Add protection to a form
If you want to limit how much others can edit or format a form, use the Restrict Editing command:
-
Open the form that you want to lock or protect.
-
Select Developer > Restrict Editing.
-
After selecting restrictions, select Yes, Start Enforcing Protection.


Advanced Tip:
If you want to protect only parts of the document, separate the document into sections and only protect the sections you want.
To do this, choose Select Sections in the Restrict Editing panel. For more info on sections, see Insert a section break.

Show the Developer tab
If the developer tab isn’t displayed in the ribbon, see Show the Developer tab.
Open a template or use a blank document
To create a form in Word that others can fill out, start with a template or document and add content controls. Content controls include things like check boxes, text boxes, and drop-down lists. If you’re familiar with databases, these content controls can even be linked to data.
-
Go to File > New from Template.
-
In Search, type form.
-
Double-click the template you want to use.
-
Select File > Save As, and pick a location to save the form.
-
In Save As, type a file name and then select Save.

-
Go to File > New Document.
-
Go to File > Save As.
-
In Save As, type a file name and then select Save.

Add content to the form
Go to Developer, and then choose the controls that you want to add to the document or form. To remove a content control, select the control and press Delete. You can set Options on controls once inserted. From Options, you can add entry and exit macros to run when users interact with the controls, as well as list items for combo boxes, .
-
In the document, click or tap where you want to add a content control.
-
On Developer, select Text Box, Check Box, or Combo Box.
-
To set specific properties for the control, select Options, and set .
-
Repeat steps 1 through 3 for each control that you want to add.

Options let you set common settings, as well as control specific settings. Select a control and then select Options to set up or make changes.
-
Set common properties.
-
Select Macro to Run on lets you choose a recorded or custom macro to run on Entry or Exit from the field.
-
Bookmark Set a unique name or bookmark for each control.
-
Calculate on exit This forces Word to run or refresh any calculations, such as total price when the user exits the field.
-
Add Help Text Give hints or instructions for each field.
-
OK Saves settings and exits the panel.
-
Cancel Forgets changes and exits the panel.
-
-
Set specific properties for a Text box
-
Type Select form Regular text, Number, Date, Current Date, Current Time, or Calculation.
-
Default text sets optional instructional text that’s displayed in the text box before the user types in the field. Set Text box enabled to allow the user to enter text into the field.
-
Maximum length sets the length of text that a user can enter. The default is Unlimited.
-
Text format can set whether text automatically formats to Uppercase, Lowercase, First capital, or Title case.
-
Text box enabled Lets the user enter text into a field. If there is default text, user text replaces it.
-
-
Set specific properties for a Check box.
-
Default Value Choose between Not checked or checked as default.
-
Checkbox size Set a size Exactly or Auto to change size as needed.
-
Check box enabled Lets the user check or clear the text box.
-
-
Set specific properties for a Combo box
-
Drop-down item Type in strings for the list box items. Press + or Enter to add an item to the list.
-
Items in drop-down list Shows your current list. Select an item and use the up or down arrows to change the order, Press — to remove a selected item.
-
Drop-down enabled Lets the user open the combo box and make selections.
-
-
Go to Developer > Protect Form.
Note: To unprotect the form and continue editing, select Protect Form again.
-
Save and close the form.

If you want, you can test the form before you distribute it.
-
Protect the form.
-
Reopen the form, fill it out as the user would, and then save a copy.
Show the Developer tab
-
On the right side of the ribbon, select
, and then select Ribbon Preferences. -
Under Customize, select Developer .
 , and then select Ribbon Preferences.
Open a template or a document on which to base the form
You can start with a blank document and create your own form. Or, to save time, you can start with a form template.
-
Go to File > New from Template.
-
In the left pane, expand Online Templates, and then select Forms.
-
Double-click the form template that you want to use.
Add content controls to the form
-
In the document, click where you want to add the control.
-
On the Developer tab, under Form Controls, select Text Box, Check Box, or Combo Box.
-
To set specific properties for the control, select Options, and then configure the properties that you want.
Note: To create a list of drop-down items in a combo box, select the combo box placeholder, click Options, and then add the items that you want to appear in the drop-down list.
-
Repeat steps 1 through 3 for each control that you want to add.
Add instructional text (optional)
Instructional text (for example, «Type First Name») in a text box can make your form easier to use. By default, no text appears in a text box, but you can add it.
-
Select the text box control that you want to add instructional text to.
-
On the Developer tab, under Form Controls, select Options.
-
In Default Text, type the instructional text.
-
Make sure that Fill-in enabled is selected, and then select OK.
Protect the form
-
On the Developer tab, under Form Controls, select Protect Form.
Note: To unprotect the form and continue editing, click Protect Form again.
-
Save and close the form.
Test the form (optional)
If you want, you can test the form before you distribute it.
-
Protect the form.
-
Reopen the form, fill it out as the user would, and then save a copy.
Creating fillable forms isn’t available in Word for the web.
You can create the form with the desktop version of Word with the instructions in Create a fillable form.
When you save the document and reopen it in Word for the web, you’ll see the changes you made.
Need more help?
![]()
Download Article
![]()
Download Article
- Using Windows
- Using a Mac
|
You know when you try to fill out forms in Word on the provided lines, but the text you type makes the lines move and ruins the formatting? There is a way to get rid of that. This wikiHow will teach you how to insert fillable fields on Word on PC or Mac. You’ll need to have Word set up on your computer before you can start.
-
1
Open Word. You can find this program on your Start Menu.
-
2
Open a document. You can either open a new document, create a new document from a template, or open an old document.
Advertisement
-
3
Click Options and Customize Ribbon in the File menu. You’ll find this along the top of your program window.
-
4
Check the “Developer” box in the Customize Ribbon panel.
-
5
Click Ok.
-
6
Click the icons next to Design Mode in the Developer tab. These look like “Aa”, check boxes, and tables.
- The first “Aa” icon on the right side of the panel says “Rich Text Content Control” when you hover over it. This inserts an empty field into the document that can be filled with images, videos, text, and more.
- The second “Aa” icon says “Plain Text Content Control”. This will insert a blank fillable field into your document that the user can fill with only text.
- The “Combo Box Content Control” icon is next to the check box icon, and this will insert a drop-down menu into your document. The Properties button will open options for you to add more items to the drop-down menu.
- The “Date-Picker” icon looks like a calendar and will insert an empty box that will launch a calendar so your form user can pick a specific date. The Properties button will open options for you to choose the box format and display.
- The check box icon adds a check box to your document.
-
7
Click Restrict Editing in the Developer tab. This will pull out a panel from the right of your program window.
-
8
Check the box next to “Editing Restrictions”. This will lock the document so no one can alter the text not in text boxes.
-
9
Click Yes, Start Enforcing Protection. A box will pop up asking for a password. You can enter a password if you want to allow other people with that password to be able to edit your document.


Advertisement
-
1
Open Word. You can find this program in your Applications folder.
-
2
Open a document. You can either open a new document, create a new document from a template, or open an old document.
-
3
Click the Preferences tab under Word at the top of your screen. You’ll see this next to the Apple icon
. A new window will pop up.
-
4
Click View under the “Authoring and Proofing Tools” header.
-
5
Check the “Show developer tab” box under “Ribbon”.
-
6
Click Ok.
-
7
Click “Text Box”, “Check Box”, or “Combo Box” in the Developer tab. This will insert a blank fillable field into your document.
- The Combo Box option creates something like a drop-down menu. Click the Options icon next to the Combo Box icon to access options to turn your combo box into a drop-down menu.
- The Check Box creates checkable boxes.
- The Text box adds fillable fields that control how text appears on a form. For example, instead of a document line with Name:_______ where the user can make a mess of the lines, you can use these fillable text fields to control where the text goes and how it appears. You can click the Options icon to open an options box where you can choose the input type. For example, you have a text box, but are looking for a date, you can pick Date under the “Type” heading for this.
-
8
Click Protect Form. This will prevent you from making any edits to your fields, but will activate them so they are usable.
- If you want to password protect your document, you can go to the Review tab and click Protect Document.


Advertisement
Ask a Question
200 characters left
Include your email address to get a message when this question is answered.
Submit
Advertisement
Thanks for submitting a tip for review!
About This Article
Article SummaryX
1. Open Word.
2. Click Preferences.
3. Click View.
4. Check Show developer tab.
5. Select to add a text box, check box, or combo box.
6. Click Protect.
Did this summary help you?
Thanks to all authors for creating a page that has been read 107,795 times.
Is this article up to date?
You can use Word to create interactive digital forms that other people can fill out on their computers before printing or sending them back to you. It takes a little preparation but keeps you from having to decipher messy handwriting! Some of the tools you will use when creating a form include:
- Templates: Forms are normally saved as templates so that they can be used again and again.
- Content controls: The areas where users input information in a form.
- Tables: Tables are often used in forms to align text and form fields, and to create borders and boxes.
- Protection: Users can complete the form fields without being able to change the form’s text and/or design.
Show the Developer Tab
Before you can create a form, you’ll need to turn on the Developer tab to get access to the advanced tools.
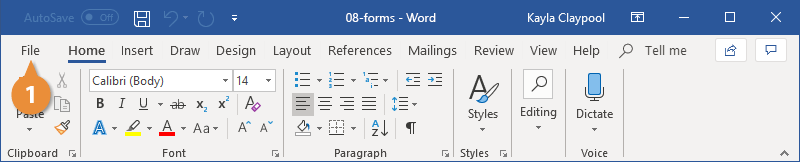
- Click the File tab.

- Select Options.

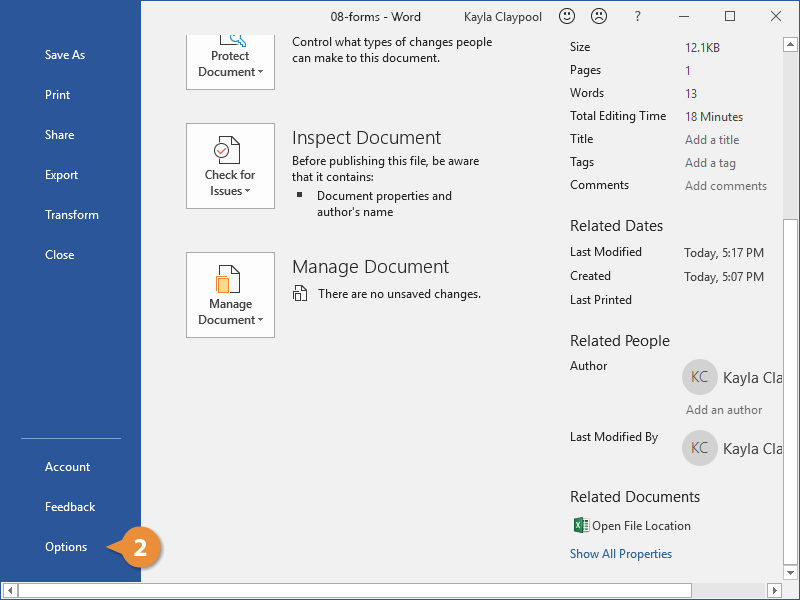
The Word Options window opens.
- Click the Customize Ribbon tab on the left.
The column on the right controls which ribbon tabs are enabled.
- Check the Developer check box.
- Click OK.
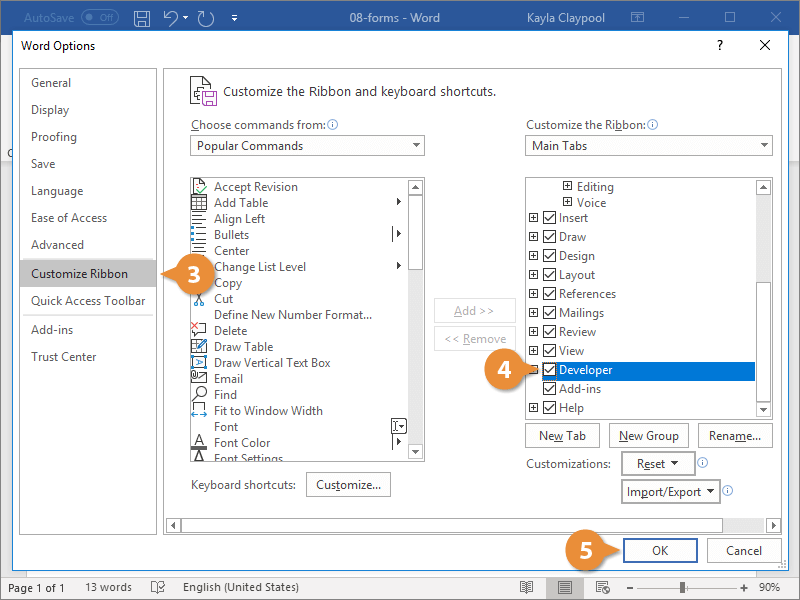
The Developer tab now appears on the ribbon. In addition to advanced tools for macro recording, add-ins, and document protection, we now have access to form controls.
Create a Form
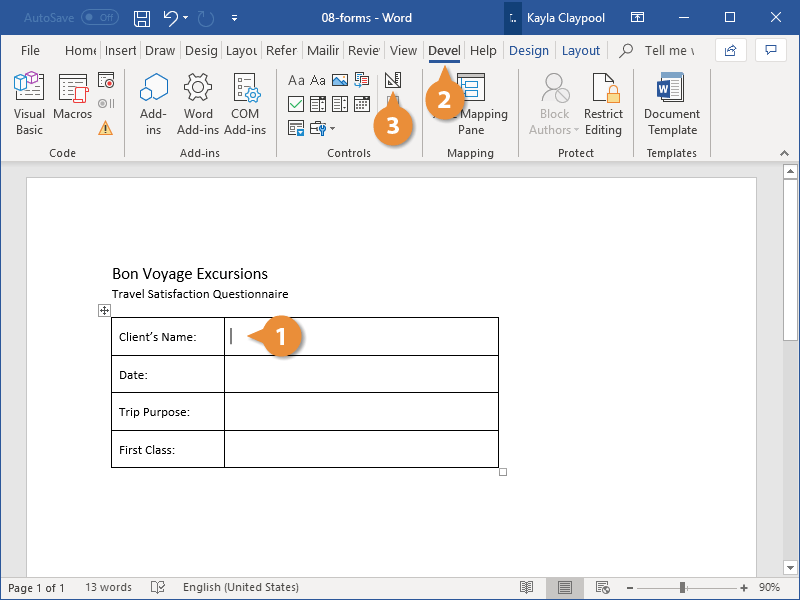
Once you’ve enabled the Developer tab, and created the layout and structure of the form, you can start adding form fields to your document with Content Controls.
- Place the text cursor where you want to insert the form field.
- Click the Developer tab on the ribbon.
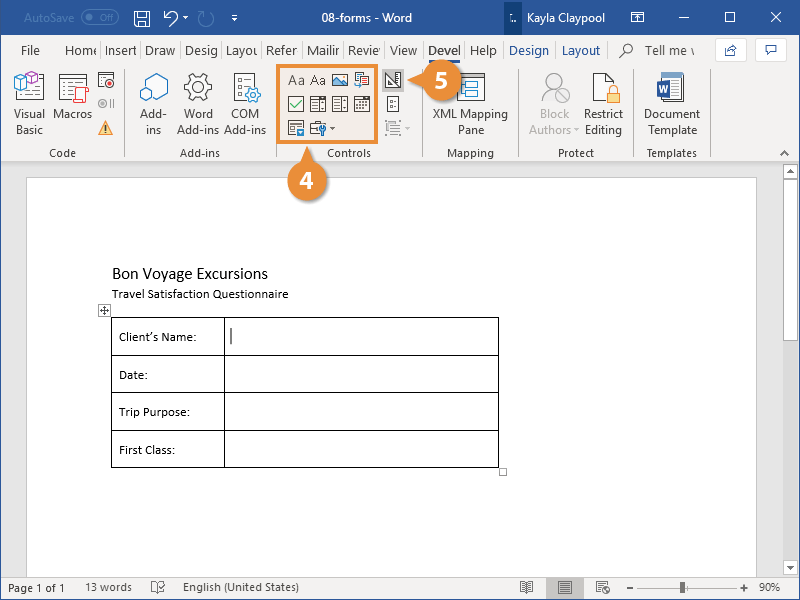
The Controls group contains the different kinds of content controls you can add to a form, as well as the toggle button for Design Mode.
- Click the Design Mode button in the controls group.
While Design Mode is active, controls you insert won’t be active, so clicking a check box to move it around won’t also check it. You can also customize placeholder text for some controls.
- Click a Content Control buttons to insert the selected type of control.
The content control is inserted.
Select a form field and click the Properties button on the ribbon to edit a control’s options. Depending on the type of control you’ve inserted, you can change its appearance, set up the options in a list, or lock the control once edited.
- When you’re done, click the Design Mode button again to exit Design Mode.
You leave Design Mode, and the content controls that you’ve inserted can now be used.
Types of Form Controls
There are many different types of form controls you can add to a form that will allow people to add different types of responses.
Finalize a Form
When you’re ready to distribute a form so others can fill it out, you can restrict the form so that content controls cannot be removed or changed by those filling it out.
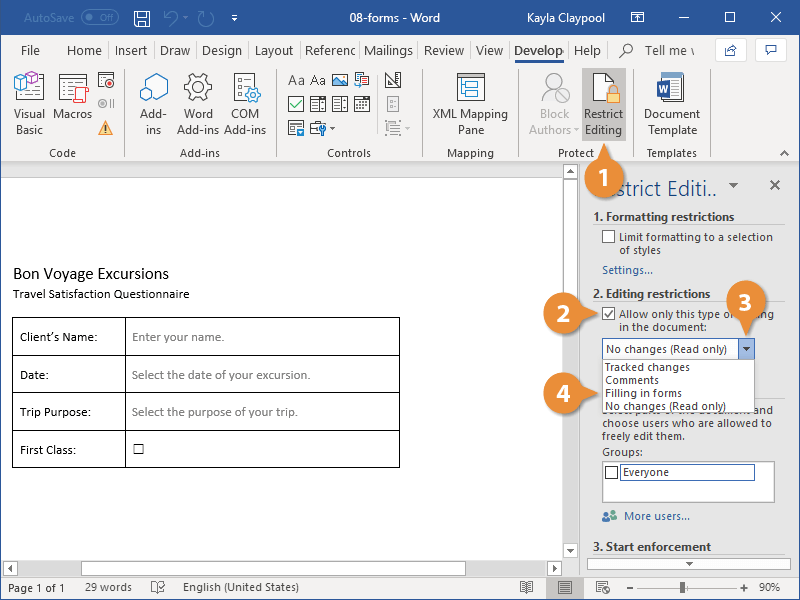
- Click the Restrict Editing button on the Developer tab.
The Restrict Editing pane appears on the right.
- Check the Editing restrictions check box.
- Click the Editing restriction list arrow.
- Select Filling in forms.
When this option is enabled, the only change that anyone else can make to this document is the filling in of form fields. They won’t be able to move, delete, or edit the fields themselves until protection is turned off.
- Click the Yes, Start Enforcing Protection button.
A password is not required to start enforcing protection, but you can add one if you’d like to prevent just anyone from turning this protection off.
- Enter a password (optional), then click OK.
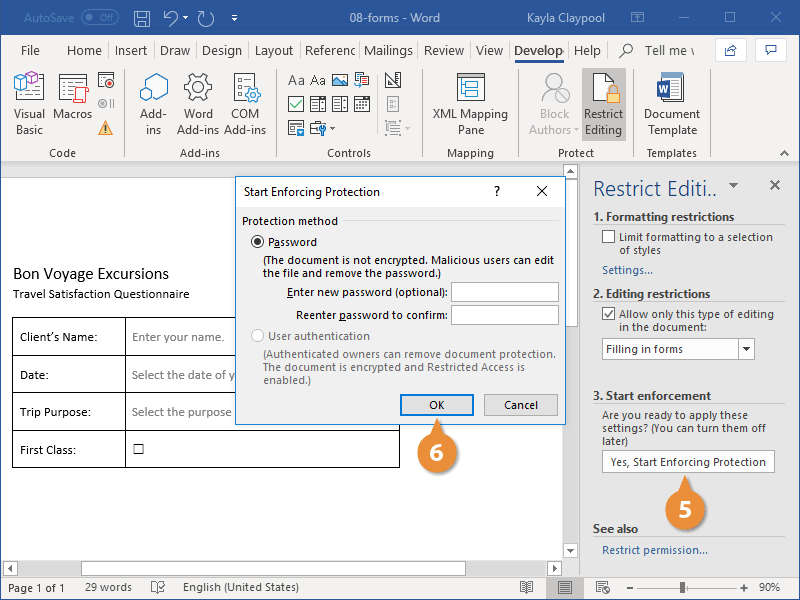
The document is now restricted, and anyone you send it to will only be able to fill in the forms.

FREE Quick Reference
Click to Download
Free to distribute with our compliments; we hope you will consider our paid training.
You would expect empty lines in a Microsoft Word document would be easy to create. And to be honest, they are! But the method to do so may not be so obvious.

Maybe you have to send someone a form to fill out by hand. You would expect empty lines in a Microsoft Word document would be easy to create. And to be honest, they are! But the method to do so may not be so obvious.
So before you rush ahead and ready your document for printing, check out this formatting trick that helps you to create neat blank lines in Microsoft Word forms.
Create Empty Lines in 1 Minute
The Tab Leader method is one of the speediest ways to create a blank line for a form. This method uses tab stops in a document to extend your blank line to the precise point you want it to end.
Write the first label for the text entry for your form. For example: Name. Separate it from the information that will go into the blank line with a colon, dash, or any other character. Then, hit the Spacebar to insert a gap before the blank line starts.
Go to the Ribbon > Home > Paragraph group on the toolbar. Click the downward pointing arrow to open the dialog box for the paragraph settings. Click the Tabs button at the bottom of the dialog box.
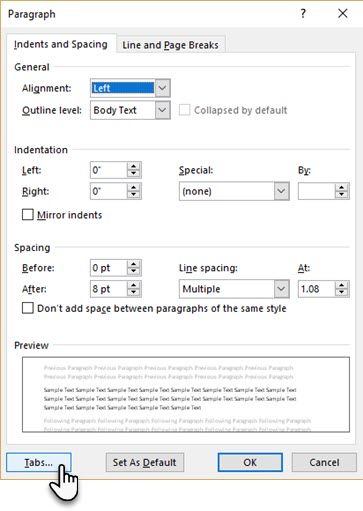
In the Tabs dialog box, click Clear All.
Under Tab stop position, type a number that corresponds to the number of inches you want the line to extend from the left margin. For example, if you want the line to extend 5 inches from the left margin, type 5″.
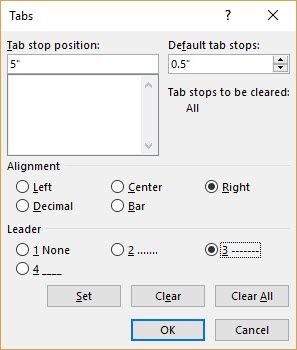
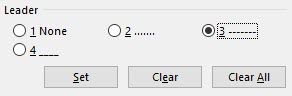
Also, select Right for the Tab Alignment, and choose 3 as the Leader to get a dashed line. What is a Leader? Microsoft Word uses either dots, dashes or solid lines as leaders. The leader style is denoted next to the numbers.
To finalize the settings, click Set and then OK to return to the document.
Place the cursor where you want to start the blank line. Press the Tab key on your keyboard, and a dotted line be drawn on the page the insertion point to the point where you had set the right tab.
![]()
Hit Enter and type the label for the second field entry (for e.g. Address:). Again, press Tab to insert the second dotted blank line. Repeat the process for all your fields you want displayed in your form. Thanks to the use of tabs, you can align all the blank lines neatly before you send the document to the printer.
For something more formal, check out how to use Microsoft Forms.