
Word for Microsoft 365 Word 2021 Word 2019 Word 2016 Word 2013 Word 2010 Word 2007 More…Less
Word can automatically count the lines in a document and display the appropriate number beside each line of text. This is useful when you need to refer to specific lines in a document, such as a script or a legal contract.
By default, Word numbers every line in a document (except those in tables, footnotes, endnotes, text boxes, and headers and footers). However, you can choose which line numbers to display. For example, you can display line numbers in all or part of the document. Or you can display line numbers at intervals, such as every tenth line (10, 20, 30, and so on).
What do you want to do?
-
Add line numbers
-
Remove line numbers
Add line numbers
You can add line numbers to all or part of a document. To view line numbers, you must be in Print Layout view (click the View tab to check).
Notes:
-
A table is counted as one line.
-
A figure is counted as one line.
-
A text box is counted as one line if it is positioned inline with the text on the page. If text on the page wraps around the text box, the lines of text on the page are counted. Lines of text inside a text box are not counted.
Add line numbers to an entire document
-
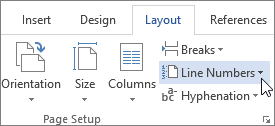
On the Layout tab, in the Page Setup group, click Line Numbers.

Note: If your document is divided into sections and you want to add line numbers to the entire document, you first need to select the document. Click Select in the Editing group on the Home tab, and then click Select All. Or press CTRL+A.
-
Do one of the following:
-
To number consecutively throughout the document, click Continuous.
-
To start with number 1 on each page, click Restart Each Page.
-
To start with number 1 after each section break, click Restart Each Section.
-
For more advanced line numbering options, such as numbering at different intervals, click Line Numbering Options, and then click Line Numbers on the Layout tab.
-
Add line numbers to a section or to multiple sections
-
Click in a section or select multiple sections.
-
On the Layout tab, in the Page Setup group, click Line Numbers.
-
Click Line Numbering Options, and then click the Layout tab.
-
In the Apply to list, click Selected sections.
-
Click Line Numbers.
-
Select the Add line numbering check box, and then select the options that you want.
Top of Page
Remove line numbers
You can remove line numbers from the entire document, from a section, or from a paragraph.
-
Click in the document, or click in the section or paragraph from which you want to remove line numbers. If you want to remove line numbers from multiple sections, select the sections.
-
On the Layout tab, in the Page Setup group, click Line Numbers.
-
Do one of the following:
-
To remove line numbers from the entire document or section, click None.
-
To remove line numbers from a single paragraph, click Suppress for Current Paragraph.
-
Top of Page
What do you want to do?
-
Add line numbers
-
Remove line numbers
Add line numbers
You can add line numbers to all or part of a document. To view line numbers, you must be in Print Layout view (click the View tab to check).
Notes:
-
A table is counted as one line.
-
A figure is counted as one line.
-
A text box is counted as one line if it is positioned inline with the text on the page. If text on the page wraps around the text box, the lines of text on the page are counted. Lines of text inside a text box are not counted.
Add line numbers to an entire document
-
On the Page Layout tab, in the Page Setup group, click Line Numbers.
Note: If your document is divided into sections and you want to add line numbers to the entire document, you first need to select the document. Click Select in the Editing group on the Home tab, and then click Select All. Or press CTRL+A.
-
Do one of the following:
-
To number consecutively throughout the document, click Continuous.
-
To start with number 1 on each page, click Restart Each Page.
-
To start with number 1 after each section break, click Restart Each Section.
-
For more advanced line numbering options, such as numbering at different intervals, click Line Numbering Options, and then click Line Numbers on the Layout tab.
-

Add line numbers to a section or to multiple sections
-
Click in a section or select multiple sections.
-
On the Page Layout tab, in the Page Setup group, click Line Numbers.
-
Click Line Numbering Options, and then click the Layout tab.
-
In the Apply to list, click Selected sections.
-
Click Line Numbers.
-
Select the Add line numbering check box, and then select the options that you want.
Top of Page
Remove line numbers
You can remove line numbers from the entire document, from a section, or from a paragraph.
-
Click in the document, or click in the section or paragraph from which you want to remove line numbers. If you want to remove line numbers from multiple sections, select the sections.
-
On the Page Layout tab, in the Page Setup group, click Line Numbers.
-
Do one of the following:
-
To remove line numbers from the entire document or section, click None.
-
To remove line numbers from a single paragraph, click Suppress for Current Paragraph.
-
Top of Page
Need more help?
Want more options?
Explore subscription benefits, browse training courses, learn how to secure your device, and more.
Communities help you ask and answer questions, give feedback, and hear from experts with rich knowledge.
Organize your documents by numbering them
What to Know
- Select Layout > Page Setup > Line Numbers > choose option > select Apply to drop-down > Selected sections.
- Next, select Line Numbers > Add line numbering > OK.
This article explains how to add line numbers to documents in Word for Microsoft 365, Word 2019, 2016, 2013, 2010, and 2007.
How to Add Line Numbers to a Word Document
To include line numbers in a document:
-
Go to Layout > Page Setup > Line Numbers.
If the document is divided into sections and you want to add line numbers to the entire document, press Ctrl+A to select the entire document.
-
Choose one of the following options:
- Continuous: Allows consecutive numbering throughout the document.
- Restart Each Page: Starts each page with the number 1.
- Restart Each Section: Starts with number 1 after each section break.
- Line Numbering Options: Allows more advanced line numbering options, for example, to number at different intervals.
-
To add line numbers to a specific section or to multiple sections, choose Line Numbering Options to open the Page Setup dialog box, then select the Layout tab.
-
Select the Apply to drop-down arrow and choose Selected sections.
-
Select Line Numbers.
-
Select the Add line numbering check box.
-
Select any other options you want, then select OK to close the window.
-
Select OK to save your changes.
All About Line Numbers
Microsoft Word automatically numbers all lines except for a select few. It counts an entire table as one line. It also skips text boxes, headers and footers, and footnotes and endnotes.
Microsoft Word does count figures as one line, as well as a text box that has inline with text wrapping applied. However, the lines of text within the text box are not counted.
You decide how Word handles line numbers. For example, apply line numbers to specific sections, or number lines in increments such as every tenth line.
Then, when it’s time to finalize the document, remove the line numbers and you’re ready to go.
Thanks for letting us know!
Get the Latest Tech News Delivered Every Day
Subscribe
 Please Note:
This article is written for users of the following Microsoft Word versions: 97, 2000, 2002, and 2003. If you are using a later version (Word 2007 or later), this tip may not work for you. For a version of this tip written specifically for later versions of Word, click here: Counting Document Lines.
![]()
Written by Allen Wyatt (last updated July 23, 2022)
This tip applies to Word 97, 2000, 2002, and 2003
Word provides a tool you can use to return simple statistics about your document. One of the statistics it can provide is the number of lines in your document. In order to see how many lines there are in your document, choose Word Count from the Tools menu. After a short delay (depending on the size of your document and the speed of your computer), Word displays the Word Count dialog box. (See Figure 1.)
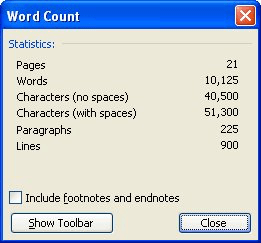
Figure 1. The Word Count dialog box.
One of the statistics provided in the Word Count dialog box is Lines. The value returned by Word depends on several things. First, it obviously depends on the formatting of your document. For instance, if you decrease the point size of text within your document, that can affect the line count. Second, the printer driver you are using can affect the number of lines in your document. In both instances, the differences are due to the different ways in which Word «flows» your text in the document. When the point size is smaller, Word can fit more characters on each given line, thereby reducing the overall number of lines required to present the same information. Likewise, using a different printer driver could result in a slightly different rendering of a font. For instance, the same font may appear more «compressed» on one printer than on another. This, again, means different amounts of information per line and a potentially different line count.
Finally, hidden text can affect the line count returned in the Word Count dialog box. If you have the printing of hidden text turned off, Word doesn’t count hidden text in the line count. If you want it to be considered, make sure you configure Word to print hidden text.
WordTips is your source for cost-effective Microsoft Word training.
(Microsoft Word is the most popular word processing software in the world.)
This tip (535) applies to Microsoft Word 97, 2000, 2002, and 2003. You can find a version of this tip for the ribbon interface of Word (Word 2007 and later) here: Counting Document Lines.
Author Bio
With more than 50 non-fiction books and numerous magazine articles to his credit, Allen Wyatt is an internationally recognized author. He is president of Sharon Parq Associates, a computer and publishing services company. Learn more about Allen…
MORE FROM ALLEN
Returning Word to Default Settings
Want to set everything back to a pristine state in Word? Doing so is more involved than you may believe.
Discover More
Inserting Video into Worksheets
You can add all sorts of objects to your workbooks, including video clips. Here’s the pros and cons (along with the …
Discover More
Rejecting Changes in a Document
When a group of people edits a document with Track Changes turned on, it can be tempting for one of the editors to use …
Discover More

Word includes a tool that allows you to view simple statistics about your document. These statistics include how many pages, words, characters, paragraphs, and lines are in your document. This is useful if you have to follow certain guidelines when writing your document.
To view these statistics, open the document in question and click the “Review” tab.

In the “Proofing” section, click “Word Count”.
The “Word Count” dialog box displays, as shown in the image at the beginning of this document. The number of pages and words can also be viewed on the status bar at the bottom of the Word window.
NOTE: The number of pages is only visible on the status bar when you are viewing your document in “Print Layout” view or “Draft” view (using the “View” tab).
If you don’t see the number of pages and words on the status bar, right-click on the status bar and select the items you want to view from the popup menu. Note that you can also view the line number for the line where the cursor is currently located.
The number of lines and pages may vary, depending on several factors, such as the margins in your document, the font and font size, and paragraph spacing, to name a few. For example, if you change to a smaller font size, there will be fewer lines and pages in your document than there would be with a larger font size. Even different printer drivers can result in a slightly different rendering of a font, thereby changing the number of lines and pages in your document.
Hidden text can also affect the line count reported on the “Word Count” dialog box. If the option to print hidden text is turned of, Word doesn’t count hidden text in the line count. If you want hidden text included in the line count, make sure you configure Word to print hidden text.
READ NEXT
- › How to Count Characters in Word
- › How to Get Workbook Statistics in Microsoft Excel
- › How to Get a Paragraph Count for a Specific Paragraph Style in a Word Document
- › How to Count Characters in Microsoft Excel
- › How to Check the Word Count in Microsoft Word
- › This New Google TV Streaming Device Costs Just $20
- › Google Chrome Is Getting Faster
- › BLUETTI Slashed Hundreds off Its Best Power Stations for Easter Sale
How-To Geek is where you turn when you want experts to explain technology. Since we launched in 2006, our articles have been read billions of times. Want to know more?