
 Please Note:
This article is written for users of the following Microsoft Word versions: 2007, 2010, 2013, 2016, 2019, and Word in Microsoft 365. If you are using an earlier version (Word 2003 or earlier), this tip may not work for you. For a version of this tip written specifically for earlier versions of Word, click here: Counting Changed Words.
![]()
Written by Allen Wyatt (last updated May 19, 2018)
This tip applies to Word 2007, 2010, 2013, 2016, 2019, and Word in Microsoft 365
Steven uses Track Changes in his documents all the time. He needs a way to count only the words that have been changed in a document—those affected by Track Changes.
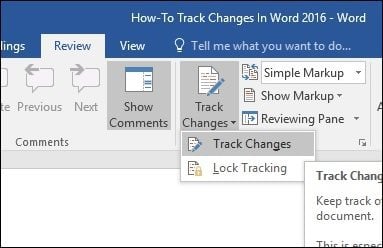
The answer is that you can sort of get the information you want through the use of the Reviewing Pane. Display the Review tab of the ribbon, then click the Reviewing Pane tool (in the Tracking group). Word displays the Reviewing Pane on-screen, and at the top of the pane is a summary of the revisions made in the document. It shows statistics for the following five changes:
- Insertions
- Deletions
- Moves
- Formatting changes
- Comments
These statistics may seem to fit the bill, but you’ll remember that I said that they provide «sort of» the information wanted. They fall a bit short if what you really want is a count of changed words. The statistics count changes, not changed words. For instance, if you delete a phrase that consists of multiple words, that edit counts as only a single deletion in the statistics. Similarly, if you add a phrase to your document, that addition counts as a single insertion, even if the insertion contained a complete paragraph.
If you want actual words changed, you are unfortunately out of luck—Word provides no way to get the information desired. You can, however, devise your own macro to determine the desired information. Here’s an example:
Sub GetTCStats()
    Dim lInsertsWords As Long
    Dim lInsertsChar As Long
    Dim lDeletesWords As Long
    Dim lDeletesChar As Long
    Dim sTemp As String
    Dim oRevision As Revision

    lInsertsWords = 0
    lInsertsChar = 0
    lDeletesWords = 0
    lDeletesChar = 0
    For Each oRevision In ActiveDocument.Revisions
        Select Case oRevision.Type
            Case wdRevisionInsert
                lInsertsChar = lInsertsChar + Len(oRevision.Range.Text)
                lInsertsWords = lInsertsWords + oRevision.Range.Words.Count
            Case wdRevisionDelete
                lDeletesChar = lDeletesChar + Len(oRevision.Range.Text)
                lDeletesWords = lDeletesWords + oRevision.Range.Words.Count
        End Select
    Next oRevision

    sTemp = "Insertions" & vbCrLf
    sTemp = sTemp & "    Words: " & lInsertsWords & vbCrLf
    sTemp = sTemp & "    Characters: " & lInsertsChar & vbCrLf
    sTemp = sTemp & "Deletions" & vbCrLf
    sTemp = sTemp & "    Words: " & lDeletesWords & vbCrLf
    sTemp = sTemp & "    Characters: " & lDeletesChar & vbCrLf
    MsgBox sTemp
End Sub
This macro steps through each change in the current document and separately sums word counts and character counts for both insertions and deletions. The statistics are then presented in a message box. Note that the macro looks at the Words collection for each change in the document. You should understand that the word count, as presented here, is an approximation. This is because of the way that words are counted. For instance, each punctuation mark in an addition is counted as a separate word. This means that a phrase such as «as one can see, this is a great way» would be tallied as ten words instead of nine (the comma counts as a separate word). Further, if the phrase you added included a leading space—which insertions often do—then there would be eleven words tallied for the insertion because of that space.
If you would like to know how to use the macros described on this page (or on any other page on the WordTips sites), I’ve prepared a special page that includes helpful information. Click here to open that special page in a new browser tab.
WordTips is your source for cost-effective Microsoft Word training.
(Microsoft Word is the most popular word processing software in the world.)
This tip (11484) applies to Microsoft Word 2007, 2010, 2013, 2016, 2019, and Word in Microsoft 365. You can find a version of this tip for the older menu interface of Word here: Counting Changed Words.
Author Bio
With more than 50 non-fiction books and numerous magazine articles to his credit, Allen Wyatt is an internationally recognized author. He is president of Sharon Parq Associates, a computer and publishing services company. Learn more about Allen…
MORE FROM ALLEN
Making Spell Check Ignore Characters
The rules of professional editing often require that editorial changes in a quote be noted with brackets. These brackets, …
Discover More
AutoText Limits
Are there limits to AutoText entries in Word? If you are having problems saving entries, it may not be due to limits …
Discover More
Using AutoComplete with Disjointed Lists
AutoComplete can help you to more quickly enter information in a worksheet. How it works, behind the scenes, can affect …
Discover More
When you want to see who’s changing what in your document (or when you want someone else to see what you changed in their document), turn on Track Changes.
Turn on Track Changes
-
When you want to see who’s changing what in your document, click REVIEW > Track Changes to turn on Track Changes.
-
To turn off Track Changes, click the Track Changes button again.
Want more?
Learn all about tracking changes in Word
Coauthor documents anywhere
The REVIEW tab has tools to help you work on a document with other people. Here’s how it works.
Let’s say someone sends you a document in email and asks for your input.
First, save it to your computer.
Then, open the copy in Word.
Now, when you find something you want to comment on, what do you do?
Well, if it were paper, you might scribble something in the margins.
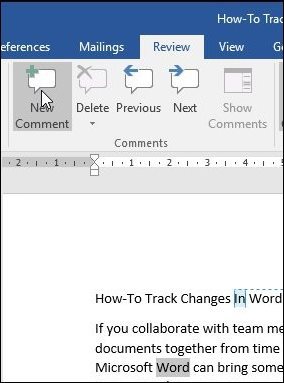
But with Word, you can go to the REVIEW tab and click New Comment, And then type your comment. Notice that it includes your name and the time you made it.
Comments are great because they allow you to add an idea or opinion to a document without actually changing anything.
In fact, you can hide them by clicking Show Comments.
But if you want to take a more direct approach, you can change the actual text of the document.
But before you do, click here to turn on Track Changes.
Now watch what happens when you make a change. This line appears in the margin. This is Word 2013’s new Simple Markup view.
When you click the line, you can see what changed.
And you can hold the mouse over the changes to see who made them and at what time. Click the line again to hide the changes.
The good thing about Track Changes is that it records every edit without making anything permanent.
You can move, copy, delete and insert text, change formatting, even change pictures and insert objects.
And the person who sent you the document can see the changes you made and decide whether to accept or reject them.
After you review a document, you can click the FILE tab and Save As.
Then, save it as a new file with your name added to the end of filename.
If you want to email it back to the sender, click FILE and Share. Then, click Email and Send as Attachment.
In the email form, add the sender’s email address on the To line, type a message, and click Send.
Up next, we’ll use Track changes to incorporate the revisions in the document.
This tutorial shows how to use Track Changes in Microsoft Word. Track Changes helps us edit documents by tracking insertions, deletions, replacements, and format changes. Word calls these edits markups.
This tutorial also includes an overview of Word’s new Modern comment tool.
We will cover twelve topics:
- How to Turn Track Changes On and Off
- How to Show and Hide Track Changes
- How to Delete Text with Track Changes
- How to Insert Text with Track Changes
- How to Replace Text with Track Changes
- How to Change Formatting with Track Changes
- How to Accept or Reject Track Changes
- How to Insert Comments
- How to Reply to Comments
- How to Resolve Comments
- How to Delete Comments
- How to Open and Close the Reviewing Pane
Watch all the steps shown here in real time!
Explore more than 200 writing-related software tutorials on my YouTube channel.
Let’s dive in…
How to Turn Track Changes On and Off
- Select the Review tab in the ribbon.

- Select the Track Changes button in the Tracking group. The button will appear darker than the rest of the ribbon when Track Changes is turned on.

- Select the Track Changes button (see figure 2) again to turn off tracking.
How to Show and Hide Track Changes
You can control how comments and edits appear by using the Display for Review and Show Markup menus in the Tracking group in the ribbon.
- Select the Display for Review drop-down menu to choose how edits and comments are displayed. The options are (A) Simple Markup, (B) All Markup, (C) No Markup, and (D) Original.

(A) Simple Markup displays the edited version of the document without visible in-line edits. However, edits are indicated by a vertical line in the left margin.
For example, if you delete a sentence, that sentence won’t appear on screen. Instead, a vertical line will appear in the left margin showing that a change was made in that location.
If you want to see the edit, select the vertical line to switch to All Markup.

Comments will be visible on the right side of the screen when in Simple Markup.
(B) All Markup displays all edits and comments.
A vertical line, like the one shown in Simple Markup (see figure 4), will appear on the left side of the screen indicating that a change was made in that location.
Select that line to switch to Simple Markup.
(C) No Markup displays the edited version of the document without any visible edits or comments.
(D) Original displays the original version of the document without any edits or comments.
- Select the Show Markup drop-down menu to choose what features Track Changes displays. (Note that this menu is called Markup Options in Word for Mac.)
I recommend showing markups for Insertions and Deletions and Formatting as well as choosing Show Only Formatting in Balloons so that your insertions and deletions will appear in the text and formatting changes will appear next to the text.

Be default, comments will appear in balloons on the right side of the text.
Important note: The remaining sections show Track Changes in the All Markup view.
How to Delete Text with Track Changes
- Select the text you want to delete.
- Select the Delete key on your keyboard. The deleted text will appear with a strikethrough in the All Markup view.

How to Insert Text with Track Changes
- Place your cursor where you want to insert new text.
- Type the new text. The insertion will appear with an underline in the All Markup view.

How to Replace Text with Track Changes
- Select the text you want to replace.
- Type the replacement text. The original text will appear with a strikethrough, and the replacement text will appear with an underline in the All Markup view.

How to Change Formatting with Track Changes
Formatting includes the font style, font size, font color, italics, bold font, underlining, superscripting and subscripting, indentations, alignment, and margins.
- Select the text you want to reformat.
- Change the format. Track Changes will automatically display the change with your other markup if you have selected formatting in the Show Markup section of the Tracking group.

How to Accept or Reject Track Changes
Edits created with Track Changes must be accepted before they become part of your document. You can accept or reject edits individually or all at once.
Accept or Reject Edits Individually
- Click on or select the insertion, deletion, or replacement text.
- Select the Accept or Reject button in the Changes group.

Pro Tip: Use the Previous and Next buttons to navigate through all the edits in the document.

Accept or Reject All Edits
Unless you are very confident in your reviewers’ expertise, I strongly caution against accepting or rejecting all edits without first checking the accuracy of each one.
- Select the Accept or Reject menu arrow in the Changes group.
- Select your preferred option: Accept/Reject All Changes or Accept/Reject All Changes and Stop Tracking.

This section covers the basics of using comments in Word. For a more in-depth look, please see my previous tutorial “How to Use Comments in Microsoft Word (Modern Comments).”
You can use the Comment tool with Track Changes turned on or turned off.
- Place your cursor near the text you want to comment on or select the text.
- Select the Review tab in the ribbon (see figure 1).
- Select the New Comment button in the Comments group.

- Type your comment into the comment text box on the right side of the screen.
If you are part of an organization, you may be able to @ mention other users in your comments.
- Select the Post button or type the keyboard shortcut Ctrl + Enter (PC) or Command + Return (Mac) to post the comment.

- If you need to edit your comment, select the Edit button (PC users see figure 15; Mac users see figure 16).


- Type your reply into the Reply text box in the other person’s comment.
- Select the Post button or type the keyboard shortcut Ctrl + Enter (PC) or Command + Return (Mac) to post the reply.

You can mark a comment as “Resolved” to tell other people (or remind yourself) that an issue has been taken care of. However, you can also reopen a resolved comment, thereby turning it back to a regular comment.
- Select the three-dot menu in the comment.
- Select Resolve thread from the drop-down menu.

The comment will no longer be visible in the contextual view on the right side of the screen.
How to Reopen Resolved Comments
- Select the Review tab (see figure 1).
- Select the Show Comments menu arrow.
- Select List from the drop-down menu.

- Select the Reopen button in the comment.

Here are two ways to delete comments.
Method 1: Select the three-dot menu in the comment and then select Delete thread from the drop-down menu.

Method 2: Place your cursor in the comment or the text connected to the comment and then select the Delete menu arrow in the Review tab.
From there, choose Delete to delete the current comment, or Delete All Comments Shown, Delete All Comments in Document, or Delete All Resolved Comments (PC only).

How to Open and Close the Reviewing Pane
The Reviewing Pane (labeled Revisions) shows all the comments and edits selected in the Show Markup drop-down menu in the Tracking group in the ribbon, along with the total number of those comments and markups in the document.
The Reviewing Pane isn’t necessary for using Track Changes, but it can be helpful when you need to find a specific edit or want to see how many edits or comments are in the document.
- Select the Review tab (see figure 1).
- Select the Reviewing Pane button in the Tracking group.
The Reviewing Pane will appear, normally on the left side of your screen.

- Reselect the Reviewing Pane button to close the Reviewing Pane.
Related Resources
How to Copy and Paste Text with Comments and Track Changes in Word
How to Remove User Names from Existing Track Changes in Microsoft Word
How to Change Your User Name for Track Changes in Microsoft Word
How to Stop Microsoft Word from Calling You “Author” in Track Changes
How to Change the Color of Track Changes in Microsoft Word
Updated January 16, 2023
This article provides macros and VBA code snippets that may help you if you are going to create Word macros to handle some operations in relation to Track Changes in Word.
You will find detailed information about how track changes works in my how-it-works article on my website wordaddins.com. The macro code below is related to that article.
IMPORTANT: The macro code in this article is made for Word 2013 and newer versions of Word. Some of the code will result in errors if used in Word 2010 and earlier versions due to changes to the Track Changes features that Microsoft introduced in Word 2013.
MACRO – Reset Advanced Track Changes Options to default
The Advanced Track Changes Options dialog box is used to define which types of changes are tracked and how tracked changes appear for the individual user.
You will find detailed information about the Advanced Track Changes Options dialog box, incl. an illustration showing the default settings, in my how-it-works article on my website wordaddins.com.
The macro below reverts the dialog box to the default settings. If you examine the code, you should be able to adjust it to other setting than the default if desired.
Comments in the macro code explain how the code relates to the dialog box.
Sub AdvancedTrackChangesOptions_SetToDefault()
    'Macro created by Lene Fredborg, Aug-2020
    'Works with Word 2013 and newer versions PC/Windows
    'This macro resets all settings in Advanced Track Changes Options to default
    'The code is organized as in the dialog box for easy reference

    With Options
        'MARKUP group
        'Insertions
        .InsertedTextMark = wdInsertedTextMarkUnderline
        .InsertedTextColor = wdByAuthor
        'Deletions
        .DeletedTextMark = wdDeletedTextMarkStrikeThrough
        .DeletedTextColor = wdByAuthor
        'Changed lines
        .RevisedLinesMark = wdRevisedLinesMarkOutsideBorder
        'Comments
        .CommentsColor = wdByAuthor

        'MOVES group
        'Track moves
        ActiveDocument.TrackMoves = True
        'Moved from
        .MoveFromTextMark = wdMoveFromTextMarkDoubleStrikeThrough
        .MoveFromTextColor = wdGreen
        'Moved to
        .MoveToTextMark = wdMoveToTextMarkDoubleUnderline
        .MoveToTextColor = wdGreen

        'TABLE CELL HIGHLIGHTING group
        'Inserted cells
        .InsertedCellColor = wdCellColorLightBlue
        'Deleted cells
        .DeletedCellColor = wdCellColorPink
        'Merged cells
        .MergedCellColor = wdCellColorLightYellow
        'Split cells
        .SplitCellColor = wdCellColorLightOrange

        'FORMATTING group
        'Track formatting
        ActiveDocument.TrackFormatting = True
        'Formatting
        .RevisedPropertiesMark = wdRevisedPropertiesMarkNone
        .RevisedPropertiesColor = wdByAuthor
    End With

    With ActiveWindow.View
        'BALLOONS group
        'Preferred width
        'Measure in (must be set before setting value)
        .RevisionsBalloonWidthType = wdBalloonWidthPoints
        'set depending on unit of measurement measurement
        If Options.MeasurementUnit = wdCentimeters Then
            .RevisionsBalloonWidth = CentimetersToPoints(9.4)
        Else
            .RevisionsBalloonWidth = InchesToPoints(3.7)
        End If
        'Margin
        .RevisionsBalloonSide = wdRightMargin
        'Show lines connection to text
        .RevisionsBalloonShowConnectingLines = True
    End With

    With Options
        'Paper orientation in printing
        .RevisionsBalloonPrintOrientation = wdBalloonPrintOrientationPreserve
    End With
End Sub
VBA code snippets for misc. Track Changes operations
Below, you will find several small VBA code snippets that may help you create your own macros for handling tracked changes.
Macro code – Turn Track Changes on and off
    'Turn on Track Changes
    ActiveDocument.TrackRevisions = True

    'Turn off Track Changes
    ActiveDocument.TrackRevisions = False
Macro code – Count number of tracked changes and comments
    Dim lngCount As Long

    'Count number of tracked changes
    lngCount = ActiveDocument.Revisions.Count

    'Count number of comments
    lngCount = ActiveDocument.Comments.Count
Macro code – Turn on/off Track Moves and Track Formatting in Advanced Track Changes Options
NOTE: Track Moves and Track formatting are document-specific settings that are saved in the document. All other options in the Advanced Track Changes Options dialog box apply to all Word documents. For details, see my comprehensive track changes article.
    'Turn on Track Moves
    ActiveDocument.TrackMoves = True

    'Turn off Track Moves
    ActiveDocument.TrackMoves = False

    'Turn on Track Formatting
    ActiveDocument.TrackFormatting = True

    'Turn off Track Formatting
    ActiveDocument.TrackFormatting = False
Macro code – Set Simple Markup, All Markup, No Markup, or Original
The code snippets below help you set options in the Display for Review menu.
    'Select Display for Review > Simple Markup
    With ActiveWindow.View.RevisionsFilter
        .Markup = wdRevisionsMarkupSimple
        .View = wdRevisionsViewFinal
    End With

    'Select Display for Review > All Markup
    With ActiveWindow.View.RevisionsFilter
        .Markup = wdRevisionsMarkupAll
        .View = wdRevisionsViewFinal
    End With

    'Select Display for Review > No Markup
    With ActiveWindow.View.RevisionsFilter
        .Markup = wdRevisionsMarkupNone
        .View = wdRevisionsViewFinal
    End With

    'Select Display for Review > Original
    With ActiveWindow.View.RevisionsFilter
        .Markup = wdRevisionsMarkupNone
        .View = wdRevisionsViewOriginal
    End With
Macro code – Show the Revision Pane
    'Show Revisions Pane Vertical
    ActiveWindow.View.SplitSpecial = wdPaneRevisionsVert

    'Show Revisions Pane Horizontal
    ActiveWindow.View.SplitSpecial = wdPaneRevisionsHoriz
Macro code – Accept and reject tracked changes
    'Accept all tracked changes in the active document
    ActiveDocument.Revisions.AcceptAll

    'Reject all tracked changes in the active document
    ActiveDocument.Revisions.RejectAll

    'Accept all tracked changes in the selection
    Selection.Range.Revisions.AcceptAll

    'Reject all tracked changes in the selection
    Selection.Range.Revisions.RejectAll
Macro code – Display of tracked changes and comments (revisions)
    'Show revisions and comments, i.e. all types of tracked changes and comments
    ActiveWindow.View.ShowRevisionsAndComments = True

    'Hide revisions and comments
    ActiveWindow.View.ShowRevisionsAndComments = False

    'Show insertions and deletions (without changing comments display)
    ActiveWindow.View.ShowInsertionsAndDeletions = True

    'Hide insertions and deletions (without changing comments display)
    ActiveWindow.View.ShowInsertionsAndDeletions = False

    'Show comments
    ActiveWindow.View.ShowComments = True

    'Hide comments
    ActiveWindow.View.ShowComments = False

    'Show formatting changes
    ActiveWindow.View.ShowFormatChanges = True

    'Hide formatting changes
    ActiveWindow.View.ShowFormatChanges = False
Macro code – Select options in Show Markup > Balloons
    'Select Show Markup - Balloons - Show Revisions in Balloons
    ActiveWindow.View.MarkupMode = wdBalloonRevisions

    'Select Show Markup - Balloons - Show all Revisions Inline
    ActiveWindow.View.MarkupMode = wdInLineRevisions

    'Select Show Markup - Balloons - Show Only Comments and Formatting in Balloons
    ActiveWindow.View.MarkupMode = wdMixedRevisions
Macro code – Turn on/off Trust Center settings related to tracked changes and comments
    'Turn on Warn before printing, saving or sending a file
    'that contains tracked changes or comments
    Options.WarnBeforeSavingPrintingSendingMarkup = True

    'Turn off "Warn before printing, saving or sending a file
    'that contains tracked changes or comments"
    Options.WarnBeforeSavingPrintingSendingMarkup = False

    'Turn on "Make hidden markup visible when opening or saving"
    Options.ShowMarkupOpenSave = True

    'Turn off "Make hidden markup visible when opening or saving"
    Options.ShowMarkupOpenSave = False

If you collaborate with team members on projects, the Track Changes feature in Word 2016 is essential, and now more powerful. Here’s how it works.
If you collaborate with team members on projects or mark up contracts with redlines, tracking changes in Microsoft Word can be a lifesaver! Track Changes is a built-in feature in Microsoft Word which truly brings sanity to the process. Even if you are not working on complex projects such as acquisitions, mergers, contracts, or authoring a best seller – Track Changes can be just as useful for small group projects, such as school assignments.
Since we last covered this feature in Microsoft Word 2010, significant improvements make Track Changes even more powerful. With the availability of Office Online, users can perform real-time collaboration on a document, which is one of the exciting new features we look at in this article.
Enable and Use Track Changes in Word 2016
Step 1: Starting Content
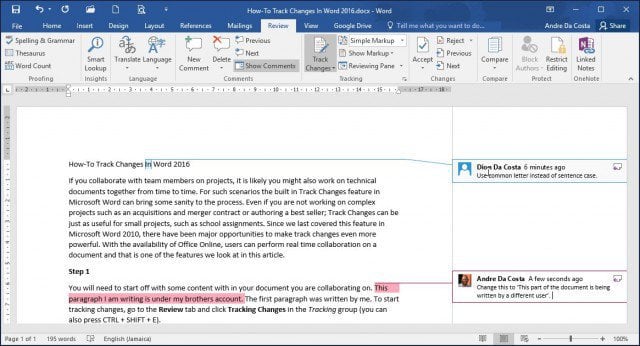
You will need to start with some content within the document you are collaborating on. A different user is writing this part of the document. I wrote the first paragraph.

Step 2: Enable Track Changes
To start tracking changes, go to the Review tab and click Track Changes in the Tracking group (you can also press CTRL + SHIFT + E.)
When Track Changes is enabled, you will see a balloon for each author on the screen’s right-hand side.
Step 3: Editing
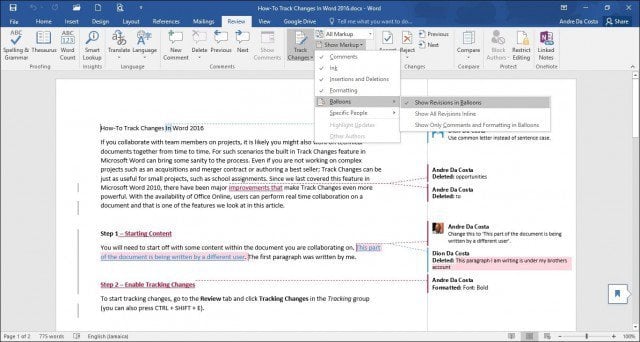
Track Changes in Word uses color coordination to avoid confusion. The first author is blue, and the second is red. When additional authors make edits, they will also be assigned a unique color.

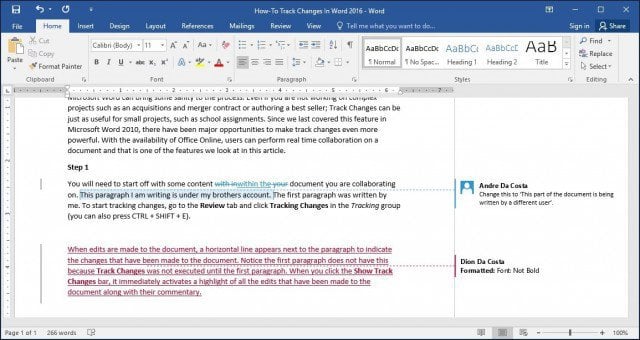
When edits are made to the document, a vertical line appears next to the paragraph to indicate the changes that have been made to the document. Notice the first paragraph does not have this because Track Changes was not enabled until further into the document. When you click the Show Track Changes bar, it immediately activates a highlight of all the edits made to the document and their commentary. If you keep it enabled and make edits, you will see the changes in real-time as you type and delete.
Step 4: Comments, Balloons & Additional Editing Tools
If you want to add a comment on a word or paragraph, highlight it, select the Review tab and click New Comment in the Comments group. Your comments will then appear on the right side of the document when the document is finalized; you can turn them off.
One of the things you’ll notice when you apply special formattings such as Bold, Italic, or Underline, a comment is automatically added to the track changes called Formatted.

You can also customize how you want balloons to appear on the document. For instance, if you want to see all the revisions added to the document by each author, click the Review tab > Show Markup menu > Balloons > Show revisions in balloons.
Revisions
The Reviewing Pane (Review > Reviewing pane) lets you review all edits by each author, which you can view vertically or horizontally on the screen. You can click a word or paragraph in the Revisions pane, and it will automatically navigate to that part of the document.

Step 5: Accept or Reject Changes made to document
If you agree with the changes that have been made to the document, you can Accept or Reject them. Click the Show Track Changes bar to highlight changes made by the other author, then go to the Review tab, click the Accept button to confirm.

You’ll now notice the changes are applied immediately.

Step 6: Compare Or Combine Documents
Another handy feature authors can take advantage of is the ability to version track a document. For instance, if two authors fork the same documents into two copies and continue working on them separately, they can later compare the two versions and combine them. As long as they are similar in structure, you can combine them to create a final document.
To compare and combine changes, select the Review tab, click Compare, select the original document in the field box, select the revised version, and then click OK.

Microsoft Word will then present a three-pane view of the document showing the main screen as the final document with combined content and the original and alternate copies in a mini window pane. When you scroll through, you can compare the changes. This is preferably done on a screen with enough screen resolution.

When you are ready to combine the documents into a final copy, go back to the Review tab, click Compare, then click Combine, select the original document in the field box, select the revised version, and then click OK.

You will then see the combined document along with the changes made by other authors in another color.

Integration with Office Online
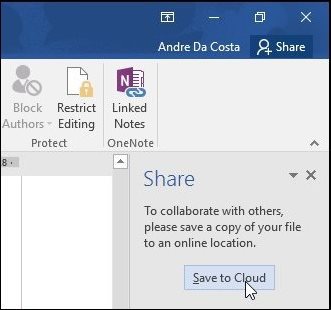
One of the killer features of Google Apps has been its real-time collaboration tools. Microsoft has finally caught up thanks to its Office Online suite, which features a web-based version of Word. A new feature in Word 2016 is sharing and viewing who is working on your document. To do that, click the Share button and save the document to your OneDrive folder.
The Share pane will then reveal additional options, with the ability to invite persons to edit the document with different restrictions. You will also notice the Block Authors and Restrict options are now enabled within the Protect group. If you use Microsoft 365 (formerly O365) in an enterprise setting, you can invite authors to collaborate.

For this article, I will use the Get a sharing link to email to additional authors I would like to collaborate with on the document.

When you or the other author load Word Online and make changes, other persons collaborating on the document will be notified in real-time.
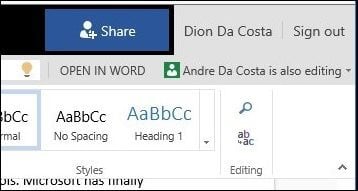
Here you can see saved edits made by the other author are color-coded in a blue highlight.

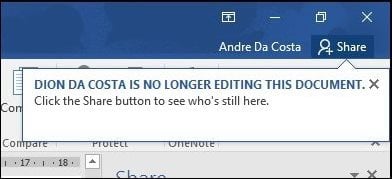
When an author is no longer editing the document, you will be notified within Word 2016.
As you can see, Track Changes is even more powerful with its real-time collaboration features. Whether you are working on projects big or small, Word 2016 can make it easy to keep everyone on the same page. Color coordination, sharing, real-time editing, and cloud integration with OneDrive add up to a compelling experience.
![]()