

Learn how to highlight separate blocks of text in Word and copy and paste them into another Word document or elsewhere.
Remember the days of highlighting text in books with a bright yellow highlighter? I did that a lot in college. I just wish I could have quickly and easily collected all the highlighted text from a book and pasted it onto pages in my notes.
Well, today you can do that in Word. If you’re reading a long document in Word and highlighting important parts, you can quickly and easily find and select all your highlighted text and copy it.
Today we’ll show you how to find and select highlighted text and how to copy and paste that text without the highlighting into another Word document.
Highlight Text
To highlight text in a Word document, select the text you want to highlight.
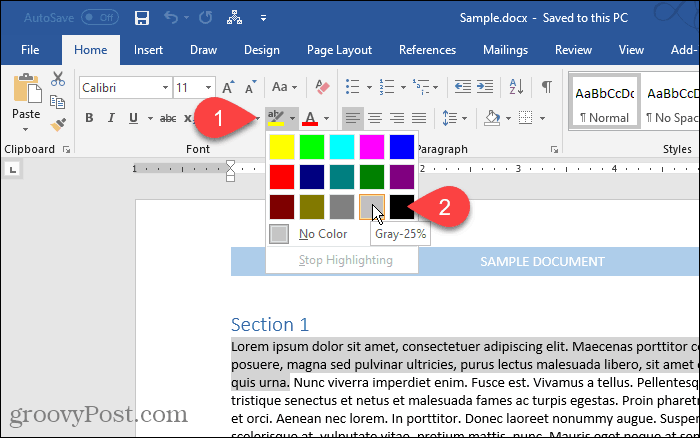
By default, the Text Highlight Color button in the Font section on the Home tab highlights the text in yellow when you click it. If you want to use a different color, click the down arrow on the right side of the button. Then, click the color you want.
The color you selected becomes the default color the next time you click the Text Highlight Color button.
Find and Select All Highlighted Text
You can manually copy all highlighted text. Start by selecting the first block of text with the mouse. Then, scroll to the next block of highlighted text and hold down the Ctrl key while you select that. Once you’ve selected all the blocks you want to copy, press Ctrl + C.
You don’t have to highlight each block of text to select multiple blocks, but it makes it easier, as you’ll see.
However, manually selecting separate blocks of text is time-consuming. You can select all highlighted text at once using the Find and Replace tool in Word.
Press Ctrl + H. On the Find and Replace dialog box, click the Find tab. Then, click More.

Click Format and then select Highlight.

Highlight displays as the Format below the Find what box.
To find and select all the highlighted text in the document, click Find In and select Main Document.
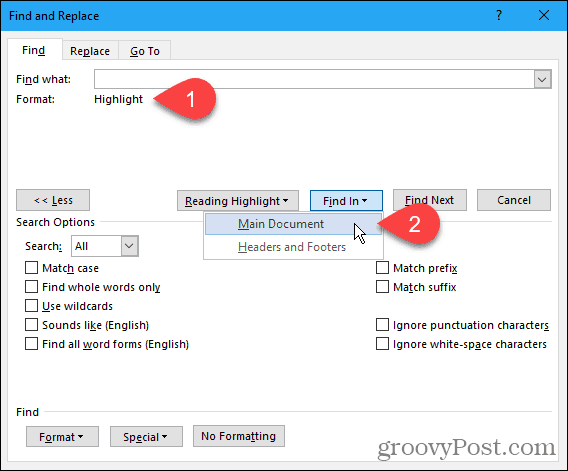
Word tells you how many highlighted items it found.
Press Esc or click the X in the upper-right corner of the dialog box to close it.

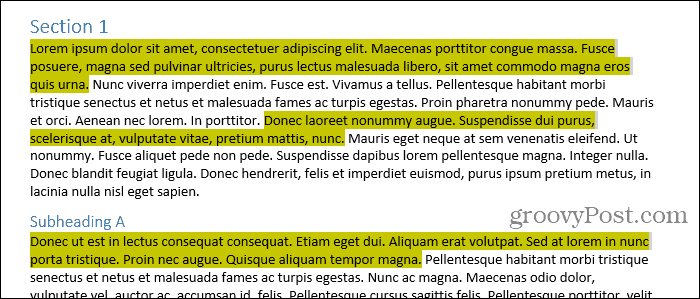
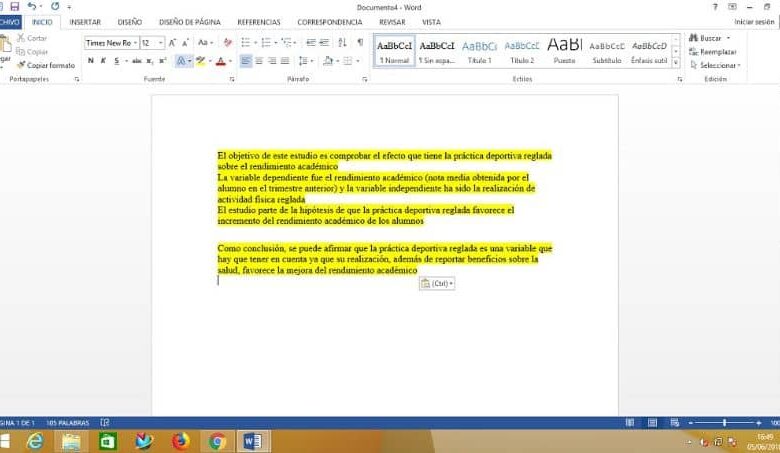
All your blocks of highlighted text are selected.
Press Ctrl + C to copy the selected text.
Paste the Selected, Highlighted Text into Another Word Document
We’re going to paste our text into a new Word document.
Go to File > New > Blank document to create a new document. Then, press Ctrl + V to paste the copied text.
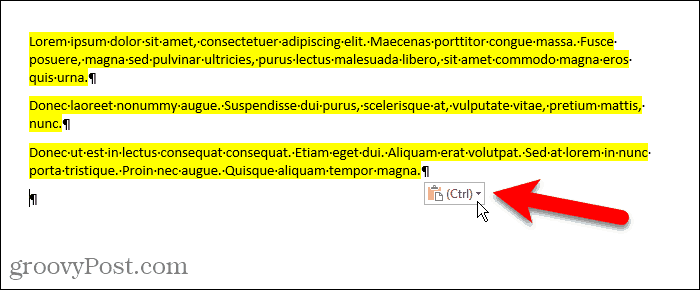
Each separate block of text is pasted on a new line.
By default, when you paste text you copied from any Word document, or any other program, the formatting automatically comes with it. So the text you just pasted remains highlighted.

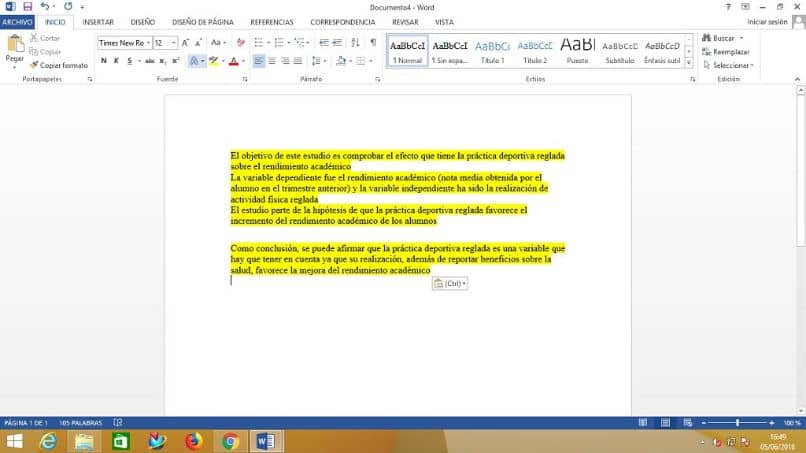
If you don’t want to keep the highlighting on the pasted text, you can paste only the text without the formatting.
Instead of pressing Ctrl + V to paste the copied text, click the down arrow on the Paste button in the Clipboard section of the Home tab. Then, click Keep Text Only.

You can also access the Keep Text Only button by clicking the Paste Options button, if you haven’t disabled it. We’ll show you in a bit where you can enable and disable the Paste Options button.
Set Keep Text Only as Default
If you want to always paste text as plain text using Ctrl + V, you can set that as the default action.
Click the down arrow on the Paste button and select Set Default Paste.
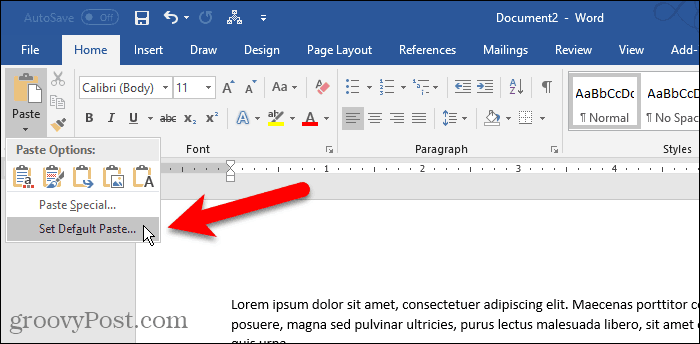
Click Advanced in the left pane on the Word Options dialog box. In the Cut, copy, and paste section on the right, select Keep Text Only from any of the first four Pasting drop-down lists. In our example, we’re copying and pasting between Word documents so we select Keep Text Only from the Pasting between documents drop-down list.
As we mentioned, text formatting is left out when pasting as text only. And you also lose images and links.
For explanations of the options available for controlling the formatting when you paste text into Word, see Microsoft’s support article.
Click OK to close the Word Options dialog box. Now you can paste the highlighted text you copied and it won’t be highlighted in the new document.

Paste Your Collected Text Almost Anywhere
You don’t have to paste the copied text into another Word document. You can paste the text into any other program that accepts text, including other word processors (like LibreOffice), text editors, and email programs (like Outlook and Thunderbird).
Happy highlighting and copying!
![]()
Table of Contents
- What words are simple subjects?
- What are the highlighted words?
- What is another word for highlighted?
- How do I move highlighted text in Word?
- How do I see highlighted text in Word?
- Where is the green highlight in Word?
- How do you move highlighted text with keyboard?
- How do you highlight an entire document?
- How do I highlight the margins in Word?
- How do you highlight specific words?
- When trying to highlight a word in a sentence what are the three ways to do so?
- What are highlighted words in the paragraph?
- What does the yellow highlight mean?
- How do you quickly highlight in Word?
- How do I get more highlight colors in Word?
- What do highlight colors mean?
- What is the best highlighter color?
- What’s the best highlighter color?
- What is better highlighter stick or powder?
- How do I choose a highlight color?
- What colors to use for highlighting?
- What Colour is best for remembering?
- What is the best color to study with?
Press “Ctrl + C” to copy all the highlighted text. To copy the highlighted text into a new Word file, click the “File” tab.
What words are simple subjects?
Simple subject definition: A simple subject is a main word or words that tell what or whom a sentence discusses, not including any modifiers….Complete Subject Examples:
- In this sentence, the “dog” is “doing” the verb, “limped.”
- Modifiers to “dog” include “the mangy old.”
- “The mangy old dog” is the complete subject.
What are the highlighted words?
Highlighted words or phrases are those made visibly different from the rest of the text, typically by a change of type font, handwriting style, or ink color, intended to draw the reader’s attention to them.
What is another word for highlighted?
Highlighted Synonyms – WordHippo Thesaurus….What is another word for highlighted?
| featured | accented |
|---|---|
| foregrounded | stressed |
| accentuated | underlined |
| spotlighted | spotlit |
| underscored | flagged |
How do I move highlighted text in Word?
Like files and folders, there are many ways to move text once it is selected:
- Cut using Ctrl+X, move your cursor to the new location of text, then paste to the new location with Ctrl+V.
- Copy using Ctrl+C, move your cursor to the new location of text, then paste to the new location with Ctrl+V.
How do I see highlighted text in Word?
Find
- Press Ctrl+F to open the Find and Replace window.
- Click More.
- Click Format.
- Select Highlight.
- Highlight should be the only ‘find’ option. Click Find Next to find the next highlighted passage.
Where is the green highlight in Word?
First of all, under “Home” tab and in “Font” group, click on the drop-down button on “Text Highlight Color” command. Pick a color to which you want change all highlight colors. For example, we choose “Bright Green” here. Then press “Ctrl+ H” to trigger the “Find and Replace” dialog box.
How do you move highlighted text with keyboard?
How to highlight text using your keyboard. To highlight with the keyboard, move to the starting location using the arrow keys. Then, hold down the Shift key, and press the arrow key in the direction you want to highlight. Once everything you want is highlighted, let go of the Shift key.
How do you highlight an entire document?
Note: To select an entire document, press CTRL+A. Press SHIFT+RIGHT ARROW.
How do I highlight the margins in Word?
Try it!
- Select Layout > Margins.
- Select Custom Margins.
- In Margins, use the Up and Down arrows to enter the values you want.
- Select OK when done.
How do you highlight specific words?
How to highlight in Word using Find
- Click Find in the Editing group or press Ctrl+F to open the Navigation pane.
- From the text dropdown, choose Options and then check the Highlight All setting (Figure B), and click OK.
- In the text control, enter video and press Enter.
When trying to highlight a word in a sentence what are the three ways to do so?
Fast Way To Highlight Words, Sentences, Lines And More In Word
- A.
- A single word , double-click on it.
- An entire paragraph , triple-click anywhere inside the paragraph or double-click on the left margin.
- A sentence , hold down Ctrl and click on the sentence.
What are highlighted words in the paragraph?
Answer. Answer: The highlighting informs the reader that this is the main information in the sentence – what the sentence is “about”. Most sentences contain important and less important information (see 24.
What does the yellow highlight mean?
This means that the quantity on the order or shipment will make your available quantity negative, but NOT your QoH.
How do you quickly highlight in Word?
Using the highlighting shortcut key
- Adding highlighting: Select the text you want to highlight, then press Ctrl+Alt+H.
- Removing highlighting: Select the highlighted text, then press Ctrl+Alt+H.
How do I get more highlight colors in Word?
Expanding Colors Available for Highlighting
- Select the text you want to highlight.
- Choose Borders and Shading from the Format menu. Word displays the Borders and Shading dialog box.
- Make sure the Shading tab is displayed. (See Figure 1.)
- From the colors displayed, select the one you want to use.
- Click OK.
What do highlight colors mean?
Highlights: Highlighting hair means isolating select strands in the hair and treating them with a haircolor or lightener to make them lighter than their base/natural color.
What is the best highlighter color?
Pink tones work best for pale to light skin and even light to medium skin. Those with pale skin can also opt for highlighters with lilac tones, which will help brighten their natural skin colour. For medium skin tones, warm shades of peach and gold work best. “It’s not easy to find a highlighter for duskier tones.
What’s the best highlighter color?
Choosing Highlighter Colors for Your Skin Tone
- Fair skin – Should “opt for highlighters with a pearlescent, icy-silver or champagne sheen”
- Neutral skin – Should “pair well with highlighters that have gold-bronze or iridescent undertones”
What is better highlighter stick or powder?
The best application method for liquid highlighters is more intensive than powder highlighters. In cream vs powder highlighter, cream highlighters work best for normal to oily skin and are great for creating a soft, dewy glow with no sparkle.
How do I choose a highlight color?
The rule of thumb when picking out a hair color is to choose tones opposite that of your skin. So for example, if you’re warm toned, you might opt for an ashier, more cool shade of highlights, and vice versa. Follow along for our breakdown of each different tone of highlights and who they look best on.
What colors to use for highlighting?
Highlighting Text The best color combinations for highlighting information are as follows: Red (#FF0000) text on a white (#FFFFFF) background. Purple (#990099) text on a white (#FFFFFF) background. Yellow (#FFFF00) text on a Prussian blue (#003366) background.
What Colour is best for remembering?
According to basic colour theory, red and yellow stimulate the mind. Red draws attention to something that is important and is good for memory retrieval, while yellow highlights points that need to be remembered and stimulates mental activity.
What is the best color to study with?
So what is the best color for studying? According to recent studies, the way color can improve study performance is by increasing alertness and neural activity through arousal. The most suitable colors for this are red, orange and yellow.
In this article, we would like to show you 2 handy methods to extract highlighted texts from your Word document.
Every so often, we are likely to highlight texts with colors when navigating through document. All these pieces of texts may scatter around the whole article but they definitely deserve our attention. Therefore, we can just export and arrange them in another document for quick review next time, saving us from scrolling mouse wheel over and over again.
Method 1: Utilize the “Advanced Find” Feature
- First off, click “Home” tab then click the upside-down button behind “Find”.
- Next choose “Advanced Find” to open the “Find and Replace” dialog box.

- In the box, put cursor inside the “Find what” text box and then click “More”.
- Then click “Format” button and choose “Highlight”.

- Next click “Find In” tab and choose “Main Document”.


Now you will see all highlight texts are in selection now, just as below:
You can copy and paste them to a new document then.
Method 2: Use Word VBA
As shown in our sample, it’s not unusual to have multiple texts in different highlighting colors. Now let’s talk about the way to get all contents in the same highlighting color first.
- First and foremost, press “Alt+ F11” to open VBA editor.
- Then click “Normal”.
- And click “Insert”.
- Next choose “Module”.

- Double click on the new module to bring out the coding space.
- Now paste the following codes there:

Sub ExtractHighlightedTextsInSameColor()
  Dim objDoc As Document, objDocAdd As Document
  Dim objRange As Range

  Set objDoc = ActiveDocument
  Set objDocAdd = Documents.Add
  objDoc.Activate

  With Selection
    .HomeKey Unit:=wdStory
     With Selection.Find
       .Highlight = True
       Do While .Execute
         If Selection.Range.HighlightColorIndex = wdYellow Then
           Set objRange = Selection.Range
           objDocAdd.Range.InsertAfter objRange & vbCr
           Selection.Collapse wdCollapseEnd
         End If
       Loop
     End With
  End With
End Sub
- Then click “Run” button.


You will have a new document with all highlighted texts in it.
Then there is another macro which shall enable you to collect all highlighted texts of the same color from multi-document. What you need to do is to organize them all in one folder and take the above steps, but replace the macro with this one:
Sub ExtractHighlightedTextsInSameColorFromMultiDoc()
  Dim objDoc As Document, objDocAdd As Document
  Dim strFile As String, strFolder As String
  Dim objRange As Range

  '  Initialization
  strFolder = "C:UsersPublicDocumentsNew folder"
  strFile = Dir(strFolder & "*.docx", vbNormal)

  Set objDocAdd = Documents.Add

  '  Precess each file in the file folder.
  While strFile <> ""
  Set objDoc = Documents.Open(FileName:=strFolder & strFile)

  With Selection
    .HomeKey Unit:=wdStory
    With Selection.Find
      .Highlight = True
      Do While .Execute
        If Selection.Range.HighlightColorIndex = wdYellow Then
          Set objRange = Selection.Range
          objDocAdd.Range.InsertAfter objRange & vbCr
          Selection.Collapse wdCollapseEnd
        End If
      Loop
    End With
  End With

  objDoc.Close
  strFile = Dir()
  Wend
End Sub
Notes:
- First as you can see, the 2 macros extract all texts in yellow. You can certainly replace the code “wdYellow” with other colors. Here is the link you can visit: https://docs.microsoft.com/en-us/previous-versions/office/developer/office-2003/aa172829(v=office.11)
- Secondly, if you want to collect all highlighted texts in different colors, you just need to delete the “If Selection.Range.HighlightColorIndex = wdYellow Then” and “End If” lines.
- Thirdly, in code line “strFolder = “C:UsersPublicDocumentsNew folder” in second macro, replace the path string path with that of the folder you have. And don’t forget to add “” at the end.
Backup is never too late
In a word, we have put so much emphasis on backup that most of you should know how important it is now. As such, we can still fail to back up on a regular basis. And the truth is, without backup, the only option left once doc corruption happens is to get a data retrieving tool.
Author Introduction:
Vera Chen is a data recovery expert in DataNumen, Inc., which is the world leader in data recovery technologies, including xlsx repair and pdf repair software products. For more information visit www.datanumen.com
If you are reading a long document in Word and marking important sections, you can quickly and easily find and select all highlighted text and copy them.
Remember when you used a bright yellow pen to mark paragraphs in a book? Everyone went to school this time. And then you’ve probably wished you could quickly and easily collect all the documents marked in the book and paste it in your notebook, right?
Today you can do it in Word. If you’re reading a long document in Word and highlighting important sections, you can quickly and easily find and select all highlighted text and copy them.
Today, this tutorial will show you how to find and select highlighted text, then copy and paste the text but no longer highlight it, into another Word document.
Highlight (mark) a text
To highlight text in a Word document, select the text you want to highlight.
By default, the Text Highlight Color button in the Font section on the Home tab highlights the text with yellow, when you click on the text. If you want to use a different color, click the down arrow to the right of the Text Highlight Color button. Then click on the color you want.
The color you selected will become the default color the next time you click the Text Highlight Color button.

Find and select all highlighted text
You can copy all highlighted text manually. Start by selecting the first text block with the mouse. Then hold down the Ctrl key while you select and move to the next highlighted text block. When you have selected all the blocks you want to copy, press Ctrl + C.
You don’t need to highlight each block of text, when you want to select multiple blocks. You will see how simple it is.
Of course, manually selecting individual blocks of text takes time. You can select all highlighted text at the same time, using Word’s Find and Replace tool.
Press Ctrl + H. On the Find and Replace dialog box, click the Find tab. Then click More .

Click Format and then select Highlight .

The Highlight feature displays as Format in Find what .
To find and select all highlighted text in the document, click Find in and select Main Document .

Word will tell you how many items are highlighted.
Press Esc or click X in the upper right corner of the dialog box to close it.

All your highlighted text blocks will be selected.
Press Ctrl + C to copy the selected text.

Paste the highlighted highlight text into another Word document
Next, we will learn how to paste selected highlight text into a new Word document.
Go to File> New> Blank document to create a new document. Then press Ctrl + V to paste the copied text.
Each individual text block is pasted on a new line.
By default, when you paste the text you copied from any Word document or any other program, the format automatically comes with it (meaning that the format remains the same, unchanged). So the text you just pasted is still highlighted.

If you don’t want to keep highlighting on pasted text, you can just paste the text without formatting.
Instead of pressing Ctrl + V to paste the copied text, click the down arrow on the Paste button in the Clipboard section of the Home tab. Then, click Keep Text Only .

You can also access the Keep Text Only button just by clicking the Paste Options button, if you have not turned off this feature. The article will show you where you can turn on and off the Paste Options button.

Set Keep Text Only as default
If you always want to paste text as plain text using Ctrl + V , you can set this as the default task.
Click the down arrow on the Paste button and select Set Default Paste .

Click Advanced in the left window in the Word Options dialog box. In the Cut, copy, and paste section on the right, select Keep Text Only from any of the first four Pasting lists. In this example, we are copying and pasting between Word documents, so choose Keep Text Only from the Pasting between documents list .
As mentioned above, the text format is ignored when selecting the Keep Text Only feature . And also linked images will be lost.
To find an explanation of the options available, help control formatting when you paste text into Word, see the following article: Control formatting when pasting text in Word.
Click OK to close the Word Options dialog box. You can now paste the copied text and it will not be highlighted in the new document.

Paste your existing text almost anywhere
You can not only paste the copied text into another Word document. You can paste this text into any other program that accepts text, including word processors (like LibreOffice), text editors and other email programs (like Outlook and Thunderbird).
Good luck!
See more:
- How to use Spike to copy and paste text blocks in Word
- How to color PDF documents on Microsoft Edge
- Instructions to turn off the Popular Highlights feature on Kindle
Remember when you used a bright yellow pen to mark paragraphs in a book? Everyone went to school this time. And then you’ve probably wished you could quickly and easily collect all the documents marked in the book and paste it in your notebook, right?
Today you can do it in Word. If you’re reading a long document in Word and highlighting important sections, you can quickly and easily find and select all highlighted text and copy them.
Today, this tutorial will show you how to find and select highlighted text, then copy and paste the text but no longer highlight it, into another Word document.
Highlight (mark) a text
To highlight text in a Word document, select the text you want to highlight.
By default, the Text Highlight Color button in the Font section on the Home tab highlights the text with yellow, when you click on the text. If you want to use a different color, click the down arrow to the right of the Text Highlight Color button. Then click on the color you want.
The color you selected will become the default color the next time you click the Text Highlight Color button.
Find and select all highlighted text
You can copy all highlighted text manually. Start by selecting the first text block with the mouse. Then hold down the Ctrl key while you select and move to the next highlighted text block. When you have selected all the blocks you want to copy, press Ctrl + C.
You don’t need to highlight each block of text, when you want to select multiple blocks. You will see how simple it is.
Of course, manually selecting individual blocks of text takes time. You can select all highlighted text at the same time, using Word’s Find and Replace tool.
Press Ctrl + H. On the Find and Replace dialog box, click the Find tab. Then click More .
Click Format and then select Highlight .
The Highlight feature displays as Format in Find what .
To find and select all highlighted text in the document, click Find in and select Main Document .
Word will tell you how many items are highlighted.
Press Esc or click X in the upper right corner of the dialog box to close it.
All your highlighted text blocks will be selected.
Press Ctrl + C to copy the selected text.
Paste the highlighted highlight text into another Word document
Next, we will learn how to paste selected highlight text into a new Word document.
Go to File> New> Blank document to create a new document. Then press Ctrl + V to paste the copied text.
Each individual text block is pasted on a new line.
By default, when you paste the text you copied from any Word document or any other program, the format automatically comes with it (meaning that the format remains the same, unchanged). So the text you just pasted is still highlighted.
If you don’t want to keep highlighting on pasted text, you can just paste the text without formatting.
Instead of pressing Ctrl + V to paste the copied text, click the down arrow on the Paste button in the Clipboard section of the Home tab. Then, click Keep Text Only .
You can also access the Keep Text Only button just by clicking the Paste Options button, if you have not turned off this feature. The article will show you where you can turn on and off the Paste Options button.
Set Keep Text Only as default
If you always want to paste text as plain text using Ctrl + V , you can set this as the default task.
Click the down arrow on the Paste button and select Set Default Paste .
Click Advanced in the left window in the Word Options dialog box. In the Cut, copy, and paste section on the right, select Keep Text Only from any of the first four Pasting lists. In this example, we are copying and pasting between Word documents, so choose Keep Text Only from the Pasting between documents list .
As mentioned above, the text format is ignored when selecting the Keep Text Only feature . And also linked images will be lost.
To find an explanation of the options available, help control formatting when you paste text into Word, see the following article: Control formatting when pasting text in Word.
Click OK to close the Word Options dialog box. You can now paste the copied text and it will not be highlighted in the new document.
Paste your existing text almost anywhere
You can not only paste the copied text into another Word document. You can paste this text into any other program that accepts text, including word processors (like LibreOffice), text editors and other email programs (like Outlook and Thunderbird).
Good luck!
See more:
- How to use Spike to copy and paste text blocks in Word
- How to color PDF documents on Microsoft Edge
- Instructions to turn off the Popular Highlights feature on Kindle

Word allows you to highlight text just as you would using a highlighter on paper. You can call out specific parts of a document using the highlighting tool. What if you want to copy all non-contiguous highlighted text into a different document?

You can manually copy all non-contiguous highlighted text by selecting the first section with the mouse. Then, scroll to the next highlighted section and hold down the “Ctrl” key as you select that text. Repeat this procedure for each highlighted section and then press “Ctrl + C”.
The manual procedure can get tedious and time-consuming. However, there is an easier way to select all highlighted sections at once so you can copy them and paste them into a separate Word document or another program.
To select all non-contiguous highlighted sections in a document, press “Ctrl + H” to open the “Find and Replace” dialog box. Click the “Find” tab.
Click the “More” button to expand the dialog box and view more options.
Click the “Format” button and select “Highlight” from the popup menu.
The “Highlight” format is listed under the “Find what” edit box. Click “Find In” and select “Main Document” from the popup menu.
A message displays how many items were found that match the criteria. Press “Esc” to close the dialog box or click the “X” in the upper-right corner of the dialog box.
All your highlighted sections are selected. Press “Ctrl + C” to copy all the highlighted text.
To copy the highlighted text into a new Word file, click the “File” tab.
Click “New” in the list of options on the left side of the “Info” screen.
On the “New” screen, click the “Blank document” item.
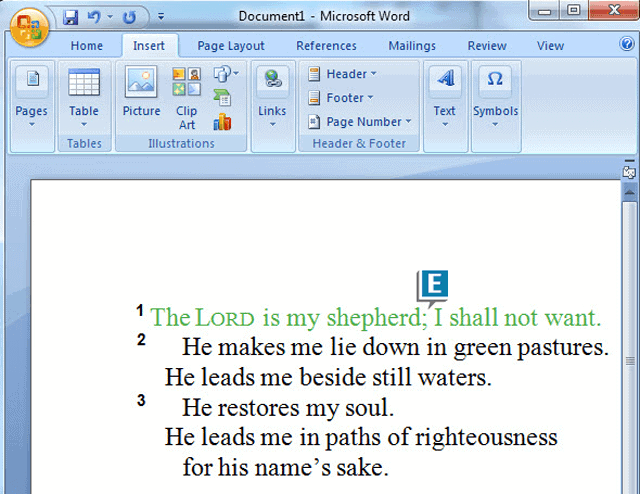
When the new, blank document opens, press “Ctrl + V” to paste the text. The highlighting is preserved and each separate chunk of text is pasted on a new line.
NOTE: If you want to remove the highlighting as you paste the text, you can use the Paste Options feature to paste only the text without the formatting.
The copied text can also be copied into other word processing programs, text editing programs, or other programs that accept text or even into an email. You don’t have to paste the copied text into a Word file.
READ NEXT
- › The New NVIDIA GeForce RTX 4070 Is Like an RTX 3080 for $599
- › HoloLens Now Has Windows 11 and Incredible 3D Ink Features
- › How to Adjust and Change Discord Fonts
- › This New Google TV Streaming Device Costs Just $20
- › Google Chrome Is Getting Faster
- › BLUETTI Slashed Hundreds off Its Best Power Stations for Easter Sale
How-To Geek is where you turn when you want experts to explain technology. Since we launched in 2006, our articles have been read billions of times. Want to know more?
Today’s post is from Morris Proctor, certified and authorized trainer for Logos Bible Software. Morris, who has trained thousands of Logos users at his two-day Camp Logos seminars, provides many training materials.
A very common question I get is exemplified in this recent email inquiry from a Logos user:
Is there a way to copy and paste the biblical text into a Word document and maintain the highlights I’ve added?
The short answer is this: some highlights easily copy and paste, while others do not.
For example:
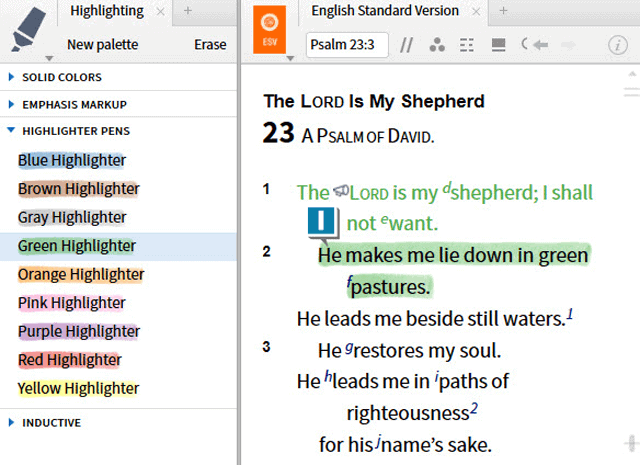
- Open any Bible to any location
- Choose Tools | Highlighting
- Select some text in the Bible (A)
- Expand the Solid Colors palette (B)
- Select the Green Foreground style (C)
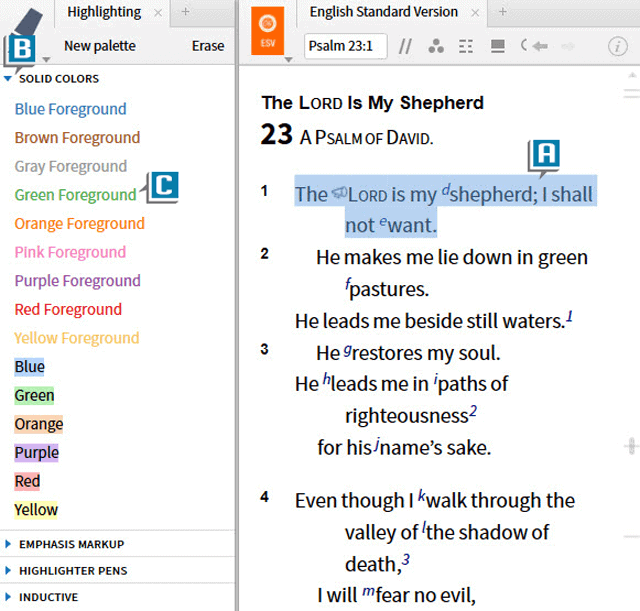
- Notice the selected text in the Bible turns green (D)

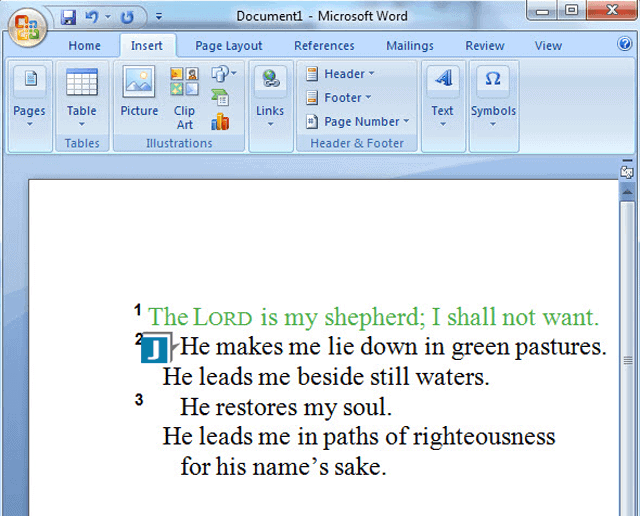
- Copy and paste the green highlighted text into a Word document
- Notice the green highlighted text is maintained in the Word document (E)
- Select some additional text in the Bible (F)
- Expand the Highlighter Pens palette (G)
- Select the Green Highlighter style (H)
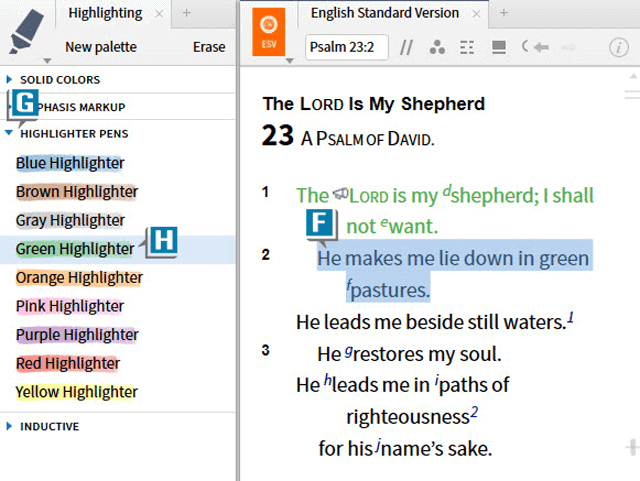
- Notice the selected text in the Bible is highlighted in green (I)
- Copy and paste the green highlighted text into a Word document
- Notice the green highlighted text is NOT maintained in the Word document (J)
What’s the difference in the above two scenarios?
Simply put, in the first example, we changed the character formatting on the text itself (turned it green). In the second, we basically added an image (green natural highlighter) to the text. Character formatting carries over in the copy–paste process; images do not.
So if you need Logos highlights in a Word document, use the Logos-provided styles that emphasize character formatting.
When you create your own styles, focus on the Font Styling (K) and Insert Text (L) sections that emphasize character formatting, including:
- Font
- Font size
- Text color
- Bold
- Italics
- Small caps
- Large caps
- Superscript
- Subscript
- Inserted text before or after the resource text
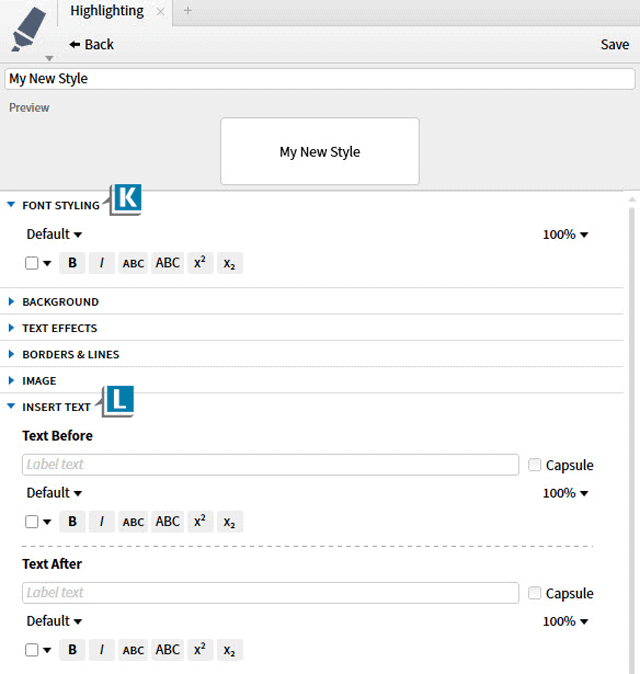
All of the above characteristics are maintained as you copy and paste highlighted resource text from Logos to a Word document.
For more detailed instructions on creating your own highlighting styles, check out the Logos 6 Training Manual: Volume 2, which is part of the Logos 6 Training Manual: Volumes 1 and 2 bundle.
And for live, hands-on training, be sure to register for an upcoming Camp Logos live training seminar, including events in Louisville, Kentucky and Dallas, Texas.
|
02-10-2013, 01:37 PM |
|||
|
|||
|
Copy paste highlighted text to another doc I am trying find/build a macro that can copy all my highlighted text in a word document and paste it to another document. Is this possible?
|


|
02-10-2013, 02:42 PM |
|||
|
|||
|
Hi
|
|
02-10-2013, 02:53 PM |
|||
|
|||
|
Hi Tony, It will be posted to a new blank doc.
|
|
02-10-2013, 04:14 PM |
|||
|
|||
|
And by «highlighted», do you mean that you have selected text (highlighted); or do you mean non-selected text that has highlights
|
|
02-10-2013, 04:18 PM |
|||
|
|||
|
The highlighted sentences are from using the yellow Highlighter feature from the menu on the homepage. It has a highlighter pen look to it.
|
|
02-10-2013, 11:18 PM |
|||
|
|||
|
Code: Sub CopyHighlightsToOtherDoc()
Dim ThisDoc As Document
Dim ThatDoc As Document
Dim r As Range
Set ThisDoc = ActiveDocument
Set r = ThisDoc.Range
Set ThatDoc = Documents.Add
With r.Find
.Text = ""
.Highlight = True
Do While .Execute(Forward:=True) = True
ThatDoc.Range.InsertAfter r.Text & vbCrLf
r.Collapse 0
Loop
End With
End Sub
All highlighted text in the ActiveDocument are copied (with an added paragraph mark to separate them) to a new document.
|
|
02-11-2013, 06:33 AM |
|||
|
|||
|
Thanks Fumei. I cant tell you how much I appreciate it : )
|
|
02-14-2013, 10:00 AM |
|||
|
|||
|
Hello awesome Forums, The reason I posted the question on this forum is b/c my question is related to MS Word and not MS Excel. I thought the other site was primary for Excel questions (hence the forum name) and would not receive an accurate response or any response at all…ie 2 different program sites. What I should of done was delete the question on the other site. Sorry for the confusion and I hope you understand. Have a great end of the week and weekend Thx
|
|
07-18-2013, 10:35 AM |
|||
|
|||
|
Fumei, Thank you again for the code you provided. Can you tweak this where it will copy and past rather than cut and paste to the other doc. Thanks
|
|
09-16-2019, 02:30 AM |
|||
|
|||
|
How can I add page number and section heading of the highlighted para along with highlighted para
|
|
07-14-2021, 12:58 AM |
|||
|
|||
|
Quote:
Originally Posted by fumei And by «highlighted», do you mean that you have selected text (highlighted); or do you mean non-selected text that has highlights Mr. fumei, What if I have a range of the document, and this range may include text, pictures, tables… etc So, I want to select the range and then copy it with the same formatting to a new document. I will appreciate your help by making such a VBA code to do my need.
|

|
04-10-2022, 09:43 AM |
|||
|
|||
|
Quote:
Originally Posted by fumei Code: Sub CopyHighlightsToOtherDoc()
Dim ThisDoc As Document
Dim ThatDoc As Document
Dim r As Range
Set ThisDoc = ActiveDocument
Set r = ThisDoc.Range
Set ThatDoc = Documents.Add
With r.Find
.Text = ""
.Highlight = True
Do While .Execute(Forward:=True) = True
ThatDoc.Range.InsertAfter r.Text & vbCrLf
r.Collapse 0
Loop
End With
End Sub
All highlighted text in the ActiveDocument are copied (with an added paragraph mark to separate them) to a new document.
This is awesome. But I was wondering if you can tweak this for my need. Basically it does the same thing but instead of pasting it in a new document I want it to override the current document. I want nothing else on that document but for the result to be pasted, then save it. This is so that I can keep the result under the same filename.
|
|
04-10-2022, 03:52 PM |
|
You don’t need a macro for that — simply:
__________________
|
|
04-15-2022, 12:52 PM |
|||
|
|||
|
Quote:
Originally Posted by macropod You don’t need a macro for that — simply: I need it to be in a macro because the next step is creating a .bat for it that will automate doing it for multiple documents inside a folder. Thank you.
|
How highlight in Word works
Learn how to highlight in Word, how to remove highlight / unhighlight in Word, find and replace highlight, etc.
In Word, you can highlight text on the screen much like you can highlight text on paper using a highlighter. In this article, you will find general information about how highlight in Word works. The basic information about highlight applies to both the built-in highlight functionality and the functionality of the DocTools HighlightManager add-in.
There is no difference between highlight added using the DocTools HighlightManager add-in and using the built-in highlight functionality in Word. The difference is that DocTools HighlightManager add-in makes the work much faster and more flexible.
15 available highlight colors
Word offers 15 highlight colors. For years, Word users have asked for more colors or the option to customize highlight colors, but so far with no luck.

Figure 1. Word highlight colors and their names.
Many of the 15 highlight colors available are too dark to use in most cases – for example, you can’t read black text on any of the darkest highlight colors.
Personally, I use yellow, bright green, turquoise and, in a few cases, red. The colors are rather glaring but I find they are the only ones that work.
Even if the Gray 25% is light enough to read the text, I don’t use it since it is impossible to distinguish it from selected text and from fields with field shading turned on.
In addition to the 15 highlight colors, there is a No Color which removes highlight.
Back to Table of Contents
How to show or hide highlight on screen and in print
- Highlight is neither font formatting nor paragraph formatting
- Highlight in Word documents is placed in its own layer that you can either show or hide
Even if it may look so, highlight in Word is not applied as font formatting or paragraph formatting like e.g. color shading. If you check the formatting of highlighted text, you will not see the highlight listed anywhere.
The display of highlight is managed via an option in Word:
- To show highlight both on the screen and in print, turn ON File > Options > Display > Show highlighter marks. See Figure 2 below.
- To hide highlight both on the screen and in print, turn OFF File > Options > Display > Show highlighter marks. See Figure 2 below.
Note that the Show highlighter marks setting is a global Word setting. It applies to all documents.
When you turn off Show highlighter marks, any highlight in documents will only be hidden, not removed. As soon as you turn on the setting, the highlight will appear again, if any. The highlight will also be visible if the document is opened on another computer with the setting turned on.
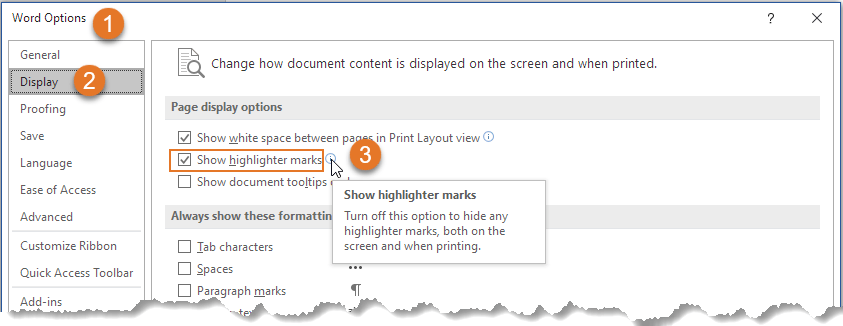
Figure 2. To show highlight on the screen and in print, turn on Show highlighter marks.
When you select a highlight color using the built-in functionality of Word, that color will be set as the default highlight color, i.e. the same color will be applied the next time you click the Text Highlight Color icon in the Home tab of the Ribbon or in the Mini Toolbar.
As opposed to the built-in functionality, the selection of a specific highlight color using the Apply Highlight command in the DocTools HighlightManager add-in will not affect your next highlight operation. The add-in lets you apply any highlight color with a click.
How to print without highlight
As explained above, you can turn highlight on and off, without removing the highlight from the document.
To print without highlight but keep the highlight in the document:
- Turn off display of highlight as explained above (see Figure 2).
- Print.
- Turn highlight on again, if you want.
In the DocTools HighlightManager add-in, you will find a command for quickly turning on and off the display of highlight instead of digging deep into the Word Options dialog box.
Highlight and track changes
Changing highlight in a document is not registered by track changes. Even if track changes is on, Word will not regard a highlight change as a revision.
The difference between highlight color and shading color
You should be aware of the difference between highlight and shading.
As mentioned above, the number of highlight colors is limited. On the other hand, you can apply any color of your choice via the Shading tools in Word. This may make users want to use shading instead of highlight in order to get access to more colors. However, the two types of coloring work in totally different ways.
As explained above, highlight in Word is neither font formatting nor paragraph formatting. The highlight lives in its own layer in Word and can be turned on or off for all content. The same is not possible with shading.
If you apply a shading color to content using a color from one of the Shading tools in Word or via the Borders and Shading dialog box, that color is applied as formatting of text, paragraphs, table cells or entire tables.
This means that the shading is applied as a characteristic or an attribute of the text, paragraph, table cell or table itself.
You can’t turn on and off shading for an entire document as you can with highlight. You can easily select all and set the shading to No Color. However, once you have removed the shading, you can’t easily apply it again if spread across the entire document. This means that it may not necessarily be a good idea to use shading as a substitute for highlight.
Highlight is often used as a temporary marking of content, e.g. during the editing process. Shading may more often be used as permanent formatting that is meant to remain in the finished document.
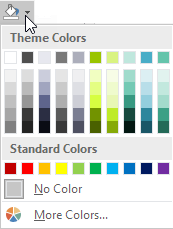
Figure 3. A color selected from a Shading palette is either font, paragraph, or table formatting.
A shading color you apply via a Shading palette or via the Borders and Shading dialog box is applied as one of the following types of formatting depending on the conditions and what you select:
- Font formatting applied to text
- Paragraph formatting applied to entire paragraph(s)
- Table cell formatting applied to entire table cell(s)
- Table formatting applied to entire table(s)
Back to Table of Contents
How to highlight in Word using the built-in functionality
You can apply highlight in different ways using the built-in functionality in Word. See METHODs 1-4 below. When you apply highlight to selected text in Word using the built-in methods described below, Word doesn’t retain the selection but collapses the selection so the insertion point is placed after the selection afterwards. Since you may often want to apply e.g. formatting to the same selection immediately after applying highlight, this is not always practical.
The DocTools HighlightManager add-in lets you decide whether or not to keep the selection after highlighting text. It can help you save time.
METHOD 1 – How to highlight selected text via the Ribbon
- Select the text to be highlighted.
- Select Home tab > click the arrow in Text Highlight Color icon and click the desired highlight color. The currently selected color works as the default highlight color and is shown in the icon. If you want to apply that color, you can just click the icon. (To remove highlight, select No Color).

Figure 4. The Text Highlight Color options in the Home tab in the Ribbon.
Back to Table of Contents
What is the default highlight color in Word?
The default highlight color in Word is the highlight color currently shown in the Text Highlight Color icon.
When you click one of the 15 colors or No Color, that color becomes the default highlight color.
The default highlight color will automatically be used by Word for the next highlight unless you select another color.
The DocTools HighlightManager add-in lets you use any highlight color without changing the default highlight color.
METHOD 2 – How to highlight selected text via the Mini Toolbar
If you have the Mini Toolbar enabled, you can also apply highlight via that toolbar:
- Select the text to be highlighted.
- In the Mini Toolbar that appears when you have selected text, click the arrow in the Text Highlight Color icon and click the desired highlight color. The currently selected color works as the default highlight color and is shown in the icon. If you want to apply that color, you can just click the icon. (To remove highlight, select No Color).
The highlight tools in the Mini Toolbar are identical to the ones on the Home tab in the Ribbon.
The Mini Toolbar only appears when you have selected text and if, at the same time, the option File > Options > General > Show Mini Toolbar on selection is turned on. See Figure 5 below.
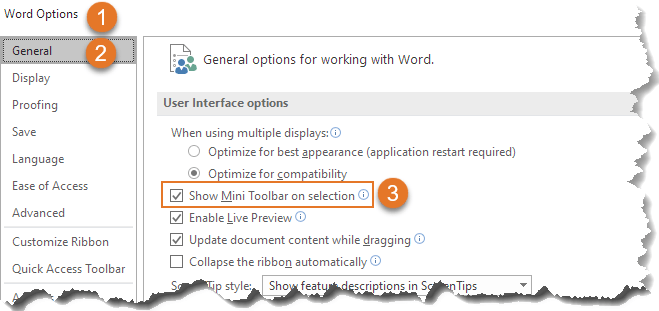
Figure 5 The Mini Toolbar is only shown if the Show Mini Toolbar on selection option is turned on.
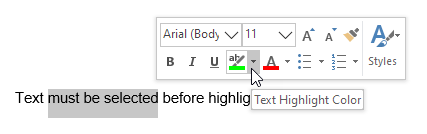
Figure 6. The Text Highlight Color options in the Mini Toolbar are the same as in the Home tab of the Ribbon.
METHOD 3 – How to highlight using a shortcut
Word has a default shortcut assigned to highlight:
- Alt+Ctrl+H
You can both apply highlight and remove highlight using the Alt-Ctrl-H shortcut. Note that this shortcut only works with the currently selected default highlight color so you still have to first make sure the desired color has been selected, either via the Home tab or the Mini Toolbar.
As opposed to how the Alt-Ctrl+H shortcut works, the DocTools HighlightManager add-in lets you assign shortcuts to each individual highlight color – customizable shortcuts have been assigned to the most useful highlight colors beforehand so they are ready for use at once. This means that the add-in makes it possible to apply any highlight color simply by pressing a keyboard shortcut without first switching color.
How the Alt+Ctrl+H shortcut works
You must select text before pressing the Alt+Ctrl+H shortcut. What happens when you press the shortcut depends on the situation. See the examples below:

Figure 7. No highlight applied to the selection beforehand.
EXAMPLE 1
If the selected text is not highlighted beforehand, Alt+Ctrl+H applies the highlight color that is currently selected as the default highlight color in Home tab > Text Highlight Color.
NOTE: If the currently selected default color is No Color, no highlight will be applied even if you press the shortcut.

Figure 8. Entire selection highlighted beforehand.
EXAMPLE 2
If the entire selected text is already highlighted (same color or mixed colors), Alt+Ctrl+H removes the highlight. This means that it works as a toggle: It adds or removes highlight depending of the selection.

Figure 9. The selected text is partly highlighted beforehand.
EXAMPLE 3
If the selected text is partly highlighted, i.e. some of the text is highlighted and other is not, Alt+Ctrl+H applies the highlight color that is currently selected as the default highlight color in Home tab > Text Highlight Color.
NOTE: If the currently selected default color is No Color, Alt+Ctrl+H removes highlight from the selection.
Back to Table of Contents
METHOD 4 – How to highlight without first selecting text
If you click the Text Highlight Color icon on the Home tab or in the Mini Toolbar without first selecting text, the cursor changes to the icon shown below (enlarged here). You can then highlight text by dragging across the text that is to be highlighted.
NOTE: If you drag across text that is already highlighted, the highlight will be removed.

Figure 10. Highlighter icon
To exit the highlighter mode, do one of the following:
Press the Escape key OR
Click the Text Highlight Color icon on the Home tab or in the Mini Toolbar OR
Select Stop Highlighting from the Text Highlight Color tools on the Home tab or in the Mini Toolbar.
Note that the DocTools HighlightManager add-in lets you apply any highlight color to a paragraph without first selecting the entire paragraph – you only need to press a shortcut.
How to unhighlight in Word
Unhighlight is the same as removing highlight. See below.
How to stop highlighting in Word
If you click inside text that is highlighted and start typing, the new text you type will inherit the highlighting from the existing text. If you want to stop highlighting text when you type the new text, you can for example do as follows – all carried out via the keyboard:
- Type the first new character, then press and hold the Shift key and press the Left Arrow key to select the typed character.
- Press Alt+Ctrl+H to unhighlight the selected character you just typed.
- Press the Right Arrow key once to move after the typed character (or you can just delete the character when finished typing in step 3).
- Then continue to type the new text.
Getting rid of highlight may be referred to as either removing highlight or unhighlight. You may also think of it as how to remove highlighted text in word even if you want to keep the text and only make the highlighting go away.
To get rid of highlight in Word – or unhighlight – you can follow the steps described for applying highlight using METHOD 1, METHOD 2, METHOD 3 or METHOD 4 above but with the difference, that you select No Color instead of one of the 15 colors.
The DocTools HighlightManager add-in provides tools that let you quickly remove highlight either from the selection or from all paragraph(s) that are fully or partly included in the selection. This means that you don’t need to spend time on first selecting the entire paragraphs to remove highlight.
How to remove highlight from a paragraph number or bullet
If you are working with Word documents with automatic numbering, you may have struggled with how to unhighlight a number in Word. The same may be true for bullets in bulleted paragraphs.
Paragraph marks and trailing spaces (spaces at the end of a paragraph) never show highlight. However, they may be highlighted – but you can’t see it.
If only the number or bullet of a paragraph is highlighted, it is because the paragraph mark of that paragraph is highlighted.
To remove highlight from a number or from a bullet, select the paragraph mark and remove the highlight. You can also select the entire paragraph or the last part of the paragraph as long as you make sure the paragraph mark is included in the selection. Then the highlight will disappear from the number/bullet. See the illustration below.
TIP: Turn on formatting marks (Ctrl+Shift+8) so you can see the paragraph marks and other non-printing characters. Paragraph marks look like this: 

Figure 11. To remove highlight from a number or bullet, select the paragraph mark and unhighlight it.
The DocTools HighlightManager add-in provides a tool that lets you quickly remove highlight from numbered or bulleted paragraphs. You only need to click a button to remove highlight from any bullet or number in the selection or in the entire document.
Back to Table of Contents
How to remove light yellow highlight that does not disappear when selecting No Color
You may experience that you open a document in which some areas are highlighted with a light or pale yellow color (see figure 12 below). The color differs from the bright yellow color in the highlight color palette. If you try to remove the light, yellow highlight by selecting No Color from the highlight palette, nothing happens.
Such pale, yellow highlight is most likely a result of the document being protected. The yellow color is used to show which areas of the document you can edit. You can turn off the highlight but it will be turned on again if you close and reopen the document. As opposed to normal highlight colors, the light, yellow color does not print. It is shown on the screen only.
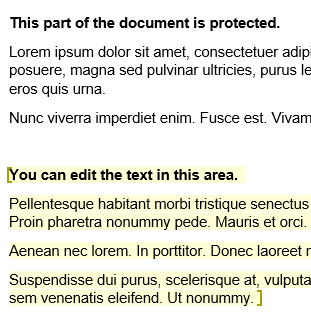
Figure 12. Example of light, yellow highlight that shows which areas you can edit in a protected document.
To remove the light yellow highlight:
- In the Ribbon, select Review tab > Restrict Editing.
- In the Restrict Editing pane that opens, turn off Highlight the regions I can edit. See figure 13 below.
You can also open the Restrict Editing pane from the Developer tab > Restrict Editing.

Figure 13. To remove the light, yellow highlight, turn off Highlight the regions I can edit.
Back to Table of Contents
How to replace highlight colors in a document
You can use Find in Word to search for highlight. You can also use Find and Replace to e.g. search for highlight and remove it or to apply highlight to a search string – or to replace one highlight color with another. See the examples below about how you can use Find and Find and Replace in relation to highlight.
How to find highlight
As you will learn below, the built-in functionality of Word does not let you search for a specific highlight color. As opposed to that, the DocTools HighlightManager add-in lets you find any specific highlight color.
Word does not let you search for specific highlight colors.
If two or more paragraphs in succession are highlighted, Word will not find them as one instance of highlight. Word interprets each paragraph as one instance of highlighting. This means that Word finds highlight in one paragraph at a time.
To find highlight in Word using the Find and Replace dialog box:
- Press Ctrl+H to open the Find and Replace dialog box. If you only want to find highlight, you can use the Find tab in the dialog box. If you want to replace highlight, make sure the Replace tab is selected.
- To find highlight, make sure the insertion point is in the Find what field.
- To expand the dialog box so all options are shown, click the More button.
- Select Format (bottom of dialog box) > Highlight. The word «Highlight» will now be shown below the Find what field. See Figure 15 below.
- If you want to find highlight no matter the text, leave the Find what field empty, otherwise enter the relevant text.
- Add other search criteria as needed and use the buttons in the dialog box to find and/or replace.
TIP: You can find both Highlight and Not highlight
If you select Highlight from the Format menu in the Find and Replace dialog box twice, the text below the Find what or Replace with field changes from Highlight to Not highlight. See Figure 15 below.
This means that you can search for and replace with both highlight and no highlight.
If you select Format > Highlight a third time, Not highlight is cleared.
To clear all Format criteria from the Find what or Replace with field, click in the relevant field, then click the No Formatting button. Alternatively, press Ctrl+Spacebar to clear the formatting.
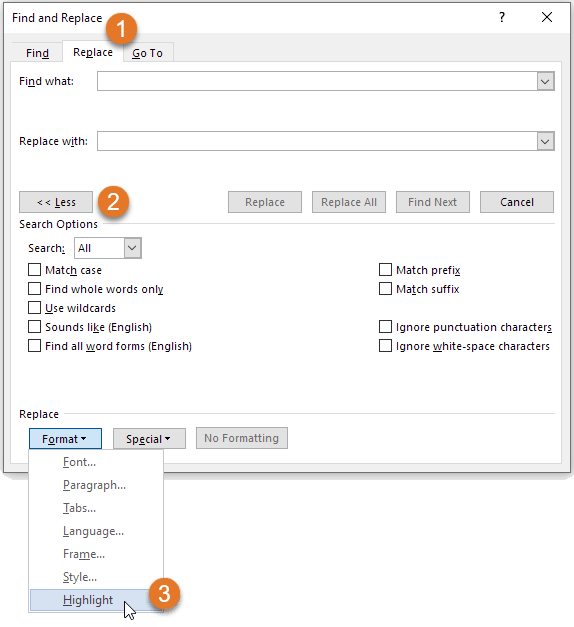
Figure 14. The Find and Replace dialog box lets you search for or replace with Highlight.

Figure 15. Example: You can search for Highlight and replace with Not Highlight.
How to replace one highlight color with another
You may sometimes want to change highlight color in Word.
You can use the Find and Replace command to replace one highlight color with another. To do this:
- Select the new highlight color you want as the default highlight color (via the Text Highlight Color in the Home tab or the Mini Toolbar).
- Press Ctrl+H to open the Find and Replace dialog box.
- In both Find what and Replace with, add Highlight (see How to find highlight above for help. Leave the text fields empty unless you want to search for specific text and/or replace with other text.
- If you want to replace any highlight, no matter the color, with the new color, click Replace All. If you only want to replace a specific color, use the Find Next button and click Replace only if relevant – repeat Find Next.
As opposed to the built-in functionality in Word, the DocTools HighlightManager add-in lets you find any specific highlight color and replace it with any other highlight color, leaving all other colors unchanged.
The DocTools HighlightManager add-in also has a Find command that finds the next highlight in the document without you needing to set up the search in the Find or Find and Replace dialog box.
Back to Table of Contents
How to copy only the highlighted text to another document
The built-in functionality of Word does not have a special feature for copying only highlighted text.
You could save a copy of the document and use Find and Replace to delete all text that is not highlighted. To do that:
- Press Ctrl+H to open the Find and Replace dialog box.
- Click in the Find what field and select Format > Highlight twice until the text Not highlight is shown below the field. Leave the field empty.
- In the Replace with field, type ^p in the field.
The ^p replaces the found non-highlighted text with a paragraph mark. This will split the remaining highlighted text in paragraphs. Otherwise, the result could be that many highlighted instances end in one paragraph. - Click Replace All.
The result may not always be useful since all the highlighted text remains with context.
The DocTools HighlightManager add-in includes a command for extracting highlight to a new document. Using that command, you can quickly create a document that includes the highlight, incl. metadata about each found instance.
Troubleshooting highlight
PROBLEM 1 – Highlight it is not visible on the screen
If you apply a highlight color to selected text and no color appears, the problem is likely to be one of the following:
- You have selected No Color instead of a color.
- The selection if of a type that can’t be highlighted.
- The Show highlighter marks setting is turned OFF. See how to turn on highlight marks.
PROBLEM 2 – Why can’t I remove highlighting in Word?
If you try to remove highlight using the methods described above and if that doesn’t remove the color, the reason may be that the color is not applied using highlight.
See PROBLEM 4 below for further details about how to get rid of other types of colors than highlight.
PROBLEM 3 – How to remove yellow highlight in Word?
A yellow background color on text in Word may not always be highlight. If you try to remove highlight using the methods described above and if that doesn’t remove the yellow color, the reason may be that the color is not applied using highlight.
See PROBLEM 4 below for further details about how to get rid of other types of colors than highlight.
PROBLEM 4 – The color doesn’t disappear when I attempt to remove highlight
What to do if you can’t remove highlighting in word? The reason may be that what looks like highlighting isn’t highlighting at all but another type of coloring.
If you select text that seems to be highlighted and try to remove the highlight and if this does not make the color go away, the reason may be that it is not highlight but one of the following:
- The color is a warm yellow highlight color added by the Find feature
- The color is color shading
- The color is light yellow and is showing which areas you can edit in a protected document
- The color is light gray field shading making it possible to distinguish fields from normal text
- The color is light gray Form Field shading making it possible to see where to fill in fields
See below for help on how to remove the five types of color.
How to remove yellow highlight added by the Find feature
If you use the Find feature in the Navigation Pane, Word highlights all occurrences that match your search criteria. You can, for example, remove the highlight by pressing the Escape key once.
How to remove color shading
- Selected the text from which you want to remove the color shading.
- Select Home tab > Paragraph group > Shading menu > No Color.
Note that shading can be applied to part of a paragraph, entire paragraphs, table cells, or entire tables. However, selecting No Color from the Paragraph group can remove shading from any of the types.
How to remove the light yellow color from a protected document
See how you remove light yellow highlight from a protected document above.
How to remove gray field shading
In documents with fields, I recommend having field shading set to always be displayed. The shading is visible on the screen only and does not print (more information about field shading). However, you can turn off field shading or set it to be displayed only on field(s) that are selected:
- Select File > Options > Advanced.
- In the Show document content group, select Field shading > Never or When selected.
- Click OK.

Figure 16. Example of a field with fields shading.
I strongly recommend having field shading shown always. If you can’t distinguish fields from other content, you risk making manual changes inside fields. The result will be that such changes are gone when you update fields.
How to remove gray Form Field shading
Word documents that are created as forms that are to be filled in by users may be created using a special type of fields: Form Fields. In newer versions of Word, forms that use Form Fields are referred to as Legacy Forms since Word now also lets you create forms using content controls.
If you see gray shading that can’t be removed using any of the methods above, Form Fields may be in use. You can quickly find out by pressing Alt+F9 to show field codes. If the areas with the gray shading now appear as { FORMTEXT }, { FORMCHECKBOX }, or { FORMDROPDOWN }, Form Fields are in use.

Figure 17. Example of Form Field without and with Form Field shading and example of Form Field showing field code.
It is practical to have Form Field shading turned on since it makes it easy to see where to fill in data. However, you can turn the Form Field shading off:
- On the Developer tab > Controls group, click Legacy Tools.
- Click the Form Field Shading icon to turn off the shading of Form Fields.
If you can’t see the Developer tab, see How to show the Developer tab in Word.
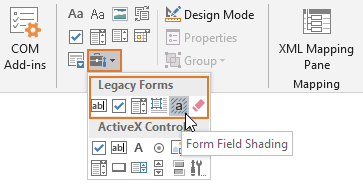
Figure 18. Form Field shading can be turned on and off via Developer tab > Controls group > Legacy Tools.
Back to Table of Contents
PROBLEM 5 – No highlight is applied when I press Alt+Ctrl+H
As explained above, Alt+Ctrl+H is the default shortcut assigned to highlight. If you press Alt+Ctrl+H and nothing happens, the problem is likely to be one of the following:
- You have not selected any text or the selection if of a type that can’t be highlighted.
- The currently selected highlight color in Home tab > Text Highlight Color is No Color,
Back to Table of Contents
PROBLEM 6 – How to customize highlight color in Word?
The quick answer is: You can’t create custom highlight colors in Word. The colors are restricted to the 15 colors shown in Figure 4 above.
You might use color shading instead of highlight. When it comes to color shading, you can define any color you want. However, highlighting and color shading are very different as explained above.
Back to Table of Contents
How to apply or remove highlight via macros (VBA)
Below, you will find small examples of macro code related to highlight. If you record a macro in Word to find out what code to use for highlighting, the result is macro code that also changes the default highlight color to the color you apply. As you will see in the code samples below, you can apply or remove highlight via VBA without changing the default color.
EXAMPLE 1: Apply yellow highlight to the selection without changing the default highlight color that is shown in the Text Highlight Color icon:
Selection.Range.HighlightColorIndex = wdYellow
EXAMPLE 2: Remove highlight from the selection without changing the default highlight color that is shown in the Text Highlight Color icon:
Selection.Range.HighlightColorIndex = wdNoHighlight
EXAMPLE 3: Select bright green as the default highlight color that will be shown in the Text Highlight Color icon:
Options.DefaultHighlightColorIndex = wdBrightGreen
Back to Table of Contents

Generate complete documents in seconds from re-usable text or graphics
Manage comments in Word fast and easy – review comments, extract comments to Word or Excel, etc.
Simplify and speed up the management of cross-references even in your most complex documents
Manage and repeat data in Word fast and easy with custom document properties and DocProperty fields
Extract insertions, deletions and comments from any Word document, incl. context and headings
Apply any highlight color or remove highlight in Word with a single click – customizable shortcuts
Browse pages, sections, headings, tables, graphics, etc. and find text in Word with a single click
Check safety-critical procedure documents for human factor issues in minutes – improve quality and help prevent errors
Create screen tips in Word fast and easy – with up to 2040 characters
Highlight can be useful in many Word documents, not least during the editing process. This article has explained how highlight in Word works. You have learnt how to highlight, how to remove highlight / unhighlight, how to solve different problems with highlight, etc. I hope this article helps you work more efficiently with highlight in Word.
Selecting all highlighted text in Word or Google Docs is a very useful option when you want to copy or get only part of the text and not all of it. It is as useful as create a macro Word document. Both allow, as if it were a piece of paper, to highlight with different colors the section of text that catches your attention the most. So differentiate it from the rest of the text.
There are times when you want to select only highlighted text of a document. This can be done manually using the mouse, which is not very difficult. However, if it is a very long write, this task becomes quite tedious.
Word and Google Docs are tools for highlighting text in different colors. Just like you would with a highlighter pen on a sheet of paper. It’s a way of mark out the areas of the document that are most important or that catch your attention.
What if you want to select highlighted text in a document and it is separated by unhighlighted paragraphs? One way is to do this with the mouse, shading the highlighted paragraphs that interest you most while maintaining the «Ctrl» key depressed .
But this option is not at all functional if it is a very long text. In addition, if for some reason you stop pressing the «Ctrl» key, you will lose all the selection work you have done. This way of doing things is therefore neither the most comfortable nor the most reliable.
However, there is a much faster and more efficient way to select all the highlighted text in Word or Google Docs that a lot of people don’t know about. This will make it easier for you to select the text in question so that you can copy it to another document or use it in another program.
Steps to Select All Highlighted Text in Word or Google Docs
Open Word document without risk of virus infection if you received it by courier. However, you can also choose one that is already made on the computer.
If you want to automatically select all highlighted text in Word or Google Docs, you need to press the «Ctrl + H» keys . This will open a dialog called “Find and Replace”. In it, you have to click on the section » Search «.
In the lower left corner of this dialog is the option » Plus “, Click here to see more search options. In the new options that you will see, find the section » Format And click on it. A context menu will appear in which you must select the section « Highlight ».
In this way, the format » Highlight Will be reflected in the search bar. Then you have to click on the button » Search in» and, in the contextual menu, choose the option » Main document ”.
A message will appear indicating how many items matching that format have been selected. Then close the conceptual menu by pressing the touch » Escape And in turn click on the X to close the dialog box. You may now notice that all the highlighted text has been selected automatically in Word or Google Docs.
Use selected text in another document

If you want to use the highlighted text in another Word document or make it easier to removal or deletion of hyperlinks in Word documents , just copy the entire selection. This can be done by clicking the right mouse button and selecting the option » Copier »In the contextual menu, or by pressing the «Ctrl + C» keys.
To open a new Word document, you must go to the » File » who is found in the menu at the top of the screen. There, look for the option » New And select it. Then press the option «Blank document» to open a new Word document. When you see it on the screen, press the «Ctrl + V» keys and all selected text will be copied.
