
When working with data in Excel, you would often have a need to copy some tables from Excel into an MS Word document.
While there is no built-in option in Excel to convert an entire Excel file to Word, you can easily copy and paste the data from an Excel document to Word.
In this tutorial, I will show you multiple ways to copy data from an Excel Worksheet into a Word document.
Copy Paste Excel Table as Plain Text in MS Word
If all you want is to copy and paste a table from Excel to Word, you can do that with a simple copy paste.
It allows you to get the static table in Word, where you can then format it (and change it if you want).
The downside of this method is that in case there are any formulas in the data, that won’t work. And since this is static table, any changes you make in Excel will not get reflected in the table you copied to Word.
But in most cases, this is exactly what you want.
Let’s see how to do this.
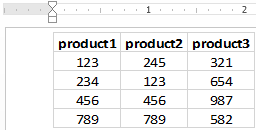
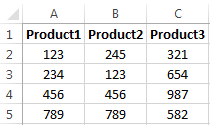
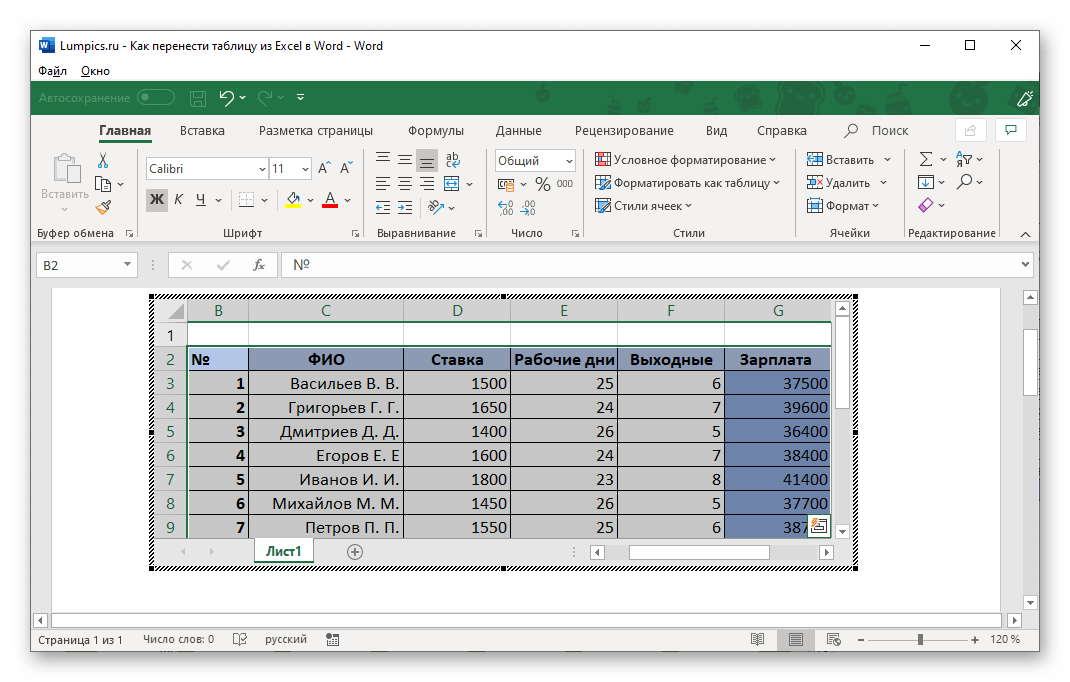
Suppose you have a dataset as shown below and you want to copy this data from Excel and insert it into Word.

Below are the steps to do this:
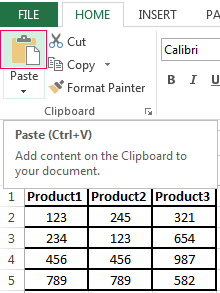
- Select the data in Excel that you want to copy to Word
- Right-click and then click on Copy (or use the keyboard shortcut Control + C in Windows or Command + C in Mac)

- Open the Word document where you want to insert this data
- Place the cursor where you want this data in the Word document
- Go to the Home tab in Word and click on Paste (or use the keyboard shortcut Control + V)

The above steps would copy the data from Excel and paste it as a static table in the Word document.

Once you have the table in Word, you can format and work with it just like any other table that you insert in Word.
A couple of things to note when using this method:
- If there are any formulas in the table in Excel, they won’t be copied. In my example, I have the formulas in the Total row, but when copied to Word, these are static values. If you make any changes to any data, you will have to manually adjust the formula values as well
- If you don’t want to get copy the formatting from Excel and would rather want to use the formatting of the Word document, you can use the option Use Destination Style option. It shows up when you click on the Paste Options icon after you have pasted the table in Word.
Embed Excel Table into Word (as a Linked Object)
In the above method, we copied the data from Excel and inserted it as a static table into Word.
Another option that you can use is to copy and paste the table into a Word document and keep the two tables linked.
This way, if you make any changes in the Excel table that you copied, you will see that these are reflected in real-time in the table in Word as well.
This is quite useful when there is a possibility that you may have to update the data in Excel and it would also need to be updated in Word. By having the linked table, you only need to make changes in Excel data and these would automatically get reflected in the table you copied to Word.
Let me show you how this works.
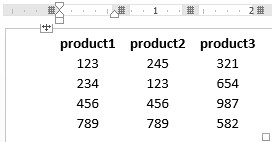
Suppose you have a table as shown below and you want to copy it from Excel to MS Word and keep this linked.
Below are the steps to do this:
- Select the data in Excel that you want to copy to Word
- Right-click and then click on Copy (or use the keyboard shortcut Control + C)
- Open the Word document where you want to insert this data
- Place the cursor where you want this data in the Word document
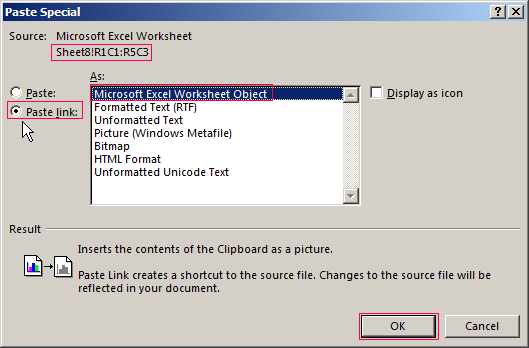
- Go to the Home tab in Word and click on Paste drop-down (click on the small inverted arrow below the Paste Special icon)

- In the options that show up, click on Paste Special

- In the Paste Special dialog box, select the ‘Paste link’ option

- Select Microsoft Excel Worksheet Object from the listed options

- Click OK
The above steps would insert the copied table in Word, where it’s still linked to the original table in Excel.
Now, if you go and make any changes in the table in Excel, you will see that the same is reflected in the table in Word (in real-time).
If for some reason your data doesn’t update in real-time, right-click on the table and click on the ‘Update Link’ option
Here are some things you need to know about this method:
- Since the two files are linked to each other, you will have to keep these together. If you’re sending the Word file to someone, you will also have to send them the Excel file, or the link would be broken and the data in Word would not update.
- Whenever the Word file opens, it will check for any updates in the Excel table. This works even if the Excel file is closed.
This method is best suited for situations where you have a large Excel file that has a lot of calculations/data/dashboards. By using this method, you can only copy a small part of the Excel file, while still being able to update the table when values change in Excel.
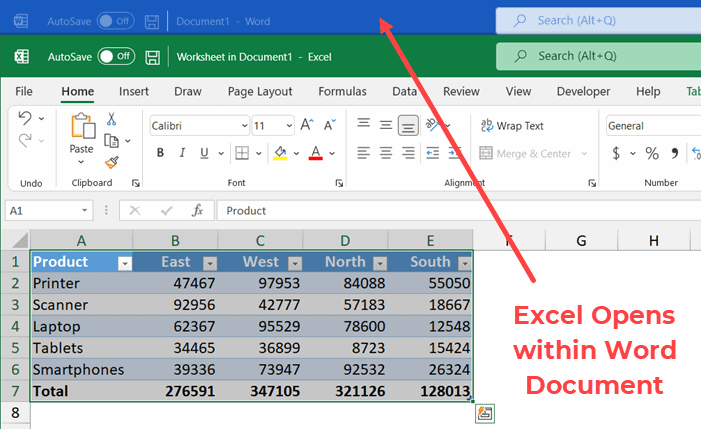
Embed Excel Table into Word
This is a really useful feature that MS Word offers. It allows you to embed an Excel document as a part of the Word document.
In the above method, I showed you how to keep the Excel and Word files together and keep them linked.
In this section, I will show you how to embed the Excel file within the Word document, so you won’t have to keep both the files (and only keep the Word file).
In layman terms, it’s as if you can open and work on an Excel worksheet from within the Word Document.
Let me show you what I mean.
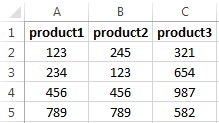
Suppose you have a table in Excel as shown below that you want to copy to Word.
Below are the steps to insert this as an Embedded Excel object in Word:
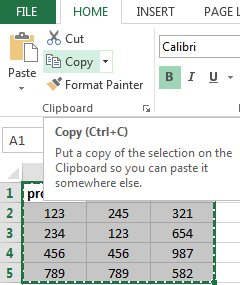
- Select the data in Excel that you want to copy to Word
- Right-click and then click on Copy (or use the keyboard shortcut Control + C)
- Open the Word document where you want to insert this data
- Place the cursor where you want this data in the Word document
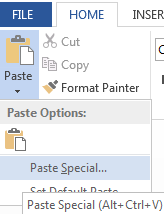
- Go to the Home tab in Word and click on Paste drop-down (click on the small inverted arrow below the Paste Special icon)
- In the options that show up, click on Paste Special
- In the Paste Special dialog box, make sure the ‘Paste’ option is selected

- Select Microsoft Excel Worksheet Object from the listed options

- Click OK
The above steps would insert the copied data from Excel to MS Word.
But what actually happnes in the backend in MS Word is that it creates a new Excel file (which is a part of the Word document itself) and shows you the table from that file.
If you double click on the table, you will notice that it opens the Excel file (from within the Word document). You get to see the familiar Excel interface while still being in the Word document.
You can make any change and also use functionality such as conditional formatting, and that would be reflected in the table. Also, any formulas you have in place would continue to work.
The biggest benefit of using this method is that you don’t have to worry about two separate files. Unlike the previous method, in this method, the Excel file is a part of the Word document.
So, if you save the Word file or share it with someone else, the Excel file would remain with it and the data would remain intact.
On the downside, if you use multiple such tables or if the data is large, it will lead to a heavy Word document (as it has to also bear the weight of the embedded Excel file).
Copy Excel Table as a Satic Image
If you’re preparing a report and all you want is a really easy way to show some table (without any need to change the data), you can insert that data as an image.
Doing this is really easy and images are also easier to manage in Word (such as placement and resizing).
With copying an images, you also have an option to link the image to the table in Excel. This way, if you make any changes in Excel table, it would be reflected in the table image in Word.
Inserting Copied Table as a Static Image in Word
Suppose you have a table as shown below in Excel:
Below are the steps to copy this table and insert it as an image in MS Word:
- Select the data in Excel that you want to copy to Word
- Right-click and then click on Copy (or use the keyboard shortcut Control + C)
- Open the Word document where you want to insert this data
- Place the cursor where you want this data in the Word document
- Go to the Home tab in Word and click on Paste drop-down (click on the small inverted arrow below the Paste Special icon)
- In the options that show up, click on Paste Special
- In the Paste Special dialog box, make sure the ‘Paste’ option is selected

- Select ‘Picture’ from the listed options

- Click OK
The above steps would insert an image of the table in the Word document.
This is just like any other image and you can resize and format it.
Inserting Copied Table as a Linked Image in Word
If you like the flexibility of managing images in Word, and still want the table to be connected to the original Excel file, you can do that as well.
Suppose you have a table as shown below in Excel:
Below are the steps to copy this table and insert it as a linked image in MS Word:
- Select the table in Excel
- Right-click and then click on Copy (or use the keyboard shortcut Control + C)
- Open the Word document where you want to insert this data
- Place the cursor where you want this data in the Word document
- Go to the Home tab in Word and click on Paste Special
- In the Paste Special dialog box, select the ‘Paste Link’ option

- Select ‘Picture’ from the listed options

- Click OK
The above steps would again give you an image that you can easily resize and format.
But since this is linked to the original table in Excel, if you make any changes in the original table, these would also be reflected in the image.
Also, remember that since this image is linked to the original data, if you plan to share this Word document with someone else, you should also share the Excel File (in case you want the link to remain as is)
In case the excel file is not available or the name is changed, the image would be just like any other regular image.
So these are some of the ways you can use to copy a table for Excel and insert it into Word. In most cases, I prefer copying and pasting Excel tables as images, as these are easier to manage. In some cases, I also prefer the embed method which allows me to open the Excel file from within Word itself.
I hope you found this tutorial useful!
Other Excel tutorials you may also like:
- How to Save Excel Charts as Images (save as PNG, JPG, BMP)
- Microsoft Excel Won’t Open – How to Fix it! (6 Possible Solutions)
- How to Quickly Copy Chart (Graph) Format in Excel
- How to Copy Conditional Formatting to Another Cell in Excel
- How to Copy and Paste Formulas in Excel without Changing Cell References
- Copy and Paste Multiple Cells in Excel (Adjacent & Non-Adjacent)
Make calculations and draw up a table more conveniently in Excel if you want to work with numeric data. In fact the program is a table. Word for such work is not quite fit.
But sometimes you have to migrate from an Excel table to Word. Also you may need to convert filled data. Converting from one format to another is unproductive and takes too much time. There should be another way.
How to move a table from Excel to Word?
The first method.
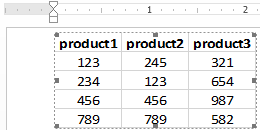
- We have a table with three columns and five rows. The boundaries are set.
- Select the data range. Click Copy in the main menu. Alternatively use the key combination Ctrl + C. Also you may select table and click the right mouse button. Than choose and click «Copy».
- Open the Word List. In the main menu use «Paste» tool. Select the «Paste Special».
- We set the parameters of a special paste. «Paste Link» — «Microsoft Excel Worksheet Object». Check is the source for insert selected correctly. Click OK.
The result of our work:
This method has some drawbacks:
- table inserted as a graphic object that is it cannot be edited.
- border spreadsheets may extend beyond the sheet.
The second method.
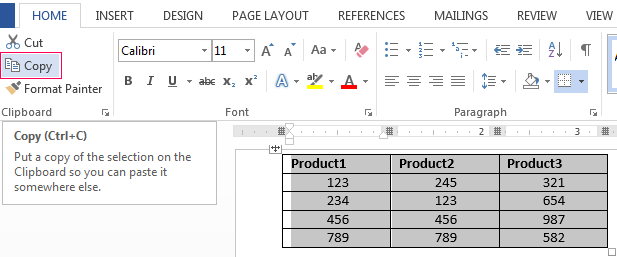
- Select a table in MS Excel. Copy it to the clipboard.
- Open MS Word. Click «Paste» or use the key combination CTRL+V (Shift+Ins). The result is next:
We can edit the data, change borders, font values and format.
This method of insertion has one significant drawback. Table with a large amount of data goes beyond the sheet.
The third method.
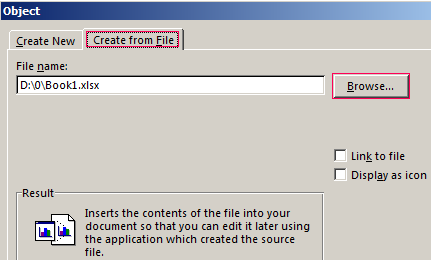
- Go to the tab «INSERT» in In Word sheet. We need the menu «Text» and the tool «Object».
- Select «Create from File» in the dialog box. Click «Browse» to find the text file Prodic1.txt.
- In the «File name:» line will be its data when the desired object will be found. Click OK.
The inserted table is a graphical object. You cannot edit the values in the cells.
You should first remove borders to insert a range of data without boundaries.
In MS Excel:
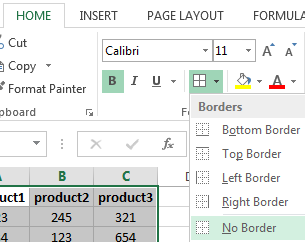
Or use a combination of keys CTRL + SHIFT + (minus).
In MS Word:

If you want to manipulate the boundaries must be inserted with the 1 and 2 method.
How to convert a table from Word to Excel?
We’ll perform a reverse transfer.
Method 1.
- Select a table in MS Word. Click «Copy» CTRL+C.
- Open MS Excel. Put the mouse in the place where the table should appear. Click «Paste» after right click.
We have a «neat» table. Therefore it inserted smoothly and accurately. If the data were filled ugly with a lot of extra characters (non-printable) so the row and column boundaries may shift. There are 2 outputs to escape from this situation:
- Clean the data manually. If there are a lot of recurring characters you can use AutoCorrect Options.
- Save the spreadsheet as text (in txt format). In this case all the extra characters will be deleted. And then insert the data from the txt to Excel.
Method 2.
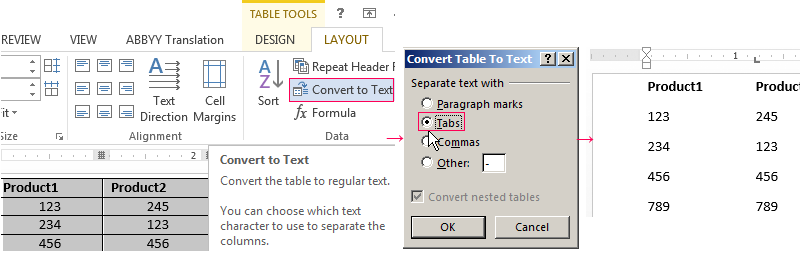
- Select the table in Word. Menu «TABLE TOOL» — «LAYOUT» — the tool «Convert to Text». In the parameters of the transformation choose «Tabs».
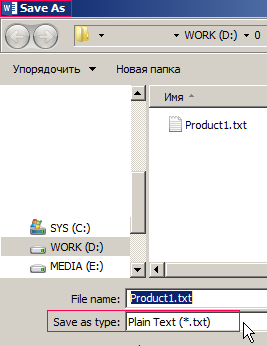
- Go to the main menu – «Save as» — «Save as type». Choose file type «Plain Text (*.txt)».
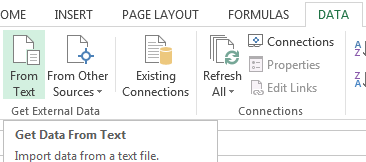
- Open Excel. «DATA» tab. «Get External Data» — «From Text».
- Now find the saved file. Click «Open». And then the «Text Import Wizard» opens.
- Set the desired conversion settings. Choose data format with delimiters. Separator character is a tab character. Done.
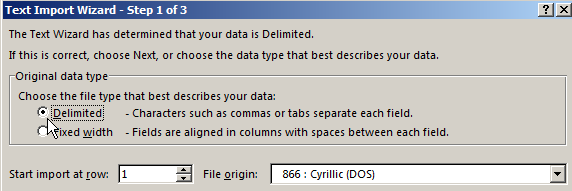
You can edit the data and draw border etc. This method of insertion removes the extra characters and prevents displacement of the cells.
Import Linked or Unlinked Excel Worksheet Data into Word Files
by Avantix Learning Team | Updated February 1, 2021
Applies to: Microsoft® Excel® and Word® 2010, 2013, 2016, 2019 or 365 (Windows)
You can easily copy or import Excel worksheet data into Word documents. When you import from an Excel file, you can choose to import linked or unlinked data. If it’s linked, you will be able to update, change and remove the links.
The following are three easy ways to import Excel data into Word by copying and pasting:
- Copy the data in the Excel file, switch to the Word document and then paste the data where you want it to appear as a static copy.
- Import the Excel data into the Word document as a linked OLE (Object Linking and Embedding) object so that when the Excel file changes, the Word document will update as well.
- Create links to the Excel data in a Word table so that when the Excel file changes, the table will update.
If you choose the second or third method, you will need to ensure that the Excel file remains in the same location with the same name or manage the link(s) using Edit Links.
Recommended article: How to Create a Table of Contents in Word
Do you want to learn more about Microsoft Word? Check out our virtual classroom or live classroom Word courses >
Inserting unlinked Excel data
You can easily copy data from Excel and paste it into a Word document. Use this method if you do not need to update the Word file when the Excel data changes.
To insert unlinked Excel data into Word:
- Open the Excel file.
- Select the data you want to copy into the Word file.
- Press Ctrl + C or right-click and select Copy from the drop-down menu.
- Open the Word file.
- Position the insertion point where you want the Excel data to appear.
- Press Ctrl + V or right-click and choose Paste Values from the drop-down menu.
With this method, the Excel data will be copied into Word as a table and the Word file will not update when the Excel file changes. Because the data is pasted into a table, you can use Word’s table tools to format it and the file will be smaller because the data is not linked.
Inserting Excel data as a linked OLE object
You can insert an OLE (Object Linking and Embedding) object when you want to insert a linked copy of Excel data. However, one of the problems with this method is that the OLE object is like a picture of the cells and you would need to format the data in Excel to appear the way you want in the Word file.
To insert Excel data into Word as a linked OLE object:
- Open the Excel source workbook.
- Select the data you want to place in the Word file.
- Press Ctrl + C or right-click and choose Copy from the drop-down menu.
- Open the Word destination document.
- Position the insertion point where you want the linked Excel data to appear.
- Click the Home tab in the Ribbon and select the arrow below Paste. A drop-down menu appears.
- Select Paste Special. A dialog box will appear.
- Click Paste Link.
- Under As, select Microsoft Excel Worksheet Object.
- Click OK.
Note the Paste link option on the left of the Paste Special dialog box:

You can double-click an OLE object to jump to the source Excel file.
Inserting linked Excel data into a Word table
You can insert Excel data as a table in Word where each cell is linked to the Excel data source. This is a great method because you can maintain links but format the data the way you want in Word.
To insert linked Excel data into a Word table:
- Open the Excel source workbook.
- Select the data you want to place in the Word file.
- Press Ctrl + C or right-click and choose Copy from the drop-down menu.
- Open the Word destination document.
- Position the insertion point where you want the linked Excel data to appear.
- Click the Home tab in the Ribbon and select the arrow below Paste. A drop-down menu appears.
- Select Paste Special. A dialog box will appear.
- Click Paste Link.
- Under As, select HTML Format.
- Click OK.
HTML format is selected by default in the Paste Special dialog box:

Click in the table in the Word document. As long as Field Shading When Selected is set in Word Options, each cell will appear with gray shading indicating that it is a field linked to Excel. You can format the table in Word.
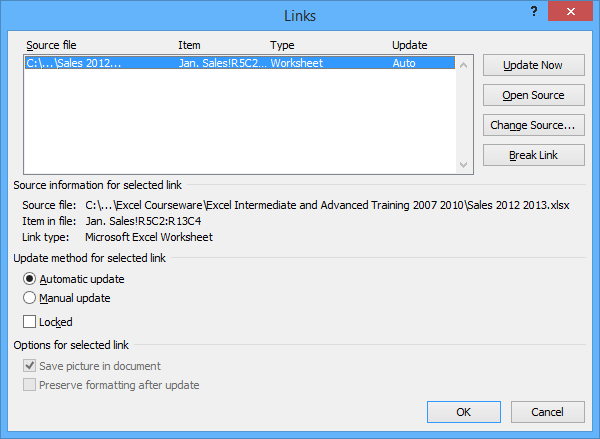
Updating or managing links
One of the benefits of linking data is that information in a destination document updates when you change information in the source document. This typically occurs automatically if both documents are open. However, if you open a Word document with links and the Excel file is not open, Word should prompt you to update the links. You may also need to update links yourself or re-establish a link if the original Excel file has been moved or renamed.
To update or manage links:
- Right-click a linked object or HTML table. A drop-down menu appears.
- Choose Linked Worksheet Object and then Edit Links. A dialog box appears.
- Under Update method for selected link, Automatic update is selected by default. You can choose Manual update if you do not want the data to update automatically. You would then need to click the link and click Update Now to update.
- Make any other changes (such as breaking a link of changing the source for a link).
- Click OK.
The Links dialog box below displays one link:
It’s not difficult to import Excel data into Word. Typically, the biggest issue occurs when other users move or rename the source Excel file but this can be managed using Edit Links and changing the source.
This article was first published on March 13, 2016 and has been updated for clarity and content.
Subscribe to get more articles like this one
Did you find this article helpful? If you would like to receive new articles, join our email list.
More resources
How to View Word Count in Word (4 Ways)
14+ Word Selection Shortcuts to Quickly Select Text
How to Superscipt or Subscript in Word (with Shortcuts)
How to Format Microsoft Word Tables Using Table Styles
How to Insert a Check Mark or Tick Mark in Word (5 Ways)
Related courses
Microsoft Word: Intermediate / Advanced
Microsoft Excel: Intermediate / Advanced
Microsoft PowerPoint: Intermediate / Advanced
Microsoft Word: Long Documents Master Class
Microsoft Word: Styles, Templates and Tables of Contents
Microsoft Word: Designing Dynamic Word Documents Using Fields
VIEW MORE COURSES >
Our instructor-led courses are delivered in virtual classroom format or at our downtown Toronto location at 18 King Street East, Suite 1400, Toronto, Ontario, Canada (some in-person classroom courses may also be delivered at an alternate downtown Toronto location). Contact us at info@avantixlearning.ca if you’d like to arrange custom instructor-led virtual classroom or onsite training on a date that’s convenient for you.
Copyright 2023 Avantix® Learning
Microsoft, the Microsoft logo, Microsoft Office and related Microsoft applications and logos are registered trademarks of Microsoft Corporation in Canada, US and other countries. All other trademarks are the property of the registered owners.
Avantix Learning |18 King Street East, Suite 1400, Toronto, Ontario, Canada M5C 1C4 | Contact us at info@avantixlearning.ca
How to Import Excel Data into a Word Table
This help page will show you how to import data from Excel into a Microsoft Word table.
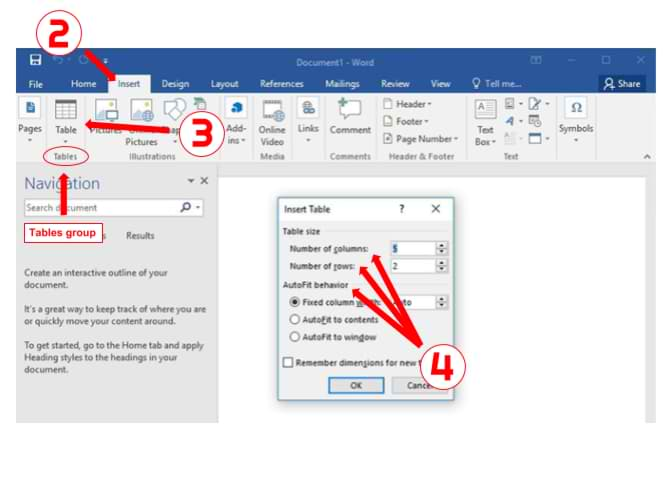
- Open a new or existing document in Microsoft Word.
- Click the «Insert» tab > Locate the «Tables» group.
- Select the «Table» icon > Choose the «Insert Table…» option.
- Set the «Number of columns,» «Number of rows,» and «AutoFit behavior» to your desired specifications > Click [OK].
- Open the Excel file and use your mouse to select the data you wish to import.
- Right-click on the range of cells you have highlighted and select «Copy.»
- Switch back to Word and highlight the table cells where you want to import the Excel data.
- Right-click on the Word table and click the option you want under «Paste Options.»
Note:
If you select the table in Word, the «Table Tools» tab will appear at the top of the page. Use this tab to format the «Design» and «Layout» of the table to meet your preferences.
Keywords: transfer, convert, change, Excel to Word, export, move, copy, import, Excel 2007, Word 2007, Microsoft, micro soft
Share This Post
-
Facebook
-
Twitter
-
LinkedIn
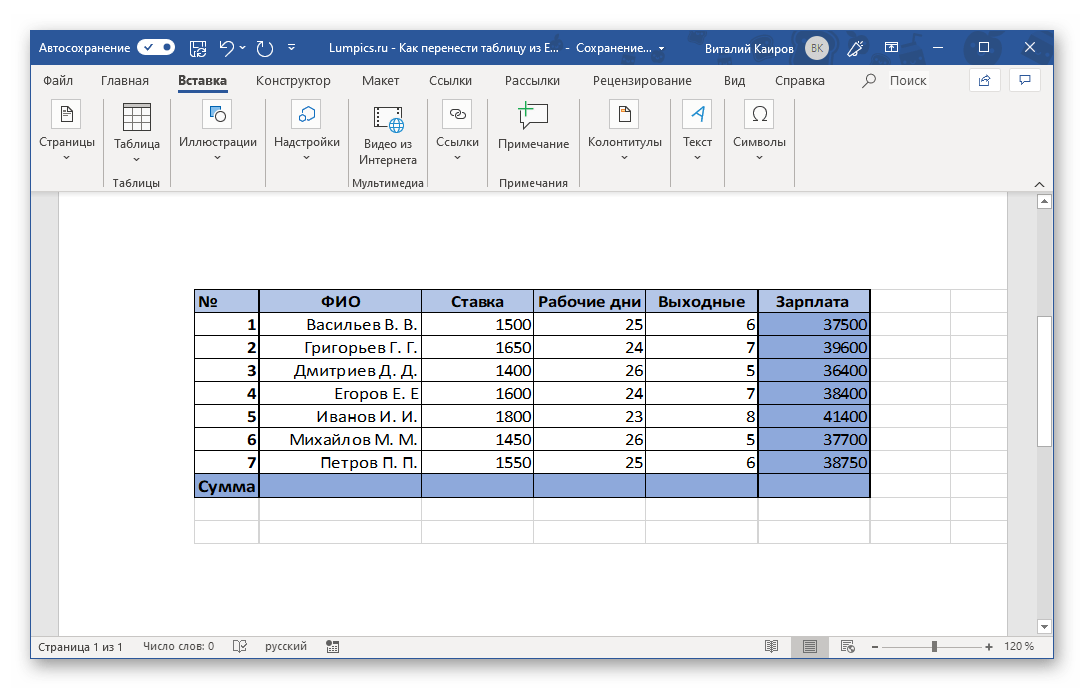
Некоторые пользователи сталкиваются с необходимостью в параллельной работе как с текстовым редактором Word, так и Excel. Иногда может понадобиться перенос таблицы в документ, с чем часто возникают трудности, ведь непонятно, как реализовать ячейки и обеспечить корректное отображение содержимого.
Я покажу три разных метода, решающих эту задачу, а вам останется только выбрать подходящий.
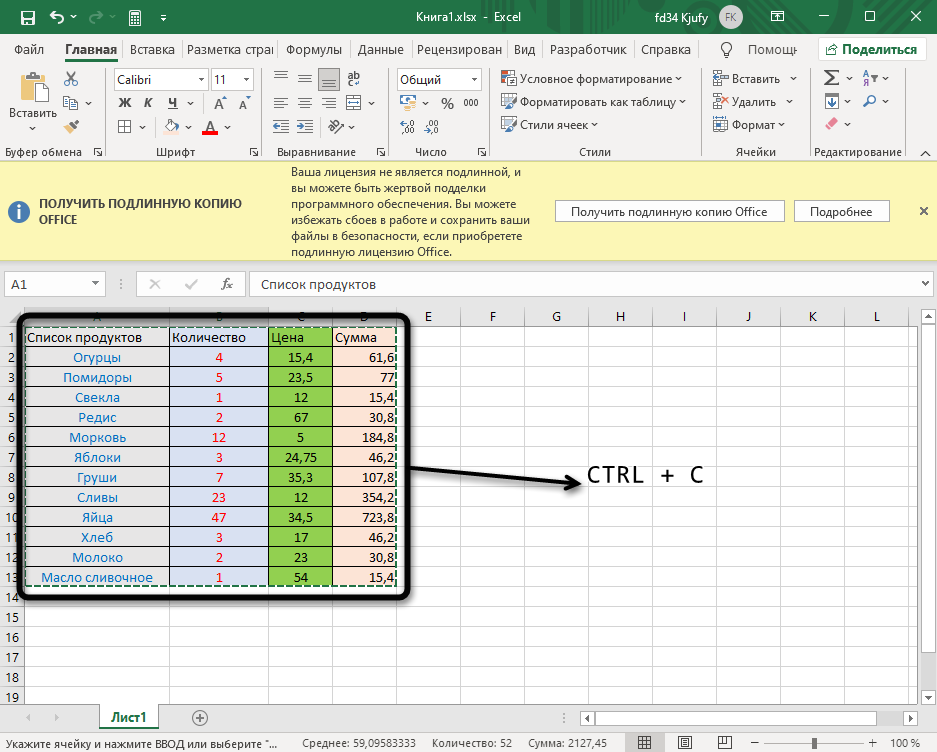
Сразу обращу внимание на то, что широкую таблицу в Excel необходимо предварительно сузить или удалить лишнее, поскольку рабочее пространство в Ворде не такое широкое и все ячейки могут просто не поместиться. Конечно, вы можете сначала проверить, как отобразится таблица в текущем ее состоянии, а затем выполнить редактирование, если это понадобится.
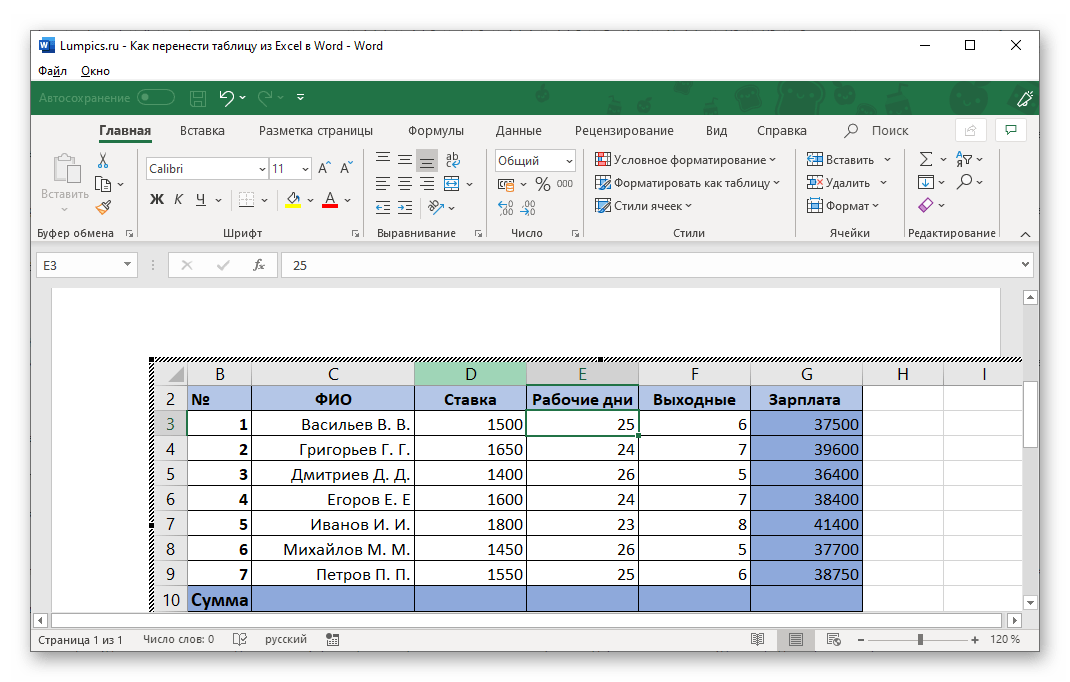
Способ 1: Простое копирование таблицы из Excel в Word
Простое копирование – самый удобный метод переноса таблицы, если она уже создана в Эксель и должна стать частью текстового документа. Для этого вам понадобится параллельно открыть две программы и использовать стандартные сочетания клавиш.
-
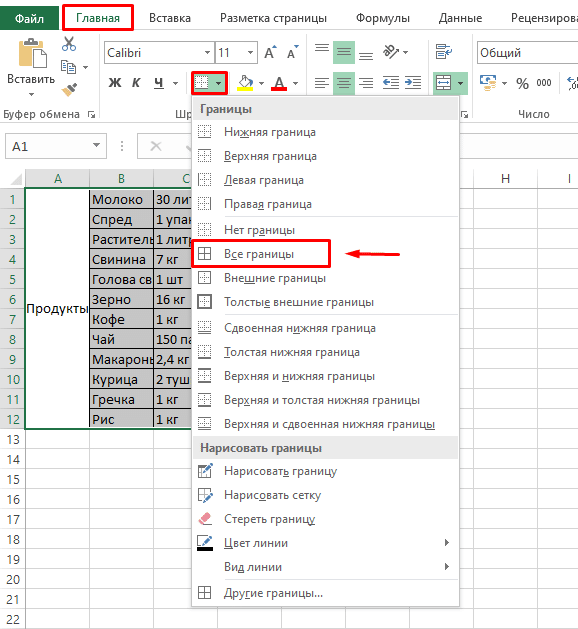
В Excel выделите всю таблицу, после чего зажмите комбинацию клавиш Ctrl + C. Если таблица не скомпонована или в ней нет выделения границ, лучше заранее решить эту задачу, иначе содержимое в Ворде отобразится без разделения на ячейки. Проще всего будет перейти в меню «Границы» и выбрать вариант «Все границы».

-
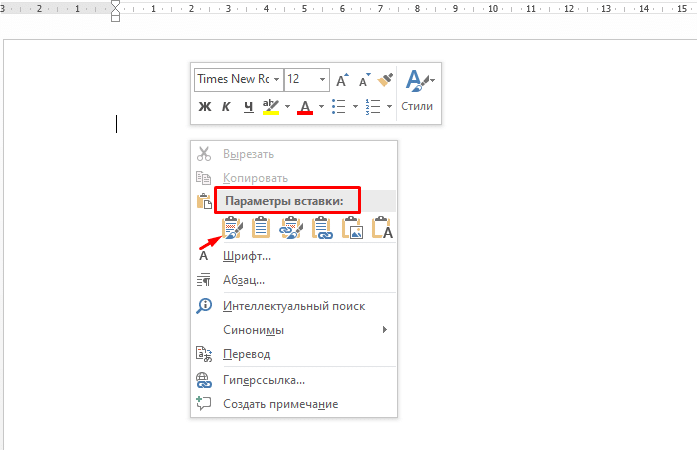
Как только таблица будет скопирована, откройте необходимый вам документ в текстовом редакторе, активируйте курсор в месте для вставки и используйте комбинацию клавиш Ctrl + V.
-
Вы увидите, что таблица вставилась корректно, но отображается слева, если не растянута на весь лист. Зажмите кнопку для ее перемещения и передвиньте в удобное место.

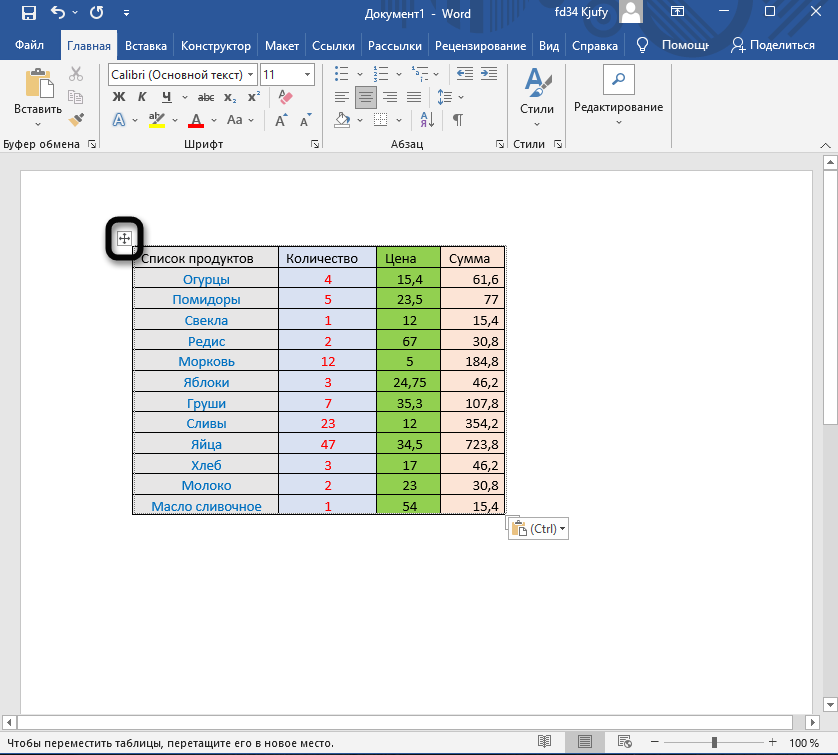
Две эти программы созданы одной компанией, а это значит, что они отлично взаимодействуют друг с другом, что и видно на примере вставки таблицы. Кстати, если в самом Ворде кликнуть по ней дважды, откроется продвинутый редактор, позволяющий вносить требуемые изменения. Более детально я его затрону в следующем методе.
Комьюнити теперь в Телеграм
Подпишитесь и будьте в курсе последних IT-новостей
Подписаться
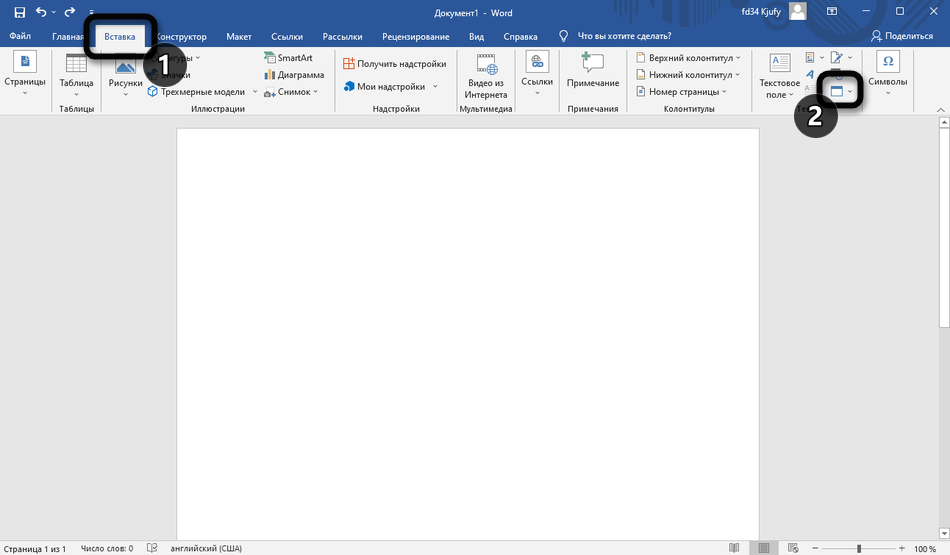
Способ 2: Вставка таблицы из файла
Не всем пользователям подходит предыдущий метод, поскольку он требует обязательного выделения границ и не всегда корректно переносит все данные, если речь идет о масштабных книгах. Если вы тоже относитесь к числу таких юзеров, попробуйте другой вариант – вставку таблицы из файла, выполнение которого выглядит так:
-
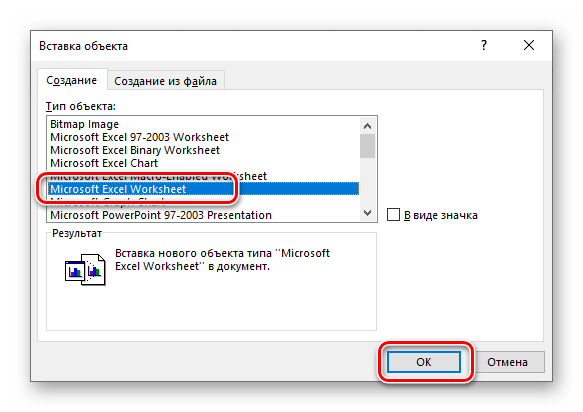
Откройте документ в Word, поставьте курсор на место расположения будущей таблицы, перейдите на вкладку «Вставка» и выберите тип «Объект».
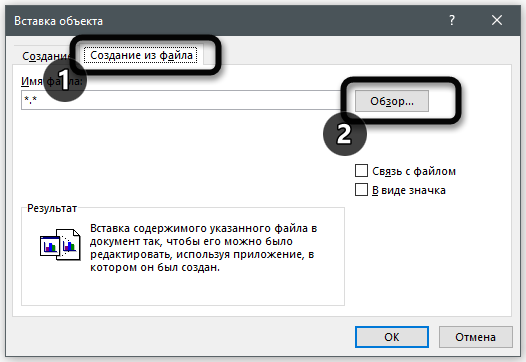
-
В новом окне вас интересует вкладка «Создание из файла» и переход к «Проводнику» для выбора подходящей Excel-книги.
-
Отыщите ее и щелкните дважды для открытия.
-
Она будет добавлена на страницу и доступна для редактирования.
-
Что касается редактирования, то осуществляется оно в отдельном модуле, открывающемся после двойного клика ЛКМ по таблице. Так вы можете без проблем редактировать ячейки и использовать функции.
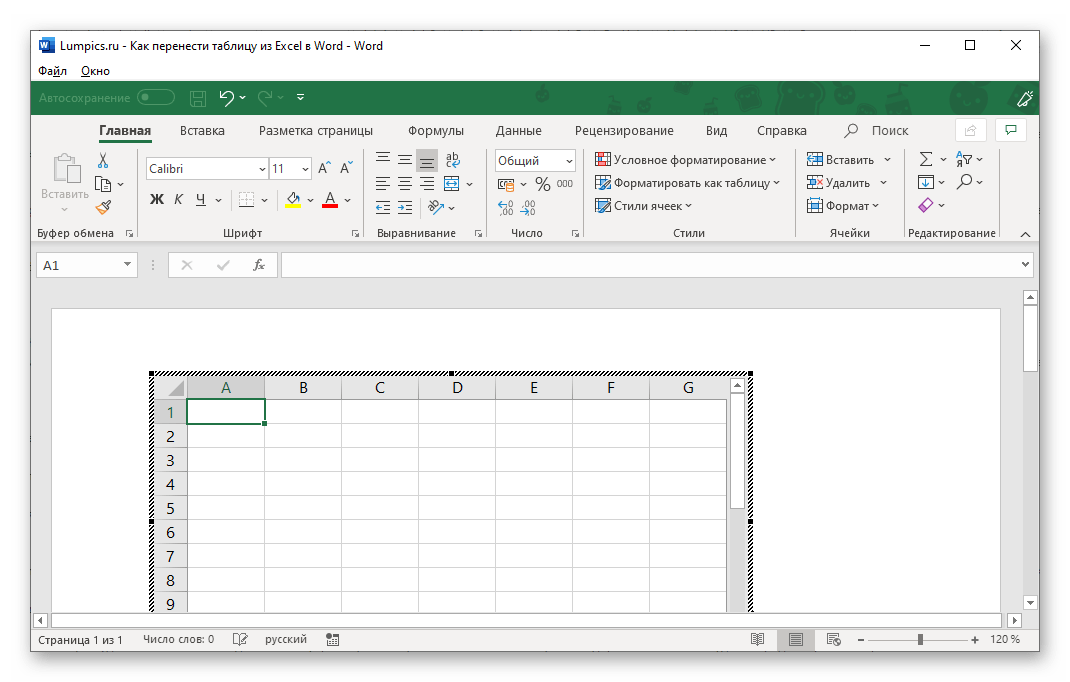
Дополнительно обращаю ваше внимание на то, что в окне «Вставка объекта» есть и другая вкладка, называющаяся «Создание». В ней вы можете выбрать вариант «Microsoft Excel Worksheet», вставив тем самым на страницу пустую таблицу. Редактируйте ее точно так же, как и обычный лист в Экселе, добавляя различные вычисления и функции.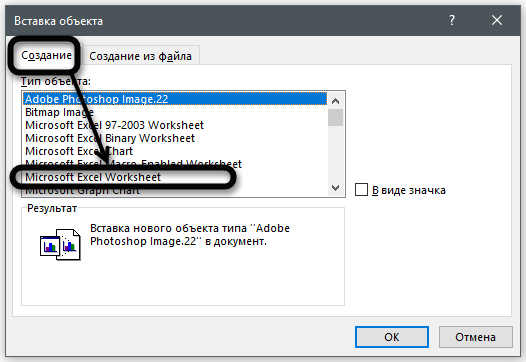
Способ 3: Создание таблицы в Word
Этот метод не совсем относится к рассматриваемой сегодня задаче, но может пригодиться в некоторых случаях. На вкладке «Вставка» вы видите меню «Таблица», из которого можно сформировать таблицу на определенное количество ячеек, вставить ее по заданным параметрам, использовать шаблоны или выбрать тип «Таблица Excel». В последнем случае произойдет такая же вставка, о которой я рассказал в завершении предыдущего метода. Используйте любой из предложенных вариантов, когда понадобится оформить таблицу в простом текстовом документе.
Единственная проблема, которая может возникнуть при переносе таблицы из Эксель, – некорректное отображение данных в случае их большого количества, то есть когда таблица широкая, о чем я уже писал в начале статьи. Если ситуацию не получится решить форматированием, попробуйте разбить таблицу на две или более части, после чего последовательно вставьте на лист в Ворде.
How to Insert Excel Data Into Word (Tables, Files, Spreadsheets)
Microsoft Word is great for working on documents—but not so great with tables of data.
If you want to put a table into a Microsoft Word document, you can work with Word’s built-in table tools, or you can insert data directly from Excel.
Guess which one is better?
Getting your Excel data into Word is easy, makes it look better, and automatically updates. It’s a no-brainer💡
There are multiple ways of getting data from Excel into Word.
I’ll walk you through the best ones, step-by-step.
Please download my free sample workbook if you want to tag along.
Free video on inserting Excel data in a Word document
Watch my video and learn how to easily copy and paste data from an Excel file to Word.
This video walked you through how to insert an Excel table in Word so it becomes a Microsoft Word table instead.
It’s done with all the classic copy-and-paste options: keep source formatting, match destination styles,
But there are other ways of getting things from Excel to Word.
Let’s dive into those below 🤿
What is an Excel Worksheet object?
Recent versions of Microsoft Office include the capability to insert objects into documents. These objects are either embedded or linked.
Embedded objects don’t update. If you include an embedded Excel object and change data in the Excel sheet you copied it from, no changes will be applied.
Linked objects update automatically. A linked Excel object will update to reflect changes in the original Excel sheet.
You can embed and link things other than Excel worksheets, but we’ll focus on Excel objects here.
It’s worth noting that the linked spreadsheet needs to remain available for this to work.
Also, this process works in reverse, as well: you can link to Word document objects from an Excel spreadsheet and insert them there in a matter of seconds.
Embedding Excel objects in Word
We’ll start with the simpler of the two: embedding an Excel object. Let’s take a look at the example workbook to see how it works.
Open the example workbook and a blank Word document.
On the first worksheet in the Excel file, you’ll see a small table. Select and copy it.

Go to your Word document, and paste the table with Ctrl + V.
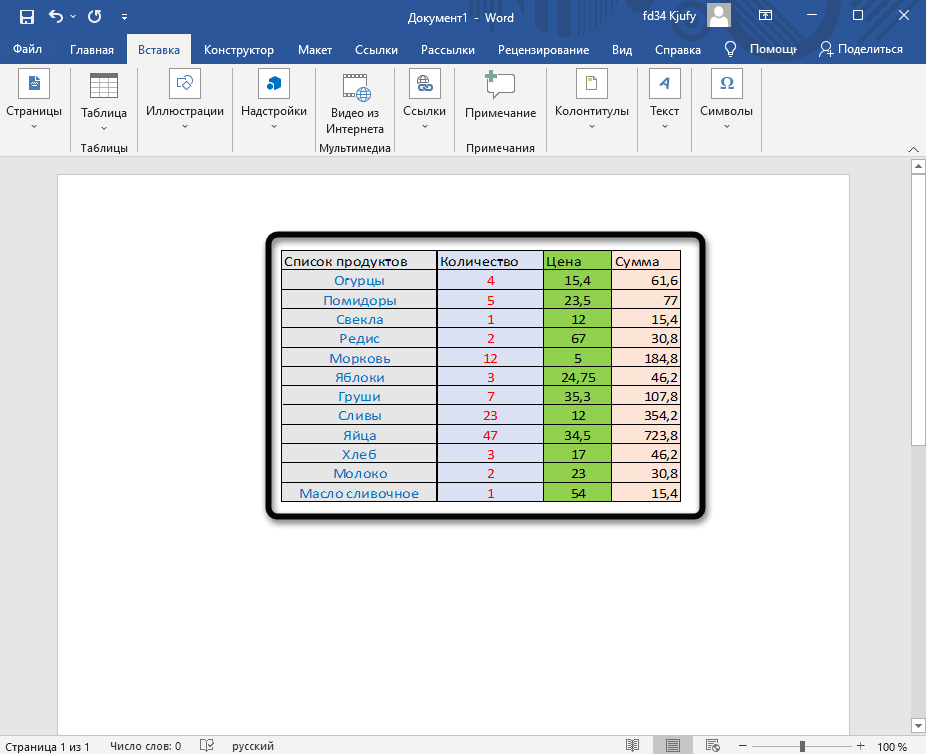
You’ll see a table like this one:

If you click into this table, nothing notable will happen—you can edit the names of the months or the numbers, and they’ll change.
If you try inputting an Excel formula, however, it will only display as text.
Head back to the Excel worksheet and copy the table again.
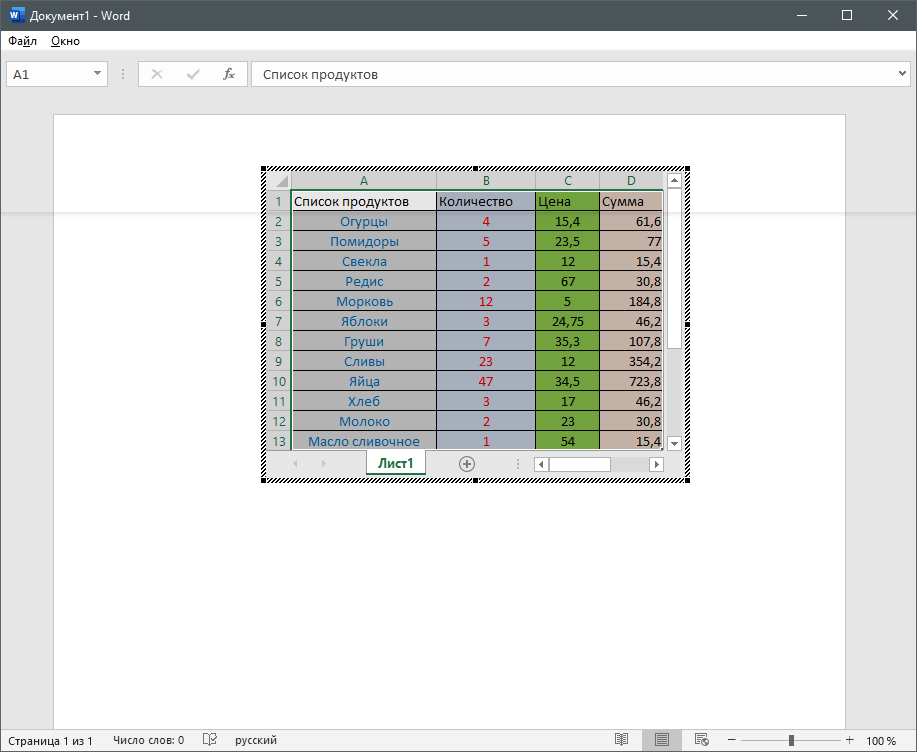
In Word, click the Home tab of the Ribbon, and select Paste > Paste Special. In the resulting pop-up window, click on the Worksheet Object, and click OK.

You’ll now see a table that looks a bit different:

At first, it looks like the distinguishing feature of this table is gridlines.
But if you double-click the table, you’ll get a surprising new interface:

As you can see, this gives you an embedded version of Excel within Microsoft Word.
All because it’s a linked object. Pretty cool, huh?😎
You can do all the things you’re used to in Excel: use and edit formulas, apply conditional formatting, add new rows and columns, sort and filter data, and everything else you’ve come to expect from Excel.
And source formatting (from the Excel worksheet) is transferred to the Word document.
In short, it gives you a lot more table-editing power than you get with the standard Microsoft Word interface.
To exit the Excel interface, click outside of the table, and you’ll go back to the regular editor for your document.
If you go back to the Excel spreadsheet and make an edit in the table, you’ll see that the Excel object doesn’t update. So if your calculations change, or you get new data and add it to the spreadsheet, you’ll need to update your Word document manually.
Let’s fix that.
Linking Excel objects in Word
As I mentioned before, embedded objects don’t automatically update. Linked objects, on the other hand, do.
And this can save you a lot of time.
Fortunately, linking an Excel object in Microsoft Word is easy.
The example workbook we used previously is the source Excel file.
Copy the table from the example workbook, and head back to the Word file. Again, click Paste > Paste Special in the Home tab. Again, select Microsoft Excel Worksheet Object.
This time, however, you’ll need one more click. On the left side of the window, you’ll see two radio buttons. One says Paste, and the other says Paste Link. Click the button next to Paste Link:

After hitting OK, you’ll get another table in your Word document. This one looks the same as the previous one:

There’s an important difference, however ⚠️
Let’s go back to the original Excel file and change one of the values.
We’ll change May’s value from 9 to 10.
Here’s what happens:
It might not be super clear in the GIF above, but the linked table automatically updates to match the Excel spreadsheet, while the embedded table doesn’t.
In other words, the Excel file changes are automatically applied to the Word document.
Insert an Excel worksheet in a Word document
Linking an Excel worksheet is the best way to get Excel data into Word because Excel is the best tool for working with spreadsheets.
If you want to insert a new object, you can insert a new spreadsheet into your Word document and work on it with the in-Word Excel tool.
To be completely honest, I don’t understand why you wouldn’t just work in Excel first, but I thought you might want to know anyway!
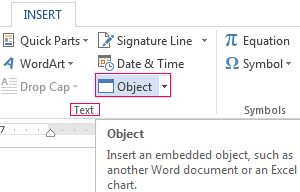
To insert a blank Excel worksheet object into the Word file, go to the Insert tab on the Ribbon.
Click the Object button in the Text group, then find the Microsoft Excel Worksheet object option.
This opens up the trusty ol’ object dialog box.

Hit OK, and you’ll get a blank worksheet in your Word document.
When you want to edit it, double-click the worksheet and you’ll open the Excel editor right inside of Word.

As before, you can do all the things you usually do in Excel right from Word in this worksheet.
And that’s an easy way of getting data from Excel to Word by making it an embedded object in the Word doc.
That’s it – Now what?
Linking data from Excel to Word documents is a simple automation that can save you a lot of time.
But obviously, it’s just a small part of Excel vast arsenal of functions and features.
The most important functions, though, are: IF, SUMIF, and VLOOKUP.
You learn all those 3 functions + how to effectively clean data in my free 30-minute Excel course sent straight to your inbox in just a few minutes.
Other relevant resources
If you want to automate your work between Word and Excel, you most definitely need to take a look at my guide to mail merge (I love mail merge💖).
Kasper Langmann2023-01-27T21:19:47+00:00
Page load link
Word и Excel — приложения офисного пакета Microsoft. Поэтому эти программы тесно взаимосвязаны. Они позволяют создавать таблицы и редактировать их. Однако не все пользователи знают, как перенести таблицу из Excel в Word. Ниже приведены пошаговые инструкции для таких случаев.
Содержание
- Как вставить таблицу Excel в Word: 4 способа
- Способ 1: Простое копирование и вставка
- Способ 2: Копирование и специальная вставка
- Способ 3: Вставка таблицы из файла
- Способ 4: Самостоятельное создание таблицы в Word
Как вставить таблицу Excel в Word: 4 способа
Благодаря тесной интеграции между Ворд и Эксель можно пользоваться схожими функциями в разных документах, а также экспортировать и импортировать объекты при условии их совместимости. В частности, можно перенести таблицу из листа Excel в Word.
Для этого предусмотрено 4 способа. Ниже к каждому из них приводится пошаговая инструкция. Однако прежде стоит уменьшить ширину столбцов или удалить лишние данные в Эксель, так как там рабочая область шире. Из-за этого ячейки при перемещении в Ворд могут попросту не отобразиться.
Способ 1: Простое копирование и вставка
Удобнее всего перемещать табличные данные из Excel в Word, чтобы они стали частью текстового документа, — простым копированием. Обе программы должны быть одновременно открыты.
Инструкция состоит из трех действий:
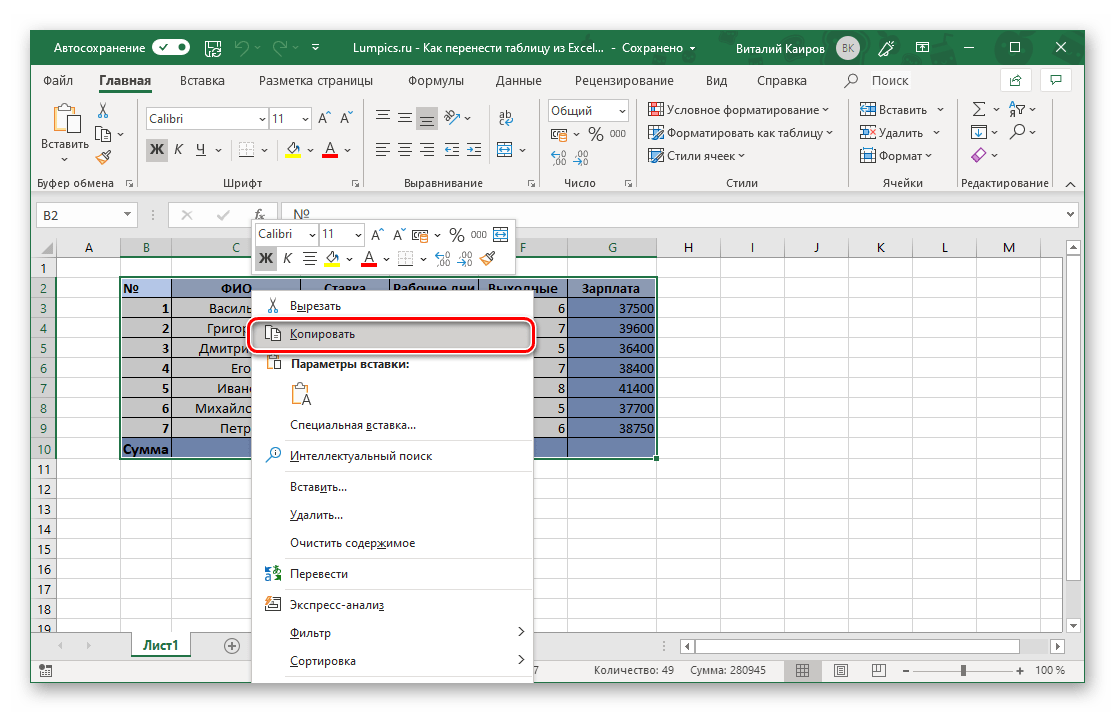
- Выделить таблицу Эксель, которую необходимо перенести в Ворд.

- Скопировать ее, используя сочетание клавиш Ctrl и C. Второй вариант: кликнуть по выделению правой клавишей мышки и в контекстном меню выбрать «Копировать».


- После копирования следует перейти в Ворд, установить курсор в нужном месте, а затем добавить таблицу из Эксель. Чтобы это сделать, необходимо щелкнуть правой клавишей мышки, далее выбрать один из параметров вставки. Второй вариант — воспользоваться комбинацией клавиш Ctrl и V.


Иногда скопированная таблица появляется не в том месте. Чтобы ее переместить, необходимо зажать значок в виде стрелок рядом с левым верхним углом с помощью левой кнопки мышки. После этого можно переносить столбцы в любую часть рабочей области.
Если нужно увеличить границы таблицы, аналогичным образом зажимают квадрат рядом с правым нижним углом и тянут мышкой в сторону.
Если кликнуть мышкой по любой из секций, в верхней ленте появятся инструменты для редактирования, разделенные на 2 вкладки: «Макет» и «Конструктор».
Указанный способ перевода таблицы из Excel в Word — наглядный пример взаимодействия Ворда и Экселя.
Способ 2: Копирование и специальная вставка
Если из Эксель необходимо перевести таблицу в Ворд, можно также применить инструмент «Специальная вставка». При его использовании сохраняется первоначальный вид секций и их связь с приложением Excel и конкретным исходным документом. Этот вариант преобразования позволяет перебросить любые по высоте и ширине ячейки в текстовый редактор. Однако их отображение в Word может искажаться.
Инструкция следующая:
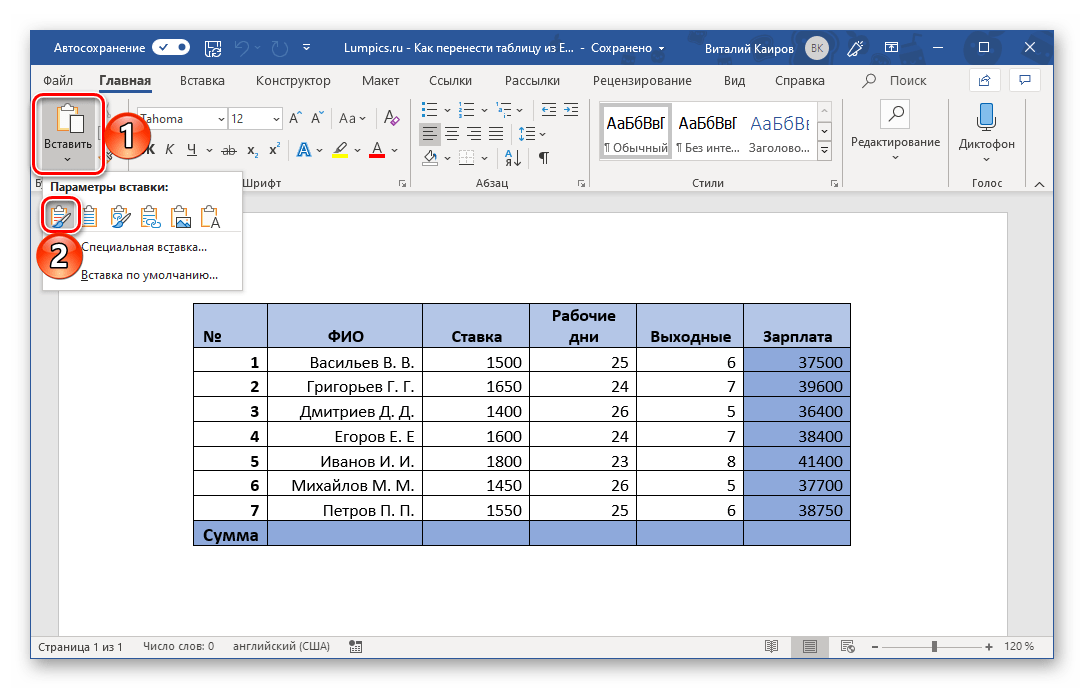
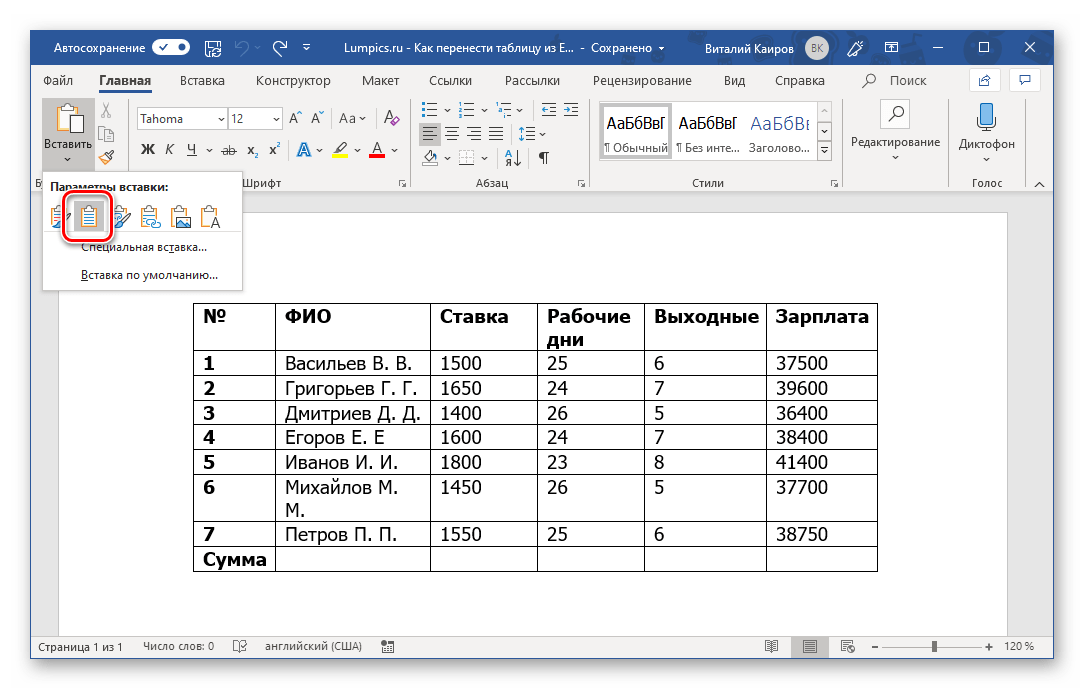
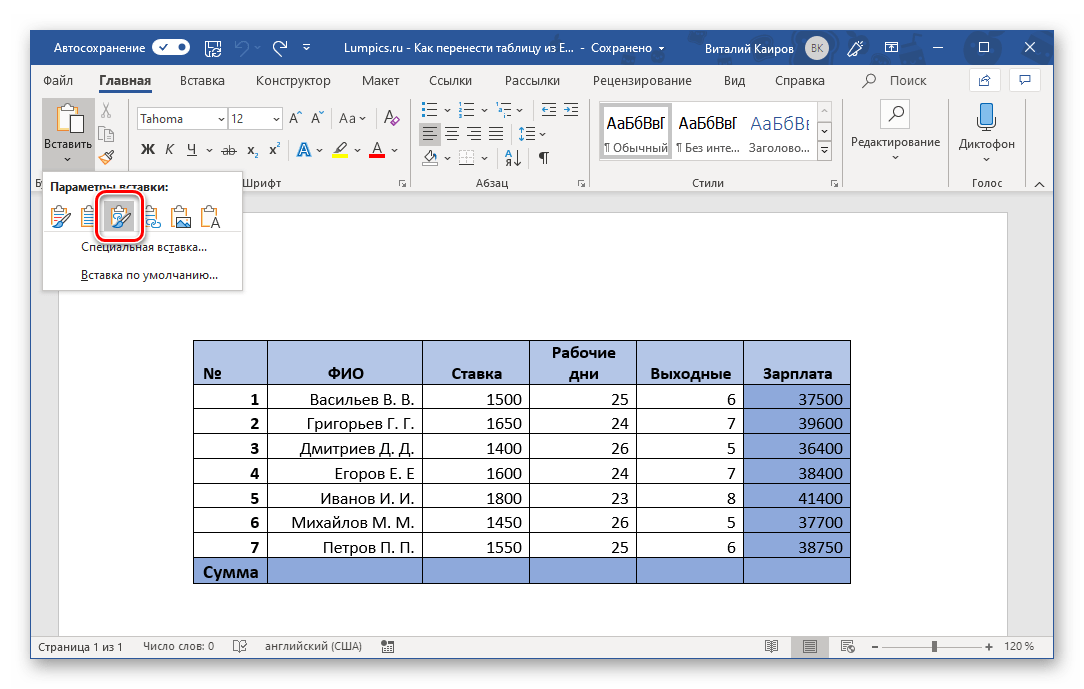
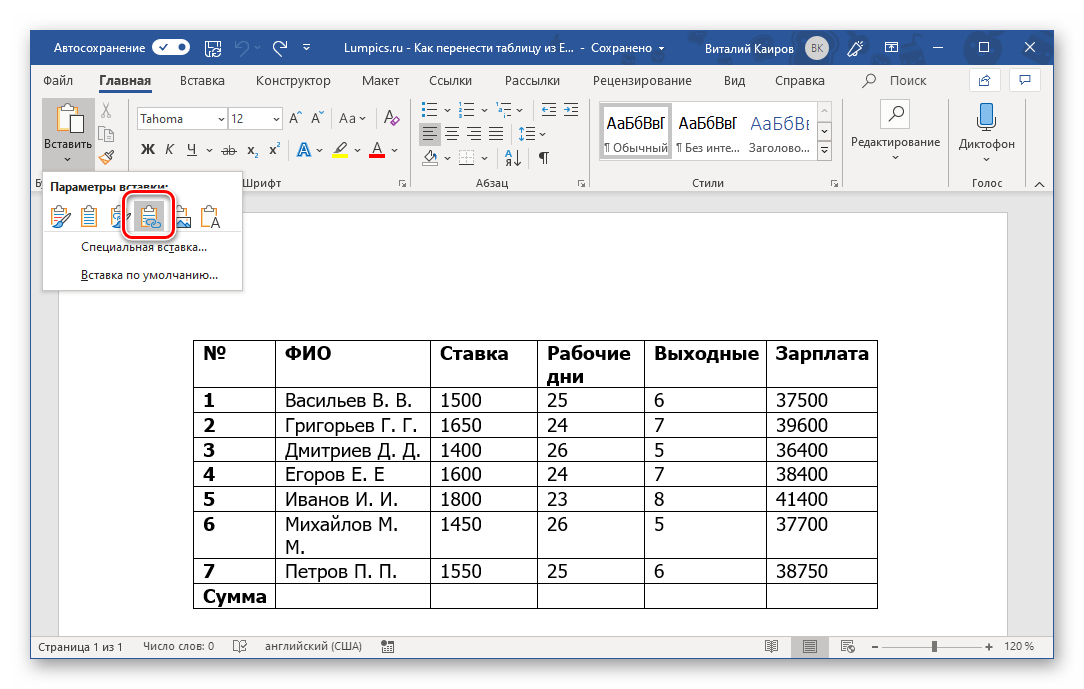
- Выделяем строки и копируем их, используя правую клавишу мыши либо комбинацию кнопок Ctrl + C.

- В Ворде открываем сверху вкладку «Главная» и нажимаем «Вставить», затем выбираем параметр «Специальная вставка».

- В диалоговом окне выбираем «Лист», затем указываем один из вариантов добавления: «Связать» или «Вставить». Далее подтверждаем выбор, нажав кнопку «ОК».


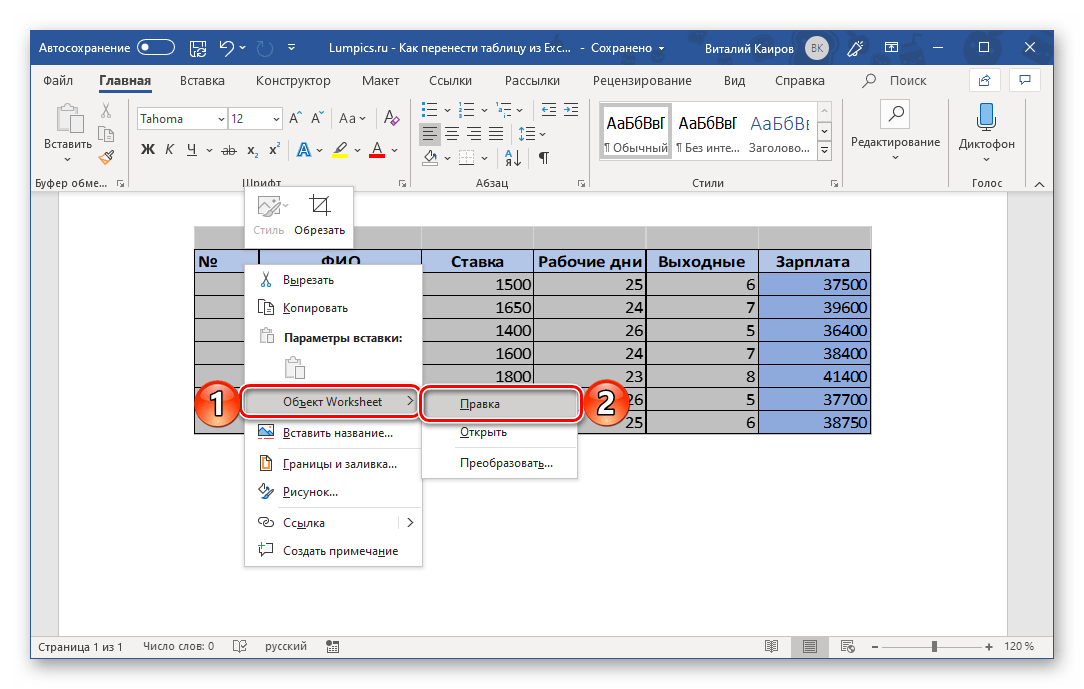
Если выбрать первый способ, при редактировании столбцов из файла Excel пользователю будет доступен функционал программы Эксель прямо в Ворде. При указании параметра «Связать» со вставленной сеткой и ее содержимым можно будет работать аналогичным образом, как и в предыдущем случае, однако при попытке редактирования пользователя будет перебрасывать в Excel.
При этом любые изменения таблица отобразятся и в Word тоже. Для внесения правок нужно дважды кликнуть по любой строке, а для выхода из этого режима — щелкнуть в любой другой части рабочей области.
Способ 3: Вставка таблицы из файла
Из Excel перевести таблицу в Word можно также, открыв лишь текстовый редактор. Для этого нужно знать расположение документа, чтобы вставить файл. Поэтому стоит заранее сохранить его в удобном для поиска месте. Такой способ подойдет, если в исходнике нет лишних элементов.
Перенос таблицы осуществляется следующим образом:
- Ставим курсор в нужном месте в окне Word.
- Переходим в раздел «Вставка» и в категории «Текст» нажимаем «Объект».

- В выпадающем меню выбираем вкладку «из файла», нажимаем «Обзор», указываем расположение исходника и щелкаем по кнопке «Вставить».


Далее можно просто подтвердить выбор, нажав «ОК». В этом случае можно лишь поменять размеры, переделать содержимое нельзя. Если установить связь, преобразовывать содержимое и границы пользователь сможет в обеих программах.
Параметр «В виде значка» означает, что в текстовом приложении появится ярлык исходного файла. Если связь с ним не установлена с помощью галочки напротив соответствующего пункта, изменения будут недоступны. Документ нужно закрыть для добавления.
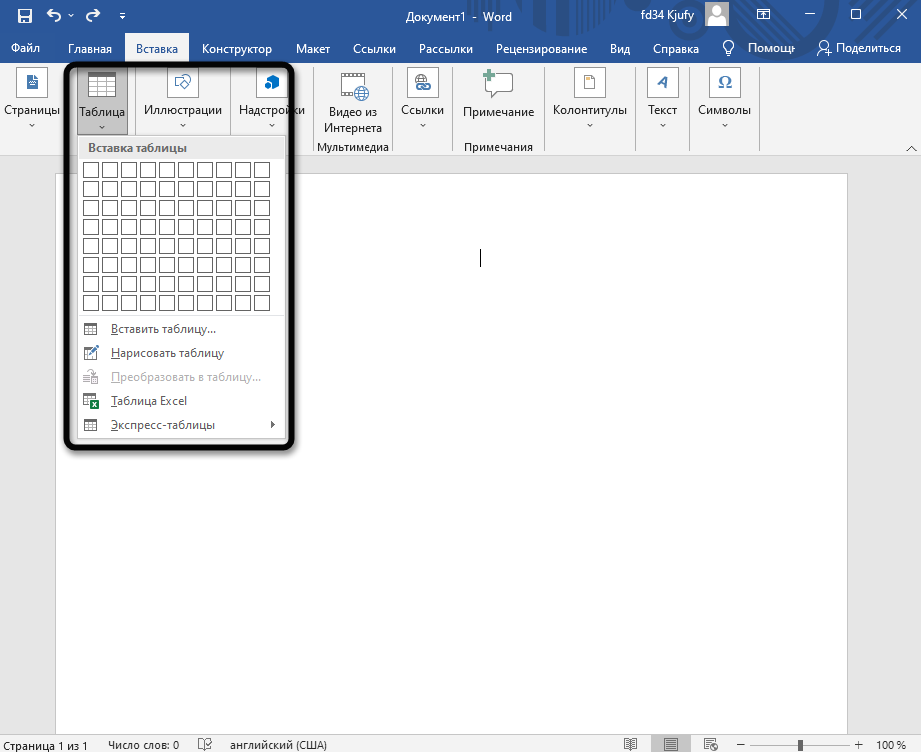
Способ 4: Самостоятельное создание таблицы в Word
Четвертый способ позволяет не преобразовать таблицу, сохраненную в Excel, а создать новую.
Для этого следует:
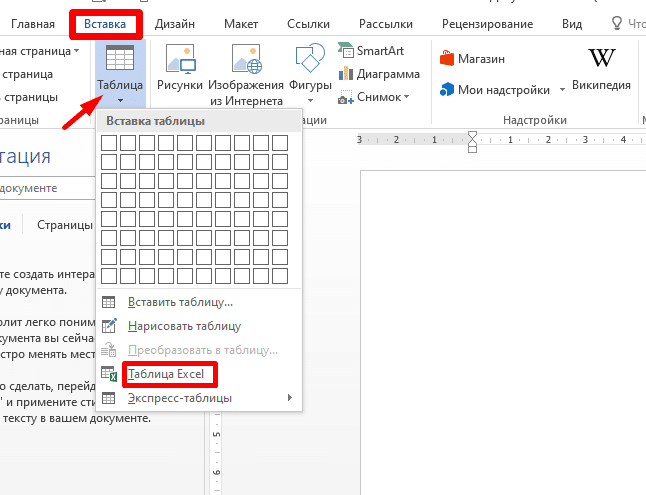
- Перейти в верхней панели инструментов к разделу «Вставка».
- Нажать «Таблица» и выбрать Excel.

- Добавленная сетка будет сделана по аналогии с указанными электронными таблицами. При работе с ней доступ к функционалу Эксель тоже сохраняется.


Если при переносе ячеек из одного приложения в другое данные отображаются некорректно из-за большого объема, а проблема не решается форматированием границ, остается лишь разбить столбцы со строками на несколько частей и поочередно вставить их в текстовый редактор.
Содержание
- Перенос таблицы из Эксель в Ворд
- Способ 1: Копирование и вставка
- Способ 2: Копирование и специальная вставка
- Способ 3: Вставка из файла
- Способ 4: Вставка пустой таблицы
- Способ 5: Самостоятельное создание
- Заключение
- Вопросы и ответы

Популярный табличный процессор Excel – это лишь одно из нескольких приложений, входящих в состав офисного пакета Microsoft Office. Все его компоненты тесно связаны между собой и имеют ряд общих функций, возможностей. Так, текстовый редактор Word тоже позволяет работать с таблицами, создавать их с нуля и редактировать. Но иногда возникает задача переноса элементов данного типа из одной программы в другую. О том, как это делается, мы расскажем сегодня.
Перенос таблицы из Эксель в Ворд
Как уже было сказано выше, между приложениями Excel и Word реализована довольно тесная интеграция. Это предоставляет возможность удобного импорта и экспорта совместимых объектов и файлов, обмена таковыми и использования функций одной программы в другой. Перенос таблицы из специально предназначенного для их создания приложения в то, что ориентировано в первую очередь на работу с текстом – одна из задач, решить которую можно сразу несколькими способами, и каждый из них мы подробно рассмотрим далее.
Способ 1: Копирование и вставка
Оптимальным и наиболее очевидным решением будет простое копирование таблицы из Эксель в Ворд.
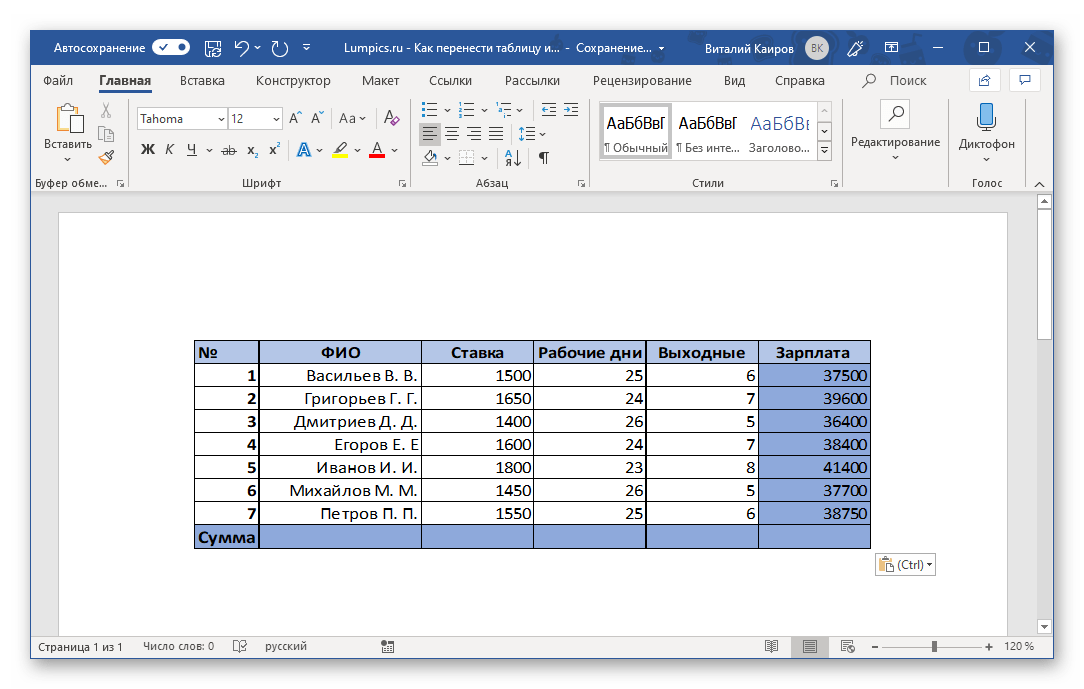
- Выделите с помощью мышки таблицу, которую необходимо перенести в текстовый редактор.

Примечание: Прежде чем приступить к перемещению таблицы, следует определиться с ее размерами, а точнее, убедиться в том, что она не выйдет за пределы полей текстового документа. В случае крайней необходимости вы можете не только уменьшить (или, наоборот, увеличить) ее прямо в Excel, но и также настроить поля в Word и даже сменить ориентацию страницы с привычной книжной на альбомную.
Подробнее:
Как изменить размер таблицы в Эксель
Настройка полей в Ворде
Как в Ворде сделать альбомный лист - Скопируйте подготовленную таблицу, воспользовавшись для этого кнопками на ленте, контекстным меню или горячими клавишами «CTRL+C».
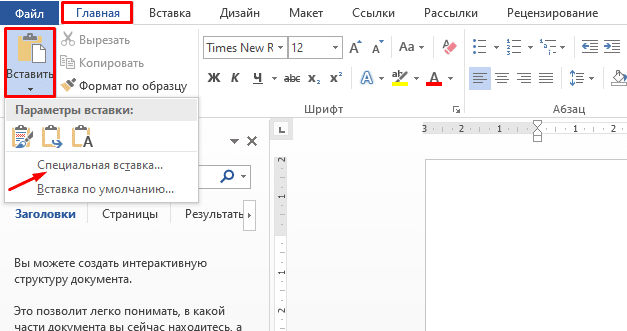
- Теперь переходите к MS Word. Откройте документ, в который требуется перенести таблицу, поместите указатель курсора (каретку) в то место страницы, где она должна находиться, и выполните одно из следующих действий:
- Разверните меню кнопки «Вставить» (вкладка «Главная») и кликните по первому значку в списке – «Сохранить исходное форматирование»;
- Щелкните правой кнопкой мышки (ПКМ) в месте вставки таблицы, и в появившемся контекстном меню выберите аналогичную вышеуказанной кнопку с изображением планшета и кисти;
- Воспользуйтесь клавишами «CTRL+V» или, что лучше, «SHIFT+INSERT».

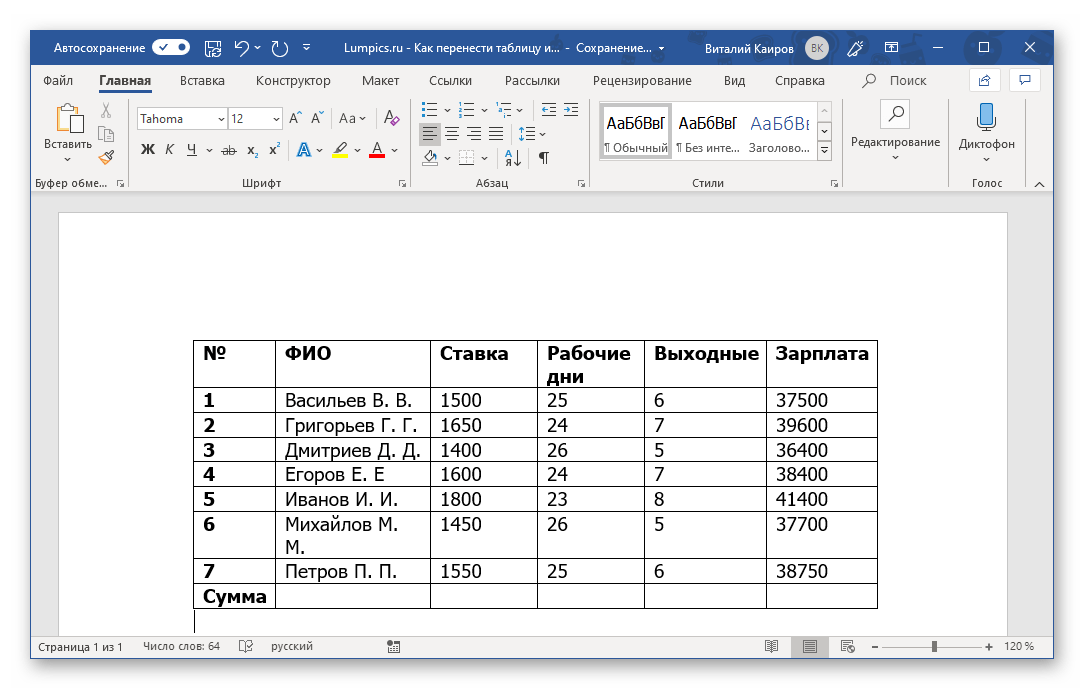
Скопированная из Эксель таблица будет вставлена в Ворд в своем изначальном виде, после чего вы сможете продолжить работать с ней – заполнять, оформлять, редактировать.

Как вы наверняка могли заметить, в меню вставки текстового редактора есть и другие варианты. Кратко рассмотрим каждый из них.
- Использовать стили конечного документа. Таблица будет вставлена без исходного форматирования и выполнена в стиле, который в настоящий момент используется вами в MS Word. То есть, если у вас, к примеру, в качестве основного установлен шрифт Tahoma с размером 12, именно в нем и будет записано содержимое таблицы.
- Связать и сохранить исходное форматирование. Таблица вставляется в том же виде, в котором она была выполнена в Excel и сохраняет связь с табличным процессором – вносимые в нем изменения будут отображаться в Word и наоборот.
- Связать и использовать конечные стили. Данный вариант представляет собой синтез двух предыдущих – таблица принимает стиль оформления текущего документа Ворд, но сохраняет свою связь с Эксель.
- Рисунок. Таблица будет вставлена в виде изображения, непригодного для редактирования.
- Сохранить только текст. Таблица вставляется в качестве текста, но сохраняет исходную форму (без видимых границ, столбцов и ячеек).

Читайте также: Как в Ворд преобразовать таблицу в текст
Этот метод решения нашей задачи предельно прост в своей реализации, плюс ко всему он предоставляет сразу несколько различных вариантов вставки, позволяя подобрать оптимальный. Однако такой подход не лишен недостатков: слишком большие таблицы просто так перенести не получится – они будут выходить за пределы полей текстового документа.
Читайте также: Форматирование таблиц в Microsoft Word
Способ 2: Копирование и специальная вставка
В приложениях пакета Майкрософт Офис есть полезная функция «Специальной вставки», которая позволяет перенести таблицу в виде целостного объекта, сохранив при этом его связь с Excel (как программой и/или конкретным файлом-исходником). Такой подход отчасти решает проблему предыдущего способа, позволяя поместить даже довольно большие (широкие или высокие) таблицы на страницы текстового документа, однако в самом Word они все равно могут отображаться некорректно.

- Выделите и скопируйте таблицу из Эксель так, как мы это делали в первом шаге предыдущего способа.
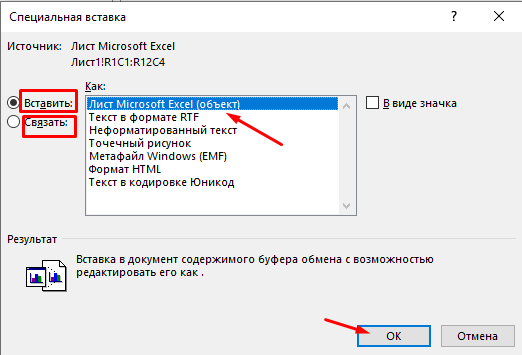
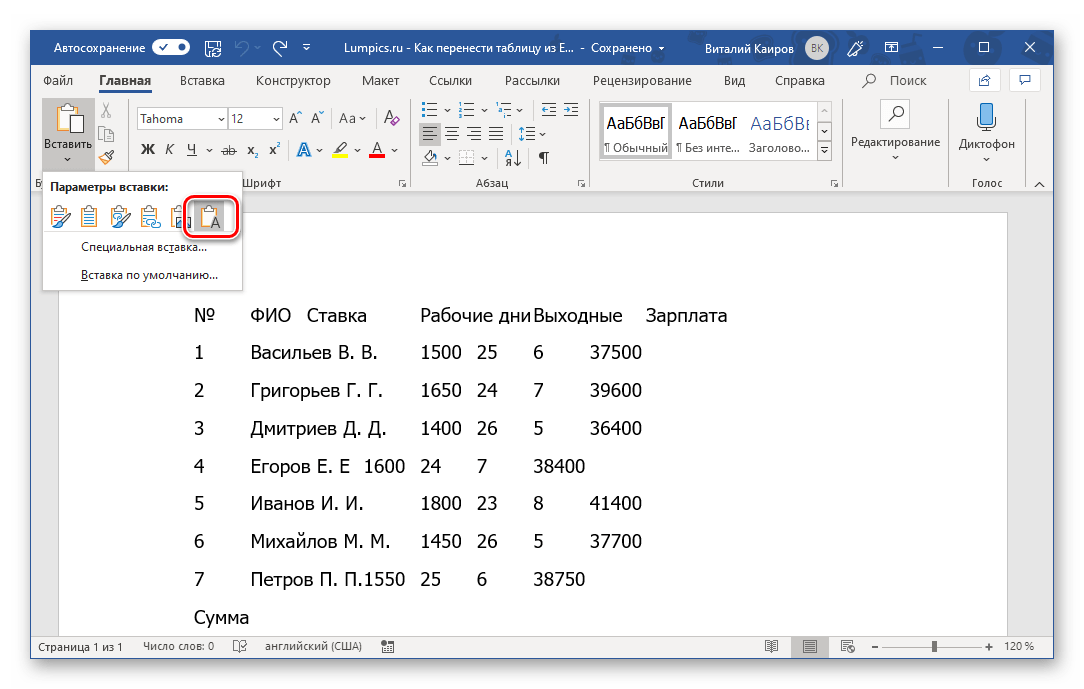
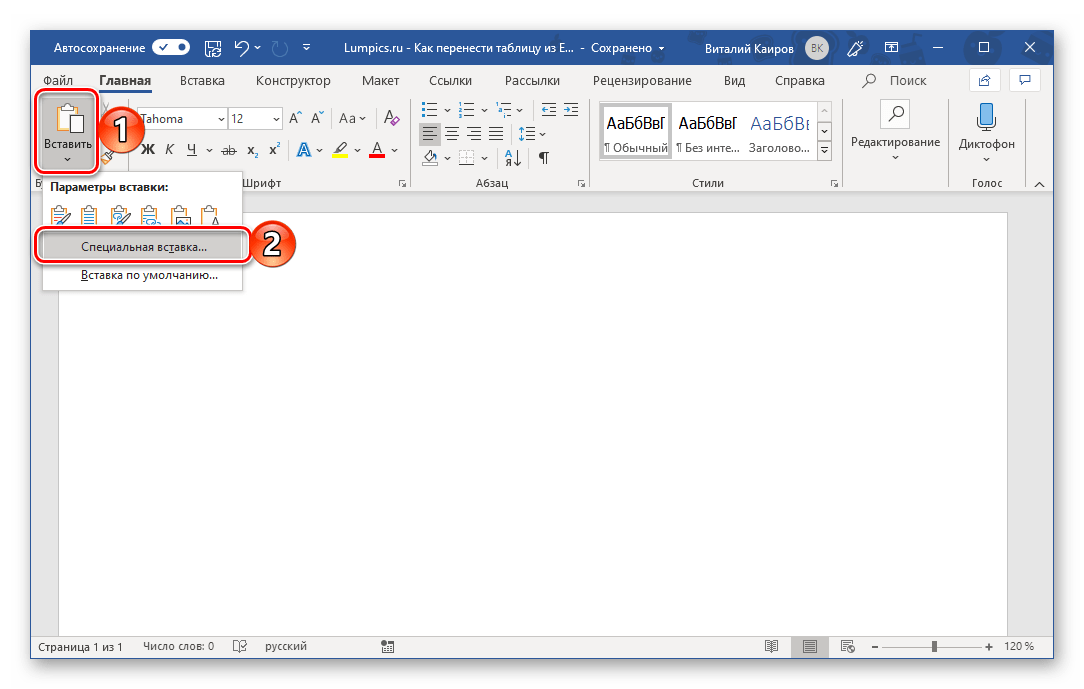
- Перейдите к текстовому редактору и в его «Главной» вкладке нажмите по кнопке «Вставить». Выберите из выпадающего списка пункт «Специальная вставка».
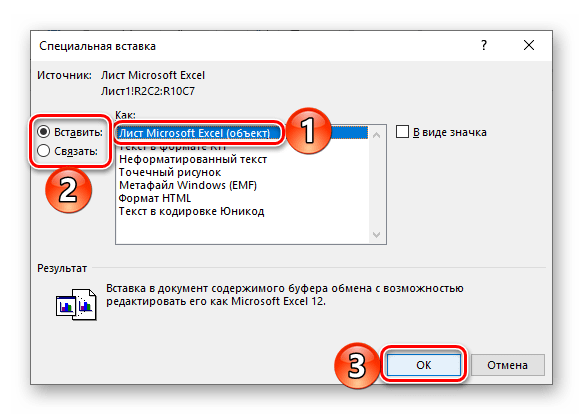
- В открывшемся окне «Специальная вставка» выберите первый пункт «Лист Microsoft Excel (объект)», а сбоку от этого списка установите маркер напротив одного из двух пунктов:
- «Вставить» — добавленная таким образом таблица при попытке ее редактирования (двойное нажатие ЛКМ) будет запускать панель инструментов Excel прямо в среде Word, что позволяет использовать всю основную функциональность табличного процессора, не покидая при этом среды текстового редактора.
- «Связать» — таблица вставляется ровно в том же виде, как и в предыдущем случае, но все ее редактирование (возможное по двойному нажатию ЛКМ) будет производиться в исходном файле Эксель, из которого и осуществляется перенос. Плюс ко всему, если вы внесете в нее какие-либо изменения в табличном процессоре, они будут отображены и в текстовом редакторе. По сути это то же, что и вариант вставки «Связать и сохранить исходное форматирование», рассмотренный в предыдущем способе.

Определившись с выбором, нажмите «ОК» для подтверждения, после чего скопированный объект появится на странице документа Word.

Для редактирования достаточно просто дважды нажать ЛКМ по таблице, а для выхода из этого режима – кликнуть за пределами таблицы.

Перейти к правке можно и через контекстное меню

Этот метод переноса таблиц из Эксель в Ворд по некоторым параметрам превосходит рассмотренный выше. Он позволяет использовать для работы все возможности табличного процессора, которые существенно превосходят таковые в текстовом редакторе.
Читайте также: Форматирование таблиц в Excel
Способ 3: Вставка из файла
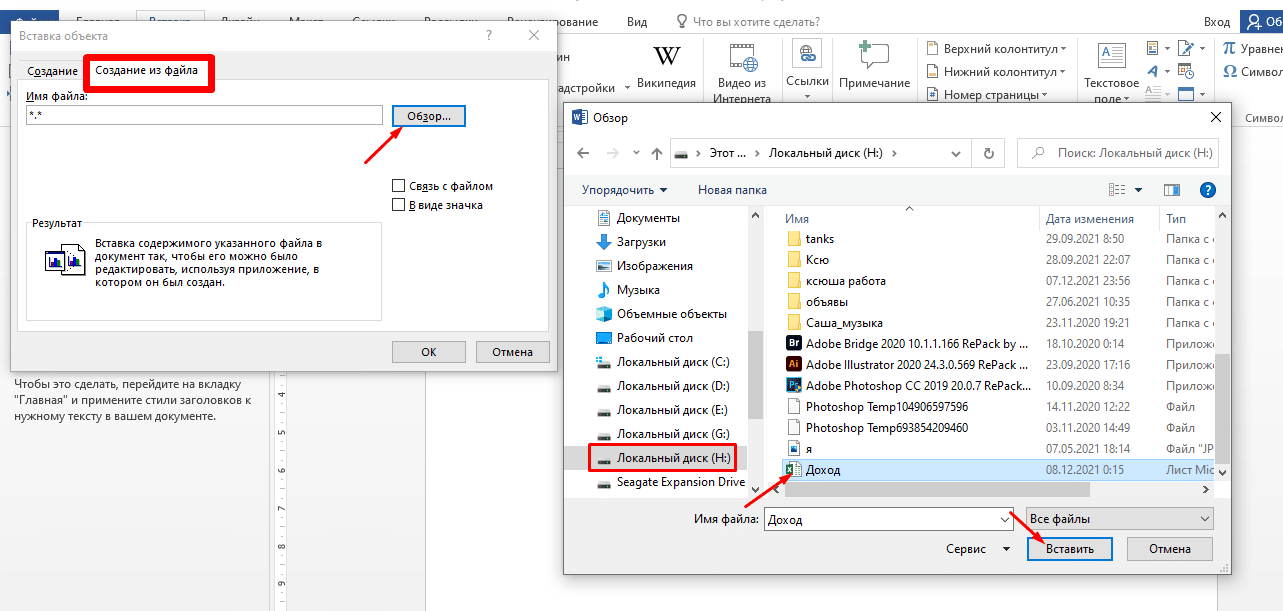
Существует вариант переноса таблицы в Word из Excel без необходимости открытия последнего. Достаточно знать лишь о том, где располагается нужный файл. Еще одно важное условие – в нем не должно содержаться лишних элементов.
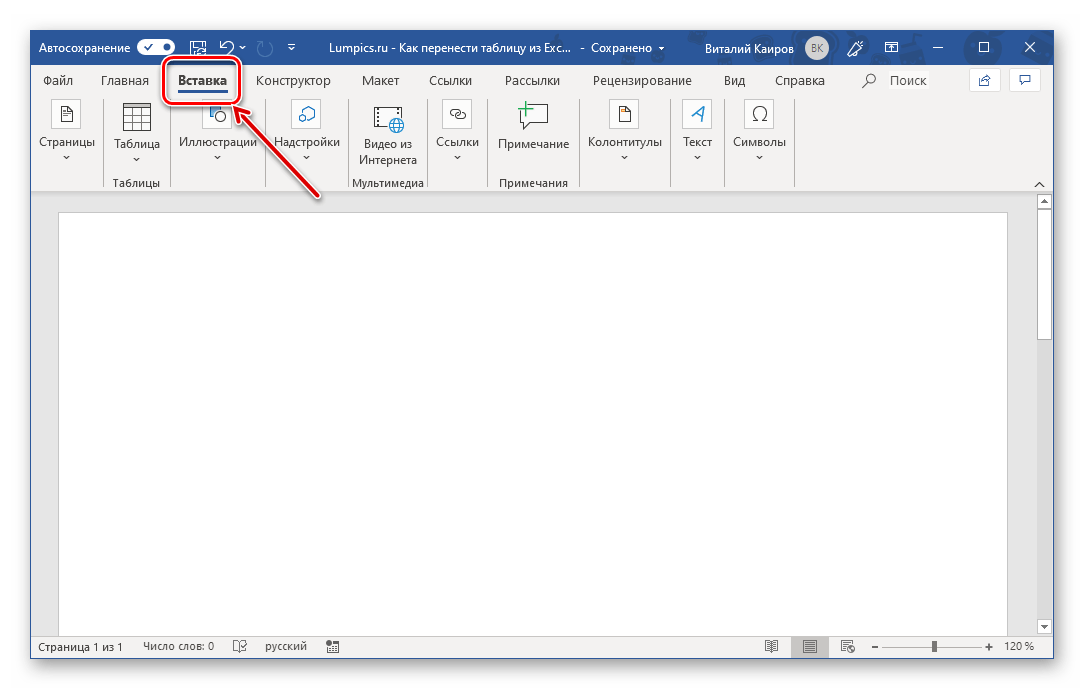
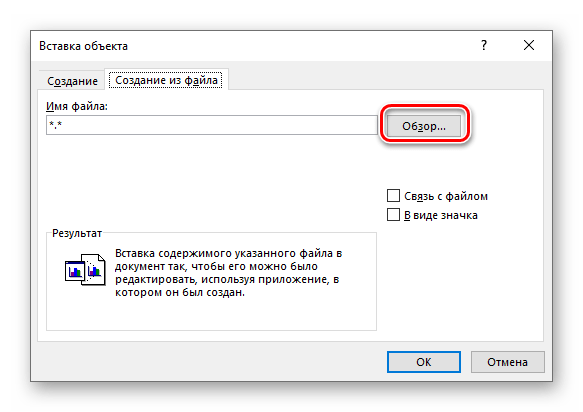
- Установите указатель в том месте документа Ворд, в которое вы хотите поместить таблицу из Эксель, и перейдите во вкладку «Вставка».
- В группе инструментов «Текст» нажмите по кнопке «Объект» (или выберите одноименный пункт из ее выпадающего списка).
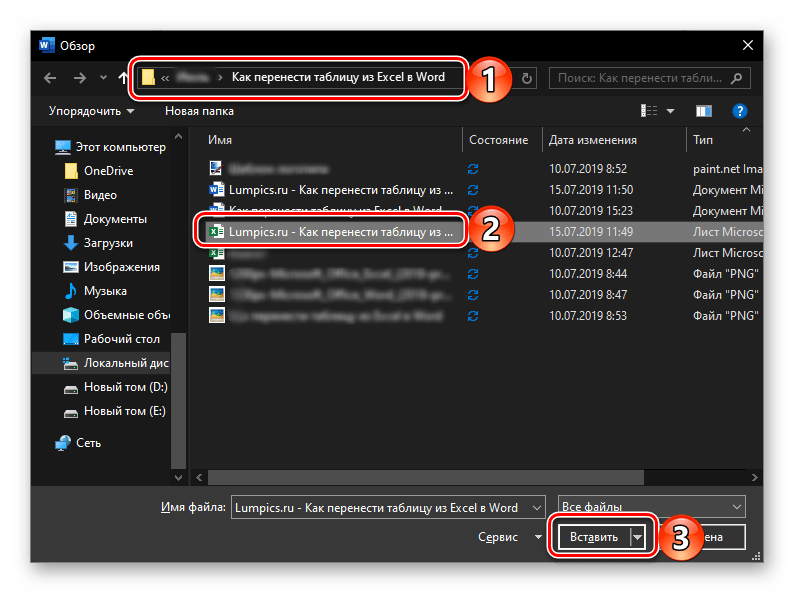
- В открывшемся окне «Вставка файла» перейдите во вкладку «Создание файла».

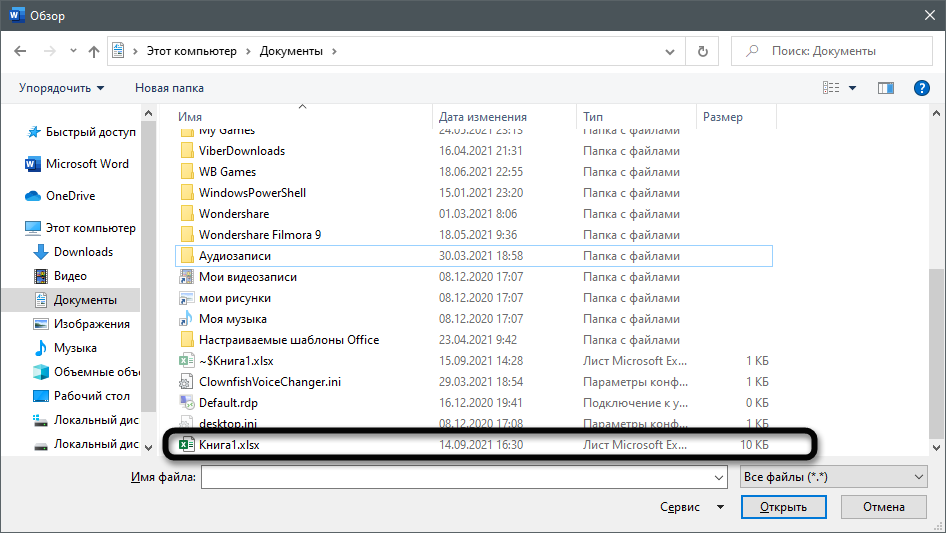
Нажмите на кнопку «Обзор» и перейдите с помощью системного «Проводника» в папку, в которой хранится файл с электронной таблицей. Выделите его и нажмите «Вставить».
- Далее можно действовать по одному из трех алгоритмов:
- Просто нажать «ОК». Таблица будет вставлена в виде объекта, размеры которого можно изменять, но содержимое нельзя будет отредактировать.
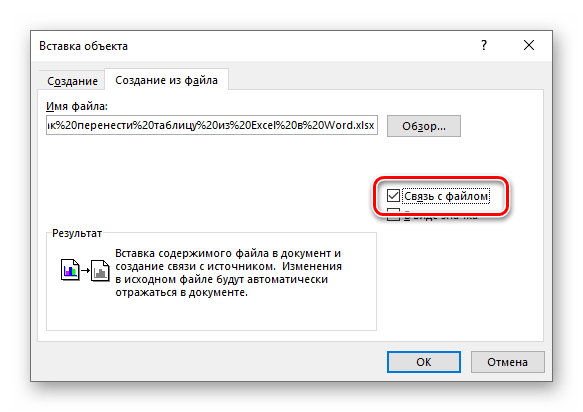
- Установить галочку напротив пункта «Связь с файлом» — вставленная таблица будет связана с Excel и пригодна для редактирования как в нем, так и в Word. Изменения, внесенные в одной программе, сразу же будут отображаться в другой (после обновления связей).
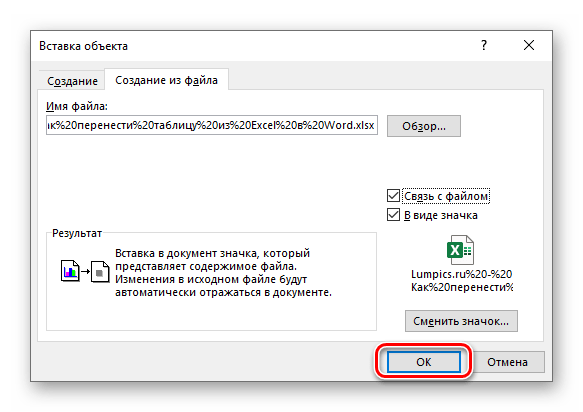
- Галочка напротив «В виде значка» — в текстовый документ будет добавлен ярлык файла Эксель. Если не отмечать «Связь с файлом», по его открытии будет открываться таблица в том виде, который она имела на момент вставки. Если же эту отметку установить, ярлык получит те же свойства, что описаны в предыдущем пункте, с той лишь поправкой, что в Ворд его редактировать не получится.
Примечание: Если документ Microsoft Excel, вставка которого осуществляется в Microsoft Word, будет открыт, появится показанное на скриншоте ниже уведомление об ошибке. В таком случае необходимо закрыть программу и повторить вышеописанные действия.
- Как только вы определитесь с выбором и нажмете «ОК» в окне «Вставка файла»,
на странице документа Word появится объект или таблица Excel, или ее ярлык, в зависимости от того, какой вариант вы выбрали.


Дальнейшая работа с таблицей осуществляется так же, как и в рассмотренных выше случаях, если только она не была вставлена в виде объекта, не связанного с оригинальным файлом.
Способ 4: Вставка пустой таблицы
Аналогично предыдущему методу переноса объекта из файла Эксель в Ворд, можно вставить в последний не только заполненную данными, но и пустую таблицу. Делается это практически так же, непосредственно внутри текстового редактора.
- Определите в документе место для будущей таблицы и перейдите во вкладку «Вставка».
- Нажмите по кнопке «Объект» для открытия уже знакомого нам окна «Вставка файла».
- В его первой вкладке «Создание» выделите пункт «Microsoft Excel Worksheet», после чего нажмите «ОК» для подтверждения.


В Word будет вставлен лист Excel, в котором вы сможете создать свою таблицу с нуля, используя для этого все основные инструменты табличного процессора, которые появятся на панели инструментов текстового редактора.
Для выхода из режима редактирования просто кликните ЛКМ за пределами вставленного элемента.
Способ 5: Самостоятельное создание
Существует и еще один метод создания пустой таблицы Эксель непосредственно в Ворде, и в своей реализации он даже более прост, чем рассмотренный выше.
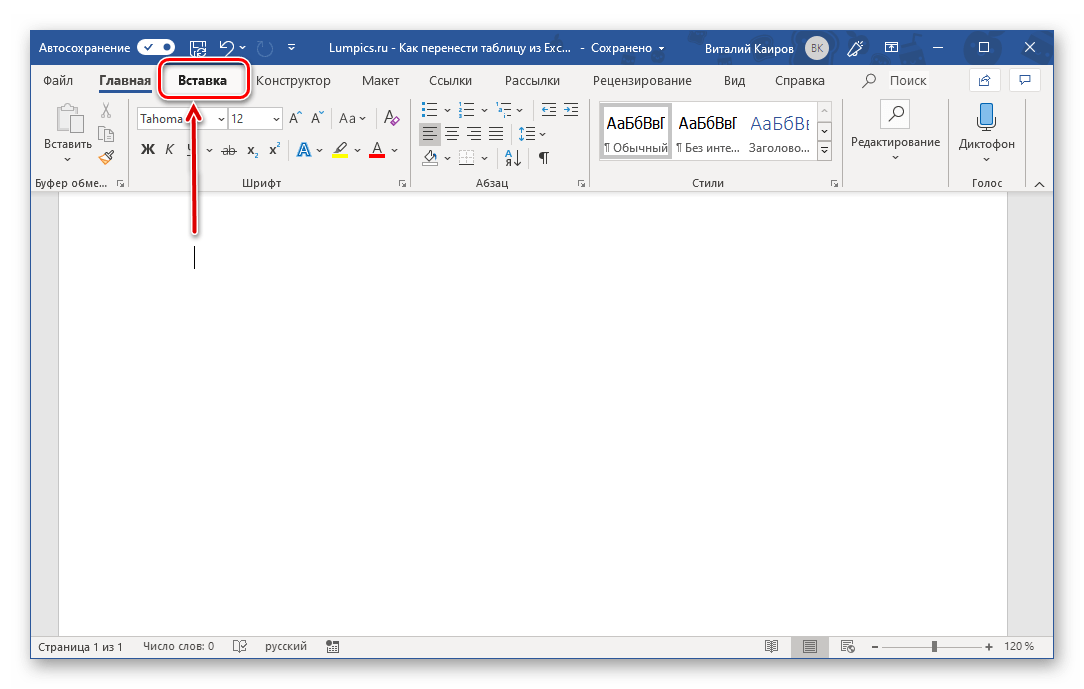
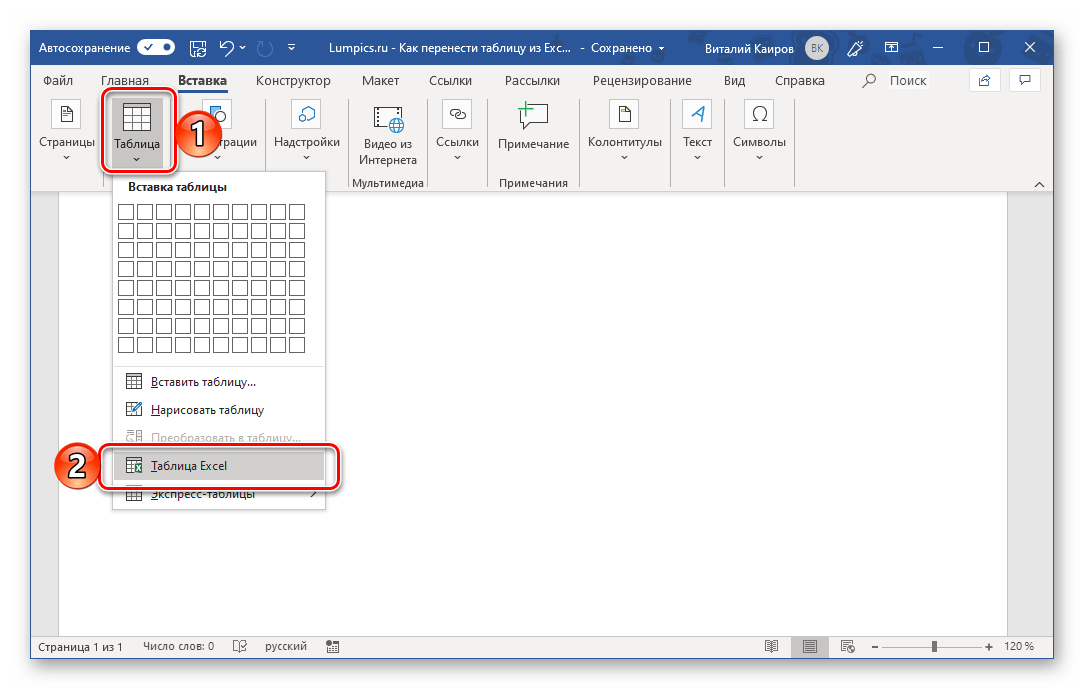
- Поместив указатель курсора в то место документа, где планируете расположить будущую таблицу, перейдите во вкладку «Вставка».
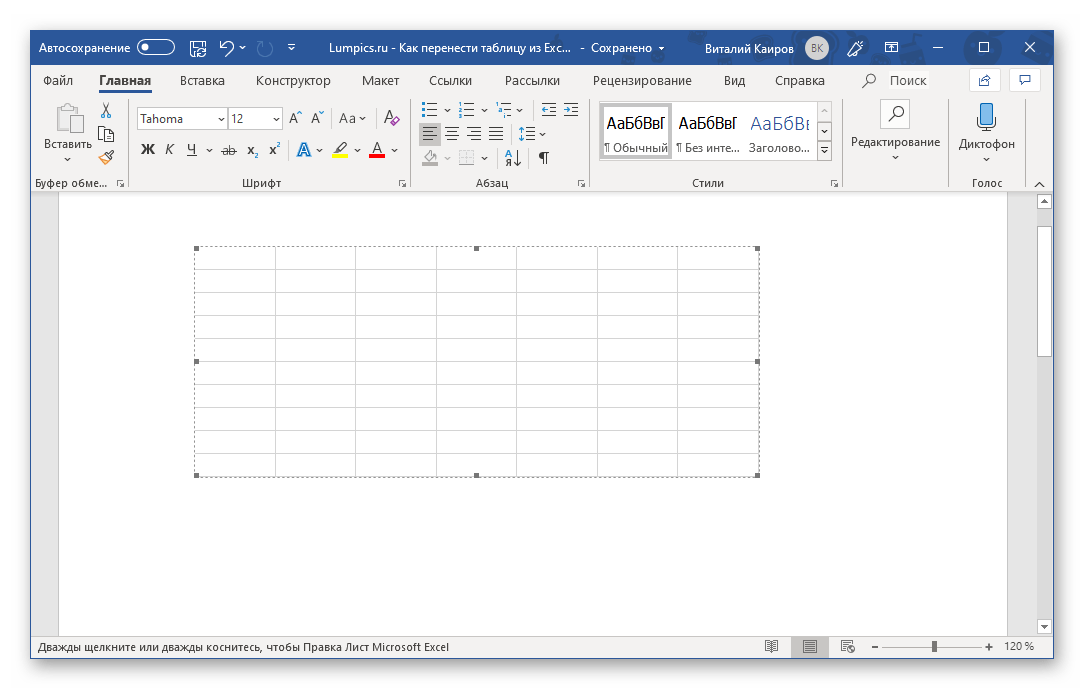
- Разверните меню кнопки «Таблица» и выберите пункт «Таблица Excel».
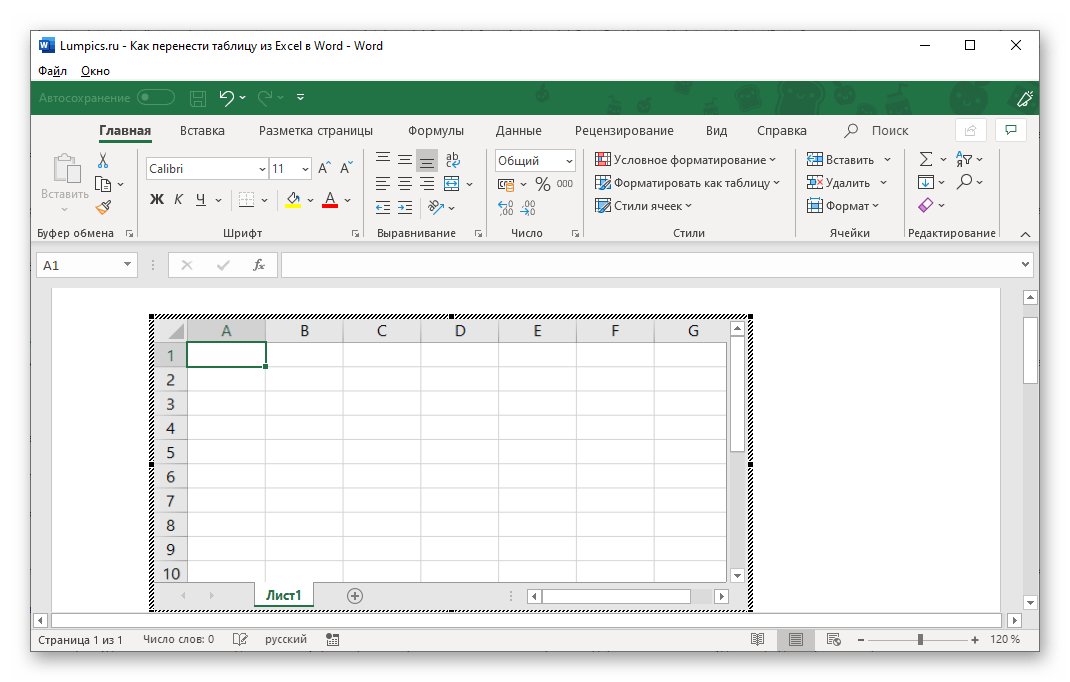
- Перед вами появится миниатюра стандартного и пока что пустого листа Excel, аналогичного таковому в способе выше. Дальнейшая работа с ним осуществляется по тому же алгоритму.
Несмотря на то что данная статья посвящена в первую очередь переносу таблиц из Эксель в Ворд, мы все же посчитали нужным рассмотреть и варианты создания их с нуля. При этом в текстовом редакторе от Майкрософт можно создавать и более простые таблицы, которые к тому же независимы от более продвинутого в данном плане собрата по офисному пакету. О том, какие еще есть альтернативные способы решения нашей сегодняшней задачи, вы можете узнать из представленной по ссылке ниже статьи.

Подробнее: Как сделать таблицу в Ворде
Заключение
Мы рассмотрели все возможные способы переноса таблицы из Excel в Word, а также затронули парочку альтернативных решений, предоставляющих возможность самостоятельного создания подобного рода объектов.
Читайте также: Как перенести содержимое файла Ворд в Эксель
Еще статьи по данной теме: