Move or copy cells and cell contents
Use Cut, Copy, and Paste to move or copy cell contents. Or copy specific contents or attributes from the cells. For example, copy the resulting value of a formula without copying the formula, or copy only the formula.
When you move or copy a cell, Excel moves or copies the cell, including formulas and their resulting values, cell formats, and comments.
You can move cells in Excel by drag and dropping or using the Cut and Paste commands.
Move cells by drag and dropping
-
Select the cells or range of cells that you want to move or copy.
-
Point to the border of the selection.
-
When the pointer becomes a move pointer
, drag the cell or range of cells to another location.
Move cells by using Cut and Paste
-
Select a cell or a cell range.
-
Select Home > Cut
or press Ctrl + X.
-
Select a cell where you want to move the data.
-
Select Home > Paste
or press Ctrl + V.
Copy cells by using Copy and Paste
-
Select the cell or range of cells.
-
Select Copy or press Ctrl + C.
-
Select Paste or press Ctrl + V.
Need more help?
You can always ask an expert in the Excel Tech Community or get support in the Answers community.
See Also
Move or copy cells, rows, and columns
Need more help?
Excel for Microsoft 365 for Mac Excel 2021 for Mac Excel 2019 for Mac Excel 2016 for Mac Excel for Mac 2011 More…Less
You can copy and paste specific cell contents or attributes (such as formulas, formats, comments, and validation). By default, if you use the Copy 


Paste menu options
-
Select the cells that contain the data or other attributes that you want to copy.
-
On the Home tab, click Copy
.
-
Click the first cell in the area where you want to paste what you copied.
-
On the Home tab, click the arrow next to Paste, and then do any of the following. The options on the Paste menu will depend on the type of data in the selected cells:
|
Select |
To paste |
|---|---|
|
Paste |
All cell contents and formatting, including linked data. |
|
Formulas |
Only the formulas. |
|
Formulas & Number Formatting |
Only formulas and number formatting options. |
|
Keep Source Formatting |
All cell contents and formatting. |
|
No Borders |
All cell contents and formatting except cell borders. |
|
Keep Source Column Widths |
Only column widths. |
|
Transpose |
Reorients the content of copied cells when pasting. Data in rows is pasted into columns and vice versa. |
|
Paste Values |
Only the values as displayed in the cells. |
|
Values & Number Formatting |
Only the values and number formatting. |
|
Values & Source Formatting |
Only the values and number color and font size formatting. |
|
Formatting |
All cell formatting, including number and source formatting. |
|
Paste Link |
Link the pasted data to the original data. When you paste a link to the data that you copied, Excel enters an absolute reference to the copied cell or range of cells in the new location. |
|
Paste as Picture |
A copy of the image. |
|
Linked Picture |
A copy of the image with a link to the original cells (if you make any changes to the original cells those changes are reflected in the pasted image). |
|
Column widths |
Paste the width of one column or range of columns to another column or range of columns. |
|
Merge conditional formatting |
Combine conditional formatting from the copied cells with conditional formatting present in the paste area. |
Paste Special options
-
Select the cells that contain the data or other attributes that you want to copy.
-
On the Home tab, click Copy
.
-
Click the first cell in the area where you want to paste what you copied.
-
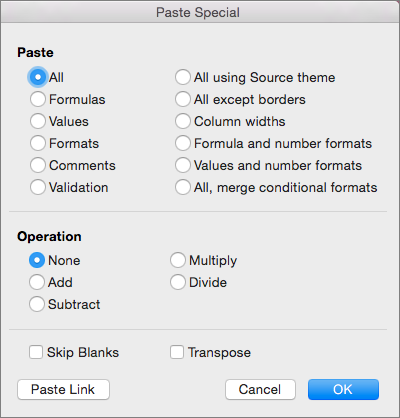
On the Home tab, click the arrow next to Paste, and then select Paste Special.
-
Select the options you want.
Paste options
|
Select |
To paste |
|---|---|
|
All |
All cell contents and formatting, including linked data. |
|
Formulas |
Only the formulas. |
|
Values |
Only the values as displayed in the cells. |
|
Formats |
Cell contents and formatting. |
|
Comments |
Only comments attached to the cell. |
|
Validation |
Only data validation rules. |
|
All using Source theme |
All cell contents and formatting using the theme that was applied to the source data. |
|
All except borders |
Cell contents and formatting except cell borders. |
|
Column widths |
The width of one column or range of columns to another column or range of columns. |
|
Formulas and number formats |
Only formulas and number formatting. |
|
Values and number formats |
Only values and number formatting options from the selected cells. |
|
All, merge conditional formats |
Combine conditional formatting from the copied cells with conditional formatting present in the paste area. |
Operation options
The Operation options mathematically combine values between the copy and paste areas.
|
Click |
To |
|---|---|
|
None |
Paste the contents of the copy area without a mathematical operation. |
|
Add |
Add the values in the copy area to the values in the paste area. |
|
Subtract |
Subtract the values in the copy area from the values in the paste area. |
|
Multiply |
Multiply the values in the paste area by the values in the copy area. |
|
Divide |
Divide the values in the paste area by the values in the copy area. |
Other options
|
Click |
To |
|
Skip Blanks |
Avoid replacing values or attributes in your paste area when blank cells occur in the copy area. |
|
Transpose |
Reorients the content of copied cells when pasting. Data in rows is pasted into columns and vice versa. |
|
Paste Link |
If data is a picture, links to the source picture. If the source picture is changed, this one will change too. |
Tip: Some options are available both on the Paste menu and in the Paste Special dialog box. The option names might vary a bit but the results are the same.
-
Select the cells that contain the data or other attributes that you want to copy.
-
On the Standard toolbar, click Copy
.
-
Click the first cell in the area where you want to paste what you copied.
-
On the Home tab, under Edit, click Paste, and then click Paste Special.
-
On the Paste Special dialog, under Paste, do any of the following:
Click
To
All
Paste all cell contents and formatting, including linked data.
Formulas
Paste only the formulas as entered in the formula bar.
Values
Paste only the values as displayed in the cells.
Formats
Paste only cell formatting.
Comments
Paste only comments attached to the cell.
Validation
Paste data validation rules for the copied cells to the paste area.
All using Source theme
Paste all cell contents and formatting using the theme that was applied to the source data.
All except borders
Paste all cell contents and formatting except cell borders.
Column widths
Paste the width of one column or range of columns to another column or range of columns.
Formulas and number formats
Paste only formulas and number formatting options from the selected cells.
Values and number formats
Paste only values and number formatting options from the selected cells.
Merge conditional formatting
Combine conditional formatting from the copied cells with conditional formatting present in the paste area.
To mathematically combine values between the copy and paste areas, in the Paste Special dialog box, under Operation, click the mathematical operation that you want to apply to the data that you copied.
Click
To
None
Paste the contents of the copy area without a mathematical operation.
Add
Add the values in the copy area to the values in the paste area.
Subtract
Subtract the values in the copy area from the values in the paste area.
Multiply
Multiply the values in the paste area by the values in the copy area.
Divide
Divide the values in the paste area by the values in the copy area.
Additional options determine how blank cells are handled when pasted, whether copied data is pasted as rows or columns, and linking the pasted data to the copied data.
Click
To
Skip blanks
Avoid replacing values in your paste area when blank cells occur in the copy area.
Transpose
Change columns of copied data to rows, or vice versa.
Paste Link
Link the pasted data to the original data. When you paste a link to the data that you copied, Excel enters an absolute reference to the copied cell or range of cells in the new location.
Note: This option is available only when you select All or All except borders under Paste in the Paste Special dialog box
Tip: In Excel for Mac version 16.33 or higher, the «paste formatting», «paste formulas», and «paste values» actions can be added to your quick-access toolbar (QAT) or assigned to custom key combinations. For the keyboard shortcuts, you’ll need to assign a key combination that isn’t already being used to open the Paste Special dialog.
See Also
Move or copy a sheet
Move or copy cells, rows, or columns
Customize the Ribbon and toolbars in Office for Mac
Create a custom keyboard shortcut for Office for Mac
Need more help?
Want more options?
Explore subscription benefits, browse training courses, learn how to secure your device, and more.
Communities help you ask and answer questions, give feedback, and hear from experts with rich knowledge.
Copying and Pasting a cell or a range of cells is one of the most common tasks users do in Excel.
A proper understanding of how to copy-paste multiple cells (that are adjacent or non-adjacent) would really help you be a lot more efficient while working with Microsoft Excel.
In this tutorial, I will show you different scenarios where you can copy and paste multiple cells in Excel.
If you have been using Excel for some time now, I’m quite sure you would know some of these already, but there’s a good chance you’d end up learning something new.
So let’s get started!
Copy and Paste Multiple Adjacent Cells
Let’s start with the easy scenario.
Suppose you have a range of cells (that are adjacent) as shown below and you want to copy it to some other location in the same worksheet or some other worksheet/workbook.

Below are the steps to do this:
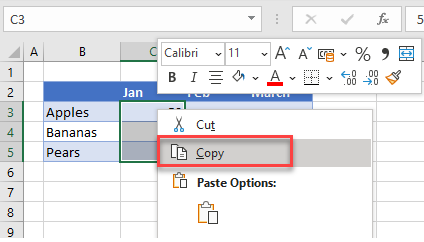
- Select the range of cells that you want to copy

- Right-click on the selection
- Click on Copy

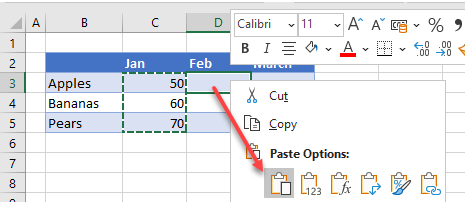
- Right-click on the destination cell (E1 in this example)
- Click on the Paste icon
The above steps would copy all the cells in the selected range and paste them into the destination range.

In case you already have something in the destination range, it would be overwritten.
Excel also gives you the flexibility to choose what you want to paste. For example, you can choose to only copy and paste the values, or the formatting, or the formulas, etc.
These options are available to you when you right-click on the destination cell (the icons below the paste special option).
Or you can click on the Paste Special option and then choose what you want to paste using the options in the dialog box.
Useful Keyboard Shortcuts for Copy Paste
In case you prefer using the keyboard while working with Excel, you can use the below shortcut:
- Control + C (Windows) or Command + C (Mac) – to copy range of cells
- Control + V (Windows) or Command + V (Mac) – to paste in the destination cells
And below are some advanced copy-paste shortcuts (using the paste special dialog box).
To use this, first copy the cells, then select the destination cell, and then use the below keyboard shortcuts.
- To paste only the Values – Control + E + S + V + Enter
- To paste only the Formulas – Control + E + S + F + Enter
- To paste only the Formatting – Control + E + S + T + Enter
- To paste only the Column Width – Control + E + S + W + Enter
- To paste only the Comments and notes – Control + E + S + C + Enter
In case you’re using Mac, use Command instead of Control.
Also read: How to Cut a Cell Value in Excel (Keyboard Shortcuts)
Mouse Shortcut for Copy Paste
If you prefer using the mouse instead of the keyboard shortcuts, here is another way you can quickly copy and paste multiple cells in Excel.
- Select the cells that you want to copy
- Hold the Control key
- Place the mouse cursor at the edge of the selection (you will notice that the cursor changes into an arrow with a plus sign)
- Left-click and then drag the selection where you want the cells to be pasted

This method is also quite fast but is only useful in case you want to copy and paste the range of cells in the same worksheet somewhere nearby.
If the destination cell is a little far off, you’re better off using the keyboard shortcuts.
Copy and Paste Multiple Non-Adjacent Cells
Copy-pasting multiple cells that are nonadjacent is a bit tricky.
If you select multiple cells that are not adjacent to each other, and you copy these cells, you’ll see a prompt as shown below.

This is Excel’s way of telling you that you cannot copy multiple cells that are non-adjacent.
Unfortunately, there’s nothing that you can do about it.
There’s no hack or a workaround, and if you want to copy and paste these nonadjacent cells, you will have to do this one by one.
But there are a few scenarios where you can actually copy and paste non-adjacent cells in Excel.
Let’s have a look at these.
Copy and Paste Multiple Non-Adjacent Cells (that are in the same row/column)
While you can not copy non-adjacent cells in different rows and columns, if you have non-adjacent cells in the same row or column, Excel allows you to copy these.
For example, you can copy cells in the same row (even if these are non-adjacent). Just select the cells and then use Control + C (or Command + C for Mac). You will see the outline (the dancing ants outline).

Once you have copied these cells, go to the destination cell and paste these (Control + V or Command + V)
Excel will paste all the copied cells in the destination cell but make these adjacents.
Similarly, you can select multiple nonadjacent cells in one column, copy them, and then paste it into the destination cells.
Copy and Paste Multiple Non-Adjacent Rows/Columns (but adjacent cells)
Another thing Excel allows is to select non-adjacent rows or non-adjacent columns and then copy them.

Now when you paste these in the destination cell, these would be pasted as adjacent rows or columns.

Below is an example where I copied multiple non-adjacent rows from the dataset and pasted these in a different location.
Copy Value From Above in Non-Adjacent Cells
One practical scenario where you may have to copy and paste multiple cells would be when you have gaps in a data set and you want to copy the value from the cell above.
Below I have some dates in column A, and there are some blank cells as well. I want to fill these blank cells with the date in the last filed cell above them.

To do this, I would need to do two things:
- Select all the blank cells
- Copy the date from the above-filled cell and paste it into these blank cells
Let me show you how to do this.
Select All Blank Cells in the Dataset
Below are the steps to select all the blank cells in column A:
- Select the dates in column A, including the blank ones that you want to fill

- Press the F5 key on your keyboard. This will open the Go To dialog box.
- Click the Special button. This will open the Go To Special dialog box.

- In the Go To Special dialog box, select Blanks

- Click OK
The above steps would select all the blank cells in column A.

Now, we want to somehow copy the value in the above field cell in these blank cells. This cannot be done using any copy-paste method so we will have to use a formula (a very simple one).
Fill Blank Cells with Value Above
This part is really easy.
- With the blank cell selected, first hit the equal to key on your keyboard

- Now hit the Up arrow key. This will automatically enter the cell reference of the cell that is above the active cell.

- Hold the Control key and press the Enter key
The above steps would enter the same formula in all the selected blank cells – which is to refer to the cell above it.

While this is a formula, the end result is that you have the blank cells filled with the above-filled date in the data set.
Once you have the desired result, you can convert the formula into values if you want (so that the formula doesn’t update the cells in case you change any value in a cell that is being referenced in the formula).
So these are a couple of methods you can use to copy and paste multiple cells (adjacent and non-adjacent cells) in Excel. I am sure using these methods will help you save tons of time in your day-to-day work.
I hope you found this tutorial useful!
Other Excel tutorials you may also like:
- How to Copy and Paste Column in Excel? 3 Easy Ways!
- How to Copy Excel Table to MS Word (4 Easy Ways)
- How to Copy Conditional Formatting to Another Cell in Excel
- How to Copy and Paste Formulas in Excel without Changing Cell References
- How to Edit Cells in Excel?
How to Copy and Paste in Excel – Step-By-Step (2023)
Copy/pasting is something we have all known for ages now. But there’s so much more to the dynamic copy-paste tool of Excel than simple copying/pasting of values.
And the guide below will show you how resourceful the copy-and-paste tool of Excel can be. So let’s dive right in👇
Hold on! Download our sample workbook here to tag along with the guide.
How to copy and paste into Excel
Unlike any other spreadsheet program, Excel offers a huge variety of options for copying/pasting data.
You can paste anything – formulas, formatting, values, transposed values, and whatnot🖌
And the best part is that you can access a single option from multiple places, offering extra ease of use. So how do you copy and paste values in Excel? Let’s see below
Generally, there are three 3️⃣ ways in which you can copy/paste your data once you select a cell.
1. The clipboard group
The Clipboard section contains all the functions you need to copy and paste values in Excel. It sits in the Home tab of the ribbon.

You can use the Scissors option to cut data and the Two Sheets option to copy the data✂
The Clipboard icon is the paste button that holds all the copied data. The Paint Brush icon below is known as the Format Painter, which lets you copy the formatting🖌
And the options don’t just end here – Click on the arrow in the bottom right corner to view more copy/paste options.
2. The right-click menu
You can access the context menu by right-clicking the cell you want to copy. The dropdown list will show you a bunch of options.

Select Copy to make a copy of the selected cell in the clipboard. Once you copy a cell, a continuously moving border will enclose it.
Pro Tip!
You can also use CTRL + C to copy the data. It is the most common keyboard shortcut used in Excel and is very efficient.
Simply select the cell and press CTRL + C.
Then, select the destined cell and press CTRL + V to paste the copied contents into it 🥂
After you’ve copied the cell, navigate to the destination cell and paste it.
To paste the cell contents, right-click on the destination cell. From the context menu, select the option “Paste”📃

3. The CTRL button
This method is quite similar to using CTRL + C, but not many people know it🤔
- Select the cell.
- Press the CTRL key.
- Hover over the cell until the plus sign appears.
- Hold and drag the cell to a new location.
- You get an exact copy of your original cell in the new location.
How to copy formulas only in Excel
So now we know the basics of copy-pasting in Excel.
But do you know how to copy and paste only formulas in Excel? We do it using a trick.
Let’s see an example below.
The data set we use below shows if the given condition is true or false.

The function running behind these boolean values is the AND function. You can access it from the Formulas Tab 💻

Now let’s say we want to add another row at the bottom and copy the formula above it.

An easy way is to:
- Copy the formula above by selecting any cell that contains the formula and press CTRL + C.
- Right-click the cell where you want to paste the formula. A dropdown list will appear with the paste section like this ⏬

- Click on the Paste Special commands option.
- From the Paste Special menu, select the Formulas and Number formatting option (hovering over the icons shows their names).
The formula will be pasted into the new cell, and the cell references will adapt accordingly.

Similarly, if you want to copy the formula to multiple cells, you can do it using the Paste Special dialog box 💭
Launch the Paste Special Dialog box using the shortcut keys Alt + E + S.

Simply select the Paste option you want to apply on the cell while pasting data. And since we are dealing with formulas, we will select the option “Formulas”.
How to make a copy of an Excel sheet
Making a copy of an Excel sheet may seem difficult with no options visible on the face of the worksheet. But believe us, it is just a click away.

Say, we want to make a copy of Sheet 1🧾
There are two ways to do this. First, use the right-click menu, and second, use the CTRL key.
The right-click context menu:
- Select the sheet you want to copy.
- Right-click the sheet and select the Move or Copy option.

- You will see a pop-up asking for the location and whether you want to create a copy.

- Check the option to Create a Copy.
What happens if you don’t check the option to create a copy🤔
Excel will remove the sheet from the present workbook. And move it to the destination workbook.
- Choose the pasting location from the To Book option.
- Click Ok.

- The subject worksheet appears in the chosen location💪
Using the CTRL key:
To copy a sheet using the Control key, follow the steps below:
- Select the sheet.
- Press the CTRL key.
- Drag the sheet to a new location to make its copy.
We have created a copy of Sheet 1 in the same book.

- A new file, Sheet 1 (2), appears on the Sheet tab.
Copy values not formula
It’s time we see how to copy only the values in Excel and not the underlying formulas.
From the dataset below, let’s copy the cell values only 🔢

To copy cell values, follow the steps below:
- Select the cell or the range of cells whose value is to be copied.
- Press Ctrl + C to copy the cell values.
- Go to the blank cells where you want to paste the selected range.
- Right-click the first cell and open the Paste Special dialog box.
- From the Paste Special options, select the Values option.
This tells Excel to paste the values of the copied cells only 🌟

- Click Okay. And there you go!

Values from the copied range appear in all the cells selected.
Note that Excel has pasted the exact values only. You can select the cell and view the formula bar to see that the values have no formulas to them.
Had you pasted them simply, Excel would have copied and adapted the formula of the copied cells for the destination cells as follows 😵

Shortcut to paste values
Oh, and there’s a very efficient shortcut to paste values in Excel too 💪
- Select the values to be copied.
- Press CTRL + C to copy them.
- Go to the destination cells to paste values. Select the first cell of the destination cell range.
- Press CTRL + Alt + V.
- Press V.

- Select Ok.
- You’d have the cell values pasted in Excel without any cursor movement 🖱
How to copy formatting
We have so far seen how to copy and paste formulas and values. Let’s now have a look at the copy-pasting of formatting.
Hint: It’s done the same way as formulas and values are copied/pasted✌
We are using the same data set for this example. And we want to paste the existing formatting to the new cells below.

To do so:
- Select the cells with the source formatting (the formatting that you want to copy) to copy them.
- Once copied, select the cell (or cells) where you want to paste the cell formatting🖱
- You can use the context menu to open the Paste Special dialog box and choose Formatting. Or press CTRL + Alt + V and then T to paste the formatting only.
The results look like this:

Note how Excel has pasted the format (including the font style and the font size) to the destined cells.
There is yet another way to copy cell formatting in Microsoft Excel – by using the Format Painter. We bet you didn’t see that coming😎
All you need to do is select the cells containing the source formatting. And click the Paintbrush icon on the ribbon to activate the Format Painter

With the format painter activated, select the cells where you want to paste the formatting.
And tada! The new cells are formatted like the source formatting.

Pro Tip!
If you want to paste the formatting to a single cell or a range of adjacent cells only, click on the format painter once. In this case, the format painter will deactivate after painting the format once.
But, if you want to apply the source formatting to multiple non-adjacent cells, double-press the Format Painter icon. Now the format painter will stay active until you manually deactivate it 🎨
That’s it – Now what?
In this article, we learned how to copy and paste values and formulas in Excel. We also saw how we could paste cell formatting to a range of cells in a few easy steps.
And even though this article covers most of the aspects of the copy-paste tool in Excel, there’s still so much to learn.
Like the three most important functions of Excel. The VLOOKUP, IF, and SUMIF functions.
To learn these functions (and more!), enroll in my 30-minute free email course today.
Kasper Langmann2023-01-19T12:05:51+00:00
Page load link
This tutorial demonstrates how to copy and paste multiple cells in Excel and Google Sheets.
Copy Adjacent Cells
Fill Handle
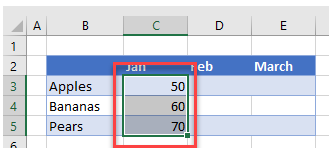
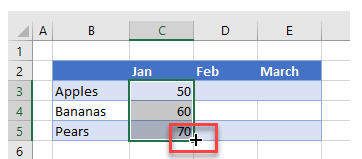
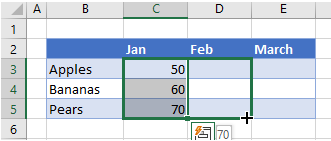
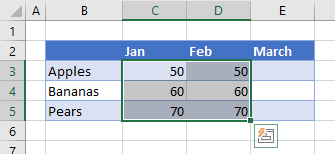
There are several ways that a range of cells can be copied and pasted in Excel. The simplest way to copy multiple or a range of cells across from one column or row to another is use the mouse to drag the values across from one column or row to the next.
- In your worksheet, highlight the cells you wish to copy.
- In the bottom-right corner of your selection, position your mouse so that the mouse pointer changes to a small cross.
- Drag the mouse across to the cells you wish to fill.
- Release the mouse to copy the information into the blank cells.
‘
This method works well for both copying of cells from column across to an adjacent column on the right, or from a row down to the next row.
Quick Menu
- In your worksheet, highlight the cells you wish to copy.
- Right-click on the cells you wish to copy to view the quick menu and click Copy.
Note that the source cells have small moving lines around them indicating that the information is ready to paste.
- Select the first destination cell and then right-click once again and click Paste.
OR Press the ENTER key on the keyboard to paste the cell data.
Note: You do not have to select the entire destination range where you wish to paste the cell information; you only need to select the first cell.
Copy Nonadjacent Cells
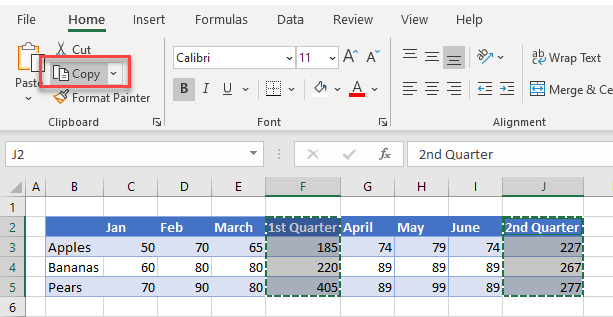
- In your worksheet, highlight the nonadjacent cells you wish to copy by highlighting the first range of cells, and then holding down the CTRL key, highlight the second range of cells.
- Then, in the Ribbon, go to Home > Clipboard > Copy or press CTRL + C on the keyboard. Notice that small little moving lines appear around both selected ranges.
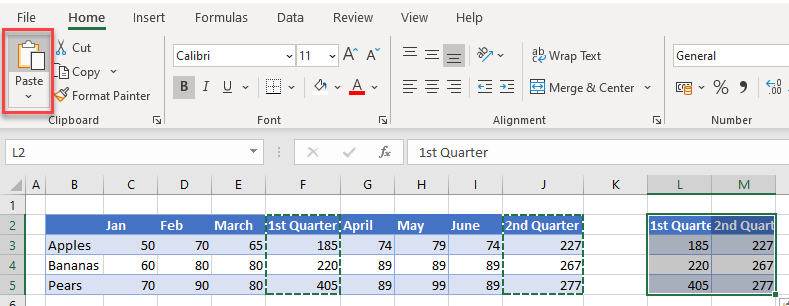
- Select the cell where you wish to paste your data and then, in the Ribbon, go to Home > Clipboard > Paste (or press CTRL + V on the keyboard).
- When you click Paste on the Ribbon, or type CTRL + V on the keyboard, you are left with the small moving lines around your original cells. This is because the information is still on the clipboard and can be pasted as often as you like by using CTRL + V or clicking Paste in the Ribbon. If you wish to exit this mode you can either use ENTER on the keyboard to paste your data, or, if you have already pasted your data, you can press ESC on the keyboard to remove the small moving lines.
Copy Entire Columns and/or Rows
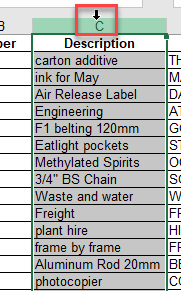
- To copy a column, select the entire column using the column header.
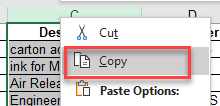
- Right-click to bring up the quick menu and click Copy.
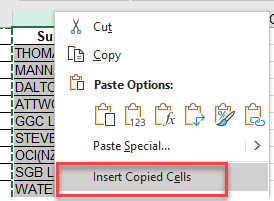
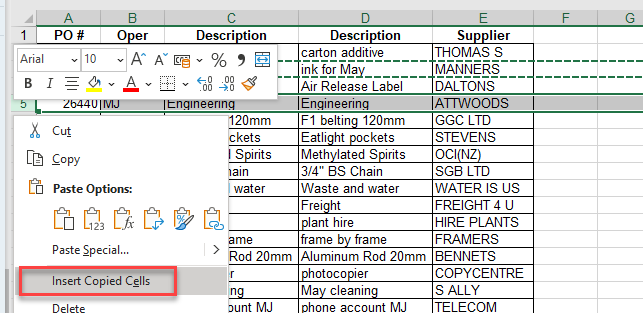
- Select the column where you want to paste the copied cells, and right-click on the column header of the destination column. Click Insert Copied Cells.
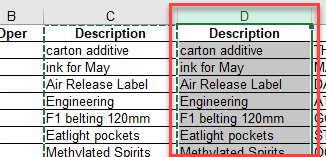
A new column is inserted before the column you selected. This new column will contain the copied cells.
Note: if you have selected a blank column (i.e., no data in any of the cells), you can just press ENTER on the keyboard or choose Paste from the quick menu to paste the copied data into the existing column.
You copy a row in the same way.
- Click in the row header of the row you wish to copy to select the row, and then right-click and click Copy.
- Right-click on the destination row header and to insert a row with the copied data, click Insert Copied Cells, or click Paste to paste the data into an existing row.
Copy Formulas
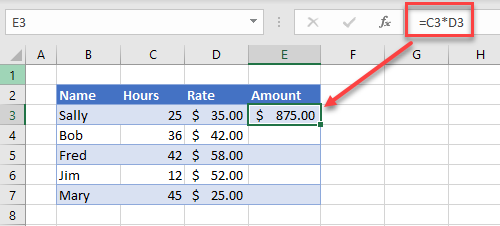
If you have a cell with a formula in it, and you wish to use that formula in adjacent, or nonadjacent cells, you can copy the formula in the same way as you would copy cells above.
- Select the cell that contains the formula, and then either:
- Right-click, and then click Copy.
OR Press CTRL + C on the keyboard.
OR In the Ribbon, go to Home > Clipboard > Copy.
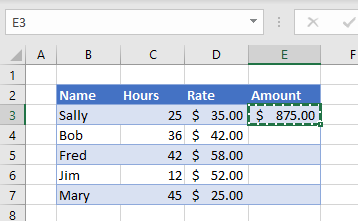
Small moving lines indicate that the cell has been copied.
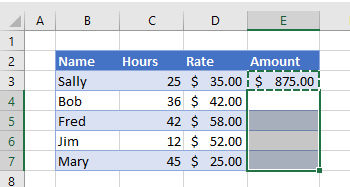
- Select the cells where you want to paste the formula.
- Right-click, and then click Paste.
OR Press CTRL + V or ENTER on the keyboard.
OR In the Ribbon, go to Home > Clipboard > Paste.
As you look down at the copied formula, you will notice that the formula automatically changes according to the row and column you are copying down or across to.
Note: You can also copy and paste an exact formula so that the row and column information don’t change.
Copy Cell Data or Formula
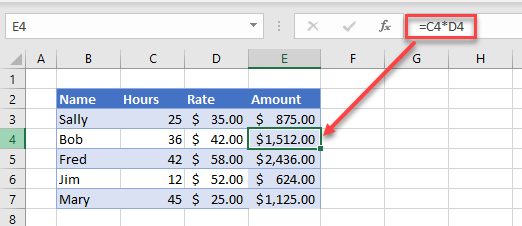
In the picture above, the formatting from cell E3 was pasted into cells E4:E7 along with the formula. The same thing happens when you copy cell data without a formula. To prevent this from happening, use Paste Options to just paste the formulas without the format.
- Copy the cell.
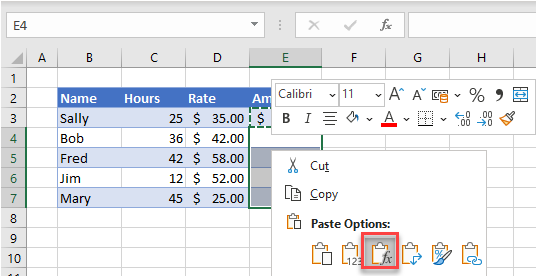
- Then, right-click and choose Paste Options > Paste Formulas.
OR
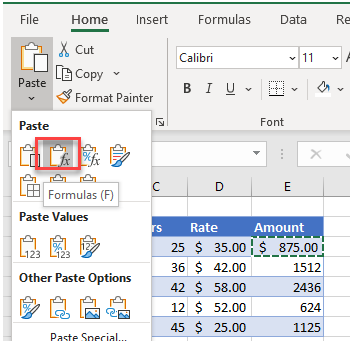
In the Ribbon, go to Home > Clipboard > Paste > Paste Formulas.
This pastes the formulas into the selected cells without any formatting.
Copy a Formula to Adjacent Cells
You can also drag the formula down to the adjacent cells by using the fill handle.
Notes
- Note that this method will also copy the formatting down to the adjacent cells along with the formula.
- It’s also possible to use Paste Options to paste the formula as text.
Copy-Paste Multiple Cells in Google Sheets
Copying and pasting in Google Sheets works in much the same way as it does in Excel.
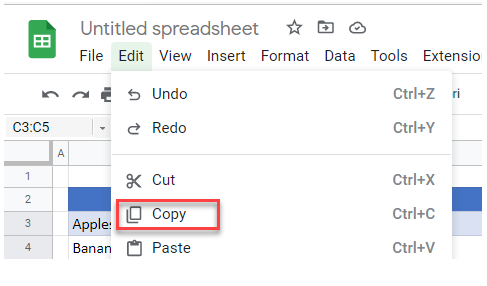
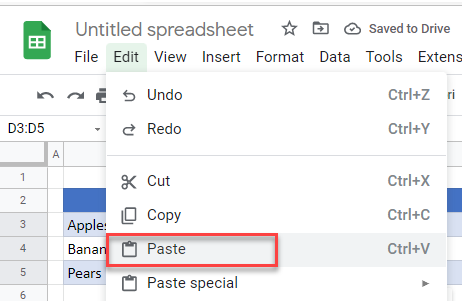
- Highlight the cells you wish to copy, and then, on the keyboard press CTRL + C or in the Menu, go to Edit > Copy.
- Select the destination cell and press CTRL + V on the keyboard, or in the Menu, go to Edit > Paste.
You may get a message that you need to install an extension to use Edit > Paste.
You can either dismiss the information message and use CTRL + V to paste the cell data, or you can install the extension into your browser to enable you to use Edit > Paste on the menu.
As with Excel, you can use Paste Special to paste only part of the cell contents: formulas, values, format, etc.
- In the Menu, go to Edit > Paste special and then select the option required.
Adjacent Cells
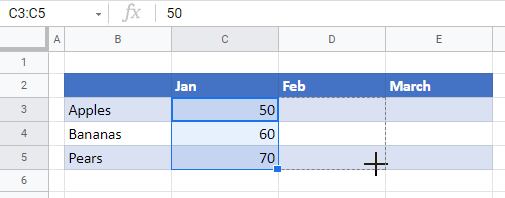
To copy the cell data across to adjacent cells using the mouse, highlight the cells containing the data, and then, drag the mouse pointer across to the desired destination cells.
Nonadjacent Cells
Selecting nonadjacent cell ranges in Google Sheets works the same as in Excel. Select the first range then, holding down the CTRL key, select the second range. Then copy both ranges using CTRL + C or in the Menu, go to Edit > Copy.
Select the destination location and the press CTRL + V or, in the Menu, go to Edit > Paste.
Copy Entire Columns and Rows
- As with Excel, right-click in the header of the column, then click Copy.
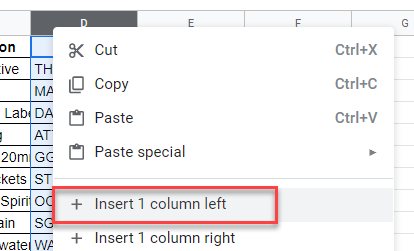
- Right-click in the column header of the destination column. Google will not automatically insert a new column so insert a column first if you do not wish to overwrite the data already in the column. Click Insert 1 column left.
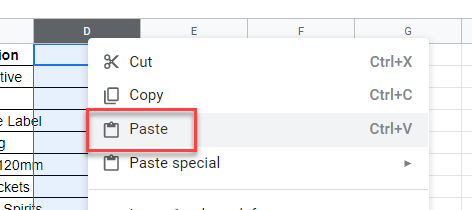
- Right-click in the new column header and click Paste.
The copied data is pasted into the new column.
Copying an entire row works in the same way; just click the row header instead of the column header!
More Options
For more information on copying and pasting in Excel and Google Sheets, see:
- Copy and Paste Exact Formula
- Copy and Paste Non-Blank Cells (Skip Blanks)
- Copy and Paste Without Borders
- Paste Horizontal Data Vertically
- Rearrange Columns
- Duplicate Rows
- VBA Value Paste & Paste Special
- VBA – Cut, Copy, Paste from a Macro
- VBA Copy / Paste Rows & Columns
- Select Nonadjacent Cells or Columns
- Copy Cell From Another Sheet
Working in spreadsheets all day? Check out these 15 copy & paste tricks to save time when you’re copying and pasting cells in Microsoft Excel.
Excel is one of the most intuitive spreadsheet applications to use. But when it comes to copying and pasting data throughout different parts of the spreadsheet, most users don’t realize how many possibilities there are.
Whether you want to copy and paste individual cells, rows or columns, or entire sheets, the following 15 tricks will help you do it faster and more efficiently.
1. Copy Formula Results
One of the most annoying things about copying and pasting in Excel is when you try to copy and paste the results of Excel formulas. This is because, when you paste formula results, the formula automatically updates relative to the cell you’re pasting it into.
You can prevent this from happening and copy only the actual values using a simple trick.
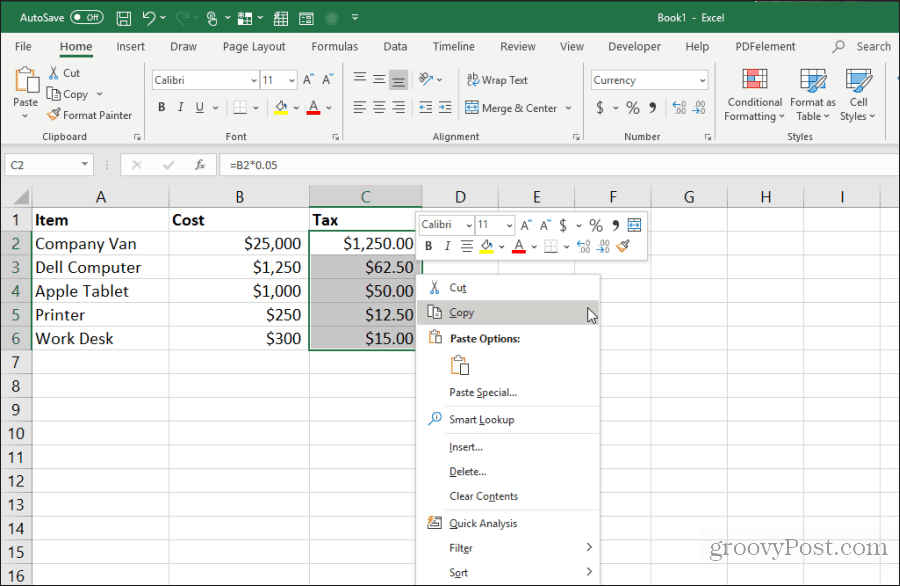
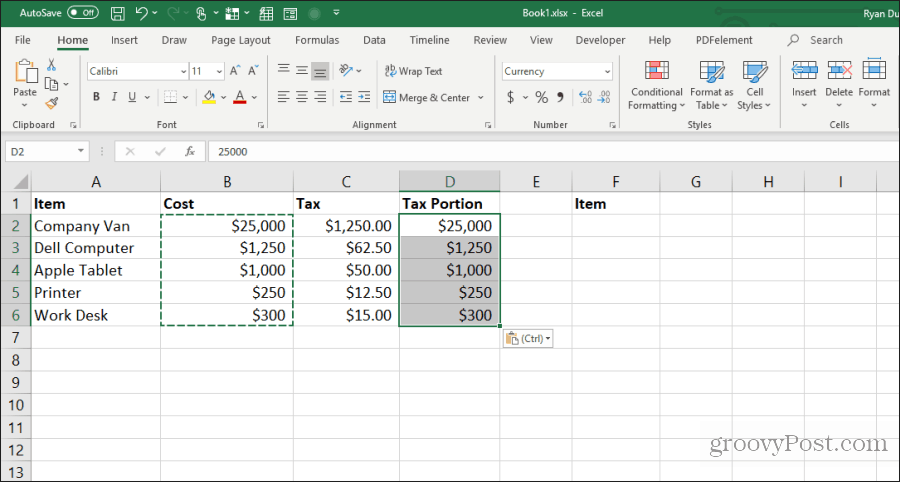
Select the cells with the values you want to copy. Right-click any of the cells and select Copy from the pop-up menu.
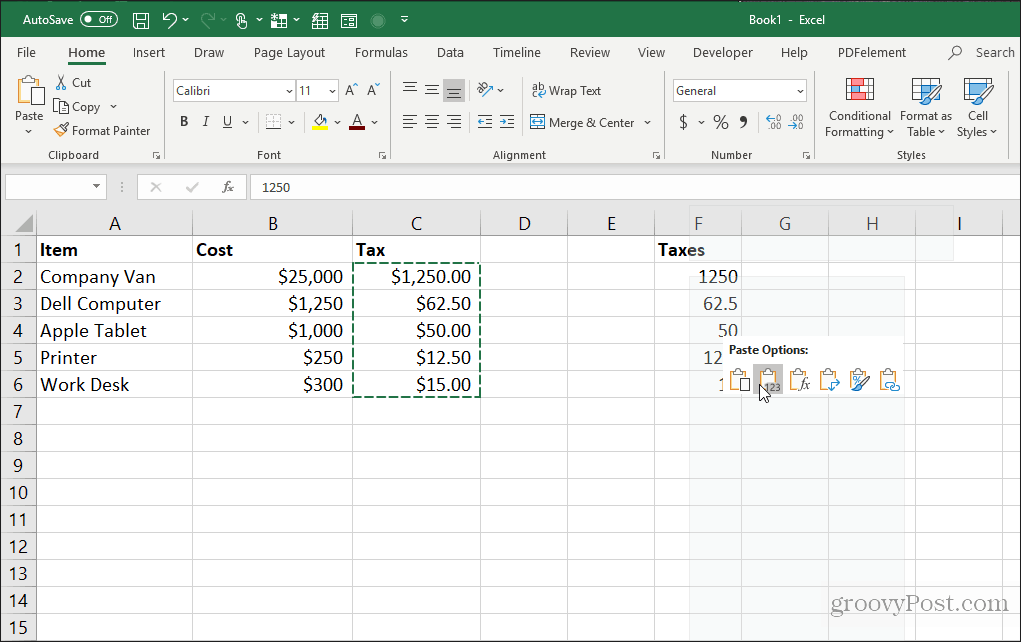
Right-click the first cell in the range where you want to paste the values. Select the Values icon from the pop-up menu.
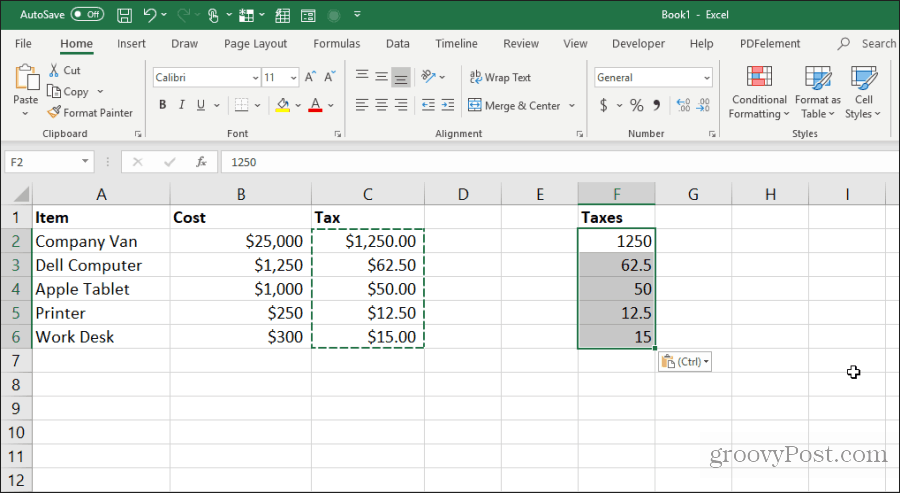
This will paste only the values (not the formulas) into the destination cells.
This removes all of the relative formula complexity when you normally copy and paste formula cells in Excel.
2. Copy Formulas Without Changing References
If you want to copy and paste formula cells but keep the formulas, you can do this as well. The only problem with strictly pasting formulas is that Excel will automatically update all the referenced cells relative to where you’re pasting them.
You can paste the formula cells but keep the original referenced cells in those formulas by following the trick below.
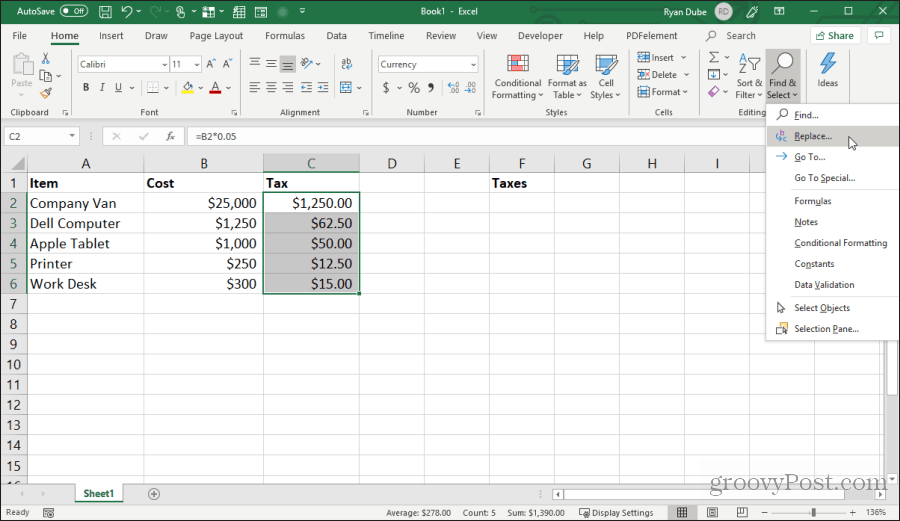
Highlight all of the cells that contain the formulas you want to copy. Select the Home menu, click on the Find & Select icon in the Editing group, and select Replace.
In the Find and Replace window, type = in the Find what field, and # in the Replace with field. Select Replace All. Select Close.
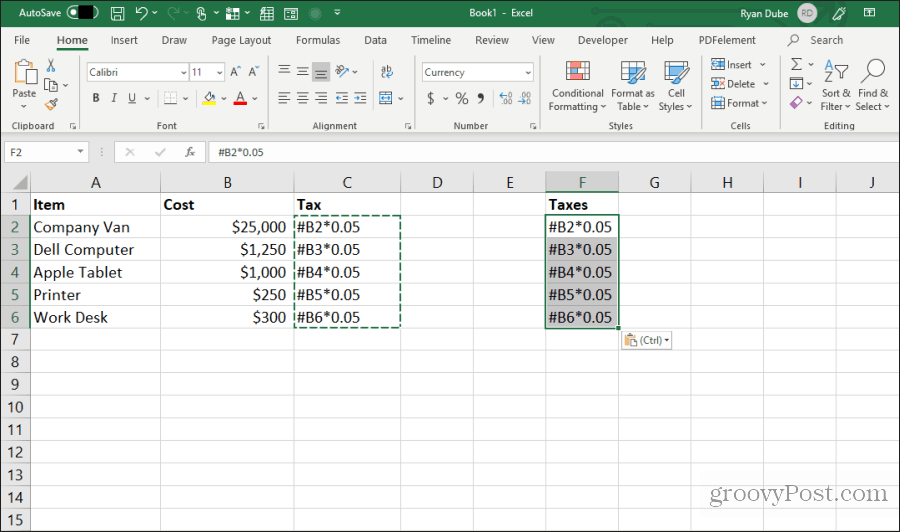
This will convert all formulas to text with the # sign at the front. Copy all of these cells and paste them into the cells where you want to paste them.
Next, highlight all of the cells in both columns. Hold down the Shift key and highlight all cells in one column. Then hold down the Control key and select all of the cells in the pasted column.
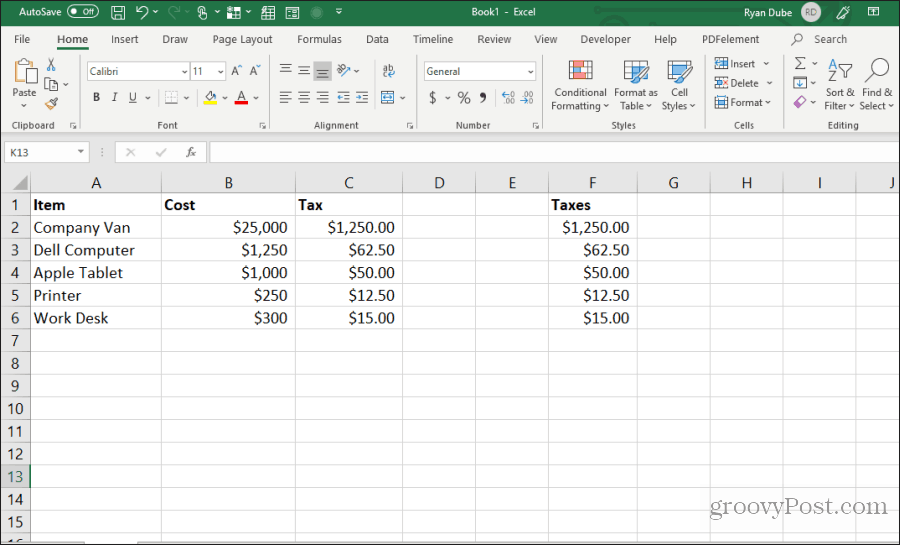
With all cells still highlighted, repeat the search and replace procedure above. This time, type # in the Find what field, and = in the Replace with field. Select Replace All. Select Close.
Once the copy and replace are done, both ranges will contain the same formulas without shifting references.
This procedure may seem like a few extra steps, but it’s the easiest to override the updated references in copied formulas.
3. Avoid Copying Hidden Cells
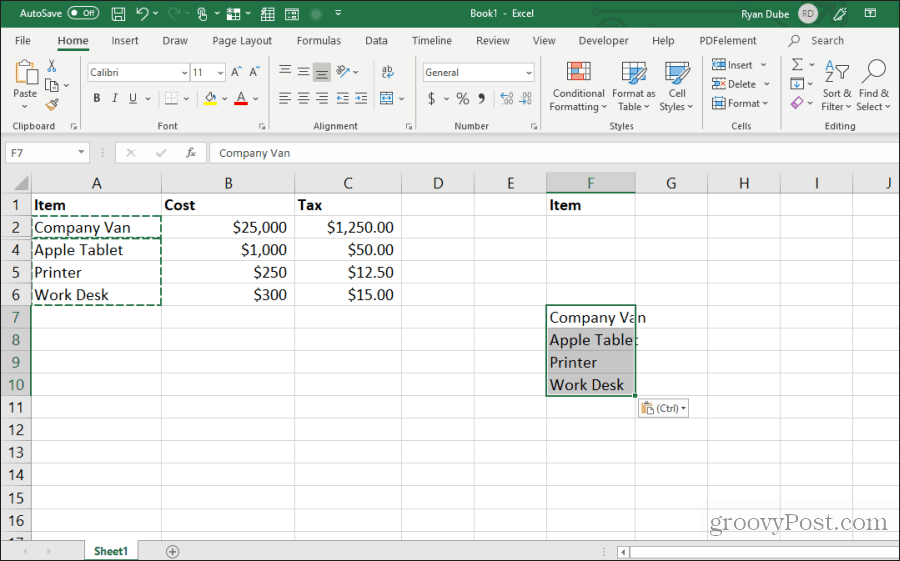
Another common annoyance when copying and pasting in Excel is when hidden cells get in the way when you copy and paste. If you select and paste those cells, you’ll see the hidden cell appear in the range where you paste them.
If you only want to copy and paste the visible cells, select the cells. Then in the Home menu, select Find & Select, and then select Go To Special from the dropdown menu.
In the Go To Special window, enable Visible cells only. Select OK.
Now press Control+C to copy the cells. Click on the first cell where you want to paste, and press Control+V.
This will paste only the visible cells.
Note: Pasting the cells into a column where an entire second row is hidden will actually hide the second visible cell you’ve pasted.
4. Fill to Bottom with Formula
If you’ve entered a formula into a top cell next to a range of cells already filled out, there’s an easy way to paste the same formula into the rest of the cells.
The typical way people do this is to click and hold the handle on the bottom left of the first cell and drag it to the bottom of the range. This will fill in all cells and update cell references in the formulas accordingly.
But if you have thousands of rows, dragging all the way to the bottom can be difficult.
Instead, select the first cell, then hold down the Shift key and hover the house over the lower-right handle on the first cell until you see two parallel lines appear.
Double click on this double-line handle to fill to the bottom of the column with data to the left.
This technique to fill cells down is fast and easy and saves a lot of time when you’re dealing with extensive spreadsheets.
5. Copy Using Drag and Drop
Another neat time-saver is copying a group of cells by dragging and dropping them across the sheet. Many users don’t realize that you can move cells or ranges just by clicking and dragging.
Give this a try by highlighting a group of cells. Then hover the mouse pointer over the edge of the selected cells until it changes to a crosshair.
Left-click and hold the mouse to drag the cells to their new location.
This technique performs the same action as using Control-C and Control-V to cut and paste cells. It’ll save you a few keystrokes.
6. Copy from Cell Above
Another quick trick to save keystrokes is the Control+D command. If you place the cursor under the cell, you want to copy, press Control+D, and the cell above will get copied and pasted into the cell you’ve selected.
Control+Shift+’ performs the same action as well.
7. Copy from Left Cell
If you want to do the same thing but copying from the cell to the left instead, select the cell to the right and press Control+R.
This will copy the cell to the left and paste it in the cell to the right, with just one keystroke!
8. Copy Cell Formatting
Sometimes, you may want to use the same formatting in other cells that you’ve used in an original cell. However, you don’t want to copy the contents.
You can copy just the formatting of a cell by selecting the cell, then type Control+C to copy.
Select the cells you want to format like the original, right-click, and select the formatting icon.
This will paste only the original formatting but not the content.
9. Copy Entire Sheet
If you’ve ever wanted to work with a spreadsheet but didn’t want to mess up the original sheet, copying the sheet is the best approach.
Doing this is easy. Don’t bother to right-click and select Move or Copy. Save a few keystrokes by holding down the Control key, left-click on the sheet tab, and dragging it to the right or the left.
You’ll see a small sheet icon appear with a + symbol. Release the mouse button, and the sheet will copy where you’ve placed the mouse pointer.
10. Repeat Fill
If you have a series of cells that you want to drag down a column and have those cells repeat, doing so is simple.
Just highlight the cells that you want to repeat. Hold down the Control key, left-click the lower right corner of the bottom cell, and drag down the number of cells that you’d like to repeat.
This will fill all of the cells below the copied ones in a repeating pattern.
11. Paste Entire Blank Column or Row
Another trick to save keystrokes is adding blank columns or rows.
The typical method users use to do this is right-clicking the row or column where they want a blank and selecting Insert from the menu.
A faster way is to highlight the cells that make up the row or column of data where you need the blank.
Holding down the Shift key, left-click the bottom right corner of the selection, and drag down (or to the right if you selected a column range).
Release the mouse key before you release Shift.
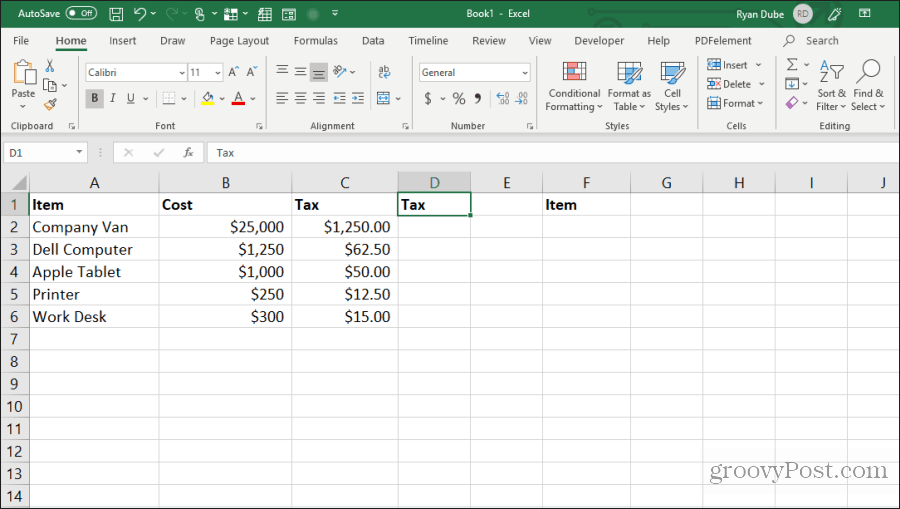
This will insert blanks.
12. Paste Multiples of a Single Cell
If you have a single cell of data that you want to replicate over many cells, you can copy the individual cell and paste it over as many cells as you like. Select the cell you want to copy and press Control+C to copy.
Then choose any range of cells where you want to copy the data.
This will replicate that cell across as many cells as you like.
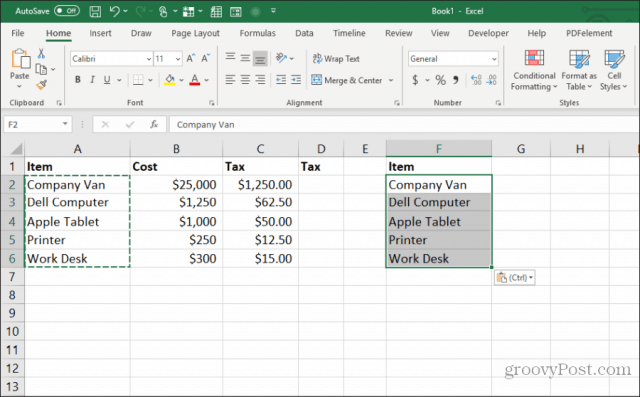
13. Copy Column Width
When copying and pasting a column of cells and you want the destination to be the same width as the original, there’s a trick to that as well.
Just copy the original column of cells as you normally would using the Control-C keys. Right-click the first cell in the destination and press Control-V to paste.
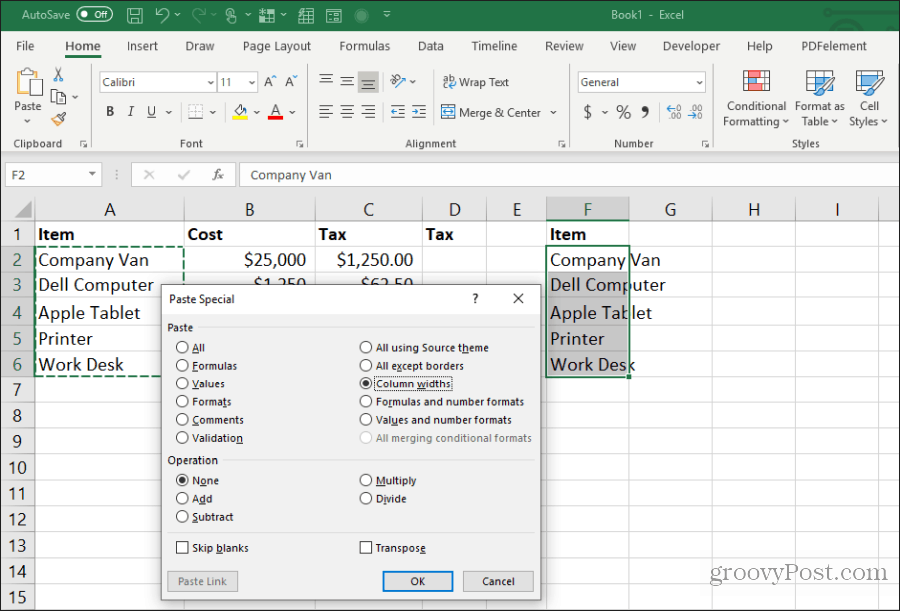
Now, select the original column of cells again and press Control-C. Right-click the first cell in the column you previously pasted and choose Paste Special.
In the Paste Special window, enable Column widths and select OK.
This will automatically adjust the column width to match the original widths as well.
It might be easier to adjust the column width with your mouse, but if you’re adjusting the width of multiple columns at once on a huge sheet, this trick will save you a lot of time.
14. Paste with Calculation
Have you ever wanted to copy a number to a new cell but perform a calculation on it simultaneously? Most people will copy the number to a new cell and then type a formula to perform the calculation.
You can save that extra step by performing the calculation during the paste process.
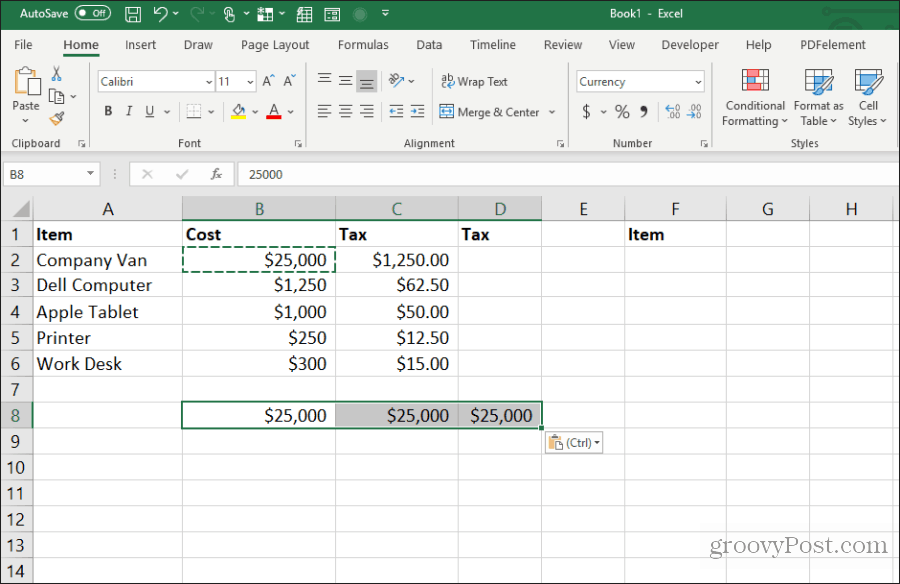
Starting with a sheet containing the numbers you want to calculate, first select all of the original cells and press Control+C to copy. Paste those cells into the destination column where you want the results.
Next, select the second range of cells you want to calculate and press Control+C to copy. Select the destination range again, right-click, and choose Paste Special.
In the Paste Special window, under Operation, select the operation you want to perform on the two numbers. Select OK, and the results will appear in the destination cells.
This is a fast and easy way to perform quick calculations in a spreadsheet without using extra cells to do quick calculations.
15. Transpose Column to Row
The most useful paste trick of all is transposing a column into a row. This is especially useful when you have one sheet with items vertically along a column that you want to use as headers in a new sheet.
First, highlight and copy (using Control+C) the column of cells you want to transpose as a row in your new sheet.
Switch to a new sheet and select the first cell. Right-click and select the transpose icon under Paste Options.
This pastes the original column into the new sheet as a row.
It’s fast and easy and saves the trouble of copying and pasting all of the individual cells.
Use all of the 15 tips and tricks above to save yourself a lot of time the next time you’re working with your Excel worksheets.
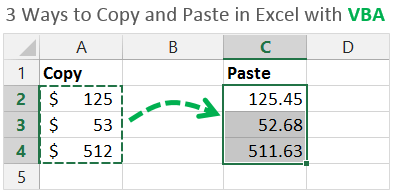
Bottom line: Learn 3 different ways to copy and paste cells or ranges in Excel with VBA Macros. This is a 3-part video series and you can also download the file that contains the code.
Skill level: Beginner
Copy & Paste: The Most Common Excel Action
Copy and paste is probably one of the most common actions you take in Excel. It’s also one of the most common tasks we automate when writing macros.
There are a few different ways to accomplish this task, and the macro recorder doesn’t always give you the most efficient VBA code.
In the following three videos I explain:
- The most efficient method for a simple copy and paste in VBA.
- The easiest way to paste values.
- How to use the PasteSpecial method for other paste types.
You can download the file I use in these videos below. The code is also available at the bottom of the page.
Video #1: The Simple Copy Paste Method
You can watch the playlist that includes all 3 videos at the top of this page.
Video #2: An Easy Way to Paste Values
Video #3: The PasteSpecial Method Explained
VBA Code for the Copy & Paste Methods
Download the workbook that contains the code.
'3 Methods to Copy & Paste with VBA
'Source: https://www.excelcampus.com/vba/copy-paste-cells-vba-macros/
'Author: Jon Acampora

Sub Range_Copy_Examples()
'Use the Range.Copy method for a simple copy/paste

    'The Range.Copy Method - Copy & Paste with 1 line
    Range("A1").Copy Range("C1")
    Range("A1:A3").Copy Range("D1:D3")
    Range("A1:A3").Copy Range("D1")

    'Range.Copy to other worksheets
    Worksheets("Sheet1").Range("A1").Copy Worksheets("Sheet2").Range("A1")

    'Range.Copy to other workbooks
    Workbooks("Book1.xlsx").Worksheets("Sheet1").Range("A1").Copy _
        Workbooks("Book2.xlsx").Worksheets("Sheet1").Range("A1")

End Sub


Sub Paste_Values_Examples()
'Set the cells' values equal to another to paste values

    'Set a cell's value equal to another cell's value
    Range("C1").Value = Range("A1").Value
    Range("D1:D3").Value = Range("A1:A3").Value

    'Set values between worksheets
    Worksheets("Sheet2").Range("A1").Value = Worksheets("Sheet1").Range("A1").Value

    'Set values between workbooks
    Workbooks("Book2.xlsx").Worksheets("Sheet1").Range("A1").Value = _
        Workbooks("Book1.xlsx").Worksheets("Sheet1").Range("A1").Value

End Sub


Sub PasteSpecial_Examples()
'Use the Range.PasteSpecial method for other paste types

    'Copy and PasteSpecial a Range
    Range("A1").Copy
    Range("A3").PasteSpecial Paste:=xlPasteFormats

    'Copy and PasteSpecial a between worksheets
    Worksheets("Sheet1").Range("A2").Copy
    Worksheets("Sheet2").Range("A2").PasteSpecial Paste:=xlPasteFormulas

    'Copy and PasteSpecial between workbooks
    Workbooks("Book1.xlsx").Worksheets("Sheet1").Range("A1").Copy
    Workbooks("Book2.xlsx").Worksheets("Sheet1").Range("A1").PasteSpecial Paste:=xlPasteFormats

    'Disable marching ants around copied range
    Application.CutCopyMode = False

End Sub
Paste Data Below the Last Used Row
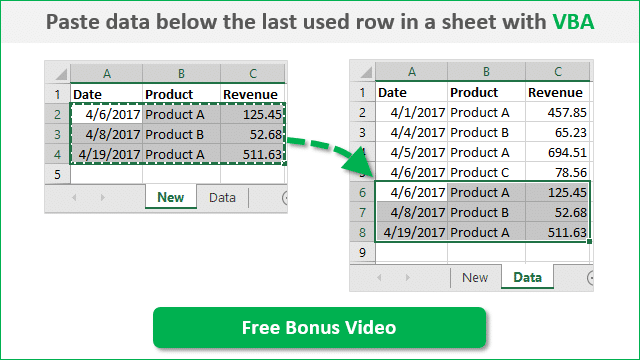
One of the most common questions I get about copying and pasting with VBA is, how do I paste to the bottom of a range that is constantly changing? I first want to find the last row of data, then copy & paste below it.
To answer this question, I created a free training video on how to paste data below the last used row in a sheet with VBA. Can I send you the video? Please click the image below to get the video.
Free Training on Macros & VBA
The 3 videos above are from my VBA Pro Course. If you want to learn more about macros and VBA then checkout my free 3-part video training series.
I will also send you info on the VBA Pro Course, that will take you from beginner to expert. Click the link below to get instant access.
Free Training on Macros & VBA
Please leave a comment below with any questions. Thanks!
Copy Paste is the most common action when you start to work with Excel.
Benefits of the action Copy Paste
With Excel, you can copy any cell or any range of cell
- Select the cell you want to copy and click on the following icon «Copy» in the Home tab.
- Just after you see an animation with dotted lines moving (the dancing ants 😉) This indication means that the cell has been copied in the contain of the cell is in the memory of the computer.
- Then, select the cell where you want to paste the contain of the first cell
- Click on the Paste icon.
- All the contain of the first cell (color, font, borders, formula) is transferred to the second cell.
Keyboard Shortcut
You can also use the following shortcut to perform the same action
| Copy contents of the selection to the clipboard | Ctrl + C |
| Paste contents of the clipboard. | Ctrl + V |
The fill-handle
When you want to copy / paste on adjacent cells, it is faster to do this action with the mouse. In the bottom-right corner of a cell, you notice a square: it’s the fill-handle.
Whatever the contained of your original cell you just have to click and drag to copy this cells.
If you have a single value, use the fill-handle will copy the same value. If you press Ctrl, you extend the series.
Increase series automatically
The fill-handle helps you to increase series of values automatically. NO FORMULA needed 😉
Duplicate column with the Ctrl Key
If you want to duplicate a column, the easiest way is to
- Select the column you want to duplicate
- Move the cursor to the edge of the selection
- Press the Ctrl key
- Drag and Drop BUT never release the Ctrl Key
Copy a formula
When the cell contains a formula, Excel automatically changes the references of the formula.
Let’s copy cell C2 to the range C3:C6.
Automatically, Excel has changed the references of the cells in the formulas 😉
You can «block» the cell references by putting the $ sign on both sides of the reference to ensure that references do not move. To avoid mistake with the reference of the cells, refer to this article.
Tutorial video with all the tricks
If you want to know more tricks with the copy-paste, have a look at this video


 , drag the cell or range of cells to another location.
 or press Ctrl + X.
 or press Ctrl + V.
 .
.

