
Tables in Word are useful in so many situations. In this post you’ll discover how to create tables, then manipulate and design them in the quickest and easiest way to provide that visual punch.
Clickable Table of Contents
Enhance your Word tables with these advanced features
1. What are tables in Word good for?
Tables are useful for 2 distinct reasons.
- To show an actual table of data, or
- To organise and postion text, images and other elements on the page.
Many years ago, typewriters ruled the world. And a feature of a good typewriter was the tab stop, which was a device that essentially let you control indentation.
Over the years many people have continued to use tabs to indent text, because of its convenience, but they are hard work to set up properly.
Tables provide a much easier way to organise content on a page.
1. Select the Insert tab.
2. Click the Tables icon in the Tables group.
3. Move your mouse pointer into the table grid until the required number of rows and columns are highlighted orange, then left-click.

An empty table is inserted into the document.
Two new tabs, Design and Layout are also added to the ribbon area, under the banner of Table Tools.


3. MOVING AROUND A Word TABLE
- While the table is empty, you can use the cursor keys to move around the cells. However, when the cells contain information, using the cursor keys will move through the cell content first before moving to the next cell
- You can left-click in any cell to position the cursor.
- Press Tab to move to the next cell. The cursor will move across and then down the table.
- Press Shift + Tab to move to the previous cell.

NB. Using Tab is better than using the cursors as it will move to the next/previous cell regardless of whether there is information in the cells.
NB2. If you press Tab while you are in the last cell, a new row will be added to the bottom of your table
4. SELECTING A CELL, ROW, COLUMN OR THE ENTIRE TABLE
To select a cell:
1. Position the mouse pointer inside the cell on the bottom-left corner of the cell.
The pointer will change shape to a solid black arrow that points up and right.
2. Left-click.

To select a row of a table:
1. Position the mouse pointer in the left margin in line with the row you want to select.
The mouse pointer will change to a white arrow that points up and right.
2. Left-click.

To select a column
1. Position the mouse pointer so that it rests on the top border of the table, above the column you want to select.
The mouse pointer will change to a solid black arrow pointing down.
2. Left-click.

To select the entire table:
1. Position your mouse pointer over the 4-headed arrow icon situated at the top-left of the table.
2. Left-click.

5. INSERTING AN EXTRA ROW OR COLUMN
To insert an extra row:
1. Position the cursor in a cell.
2. Select the Layout tab, under the Table Tools banner.
3. Click Insert Above or Insert Below in the Rows and Columns group

Here is a quick way to insert new rows:
1. Position the cursor to the left of the table, but in close proximity.
2. A plus symbol will appear above or below the mouse pointer indicating where the new row will be added.

3. Nudge the mouse pointer up or down to move the plus sign above or below.
4. Left-click to insert the new row,
To insert an extra column:
1. Position the cursor in a cell.
2. Select the Layout tab, under the Table Tools banner.
3. Click Insert Left or Insert Right in the Rows and Columns group

Here is a quick way to insert a new column:
1. Position the cursor above a column, but in close proximity to the table.
2. A plus symbol will appear to the left or right of the mouse pointer indicating where the new column will be added.
3. Nudge the mouse pointer left or right to move the plus sign to the left or the right of the column.
4. Left-click to insert the new column,

6. DELETING A ROW OR COLUMN
To delete the current row or column:
1. Position the cursor in any cell of the row you want to delete.
2. Select the Layout tab, under the Table Tools banner.
3. Click the Delete icon in the Rows and Columns group.

4. Choose Delete Row or Delete Column from the drop-down menu.
7. Quickly fORMATTING tables in Word
Word provides you with a number of pre-set table designs. This means that it formats the headings and the data, applies a variety of borders and colours the cells in a way that makes it look like a professionally produced table. As a beginner this simple technique will give you a good-looking table.
1. Position the cursor in any cell in the table.
2. Select the Design tab under the Table Tools banner.
The Table Styles group lists a number of table designs. To get the full list, click the More button beneath the table styles scroll bar
The default table style is Table Grid in the Plain Tables category which adds simple gridlines but no shading to your table.
Live Preview allows you to hover over a design and see it applied to your table. If you like what you see, click to select the table design.

In the Table Style Options group of the Design tab, tick the components that you have in your table. For example, if your table has column headings, tick Header Row. In doing this, the various parts of your table are formatted accordingly

Header Row
This will emphasise the header row by making the text bold or applying a different cell colour (depending on the table style selected.
Total Row
This will emphasise the bottom table row by making the text bold or applying a different cell colour (depending on the table style selected.
First Column
This will emphasise the first column (for labels etc.) by making the text bold or applying a different cell colour (depending on the table style selected.
Last Column
This will emphasise the last column (for row totals etc.) by making the text bold or applying a different cell colour (depending on the table style selected.
Banded Rows
This will make odd rows one colour and even rows a different colour. This helps readability.
Banded Columns
This will make odd columns one colour and even columns a different colour. This helps readability.
8. SETTING THE BORDERS AND SHADING
The Table Styles Gallery allows you to completely format a table with one click. Whereas you used to need some nous, anybody can now create a professional looking design.
However, you will often still need to apply your own border and shading, and manually change a table design. With a little effort can add a lot of flavour to your page and dramatically enhance the overall appearance of the document.
To set the borders for tables in Word:
1. Select the portion of the table that you wish to set the borders for. This may be the entire table, a row or rows, a column or columns or a selection of cells.
2. Select the Design tab under the Table Tools banner.
3. Select the Borders icon. A drop-down list appears. This list shows every combination of border that can be turned on or off. The icons with a shaded background are currently switched on. The rest are switched off.
4. Click any icon to switch the border on or off. The border style that is applied is the default style (½ pt solid black line ) or the last style that was used.

5. To apply customised borders, with different colours, styles and widths, click the Borders & Shading option at the bottom of the list to display the Borders and Shading dialog box.


Your selection will always have an outer border, and if you selected more than one cell, you will have some inside borders as well. The easiest way to use the dialog box is to start on the bottom-middle and work your way up and right.
1. Select the colour and width (thickness) that you would like for your border.

2. Choose a style (e.g. dotted, dashed, double, solid etc.)

3. Paint your borders. There are two ways to do this.
- The first way is to click directly on a border in the Preview itself.
- The second way is to click the appropriate icon around the edge of the Preview section that represents each border. Depending on which cells you selected in your table, some of these icons may not be available.

On the left-hand side of the dialog box, there are some pre-defined border combinations which you can use to save yourself some time. Depending on your selection of cells, the pre-defined options may differ. Here’s a run-down:

To shade the cells of tables in Word:
1. Select the portion of the table that you wish to shade. This may be the entire table, a row or rows, a column or columns or a selection of cells.
2. Select the Design tab under the Table Tools banner.
3. Click the Shading icon.
The colours that you see displayed match the current them of the document. Themes were discussed earlier in the course.
4. Click a colour in the palette.
While you can pick any colour, it is recommended to stick with the light colour shades, otherwise your tables will appear very loud and ugly, like they’re shouting in your face. Subtle is the order of the day. The exception to this is column headings or other cells that you wish to differentiate. Under these circumstances, you can use a dark colour, but use a light font with it.

If you cannot find the exact colour you need,
- Click the More Colours link underneath the palette. This displays a larger, more accurate colour palette.
- And if that’s not enough, click the Custom tab and you’ll get a really fine selection of colours (you can even enter your own RGB settings if you know them)

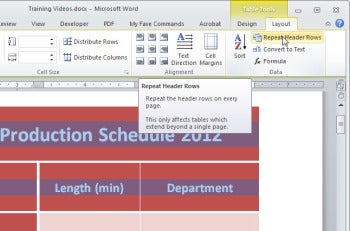
9. REPEATING table HEADINGS ON EVERY PAGE WHEN PRINTING
When you have large tables that occupy two or more pages, many people insert manual page breaks, then copy and paste their table header rows at the top of each page.
When rows are added or removed from tables in Word, the table headers end up half way down the page.
There is a simple tool that will eliminate this problem
1. Ensure that the table is a single table, with no manual page breaks in the middle, and one header at the top. The table header may occupy more than one row, it doesn’t affect the way this feature works.
2. Position the cursor somewhere in the top row of the table.
3. Select the Layout tab under the Table Tools banner.
4. Click the Repeat Header Rows icon ion the Data group.

Now, it doesn’t matter how many rows tables in Word contain, if the table ever spills across into another page, the header row (which normally displays the column headings) will always appear at the top of the table.
10. All the key points again
- Tables in Word serve 2 distinct purpose: to display a table of data and to organise and position items on the page
- To create table, select 2 tabs — Design and Layout under the Table Tools banner.
- There are 2 tabs — Design and Layout under the Table Tools banner.
- You can press the TAB key to move direct to the next cell and SHIFT and TAB together to move backwards through a table.
- The four elements of a table are cells, rows, columns and the whole table. Each can be selected.
- Rows can be inserted by selecting the Layout tab under Table Tools, then clicking the Insert Above or Insert Below icons. Alternatively, hover to the left of a row and click the plus symbol that appears above or below the mouse pointer.
- Columns can be inserted by selecting the Layout tab under Table Tools, then clicking the Insert
Left or Insert Right icons. Alternatively, hover above a table column and click the plus symbol that appears to the left or right of the mouse pointer. - Columns and rows and be removed from the table, by positioning the cursor in the row or column to be removed, then clicking the Delete icon on the Layout tab of Table Tools and choosing Delete
Row or Delete Column. - Tables can be formatted using the Table Style gallery or by manually setting the shading and borders manually. Both sets of tools are found on the Design ribbon of the Table Tools.
- When using the Microsoft Table Styles, you can control the behaviour of the formatting by setting the Table Style options – 6 tick boxes that define the structure of your table.
- For long tables that spill across onto subsequent pages, the top row, which normally contains the column headings can be set to repeat automatically. So there is no excuse for cutting and pasting headings midway through your table or taping pages together to make sense of the table!
I hope you found plenty of value in this post. I’d love to hear your biggest takeaway in the comments below together with any questions you may have.
Have a fantastic day.


About the author
Jason Morrell
Jason loves to simplify the hard stuff, cut the fluff and share what actually works. Things that make a difference. Things that slash hours from your daily work tasks. He runs a software training business in Queensland, Australia, lives on the Gold Coast with his wife and 4 kids and often talks about himself in the third person!
SHARE
Are you struggling to get your message across? When your Microsoft Word project contains information, try presenting it in the form of a Word table. Learn how to make tables in Word quickly with a template.


A table is a kind of chart that organizes and presents data in rows and columns. It makes information easier to grasp, understand, and analyze at a glance, compared to explaining the same data through plain text.
Microsoft Word gives you various ways to insert or create a table. And you’ve got granular control over the formatting, layout, and appearance of Microsoft Word tables. Table charts are useful in different types of Word projects, whether for personal, educational, or business use.
This article will show you how to make a table in Word using a template. Then edit and format it to change its appearance.
(Note: The screenshots and instructions that follow are made using Microsoft Word for Mac version 16.4. If you’re using a different version of Word, then the interface and steps may be different.)
How to Make & Edit MS Word Tables (Video)
In this video, you’ll learn how to quickly make tables in Mircosoft Word. Find out how to start with a premium template. Quickly customize it to make an attractive, professional MS Word table you can use and reuse.
To learn even more about MS Word tables and about templates than can be used for tables, study the step-by-step tutorial below:
How to Make Basic Tables in Word
Let’s start by learning how to make a basic table in Microsoft Word:
1. Insert a Table
You can create a basic Microsoft Word table in one of two ways:
Method 1. The Insert Tab
Click on the Insert tab, then click the Table button on the ribbon.


The Insert Table panel appears. Drag the cursor over the squares to specify the number of columns and rows you want to create. Click to apply.


Method 2. The Insert Menu
Go to Insert > Table….


The Insert Table panel opens. Specify the number of columns and rows you need. (You can always add or remove columns and rows later.)


Also select the Autofit Behavior you want the table to have. You’ve got several options:
- Initial column width. The default setting is Auto, which divides the entire width of your page window across the number of columns in the table. Or, you can specify a different column width.
- AutoFit to contents. Resizes the column width based on the width of the content inside the column.
- AutoFit to window. Distributes the columns equally across the entire width of the page window.
- Set as default for new tables. Check this option if you want the settings to be applied globally to all new tables you create.
When you’re happy with the options you’ve selected, click OK.


2. Draw a Table
Or, you can draw a table in MS Word. This is a useful feature if you want to create an irregular or more complicated table with columns and/or rows of varying widths.
To draw a table, click Insert > Table > Draw Table.


With your mouse or trackpad, click and drag the cursor to start drawing your table. You can begin by drawing the outermost boundary of the table first.


Then, click and drag the cursor to create columns and rows inside the table. When you’re done, click anywhere outside the table.


Here’s an example of an “irregular” table you can draw using this feature.


If you make a mistake, click Layout > Eraser to erase a line from the table.


Click and drag the eraser along the line you wish to erase. The line that’ll be erased appears as a thick, red line. Release the mouse or trackpad to erase.


Click outside the table when you’re done.
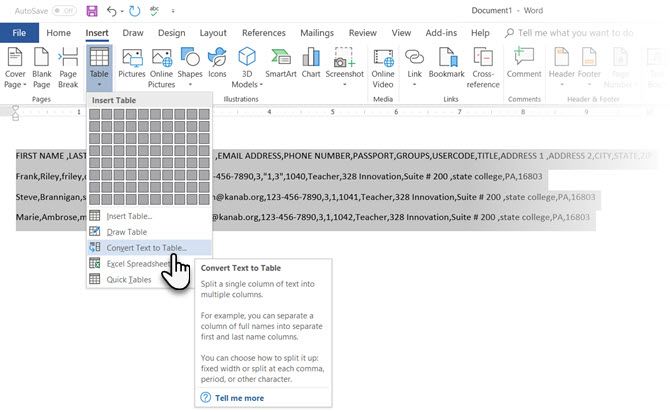
3. Convert Text to Tables and Vice Versa
Another way to create a table is by converting text into a table. This means you can take non-tabular data from a CSV or plain TXT file and convert them into a table.
First, copy and paste the non-tabular data into your Word document.


With the text selected, go to Insert > Table > Convert Text to Table….


The Convert Text to Table panel opens. Specify the settings you wish to use. Click OK.


The text is then converted into a table.


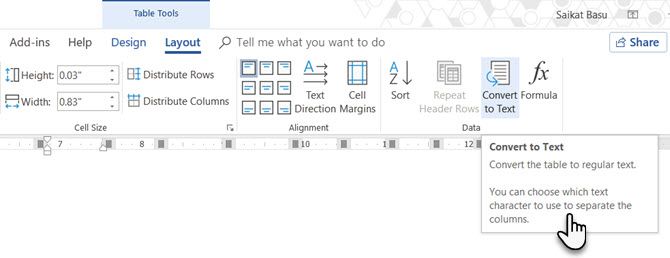
You can also do the opposite, which is to convert a table into text.
Select the cells or entire table you want to convert. Next, click on the Layout tab then click the Convert Table to Text icon.


The Convert Table to Text panel opens. This is where you’ll decide how you want to separate text that’s currently in different columns. When you’ve made a selection, click OK.


For this example, I chose to separate text with commas. This is what the converted table looks like.


4. Advanced: How to Insert a Table from Excel
If you’ve already created a table in Excel, you can embed it into your Word document.
Open the Excel file. Click and drag the mouse to select the table.


Go back to your Word document. Go to Edit > Paste Special ….


In the Paste Special panel, select Microsoft Excel Binary Worksheet Object, then click OK.


This embeds the Excel table into Word. It’s still an Excel table, which means you can’t edit or format the table in MS Word. You’ve got to do so in Excel.


Double-click anywhere in the table to launch the source file in Excel. When you make any changes to the table in Excel, the table embedded in your Word project automatically updates to reflect those changes.
Now you know how to make a table in MS Word using various options.
How to Edit Tables
At any time after creating your table, you can edit and customize it to look the way you want it to. Here are some steps for editing tables in Microsoft Word:
1. Add a Column or Row
To add a row or column, click inside a table cell. Right-click on the mouse, then click Insert.


Select one of the following:
- Columns to the Left. Adds a column to the left of the current column
- Columns to the Right. Adds a column to the right of the current column
- Rows Above. Adds a row above the current row
- Rows Below. Adds a row below the current row
- Cells … Inserts a cell and shifts the rest of the cells either to the right or down from where the cursor is
- Table … Inserts a table inside the current cell
Or, with the cursor in one of the cells, you can click on the Layout tab.


Then choose of the following buttons on the ribbon:
- Insert Above. Inserts a row above the current cell
- Insert Below. Inserts a row below the current cell
- Insert Columns to the Left. Inserts a column to the left of the current cell
- Insert Columns to the Right. Inserts a column to the right of the current cell
Finally, you can add a new row when you’ve reached the last cell in the last row of your table. Simply press tab and a new row appears.
2. Delete a Column or Row
To delete a cell, column, row, or table, click on the Layout tab > Delete.


Select one of the options that appear:
- Delete Cells …
- Delete Columns
- Delete Rows
- Delete Table
You can use the same steps to edit a table you’ve drawn. Or, you can use the Layout tab to add or delete rows and columns.


Merge Cells
Sometimes you may want to merge cells to present information more clearly. To merge cells, click and drag the cursor to select the cells you wish to merge.


On the Layout tab, click on the Merge Cells button.


Or, after selecting the cells to be merged, right-click on your mouse, then click Merge Cells.


Now the cells have been merged into one.


Split Cells
After merging cells, you can always split them again into separate cells.
Place the cursor in the merged cell, then click Layout > Split Cells.


Or, right-click on your mouse, then click Split Cells….


Either way, the Split Cells panel pops up. Specify the number of columns and rows you want to split the cell into. Click OK.


Split Table
You may decide that it makes more sense to split up a table into two separate tables. Microsoft Word lets you do that easily, too.
In this example, I want to split the table right above the Accessories cell. And so, I’ll place the cursor in that cell. Next, click on the Layout tab, then click the Split Table button.


Now, we’ve got two separate tables.


Table Formatting
When you first create a table, it looks plain and boring. But Microsoft Word has many features so you can format tables to look exactly the way you want them. Here are some common ways to format tables:
1. Table Styles
The easiest way to format a table is by using one of the pre-formatted table styles. Put the cursor in any cell in the table. Click on the Table Design tab. Next, click on the arrow to expand the Table Styles group.


Click on a style you want to use and it’s applied immediately.


You can change any style you’ve selected. Again, click on Table Design, expand the Table Style group, then click Modify Style.


The Modify Style panel opens. Make the selections you want, then click OK.


2. Use Your Own Formatting
The Table Design tab gives you control over the appearance of every aspect of your table. Click on the Table Design tab and any of the appropriate buttons on the ribbon.


Resize a Table
You can also resize your table. Click on any cell to select the table, then click and drag one of the corners to resize it.


Or, you can use the Layout tab to resize individual cells, specific rows or columns, or the entire table. Select the columns or rows you wish to resize. Specify the height and/or width you wish to apply.


You can also adjust column width by hand by using the Table Ruler. Click inside a column you want to change. Then, drag the sliders in the Table Ruler to set to desired width.


Text Wrapping
If you want text to flow around the table, you can do so by changing its text wrapping.
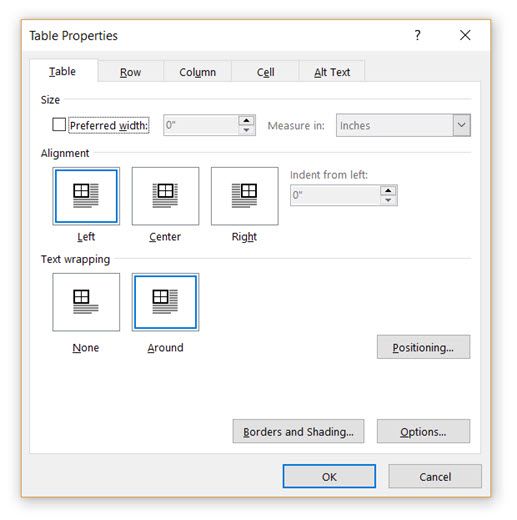
Click in any cell to select the table. Click Table > Table Properties….


In the Table Properties panel and under Text Wrapping, click Around > OK.


Now the text flows around the table.


Take note that the Table Properties panel allows you to format other qualities of the table, including:
- Size
- Alignment
- Positioning
- Borders and Shading
On the other tabs, you can change:
- Column, Row, and Cell Size
- Allow row to break across pages
- Repeat as header row at the top of each page
- Cell Vertical Alignment
- Alt Text (Title and Description) — more information about the table, to help people with vision or cognitive impairment who may not see the table
Find Great Styles for Microsoft Word
You don’t have to start from scratch to create an impressive and effective Word document — even if you don’t have design skills. You can find great styles by using a template for Word.


One great source for great Microsoft Word templates and professional graphics is Envato Elements. For one low monthly subscription, you get unlimited downloads of templates, graphics, fonts, and other creative tools you need for your project. It’s a terrific option if you create plenty of materials.
For single projects, GraphicRiver is an outstanding source for templates for Word. This marketplace gives you access to thousands of creative elements on a pay-per-use basis.
Learn More
Microsoft Word has many robust features to help you realize the vision you’ve got for your document. But with power comes complexity. That’s why it’s a good idea to learn how to use Microsoft Word.
These articles will help you get started:
Visualize Your Data with Microsoft Word Tables
Make your information clearer and easier to understand by learning how to make a table in Microsoft Word. Tables organize data into rows and columns, which makes them easier to grasp at a glance. Follow the steps in this article to create, format, and customize tables in Word.
You can also use a premium Word template to get a premium design created by designers. Get Word templates from Envato Elements, if you want unlimited downloads of templates, graphics, and other creative tools you need — all for one flat monthly fee.
Or, get premium templates for Word from GraphicRiver if you prefer to pay for each use of an item. Both sources give you access to thousands of design elements created by professionals, so you can save time, energy, and effort while creating an outstanding Word document.
Did you find this post useful?

Marketing & Communications Professional and Lifelong Learner/Canada
Lexi Rodrigo is a marketing and communications professional, copywriter, and course creator who helps remarkable brands and people get seen, heard, and known. Writing for the web since 2008, she has over 100+ blog posts published on Envato Tuts, Acadium, Mirasee, Vero, Copyblogger, FreelanceFolder, Business2Community, and others.
Lexi has supported multimillion-dollar companies and nonprofits in various marketing and communication roles. She has driven results like tripling the organic search traffic of a blog in three months and generating over $65 million in revenues, donations, and sponsorships.
She has a Bachelor of Arts degree in communications. She is also the co-author of «Blog Post Ideas: 21 Proven Ways to Create Compelling Content and Kiss Writer’s Block Goodbye.» When she’s not reading or writing, Lexi bakes bread, grows food, and takes long walks.
Create, Modify and Apply Table Styles in Word Documents
by Avantix Learning Team | Updated August 21, 2022
Applies to: Microsoft® Word® 2013, 2016, 2019, 2021 or 365 (Windows)
You can apply table styles to your Word tables to format them quickly and consistently. Word is shipped with several built-in table styles or you can create your own. You can edit table styles by modifying borders, shading, character formatting, paragraph formatting and table properties. If your document includes multiple tables, table styles can save a lot of time.
Note: Buttons and Ribbon tabs may display in a different way (with or without text) depending on your version of Word, the size of your screen and your Control Panel settings. For newer versionns of Word, Ribbon tabs may appear with different names. For example, the Table Tools Design tab may appear as Table Design.
Recommended article: How to Keep a Microsoft Word Table Together on One Page
Do you want to learn more about Microsoft Word? Check out our virtual classroom or live classroom Word courses >
Table styles and themes
Every Word document uses a document theme which includes a font theme and color theme. The colors used in table styles are based on the color theme.
You can select document themes, color themes and font themes using the Themes, Colors or Fonts drop-down menus on the Design tab in the Ribbon:

You can also create your own custom color themes so your tables can be formatted using your organization’s colors.
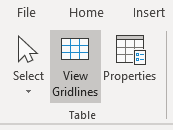
Display gridlines
When you are working with tables, it’s a good idea to turn gridlines on. Borders, which are a format, will print. Gridlines do not print.
To display gridlines:
- Click in a table.
- Click the Table Tools Layout or Table Layout tab.
- Click View Gridlines. Gridlines will stay on for all Word documents.
View Gridlines appears on the Table Tools Layout or Table Layout tab when you click in a table:
Apply a table style
If your Word document contains multiple tables that you want to format in a consistent way, it’s best to use table styles rather than applying manual or direct formatting to each table.
To apply a table style to a table:
- Click in the table.
- Click the Table Tools Design or Table Design tab in the Ribbon.
- Click the More down arrow on the bottom right in the Table Styles gallery. A drop-down menu appears.
- Hover over the various table styles. The table formatting will change as you move over different table styles in the gallery.
- Click the table style you want to apply.
Below is the Table Styles gallery (the current theme is the Office theme):
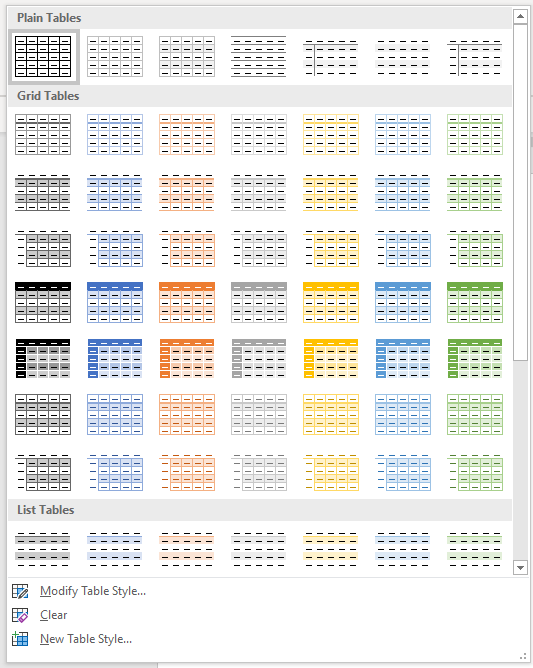
Note: Table styles do not include row height, column width or custom cell formatting for individual cells. If a user applies manual or direct formatting to a table (such as fills and borders) on the Table Tools Design or Table Design tab, this formatting will override the table style.
Apply Table Style Options
Once you have selected a table style, you can select or check different Table Style Options (which are affected by the formats in the selected table style).
The six Table Style Options that you can apply are: Header Row, Total Row, Banded Rows, First Column, Last Column and Banded Columns. If you have selected a plain table style, you may not notice any changes in the table formatting if you select different Table Style Options.
Table Style Options appear on the Table Tools Design or Table Design tab as follows when you click in a table:
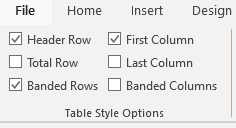
To select Table Style Options:
- Click in the table.
- Click the Table Tools Design or Table Design tab in the Ribbon.
- In Table Style Options, check or uncheck Header Row. If this option is checked, the header row will be formatted differently from the body rows.
- In Table Style Options, check or uncheck Total Row. If this option is checked, the last row will be formatted differently from the body rows.
- In Table Style Options, check or uncheck Banded Rows or Banded Columns for alternate row or column shading.
- In Table Style Options, check First Column or Last Column if you want the first or last column formatted differently from the other columns.
In the following table, Header Row and Banded Rows are checked in Table Style Options:

Modify a table style
You can modify a table style in a Word document and all tables using that table style will change.
To modify a table style:
- Click in the table.
- Click the Table Tools Design or Table Design tab in the Ribbon.
- Click the More down arrow on the bottom right in the Table Styles gallery. A drop-down menu appears.
- Click Modify Table Style. A dialog box appears. You can also right-click a table style and select Modify.
- From the Apply Formatting to drop-down menu, select the element that you want to modify (such as Header row).
- Select the desired formatting such as font, font size, font color, fill and border.
- From the Apply Formatting to drop-down menu, select the next element that you want to modify.
- Select the desired formatting such as font, font size, font color, fill and border.
- Repeat for other elements.
- Select Only in this document or New documents based on this template. If you select Only in this document, the modified style will only be available for the current document. If you select New documents based on this template, then the table style will be modified for future documents based on the current template (usually the Normal template).
- Click OK.
Below is the Modify Style dialog box:
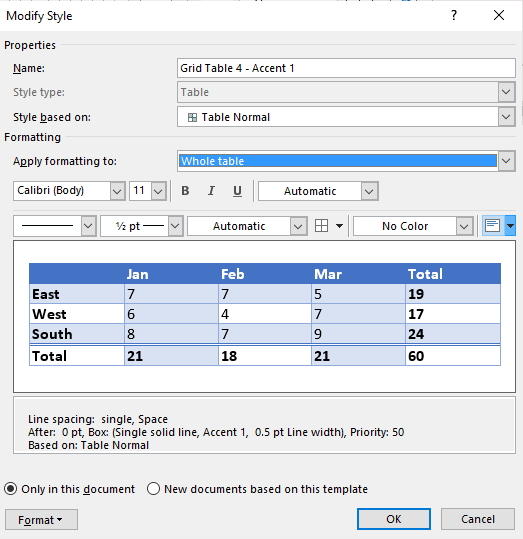
You can also click Format at the bottom of the dialog box and choose other options such as Font or Paragraph.
If you modify a table style and the tables using that style do not change, it’s likely that direct or manual formatting has been applied to the table which then overrides the table style. You may need to clear formatting in the table by selecting the table and clicking Clear Formatting on the Home tab in the Font group.
You can also modify Table Properties in a table style. Table properties include table alignment, row settings and cell margins.
To modify Table Properties in a table style:
- Click in the table.
- Click the Table Tools Design or Table Design tab in the Ribbon.
- Click the More down arrow on the bottom right in the Table Styles gallery. A drop-down menu appears.
- Click Modify Table Style. A dialog box appears. You can also right-click a table style and select Modify.
- Click Format on the bottom left of the dialog box. A drop-down menu appears.
- Click Table Properties. A dialog box appears.
- Click the Table tab and select an Alignment.
- Click the Row tab and select the desired options. For example, turn off Allow row to break across pages.
- Select any other formatting options you want to apply to the entire table.
- Click OK.
- Select Only in this document or New documents based on this template.
- Click OK.
Below is the Table Properties dialog box with the Table tab selected:

Create a new table style
You can also create a new or custom table style.
To create a custom table style:
- Click in the table.
- Click the Table Tools Design or Table Design tab in the Ribbon.
- Click the More down arrow on the bottom right in the Table Styles gallery. A drop-down menu appears.
- Click a table style to apply it as a base style.
- Click the More down arrow on the bottom right in the Table Styles gallery. A drop-down menu appears.
- Click New Table Style. A dialog box appears.
- Enter a name for the new table style in the Name box.
- Select the desired formatting.
- Select Only in this document or New documents based on this template.
- Click OK.
New Table Style appears at the bottom of the Table Styles gallery:
The new table style will appear in the Table Styles gallery under Custom (at the top of the gallery). If you want to delete it, right-click it in the gallery and select Delete Table Style.
Clear a table style
To clear a table style and remove formatting:
- Click in the table.
- Click the Table Tools Design or Table Design tab in the Ribbon.
- Click the More down arrow on the bottom right in the Table Styles gallery. A drop-down menu appears.
- Click Clear.
Clear appears at the bottom of the Table Styles gallery:
Set a default table style
You can also set a default table style for new tables in the current document or all new documents.
To set a default table style:
- Click in the table.
- Click the Table Tools Design or Table Design tab in the Ribbon.
- Click the More down arrow on the bottom right in the Table Styles gallery. A drop-down menu appears.
- Right-click the table style you want to use as the default style and select Set as Default from the drop-down menu. A dialog box appears.
- Select This document only or All documents based on the Normal.dotm template (the default template in Word is the Normal template).
- Click OK.
If you are working with documents with multiple tables, formatting with table styles can ensure that your tables are formatted consistently and save a lot of time.
Subscribe to get more articles like this one
Did you find this article helpful? If you would like to receive new articles, JOIN our email list.
More resources
4 Ways to Create a Table in Word
14 Shortcuts to Quickly Select Text in Microsoft Word
How to Create Headings in Word (Using Heading Styles)
How to Quickly Remove Hard Returns in Word Documents
10 Microsoft Word Tips, Tricks and Shortcuts for Selecting in Tables
Related courses
Microsoft Word: Intermediate / Advanced
Microsoft Excel: Intermediate / Advanced
Microsoft PowerPoint: Intermediate / Advanced
Microsoft Word: Long Documents Master Class
Microsoft Word: Styles, Templates and Tables of Contents
Microsoft Word: Designing Dynamic Word Documents Using Fields
VIEW MORE COURSES >
Our instructor-led courses are delivered in virtual classroom format or at our downtown Toronto location at 18 King Street East, Suite 1400, Toronto, Ontario, Canada (some in-person classroom courses may also be delivered at an alternate downtown Toronto location). Contact us at info@avantixlearning.ca if you’d like to arrange custom instructor-led virtual classroom or onsite training on a date that’s convenient for you.
Copyright 2023 Avantix® Learning
Microsoft, the Microsoft logo, Microsoft Office and related Microsoft applications and logos are registered trademarks of Microsoft Corporation in Canada, US and other countries. All other trademarks are the property of the registered owners.
Avantix Learning |18 King Street East, Suite 1400, Toronto, Ontario, Canada M5C 1C4 | Contact us at info@avantixlearning.ca
Бытует мнение, что таблицы Microsoft Word — самая неприятная часть текстового редактора. Они неуклюжи, ими трудно управлять, их тяжело форматировать. После прочтения этой статьи у вас не останется таких предубеждений.

Предвзятое отношение к таблицам имеет свои глубокие корни. Чего греха таить, дюжину лет назад таблицы в Word не могли похвастаться удобством из-за несовершенства программы в целом. Но с тех пор прошло много времени. Microsoft прекрасно поработала над своими ошибками и сделала всё возможное для удобства пользователей. Жаль, конечно, что многие из тех самых пользователей об этом не знают и до сих пор работают в 2003-й редакции офисного пакета. Историю про ёжиков и кактусы не напоминает? 
Всем застрявшим в прошлом просто по-человечески рекомендую обновиться как минимум до 2013-й версии Microsoft Office, а лучше — сразу до свежей, 2016-й. Поверьте, вам только кажется, что вы работаете в ставшей классикой среде, на самом деле она уже давно поросла мхом и плесенью.
Используйте шаблоны
Офисные будни полны однообразных документов, в том числе и таблиц. Берём одну электронную бумажку, вырезаем её часть, вставляем в новый документ и правим детали. Хорошая методика, но, как мне кажется, работа с шаблонами немного проще и быстрее. К слову, в самом Word шаблоны величают экспресс-таблицами.
Кликните по закладке «Вставка», щёлкните по «Таблице» и перейдите к «Экспресс-таблицам». Обратите внимание на пункт «Сохранить выделенный фрагмент в коллекцию».
Здесь вы найдёте несколько вполне полезных вариантов и, что самое главное, сможете сохранить в качестве шаблона любую другую таблицу или её фрагмент, в том числе и собственного производства.
Рисуйте таблицы
Помните медведя, который в детстве прошёлся по вашим ушам и рукам в безудержном цыганском танце? Именно с тех пор вы не любите пение и кисточки и именно с тех пор вы упорно игнорируете опцию «Нарисовать таблицу» в Word. Встряхнись, взрослый человек! Пора подавить мохнатое чудовище! Это проще, чем кажется.
Кликните по закладке «Вставка», щёлкните по «Таблице» и перейдите к пункту «Нарисовать таблицу».
И не бойтесь совершить промах: под рукой всегда найдётся ластик. Порой карандаш и стиралка существенно упрощают создание сложных таблиц с мелкими элементами.
Вставляйте строки и столбцы быстро
Начиная с Word 2013 добавление строк и столбцов из зубодробительной пытки превратилось в увлекательную забаву. Не подумайте, архаичные «Вставить столбцы слева/справа» и «Вставить строки сверху/снизу» никуда не делись, но о них теперь можно забыть.
Наведите курсор на пространство между строками или столбцами за пределами таблицы и нажмите на появившийся плюс.
В будущем хотелось бы видеть что-то похожее и для функции удаления.
Применяйте линейку
У каждого человека есть любимые и отталкивающие цифры, которые он без разбору использует или избегает в своей жизни. Даже в параметрах своих таблиц. Знаю таких.
Если вы привыкли точно выставлять значения отступов, ширину и высоту ячеек через свойства таблицы, попробуйте альтернативу — линейку.
Наведите курсор на границу столбцов или строк, схватите её, зажмите клавишу Alt и пользуйтесь удобством сантиметровой линейки.
Такой же трюк можно провернуть и с маркерами отступов и выступов. Наведите на них курсор и зажмите всё ту же клавишу Alt.
Используйте горячие клавиши
Будь я разработчиком программного обеспечения, я бы нарёк горячие клавиши душевными кнопками. Ведь порой так и хочется обняться с ноутбуком только потому, что они есть. Что же касается таблиц Word, я наиболее часто использую тройку комбинаций:
- Alt + Shift + «Вверх/Вниз» быстро перемещает текущую строку на одну позицию выше или ниже (просто незаменимая вещь).
- Ctrl + Shift + A мгновенно превращает прописные буквы в заглавные, что очень полезно для заголовков.
- Ctrl + Tab добавляет табуляцию в ячейке, в то время как обычный Tab переносит курсор на следующую ячейку.
Преобразуйте текст в таблицу
Немного магии, которой можно прихвастнуть на глазах у изумлённой публики. Вместо того чтобы создавать таблицы привычным способом, попробуйте парочку других, более изощрённых, вариантов:
- Массивы ячеек, скопированные из Excel, вставляютcя в Word как таблица с невидимыми границами.
- Хорошо структурированный текст легко преобразуется в таблицу штатными средствами Word.
Выделите текст, кликните по закладке «Вставка», щёлкните по «Таблице» и выберите пункт «Преобразовать в таблицу».
Обратите внимание на вспомогательные параметры: качество преобразования зависит от них напрямую.
Контролируйте размеры ячеек
Хочешь узнать человека, подкинь ему таблицу с текстом-самодуром. Немного свободная интерпретация известного мнения, конечно, но бьёт в точку. Только взгляните на скриншот, а точнее на первую колонку и слово «филологический» — безобразное бельмо.
По моим наблюдениям, в таких случаях люди сначала неприлично выражаются, а затем прибегают к не самому оптимальному выходу — уменьшают размер шрифта. Но лучше вместить текст другим путём.
Щёлкните в ячейке правой клавишей, выберите пункт «Свойства таблицы», переключитесь на закладку «Ячейка», перейдите к «Параметрам» и проставьте галочку в графе «Вписать текст».
Word поднатужится и вернёт убежавшую букву на место, а в мире снова воцарится мир. К слову, для наглядности «вписанный» текст будет подчёркиваться голубой линией.
А ещё, бывает, позаимствуешь чью-то таблицу и довольно напеваешь себе под нос: «Только ты, рыба моей мечты»! Хорошая работа чужими руками! Начинаешь заливать её своими данными, и тут происходит неконтролируемая чертовщина: одни столбцы расползаются за счёт похудения других. Голова отрезвляется, и реальность перестаёт радовать. Как быть?
Шутки шутками, но случается, что вам присылают таблицу строгого формата, с которой нельзя оплошать. Как минимум не поленитесь отправить её обратно с прежними размерами. Так получатель увидит то, что ожидает увидеть. А для этого отключите автоподбор размеров по содержимому.
Щёлкните в любой из ячеек правой клавишей мыши, выберите пункт «Свойства таблицы», перейдите к «Параметрам» и снимите галочку в графе «Автоподбор размеров по содержимому».
Эта же опция спасёт вашу таблицу от коллапса, если вам необходимо заполнить некоторые ячейки изображениями: они впишутся в виде миниатюры вместо полномасштабного размера.
Есть что добавить? Пишите в комментариях.
On Microsoft Word, tables are essential formatting tools. Microsoft Office has made it easier to create and format basic tables in Microsoft Word for Office 365, Word 2019, Word 2016, and Word 2013.
We haven’t covered tables as much as we would have liked to. It’s time to correct that, as the number of people asking questions on how to format tables properly is piling up. Maybe these eight table tips can be an appetizer. You just cannot create beautiful Microsoft Word documents by cutting corners on tables—here’s how to format tables in Word.
By the way, it’s possible to get a free copy of Microsoft Word, should you need one.
1. How to Make a Table in Microsoft Word
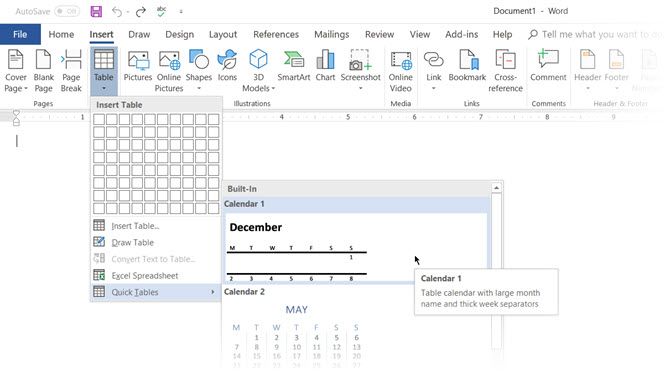
Using tables, and even changing them on the fly according to the data, has become far easier in the newer versions of Word such as Microsoft Word 2019 and Office 365. Intuitive Microsoft Word table formatting features give you finer (and quicker) control over how a table looks. But first head to the Ribbon > Insert > Table > Insert Table for making your first table.
It gives you five options for creating your first table.
The quickest way to start is with Quick Tables. The built-in designs save you from the lack of design skills. You can modify the designs by adding your own rows and columns or deleting the ones you don’t need.
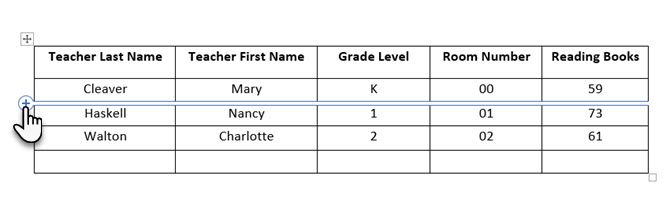
Another quick way to create a table in Word is the Insert Control feature. You can create a new column or row with one click. Hover the mouse over a table. A bar appears right outside your table between two existing columns or rows. Click on it when it appears, and a new column or row will be inserted at that position.
When you want to move or order a row around, use the combination of Alt+Shift+Up Arrow and Alt+Shift+Down Arrow to order the row up or down. Move contiguous rows by selecting them all first.
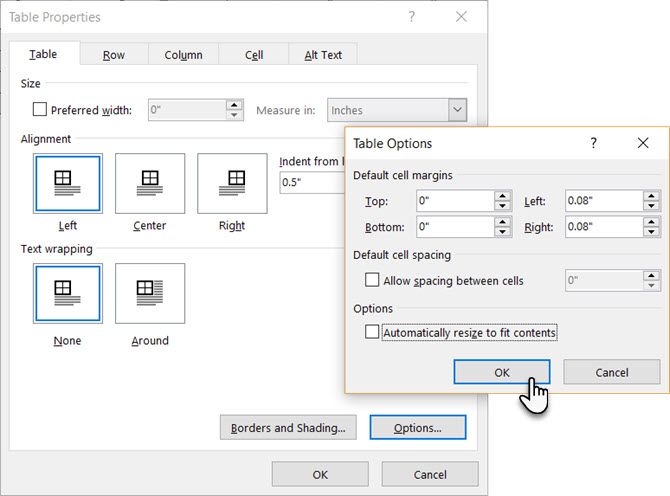
How to Use Table Properties to Position Your Table on the Page
If your tables are overlapping in Word, or you want to stop them from overlaying your text, then you need to learn how to position your tables on the page using the Table Properties feature.
Right-click on the table and select Table Properties from the context menu. The Table Properties dialog box is for precise control over the data and its display. Control the size, alignment, and indentation of the table.
By default, Word aligns a table on the left. If you want to center a table on the page, select the Table tab. Click on Alignment > Center.
The Indent from left figure controls the distance of the table from the left margin.
Position the table according to the text around it for a visually aesthetic look. Wrap text around tables by dragging it by the handle. The text wrapping changes automatically from None to Around. From the Table Positioning dialog box, you can set the Distance from surrounding text for each side of the table.
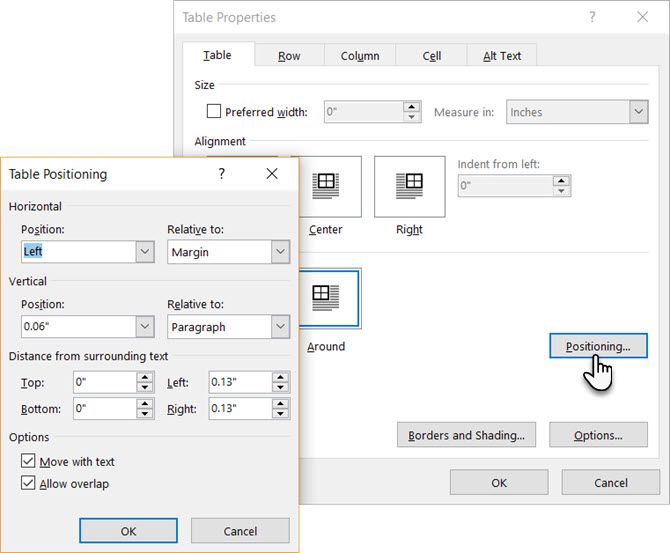
Select Move with Text if the text is directly related to the table data. The table is vertically aligned to the related paragraph around it. If the table data applies to the whole document, you can keep the option unchecked.
You can also control the tables with Microsoft Word keyboard shortcuts.
2. Use the Ruler
If you’re looking for an easy way to make tables look good in Word, then sizing tables and positioning them accurately is an art in itself. If you need precise measurements to size your rows and columns—use the ruler.
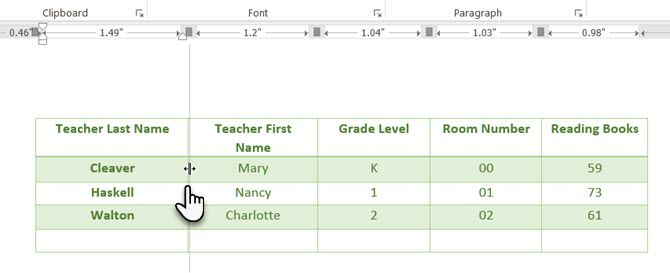
Hover the mouse over a border. When the double-arrow pointer appears, click the border and hold down the ALT key. Move the rows and columns to fit your measurements.
3. Convert Text to Table (and Vice Versa)
Tabular data gives information in its structure. It would have been frustrating if Word didn’t have something to handle non-tabular data. You can convert data to tables instantly from the Insert Table command.
Select the text. Go to Ribbon > Insert > Table > Insert Table.
Microsoft Word determines the required number of rows and columns by considering the text separators and then auto-fits the contents. The Convert Text to Table dialog box allows you more control if the previous operation doesn’t work out right. You can also choose how to fit the contents of the table on the page.
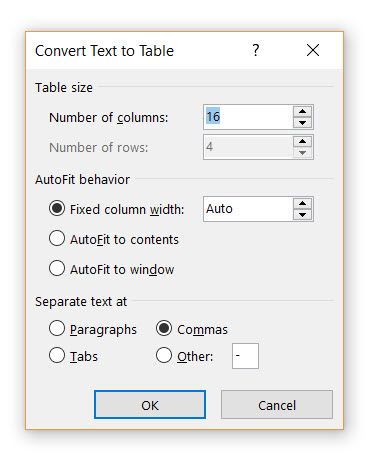
You can specify how Microsoft Word should separate the data into rows and columns. Paragraph, tabs, commas, or any other delimiting character. This allows you to easily import non-tabular data from CSV files or plain TXT files and convert them into formatted tables. Remember, you can also import data from Microsoft Word into an Excel spreadsheet.
Convert Table to Text
Engineer the reverse process if someone asks you to send them files with comma-separated values or any other delineator. Select the entire table by clicking the “move” handle above the table.
Go to Ribbon > Table Tools > Layout > In the Data Group, click Convert to Text.
Simple text can be boring. When you have the chance, convert your table of data to a more visual chart instead with one of the underused features in Microsoft Word.
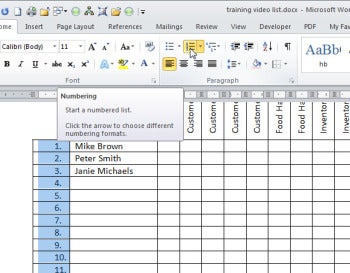
4. Auto-Fill Column Numbers
Microsoft Excel makes auto-filling a sequence of numbers very easy. Microsoft Word does not, and you may have to resort to a manual job. There is a simpler way.
Create a new column for the serial numbers if it does not exist. Select this column by positioning the mouse over the column.
With the column selected, go to Home > Paragraph > Click the Numbering button for inserting a numbered list.
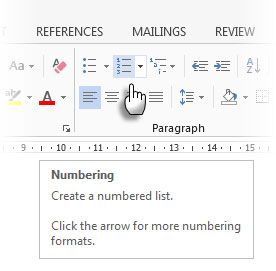
A number sequence is inserted in the column automatically.
5. Freeze Those Tables!
Microsoft Word tables change their dimension to accommodate new data. There may be times when you do not want the table to change size at all, even when new data is inserted. That is—“freeze” the size of cells.
The first step is to specify a fixed size for the cells. Go to Table Properties > Row > Enter a value in the Specify height box. For Row height is select Exactly from the dropdown.
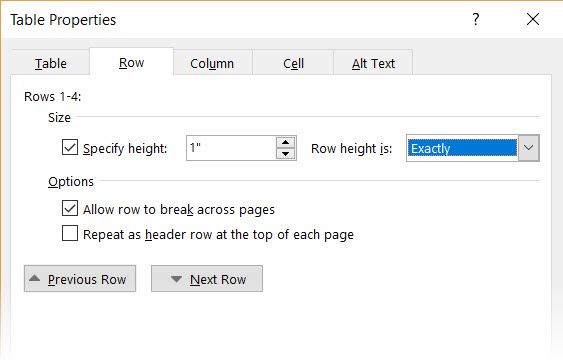
Now, select the Table tab > click the Options button > uncheck the Automatically Resize to Fit Contents check box.
Click OK twice to exit the Table Properties dialog box.
This also solves the problem of inserting an image into a cell without the cell expanding to accommodate the image. If the image is bigger than the available space in the cell, it gets cropped to fit within the cell.
6. Change Rows Into Columns in a Table
There are situations where you have to change rows into columns and columns into rows. One possible scenario is where the number of columns exceeds the page margin. Switching columns around to rows and vice-versa is called transposition.
The bad news is that Word does not have an inbuilt method for handling this yet. Microsoft suggests that you copy-paste your table into Microsoft Excel and use its Transpose command. The transposed table can now be copy-pasted back into Microsoft Word.
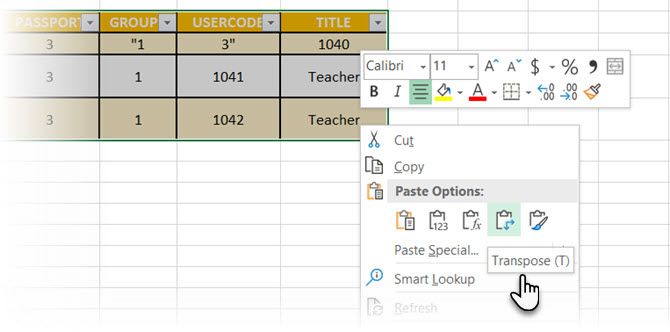
Data shows how easy it is in Excel with this short tutorial on switching rows into columns. Also, take the help of Microsoft’s Support Page if you run into a problem using the Transpose command.
7. Paste Perfect Excel Tables Into Gmail
You will find a use for this simple workaround. By default, Gmail does not retain the spreadsheet format when you paste from Microsoft Excel. To email tabular data without sending it as a separate attachment, use Microsoft Word as a bridge.
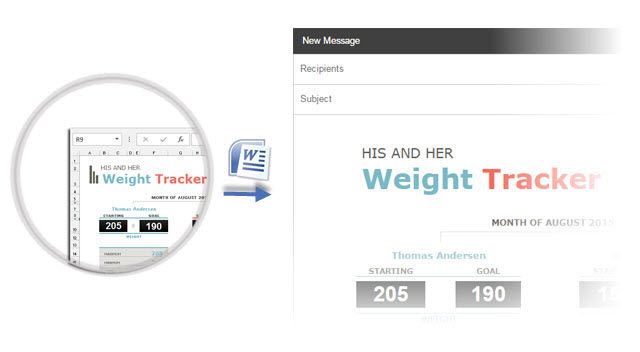
Select and copy-paste the Microsoft Excel table to a Microsoft Word document with the source formatting. Now, copy-paste from Microsoft Word to Gmail. As you can see from the screenshot, the problem is solved. You might have to tweak the more heavily formatted tables slightly, but most of the formatting is retained.
8. Reuse Your Tables to Save Time
You can save a lot of time by re-using tables in your professional Microsoft Word documents. Save empty table formats and insert new data when required. With this quick save, you won’t have to recreate the layout from scratch for new data.
Select a table. Go to Ribbon > Insert > Text group > click Quick Parts > Save Selection to Quick Part Gallery.
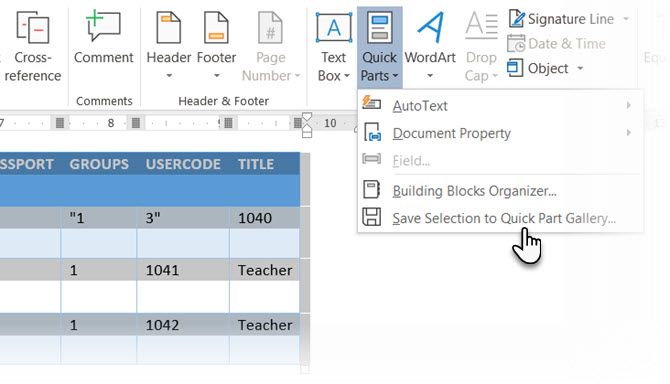
After you save a selection to the Quick Part Gallery, you can reuse the selection by clicking Quick Parts and choosing the selection from the gallery.
Use the Building Blocks Organizer to preview any table you created. You can also edit properties and delete the tables from here.
Do Microsoft Word Tables Confuse You?
These tips aren’t enough to cover the scope of formatting tables in Word. I haven’t talked about the role of the Design tab in creating eye-catching tables. That is a topic in itself. But it is one of the lesser areas to get confused over thanks to the visual help in that tab.
Working with tables in Word can be extremely rewarding. While tables are one common area between Microsoft Word and Excel, Microsoft Excel is more for power managing tabular data. Nonetheless, learning how to format tables well in both applications is an essential Microsoft Office skill. Use them at every opportunity.

Tables are a Word tool that everyone needs to use at some point to organize otherwise unruly text and numbers. From timetables to rosters to invoices to calendars, all kinds of projects are based on tables.
Although tables are simple to create in Word, you can do lots of things with them. When you need to total a column of numbers in a table, don’t bother fetching a calculator—let Word add them automatically. If your tables span multiple pages, don’t painstakingly add the column headings to each page—make Word do it for you. In this article I’ll show you ten secrets for working with tables in Microsoft Word.
1. Have Word Do the Math
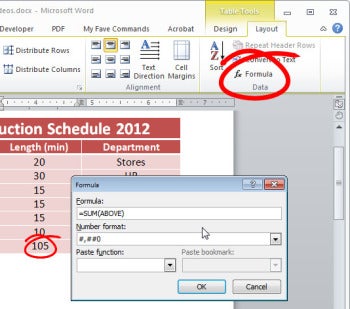
If you need to total a column of figures in a table, Microsoft Word can do the math. Once you’ve drawn the table, click in a cell in a column of numbers where you want the column total to appear. Go to Table Tools > Layout, and click Formula. If =SUM(ABOVE) does not automatically appear in the Formula dialog box’s Formula field, type it there. Select a format from the ‘Number format’ list—I chose #,##0 to get a whole number result—and click OK. Word will automatically insert the total into the cell.
If you later change any of the values that contribute to the total, click in the cell where the formula field code resides and press F9. You can also press Ctrl-A to select the entire document and then press F9 to update all of the field codes in the document.
2. Place Table Headings on Every Page
When you have a large table that spans multiple pages, it’s useful to make the table’s heading rows repeat at the top of each page. This arrangement ensures that anyone viewing a page can see clearly what each column contains without having to refer back to the top of the table.
First select the heading rows to be repeated. You can select multiple rows, but they must be consecutive and they must appear at the top of the table. In the Table Tools > Layout tab, click Repeat Header Rows.
You won’t necessarily see any immediate difference in your table when you do this; but once the table grows beyond one page, the heading rows will automatically repeat at the top of each subsequent page.
3. Create Business Cards and Name Badges
You might be surprised to learn that you can easily lay out business cards and name badges using Word tables. You must first determine which paper stock to use, so that the table will print correctly.
In Word, you configure business cards and name badges the same way you do sheets of sticky labels, so start with a new empty Word document and click Mailings > Start Mail Merge > Labels. In the Label Options dialog box, select the type of printer you’re using, the label vendor, and then the product number (the ‘Product number’ list includes not only labels but also business-card stock and name badges). Your label manufacturer might not be on the list; in that case, look over the label packet to see if it claims to have a similar layout to another manufacturer’s product, and tell Word to use that product number instead. If you cannot find a match anywhere, click New Label and configure the settings for your paper.
Once you’ve selected the correct paper, click OK; a new table will appear in your document. The table layout will match the layout of your paper stock, but the gridlines you see won’t print. Create your business cards or name badges, one per cell table, and print them on your paper stock.
Next Page: Make Table Rows the Same Height
4. Make All Table Rows of Equal Height
If a table has all of the same type of data in it, you might want to format it to make the rows the same height. If you wish, start by dragging the bottom border of the table to the position where the table should end. For example, you could drag the bottom border up until it’s just above the footer area, so that the table will fill the page. Alternatively, you could drag the bottom border down a little to make the table a bit larger, so that you have some extra space that you can use to resize the rows.
Now select the entire table or a series of rows, and make them all the same height by right-clicking and choosing Distribute Rows Evenly. Word will adjust each selected row, and the table will consume the entire area down to where you dragged its bottom border. You can render selected columns of equal width using a similar process.
5. Break a Table in Two or Fuse Two Tables Together

When you want to break a table into two pieces, either by splitting it at a certain row or by removing a few rows and making a new table from them, you can use a handy keystroke. Start by selecting all the rows that you want to move to a second table, and then press Shift-Alt-Down Arrow (or Shift-Alt-Up Arrow, depending on the direction you want to move in) to start moving the selected rows through the table. As soon as the rows reach the top (or bottom) of the table, they’ll break away and form a second, independent table.
Likewise, to fuse two tables into one, you can select all the rows in one table and press Shift-Alt-Up Arrow or Shift-Alt-Down Arrow to move the rows up or down until they join up with another table.
6. Place Two Tables Side by Side
Word offers several ways to position two tables side by side on a page. If you need the tables to be formatted differently, create one or both inside a text box (because tables inside text boxes can sit anywhere on a page). To place a table in a text box, click Insert > Text Box > Draw Text Box, and draw a text box in the document. Click inside the box and add the table by clicking Insert > Table. You can remove the text-box border by clicking the text box, choosing Drawing Tools > Format > Shape Outline, and selecting No Outline. If you are having trouble placing a text box beside an existing table or beside another text box, click each text box in turn and choose Drawing Tools > Format tab > Wrap Text > In Front of Text.
Alternatively, if the two tables can share a general layout in terms of row height, you can create them as a single table and then place an empty column in the middle to provide visual separation.
7. Add an Image Inside a Table Cell
You can place an image inside a table cell so that it does not move. To do this, click in the table cell, choose Insert > Picture or Insert > Clip Art, and select the image to use. The default Word image format is In Line With Text, so the picture should stay in place; you’ll simply need to resize it to fit it inside the table cell. If the image is not stuck in the table cell, click it, choose Picture Tools > Format, and in the Wrap Text list choose In Line With Text.
8. Make Smart Headings for Narrow Columns

When you create a table with lots of columns, the columns could become extremely narrow in order to fit within the document’s margins. If you use long strings of text for column headings, they might become hyphenated beyond comprehension, or even truncated. The solution is to rotate that text. Select the cells containing the column headings, and choose Table Tools > Layout. Select Text Direction from the Alignment options, and click until the Ribbon image displays the text oriented in the appropriate direction (typically, pointing up). Now type the text into the heading cells in the table, and it will rotate and fit much better.
Next Page: Convert a Table to Text, and Vice Versa
9. Convert a Table to Text, and Vice Versa
If you have text in a table that you’d prefer to appear as regular text—if, say, you copied a table from a website and pasted it into a document—here’s an easy way to make the conversion. Select the table by clicking the icon outside its top-left corner, and choose Table Tools > Layout > Convert to Text. When prompted, choose to separate the text using paragraph marks, tabs, or some other character (paragraph marks is usually the best option), and click OK. Word will remove the table and convert the data to regular text.
Word also allows you to perform the opposite conversion, turning regular text into a table. Select the text and click Insert > Table > Convert Text to Table. Choose the number of columns for your table, and let Word automatically select the number of rows. Indicate whether to separate the text at paragraphs, commas, tabs, or another character (specify which character), and click OK. Once the data is in the table, you can rearrange it as you see fit.
10. Quickly Number Table Rows
You can number the rows in a table in such a way that they will automatically update if you add, move, or remove rows. Add a new column in which to place the numbers, select it (or select an existing column if you want to place numbers in front of the contents of each cell in that column), and click Home > Numbering.
Word will automatically number the cells in the table. If you move a row to a different position—if, for example, you use the Shift-Alt-Up Arrow or Shift-Alt-Down Arrow keystrokes—the row numbers will instantly update.
Bonus Table Tip
One confusing aspect of working with a table is deleting it when you no longer want it. To do this in one keystroke, click the indicator outside the top-left corner of the table and press the Backspace key.
Doing so deletes the entire table, contents and all, whereas pressing the Delete key simply removes the contents and leaves the table in place.
If you liked this article, you might also like:
Five Microsoft Word Nightmares—and How You Can Fix Them
Work Faster in Microsoft Word: 10 Secrets
Make Image Magic in Microsoft Office 2010: 10 Cool Tricks
How to Create Smart Microsoft Word Templates
9 Microsoft Office Tips Everyone Should Know
Quick Tips for Microsoft Word, Cool Windows Tools
Microsoft Word Tip: Quickly Add Filler Text to Your Document
Excel
Writing long paragraphs for keeping a record of certain incidents, managing work schedules, inventories, and even creating a day’s schedule can be quite painful. Many a time, you may think about getting a simple and easy-to-use solution that can help you in capturing all your data in an organized form and makes it easier for presentation and interpretation. The all-new range of Blank Table Card Templates offers you the high comfort of maintaining, tracing, capturing, and analyzing large data sets within a few minutes.

All these sample templates are designed by experienced professionals and industry experts who incorporate all the relevant sections in the spreadsheets to make data handling better and easy. We have all sorts of printable table templates from 5 column charts, 3 column graphs, and other ways to present information, perfect for graphic organizers. We have printable samples available in formats like Google Sheets, Google Docs, Excel, PDF, etc. You can also see our Blank Statement Templates.
Blank Printable Table of Contents Template

Details
File Format
- MS Word
- Google Docs
- Apple Pages
- MS Publisher
Download
Blank Time Table Chart Template

Sample Blank Table Chart Template

Details
File Format
- MS Word
- Apple Pages
Download
Blank Table Reservation Checklist Design

Details
File Format
- MS Word
- Google Docs
- Apple Pages
Download
Blank Time Table Chart Template

Blank Daily Time Table Chart Template


Details
File Format
- MS Excel
- MS Word
- Numbers
- Pages
Size: US, A4
Download

Details
File Format
- Pages
- MS Excel
- MS Word
- Numbers
Size: A4, US
Download
Free Empty / Blank Table Of Content Chart Template
 science.widener.edu
Details
File Format
Size: 10.6 KB
Download
Printable Blank Table Templates
Are you looking for blank tables to document your work? Then, you can check out Blank Table Simple Templates. These tables come in different shapes and sizes. The blank tables are the documents that you can fill in with words or numbers. You can have blank tables to fill in your timetable like school, periodic tables, tables to practice mathematical problems, and tables to record your personal and professional data. A blank table will make your work easy and efficient. Blank Table Printable Templates are available online. You can edit and customize them in any way you want.
Sample Weekly Template For Blank Table Free Download

Details
File Format
- DOC
Size: 8.5 KB
Download
Free Blank Table for Fillable Math Data Template Word

Details
File Format
- Xls
Size: 8.9 KB
Download
Free Blank Table with 2 & 3 Column Document

Details
File Format
- DOC
Size: 7.9 KB
Download
Free Nice Blank Table with 5 Column Worksheet in PDF
 lrt.ednet.ns.ca
Details
File Format
Size: 31 KB
Download
Free Blank Table Health Information Schedule
 nhm.gov.in
Free Data Bar Graph Blank Table
 cgcatogo.com
Details
File Format
Size: 28 KB
Download
Free Graphic Organizer Blank Table
 actedu.in
Details
File Format
Size: 76 KB
Download
Where Can You Use Ready-made Templates?
Most of the time, you may use spreadsheets blank and tables to manage a large set of data that is hard to understand. Segmenting it into various sections, disturbing them as per their relevant data fields, and then listing the entire captured data in various contents of a particular table makes the job of analyzing and decision-making much easier. You may also see Excel Templates.
Owing to their higher clarity interface and ease-to-use designing, these already made general templates are available for download in both Outlook and Publisher formats. These easy-to-use templates can help you to deliver presentations, projects, online works, data keeping, and other important works in no time, but with better clarity and presentation features. One of the biggest advantages of using these Blank Table Model Templates is that you can get colorful, multi-textured, and stylish tables to keep and manage your data records. You may also see our Blank Sheet Templates.
What is a Blank Table of Contents Template?
The Blank Table of Contents Template is one of the most basic and attractive templates available under this category. The cool template features a simple and elegant look but includes a set of particulars that can help you create a detailed Table of Contents page for any project or presentation. Starting from the serial number, the table includes a column for particulars, to add its description, to mark the page number on which the topic is starting and ending, and a remarks column to add the findings of the reviewer. These already made good templates are easy to use and can be customized to create your own table of contents writer template that helps you to stand out from the rest in terms of showing your skills.
Attractive Tables for All Kinds of Works
The Blank Table Template category contains a huge set of templates that you can utilize for almost every type of work orders you do. All these blank templates are segregated into various categories and you can choose the desired one from all types of tables ranging from colorful to black and white, multi columnar to just simple font ones, stylish fonts to basic ones, and so on. If you work in a big corporate company or own a small business and look for someone who can manage your data chunks, then these highly stylish and easily customizable templates are specifically designed for you!
Conclusion
All these professional templates are available in various versions of MS Word format and PDF format to ensure that they help you complete all the designated tasks with great ease. The best thing about these readymade basic templates is that they’re highly customizable and you can use them in all your works by making alterations according to your requirements. The entire range of Blank Table Templates comes in various colors, formats, multiple tables, and contents of fields to deliver an attractive outcome. If you’re bored of those old and traditional-looking modern templates, then try downloading and using these creative templates because the final outcome will appear different from general ones.
If you have any DMCA issues with this post, please contact us!
More in Excel
Tables are the coolest. Get to know how to use them and how not to use
them, and you’ll love them like I do.
When to Use Tables
- Side-by-side bulleted lists
- Side-by-side text, such as instructor text alongside of student text, or
for troubleshooting manuals - When you’re tempted to insert a spreadsheet
- When you think you need a spreadsheet to do (minor) calculations
- For signature lines
- To have headings «top-aligned» side-by-side with a paragraph, such as with
a resume - In forms (definitely in forms!)
Tables are used on the web a lot, and just as ill-used as Word tables. Here’s
a few tips, and why they work.
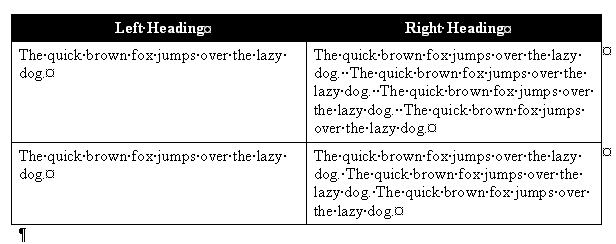
No paragraph returns!
The ideal table in Word won’t have any paragraph returns in it. Why? If
you’re using table columns to align text side-by-side, likely, you’ll have a
bunch of paragraph returns to space them perfectly left and right.
The Wrong Way
What will happen to the table below if we take the word «lazy» out of the
first paragraph of text in the left-hand column? Everything bumps up one line,
and our 2nd paragraph is no longer aligned side-by-side with its paragraph.

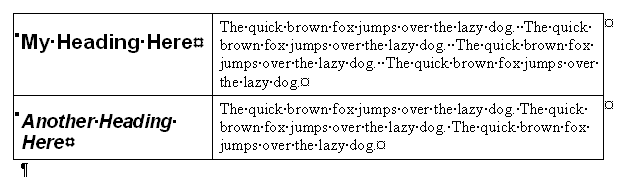
The Right Way
Here, we create a new table row for each paragraph. I also like
to select my entire table and Format Paragraph and
put 3 in space before and space after (or use styles that do this for me). It
provides a nice amount of white space around your text.
How to Get it Right if it’s Already Wrong
Beginning at the bottom of your table create a bunch of rows.
Select your text, a paragraph at a time, working from the bottom-up, and drag
down into the new rows.
The Wrong Way
I’ve seen many documents with tables and tables and tables of
information to provide a layout like the following.
It’s okay to do this, but such a bunch of unnecessary trouble in
very large documents. Instead, create styles for your headings, and then have
your body text style indented a couple of inches. While you may use up a few
extra pages, you’re not dealing with stupid layout issues.
How to Get it Right if it’s Already Wrong
Select your table. Hit Table Convert Table
to Text. Choose Paragraphs, OK.
For Signatures
It’s really simple to put signature lines using table cells. I
like to begin by inserting a 3-column table, and set it up as shown:
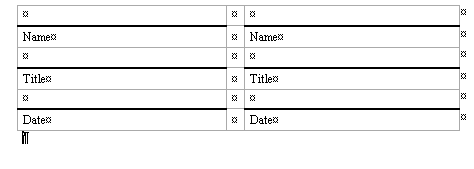
The table above is created using paragraph formatting with 3pts
before and after. I used an extra heavy border line to create the screenshot
only. Normally, I use the default borderlines. If you need three signatures, you
can insert five columns instead of three. If you only need one signature, you
could simply delete the text and remove the borders from one of the columns.
Save this as an Autotext
entry so you can use it again and again.
When Not to Use Tables
- For newsletters (usually, you’ll want to use columns under Format Columns)
- To indent text (indent the style instead)
- For numbered lists with more than one column. (It’s not worth the effort
to figure out how to get your numbering to go left, then right, then left,
then right. But if your numbering goes down a column, that’s fine.) In other
words, it’s very difficult to create the following layout and use numbered
lists. You might as well do it manually if you must have it this way.

Select the table
- Using the mouse: Move the mouse over the table until you see the table selection icons in the upper-left corner of the table and click it:

Note: You can also click on the table selection icon in the bottom-right corner (resizing handle) for the same effect.
- Using the keyboard: To select table elements, on the Table Layout tab, on the Table group, click the Select button, then select the option you prefer:

- Select Cell
- Select Column
- Select Row
- Select Table
Format the table
After positioning the cursor anywhere in a table or selecting a table element, Word shows two tabs: Table Design and Layout. E.g.:

See also Select and format table elements in Word.
Apply a predefined Table style
There are several predefined styles you can use for the table. Styles include a variety of borders, colors, and other attributes that give a table a very professional appearance.
To choose any of the predefined styles, do the following:
1. Select the table.
2. On the Table Design tab, in the Table Styles group, in the Styles Gallery, click the More arrow to see the complete list of styles:

3. Select the table style you want:

The Table Styles gallery includes three categories of styles:
- Plain Tables have minimal formatting.
- Grid Tables include vertical separators between columns.
- List Tables do not include vertical column separators:

Note: The selected style overrides any previously added style changes for the table.
Modify the table style options
To change the table or selected style, on the Table Design tab, in the Table Style group, click Modify Table Style…:

In the Modify Style dialog box, make changes you want:

Note: Click the Format button at the bottom of the dialog box to change other options such as Font or Paragraph. See also how to clear formatting.
Customize the table formatting
After applying a table style, you can turn various options on or off to change their appearance. On the Table Design tab, in the Table Style Options group, there are six options:

- Header Row is the first row of the table that contains Headers that helps identify the contents of a particular column. Usually, the Header Row is formatted differently and should be repeated at the beginning of each new page for tables that extend beyond one page.
Note: According to most requirements, data tables should have a header row to provide a contextual structure that aids navigation.
- Total Row is the last row of the table. If this option is selected, the last row will be formatted differently from the body rows, designed to summarize the rows above it (see how to insert formulas).
- First Column used special formatting to the column. Usually, the First Column contains the row headings.
- Last Column applies special formatting to the column to summarize the earlier columns (see how to insert formulas).
- Banded Rows and Banded Columns alternate the background color of rows and columns (see how to change the background color for the selected cells below).
Note: Certain Table Style Options may have a different effect depending on the Table Style you’ve chosen. You might need to experiment to get the look you want.
Apply the border styles
To apply and remove cell borders, do the following:
1. Select the cells or entire table to which you want to add a border.
2. On the Table Design tab, in the Borders group, choose the desired Border Styles, Line Style, Line Weight, and Pen Color:

- Select the predefined Line Style, Line Weight, and Line Color from the Border Styles dropdown list:

- Select the Line Style:

- Select a border thickness from the Line Weight dropdown list:

- Select the border color from the Pen Color dropdown list:

- Select the borders from the Borders dropdown list:

Note: Select No Borders from the Borders dropdown list to remove borders from the selected cells.
- Draw the border where you want:
- After selecting border style or color, the Border Painter button is automatically checked, or
- If all that you want is selected already, just click the Border Painter button by yourself:

After any of these actions, your cursor changes to the brush. Now, draw the border where you need it:

Note: Use the Eraser button in the Draw group on the Table Layout tab to remove the unnecessary border:


Apply background colors and shading
To change the background color for some table elements, select them, then on the Table Design tab, in the Table Styles group, click the Shading button, then select the background color you prefer:

Note: To use a pattern instead of a solid color, on the Table Design tab, in the Borders group, click the dialog box launcher:

In the Borders and Shading dialog box, on the Shading tab, select a pattern in the Style list:

Layout of the table
The Table Layout tab includes commands for changing the entire table format, as well as commands for changing the appearance of individual table components such as cells, columns, rows:

See Select and format table elements in Word for more details.
Resize a table
- Using the mouse: To resize a table in a Word document, move the mouse over the table until you see the table resizing icons (handle) in the bottom-right corner of the table and click it:

Drag the table to the size you need, and then release the handle.
- Using the keyboard: Select a table (see also how to resize individual cells, specific rows, or columns); the do one of the following:
- On the Layout tab, in the Cell Size group, change the values in the Height and Width fields:

- Open the Table Properties dialog box by doing one of the following:
- On the Table Layout tab, in the Table group, click the Properties button:

- Right-click the table and select Table Properties… in the popup menu:

In the Table Properties dialog box, on the Table tab, in the Size section, select the Preferred width check box, then:
- In the Preferred width field, type or select the value you need,
- In the Measure in dropdown list, select one of the items:
- Percent to specify the percentage of the table width,
- Inches to fix the column width:

- On the Table Layout tab, in the Table group, click the Properties button:
- On the Layout tab, in the Cell Size group, change the values in the Height and Width fields:


See how to resize table elements for more details.
Freeze the table
Some Word tables change the width of their columns according to the data. To stop changing the table size when new data is inserted, do the following:
1. Select the table.
2. Open the Table Properties dialog box.
3. In the Table Properties dialog box, on the Table tab, click the Options… button:

4. In the Table Options dialog box, deselect the Automatically resize to fit contents check box:

See also how to fix the height of table rows.
Move a table
To move a table to a new page or a new document, select it, then use the Cut and Paste commands. You can also use the Copy command to leave a copy of the table in the original location.