
Using the Export Wizard, you can export data from an Access database to in a file format that can be read by Excel. This article shows you how to prepare and export your data to Excel, and also gives you some troubleshooting tips for common problems that might occur.
In this article
-
Exporting data to Excel: the basics
-
Prepare for the export operation
-
Run the export operation
-
What else should I know about exporting?
-
Troubleshoot missing and incorrect values
Exporting data to Excel: the basics
When you export data to Excel, Access creates a copy of the selected data, and then stores the copied data in a file that can be opened in Excel. If you copy data from Access to Excel frequently, you can save the details of an export operation for future use, and even schedule the export operation to run automatically at set intervals.
Common scenarios for exporting data to Excel
-
Your department or workgroup uses both Access and Excel to work with data. You store the data in Access databases, but you use Excel to analyze the data and to distribute the results of your analysis. Your team currently exports data to Excel as and when they have to, but you want to make this process more efficient.
-
You are a long-time user of Access, but your manager prefers to work with data in Excel. At regular intervals, you do the work of copying the data into Excel, but you want to automate this process to save yourself time.
About exporting data to Excel
-
Access does not include a “Save As” command for the Excel format. To copy data to Excel, you must use the Export feature described in this article, or you can copy Access data to the clipboard and then paste it into an Excel spreadsheet.
-
You can export a table, query, form, or report. You can also export selected records in a multiple-record view, such as a datasheet.
-
Microsoft Excel includes a command to import data from an Access database. You can use that command instead of the export command in Access; however, the Excel import command only allows you to import tables or queries. For more information, see the Excel Help article Connect to (import) external data.
-
You cannot export macros or modules to Excel. When you export a form, report, or datasheet that contains subforms, subreports, or subdatasheets, only the main form, report, or datasheet is exported. You must repeat the export operation for each subform, subreport, and subdatasheet that you want to export to Excel.
-
You can only export one database object in a single export operation. However, you can merge multiple worksheets in Excel after you complete the individual export operations.
Top of Pge
Prepare for the export operation
Before performing an export procedure, it is a good idea to review the data that you want to export to make sure that it does not contain any error indicators or error values. If there are any errors, try to resolve them before you export the data to Excel. Otherwise, problems can occur during the export operation, and null values might be inserted into cells in the Excel worksheet. For more information about problems that can occur when exporting to Excel, see the section Troubleshoot missing and incorrect values.
If the source object is a table or a query, decide whether you want to export the data with or without its formatting. This decision affects two aspects of the resulting workbook — the amount of data that is exported and the display format of the data. The following table describes the outcome of exporting formatted and unformatted data.
|
Export |
Source Object |
Fields and records |
Formatting |
|
Without formatting |
Table or query Note: Forms and reports cannot be exported without their formatting. |
All fields and records in the underlying object are exported. |
The Format property settings are ignored during the operation. For lookup fields, only the lookup ID values are exported. For hyperlink fields, the contents are exported as a text column that displays the links in the format displaytext#address#. |
|
With formatting |
Table, query, form, or report |
Only fields and records that are displayed in the current view or object are exported. Filtered records, hidden columns in a datasheet, and fields not displayed on a form or report are not exported. |
The wizard respects the Format property settings. For lookup fields, the lookup values are exported. For hyperlink fields, the values are exported as hyperlinks. For rich text fields, the text is exported but the formatting is not. |
-
Choose the destination workbook and file format. Note that reports can only be exported in the older *.xls file format, not in the newer *.xlsx file format.
During the export operation, Access prompts you to specify the name of the destination workbook. The following table summarizes when a workbook is created (if it does not already exist) and when it is overwritten (if it does already exist).
|
If the destination workbook |
And the source object is |
And you want to export |
Then |
|
Does not exist |
A table, query, form, or report |
The data, with or without the formatting |
The workbook is created during the export operation. |
|
Already exists |
A table or query |
The data, but not the formatting |
The workbook is not overwritten. A new worksheet is added to the workbook, and is given the name of the object from which the data is being exported. If a worksheet having that name already exists in the workbook, Access prompts you to either replace the contents of the corresponding worksheet or specify another name for the new sheet. |
|
Already exists |
A table, query, form, or report |
The data, including the formatting |
The workbook is overwritten by the exported data. All existing worksheets are removed, and a new worksheet having the same name as the exported object is created. The data in the Excel worksheet inherits the format settings of the source object. |
The data is always added in a new worksheet. You cannot append the data to any existing worksheet or named range.
Top of Page
Run the export operation
-
If the destination Excel workbook is open, close it before you continue.
-
In the Navigation Pane of the source database, select the object that you want to export.
Export only a portion of the data
If the object is a table, query, or form, and you want to export only a portion of the data, open the object in Datasheet view and select the records you want.
To open a form in Datasheet view:
-
Double-click the form to open it.
-
Right-click the form, and then click Datasheet View. If this option is not available:
-
Click Design View.
-
Press F4 to display the Property Sheet task pane.
-
Select Form from the drop-down list at the top of the Property Sheet.
-
On the Format tab of the Property Sheet, set the Allow Datasheet View property to Yes.
-
On the Design tab, in the Views group, click Datasheet View.
Note: You cannot export a portion of a report. However, you can select or open the table or query that the report is based on, and then export a portion the data in that object.
-
-
-
On the External Data tab, in the Export group, click Excel.
-
In the Export — Excel Spreadsheet dialog box, review the suggested file name for the Excel workbook (Access uses the name of the source object). If you want, you can modify the file name.
-
In the File Format box, select the file format that you want.
-
If you are exporting a table or a query, and you want to export formatted data, select Export data with formatting and layout. For more information, see the section Prepare for the export operation.
Note: If you are exporting a form or report, this option is always selected but unavailable (it appears dimmed).
-
To view the destination Excel workbook after the export operation is complete, select the Open the destination file after the export operation is complete check box.
If the source object is open, and if you selected one or more records in the view before starting the export operation, you can select Export only the selected records. To export all the records displayed in the view, leave this check box cleared.
Note: This check box remains unavailable (dimmed) if no records are selected.
-
Click OK.
If the export operation fails because of an error, Access displays a message that describes the cause of the error. Otherwise, Access exports the data and, depending on your selection in step 7, opens the destination workbook in Excel. Access then displays a dialog box in which you can create a specification that uses the details from the export operation.
Top of Page
What else should I know about exporting?
-
For information on how to save the details of your export into a specification that you can reuse later, see the article Save the details of an import or export operation as a specification.
-
For information on how to run saved export specifications, see the article Run a saved import or export operation.
-
For information on how to schedule specifications to run at specific times, see the article Schedule an import or export operation.
-
For information on how to change a specification name, delete specifications, or update the names of source files in specifications, see the article Manage Data Tasks.
Top of Page
Troubleshoot missing and incorrect values
The following table describes various ways of troubleshooting common errors.
Tip: If you find that just a few values are missing, fix them in the Excel workbook. Otherwise, fix the source object in the Access database, and then repeat the export operation.
|
Issue |
Description and resolution |
|
Calculated fields |
The results of calculated fields are exported; the underlying expressions that perform the calculations are not. |
|
Multivalued fields |
Fields that support multiple values are exported as a list of values separated by semicolons (;). |
|
Pictures, objects, and attachments |
Graphical elements (such as logos, contents of OLE object fields, and attachments that are part of the source data) are not exported. Add them to the worksheet manually after you complete the export operation. |
|
Graph |
When you export a form or report that contains a Microsoft Graph object, the graph object is not exported. |
|
Data in the wrong column |
Null values in the resulting worksheet are sometimes replaced by the data that should be in the next column. |
|
Missing date values |
Date values earlier than Jan 1, 1900 are not exported. The corresponding cells in the worksheet will contain a null value. |
|
Missing expressions |
Expressions that are used to calculate values are not exported to Excel. Only the results of the calculations are exported. Manually add the formula to the Excel worksheet after you complete the export operation. |
|
Missing subforms, subreports, and subdatasheets |
When you export a form, report, or datasheet, only the main form, report, or datasheet is exported. You must repeat the export operation for each subform, subreport, and subdatasheet that you want to export. |
|
Missing or incorrectly formatted columns |
If none of the columns appear to be formatted in the resulting worksheet, repeat the export operation, being sure to select the Export data with formatting and layout check box in the wizard. Conversely, if only some columns appear to be formatted differently from the versions in the source object, apply the formatting that you want manually in Excel. Format a column in Excel
|
|
«#» value in a column |
You might see the value # in a column that corresponds to a Yes/No field in a form. This can be the result of starting the export operation from the Navigation Pane or in Form view. To resolve this issue, open the form in Datasheet view before exporting the data. |
|
Error indicators or error values |
Check the cells for error indicators (green triangles in the corners) or error values (strings that begin with the # character instead of the appropriate data). |
Top of Page
CSV Converter
CSV
CSV is a file extension that can store comma separated numeric and alpha numeric data in simple text format. CSV is used while data transferring and it can contain records contained with a lot of fields. Each record has same number of fields.
XLS Converter
XLS
XLS is Microsoft Excel spreadsheet file that stores data and manipulates several mathematical operations. It uses a visual basic operation to implement several numeric functions. This spreadsheet file is supported by most of the open source or proprietary spreadsheet software.
+200 Formats Supported
CloudConvert is your universal app for file conversions. We support nearly all audio, video,
document, ebook, archive, image, spreadsheet, and presentation formats. Plus, you can use our online
tool without downloading any software.
Data Security
CloudConvert has been trusted by our users and customers since its founding in 2012. No one except you
will ever have access to your files. We earn money by selling access to our API, not by selling your
data. Read more about that in our Privacy Policy.
High-Quality Conversions
Besides using open source software under the hood, we’ve partnered with various software vendors to
provide the best possible results. Most conversion types can be adjusted to your needs such as setting
the quality and many other options.
Powerful API
Our API allows custom integrations with your app. You pay only for what you actually use, and there are
huge discounts for high-volume customers. We provide a lot of handy features such as full Amazon S3
integration. Check out the CloudConvert API.
CSV to XLSX (EXCEL) Converter
Convert your csv files to xlsx online & free
Drop files here. 100 MB maximum file size or Sign Up
Convert to CSV
csv
Comma-Separated Values
Is a text format used for representing tabular data. Each file line is located on a separate line in the table. The values of the columns are separated by a delimiter, most often a comma. However, other symbols can be used as delimiters as well.
XLSX Converter
xlsx
Office Open XML Worksheet Sheet
XLSX is a file format created with Microsoft Excel, version from 2007 and younger. This file is a spreadsheet. All data distributed document and stored in the cells. Each cell has a unique address, which is denoted by the letters and Arabic numerals. XLSX file format is based on the Open XML. To reduce the size of the file is compressed ZIP.
How to convert CSV to XLSX
Step 1
Upload csv-file(s)
Select files from Computer, Google Drive, Dropbox, URL or by dragging it on the page.
Step 2
Choose «to xlsx»
Choose xlsx or any other format you need as a result (more than 200 formats supported)
Step 3
Download your xlsx
Let the file convert and you can download your xlsx file right afterwards
CSV to XLSX Quality Rating
4.8 (80,914 votes)
You need to convert and download at least 1 file to provide feedback!
![]()
Download Article
![]()
Download Article
Do you need to convert an XML file to the XLSX or CSV format? Converting XML data files to Excel is super easy—you’ll just need to import the data into a workbook and save the file. As long as you’re using a recent version of Excel (2016 & later for Windows, or 2019 & later for Mac), you can also use Power Query to transform your XML data before making a conversion. This wikiHow will teach you two simple ways to convert any XML file in Excel, including a quick trick you can use if you don’t have Microsoft Excel on your computer.
Things You Should Know
- You can use Excel’s Power Query tool to transform XML data before saving the file in the XLSX format.
- If you’re using Windows, you can import XML files from the web in addition to files already on your computer.
- If Microsoft Excel isn’t installed on your PC or Mac, you can copy and paste the contents of an XML file from a text editor into a web-based converter.
-

1
Open a new blank workbook in Microsoft Excel. You’ll find Excel in your Windows Start menu or your Mac’s Applications. Click Blank workbook on the welcome screen to start fresh.
-
2
Click the Data tab. You’ll see it at the top of Excel.
Advertisement
-
3
Click Get Data. This icon is on the left side of the toolbar at the top of Excel for Windows.
-
4
Select From File (Windows) or Text/CSV (Mac). Choosing this option allows you to select an XML file from your computer or any connected network and cloud drives.
- If you’re using Windows, you can import an XML file from the web instead. Instead of choosing From File, select From Other Sources > From Web, enter the direct URL to the XML file, and then click OK. Then, skip to Step 7.
- If you’re using a Mac, make sure the XML file you want to convert is already saved to your computer. Unlike in Windows, you won’t be able to open XML files from the web in Excel.
-
5
Select From XML (Windows only). This opens your file browser.
-
6
Select the XML file and click Import (Windows) or Next (Mac). The Navigator window will expand.
-
7
Select the XML table name click Load. Choose the file name that has a table icon to its left—you’ll see a preview of the data from that table. When you click Load, the data from the XML file will appear in a brand new sheet in your workbook.
- Windows: If you want to modify anything about the data first, such as column headers, you can click Transform Data instead. Then, make your changes in the Power Query window and click Close & Load at the top-left corner to add the data to a new worksheet.
- Mac: If you want to modify anything about the XML data, click Load first, then launch Power Query by clicking the down-arrow next to the «Get Data» icon in the toolbar and selecting Launch Power Query Editor…. Make changes to your data, then click Close & Load on the Home tab.
-
8
Save the file. You can save the file as an XLSX (Excel Workbook), CSV, or other format. Here’s how:
- Click the File menu and choose Save As.
- Click Browse (Windows) or On My Mac (Mac), then choose a folder.[1]
- Type a name for your workbook.
- If you want to save the file as an Excel XLSX file, choose Excel Workbook from the «Save as type» or «File Format» menu. You can choose any of the formats in the list, including CSV (Comma Delimited).
- Click Save to save the file.


Advertisement
-
1
Go to https://wtools.io/convert-xml-to-excel in a web browser. This free tool makes it easy to convert XML files to the Excel XLSX format even if you don’t have Microsoft Excel installed.
-
2
Open the contents of your XML file in a text editor. To use the online converter, you’ll need to copy the data from the XML file into the form in your browser. Double-clicking the XML file will open it in your default web browser, but the info may not copy correctly this way. To open the file in a text editor, right-click the file, select Open With, then choose a text editor like Notepad (Windows) or TextEdit (Mac).
-
3
Copy the contents of the XML file. To do this, click anywhere in the text editor, then press Control + A (PC) or Command + A (Mac) to highlight everything in the file. Then, press Control + C (PC) or Command + C (Mac) to copy.
-
4
Paste the copied data into the web form. You can do this easily by right-clicking the form and selecting Paste.
-
5
Click the CONVERT & DOWNLOAD button below the form. This creates an XLSX file and downloads the file to your computer.
- Depending on your settings, you might have to select a save location and click Save or OK to start the download.


Advertisement
Our Most Loved Articles & Quizzes
Ask a Question
200 characters left
Include your email address to get a message when this question is answered.
Submit
Advertisement
Video
Thanks for submitting a tip for review!
About This Article
Article SummaryX
1. Open the file in Excel.
2. Click File.
3. Click Save As.
4. Change the file type to .CSV.
5. Click Save.
Did this summary help you?
Thanks to all authors for creating a page that has been read 247,430 times.
Is this article up to date?
Many software programs offer data output in the form of a downloadable CSV file.
Owing to their simplicity and versatility, CSV files take up less space and are easily transferable. As such, CSV is often the go-to extension for a lot of database programs.
In fact, CSV and spreadsheets go hand in hand.
That is why Excel provides multiple ways to convert a CSV file to Excel. In this tutorial we will look at three such ways:
- By opening the file from Windows Explorer
- By opening the file directly in Excel
- By importing the file
We will also look at a few issues you are likely to face when you convert a CSV file to Excel and how to address and resolve these issues.
What is a CSV File?
A CSV file is a very commonly used file extension.
It is a plaintext format file in which values are separated by commas, hence the name Comma Separated Values (CSV).
However, it is not uncommon to find CSV files where the values are separated by other symbols like semicolons or tabs.
These files can be opened using any spreadsheet program like Excel, Google Sheets, Open Office, etc.
You can also open them in a simple text editor like Notepad.
The files contain simply the data in text form, without any formatting or formulas.
Owing to their ease of storage and their compatibility, the CSV format is a popular file format.
The data in CSV files do not contain any kind of formatting.
So, if you want to use it in Excel, you will need to first get Excel to format the data into a form that can be displayed in cells.
Let us look at three ways in which we can convert a CSV file to Excel.
Method 1: Directly Opening a CSV File in Excel from Windows Explorer
You can directly open a CSV file that is in any folder from Windows Explorer or your file browser.
To open the file in Excel, simply double-click the file.
Most of the time computers are set up to open CSV, TSV and other similar files directly in Excel, if it is present on your computer.
You can tell if Excel is the default program to open the file from the familiar green Excel icon as shown below:

However, if your computer has not been set up to open CSV files directly in Excel, you can set it up as follows:
- Right-click on the CSV file.
- Select ‘Open With’ from the context menu that appears.
- You should now see a submenu with a list of applications. If you see ‘Excel’ as one of the options, go ahead and select it.
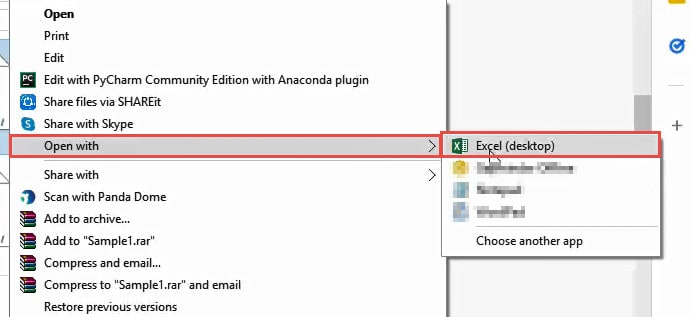
- If you don’t see Excel as one of the options, then click on ‘Choose another app’.
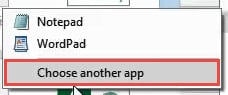
- Select Excel from the app options (Click ‘More Apps’ for more app options).
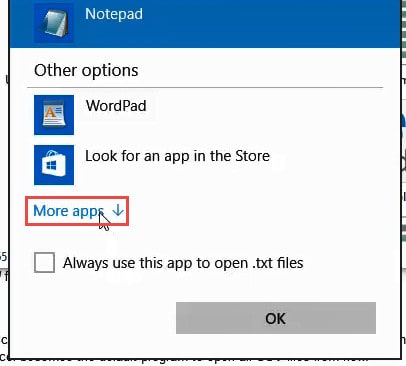
- Click on the checkmark next to ‘Always use this app to open .csv files’. This will make sure that Excel becomes the default program to open all CSV files from now.
Also read: How to Open XML Files in Excel?
Method 2: Opening a CSV File Directly in Excel
You can also open a CSV file directly in Excel as follows:
- Open Microsoft Excel.
- Click on the File tab.
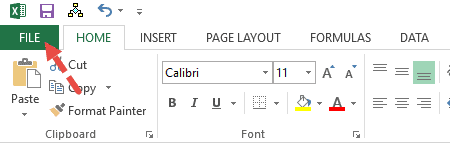
- Click on Open.
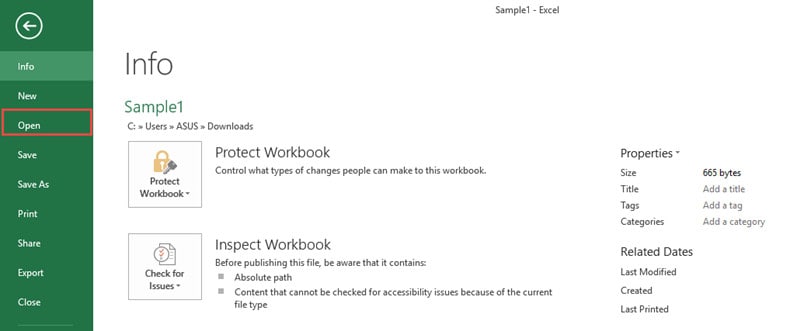
- Browse and select the CSV file that you want to open.
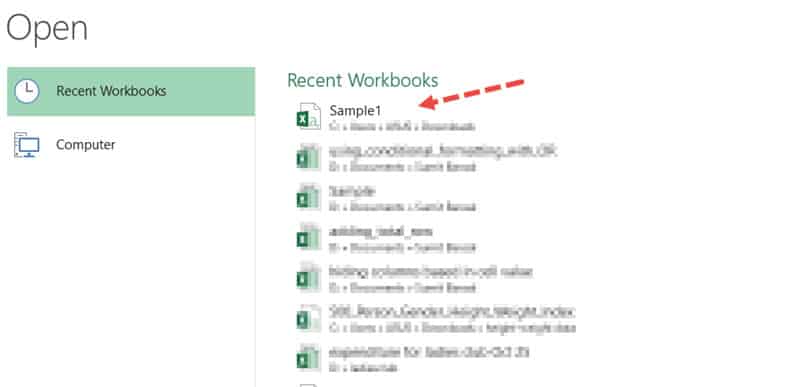
That’s it! Your CSV file should automatically open in Excel.
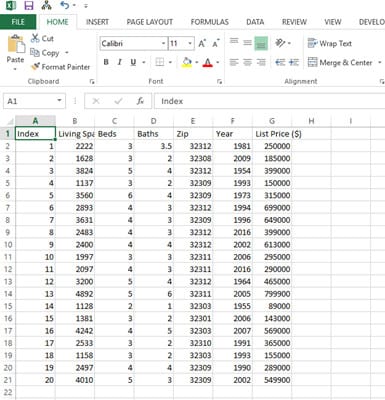
Once the file opens, you might find some data items looking out of place.
You might also find some of the data formatted differently from what you had expected.
This is because Excel uses your default data format settings to convert each column of the original file to Excel.
However, there is no need to worry. You can always format the data according to your requirements either in the original CSV file or within Excel.
We will discuss more on how to do that towards the end of this tutorial.
Note that the first two methods discussed so far do not change the format of the CSV file to XLS or XLSX.
If you save the file, it will still get saved as a CSV file.
Also read: How to Open an MPP file in Excel?
Method 3: Importing a CSV File to Excel
This method lets you import and converts data from a CSV file into an existing Excel worksheet.
The steps to import a CSV file to Excel is as follows:
- Select the cell from where you want to start displaying the imported data.
- From the Data tab, select ‘From Text’ under the ‘Get External Data’ group.
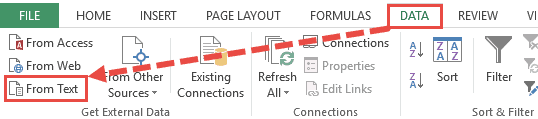
- This will open a dialog box, from where you can select the CSV file that you want to import.
- Either double click on the file name or select the file and press Open.
- This will open the ‘Text Import Wizard’.
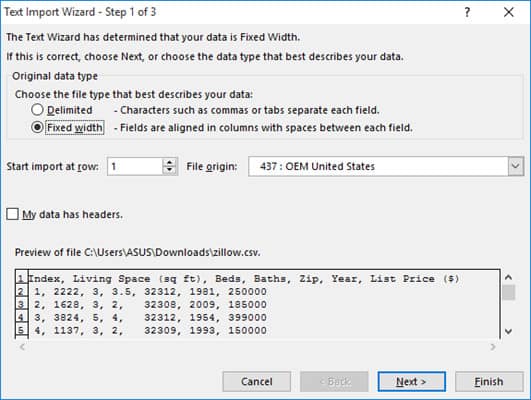
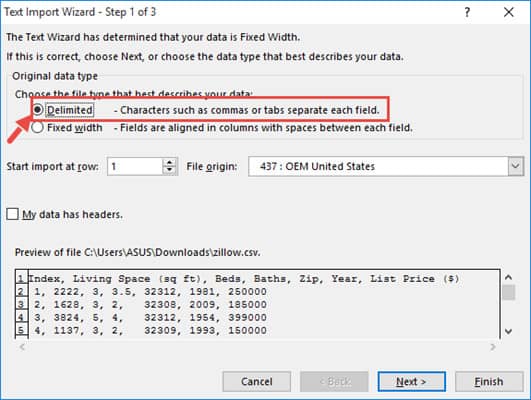
- The first step of the wizard lets you choose the file type that best describes your data. Make sure the ‘Delimited’ option is selected.
- Click Next.
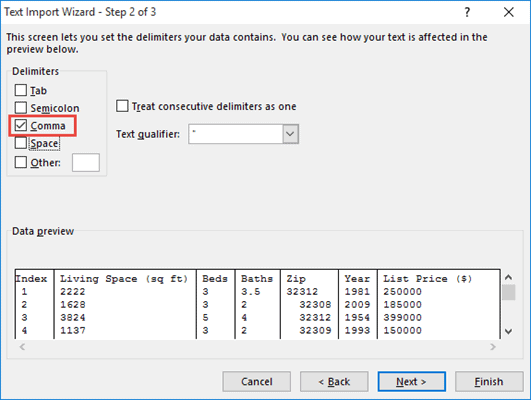
- The second step lets you set the delimiter by which you want to separate the data. Since the data items in our CSV file are separated by commas, make sure the ‘Comma’ option is checked.
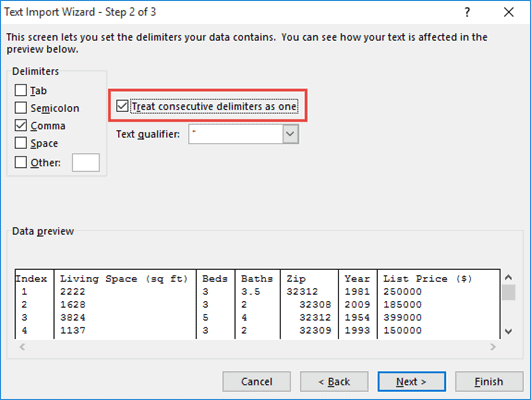
- You can also make sure the checkbox next to ‘Treat consecutive delimiters as one’ is checked. This ensures you don’t get unnecessary blank cells due to the presence of repeated consecutive commas (that were probably there by mistake).
- Click Next.
- The third step lets you set the format for each column. At the bottom of the wizard window, you can see a preview of how your data is going to look after splitting the column. If you want to change the format for any of the columns, simply select the column you need to format from the preview and select the radio button corresponding to the format you want for that column. If you don’t want the column to show at all, then you can select the ‘Do not import column (skip)’ option.
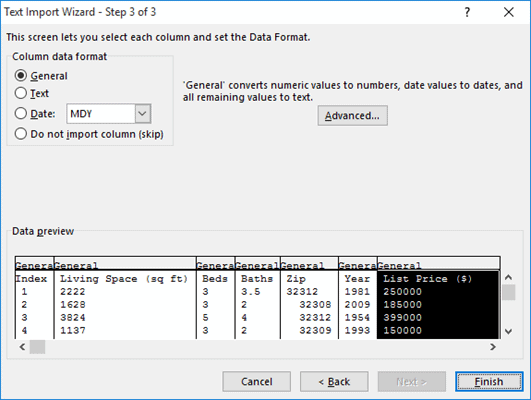
- Click Finish.
- Finally you will get asked to confirm where you want to start displaying your imported data. If importing to the same sheet, check if the starting cell is correctly mentioned in the input box below ‘Existing worksheet’. If you want to display the imported data in a new worksheet, check the radio button next to ‘New worksheet’.
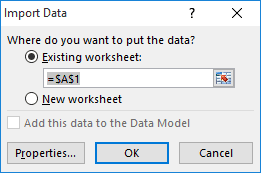
- Click OK.
You should now see your CSV data imported into the cells starting from your selected cell.

Also read: How to Open VCF File in Excel?
Handling Problems that Arise After Converting a CSV File to Excel
Now let us take a look at some issues that are likely to arise when you convert a CSV file to Excel and how to address and handle these issues.
Some of the problems you might see after conversion include:
- Data displayed in a single column
- Values not separated as expected
- Lost leading zeros in numerical values
- Numerical or Text values converted to dates
- Dates converted to text
Let’s address each of these issues and see how to resolve them.
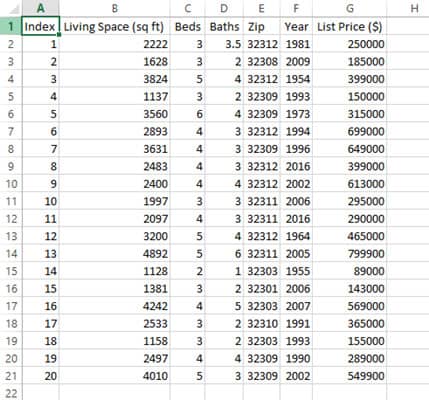
Data Displayed in a Single Column
After converting your CSV file to Excel you might find each record of data displayed in a single Excel column as shown below:
To break them up into separate columns, you can use the Text to Columns feature of Excel as follows:
- Select the range of cells containing your copied data
- From the Data tab, select the ‘Text to Columns’ button (in the ‘Data Tools’ group).
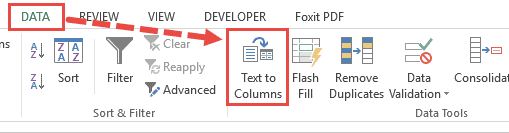
- This will open the Convert Text to Columns wizard.

- You will notice that the steps in this wizard are exactly like the ‘Text Import Wizard’ discussed in method 3 of this tutorial (importing a CSV file to Excel). So you can follow steps 6 to 12 from method 3.
- At the end of 12, when you click the Finish button, you should see your CSV data imported into the cells starting from your selected cell.
Your data should now be split into separate columns for each field, based on the comma delimiter in the CSV file.
You can now go ahead and further clean up / format the data as required.
Values not Separated as Expected After Converting CSV to Excel
In some cases, you might find the entire structure of the table gone awry.
This could be because you have different separators set in your computer’s regional and language settings from the separators set in the CSV file.
For example, in some countries, the default separator is the comma, while in certain others, it is the semicolon.
To solve this issue, you can do one of the following:
- Change the Separator in your Computer’s Regional Settings
- Import the File instead of Opening Directly
Change the Separator in your Computer’s Regional Settings
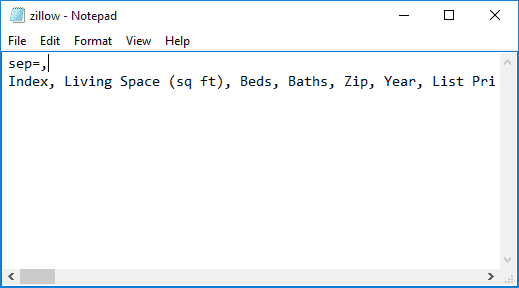
Specify the separator for your region directly in the CSV file, by typing “sep=,” or “sep=;” in the first line.
You can add this in any text editor, for example, Notepad.
Import the File instead of Opening Directly
Instead of directly opening the file, you can try importing the file (as shown in method 3 – importing a CSV file to Excel), and provide the right delimiter in Step 2 of 3 in the Text Import Wizard.
Note: Sometimes you might find more than one value put into a single cell. This might be because of the absence of a delimiter separating the two values in the original CSV file. To solve this problem, you can either open the CSV file in a text editor, add the separators in the right place, or you could split the cell using the Text to Columns feature. Make sure the cells to the right are empty before splitting the cell. You don’t want the existing values to get overwritten by the split values.
Lost Leading zeros in numerical values after Converting CSV to Excel
If your original CSV file contains numerical values with leading zeros, you might find them absent after converting the file to Excel.
This is because your Excel cells are automatically set to display numerical values in the General format.
This format removes leading zeros from numbers. If you want to retain the leading zeros, you can try changing the format of the column cells to Text.
Numerical or Text Values Converted to Dates after Importing CSV to Excel
You might find certain text values from the original CSV file mysteriously converted to dates after importing to Excel.
This could be because the original values in your CSV file happen to resemble date values. For example, you might have a user name as jan19, which Excel might interpret as a date.
The solution to this problem is simple. Simply change the format of the cell to Text.
Dates Converted to Text after Importing CSV to Excel
Finally, you might find certain dates from the original CSV file converted to text.
This might be because Excel did not recognize the date format, so it assumed it to be a Text value.
The solution to this problem is to simply convert the format of the cell to Date and set the date to your required format.
In this tutorial, we showed you three different ways to convert a CSV file to Excel.
We also pointed out certain issues you are likely to face after converting the file, and suggested solutions to overcome the issues.
We tried to make this tutorial informative enough so you know exactly what to do when using CSV files in Excel. Hope we did not miss any points.
Other Excel tutorials you may also find useful:
- How to Convert a Text File to Excel?
- How to Open Excel File [xls, xlsx] Online (for FREE)
- Why does Excel Open on Startup (and How to Stop it)
- How to Make Excel File Read Only
- How to Insert an Excel file into MS Word
- How to Save Selection in Excel as PDF (3 Easy Methods)
- How to Merge Two Excel Files?
- How to Convert PDF to Excel without Software?
- How to Open DAT Files in Excel?