
INTELLIGENT WORK FORUMS
FOR COMPUTER PROFESSIONALS
Contact US
Thanks. We have received your request and will respond promptly.
Log In
Come Join Us!
Are you a
Computer / IT professional?
Join Tek-Tips Forums!
- Talk With Other Members
- Be Notified Of Responses
To Your Posts - Keyword Search
- One-Click Access To Your
Favorite Forums - Automated Signatures
On Your Posts - Best Of All, It’s Free!
*Tek-Tips’s functionality depends on members receiving e-mail. By joining you are opting in to receive e-mail.
Posting Guidelines
Promoting, selling, recruiting, coursework and thesis posting is forbidden.
Students Click Here
Controlling Word from AccessControlling Word from Access(OP) 11 Apr 05 10:06 I have never used the Shell function before, so I am not certain just how to get done what I need. I need to open Word from Access, then open a form letter template that gets its data from the Access database from which I am opening Word. Then merge the data and print the letters. I can open Word with the Shell function, but then when I attempt to open the form letter template, the SendKeys sends the information back to Access and not to Word. What do I need to do differently? Red Flag SubmittedThank you for helping keep Tek-Tips Forums free from inappropriate posts. |
Join Tek-Tips® Today!
Join your peers on the Internet’s largest technical computer professional community.
It’s easy to join and it’s free.
Here’s Why Members Love Tek-Tips Forums:
 Talk To Other Members
- Notification Of Responses To Questions
- Favorite Forums One Click Access
- Keyword Search Of All Posts, And More…
 Talk To Other Members
Register now while it’s still free!
Already a member? Close this window and log in.
Join Us Close
The first sample in this section demonstrates how to build, design, and populate a table in Word based on data in an Access table. It uses automation to control Word from Access, and it even includes a simple Access form for invoking the automation procedure. The second and third samples tackle two mail merge tasks programmatically: generating mailing labels and generating a form letter.
The form letter sample here accomplishes the same thing as the form letter sample in Chapter 6. You can compare the two approaches to see which best fits your needs. In general, the philosophy behind having multiple components is that you should use each to do what it does best. The sample in this chapter enables Access to store data and Word to generate form letters for printing. If you find it easy to work with the Word object model and the MailMerge object, this approach might work best for you. If you prefer to concentrate on becoming expert in Access by itself, the approach in Chapter 6 might be preferable.
Automating Word from Access
The following automation sample transfers contents from a recordset based on a table in Access to a table in Word. When you have references to multiple object models with similar terms, you should include a prefix before the object data type designation in its declaration: you should use Word.Table instead of Table, for example. This tells the VBA interpreter which kind of Table object you want. Recall that Access can also declare a Table object from the ADOX library. Also, note that the Range object in Word behaves differently from than the one in Excel. VBA and IntelliSense let you build cross-application solutions, but they do not relieve you of the chore of learning the object models for individual applications.
Sub fromAccessToWordTable() Dim myWDApp As Word.Application Dim myRange As Word.Range, myTable As Word.Table Dim acell As Word.Cell, emailCol As Integer Dim rst1 As New Recordset, irow As Integer 'Open the table with the new contacts. With rst1 .ActiveConnection = CurrentProject.Connection .Open "oe4pab", , adOpenKeyset, adLockOptimistic, adCmdTable End With 'Create a Word application instance and turn on 'the Assistant's working animation. AssistantWorkingOn Set myWDApp = CreateObject("Word.Application") 'Add a document to the application and a table to the document. 'Specify rows to equal one more than e-mail address 'table in Access. myWDApp.Documents.Add Set myRange = myWDApp.ActiveDocument.Range(0, 0) myWDApp.ActiveDocument.Tables.Add Range:=myRange, _ NumRows:=rst1.RecordCount + 1, NumColumns:=3 'Insert column headings for table. With myWDApp.ActiveDocument.Tables(1).Rows(1) .Cells(1).Range.Text = rst1.Fields(0).Name .Cells(2).Range.Text = rst1.Fields(1).Name .Cells(3).Range.Text = rst1.Fields(2).Name End With 'Insert first name, last name, and e-mail from Access table. 'Insert contact info in the second through the last row. For irow = 2 To myWDApp.ActiveDocument.Tables(1).Rows.Count emailCol = 0 For Each acell In _ myWDApp.ActiveDocument.Tables(1).Rows(irow).Cells acell.Range.Text = IIf(IsNull(rst1.Fields(emailCol)), _ "", rst1.Fields(emailCol)) emailCol = emailCol + 1 Next acell rst1.MoveNext Next irow 'Format table to fit content, turn on idle animation, and 'make Word visible so user can see table in Word. myWDApp.ActiveDocument.Tables(1).AutoFitBehavior wdAutoFitContent AssistantIdleOn myWDApp.Visible = True End Sub
The procedure starts by opening a recordset object based on a table in Access—the familiar oe4pab that you saw in the Outlook samples. Since the application uses the RecordCount property, you should avoid using a forward-only cursor. The sample uses the adOpenKeyset constant for the cursor type specification. After opening the recordset, the application turns on the working animation for the Assistant and runs the CreateObject function to create a fresh instance of Word.
The procedure then constructs the table in Word. It adds a new document and then adds a table to the document’s top left corner. The parameters of the Add method for the Table object specify that the table will have one more row than there are rows in the Access table. This allows one row of column headers plus all the data in the oe4pab table. Before starting to work with the recordset values, the procedure writes the column headers in the first row. These are the field names for the table in Access.
A pair of nested For loops navigate through the cells in the table. The outer loop progresses sequentially through the rows. The inner one marches across the columns within a row. Notice that Word has a Cells collection for the columns within the row of a table. The inner loop navigates to individual cells within the Word table. The reference to a cell starts with the automation object, myWDApp, and then hierarchically moves to the ActiveDocument object, the first table on the document, and the row in the table. After identifying a cell within a row to process, an IIf function based on the recordset values computes a value for the Text property of the cell.
After iterating through all of the table’s cells, the procedure closes by performing three steps. First, it reformats the columns’ widths so they are wide enough to display column values without wrapping. Second, it assigns an idle animation to the Assistant. This essentially turns off the working animation that starts just before the Word Application object launches. Finally, the procedure sets the Application object’s Visible property to True. This changes the focus from Access to Word.
Figure 9-5 shows a form in Access that lets users start the procedure by clicking a button. The figure shows the form just after a user clicks the button. You can see a still shot of the Assistant with its working animation. When the Assistant comes to rest, the focus shifts from the Access form to the Word document with the table created by the fromAccessToWordTable procedure.
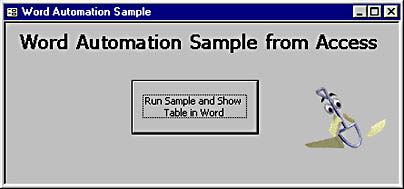
Figure 9-5. This form invokes the fromAccessToWordTable procedure. When the Assistant stops its working animation, the focus shifts to the table in Word.
Producing Mailing Labels
The built-in Word mail merge feature can draw on an Access database table or query as a record source for generating mailing labels. While you can programmatically lay out the mail merge fields or bookmarks to support the placement of Access data on Word documents, it is often much simpler to lay them out manually where you want data inserted on a document. In addition, you can use built-in wizards to help with the layout of controls for forms with multiple labels per page.
Figure 9-6 shows an excerpt from the mlabels.doc file. The mail merge fields were positioned with the built-in Mail Merge wizard that you can invoke from the Tools menu. After laying out the controls, you can programmatically control the printing of labels based on Access tables or queries through the MailMerge object.
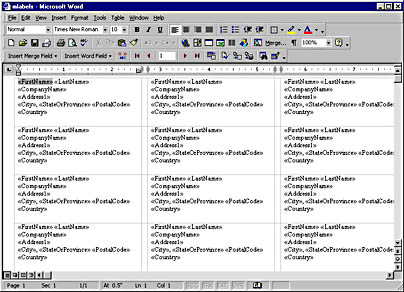
Figure 9-6. An excerpt from a Word document for printing mailing labels on Avery 5260 laser forms.
The following Word procedure is designed to run from the ThisDocument folder of the Normal template. It starts by opening the mlabels.doc file that contains the mail merge fields depicted in Figure 9-6. Then it sets a reference, myDoc, to a document based on the file. The mlabels.doc file actually contains no code of its own.
Sub printPreviewLabels() Dim myDoc As Document 'Set reference to the document. Documents.Open FileName:="mlabels.doc" Set myDoc = Documents("mLabels") 'Reference the data source in Access. myDoc.MailMerge.OpenDataSource Name:= _ "C:Programming AccessChap09Chapter9.mdb", _ Connection:="TABLE WebBasedList" 'Send the labels to a new document. With myDoc.MailMerge .Destination = wdSendToNewDocument .Execute Pause:=True End With 'Either Print Preview or Print labels. If MsgBox("Do you want to preview before printing?", _ vbYesNo, "Programming Microsoft Access 2000") = vbYes Then ActiveDocument.PrintPreview Else ActiveDocument.PrintOut End If End Sub
The key to performing any mail merge with data from Access is to invoke the OpenDataSource method for the MailMerge object within a document, such as the document that the myDoc reference points to. You often must assign two arguments, Name and Connection. You point the Name argument at the Access source file containing the data for the mail merge. The printPreviewLables procedure references Chapter9.mdb, the file for this chapter on the companion CD. You use the Connection argument to designate a type of database object and its name. Your code can designate either a Table or a Query. The sample points to a table named WebBasedList.
You can use the Word MailMerge object to write over the template with the mail merge fields or create a new document with the merged data. You use the MailMerge object’s Destination property to designate your choice. The sample uses the constant to create a new document for the merged data. After setting all the MailMerge properties that you want, you apply the Execute method to the MailMerge object. This merges the Access data into a Word document that creates your mailing labels. The sample presents a message box asking whether to print or preview the labels. After you no longer need the document with the merged fields and the one controlling the layout of the fields in a document, you can close both of them manually or with another program.
You can easily invoke a procedure such as printPreviewLabels from within Access. The procedure below does this in just three lines. This sample runs from a standard module in an Access file.
Sub runMLabels() Dim myWDApp As Word.Application 'Open connection to Word and make Word visible. Set myWDApp = CreateObject("Word.Application") myWDApp.Application.Visible = True 'Run mailing label procedure. myWDApp.Application.Run "printPreviewLabels" End Sub
Producing Form Letters
The procedure for producing form letters is essentially the same as the one for mailing labels except that the layout of mail merge fields is more straightforward. This is because you typically have just one occurrence of a record per page instead of multiple records on a page. Figure 9-7 shows the layout of a form letter in Word that is identical to the one in Chapter 6. It is easy to include a mail merge field within the body of a letter. The figure shows this in its bottom panel.
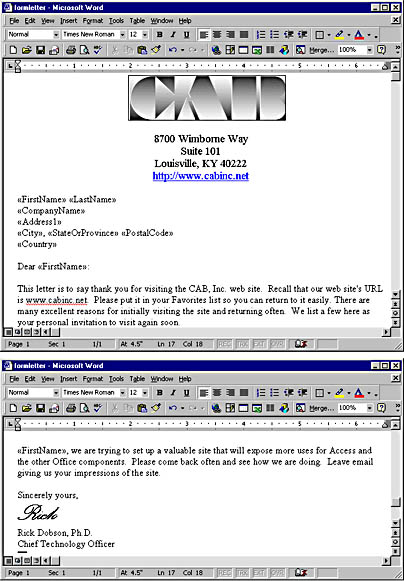
Figure 9-7. Excerpts from a Word document for printing form letters.
Do not use the full Mail Merge wizard if you plan to programmatically control the printing of labels. The code that it generates has many extra parameters and is designed explicitly for use with the wizard, not necessarily with custom applications. The sample below and the one in the previous section are designed for use from the ThisDocument folder of the Normal template. They are good starting points for your own custom form letter or mailing label applications. However, you should start the Mail Merge wizard to add the Mail Merge toolbar to the window of a document. Once you have the toolbar exposed, you can freely insert mail merge fields anywhere in a document.
The following procedure works with the document depicted in Figure 9-7, which shows excerpts from the top and bottom of the formletter.doc file. The procedure opens this file. The use of the OpenDataSource method is the same for both a form letter and mailing labels. This sample, however, designates values for the FirstRecord and LastRecord properties of the DataSource object. The OpenDataSource method specifies parameters pointing at the data source that the DataSource object represents. Setting the FirstRecord and LastRecord properties establishes a range of records for which to print form letters. This sample works with the default sort order for the records in the data source.
Sub printPreviewLetters() Dim myDoc As Document 'Load file and set a reference to it. Documents.Open FileName:="formletter.doc" Set myDoc = Documents("FormLetter") 'Reference the data source in Access. myDoc.MailMerge.OpenDataSource Name:= _ "C:Programming AccessChap09Chapter9.mdb", _ Connection:="TABLE WebBasedList" 'Send the labels to a new document. With myDoc.MailMerge .Destination = wdSendToNewDocument With .DataSource .FirstRecord = 5 .LastRecord = 9 End With .Execute Pause:=True End With 'Either Print Preview or Print labels. If MsgBox("Do you want to preview before printing?", _ vbYesNo, "Programming Microsoft Access 2000") = vbYes Then ActiveDocument.PrintPreview Else ActiveDocument.PrintOut End If End Sub
You can invoke the procedure from within Access by invoking the Run method for the Word Application object, as shown in the following procedure. This takes just three lines. While the runFormletters and runLabels procedures are procedures for a standard module in Access, you can place either or both of them behind an Access form and invoke them from command buttons. If your code designates a query in the OpenDataSource Connection parameter, you can modify the query before invoking the Word mail merge operation to further enhance your control of the mail merge.
Sub runFormLetters() Dim myWDApp As Word.Application 'Open connection to Word and make Word visible. Set myWDApp = CreateObject("Word.Application") myWDApp.Application.Visible = True 'Run form letter procedure. myWDApp.Application.Run "printPreviewLetters" End Sub
I found this (below) Access code online:
Option Compare Database
Public Sub SendLetters()
Dim wapp As Word.Application
Dim wdoc As Word.Document
Dim fld As Word.FormField
Dim db As DAO.Database
Dim rs As DAO.Recordset
Dim rs2 As DAO.Recordset
Dim filenm As String
Set db = CurrentDb
Set rs = db.OpenRecordset(«tbl_CustomerData»)
Set rs2 = db.OpenRecordset(«tbl_MailInformation»)
Set wapp = New Word.Application
wapp.Visible = True
rs.MoveFirst
While Not rs.EOF
If rs.Fields(«Days_Past_Due»).Value <= 30 Then
filenm = «C:testLetter1.doc»
End If
If rs.Fields(«Days_Past_Due»).Value > 30 Then
filenm = «C:testLetter2.doc»
End If
Set wdoc = wapp.Documents.Open(filenm)
For Each fld In wdoc.FormFields
fld.Result = rs.Fields(fld.Name).Value
Next fld
wdoc.SaveAs «C:test» & _
rs.Fields(«Name»).Value & «.doc»
wdoc.Close
rs2.AddNew
rs2.Fields(«CustomerDataID»).Value = rs.Fields(«CustomerDataID»).Value
rs2.Fields(«DateMailed»).Value = Now()
rs2.Fields(«LetterMailed»).Value = filenm
rs2.Update
Set wdoc = Nothing
rs.MoveNext
Wend
Set fld = Nothing
wapp.Quit
Set wapp = Nothing
rs2.Close
rs.Close
Set rs2 = Nothing
Set rs = Nothing
Set db = Nothing
End Sub
Works great! For me, the only problem is that the fields in the Word docs
are not named, so Access just pushes the data through. As far as I can tell,
the code doesn’t really link certain fields from the Access table to certain
fields in the Word doc. I’ve done this before, pushing data from Excel to
Word, by using DocVariables in Word. There must be a similar way of doing
this in Access, by linking the fields in the Access table to the DocVariables
in the Word doc.
Below is a sample of the code that I use to control Word from Excel:
Sub PushToWord()
Dim objWord As New Word.Application
Dim doc As Word.Document
Dim bkmk As Word.Bookmark
sWdFileName = Application.GetOpenFilename(, , , , False)
Set doc = objWord.Documents.Open(sWdFileName)
‘On Error Resume Next
objWord.ActiveDocument.variables(«BrokerFirstName»).Value =
Range(«BrokerFirstName»).Value
objWord.ActiveDocument.variables(«BrokerLastName»).Value =
Range(«BrokerLastName»).Value
objWord.ActiveDocument.Fields.Update
‘On Error Resume Next
objWord.Visible = True
End Sub
When I try to run this code in Access I get this message:
Compile Error: Method or data member not found.
This is highlighted blue:
..GetOpenFilename
The reference to Word is checked off. What am I doing wrong?
Thanks,
Ryan—
I have a word template that I use for documentation. I would like to set the content controls in the word document from MS Access. I figured out how to set the items in Word,
ActiveDocument.ContentControls(14).Checked = True
activedocument.ContentControls(1).DropdownListEntries.Item(3)enter code here
But when I try to do that from Access I cant figure out how to call the content controls.
This is the code I use when replacing bookmarks, ive tried to put content controls in with it, but no luck:
Set WordApp = GetObject(, "Word.Application")
WordApp.Visible = True
WordApp.WindowState = wdWindowStateMaximize
WordApp.Documents.Add Template:=strTemplateLocation, NewTemplate:=False

With WordApp.Selection

.GoTo what:=wdGoToBookmark, Name:="COMPANY"
.TypeText [fac]
'that works

Dim oCtrl As ContentControl
set oCtrl = .ContentControl(14)
oCtrl.Checked = True
I then get a compile error stating «Method or data member not found». With «ContentControl» on the second to last line highlighted.
Its been a long time since I worked with code, so please excuse me if something obvious is off.
thanks,
Всем привет, сегодня поговорим о выгрузки данных из Access в такие приложения как Word и Excel. Но не о стандартном способе, который есть в Access (связь с Office), а о способе, который позволяет выгружать данные в заданный шаблон как в Word, так и в Excel.
Другими словами это нужно тогда когда создать отчеты в Access по шаблону, который уже существует, например, в Word, невозможно или слишком трудоемко или как Вы знаете, может получаться просто коряво или самый распространенный вариант это когда много текста, который в отчете Access не так хорошо форматируется как в Word, а данных не так много, но необходимо автоматизировать, например это какие-то договора, заявления и так далее. Использование слияния из самого Word-а не очень удобно, поэтому я расскажу сегодня, как можно заполнять такие шаблоны напрямую из Access, путем нажатия на одну кнопку. Также как и необходимость выгрузки в шаблон Word, существует и необходимость выгрузки в шаблон Excel, и этот способ мы тоже сегодня рассмотрим.
Начнем с Word.
Вся разработка делится на две части это:
• Настройка шаблона Word;
• Настройка выгрузки данных в шаблон.
Суть настройки шаблона заключается в том, что необходимо проставить необходимые поля в тех местах шаблона, где нужно выводить то или иное поле. Это делается с помощью полей формы.
Открываем шаблон Word, для начала добавим необходимую панель инструментов, для этого нажимаем вид->панель инструментов и ставим галочку «формы». Теперь у вас отобразилась панель инструментом «Формы» все, что осталось сделать это встать на то место где необходимо добавить нужное поле и на панели выбрать «Текстовое поле». После в том месте у Вас появится серая область, которая свидетельствует о том, что поле добавлено. Теперь необходимо задать имя этого поля, для того чтобы потом из access вставлять в него значения (стандартное названия не очень удобное). Для этого щелкните правой кнопкой мы по полю и нажмите «Свойства». В поле закладка напишите желаемое имя этого поля, я в примере назвал его MyTestPole
Создайте столько полей, сколько Вам нужно.
Ну и настройка шаблона закончена, только единственное сделайте этот шаблон только для чтения, а то пользователь возьмет, сформирует документ и сохранит его, и шаблон тем самым потеряется, а если сделать только для чтения, то у него такой возможности не будет только сохранять через «Сохранить как».
Переходим к более интересной задачи это к реализации самой выгрузки из Access в этот шаблон.
Примечание! Я использую Access в связке с MS Sql 2008 поэтому и данные буду брать от туда.
Допустим у Вас есть форма, сделайте на ней кнопку (я назвал ее testbutton) и в событие нажатие кнопки вставьте следующий код:
Private Sub testbutton_Click()
‘Объявляем переменные
Dim FileDialog As FileDialog
Dim rsd As ADODB.Recordset
Dim strSQL As String
Dim WordApOb As Object
Dim WordOb As Object
Dim path As String
Set rsd = New ADODB.Recordset
‘запрос к базе данных для получения необходимых данных
strSQL = «select * from dbo.table where KOD = » & Me.kod & «»
rsd.open strSQL, CurrentProject.Connection
‘Выбираем шаблон
Set FileDialog = Application.FileDialog(msoFileDialogOpen)
‘убираем множественный выбор, он нам не нужен
FileDialog.AllowMultiSelect = False
‘очистим и установим фильтры
FileDialog.Filters.Clear
FileDialog.Filters.add «Word», «*.doc»
‘установим фильтр по умолчанию
FileDialog.FilterIndex = 1
‘проверяем, что сделал user если выбрал шаблон, то начинаем работу
If FileDialog.Show = False Then
‘Если нет то выходим
Set dlgFile = Nothing
Exit Sub
End If
‘получаем путь к файлу
path = Trim(FileDialog.SelectedItems(1))
‘Очистим переменную
Set FileDialog = Nothing
If path <> «» Then
‘Будем отслеживать ошибки
On Error GoTo Err_testbutton_Click
‘Создаем объект Word
Set WordOb = CreateObject(«Word.document»)
‘Задаем нашему документу значение из шаблона
Set WordOb = GetObject(path)
‘Задаем значение объекту word.Application
Set WordApOb = WordOb.Parent
‘делаем приложение word видимым
WordApOb.Visible = True
‘ищем наше поле в шаблоне
WordOb.Bookmarks(«mytestpole»).Select
‘задаем ему новое значение из нашего Recordset
WordApOb.Selection.TypeText Text:=Nz(rsd.Fields(«field»).Value, » «)
‘и так далее по всем полям
‘в конце перейдем на начало нашего документа
WordApOb.Selection.Goto wdGoToFirst
‘и активируем его
WordApOb.Activate
‘Очистим переменные
Set WordOb = Nothing
Set WordApOb = Nothing
Exit_testbutton_Click:
Exit Sub
Err_testbutton_Click:
MsgBox Err.Description
‘в случае ошибки будем делать следующие
‘закроем word без сохранения
WordOb.Close (wddonotsavechanges)
WordApOb.Quit
‘и также очистим переменные
Set WordOb = Nothing
Set WordApOb = Nothing
Resume Exit_testbutton_Click
End If
End Sub
Код прокомментирован, поэтому сложностей возникнуть не должно. Здесь весь смысл сводится к созданию объекта word.document и word.application, конечно же. А после мы уже работаем с нашими объектами, т.е. заполняем их.
Теперь перейдем к Excel.
В шаблоне Excel уже ненужно создавать поля как в Word, так как здесь мы уже будем ориентироваться по адресам ячеек.
Существует несколько способов, как заполнять Excel шаблон, я опишу два, первый это тогда когда Вам просто необходимо проставить несколько полей, т.е. в источнике данных будет всего одна строка с несколькими полями и второй это когда строк будет уже несколько, причем Вы не знаете, сколько именно (в зависимости от каких то условий), но в шаблоне по умолчанию отведено для этого все пару строк, поэтому мы будем нужные нам строки добавлять, для того чтобы наши данные не накладывалась на строки ниже (допустим там примечание, подпись руководителя и т.д.). И совет, я здесь для примера использую всего один источник данных, а вы, если Вам необходимо заполнить шапку, примечание и некое количество строк (т.е. область данных) то для этих задач используйте несколько источников (Recordset).