Содержание
- How to use the forms controls on a worksheet in Excel
- Summary
- More Information
- Enable the Developer tab
- Set up the list, the cell link, and the index
- List box example
- Combo box example
- Spin button example
- Scroll bar example
- Add a check box or option button (Form controls)
- Formatting a control
- Deleting a control
- Need more help?
How to use the forms controls on a worksheet in Excel
Summary
Microsoft Excel provides several controls for dialog sheets that are useful for selecting items from a list. Examples of controls are list boxes, combo boxes, spin buttons, and scroll bars.
More Information
The following methods show how to use list boxes, combo boxes, spin buttons, and scroll bars. The examples use the same list, cell link, and Index function.
Enable the Developer tab
To use the form controls in Excel 2010 and later versions, you have to enable the Developer tab. To do this, follow these steps:
Click File, and then click Options.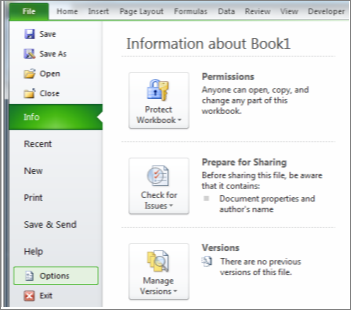
Click Customize Ribbon in the left pane.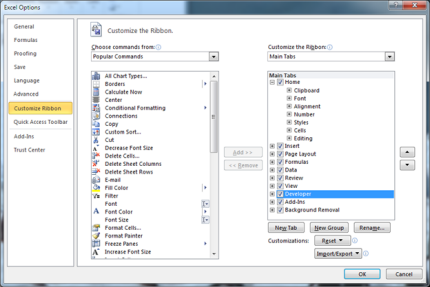
Select the Developer check box under Main Tabs on the right, and then click OK.
To use the forms controls in Excel 2007, you must enable the Developer tab. To do this, follow these steps:
Click the Microsoft Office Button, and then click Excel Options.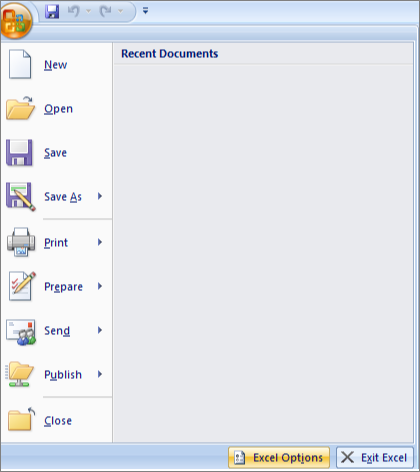
Click Popular, select the Show Developer tab in the Ribbon check box, and then click OK.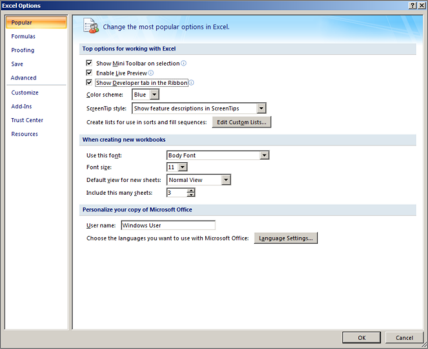
Set up the list, the cell link, and the index
In a new worksheet, type the following items in the range H1:H20:
H1 : Roller Skates
H6 : Washing Machine
H7 : Rocket Launcher
In cell A1, type the following formula:
List box example
To add a list box in Excel 2007 and later versions, click the Developer tab, click Insert in the Controls group, and then click List Box Form (Control) under Form Controls.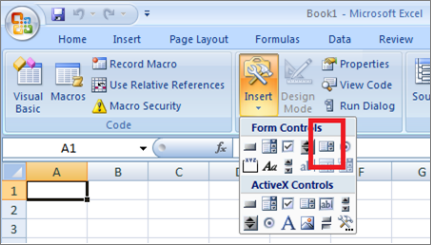
To add a list box in Excel 2003 and in earlier versions of Excel, click the List Box button on the Forms toolbar. If the Forms toolbar is not visible, point to Toolbars on the View menu, and then click Forms.
Click the worksheet location where you want the upper-left corner of the list box to appear, and then drag the list box to where you want the lower-right corner of the list box to be. In this example, create a list box that covers cells B2:E10.
In the Controls group, click Properties.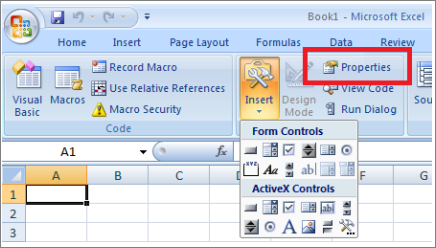
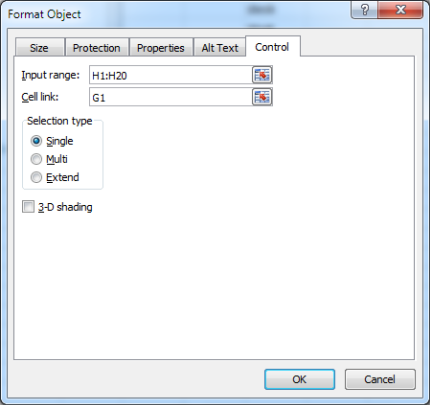
In the Format Object window, type the following information, and then click OK.
To specify the range for the list, type H1:H20 in the Input range box.
To put a number value in cell G1 (depending on which item is selected in the list), type G1 in the Cell link box.
Note: The INDEX() formula uses the value in G1 to return the correct list item.
Under Selection type, make sure that the Single option is selected.
Note: The Multi and Extend options are only useful when you are using a Microsoft Visual Basic for Applications procedure to return the values of the list. Note also that the 3-D shading check box adds a three-dimensional look to the list box.
The list box should display the list of items. To use the list box, click any cell so that the list box is not selected. If you click an item in the list, cell G1 is updated to a number that indicates the position of the item that is selected in the list. The INDEX formula in cell A1 uses this number to display the item’s name.
Combo box example
To add a combo box in Excel 2007 and later versions, click the Developer tab, click Insert, and then click Combo Box under Form Controls.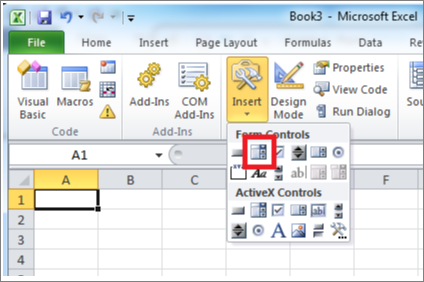
To add a combo box in Excel 2003 and in earlier versions of Excel, click the Combo Box button on the Forms toolbar.
Click the worksheet location where you want the upper-left corner of the combo box to appear, and then drag the combo box to where you want the lower-right corner of the list box to be. In this example, create a combo box that covers cells B2:E2.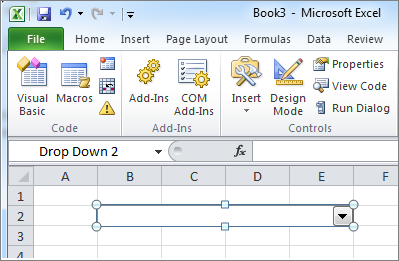
Right-click the combo box, and then click Format Control.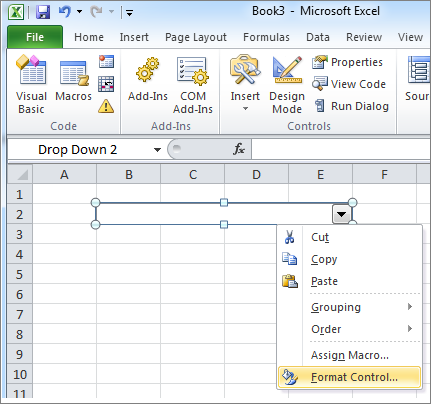
Type the following information, and then click OK:
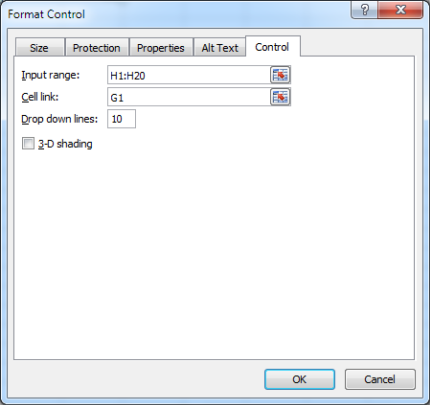
To specify the range for the list, type H1:H20 in the Input range box.
To put a number value in cell G1 (depending on which item is selected in the list), type G1 in the Cell link box.
Note: The INDEX formula uses the value in G1 to return the correct list item.
In the Drop down lines box, type 10. This entry determines how many items will be displayed before you have to use a scroll bar to view the other items.
Note: The 3-D shading check box is optional. It adds a three-dimensional look to the drop-down or combo box.
The drop-down box or combo box should display the list of items. To use the drop-down box or combo box, click any cell so that the object is not selected. When you click an item in the drop-down box or combo box, cell G1 is updated to a number that indicates the position in the list of the item selected. The INDEX formula in cell A1 uses this number to display the item’s name.
Spin button example
To add a spin button in Excel 2007 and later versions, click the Developer tab, click Insert, and then click Spin Button under Form Controls.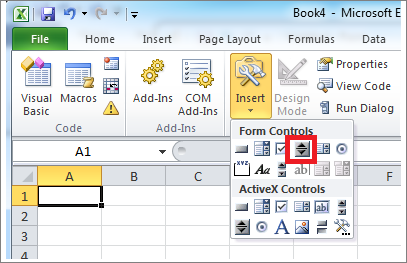
To add a spinner in Excel 2003 and in earlier versions of Excel, click the Spinner button on the Forms toolbar.
Click the worksheet location where you want the upper-left corner of the spin button to appear, and then drag the spin button to where you want the lower-right corner of the spin button to be. In this example, create a spin button that covers cells B2: B3.
Right-click the spin button, and then click Format Control.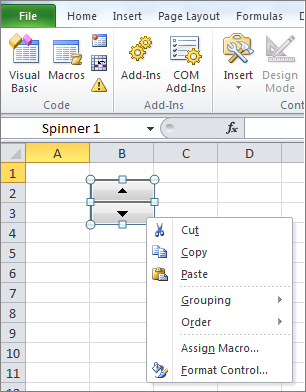
Type the following information, and then click OK:
In the Current value box, type 1.
This value initializes the spin button so that the INDEX formula will point to the first item in the list.
In the Minimum value box, type 1.
This value restricts the top of the spin button to the first item in the list.
In the Maximum value box, type 20.
This number specifies the maximum number of entries in the list.
In the Incremental change box, type 1.
This value controls how much the spin button control increments the current value.
To put a number value in cell G1 (depending on which item is selected in the list), type G1 in the Cell link box.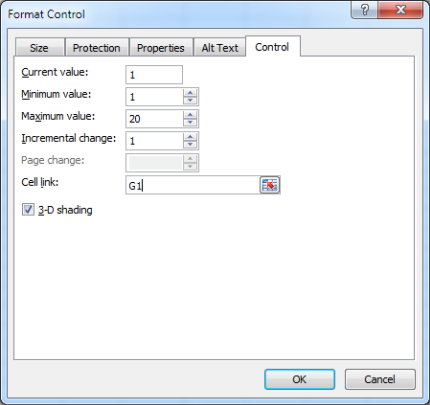
Click any cell so that the spin button is not selected. When you click the up control or down control on the spin button, cell G1 is updated to a number that indicates the current value of the spin button plus or minus the incremental change of the spin button. This number then updates the INDEX formula in cell A1 to show the next or previous item.
The spin button value will not change if the current value is 1 and you click the down control, or if the current value is 20 and you click the up control.
Scroll bar example
To add a scroll bar in Excel 2007 and later versions, click the Developer tab, click Insert, and then click Scroll Bar under Form Controls.
To add a scroll bar in Excel 2003 and in earlier versions of Excel, click the Scroll Bar button on the Forms toolbar.
Click the worksheet location where you want the upper-left corner of the scroll bar to appear, and then drag the scroll bar to where you want the lower-right corner of the scroll bar to be. In this example, create a scroll bar that covers cells B2:B6 in height and is about one-fourth of the width of the column.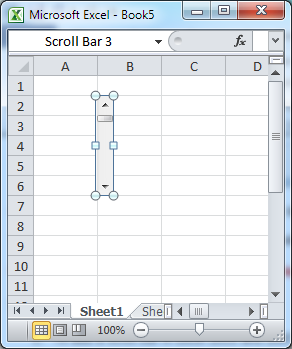
Right-click the scroll bar, and then click Format Control.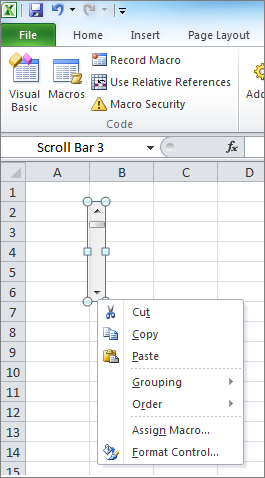
Type the following information, and then click OK:
In the Current value box, type 1.
This value initializes the scroll bar so that the INDEX formula will point to the first item in the list.
In the Minimum value box, type 1.
This value restricts the top of the scroll bar to the first item in the list.
In the Maximum value box, type 20. This number specifies the maximum number of entries in the list.
In the Incremental change box, type 1.
This value controls how many numbers the scroll bar control increments the current value.
In the Page change box, type 5. This value controls how much the current value will be incremented if you click inside the scroll bar on either side of the scroll box).
To put a number value in cell G1 (depending on which item is selected in the list), type G1 in the Cell link box.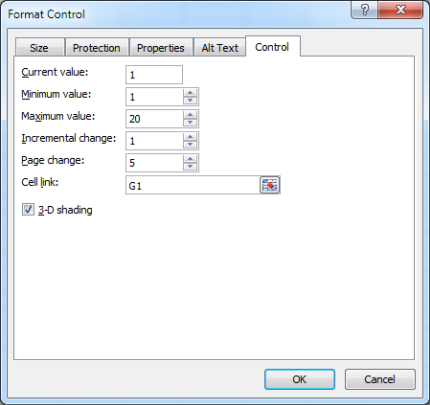
Note: The 3-D shading check box is optional. It adds a three-dimensional look to the scroll bar.
Click any cell so that the scroll bar is not selected. When you click the up or down control on the scroll bar, cell G1 is updated to a number that indicates the current value of the scroll bar plus or minus the incremental change of the scroll bar. This number is used in the INDEX formula in cell A1 to show the item next to or before the current item. You can also drag the scroll box to change the value or click in the scroll bar on either side of the scroll box to increment it by 5 (the Page change value). The scroll bar will not change if the current value is 1 and you click the down control, or if the current value is 20 and you click the up control.
Источник
Add a check box or option button (Form controls)
You can insert form controls such as check boxes or option buttons to make data entry easier. Check boxes work well for forms with multiple options. Option buttons are better when your user has just one choice.
To add either a check box or an option button, you’ll need the Developer tab on your Ribbon.
Notes: To enable the Developer tab, follow these instructions:
In Excel 2010 and subsequent versions, click File > Options > Customize Ribbon , select the Developer check box, and click OK.
In Excel 2007, click the Microsoft Office button  > Excel Options > Popular > Show Developer tab in the Ribbon.
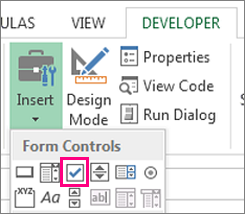
To add a check box, click the Developer tab, click Insert, and under Form Controls, click  .
.
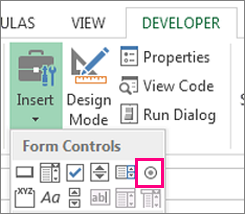
To add an option button, click the Developer tab, click Insert, and under Form Controls, click  .
.
Click in the cell where you want to add the check box or option button control.
Tip: You can only add one checkbox or option button at a time. To speed things up, after you add your first control, right-click it and select Copy > Paste.
To edit or remove the default text for a control, click the control, and then update the text as needed.
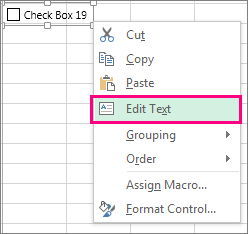
Tip: If you can’t see all of the text, click and drag one of the control handles until you can read it all. The size of the control and its distance from the text can’t be edited.
Formatting a control
After you insert a check box or option button, you might want to make sure that it works the way you want it to. For example, you might want to customize the appearance or properties.
Note: The size of the option button inside the control and its distance from its associated text cannot be adjusted.
To format a control, right-click the control, and then click Format Control.
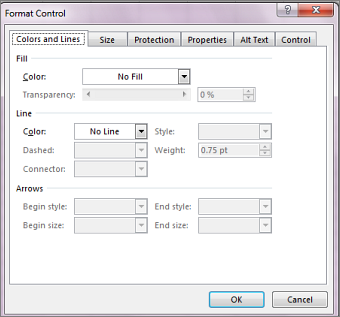
In the Format Control dialog box, on the Control tab, you can modify any of the available options:
Checked: Displays an option button that is selected.
Unchecked: Displays an option button that is cleared.
In the Cell link box, enter a cell reference that contains the current state of the option button.
The linked cell returns the number of the selected option button in the group of options. Use the same linked cell for all options in a group. The first option button returns a 1, the second option button returns a 2, and so on. If you have two or more option groups on the same worksheet, use a different linked cell for each option group.
Use the returned number in a formula to respond to the selected option.
For example, a personnel form, with a Job type group box, contains two option buttons labeled Full-time and Part-time linked to cell C1. After a user selects one of the two options, the following formula in cell D1 evaluates to «Full-time» if the first option button is selected or «Part-time» if the second option button is selected.
If you have three or more options to evaluate in the same group of options, you can use the CHOOSE or LOOKUP functions in a similar manner.
Deleting a control
Right-click the control, and press DELETE.
Currently, you can’t use check box controls in Excel for the web. If you’re working in Excel for the web and you open a workbook that has check boxes or other controls (objects), you won’t be able to edit the workbook without removing these controls.
Important: If you see an «Edit in the browser?» or «Unsupported features» message and choose to edit the workbook in the browser anyway, all objects such as check boxes, combo boxes will be lost immediately. If this happens and you want these objects back, use Previous Versions to restore an earlier version.
If you have the Excel desktop application, click Open in Excel and add check boxes or option buttons.
Need more help?
You can always ask an expert in the Excel Tech Community or get support in the Answers community.
Источник
If you’re working on a project or a monthly reporting process, document control can be the most time-consuming activity. Often there are so many documents that it is difficult to keep up with all the inputs and revisions flying about all over the place. Which documents have we got? Which documents are missing? Have we got the latest version of this or that? When was a document revised, or superseded by a new version? Aaaahhhhhh! Too many questions. This is why I created a Document Control Template for Excel, it enables me to keep track of documents for all important processes. If you think I’m just talking about using a spreadsheet like a list, then you’ll be pleasantly surprised. It’s so much more than that.
By using the Document Control Template, which I am about to share with you, it is possible to
- “Check in” documents – moving and re-naming documents into specific folders with specific file names
- See at a glance the documents which have been received or are missing
- Keep track of the “current” version, and retain copies of all previous versions of a file
- Delete old files without needing to find it in the folder structure
- Open of files in their default application with a single click
- “Roll-over” the Document Control Template for the next period/version
- Work with all file types, not just Excel workbooks
The biggest benefit of using a Document Control Template is knowing the specific file path of each document. As it then becomes possible to use other automation macros, such as consolidating workbooks, merging PDFs, or printing specific schedules of each workbook. This automation is much harder or impossible if = the exact file path of each document is now known.
Much of the code for the Document Control Template can be found in the VBA Code Snippets library. To find out more information on any of the VBA code below, follow these links.
- Selecting a file using the File Dialog Box
- Find out if a file is already open by you or another user
- Copy, move, rename, delete and confirm existence of files
- Create, delete, rename and confirm existence of folders
Introducing the Document Control Template for Excel
Download the Document Control Template
You do not need to download the file to create your own Document Control Template, all the instructions and VBA code are in the sections below. But, it will be much easier to follow along if you have the Template downloaded. If you just want to get stuck right in, you can download the file and ignore the second part of this article.
![]()
Download the file: Document Control Template
Disclaimer:
Whilst I try to create safe and reliable templates and add-ins, I can (and often do) make mistakes. Please backup copies of your files before opening this template or running any VBA code. If you do find any bugs or errors, please let me know using my contact page.
By using any templates, add-ins, downloads or information from the site, you agree that I will not be held liable for any type of damages, and use is entirely at your own risk.
Using the Document Control Template?
Below is a screenshot from the Document Control Template, each feature is described below.
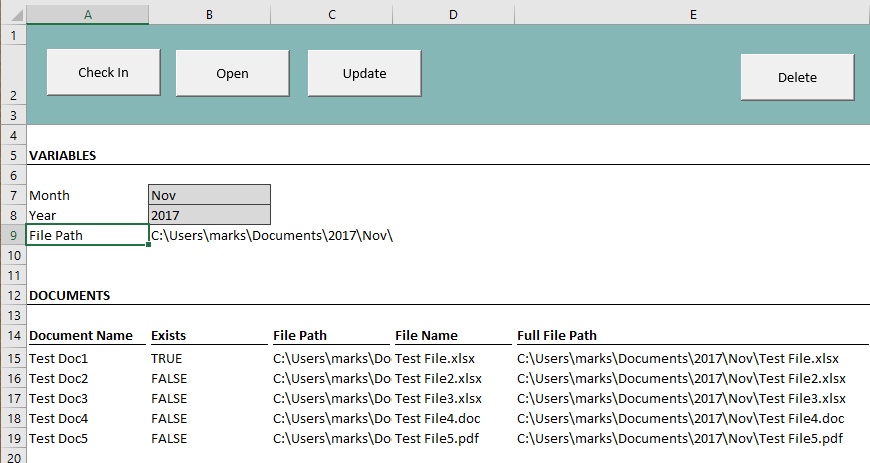
Check In Button:
To ‘Check In’ a file, select a cell with a valid file path (e.g. Cells E15-E19) then click the Check In button. A file selection window will open, navigate to the location where the file is currently saved, click Open. For this button to work a “valid file path” is where the folder exists, but the file name does not. The selected file is automatically moved to the file path selected in the cell.
Open Button:
Select a cell containing a valid file path (e.g. Cells E15-E19), then click the Open button. For this button to work a “valid file path” is where both the folder and file exist. The file will open within its default application.
Update Button:
The Update button functions in a similar way to the Check In button. The key difference being the file must already exist in the selected location. The existing file is renamed to include the day and time it was replaced, then the new file is renamed to the file name in the selected cell.
Delete Button:
Select a cell containing a valid file path, where the folder and file already exist, click Delete. The file will be deleted.
Cell Variables:
Cells B7 and B8 are variables. These are used to construct the file path in Cell B9. If the year or period changes, so does the file path. This makes the template useful for any regular reporting cycles, just change the variables and subsequent files are saved in a new location.
Existence:
Cells B15-B19 displays TRUE or FALSE to indicate if a file already exists in the location shown in Cells E15-E19.
File Path & File Name:
In my template, the File Path (Cells C15-C9) is based on the value in Cell B9. However, the file path could be unique for each file, and could incorporate other variables.
The file names (Cells D15-D19) are the names which the files will be renamed to.
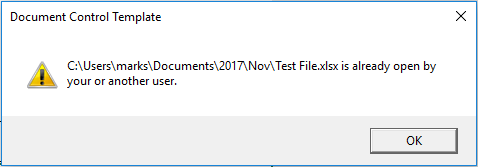
Warning messages
Using invalid file paths will trigger warning messages similar to the one below.
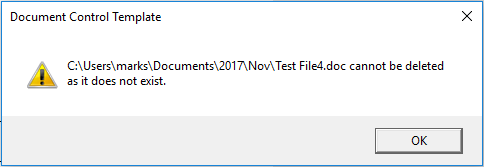
The VBA code also checks to ensure the file is not already open by another user.
There are many ways this file could be used, it is up to you to work with it and see what you can achieve.
Create your own Document Control Template
If you’re interested in making your own Document Control Template from scratch, or if you’re a VBA fan, then all the necessary steps and code are contained below.
VBA Code for the Document Control Template
Copy the code below into a Module within the Visual Basic Editor. I won’t go through the code line by line, there are comments within the code provide some guidance. Or check out the articles in the VBA Code Snippets Library for further information.
Option Explicit
Function doesFileExist(filePath) As Boolean

'Make the calculation volatile, forcing recalculation when used as
'a worksheet function
Application.Volatile

doesFileExist = Dir(filePath) <> ""

End Function
Function doesFolderExist(folderPath) As Boolean

'If blank cell selected will cause error: return false
'If not blank, then check for folder existence
If folderPath = "" Then

    doesFolderExist = False

Else

    doesFolderExist = Dir(folderPath, vbDirectory) <> ""

End If

End Function
Function IsFileOpen(fileName As String)

Dim fileNum As Integer
Dim errNum As Integer

'Allow all errors to happen
On Error Resume Next
fileNum = FreeFile()

'Try to open and close the file for input.
'If Error it means the file is already open
Open fileName For Input Lock Read As #fileNum
Close fileNum

'Get the error number
errNum = Err

'Do not allow errors to happen anymore
On Error GoTo 0

'Check the Error Number
Select Case errNum

    'errNum = 0 means no errors, therefore file closed
    Case 0
        IsFileOpen = False

    'errNum = 70 means the file is already open
    Case 70
        IsFileOpen = True

    'Something else went wrong
    Case Else
        IsFileOpen = errNum

End Select

End Function
Sub DocControlCheckIn()
'Assign this Macro to the Check In button

FileActions ("CheckIn")

End Sub
Sub DocControlOpen()
'Assign this Macro to the Open button

FileActions ("Open")

End Sub
Sub DocControlDelete()
'Assign this Macro to the Delete button

FileActions ("Delete")

End Sub
Sub DocControlUpdate()
'Assign this Macro to the Update button

FileActions ("Update")

End Sub
Sub FileActions(action As String)

Dim folderPath As String
Dim errorCount As Integer
Dim fileName As String
Dim positionOfSlash As Integer
Dim msgAns As Long

'Check if selection is blank
If Selection.Value = "" Then errorCount = errorCount + 1

'Get the folder path from the selected cell, by finding final backslash
positionOfSlash = InStrRev(Selection.Value, "")
If positionOfSlash >= 1 Then
    folderPath = Left(Selection.Value, positionOfSlash)
Else
    folderPath = Selection.Value
    errorCount = errorCount + 1
End If

'Check if the folder path exists
If doesFolderExist(folderPath) = False Then errorCount = errorCount + 1


'Display error message for selecting a cell with an invalid file path
If errorCount >= 1 Then
    MsgBox "The selected cell does not contain a valid file path.", _
        vbExclamation, "Document Control Template"
    Exit Sub
End If

'Check if file is already open
If IsFileOpen(Selection.Value) = True Then
    MsgBox Selection.Value & " is already open by your or another user.", _
        vbExclamation, "Document Control Template"
    Exit Sub
End If

Select Case action

    'Delete file if it exists, includs confirmation to delete
    Case "Delete"
         If doesFileExist(Selection.Value) = True Then
             msgAns = MsgBox("Are you sure you wish to delete " & _
                 Selection.Value & "?", vbYesNo, "Document Control Template")
             If msgAns = vbYes Then
                 Kill Selection.Value
             End If
         Else
             MsgBox Selection.Value & " cannot be deleted as it does not exist.", _
                 vbExclamation, "Document Control Template"
             Exit Sub
         End If


    'Check In the file if the file does not already exist
    Case "CheckIn"
        If doesFileExist(Selection.Value) = True Then
            MsgBox "Unable to Check In " & Selection.Value & _
                " as the file already exists", vbExclamation, _
                "Document Control Template"
            Exit Sub
        Else
            Call saveFileInLocation(Selection.Value)
        End If


    'Open the file if it exists
    Case "Open"
        If doesFileExist(Selection.Value) = True Then
            CreateObject("Shell.Application").Open (Selection.Value)
        Else
            MsgBox "Unable to open " & Selection.Value & _
                " as the file does not exist.", vbExclamation, _
                "Document Control Template"
            Exit Sub
        End If


    'Update the file if it exists
    Case "Update"
        If doesFileExist(Selection.Value) = True Then
            fileName = folderPath & Mid(Left(Selection.Value, _
                InStrRev(Selection.Value, ".") - 1), Len(folderPath) + 1) & "_" & _
                Format(Now(), "yymmddhhmmss") & _
                Mid(Selection.Value, InStrRev(Selection.Value, "."))
            Name Selection.Value As fileName
            Call saveFileInLocation(Selection.Value)
        Else
            MsgBox "Unable to update " & Selection.Value & _
                " as the file does not already exist.", vbExclamation, _
                "Document Control Template"
            Exit Sub
        End If


End Select

'Recalculate sheet.  This should force the doesFileExist function in
'Cells B15-B19 to recalculate to show correct TRUE/FALSE value
ActiveSheet.Calculate

End Sub
Sub saveFileInLocation(savePath As String)

Dim dialogBox As FileDialog
Dim selectedFile As String

Set dialogBox = Application.FileDialog(msoFileDialogOpen)

'Do not allow multiple files to be selected
dialogBox.AllowMultiSelect = False

'Set the title of the DialogBox
dialogBox.Title = "Select a file"

'Show the dialog box and assign full file path and file name to variable
If dialogBox.Show = -1 Then
    selectedFile = dialogBox.SelectedItems(1)
End If

'Check if the selectedFile is already open
If IsFileOpen(selectedFile) = True Then
    MsgBox selectedFile & " is already open by your or another user.", _
        vbExclamation, "Document Control Template"
    Exit Sub
End If

'Catch errors when moving file to final location
On Error Resume Next

'Rename the file
Name selectedFile As savePath

If Err.Number <> 0 Then

    MsgBox "Unable to Check In the file"

End If

On Error GoTo 0


End Sub
Creating the buttons on the worksheet
There are 4 main actions within the VBA code above; Check In, Open, Update, Delete. Create a button for each action. From the Developer Ribbon click Insert -> Form Controls -> Button (Form Controls). Click and draw a rectangle on the worksheet. This creates a new button. Allocate each button created to the 4 macros
- Check In – Macro: DocControlCheckIn
- Open – Macro: DocControlOpen
- Update – Macro: DocControlUpdate
- Delete – Macros: DocControlDelete
Screen shot below shows how to create a button and allocate a Macro.
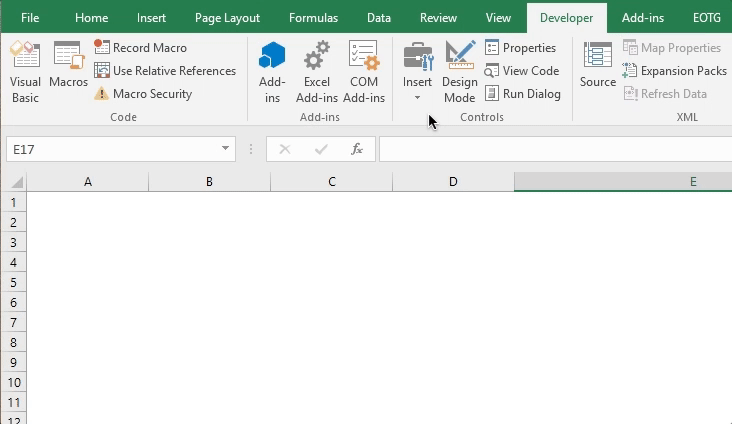
Right click on the Button to edit the text to your requirements.
File paths
The last thing required to create the template are cells with folder and file paths. How you create these paths is up to you, in my template I have chosen to use Year and Month as variables to construct the file path. This enables the document to be used for a monthly process. File paths must be valid. For Open, Delete and Update the specified file must already exist in that location, for Check In, the folder must exist, but the file does not exist.
File paths must be valid. For Open, Delete and Update the specified file must already exist in that location, for Check In, the folder must exist, but the file most not exist.
Check for existence
The VBA code includes a User Defined Function, which checks for a file’s existence.
=doesFileExist(E15)
In the User Defined Function above the file path is contained in Cell E15. The function will return TRUE if the file exists and FALSE if it does not.
Save the Template
The final step is to save the file you have created as a macro enabled workbook, an .xlsm file type.
Conclusion
There was a lot of code in there, but keep referring back to the original document, and it should all makes sense. Having a document control template has saved me hours of time every month, I hope it will give you similar benefits too.

About the author
Hey, I’m Mark, and I run Excel Off The Grid.
My parents tell me that at the age of 7 I declared I was going to become a qualified accountant. I was either psychic or had no imagination, as that is exactly what happened. However, it wasn’t until I was 35 that my journey really began.
In 2015, I started a new job, for which I was regularly working after 10pm. As a result, I rarely saw my children during the week. So, I started searching for the secrets to automating Excel. I discovered that by building a small number of simple tools, I could combine them together in different ways to automate nearly all my regular tasks. This meant I could work less hours (and I got pay raises!). Today, I teach these techniques to other professionals in our training program so they too can spend less time at work (and more time with their children and doing the things they love).
Do you need help adapting this post to your needs?
I’m guessing the examples in this post don’t exactly match your situation. We all use Excel differently, so it’s impossible to write a post that will meet everybody’s needs. By taking the time to understand the techniques and principles in this post (and elsewhere on this site), you should be able to adapt it to your needs.
But, if you’re still struggling you should:
- Read other blogs, or watch YouTube videos on the same topic. You will benefit much more by discovering your own solutions.
- Ask the ‘Excel Ninja’ in your office. It’s amazing what things other people know.
- Ask a question in a forum like Mr Excel, or the Microsoft Answers Community. Remember, the people on these forums are generally giving their time for free. So take care to craft your question, make sure it’s clear and concise. List all the things you’ve tried, and provide screenshots, code segments and example workbooks.
- Use Excel Rescue, who are my consultancy partner. They help by providing solutions to smaller Excel problems.
What next?
Don’t go yet, there is plenty more to learn on Excel Off The Grid. Check out the latest posts:
Summary
More Information
The following methods show how to use list boxes, combo boxes, spin buttons, and scroll bars. The examples use the same list, cell link, and Index function.
Enable the Developer tab
To use the form controls in Excel 2010 and later versions, you have to enable the Developer tab. To do this, follow these steps:
-
Click File, and then click Options.

-
Click Customize Ribbon in the left pane.
-
Select the Developer check box under Main Tabs on the right, and then click OK.
To use the forms controls in Excel 2007, you must enable the Developer tab. To do this, follow these steps:
-
Click the Microsoft Office Button, and then click Excel Options.
-
Click Popular, select the Show Developertab in the Ribbon check box, and then click OK.
Set up the list, the cell link, and the index
-
In a new worksheet, type the following items in the range H1:H20:
H1 : Roller Skates
H2 : VCR
H3 : Desk
H4 : Mug
H5 : Car
H6 : Washing Machine
H7 : Rocket Launcher
H8 : Bike
H9 : Phone
H10: Candle
H11: Candy
H12: Speakers
H13: Dress
H14: Blanket
H15: Dryer
H16: Guitar
H17: Dryer
H18: Tool Set
H19: VCR
H20: Hard Disk
-
In cell A1, type the following formula:
=INDEX(H1:H20,G1,0)
List box example
-
To add a list box in Excel 2007 and later versions, click the Developer tab, click Insert in the Controls group, and then click List Box Form (Control) under Form Controls.
To add a list box in Excel 2003 and in earlier versions of Excel, click the List Box button on the Forms toolbar. If the Forms toolbar is not visible, point to Toolbars on the View menu, and then click Forms.
-
Click the worksheet location where you want the upper-left corner of the list box to appear, and then drag the list box to where you want the lower-right corner of the list box to be. In this example, create a list box that covers cells B2:E10.
-
In the Controls group, click Properties.
-
In the Format Object window, type the following information, and then click OK.
-
To specify the range for the list, type H1:H20 in the Input range box.
-
To put a number value in cell G1 (depending on which item is selected in the list), type G1 in the Cell link box.
Note: The INDEX() formula uses the value in G1 to return the correct list item.
-
Under Selection type, make sure that the Single option is selected.
Note: The Multi and Extend options are only useful when you are using a Microsoft Visual Basic for Applications procedure to return the values of the list. Note also that the 3-D shading check box adds a three-dimensional look to the list box.
-
-
The list box should display the list of items. To use the list box, click any cell so that the list box is not selected. If you click an item in the list, cell G1 is updated to a number that indicates the position of the item that is selected in the list. The INDEX formula in cell A1 uses this number to display the item’s name.
Combo box example
-
To add a combo box in Excel 2007 and later versions, click the Developer tab, click Insert, and then click Combo Box under Form Controls.
To add a combo box in Excel 2003 and in earlier versions of Excel, click the Combo Box button on the Forms toolbar.
-
Click the worksheet location where you want the upper-left corner of the combo box to appear, and then drag the combo box to where you want the lower-right corner of the list box to be. In this example, create a combo box that covers cells B2:E2.
-
Right-click the combo box, and then click Format Control.
-
Type the following information, and then click OK:
-
To specify the range for the list, type H1:H20 in the Input range box.
-
To put a number value in cell G1 (depending on which item is selected in the list), type G1 in the Cell link box.
Note: The INDEX formula uses the value in G1 to return the correct list item.
-
In the Drop down lines box, type 10. This entry determines how many items will be displayed before you have to use a scroll bar to view the other items.
Note: The 3-D shading check box is optional. It adds a three-dimensional look to the drop-down or combo box.
-
-
The drop-down box or combo box should display the list of items. To use the drop-down box or combo box, click any cell so that the object is not selected. When you click an item in the drop-down box or combo box, cell G1 is updated to a number that indicates the position in the list of the item selected. The INDEX formula in cell A1 uses this number to display the item’s name.
Spin button example
-
To add a spin button in Excel 2007 and later versions, click the Developer tab, click Insert, and then click Spin Button under Form Controls.
To add a spinner in Excel 2003 and in earlier versions of Excel, click the Spinner button on the Forms toolbar.
-
Click the worksheet location where you want the upper-left corner of the spin button to appear, and then drag the spin button to where you want the lower-right corner of the spin button to be. In this example, create a spin button that covers cells B2: B3.
-
Right-click the spin button, and then click Format Control.
-
Type the following information, and then click OK:
-
In the Current value box, type 1.
This value initializes the spin button so that the INDEX formula will point to the first item in the list.
-
In the Minimum value box, type 1.
This value restricts the top of the spin button to the first item in the list.
-
In the Maximum value box, type 20.
This number specifies the maximum number of entries in the list.
-
In the Incremental change box, type 1.
This value controls how much the spin button control increments the current value.
-
To put a number value in cell G1 (depending on which item is selected in the list), type G1 in the Cell link box.
-
-
Click any cell so that the spin button is not selected. When you click the up control or down control on the spin button, cell G1 is updated to a number that indicates the current value of the spin button plus or minus the incremental change of the spin button. This number then updates the INDEX formula in cell A1 to show the next or previous item.
The spin button value will not change if the current value is 1 and you click the down control, or if the current value is 20 and you click the up control.
Scroll bar example
-
To add a scroll bar in Excel 2007 and later versions, click the Developer tab, click Insert, and then click Scroll Bar under Form Controls.
To add a scroll bar in Excel 2003 and in earlier versions of Excel, click the Scroll Bar button on the Forms toolbar.
-
Click the worksheet location where you want the upper-left corner of the scroll bar to appear, and then drag the scroll bar to where you want the lower-right corner of the scroll bar to be. In this example, create a scroll bar that covers cells B2:B6 in height and is about one-fourth of the width of the column.
-
Right-click the scroll bar, and then click Format Control.
-
Type the following information, and then click OK:
-
In the Current value box, type 1.
This value initializes the scroll bar so that the INDEX formula will point to the first item in the list.
-
In the Minimum value box, type 1.
This value restricts the top of the scroll bar to the first item in the list.
-
In the Maximum value box, type 20. This number specifies the maximum number of entries in the list.
-
In the Incremental change box, type 1.
This value controls how many numbers the scroll bar control increments the current value.
-
In the Page change box, type 5. This value controls how much the current value will be incremented if you click inside the scroll bar on either side of the scroll box).
-
To put a number value in cell G1 (depending on which item is selected in the list), type G1 in the Cell link box.
Note: The 3-D shading check box is optional. It adds a three-dimensional look to the scroll bar.
-
-
Click any cell so that the scroll bar is not selected. When you click the up or down control on the scroll bar, cell G1 is updated to a number that indicates the current value of the scroll bar plus or minus the incremental change of the scroll bar. This number is used in the INDEX formula in cell A1 to show the item next to or before the current item. You can also drag the scroll box to change the value or click in the scroll bar on either side of the scroll box to increment it by 5 (the Page change value). The scroll bar will not change if the current value is 1 and you click the down control, or if the current value is 20 and you click the up control.
Document properties are bits of information that describe and identify a workbook, such as a title, author name, subject, and keywords in the workbook.
View Document Properties
Here’s how to view a workbook’s properties…
- Click the File tab.

- Click Info.


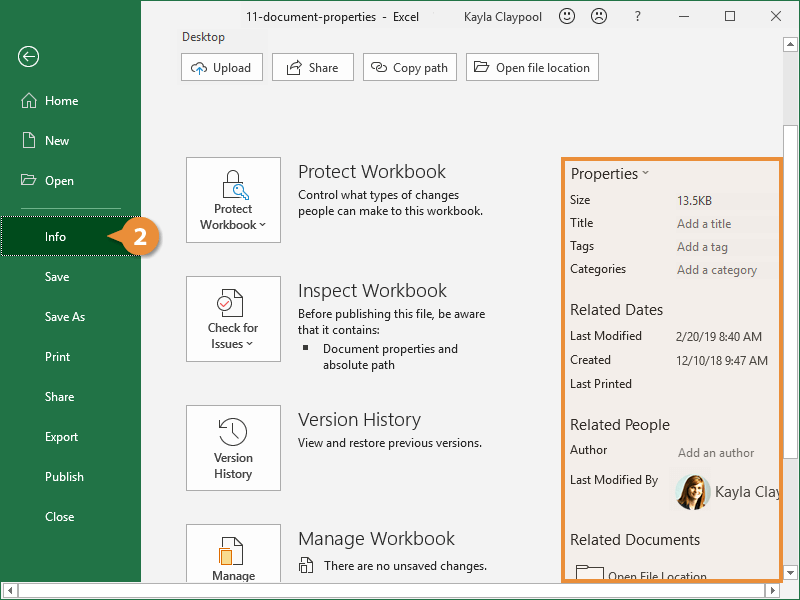
The right side of the Info tab in Backstage view displays the workbook’s properties.
Edit Properties
Some workbook properties are updated automatically, but you must manually update others.
- Click the File tab.
- In the Info tab of Backstage view, click in the property field you want to edit.
- Add in the necessary information and click outside the field when you’re finished.
- Repeat Steps 2 and 3 for any additional fields you want to add or change.
- Click the leftarrow to leave backstage view when you’re done.
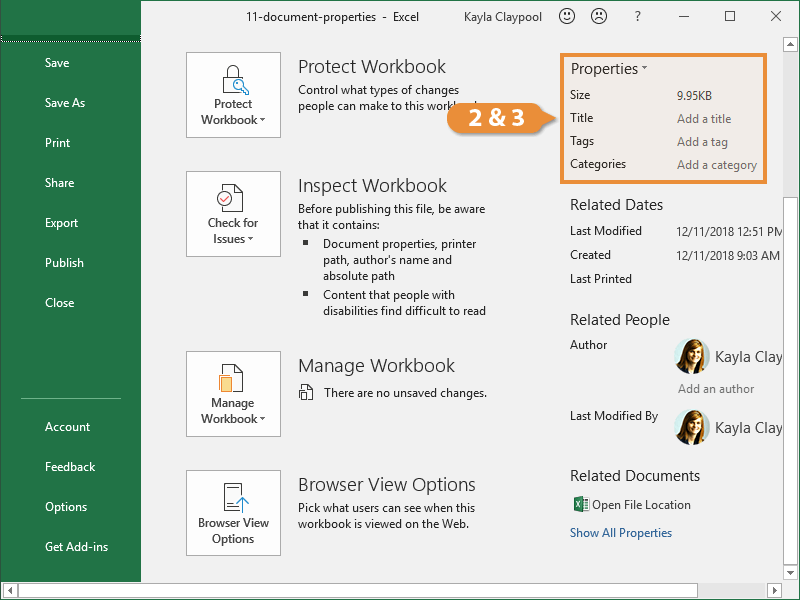
Adding an Author is another property that’s helpful to edit so you know who owns the file.
- In the Info tab of Backstage view, click in the Author field.
- Click the Search the address book button.
The Address Book dialog box displays and shows your available contacts.
- Select an author from the contacts list.
- Click To.
- Click OK.
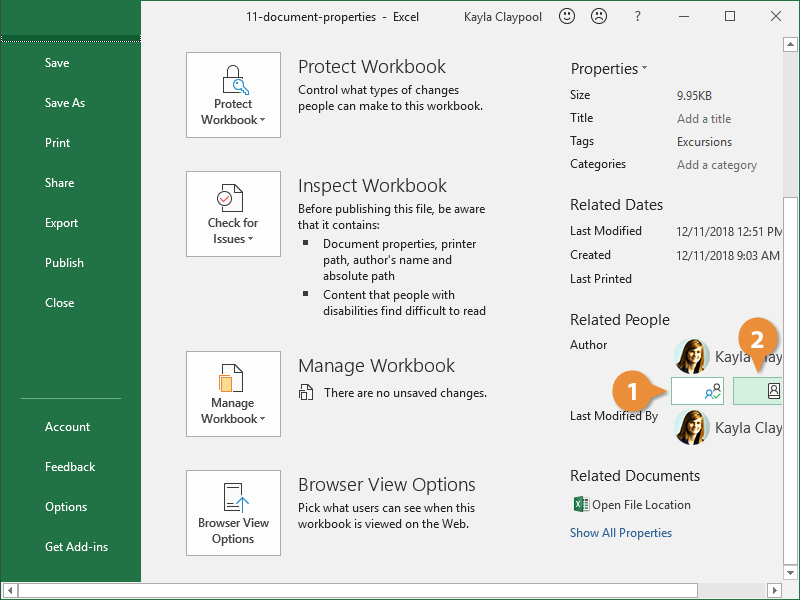
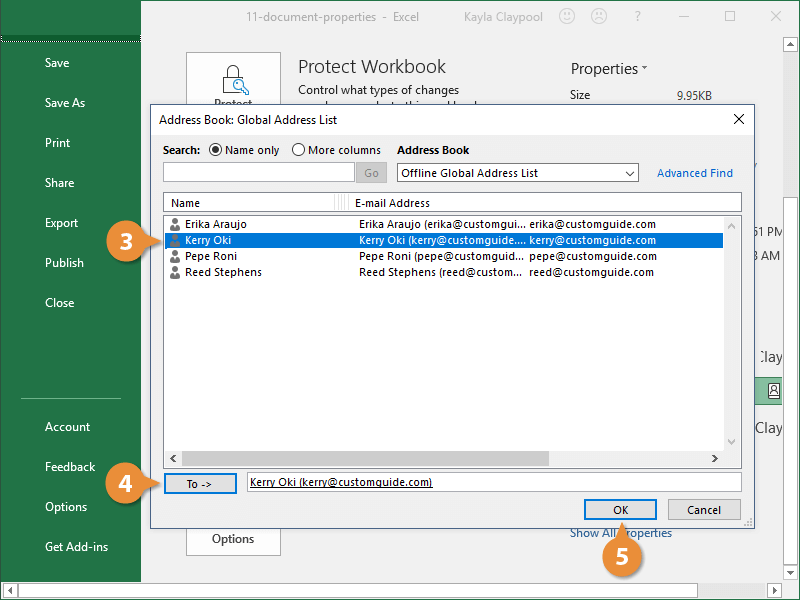
The contact you selected is assigned as the workbook’s author.
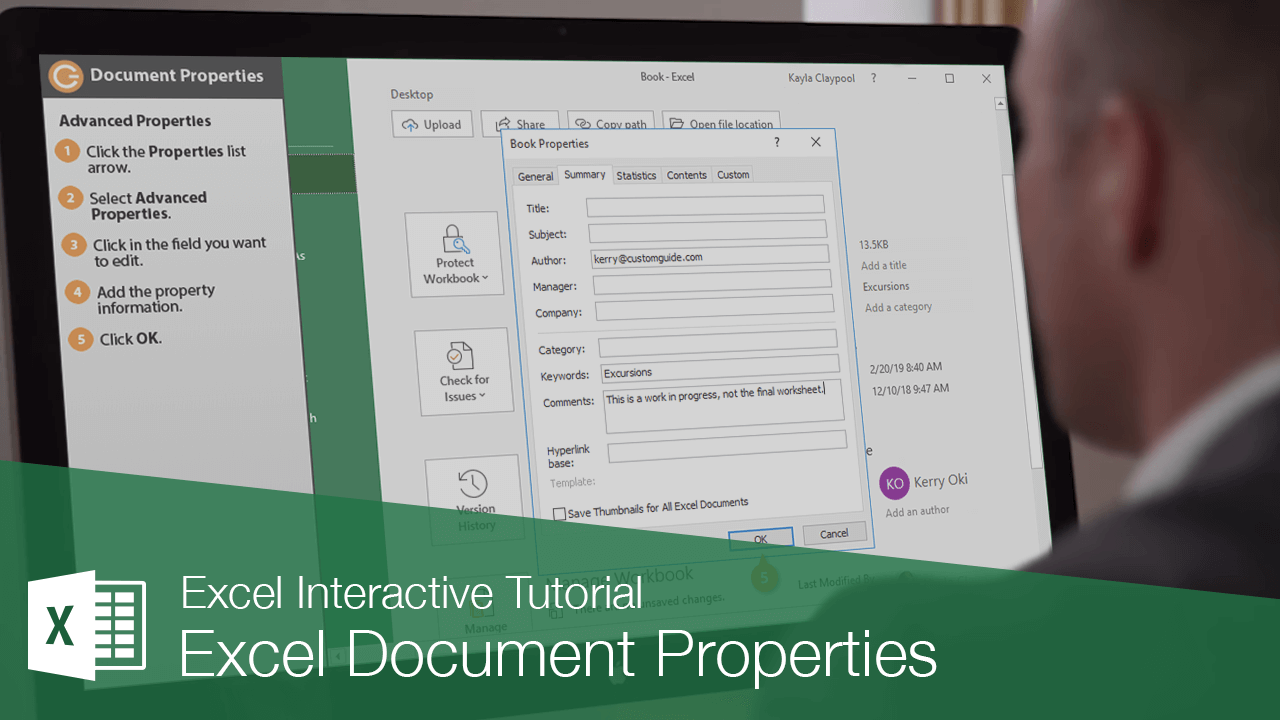
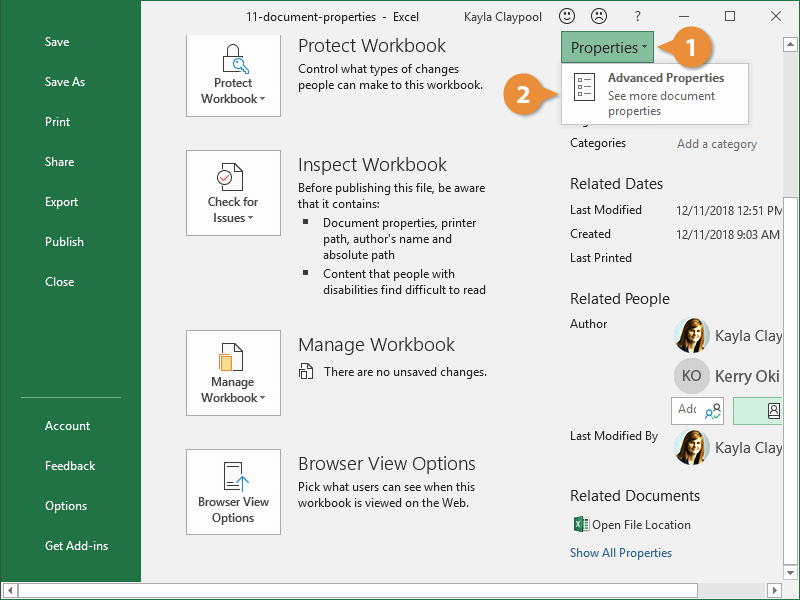
Advanced Properties
There are also some advanced properties you can edit that don’t show up on the Info page.
- Click the Properties button.
- Select Advanced Properties button.
Here you see some of the properties we’ve already modified and some that aren’t visible by default on the Info page.
- Click in the field you want to edit.
- Add the property information.
- Click OK.
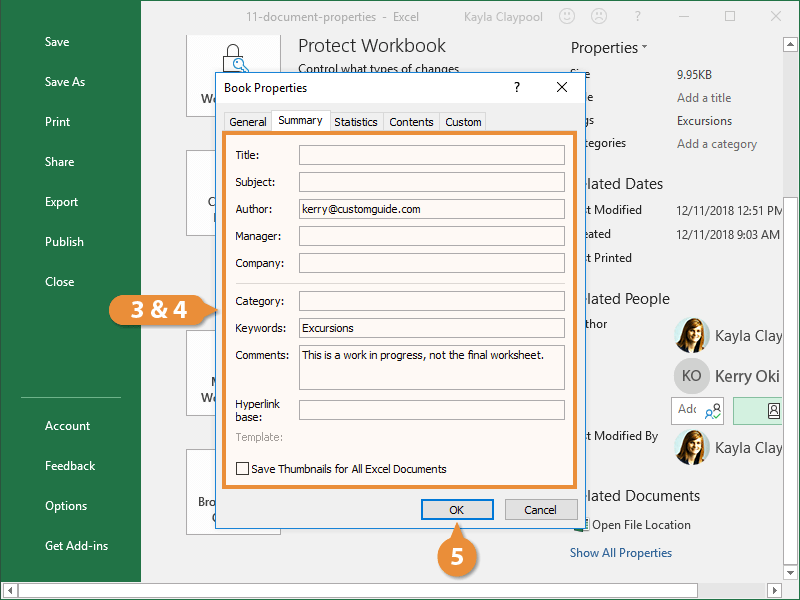
The properties are added to the workbook. You can click Show All Properties to see them.

FREE Quick Reference
Click to Download
Free to distribute with our compliments; we hope you will consider our paid training.
One of the most common document control mistakes that I see is when food businesses forget to add document control to excel spreadsheets. Document control is important in being able to correctly identify and manage your HACCP documents along with ensuring only the most current version is available for use. The excel spreadsheet platform is great for writing certain HACCP and Food safety compliance documents – especially risk assessments or approved supplier reviews.
Check out this really quick video I made showing you how easy it is to add document control to excel documents.
Watch Video
The key steps to adding document control to an excel spreadsheet
1. Click on the print / print preview button
2. Click Page Setup
3. Select Header Footer tab
4. Click custom header and add in your information. Click OK when you are done.
5. Click customer footer and add in your information. Click OK when you are done.
6. Click OK (again) when you are done.
7. Close the Print Preview page
8. Click Save
If you need help on organising your HACCP and food safety documentation click here