
Download PC Repair Tool to quickly find & fix Windows errors automatically
Content Controls in Microsoft Word offer a great way to automate your document creation. It also helps in organizing the content in a structured manner. These and many more features make Content controls easy to understand and use. So, let’s see how to add and change content controls in Word.
Content controls mostly find their use in creating templates and forms as they provide flexibility in content placement. Also, depending on your preferences, you can prevent them from being edited or deleted. Here’s how!
- Click File in Word.
- Scroll down to Options.
- Choose Customize Ribbon.
- Select the Developer box.
- Click OK.
- To add a Content control, click Rich Text Content Control box.
- Place the box at appropriate location, select Properties.
- Add General Information.
- Change Locking permissions.
How do you edit Rich Text Content Control?
Before proceeding with the steps to edit or Rich Text Content Control in Word, you’ll need to add the Developer tab to the Ribbon menu in Word.
For this, click the File tab on the Ribbon menu and choose Options.
When the Options window opens, navigate to Customize Ribbon.

Here, select the Developer box and hit the Ok button as shown in the image above.
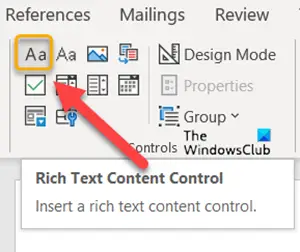
Next, to add a Content control, click Rich Text Content Control box.
Place the box at the appropriate location, to create a template.
Then, select Properties under Controls block.
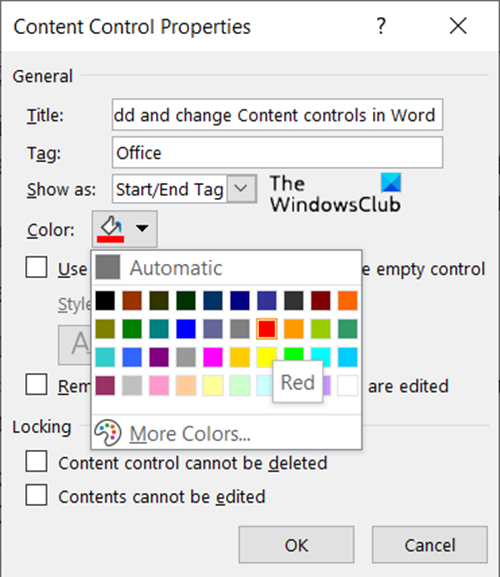
Add description like the title for the box, tags to be used, color for the box, etc.
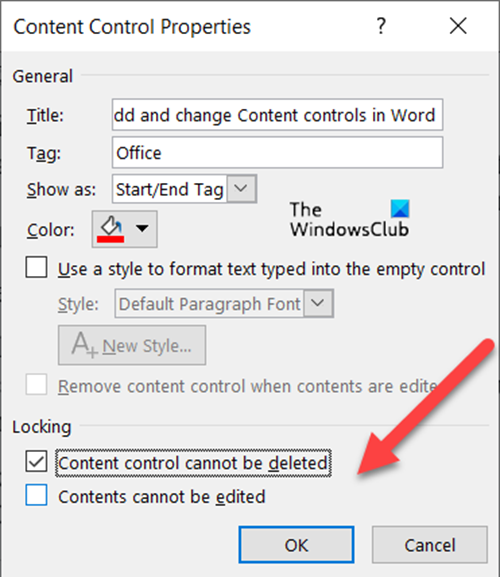
You can also change Content controls by changing its locking permission (editing or deleting them) by checking/un-checking the following boxes.
- Content Controls cannot be deleted.
- Content Controls cannot be edited.
Similarly, you can choose to create a Drop-down List via Content controls.
How do I remove content control in Word?
If you would like to delete or remove Content controls in Word:
- Press Ctrl+A to select the entire document.
- Then, right-click a visible content control.
- Now, in the context menu that appears on your computer screen, click Remove Content Control.
What is a Rich Text Content control?
A block of rich text that can be formatted represents a Rich Text Content control. So, all the custom formatted text like pictures, tables and other such items can be included in this category.
Hope it helps!

A post-graduate in Biotechnology, Hemant switched gears to writing about Microsoft technologies and has been a contributor to TheWindowsClub since then. When he is not working, you can usually find him out traveling to different places or indulging himself in binge-watching.

on
November 19, 2021, 12:28 PM PST
How to use check box content controls in a Word document
Check boxes offer a simple visual way to denote state: on or off, true or false, and so on, and they’re easier to use than ever before!
We may be compensated by vendors who appear on this page through methods such as affiliate links or sponsored partnerships. This may influence how and where their products appear on our site, but vendors cannot pay to influence the content of our reviews. For more info, visit our Terms of Use page.

We’re all familiar with check boxes. We’ve been using them all our lives, even before electronic forms came into existence. Technically, an electronic check box control is a visual representation of a binary state, such as on and off, true or false, and so on. One glance and you know the state. In this article, we’ll work through a simple example using check box controls in Word to denote attendance. Instead of reading through a list of names, with the word present or not present, you can quickly glean who is present and who isn’t by viewing the check box controls.
I’m using Microsoft 365 on a Windows 10 64-bit system, but you can use earlier versions through 2010. For your convenience, you can download the demonstration .docx file. Word Online will display existing check box controls and their state, but you can’t change the state.
SEE: Windows 11: Tips on installation, security and more (free PDF) (TechRepublic)
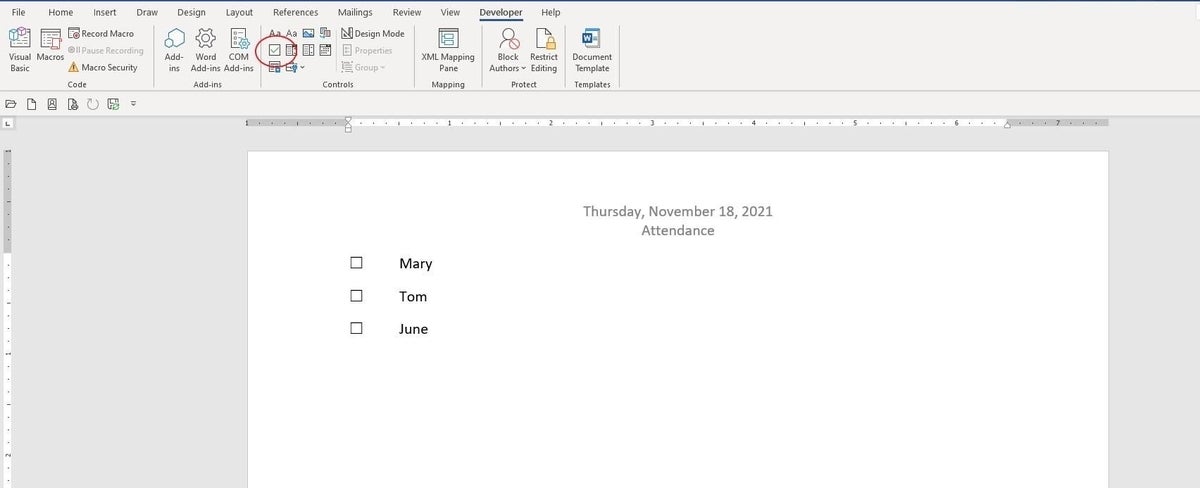
Denoting attendance
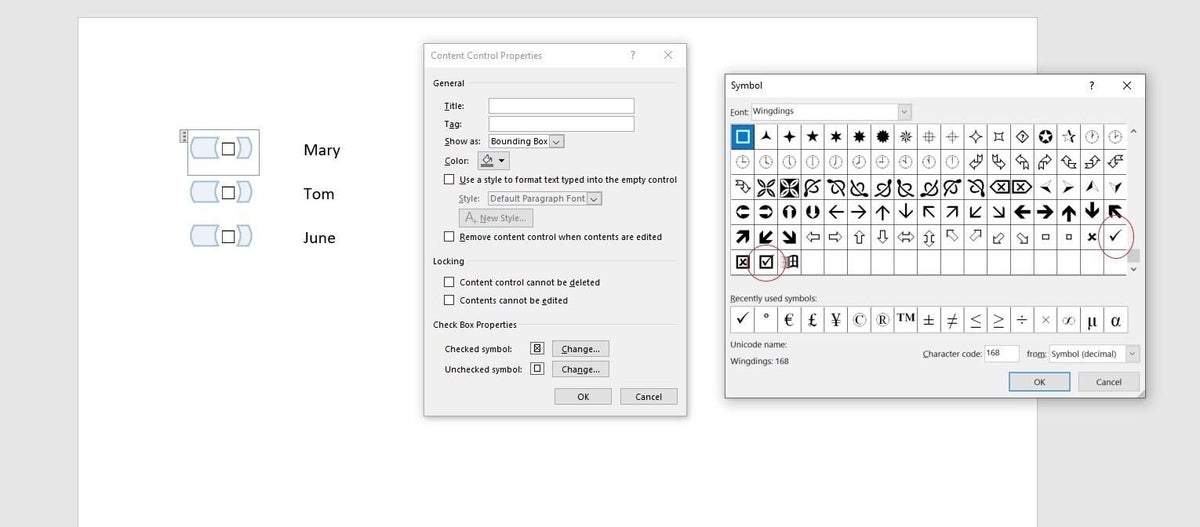
Using check box content controls couldn’t be easier now. Figure A shows three simple check boxes followed by participants Mary, Tom, and June. You can create this form quickly enough as follows:
- Position the cursor in the document where you want to insert the first check box.
- Click the Developer tab.
- In the Controls group, click the Check Box Content Control icon. Doing so will insert a check box in edit mode. We don’t want to change any of the default properties for now, so press the Right Arrow key twice to exit the control.
- Press the Tab key and enter Mary. Strictly speaking, the tab isn’t necessary, but adding a little space will improve readability.
- Insert two more controls, one for Tom and one for June.
Figure A
Wasn’t that easy? The form is immediately ready to use. Simply check or uncheck, appropriately! For instance, in Figure B, Tom didn’t attend the November 18th meeting. You can also print the list and check the controls manually.
Figure B

You might have noticed that the check box displays an X to denote a Yes/On/True state. You can change that to a more traditional check mark if you like.
SEE: How to use the many text wrapping options in Microsoft Word (TechRepublic)
Changing the check box
An X might not be the way you want to denote attendance. After all, it could be misunderstood as not in attendance. Fortunately, you can easily change the X to a more traditional check mark as follows.
- Click the Developer tab.
- In the Controls group, click Design mode. Doing so will change the appearance of the check box controls (Figure C).
- Select the one for Mary and then click Properties in the Controls group. The resulting dialog will display several properties. You might want to explore them all at a later time.
- In the Check Box Properties section (at the bottom) click Change to the right of the Checked Symbol option. Doing so opens the Symbols dialog, which you might already be familiar with.
- Choose Wingdings from the Font dropdown.
- Browse down until you find the two alternate check marks shown in Figure C.
- Choose one, click OK to insert it, and then click OK to return to the document.
- You’re still in design mode, so click Design Mode.
Figure C
Simply click Mary’s check box control to display the selected check mark (step 7) to see the more traditional check mark. However, notice that the bounding box is gone. If you choose the second check mark in step 7, you’ll continue to see the bounding bound (Figure D). You’ll want to use the same check mark; I’m just saving a figure by showing you both in the same screenshot.
Figure D

This simple example uses check box controls to denote attendance. Attending members get a click; an empty check box represents an absent member. You could also use them to track to-do items, project benchmarks, and so on.
A word on support for older controls
Although legacy controls and even some ActiveX controls are still available, I recommend using content controls because support for the older sets could end without much notice; realistically, I don’t see that happening soon in documents. However, any web-based documents should use the newer controls and not ActiveX. Internet Explorer will probably be retired in 2022, and currently, Edge doesn’t support ActiveX. It’s unlikely it ever will support these outdated controls.
Also see
- How to use VBA to repurpose a built-in command in Word and Excel (TechRepublic)
- Windows 11 cheat sheet: Everything you need to know (TechRepublic)
- Zoom vs. Microsoft Teams, Google Meet, Cisco WebEx and Skype: Choosing the right video-conferencing apps for you (free PDF) (TechRepublic)
- Checklist: Securing Windows 10 systems (TechRepublic Premium)
- More must-read Microsoft coverage (TechRepublic on Flipboard)
-
Collaboration
-
Microsoft
-
Software
You may need to add check boxes in your Word document mainly for two reasons:
1) To create an electronic Form containing clickable checkboxes, which can be used to capture user feedback (like a survey); see the following example:

2) To create a printable checklist, containing a checkbox against each item in the document. See the following example:

Adding checkbox controls to create a electronic Form (Word 2007)
You can find the checkbox control on the Developer tab of the Ribbon menu.
Note: If you could not see the Developer tab on the Ribbon, you may need to enable it from Word Options. Read the following article to know how to enable it.
https://wordknowhow.wordpress.com/2013/12/04/how-to-enable-the-developer-tab-in-word/
- On the Ribbon, under the tab Developer, within the group Controls, click the icon Legacy Tools. A drop-down list appears, which contains two sections: Legacy Forms and ActiveX Controls. See below.
![]()

ActiveX Control checkbox
- Both the sections have check box controls. If you choose to use the checkbox control available under ActiveX Controls section, click the Checkbox (ActiveX Control) icon. Word creates something like the following. Notice that the control is in Design Mode. Design Mode option is activated within the group Controls.

If you deactivate the design mode, the checkbox becomes clickable and you can use it to create a Form.
i. Right-click the checkbox control and select option Properties from the right-click menu.
ii. On the Properties sheet, under the tab Alphabetic, against the row Caption, enter a caption for the checkbox. Alternatively, you can delete the default caption to retain only the checkbox. You can even insert a picture instead by clicking the row named Picture from the Properties sheet.
Note: The ActiveX Control checkbox provides extended features as compared to the Legacy checkbox.
iii. You may find it difficult to format ActiveX checkbox controls if you are not in Design Mode. Switch to design mode by clicking the control. Now, place mouse cursor in front of the control and then use the TAB key to move it horizontally, SHIFT+TAB to move it in the opposite direction, press ENTER key to move it a step down, and press the Backspace key to bring it a level up.
Note: You can easily delete, resize, etc. in Design Mode.
Legacy check box
- If you choose to use a legacy checkbox, click the check box icon under the section Legacy Forms from the Legacy Tools drop-down list. Word creates a shaded square box, which is unchecked by default. Double-click the box to open the Check Box Form Field Options window. Here, you can control the checkbox size, default value, etc.
Note: Interestingly, the legacy check boxes cannot be used readily until you apply protection to your document. By default, Word adds a shaded checkbox. If you wish you can remove the shading by simply clicking the Form Field Shading icon available under the Legacy Tools list. See below image.
Apply protection to your document
i. To apply protection to your document, under the tab Developer, within the group Protect, click Protect Document. From the drop-down menu, click option Restrict Formatting and Editing.
ii. On the Restrict Formatting and Editing pane, under the section Editing Restriction, enable option “Allow only this type of editing in the document” and then select the option “Filling in forms” from the list box.
iii. Now, under the section Start Enforcement, click the button Yes, Start Enforcing Protection. The Start Enforcing Protection dialog box appears, where you need to set a password to protect your document.
Once protection is enforced, you can select/deselect the check box. Remember that you cannot edit a protected document. Therefore, apply protection only after you are done with formatting the document. You can unprotect a document by clicking the Stop Protection button available at the bottom of the Restrict Formatting and Editing pane.
Creating a printable check list
It is easy to add checkboxes to a document to create a printable checklist document. There are many ways you can create check boxes in a word document.
Method 1: On the Word Ribbon menu, under the tab Developer, within the group Controls, click the Legacy Tools icon. From drop-down list, under the section Legacy Forms, click the Check Box Form Field icon. Word inserts a shaded check box. Click the Form Field Shading icon to remove shading around the checkbox. Now, you can copy and paste the same to create multiple checkboxes in your document.
Method 2: On the Word Ribbon menu, under the tab Insert, within the group Illustrations, click icon Shapes. From the drop-down list, click the shape Rectangle. Change its dimensions to make it a perfect square. Copy and paste the same to create multiple checkboxes.
Method 3: On the Word Ribbon menu, under the tab Insert, within the group Symbols, click icon Symbol. From bottom of the drop-down list, select option More Symbols. From the Symbols window, select a square shape and then click Insert. Word inserts a square at the cursor position.
Add and change Content Controls in Word
- Click File in Word.
- Scroll down to Options.
- Choose Customize Ribbon.
- Select the Developer box.
- Click OK.
- To add a Content control, click Rich Text Content Control box.
- Place the box at appropriate location, select Properties.
- Add General Information.
Contents
- 1 What does control contents mean in a Word document?
- 2 How do I turn a Word document into a fillable form?
- 3 How do you insert rich text content control in Word?
- 4 How do I make a Word document fillable and not editable?
- 5 How do I create a fillable PDF from Word?
- 6 How do I turn a Word document into a fillable PDF?
- 7 How do I edit content control text in Word?
- 8 How do I insert plain text content control in Word 2013?
- 9 What is a fillable PDF?
- 10 How do I convert a Word document to a fillable PDF without Acrobat?
- 11 How do I use developer tools in Word?
- 12 How do I edit content control drop-down in Word?
- 13 How can I make CV on my laptop?
- 14 How do I copy and paste content control?
- 15 How do you use combo box content control?
- 16 Is fillable a word?
- 17 Are all PDFs editable?
What does control contents mean in a Word document?
Individual content controls can contain content such as dates, lists, or paragraphs of formatted text. Content controls help you to create rich, structured blocks of content and are designed for use in templates that insert well-defined blocks into your documents, creating structured documents.
How do I turn a Word document into a fillable form?
Creating Fillable Forms Using Microsoft Word
- Enable Developer Tab. Open Microsoft Word, then go to the File Tab > Options > Customize Ribbon > check the Developer Tab in the right column > Click OK.
- Insert a Control.
- Edit Filler Text.
- Design Mode button again to exit the mode.
- Customize Content Controls.
How do you insert rich text content control in Word?
If the Controls task pane is not visible, click More Controls on the Insert menu, or press ALT+I, C. Under Insert controls, click Rich Text Box. In the Rich Text Box Binding dialog box, select the field in which you want to store rich text box data, and then click OK.
How do I make a Word document fillable and not editable?
Head on to the “Protect” section on the ribbon and click the button labeled “Protect Document.” You should then click the button named “Restrict Formatting and Editing.” On the options that appear, select the one that says “Allow only this type of editing in the document” and pick “Filling in forms.” Once you’re done,
How do I create a fillable PDF from Word?
Create a Fillable PDF Form from a Word Document
- Open the Word document that you want to make into a PDF form.
- Go to File -> Print, make sure “Adobe PDF” is selected as your printer, and then click the Print button.
- Word will ask you where to save the PDF file you’re creating.
How do I turn a Word document into a fillable PDF?
How to create fillable PDF files:
- Open Acrobat: Click on the “Tools” tab and select “Prepare Form.”
- Select a file or scan a document: Acrobat will automatically analyze your document and add form fields.
- Add new form fields: Use the top toolbar and adjust the layout using tools in the right pane.
- Save your fillable PDF:
How do I edit content control text in Word?
On the Developer tab, in the Controls group, click Design Mode. Click the content control where you want to revise the placeholder instructional text. Edit the placeholder text and format it any way you want.
How do I insert plain text content control in Word 2013?
Inserting a Content Control
- Position the insertion point where you want the new control.
- On the Developer tab, make sure Design Mode is selected.
- Click one of the content control buttons on the Controls group to insert it into the document.
What is a fillable PDF?
Answer. A fillable PDF is a PDF document that includes certain fields that are editable without PDF-editor software. Any fillable PDF that opens in modern PDF viewers (Acrobat, Preview, Chrome, Bluebeam) will be usable in the Forms tool. Note: XFA-based PDFs are only compatible with Adobe.
How do I convert a Word document to a fillable PDF without Acrobat?
To create a fillable PDF using this tool, follow these steps:
- Open ApowerPDF.
- Click on Create.
- Select Blank Document.
- Select the Forms tab.
- Add the forms fields that you need – double-click on the field to change its appearance, name, and layout.
- When you are finished, click on File and then choose Save.
How do I use developer tools in Word?
The Developer tab isn’t displayed by default, but you can add it to the ribbon.
- On the File tab, go to Options > Customize Ribbon.
- Under Customize the Ribbon and under Main Tabs, select the Developer check box.
How do I edit content control drop-down in Word?
If you want to make any changes to the drop-down box, just select it while in Developer Mode and click “Properties” again. Select “Content control can’t be deleted” to ensure readers cannot delete the drop-down box or its options. Don’t select the “Contents cannot be edited” option.
How can I make CV on my laptop?
To access these CV templates from your computer:
- Open Microsoft Word, then click on “New from Template.”
- Then, type “CV” or “curriculum vitae) into the search bar to browse for available templates.
- Finally, choose the template you want to use, and Word will launch your ready-to-use template.
How do I copy and paste content control?
Press Ctrl+C to copy the control to the Clipboard. Position the cursor where you want to repeat the control’s selected value. Don’t press Ctrl+V as you normally would to paste something. Instead, choose Paste Special from the Paste dropdown in the Clipboard group on the Home tab (Figure D).
How do you use combo box content control?
Under Insert controls, click Combo Box.
- Click Add.
- In the Value box, type the text that you want to store if a user selects this entry.
- In the Display name box, type the text that you want to display for this entry, and then click OK.
- Repeat steps 1 through 3 for each entry that you want to add to the list box.
Is fillable a word?
Able to be filled.
Are all PDFs editable?
Adobe Acrobat has all kinds of tools to mark up PDFs and even do light editing (as well as tools to lock down PDFs to prevent any alternations). But the general point is true – Adobe Acrobat is not a word processor and PDFs aren’t meant to be edited directly.It’s called an editable PDF.
Did you know that Microsoft Word has a variety of automatic form controls that you can insert in your document? What are these exactly? What’s included in these form controls are a checkbox, a date drop-down, a custom word drop-down, among others. Using these forms are a way to make your document more user friendly. These forms also reduce the amount of errors that can be caused by manual entry.
First you will need to ensure you have the Developer tab enabled in the Ribbon, or menu at the top of your Word document. Depending on what version you are using, this menu can be found under File > Options > Customize Ribbon. Simply check the box for Developer and click OK. Now your developer tab should appear.
Insert a Checkbox
In Word, place your cursor where you would like the checkbox to go.
On the Developer tab, in the Controls group, click the box with a check mark in it.

A checkbox will appear next to your list item.

You will notice the other controls items will be greyed out; click anywhere in your word document and they will reappear.
Repeat this step for the other items in your list.
This function will allow your user to put an X in the box.

Insert a Date Drop-down
Simply place your cursor where you would like the Date drop-down form control to go.
Go to the Developer tab in the Ribbon and select the Calendar form control.

Microsoft Word will insert the calendar date form picker into your document.

Your user can now select the calendar date from this drop-down and it will appear in the document. There is also a button for Today’s date should they want to select it.

You can further customize the text and format of your date, if you go into the Properties button in the Controls group in your Ribbon.
Insert a Drop-Down Option
Once again in your Word document, place your cursor where you would like the drop-down to go.
Click on the Combo Box Content Control button in the Controls group of the Developer tab. This will insert a drop-down form without any drop-down options into your Word document.

Click on the Properties button in the Controls group.
In the Content Control Properties pop-up menu, give your drop-down box a Title. Additionally give it a Tag name that will appear in Design Mode.
You can adjust the color, the way the box appears among other settings.
I click the Add button to add text to appear as drop-down options. I do this for every choice.

Here is a picture of my final drop-down menu;


First, you need to customize Word’s ribbon and enable the “Developer” tab to show the option to add check boxes. Then, select “Developer” and click the “Check Box Content Control” button to insert a check box into your document. You can also transform Word’s bullets into checkboxes.
When you create surveys or forms with Microsoft Word, check boxes make the options easier to read and answer. We’re covering two good options for doing just that. The first is ideal for documents that you want people to fill out digitally within the Word document itself. The second option is easier if you’re planning to print documents like to-do lists.
Option 1: Use Word’s Developer Tools to Add the Check Box Option for Forms
In order to create fillable forms that include checkboxes, you first need to enable the “Developer” tab on the Ribbon. With a Word document open, click the “File” drop-down menu and then choose the “Options” command. In the “Word Options” window, switch to the “Customize Ribbon” tab. On the right-hand “Customize the Ribbon” list, select “Main Tabs” on the dropdown menu.

On the list of available main tabs, select the “Developer” check box, and then click the “OK” button
Notice that the “Developer” tab is added to your Ribbon. Just position your cursor in the document where you want a check box, switch to the “Developer” tab, and then click the “Check Box Content Control” button.
You should see a check box appear wherever you placed your cursor. Here, we’ve gone ahead and placed a check box next to each answer and, as you can see, those check boxes are interactive. Click a box to mark it with an “X” (as we’ve done for answers 2, 3, and 4) or select the whole form box (as we’ve done for answer 4) to move the check box around, format it, and so on.
RELATED: How to Create a Fillable Form With Microsoft Word
Option 2: Change Bullets to Check Boxes for Printed Documents
If you’re creating a document to print out—like a to-do list or printed survey—and just want check boxes on it, you don’t have to mess around with adding Ribbon tabs and using forms. Instead, you can create a simple bullet list and then change the bullets from the default symbol to check boxes.
In your Word document, on the “Home” tab, click the small arrow to the right of the “Bullet List” button. On the dropdown menu, select the “Define new bullet” command.
In the “Define New Bullet” window, click the “Symbol” button.
In the “Symbol” window, click the “Font” dropdown and choose the “Wingdings 2” option.
You can scroll through the symbols to find the empty square symbol that looks like a check box, or you just type the number “163” into the “Character Code” box to automatically select it. Of course, if you see a symbol you like better—like the open circle (symbol 153)—feel free to choose that instead.
When you’ve selected your symbol, click the “OK” button to close the “Symbol” window, and then click the “OK” button to close the “Define New Bullet” window, too.
Back in your Word document, you can now type your bullet list. The check boxes appear instead of the regular bullet symbol.
And the next time you need the check box symbol, you don’t have to navigate through that whole set of windows. Just click that small arrow to the right of the “Bullet List” button again, and you’ll see the checkbox listed under the “Recently Used Bullets” section.
Again, this method is really only useful for documents you want to print out. The check box symbols are not interactive, so you can’t check them off inside a Word document.
If you’re also creating spreadsheets and presentations, you may want to learn how to insert checkboxes in Excel and add checkboxes to PowerPoint too.
RELATED: How to Add a Check Mark or Tick Mark in Word
READ NEXT
- › How to Add a Check Mark or Tick Mark in Word
- › How to Count Checkboxes in Microsoft Excel
- › How to Add a Drop-Down List to a Word Document
- › How to Create a Fillable Form With Microsoft Word
- › How to Create a Basic Survey in Microsoft Word
- › Why the Right-Click Menu in Windows 11 Is Actually Good
- › Universal Audio Volt 2 Review: A Workhorse Audio Interface With Vintage Charm
- › Google+ Will Come to a Final End on July 5, 2023