
This answer is not for the initial user but for any subsequent users who wish to figure this out. It builds on the first response.
In addition to what is said in the first response:
Step 1: Click on the ‘crotchet button’ to see the formatting tabs, returns and breaks Scroll down to find the beginning of each section
Step 2: Select the page number at the beginning of each section Look at the header-footer toolbar and check to see that the options of ‘different first page and different odd & even numbers’ are not checked — if checked this will confuse the numbering of the computer
Step 3: Highlight/select and right click on the number and go to format number — check to see that in the first section — the option for start at is specified as you wish and in subsequent sections to see that the option ‘continue from previous section’ is selected
Step 4: Close header and footer and select/highlight the pages from the first section (excluding the cover page) to the last page that you wish to have a page number Click on insert page numbers and select the format you wish
This should give you continuous numbering
If you wish to have different numbering for different sections (e.g. romans in the first parts and Arabic numerals in sections that follow) — go to the particular section break that you wish to be your ‘watershed break’. In step 3 above make sure that ‘start from’ is selected instead of ‘continue from previous section’. In step 4 above, select only the first section and insert numbers in the desired format. Then select the next section and insert the 2nd format that you desire
Finally, automatically update you table of contents and there you have it
INTELLIGENT WORK FORUMS
FOR COMPUTER PROFESSIONALS
Contact US
Thanks. We have received your request and will respond promptly.
Log In
Come Join Us!
Are you a
Computer / IT professional?
Join Tek-Tips Forums!
- Talk With Other Members
- Be Notified Of Responses
To Your Posts - Keyword Search
- One-Click Access To Your
Favorite Forums - Automated Signatures
On Your Posts - Best Of All, It’s Free!
*Tek-Tips’s functionality depends on members receiving e-mail. By joining you are opting in to receive e-mail.
Posting Guidelines
Promoting, selling, recruiting, coursework and thesis posting is forbidden.
Students Click Here
Continuous Numbering in Word TablesContinuous Numbering in Word Tables(OP) 26 Nov 07 04:28 Hi again, Another question… I am arranging a complete bilingual document in a table. One language in the left column, one in the right. In order to have the same section on exactly the same position (height) on a page, I would like to have each section / chapter / subsection in a separate row. (instead of having just one row and 2 columns). Problem is, when I use rows, the numbering seem to reset after each row. If I do «continue numbering» the numbering seem to go left-right , left right etc. What I want if to have one numbering in the left column and one in the right column, continuing across the rows within one column. Do I need to apply different numbering schemes here? Is there a property with the table I can set? regards Red Flag SubmittedThank you for helping keep Tek-Tips Forums free from inappropriate posts. |
Join Tek-Tips® Today!
Join your peers on the Internet’s largest technical computer professional community.
It’s easy to join and it’s free.
Here’s Why Members Love Tek-Tips Forums:
 Talk To Other Members
- Notification Of Responses To Questions
- Favorite Forums One Click Access
- Keyword Search Of All Posts, And More…
 Talk To Other Members
Register now while it’s still free!
Already a member? Close this window and log in.
Join Us Close
Text documents can be enhanced by visualizing and condensing information in the form of diagrams, pictures or tables. Instead of continuous text, graphic inserts add variety to the typography and convey facts more succinctly than descriptive text. In academic works, it is already common to number tables and figures and list them at the end of a document. But providing an overview of the diagrams or charts you’ve added to a text can also be helpful to access and retrieve information more quickly.
Word with Microsoft 365 and IONOS!
Easily go from pen and paper to digital inking with Word — included in all Microsoft 365 packages!
![]() Office Online
Office Online
![]() OneDrive with 1TB
OneDrive with 1TB
![]() 24/7 support
24/7 support
Contents
- What’s the purpose of creating a table of figures?
- Word: Insert a table of figures
What’s the purpose of creating a table of figures?
Aside from academic pieces of writing, homework assignments for school also benefit from adding a table of figures. Similar to a list of figures or a bibliography, a table of figures provides readers with an overview of graphics and tables contained in a text. Each item is numbered and sorted consecutively with titles and page numbers showing. If, for example, a reader wants to quickly look at a specific chart, they can consult the table of figures for the correct page number.
However, where documents contain multiple tables and charts, creating a list of tables manually can quickly become complicated and time-consuming. Fortunately, Microsoft Word includes a feature that lets you automatically create a table of figures. Much like creating a list of contents or a bibliography, Microsoft’s word processing program makes it easy to organize charts and tables in an appealing format.
Tip
A table of figures makes sense where there are at least three or more figures or tables in a text.
In order to insert a table of figures in Word, you need to add a figure or create a table first. There are various ways to create tables in Word. You need to caption each table for it to be easily configured as part of a listed table. In Word, click on the “References” menu item and select the “Insert caption” function. Make sure the table is selected before captioning it.

Word then labels the item (“table”) and each table that follows is numbered sequentially. You can customize the label by creating a “New Label”. You may choose whether the caption should be placed below or above a table. When you produce a new table and repeat the “Insert caption” function, Word consecutively numbers it.
Once you have inserted and captioned all your tables, you can create the actual list. For this purpose, choose the “Insert Table of Figures” function. The window that opens allows you to format your table of figures. You now have several options to choose from, for example:
- Align page numbers to the right
- Modify fill characters
- Create your own template
Word allows you to preview a web version of the figure of tables. The separate entries therein are arranged as hyperlinks. When you click on an entry, you are taken to the corresponding table. Once you confirm your settings, Word will create the figure of tables.

The table of figures can now be modified automatically. For example, if you decide to add another table anywhere in your document, all you need to do is insert and caption it. The table of figures will automatically update and now includes the new table in the correct order. However, you need to refresh your table of figures for the new entry to show. Either right-click the list and select “Update field” or select the “Update Table of Figures” function in the “References” menu tab.

Note
Word treats tables like figures. You can add both tables and figures to a text and list them together.

How to create a table in Excel
Excel is a powerful tool for formatting, analyzing and presenting your data. Excel lets you create tables that perfectly organize groups of data and provide useful features like sorting and filtering functions, for example. In this tutorial, you’ll learn how to create Excel tables and tailor them to your individual needs.
How to create a table in Excel

How to create a bibliography in Word
Anyone writing a paper for college or school will need to use citations—and they shouldn’t forget the bibliography either. In principle, creating a bibliography in Microsoft Word is not too difficult. If you make a database with all your references, you’ll only need a few clicks to generate references and a bibliography.
How to create a bibliography in Word

Word table: Creating a table in Microsoft Word
In Word, tables prove useful in the most diverse situations, and you have several options for creating them. You can either use the table templates provided by the Microsoft tool, or you can design your own. This enables you to improve your reports, invoices or the performance of household tasks. Even data from Excel can be integrated as a table into a Word file.
Word table: Creating a table in Microsoft Word

Word Shortcuts: an overview of the best ones
Word shortcuts make working with the popular word processing program quicker and easier. Whether you are copying text, printing a document or changing the formatting – many commands do not need a mouse click to be activated. Thanks to shortcuts, you can work faster and more effectively. Here is a list of the most common Word shortcuts.
Word Shortcuts: an overview of the best ones
Hi Paul
Thanks again for the response. I have tried using the insert textbox and copy and paste — this does not look that great and it is taking a lot of time to format. I may just end up keeping all diagrams and tables portrait instead.
What I meant by the footnotes registering previous chapters was this. When I begin a new chapter, I am using section break and then for the new chapter’s footnotes, I am starting all footnotes from one for this section. When it comes to including the table for chapter 4, I am using section break so that I can include the table and then turn that page to landscape. But when the writing continues on the next page, either it starts at 1 or it continues from the very beginning of the thesis. So it registers continuous as continuous from all previous chapters. Is this clearer?
I have no idea why it does this. I would have thought that when I include a section break to start chapter 4, then continuous would be still be continuous for chapter 4. So if the footnote before the table is 10 and I include the table, the footnote after the table should either be 1 or 11, right??? But it gives me continuous for the whole thesis — hence 638. Is this any clearer ???? If you do know anything, that would be great if you could help.
If not, I think I have three options.
a) Seek IT help from uni.
b) Include all tables as portrait which is ok but landscape would be better
c) Leave a blank page with the numbering continued for the thesis. When I print it, print the tables in landscape separate and then include them before binding. This will work if all else fails.
But I would still like to know how to sort this out properly. It is something that will stay on my mind for a long while now until I complete it. 
Thanks for your help. If you do have any suggestions, that would be great.
Much appreciated
Prakash 
Tables in Word are useful in so many situations. In this post you’ll discover how to create tables, then manipulate and design them in the quickest and easiest way to provide that visual punch.
Clickable Table of Contents
Enhance your Word tables with these advanced features
1. What are tables in Word good for?
Tables are useful for 2 distinct reasons.
- To show an actual table of data, or
- To organise and postion text, images and other elements on the page.
Many years ago, typewriters ruled the world. And a feature of a good typewriter was the tab stop, which was a device that essentially let you control indentation.
Over the years many people have continued to use tabs to indent text, because of its convenience, but they are hard work to set up properly.
Tables provide a much easier way to organise content on a page.
1. Select the Insert tab.
2. Click the Tables icon in the Tables group.
3. Move your mouse pointer into the table grid until the required number of rows and columns are highlighted orange, then left-click.

An empty table is inserted into the document.
Two new tabs, Design and Layout are also added to the ribbon area, under the banner of Table Tools.


3. MOVING AROUND A Word TABLE
- While the table is empty, you can use the cursor keys to move around the cells. However, when the cells contain information, using the cursor keys will move through the cell content first before moving to the next cell
- You can left-click in any cell to position the cursor.
- Press Tab to move to the next cell. The cursor will move across and then down the table.
- Press Shift + Tab to move to the previous cell.

NB. Using Tab is better than using the cursors as it will move to the next/previous cell regardless of whether there is information in the cells.
NB2. If you press Tab while you are in the last cell, a new row will be added to the bottom of your table
4. SELECTING A CELL, ROW, COLUMN OR THE ENTIRE TABLE
To select a cell:
1. Position the mouse pointer inside the cell on the bottom-left corner of the cell.
The pointer will change shape to a solid black arrow that points up and right.
2. Left-click.

To select a row of a table:
1. Position the mouse pointer in the left margin in line with the row you want to select.
The mouse pointer will change to a white arrow that points up and right.
2. Left-click.

To select a column
1. Position the mouse pointer so that it rests on the top border of the table, above the column you want to select.
The mouse pointer will change to a solid black arrow pointing down.
2. Left-click.

To select the entire table:
1. Position your mouse pointer over the 4-headed arrow icon situated at the top-left of the table.
2. Left-click.

5. INSERTING AN EXTRA ROW OR COLUMN
To insert an extra row:
1. Position the cursor in a cell.
2. Select the Layout tab, under the Table Tools banner.
3. Click Insert Above or Insert Below in the Rows and Columns group

Here is a quick way to insert new rows:
1. Position the cursor to the left of the table, but in close proximity.
2. A plus symbol will appear above or below the mouse pointer indicating where the new row will be added.

3. Nudge the mouse pointer up or down to move the plus sign above or below.
4. Left-click to insert the new row,
To insert an extra column:
1. Position the cursor in a cell.
2. Select the Layout tab, under the Table Tools banner.
3. Click Insert Left or Insert Right in the Rows and Columns group

Here is a quick way to insert a new column:
1. Position the cursor above a column, but in close proximity to the table.
2. A plus symbol will appear to the left or right of the mouse pointer indicating where the new column will be added.
3. Nudge the mouse pointer left or right to move the plus sign to the left or the right of the column.
4. Left-click to insert the new column,

6. DELETING A ROW OR COLUMN
To delete the current row or column:
1. Position the cursor in any cell of the row you want to delete.
2. Select the Layout tab, under the Table Tools banner.
3. Click the Delete icon in the Rows and Columns group.

4. Choose Delete Row or Delete Column from the drop-down menu.
7. Quickly fORMATTING tables in Word
Word provides you with a number of pre-set table designs. This means that it formats the headings and the data, applies a variety of borders and colours the cells in a way that makes it look like a professionally produced table. As a beginner this simple technique will give you a good-looking table.
1. Position the cursor in any cell in the table.
2. Select the Design tab under the Table Tools banner.
The Table Styles group lists a number of table designs. To get the full list, click the More button beneath the table styles scroll bar
The default table style is Table Grid in the Plain Tables category which adds simple gridlines but no shading to your table.
Live Preview allows you to hover over a design and see it applied to your table. If you like what you see, click to select the table design.

In the Table Style Options group of the Design tab, tick the components that you have in your table. For example, if your table has column headings, tick Header Row. In doing this, the various parts of your table are formatted accordingly

Header Row
This will emphasise the header row by making the text bold or applying a different cell colour (depending on the table style selected.
Total Row
This will emphasise the bottom table row by making the text bold or applying a different cell colour (depending on the table style selected.
First Column
This will emphasise the first column (for labels etc.) by making the text bold or applying a different cell colour (depending on the table style selected.
Last Column
This will emphasise the last column (for row totals etc.) by making the text bold or applying a different cell colour (depending on the table style selected.
Banded Rows
This will make odd rows one colour and even rows a different colour. This helps readability.
Banded Columns
This will make odd columns one colour and even columns a different colour. This helps readability.
8. SETTING THE BORDERS AND SHADING
The Table Styles Gallery allows you to completely format a table with one click. Whereas you used to need some nous, anybody can now create a professional looking design.
However, you will often still need to apply your own border and shading, and manually change a table design. With a little effort can add a lot of flavour to your page and dramatically enhance the overall appearance of the document.
To set the borders for tables in Word:
1. Select the portion of the table that you wish to set the borders for. This may be the entire table, a row or rows, a column or columns or a selection of cells.
2. Select the Design tab under the Table Tools banner.
3. Select the Borders icon. A drop-down list appears. This list shows every combination of border that can be turned on or off. The icons with a shaded background are currently switched on. The rest are switched off.
4. Click any icon to switch the border on or off. The border style that is applied is the default style (½ pt solid black line ) or the last style that was used.

5. To apply customised borders, with different colours, styles and widths, click the Borders & Shading option at the bottom of the list to display the Borders and Shading dialog box.


Your selection will always have an outer border, and if you selected more than one cell, you will have some inside borders as well. The easiest way to use the dialog box is to start on the bottom-middle and work your way up and right.
1. Select the colour and width (thickness) that you would like for your border.

2. Choose a style (e.g. dotted, dashed, double, solid etc.)

3. Paint your borders. There are two ways to do this.
- The first way is to click directly on a border in the Preview itself.
- The second way is to click the appropriate icon around the edge of the Preview section that represents each border. Depending on which cells you selected in your table, some of these icons may not be available.

On the left-hand side of the dialog box, there are some pre-defined border combinations which you can use to save yourself some time. Depending on your selection of cells, the pre-defined options may differ. Here’s a run-down:

To shade the cells of tables in Word:
1. Select the portion of the table that you wish to shade. This may be the entire table, a row or rows, a column or columns or a selection of cells.
2. Select the Design tab under the Table Tools banner.
3. Click the Shading icon.
The colours that you see displayed match the current them of the document. Themes were discussed earlier in the course.
4. Click a colour in the palette.
While you can pick any colour, it is recommended to stick with the light colour shades, otherwise your tables will appear very loud and ugly, like they’re shouting in your face. Subtle is the order of the day. The exception to this is column headings or other cells that you wish to differentiate. Under these circumstances, you can use a dark colour, but use a light font with it.

If you cannot find the exact colour you need,
- Click the More Colours link underneath the palette. This displays a larger, more accurate colour palette.
- And if that’s not enough, click the Custom tab and you’ll get a really fine selection of colours (you can even enter your own RGB settings if you know them)

9. REPEATING table HEADINGS ON EVERY PAGE WHEN PRINTING
When you have large tables that occupy two or more pages, many people insert manual page breaks, then copy and paste their table header rows at the top of each page.
When rows are added or removed from tables in Word, the table headers end up half way down the page.
There is a simple tool that will eliminate this problem
1. Ensure that the table is a single table, with no manual page breaks in the middle, and one header at the top. The table header may occupy more than one row, it doesn’t affect the way this feature works.
2. Position the cursor somewhere in the top row of the table.
3. Select the Layout tab under the Table Tools banner.
4. Click the Repeat Header Rows icon ion the Data group.

Now, it doesn’t matter how many rows tables in Word contain, if the table ever spills across into another page, the header row (which normally displays the column headings) will always appear at the top of the table.
10. All the key points again
- Tables in Word serve 2 distinct purpose: to display a table of data and to organise and position items on the page
- To create table, select 2 tabs — Design and Layout under the Table Tools banner.
- There are 2 tabs — Design and Layout under the Table Tools banner.
- You can press the TAB key to move direct to the next cell and SHIFT and TAB together to move backwards through a table.
- The four elements of a table are cells, rows, columns and the whole table. Each can be selected.
- Rows can be inserted by selecting the Layout tab under Table Tools, then clicking the Insert Above or Insert Below icons. Alternatively, hover to the left of a row and click the plus symbol that appears above or below the mouse pointer.
- Columns can be inserted by selecting the Layout tab under Table Tools, then clicking the Insert
Left or Insert Right icons. Alternatively, hover above a table column and click the plus symbol that appears to the left or right of the mouse pointer. - Columns and rows and be removed from the table, by positioning the cursor in the row or column to be removed, then clicking the Delete icon on the Layout tab of Table Tools and choosing Delete
Row or Delete Column. - Tables can be formatted using the Table Style gallery or by manually setting the shading and borders manually. Both sets of tools are found on the Design ribbon of the Table Tools.
- When using the Microsoft Table Styles, you can control the behaviour of the formatting by setting the Table Style options – 6 tick boxes that define the structure of your table.
- For long tables that spill across onto subsequent pages, the top row, which normally contains the column headings can be set to repeat automatically. So there is no excuse for cutting and pasting headings midway through your table or taping pages together to make sense of the table!
I hope you found plenty of value in this post. I’d love to hear your biggest takeaway in the comments below together with any questions you may have.
Have a fantastic day.


About the author
Jason Morrell
Jason loves to simplify the hard stuff, cut the fluff and share what actually works. Things that make a difference. Things that slash hours from your daily work tasks. He runs a software training business in Queensland, Australia, lives on the Gold Coast with his wife and 4 kids and often talks about himself in the third person!
SHARE
If you create long Word documents with lots of captioned diagrams, tables, or figures in them, then you may be faced with the nightmare of having to update the numbering whenever you add a new figure or table to the document. And if you refer to this number within the text (e.g. “See Table 4”), that’s another place you have to remember to keep up to date.
You can automate this process—and produce automated Tables of Figures as well, just like an automated Table of Contents.
These instructions apply to any captioned tables, figures and diagrams. I will use ‘figure’ to refer to each of them—if you are creating table captions and a list of tables, substitute ‘table’ and choose the ‘Table’ option in the steps below instead of ‘Figure’.
Labeling a figure in Word
- Position your cursor beneath the figure.
- Open the Caption window:
* Word 2003: Select Insert > Reference > Caption from the menu.
* Word 2007 and later: Go to the References tab > Captions command group, then click Insert Caption. - Select Figure from the Label drop-down list.
Caption – default settings for Figure
- Optional: If you use headings with Outline Numbering, you may want to add a Chapter number. To do so, click Numbering and select the Include chapter number check box. You can also specify the number format, style, and separator.
Caption with chapter numbering included
Caption settings for chapter numbering
- Add any extra caption information after the caption number (e.g. Figure 3: xxxx).
Caption complete
- Click OK.


The caption is added, using the Caption style (you can modify this default style on the Styles and Formatting task pane in Word 2003, or the Styles floating window in Word 2007 or later). The number is automatically sequenced even if you add another figure between two existing figures with captions inserted like this.
NOTE: If the number doesn’t update automatically, or if you’ve copied an earlier caption and pasted it in another place then modified the caption’s text, update the field by selecting it and pressing F9. Update ALL the auto captions [and all other fields such as the TOC, List of Figures etc.] by pressing Ctrl+A, then F9.
Referring to a figure in the body text
The caption must exist (see above)—you can’t reference something that isn’t there.
- In the body text, place the cursor when you want the cross-reference text to be inserted.
- To insert a cross reference:
* Word 2003: Select Insert > Reference > Cross-Reference from the menu.
* Word 2007 and later: Go to the References tab > Captions command group, then click Cross-reference. - Select Figure from the Reference Type drop-down list. All figures that have been inserted as a caption are listed in the bottom half.
Cross-reference settings
- Click once on the figure that you want to refer to.
- In the Insert reference to drop-down list, select how you want the information displayed (e.g. select Only label and number to just display “Figure x” and not the entire caption; select Entire caption to display “Figure x: yyyyyy”).
- Click Insert, then click Close. The reference is added to the document—if you click in it, you should notice the gray shading indicating that it’s a field.
The cross-reference is inserted as a field


Creating the Table of Figures
- Position the cursor where you want the Table of Figures to be placed (it usually goes immediately after the Table of Contents).
- Insert the Table of Figures:
* Word 2003: Select Insert > Reference > Index and Tables from the menu.
* Word 2007 and later: Go to the References tab > Captions command group, then click Insert Table of Figures. - Click on the Table of Figures tab, if it’s not already selected.
- From the Caption Label drop-down list, select the type of table you want to create—Figure in this example.

Table of Figures settings
- Make any other changes as required.
- Click OK.
- Add a title (e.g. List of Figures) above the list just like you do for Contents.

A table of figures


Update February 2012: Really long captions: Several people have asked questions in the comments about dealing with really long captions, and there have been some excellent suggestions. Take a look at the comments from March 29, 2010, June/July 2011, and especially August 8, 2011 — one of these may solve your problem.
See also:
- Table and figure numbering: https://cybertext.wordpress.com/2009/04/28/table-and-figure-numbering/
[This article was first published in the March 2003 CyberText Newsletter; steps last checked and updated for Word 2007, 21 August 2008; screen shots added February 2009]

Insert Table Formulas in Word: Overview
You can insert table formulas in Word tables to perform simple mathematical functions on data. To insert table formulas in Word that add, subtract, multiply, and divide numbers in the table cells, you insert formulas into cells where you want to show the answers to the mathematical operations performed by the formulas.
The Parts of Table Formulas in Word
When you insert table formulas in Word, you insert a field that performs calculations on values in other table cells. Formulas always start with an equal sign (=). They often refer to the cell addresses from which they gather the data for their calculations. These cell addresses can be linked together with standard mathematical operators. These include the plus sign (+), minus sign (-), multiplication sign (*), and division sign (/), among others. You can also perform functions, like SUM, on a cell range in a table. So, a formula might be expressed “=SUM(Above),” which adds the values of the cells above the cell into which you inserted this formula.
A cell address is a way of referring to a cell. A cell address is the relative location of a cell in a table. Imagine there are letters at the top of each column, starting with “A” at the far left and then continuing to increase one letter at a time to the right. In addition, imagine each row has a number assigned to it. The topmost row is row “1.” The row numbering then continues downward, increasing by one for each row. The cell address is the column letter, followed by the row number. For example, the top left cell is always cell A1. B1 is always to the right of A1. Here is a table with the cell addresses entered into the corresponding cells to help you see the cell address naming convention.
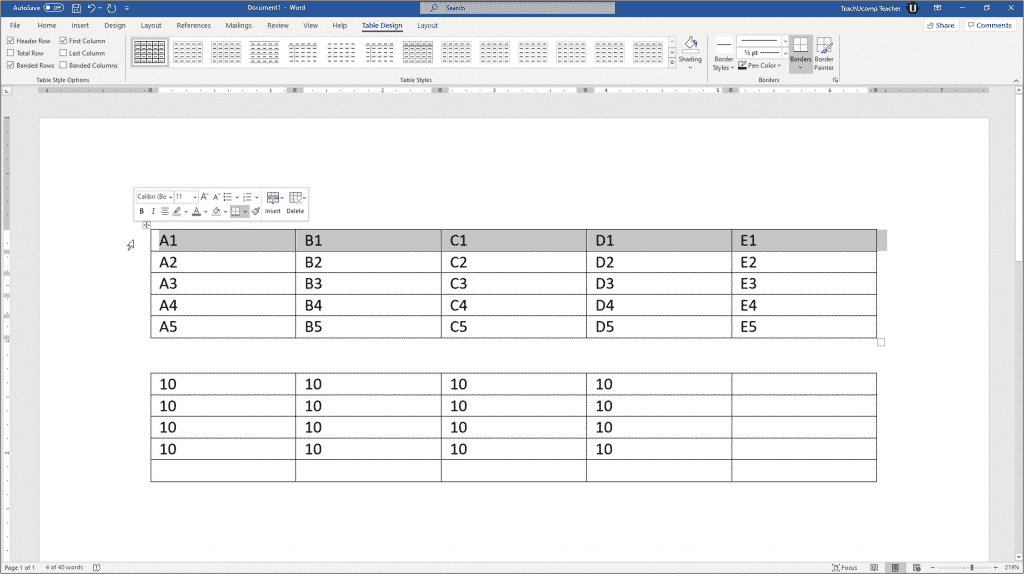
Insert Table Formulas in Word – Instructions: A picture of the cell addresses within a sample table, shown at the top of the Word document.
As stated previously, when you insert table formulas in Word, you are creating a formula field. A cell formula begins with an equal sign (=). It is often followed by the cell addresses of the cells upon which to perform the mathematical operations, joined together by standard mathematical operators. For example, to add the cells above cell A5 and show the formula result in cell A5, click into cell A5. Then insert a formula field that looks like either: =A1+A2+A3+A4 or =SUM(Above).
Instead of showing the formula itself in the cell, the cell shows the answer to the formula. Why? Because when you insert table formulas in Word in a cell, Word knows it should show the answer to the formula, not the formula itself. Formulas display their results by default, not their actual contents.
How to Insert Table Formulas in Word
To insert table formulas in Word into a table cell, click into the table cell where you want to show the answer. This is often the cell at the end of a continuous column or row of numbers. Next, click the table’s “Layout” contextual tab in the Ribbon. In older versions of Word, this appears as the “Layout” tab of the “Table Tools” contextual tab in the Ribbon. For all versions of Word, then click the “Formula” button in the “Data” button group to open the “Formula” dialog box. This dialog box lets you type the formulas used to insert table formulas in Word.
When the “Formula” dialog box first opens, Word tries to guess the formula you want. For example, if you insert table formulas in Word in a cell at the end of a column of continuous numbers, Word assumes you want to add the cell values in the column above the cell. Therefore, Word enters the formula =SUM(Above) as the default formula in the “Formula” dialog box.
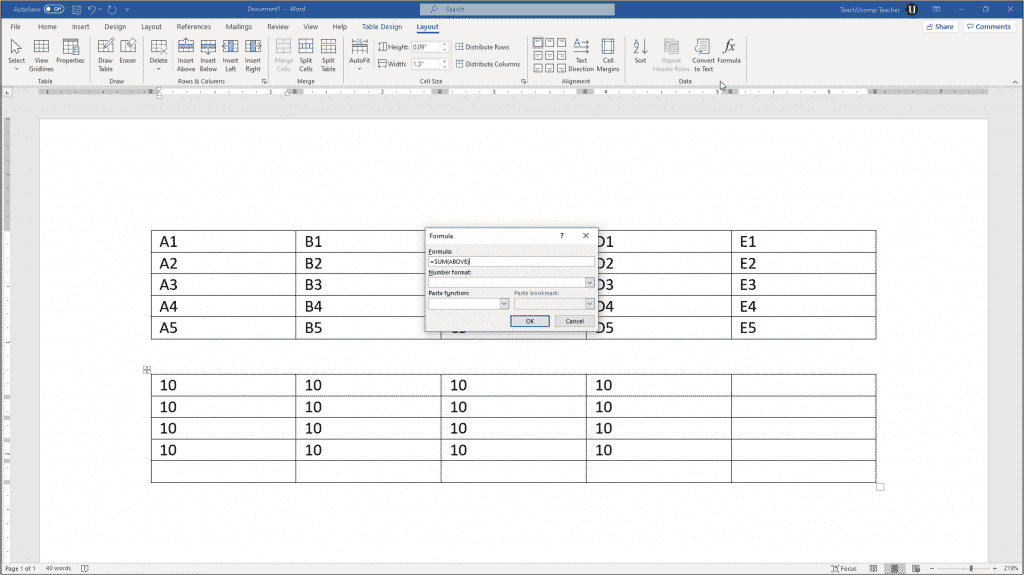
Insert Table Formulas in Word – Instructions: A picture of the default table formula that Word suggests in the “Formula” dialog box.
If Word suggests the correct formula, then click “OK” at the bottom of the “Formula” dialog box to accept it and insert the cell formula. If incorrect, then click into the “Formula:” field and enter the correct formula.
After entering the formula into the “Formula:” field, you can then use the “Number format:” drop-down to select a numeric pattern. This helps show the result in a specific numeric format.
In Word, you can use the terms “LEFT,” “RIGHT,” “ABOVE,” and “BELOW” to refer to adjacent cells in the row or column to the left of, to the right of, above, or below the cell within which you insert table formulas in Word. This is a convenient way of selecting the cell range for the function. You can also enter a cell range by typing the cell address of the upper-left cell in the cell range, followed by a colon symbol (:), then followed by the cell address of the lower-right cell in the range. For example, you could also type =SUM(A1:A4) into the “Formula:” field to add the contents of cells A1 through A4.
The word SUM is a formula function. If want to perform one mathematical operation on a range of cells, you can use functions like SUM, AVERAGE, MAX, and MIN when you insert table formulas in Word, instead of individually writing the cell addresses and mathematical operators. Word provides many standard functions in the “Paste function:” drop-down. Selecting any function from the list of functions in the drop-down menu adds it to the formula in the “Formula:” field.
After creating the Word formula, click the “OK” button to insert the formula field into the selected cell. The results of the formula then appear in the cell.
Insert Table Formulas in Word: Instructions
Instructions on How to Insert Table Formulas in Word
- To insert table formulas in Word, click into the table cell where you want to show the answer to the formula.
- Then click the table’s “Layout” contextual tab in the Ribbon. In older versions of Word, this appears as the “Layout” tab of the “Table Tools” contextual tab in the Ribbon.
- For all versions of Word, then click the “Formula” button in the “Data” button group to open the “Formula” dialog box.
- If necessary, click into the “Formula:” field and enter the desired formula.
- Optionally, to select a function to add to the formula shown in the “Formula:” field, use the “Paste function:” drop-down.
- Optionally, to format the display of the numeric formula’s result, use the “Number format:” drop-down.
- Then click the “OK” button to insert the formula field into the selected cell.
Insert Table Formulas in Word: Video Lesson
The following video lesson, titled “Inserting Table Formulas,” shows how to insert table formulas in Word. It is from our complete Word tutorial, titled “Mastering Word Made Easy v.2019 and 365.”
Tagged under:
cell address, cell addresses, course, create, document, documents, formula, formulas, function, functions, help, how-to, insert, insert table formulas, Insert Table Formulas in Word, inserting, instructions, learn, lesson, make, microsoft word, number format, overview, paste function, table, tables, teach, training, tutorial, video, Word 2013, Word 2016, Word 2019, Word for Microsoft 365, word for Office 365, write