
Word for Microsoft 365 Word for Microsoft 365 for Mac Word for the web Word 2021 Word 2021 for Mac Word 2019 Word 2019 for Mac Word 2016 Word 2016 for Mac Word 2013 Word 2010 Word 2007 Word Starter 2010 More…Less
Use sections breaks to divide and format documents of all sizes. For example, you can break down sections into chapters, and add formatting such as columns, headers and footers, page borders, to each.
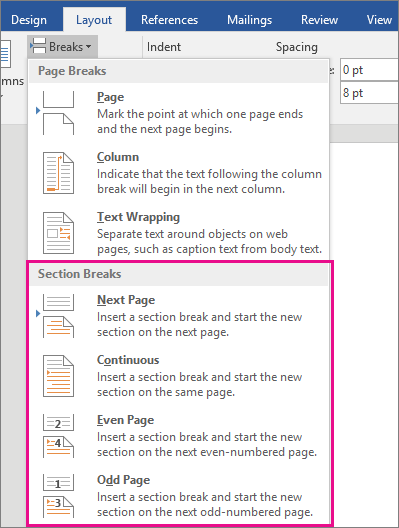
Add a section break
-
Select where you want a new section to begin.
-
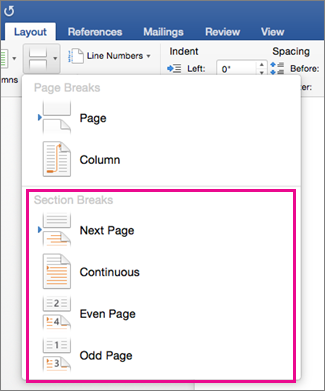
Go to Layout > Breaks.

-
Choose the type of section break you want:
-
Next Page Section break starts the new section on the following page.
-
Continuous Section break starts the new section on the same page. This type of section break is often used to change the number of columns without starting a new page.
-
Even Page Section break starts a new section on the next even-numbered page.
-
Odd Page Section break starts a new section on the next odd-numbered page.
-


Important:
Office 2010 is no longer supported. Upgrade to Microsoft 365 to work anywhere from any device and continue to receive support.
Upgrade now
Insert a section break
-
Select where you want a new section to begin.
-
Go to Page Layout > Breaks.
-
Section break that you want to add:
-
A Next Page section break starts the new section on the next page
-
A Continuous section break starts the new section on the same page.
Tip: You can use Continuous section breaks to create pages with different number of columns.
-
An Even Page or an Odd Page section break starts the new section on the next even-numbered or odd-numbered page.
-

Insert a section break
-
Select where you want a new section to begin.
-
Go to Layout > Breaks, and then choose the type of section break you want.
-
Next Page Starts the new section on the following page.
-
Continuous Starts the new section on the same page. This section break is particularly useful for documents that have columns. You can use it to change the number of columns without starting a new page.
-
Even Page Starts the new section on the next even-numbered page. For example, if you insert an Even Page Break at the end of page 3, the next section will start on page 4.
-
Odd Page Starts the new section on the next odd-numbered page. For example, if you insert an Odd Page Section Break at the end of page 3, the next section will start on page 5.
-
You can add page breaks, but Word for the web can’t add section breaks yet.
If you have the Word desktop application, use the Open in Word command to open the document and add section breaks there. When you’re done and you save the document, it will continue to be stored where you opened it in Word for the web.
See also
Use section breaks to change the layout or formatting in a section of your document
Insert a page break
Need more help?
This answer is not for the initial user but for any subsequent users who wish to figure this out. It builds on the first response.
In addition to what is said in the first response:
Step 1: Click on the ‘crotchet button’ to see the formatting tabs, returns and breaks Scroll down to find the beginning of each section
Step 2: Select the page number at the beginning of each section Look at the header-footer toolbar and check to see that the options of ‘different first page and different odd & even numbers’ are not checked — if checked this will confuse the numbering of the computer
Step 3: Highlight/select and right click on the number and go to format number — check to see that in the first section — the option for start at is specified as you wish and in subsequent sections to see that the option ‘continue from previous section’ is selected
Step 4: Close header and footer and select/highlight the pages from the first section (excluding the cover page) to the last page that you wish to have a page number Click on insert page numbers and select the format you wish
This should give you continuous numbering
If you wish to have different numbering for different sections (e.g. romans in the first parts and Arabic numerals in sections that follow) — go to the particular section break that you wish to be your ‘watershed break’. In step 3 above make sure that ‘start from’ is selected instead of ‘continue from previous section’. In step 4 above, select only the first section and insert numbers in the desired format. Then select the next section and insert the 2nd format that you desire
Finally, automatically update you table of contents and there you have it
If you want a continuous print view , you can double click in the space between the two pages, the space between pages change to a line in all the document.
How do I make text continuous in Word?
Right-click the paragraph that you want to keep together. In the box that opens, select Paragraph. In the Paragraph dialog box, click the Line and Page Breaks tab. In the Pagination section, select the Keep lines together check box, and click OK.
Why does text jump to next page in Word?
Right-click on the paragraph at the top of the second page and select Paragraph. On the Line and Page Breaks tab of the Paragraph dialog, make sure that “Page break before” is not checked. If all three can’t fit on the page with the heading, then they will jump to the next page.
How do I fix text in Word?
Follow these steps if you are using Word 2010 or a later version:
- Display the File tab of the ribbon, then click Options.
- Click Display at the left side of the dialog box.
- Select the Object Anchors check box.
- Click on OK.
- In Print Layout view, select the shape (the block arrow).
How do you make words not cut in Word?
- Go to the Home tab.
- Search for the Paragraph group and click the Paragraph dialog box launcher.
- Take one of the following steps: Look under Indents and Spacing for the Line Spacing box and set it to something different than Exactly. For example, change it to Single.
How do I unlock a text box in Word?
Click Popular, and then select Show Developer tab in the Ribbon check box. 4. Click on the Protect Document Tab select Restrict Formatting and Editing 5. Click the Stop Protection Button Page 3 How to “unlock” a Word Form The form is now unlocked and can be edited in anyway.
How do I stop text from going to the next page in Word?
How to Stop MS Word From Pushing Sentences to a New Page
- Launch Microsoft Word and click the Home tab if it is not already enabled.
- Click the small arrow in the bottom right corner of the Paragraph section of the tab’s ribbon to open the Paragraph window.
- Click the “Line and Page Breaks” tab.
- Uncheck the “Widow/Orphan Control” box, which is usually checked by default.
How do I push text to the next page in Word?
Right-click the text and choose Paragraph from the context menu. On the Line and Page Breaks tab, see if the “Page break before” option has been selected. If so, clear the option.
How do I freeze a page in Word?
Step 1: Put the cursor before the part of document you will protect, and then click the Breaks > Continuous on the Page Layout tab. Then add a continuous break at the end of the part of document with same way. Step 2: Show the Restrict Editing pane with clicking the Restrict Editing button on the Review tab.
How do I stop words splitting in pages?
When you don’t want a paragraph or even several lines of text to break between two pages, do the following:
- On the Home tab, click the Paragraph group’s dialog launcher (the small arrow at the bottom-right.
- Click the Line and Page Breaks tab.
- Check the Keep Lines together option, and click OK.
What is ligatures in pages?
Another way to affect character spacing is to use ligatures, a decorative joining of two characters to form a single typographic character. You can use ligatures in your document if the font you’re using supports them.
What is the inspector in pages?
The Inspector Window. You can format most elements of your document using the panes of the Inspector. window, including text appearance, size and positioning of graphics, and much more. Open multiple inspector windows to make working with your document easier.
How do I stop words splitting in a text box Powerpoint?
Your text might have no-break spaces instead of normal spaces
- In any text box, enter a non-breaking space (hold down the ALT key while you enter 0160 on the numeric keypad).
- Select and copy the non-breaking space character you just entered.
- On the Home tab | Editing group | click Replace.
How do you split a paragraph in PowerPoint?
Split text between two slides
- Click the AutoFit Options tool at the lower-left corner of the placeholder box.
- Select Split Text Between Two Slides or Continue on a New Slide. A new slide is created immediately after the current one. Split Text divides the current text in two halves.
How do I keep words together in a line in Word?
Non-Breaking Paragraphs and Lines
- Select the paragraph or section of text you want to keep together.
- On the Home tab in Word, click the Paragraph group’s dialog launcher (the small arrow at the bottom-right of the group).
- Pick the Line and Page Breaks.
- Check the Keep lines together option and click OK.
How do you wrap text in PowerPoint 2007?
If you use PowerPoint 2007 or older, here’s how to check this option and automatically wrap text in the box:
- Insert a text box from the Insert menu.
- Right click on the box and then on “Format Shape”.
- Click on the Text box on the left pane.
- Tick the box “Wrap text in shape” and click OK.
How do you wrap text in a text box?
Wrapping Text Around a Text Box or Frame
- Right-click on the text box. Word displays a Context menu.
- Choose Format Text Box from the Context menu. Word displays the Format Text Box dialog box.
- Click on the Layout tab (in Word 97 click on the Wrapping tab).
- Select a method of text wrapping in the Wrapping Style area of the dialog box.
- Click on OK.
How do I wrap text around an image?
Wrap text around a picture or drawing object
- Select the picture or object.
- Select Format and then under Arrange, select Wrap Text.
- Choose the wrapping option that you want to apply.
Can you wrap text around an image in PowerPoint?
Option 3: Insert a word document (preferred option) Right click on the image and go to ‘Text wrapping’ -> Tight. Save the word document. In PowerPoint go to Insert -> Object -> Create from File -> Choose the word document you just created. The text will wrap around the image automatically.
What is a text wrapping?
Text wrap is a feature supported by many word processors that enables you to surround a picture or diagram with text. The text wraps around the graphic. Text wrap in HTML is most fequently used to describe wrapping of text around an image in the HTML code.
How do you overlay text on a picture in PowerPoint 2010?
Use a text box to add text on top of a photo
- In your presentation, make sure that you’ve inserted a photo.
- On the Insert tab, in the Text group, click Text Box, drag to draw a text box anywhere near the picture, and then type your text.
How do I fill text with an image in PowerPoint?
Method 1: Go to Drawing Tools > Format > Text Fill > Picture. Choose your graphic from a file on your desktop or from an online source. Method 2: Right-click on the selected text and click on Format Text Effects. Go the first option (Text Fill & Outline) under the Text Options.
How do I fill a text pattern?
Right-click on text > format WordArt > Under ‘line’ click the drop down list for color > No color. If you WANT a border, you can experiment with different colors and the border styles. Right-click on text > format WordArt > fill effects > pattern > then choose whatever pattern you like > click OK.
How can I create my own font?
The 6 Best Sites for Creating Your Own Font
- IfontMaker – Is still the best tool for creating a font.
- FontStruct – is a free browser-based tool for creating your own typography.
- Fontographer – Fontographer is another great font editor that lets you customize existing fonts to make them your own and even provides the tools for helping you create new fonts.
How do I create an image?
How to create an image
- Find background images. The image you use becomes the “meat” of the content.
- Use an image creator.
- Include the title.
- Keep your specs the same.
- Add your logo.
- Create a thumbnail and featured image.
- Share the image on social media.
How do I fill a picture in word art?
click in WordArt Styles group > Shape Fill dropdown. select Picture from the drop down menu. navigate to the picture you want to use. OK out.
Where is the Fill option in Word?
To add a fill or effect, click your shape, click Format, click the arrow next to Shape Fill or Shape Effects, and select a color, gradient, texture, or effect. Click the shape that you want to fill.
To view the document as one continuous page without page separators:
Under the View tab switch to Web Layout. Note that your document’s width will be «elastic» in this view, meaning your paragraphs will stretch to fill as much width as they are given (try resizing the window).
To change the appearance of the page separator in Print Layout:
Place your mouse pointer exactly on the separator line and double click. This toggles the display of white space between pages.
Double click to remove the space (replaced with small gray line) and the change your margins to custom and use 0″ top and bottom. Looks pretty close to continuous. Otherwise the web view works as well (I don’t like the width so I always manually change it to the standard 8.5″ using Ctrl—A).
Tags:
Microsoft Word
Related
A paragraph break and a page break are the most heavily utilized breaks in Word. Less commonly used but very convenient for various tasks are line breaks, section breaks, and column breaks.
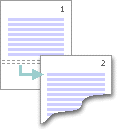
Page Break
A page break is one of the most used breaks.
Word creates a new page if no more content on the document page can fit between the top and bottom margins. In this case, Word automatically inserts a soft page break, a page break that moves when the preceding content changes:

or

You can manually insert a page break if you want to break the page at another location:

or

When you edit document content, Word changes the location of the soft page breaks for automatic page breaks but not for manually inserted page breaks.
You can display page breaks as regular nonprintable symbols. Word displays them as ![]() .
.
To insert a manual page break, position the cursor where you want to insert the page break in the document, and then do any of the following:
- On the Insert tab, in the Pages group, click Page Break:

- On the Layout tab, in the Page Setup group, click Breaks, and then click Page:

- Press Ctrl+Enter.


Note: Automatic (soft) and manual page breaks start the new page. All formatting from the original page applies to the new one. Use this type of break to start a new page with the same formatting.
To control page break settings, modify the page setting options such as page margins. To control paragraph page break settings, modify options on the Line and Page Breaks tab of the Paragraph dialog box. See How to keep lines and paragraphs together in a Word document.
See below how to delete a page break.
Column Break
You can format an entire document or a document section in columns. Within the columnar text, you can insert a column break to specify where you want to end one column and start another:

You can display column breaks as regular nonprintable symbols. Word displays them as ![]() .
.
To insert a column break, position the cursor at the beginning of the line you want to start in the new column, and then do any of the following:
- On the Layout tab, in the Page Setup group, click Breaks, and then click Column:
- Press Ctrl+Shift+Enter.

See below how to delete a column break.
Text wrapping break
See how to create and use line or text-wrapping breaks.
Section Break
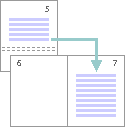
Suppose you want to format pages of the part of your document differently from the rest of the document. For example, page orientation is different from the surrounding pages. Insert section breaks above and below the pages of the specific part (see how to use different page orientations inside one document):

Suppose you select a section of text and change its page orientation, margins, format it in columns, etc. In that case, Word automatically inserts section breaks at the beginning and end of the selected text to delineate the area with new formatting.
To insert a section break, do the following:
1. Position the cursor where you want to insert the section break in the document.
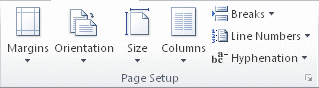
2. On the Layout tab, in the Page Setup group, click Breaks, then under Section Breaks, select one of the options:

You can configure the page layout, page setup, and headers and footers for each section independently.
To remove a page break, column break, or section break, click at the left end of the break or select the break and press the Delete key.
This Page Breaks for Microsoft Word tutorial is suitable for users of Word 2010/2013/2016/2019 and Microsoft 365.
Objective
Insert Page Breaks in Microsoft Word and Sections Breaks into Microsoft Word to control the layout and formatting.
Page Breaks in Microsoft Word Explained
If you have ever struggled to get a long Word document to look exactly as you would like, it might be that you need to brush on using breaks. Breaks allow you to split up your text into independent ‘chunks’ and apply formatting or layout options to just that specific chunk.
There are two types of breaks that you can use in a Word document. The first is a page break, and the second is a section break. In this tutorial, we are going to explore the usage of both.
Page Breaks in Microsoft Word
By default, Word automatically adds a break at the end of each page. However, you can insert a manual page break anytime you want to start a new page in your document. For example, if you are writing a book, you may want to ensure that each new chapter begins on a new page. This is where a manual page break would be useful.
Insert a Page Break
- Position your curser where you want the page to break
- Click the Layout tab
- Click the Breaks drop-down arrow
- In the Page Breaks section, click Page

NOTE: A page break can be quickly inserted by pressing the keyboard shortcut CTRL+Enter. There is also an option to add a Page Break on the Insert tab in the Pages group.
A manual page break will be added to the document and text that comes after the break pushed down on to the next page.
Show Page Breaks
Breaks will be invisible until you choose to view them by turning on Show/Hide.
- Click the Home tab
- Click the Show/Hide button

Delete Page Breaks
To delete a page break, you need to ensure that you can see the page break by turning on Show/Hide as detailed above.
- Select the page break
- Press the Delete key

Section Breaks
In Word, you can divide documents up into sections, and each section can work independently from the next. For example, you could have different headers and footers on each page. There are four different types of section break: next page, continuous, even page, and odd page.
| Next Page | Like a Page Break, Next Page creates a break in the document to go to the next page. |
| Continuous | Inserts a Continuous break, which starts a new section on the same page. A continuous break has the appearance of pressing Enter, however, if formatting marks are enabled, you can see “Section Break (Continuous)” were sections breaks are located. |
| Even Page | Inserts a section break and starts the new section on the next even-numbered page. |
| Odd Page | Inserts a section break and starts the new section on the next odd-numbered page. |
When a new section is added, any of the following formatting and layout changes can be applied to the section:
- Columns
- Footnotes and endnotes
- Headers and footers
- Line numbering
- Margins
- Page borders
- Page numbering
- Paper size or orientation
- Paper source for a printer
- Vertical alignment of text on a page
Insert a Section Break
In this example, my document is currently in portrait orientation. I want one page to be landscape. If I simply click on the page that I want to be landscape and change the orientation, the whole document will switch to landscape. I need to add in section breaks.
- Position your curser before the first word on the page you want to switch to landscape
- Click the Layout tab
- Click the Breaks drop-down arrow
- In the Section Breaks group, click Continuous

- Position your curser after the last word on the page you want to switch to landscape
- Click the Layout tab
- Click the Breaks drop-down arrow
- In the Section Breaks group, click Continuous
You have now sectioned the page off from the rest of the document. Formatting and layout changes will now apply to the page.
- Click your mouse anywhere on the page
- Click the Layout tab
- Click the Orientation drop-down arrow
- Select Landscape

Another example of section break would be if I wanted the text on one or more pages to be in columns. Here I have added a Section Break (Continuous) at the top and bottom of the page and then changed the layout to two columns. The rest of the document outside of this section is in the normal one column layout.

Video Tutorial
If you are interested in learning more about Microsoft Word. Then take a look at the following free resources:
- How to Create and Print Envelopes in Word
- How to Create a Contents Page in Word
- How to Mail Merge in Word
- How to Print Labels in Word
To learn Word with Simon Sez IT. Take a look at the Word courses we have available.
Deborah Ashby

Deborah Ashby is a TAP Accredited IT Trainer, specializing in the design, delivery, and facilitation of Microsoft courses both online and in the classroom.She has over 11 years of IT Training Experience and 24 years in the IT Industry. To date, she’s trained over 10,000 people in the UK and overseas at companies such as HMRC, the Metropolitan Police, Parliament, SKY, Microsoft, Kew Gardens, Norton Rose Fulbright LLP.She’s a qualified MOS Master for 2010, 2013, and 2016 editions of Microsoft Office and is COLF and TAP Accredited and a member of The British Learning Institute.
In this article, You are going to learn that how to Insert page-section break and How to add line number in Microsoft office Word 2016. Microsoft word automatically inserts page break at the end of each page. When you create a document then click on this option. Through to page break, you can end the current page and continue your text to the next page. You can add or remove the page break from where ever you set. But you can not remove the word which is at the end of each page. Use section break in your document to manage your document’s format, layout, page numbering and etc. Use section break to divide and format documents of all size. You can break down section and add formatting in your documents.
Start to Insert Page-Section break in Your Document
Step 1#. In the first step, I am going to tell you about page break. to insert page break first, you need to open your document then click on break option. When you open, on the new window you see some options. The first three option depends to page breaks. And the four last options depends on section break. Now we need the first three options which are: Page, Column and Text wrapping.

Menu
Page: – Through to this option you can pick up your text to the next page. I mean from the point which your cursor is, when you click on this option. Next, to that point, your text move to the next page and from that point, your current page and location will break.

Page Break
Column: – This option used to move or pick up your text when you have some columns of text. When you click on this option, from current point and current column you text will break and move to the next column. To insert page-section break you can apply these kinds of options on your documents.

Column Break
Text wrapping: – Now it’s the option which you can use when you are using pictures in your document. For example, you insert a picture in your document, when you resized the picture then. Around your picture, you have texts when you want to have on one line just a picture and. Picked the text after the picture you are going to use this option to move the position of the text.

Text Wrapping
Insert Section Breaks to Layout or Format my Document
Step 2#. As I told you that section break is used to manage your document’s layout, headers, and footers. Now, to begin with, You can control that how your document looks. For applying this option you have four option in layout tab, such are:
- Next page: – Through to this option you can insert a section break your text and start the new section on the next page.
- Continuous page: – When you want to start your a new section on the current page, use this option.
- Even Page: – Insert section break and start new section on the next just event numbered page.
- Odd Page: – And insert a section break and start the new section on the next just odd numbered page.
Section Break
Reference Specific Lines Numbers in Your Word Documents
Line number used in your document continuously for each line or for each page help you to show or use easily your document. Here you can add Line Numbers Continuously tell the end. And you can add line number for each section or restart this number on each number. on this menu, you see some deferent options which can apply for the numbers.

Line’s Number
Here our last option is Line Numbering Options, If click on this option you will open a new window for you to set more options for line numbers. when you clicked on the bottom of the page you have an option which is Line Number. Here when you opened this option, you see line’s number option on the new window. Just set them and apply on your document.

Line’s Number
Conclusion
These all are the last icons of Page Setup group in Layout tab, which you can apply on your document. To make your document entrusting to use and read, insert page-section break in your document with other settings. Now follow all of them and read carefully. For any question write down and comment it. Thanks for being with us.
0 Comments
2 Minutes read
How do I insert continuous page numbers in Word?
If you want continuous pagination that is all in the same format, go to the Insert Ribbon, and in the Header & Footer Group, click on the Page Number icon. Choose the appropriate placement of the number and a style.
Why does my page number stay the same?
Either you have restarted the page number in one of the sections, and every subsequent section is restarting at the same number (and you have a LOT of sections), or (more likely) the page number has just been typed.
How do I make page numbers not repeat?
In the “Header & Footer Tools” tab, click the Page Number menu and select “Format Page Numbers” to display the Page Number Format dialog box. Select the “Continue from Previous Section” radio-button. Then click OK and close everything down, including the Header/Footer editing tab.
How do I stop page numbers on certain pages?
Omitting last page numbersCreate your document as usual with page numbering in your header or footer.Go to the end of the last page containing text in your document.Click Insert Menu -> Break.In the Break dialog box, select Next Page in the Section break section and click OK. Double-click in the Header or Footer.
How do I number pages in Word without the first page?
On the Page Setup dialog box, click the Layout tab and select the Different first page check box in the Headers and footers section so there is a check mark in the box. Click OK. You’ll notice there is no page number on the first page of your document now.