
This Contents Page in Word tutorial is suitable for users of Word 2010, 2013, 2016, 2019, and Word for Microsoft 365.
Objective
Create a Table of Contents for a Word document and update it to add new entries.
Table of Contents Explained
A Table of Contents page makes it easier for your readers to navigate and work with long documents. It gives documents a professional look and feel and helps you jump to a specific section quickly and easily.
A Table of Contents is usually inserted at the beginning of a document or just after a cover page. It can be modified to fit the overall style of the document and be updated easily with one click when new headings and paragraphs are added to the document.
The golden rule, when creating a contents page, is good preparation.
A Table of Contents relies on the document being formatted with heading styles in order to work correctly. Word scans the document and looks for anything marked with a heading style and pulls it through into the contents page. You can choose how many heading levels you would like to include.
In this screenshot, I have pulled through 3 levels of heading.
Method
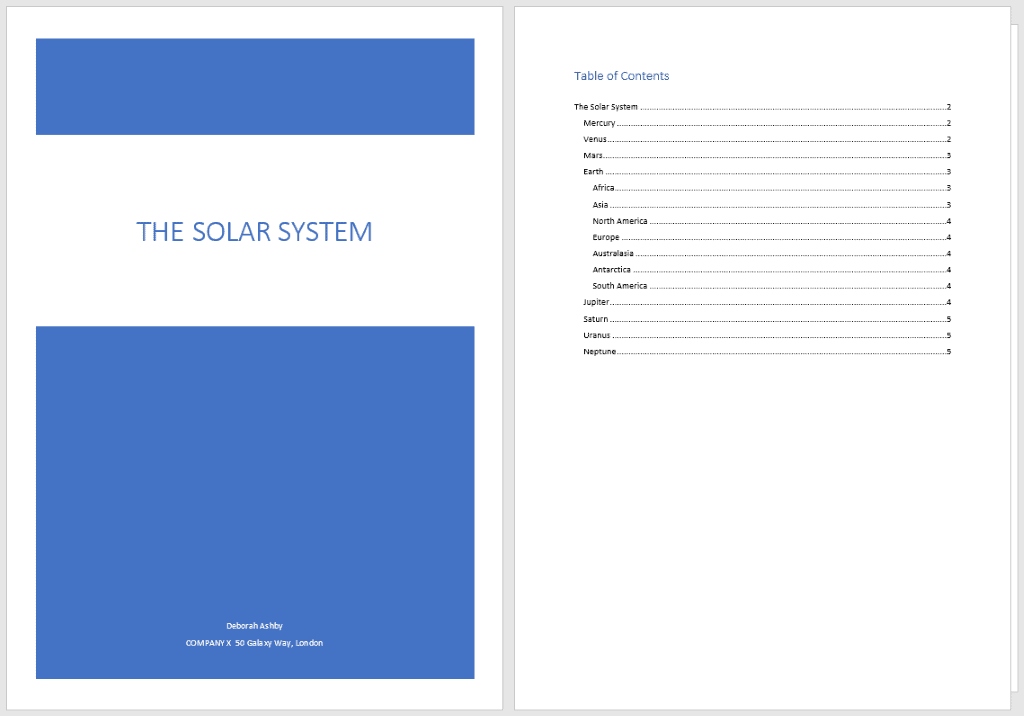
In this example, I am going to go through the process of creating, modifying, and updating a Table of Contents in Word for a document titled ‘The Solar System’.
Prepare the Word document
In order to successfully insert a Table of Contents page, you must first set-up the document correctly by using Word styles to denote headings.
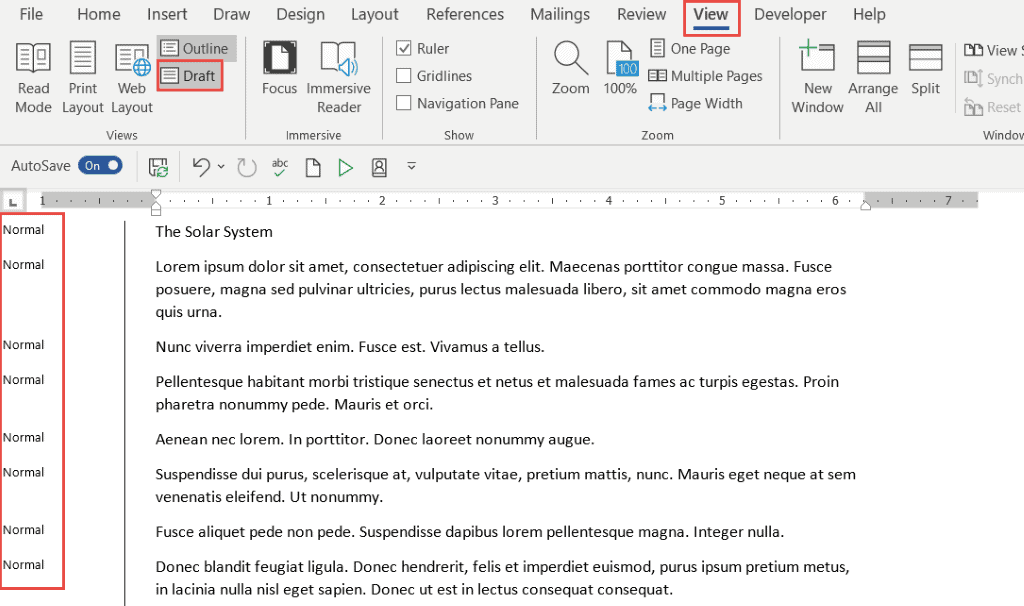
Switching to Draft View
You may find it easier to view your document in draft mode when working with styles, as it makes it easy to see which headings you’ve applied to which items.
- Click the View tab
- Click Draft
The style currently applied to each paragraph will display on the left-hand side of the document. Normal denotes no style has been applied.
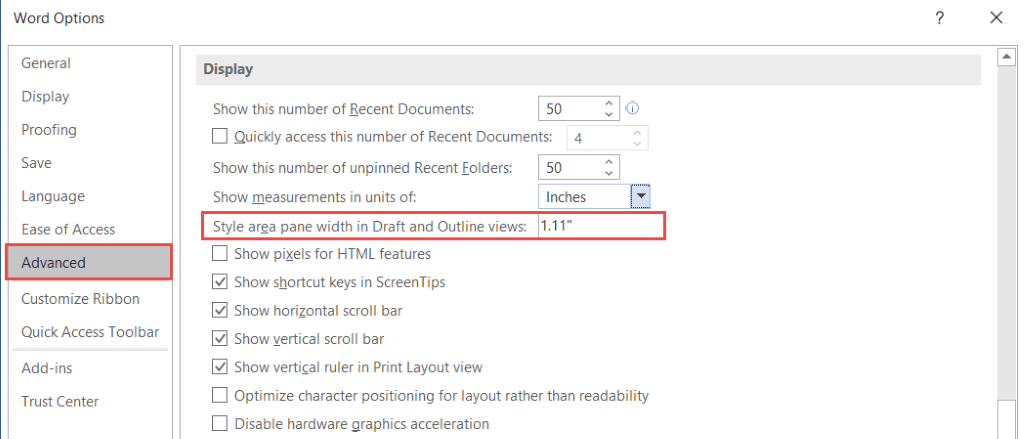
NOTE: When you switch to Draft view, if you do not see the style pane on the left-hand side, you will need to go into Word Options and turn it on.
- Click the File tab
- Click Options
- Click the Advanced tab
- Scroll down the Display section
If you cannot see the styles pane, it will say 0 inches. Set this to 1 – 2 inches and click OK.
Apply heading styles to the document
- Select the first main heading in your document
- Click the Home tab
- In the Styles group, click Heading 1
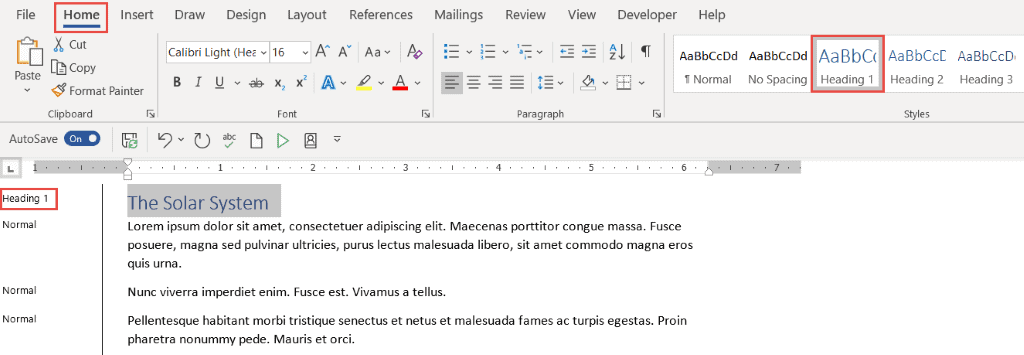
Scroll through the document and apply a Heading 1 style to all top-level headings
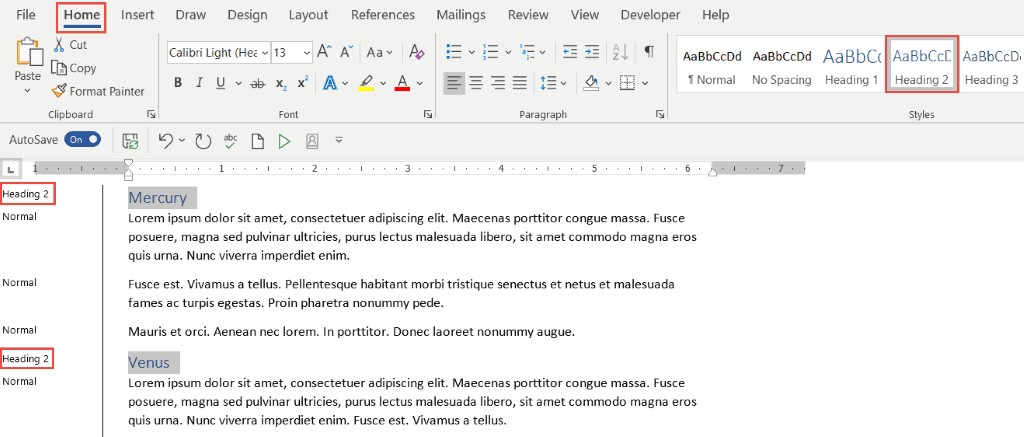
- Select the second-level headings in your document
- In the Styles group, click Heading 2
Apply a Heading 2 to all second-level headings in the document. You can hold down the CTRL key to select multiple headings at the same time.
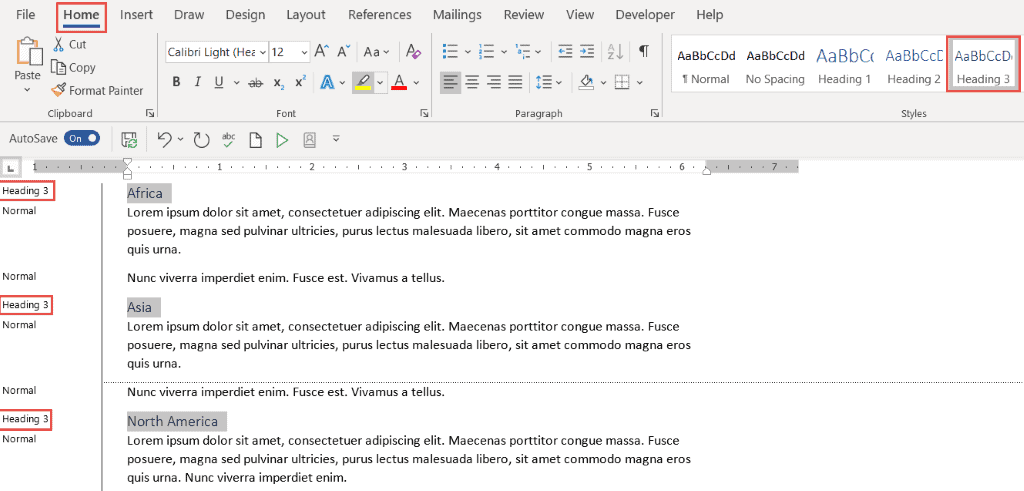
Repeat this process for any other headings in the document. In this example, I have three levels of heading in my document.
Once the document is styled and organized correctly, it becomes easy to insert a Table of Contents.
Insert the Contents Page
A contents page is normally inserted at the beginning of the document.
- Scroll to the top of the document and position the cursor before the first letter of the first word in the document
- Press CTRL+Enter to insert a page break
- Click the References tab
- Click Table of Contents
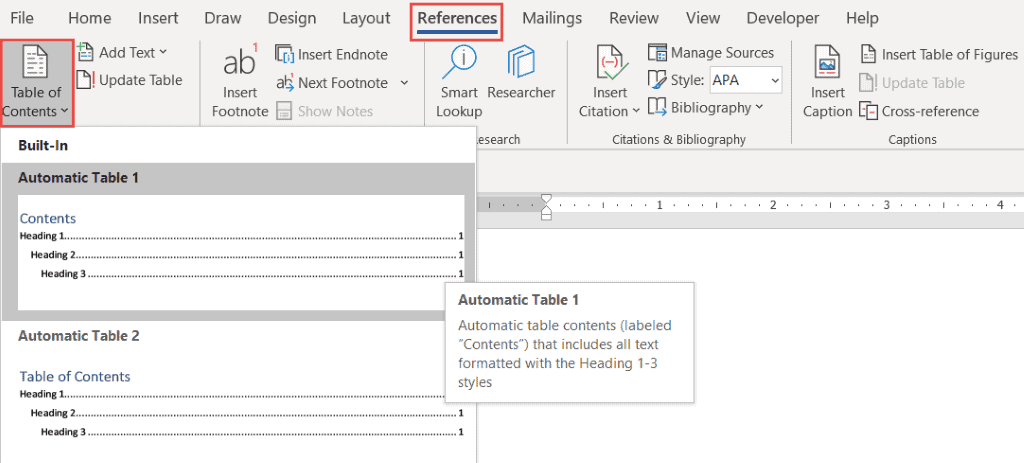
Word makes it simple to quickly add a Table of Contents by providing a small selection of in-built tables. In this example, I have selected Automatic Table 1.
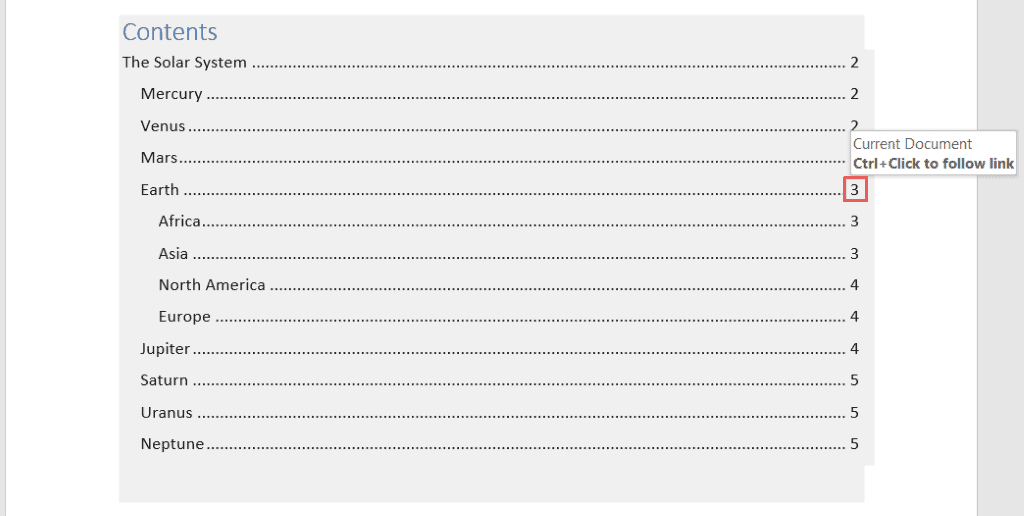
Hold down the CTRL key and click on a page number to jump to that page.
Modify a Table of Contents
You can make changes to the Table of Contents and format it as you please.
- Click on the Table of Contents to select it
- Click on the References tab
- Click Table of Contents
- Click Custom Table of Contents
Tab leaders and levels
Tab leaders
Tab leaders are the dots you see between the heading and the page number in the Table of Contents. You can change these to solid lines or dashes.
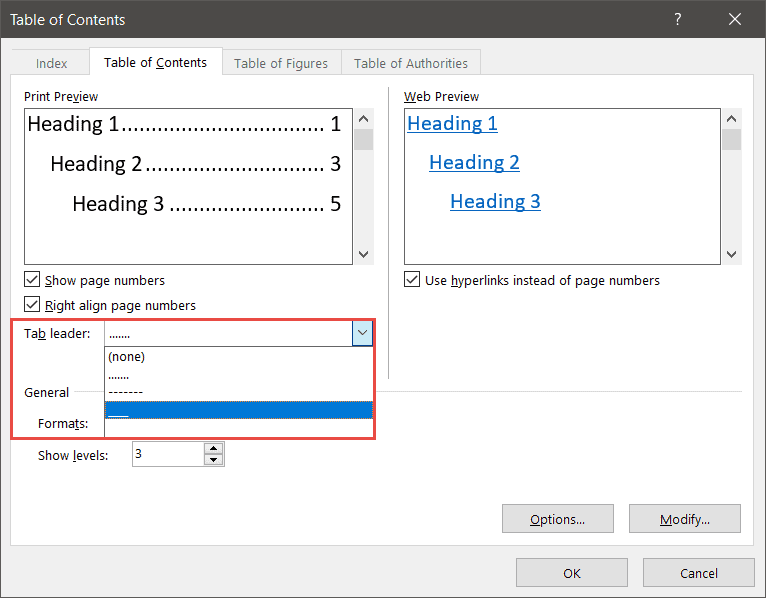
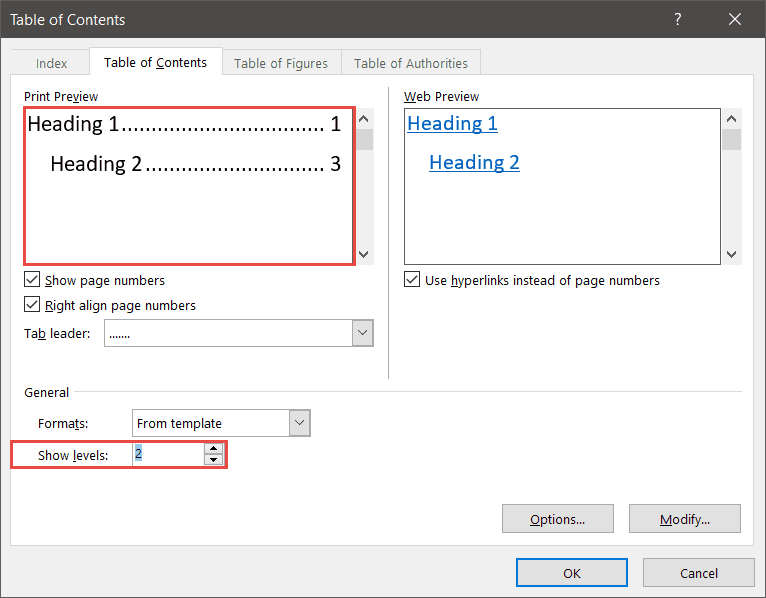
Show levels
You can also specify how many levels of heading you want to show in the Table of Contents. For example, you might have four levels of heading in the document, but you only want to show two levels in the Table of Contents.
- Click OK
If you make a change to the Table of Contents, Word will ask if you would like to replace the current Table of Contents.
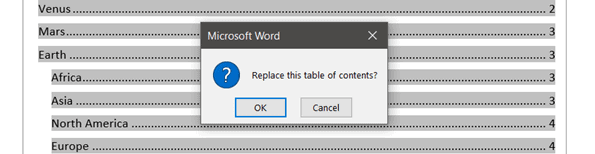
- Click OK to replace
Updating a Table of Contents
It’s rare for a document to stay the same forever. New paragraphs might be added either at the end of the document or somewhere within it. With each new addition, headings are pushed on to new pages, and the new items need to be added to the Table of Contents.
Fortunately, it’s very easy to update a Table of Contents in Word.
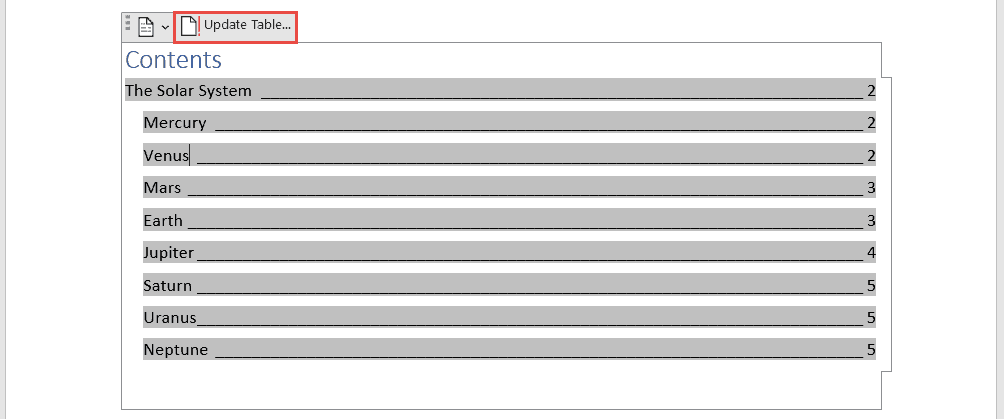
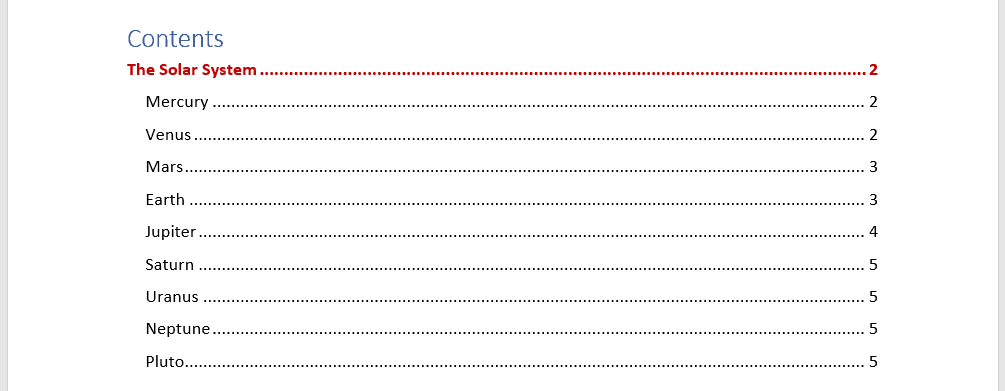
In this example, I’ve added a paragraph for ‘Pluto’ at the end of the document. I’ve formatted it with a heading 2 style.

I now need to update my Table of Contents to include the additional heading.
- Click on the Table of Contents to select it
- Click the Update Table button
Word will ask if you want to update the pages numbers only or the entire table.
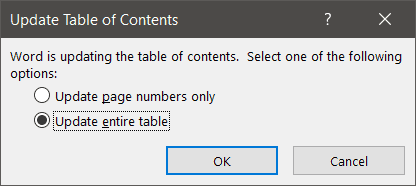
If you have reorganized your document and moved headings on to different pages but not added any new headings, you could select ‘Update page numbers only.’ For everything else, select ‘Update entire table.’
Custom Table of Contents
You can customize the look and feel of your Table of Contents by modifying the formatting. For example, you might decide that you want all level 2 headings to display in a bold, red font.
- Click on the Table of Contents to select it
- Click on the References tab
- Click Table of Contents
- Click Custom Table of Contents
- Click Modify
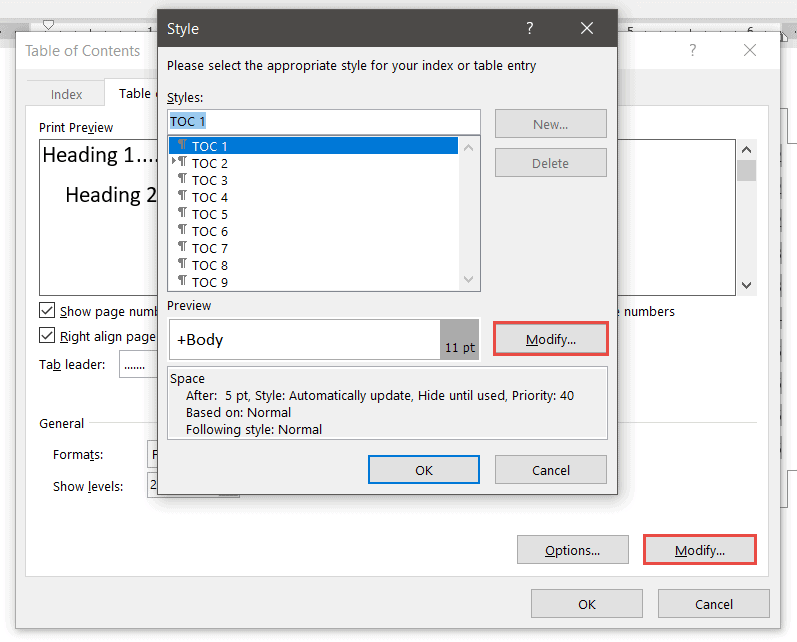
Modifying ‘TOC 1’ will affect all level 1 headings. Modifying ‘TOC 2’ will affect all level 2 headings and so on.
- Select TOC 1
- Click Modify
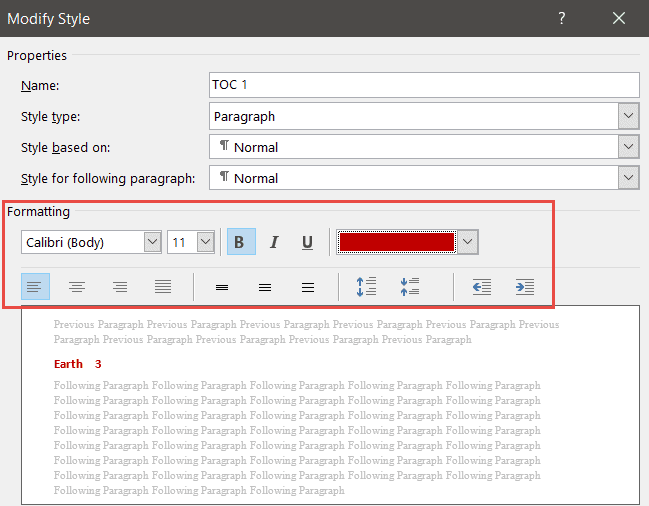
- Make the desired formatting changes
- Click OK
Video Tutorial
To see a demo of how to create a Contents Page in Word, please watch the following video tutorial.
How to create a Contents Page in Word Video (15:09)
For more Free Microsoft Office tutorials from Simon Sez IT. Take a look at our MS Office Resource Center.
To learn Word with Simon Sez IT. Take a look at the Word courses we have available.
Deborah Ashby

Deborah Ashby is a TAP Accredited IT Trainer, specializing in the design, delivery, and facilitation of Microsoft courses both online and in the classroom.She has over 11 years of IT Training Experience and 24 years in the IT Industry. To date, she’s trained over 10,000 people in the UK and overseas at companies such as HMRC, the Metropolitan Police, Parliament, SKY, Microsoft, Kew Gardens, Norton Rose Fulbright LLP.She’s a qualified MOS Master for 2010, 2013, and 2016 editions of Microsoft Office and is COLF and TAP Accredited and a member of The British Learning Institute.
Search…
- All
view_quilt view_list
Popular searches
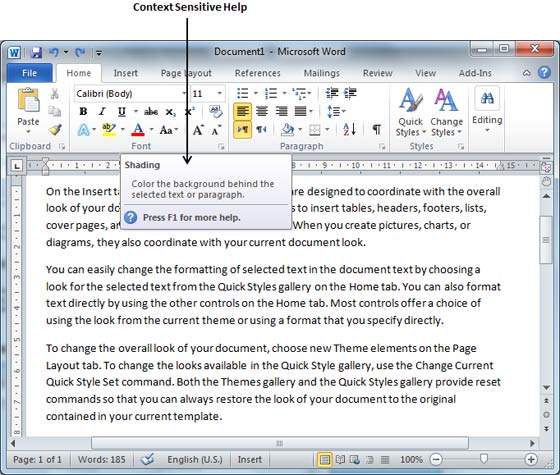
In this chapter, we will discuss Context Help in Word 2010. Microsoft Office provides more than one method for calling up Help when you need it. We will discuss a few important methods in this chapter −
Context Sensitive Help
This is the easiest way of getting help about any of the options available at word screen. You just need to bring your mouse pointer over an option and wait for 2 seconds, MS Word will pop-up a small balloon help giving you detail about the operation. If word has additional help for that option, then it gives the option Press F1 for more help as shown below when you bring your mouse pointer over the color fill option. You can press the F1 key to get further help on this option.
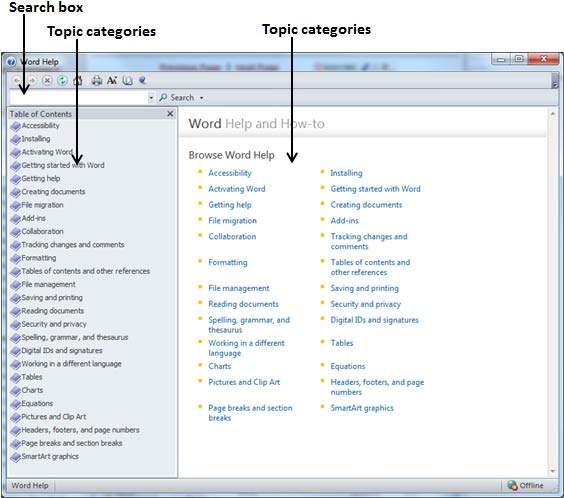
Using F1 Key
You can press the F1 key when you are in the middle of doing something and Office will display the various categories of help as shown below. You can either search a keyword using the Search option or you can browse the listed categories to go through a topic in detail −
Using Help Icon
You can also have similar help window as shown above, by clicking the Help icon located just above the right edge of the ribbon as shown below −
![]()
Using Help Option
You can communicate with Microsoft using the Help option available under the File tab.
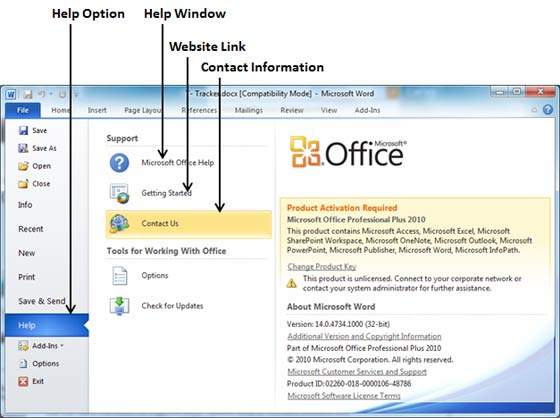
As shown above, you can use Microsoft Office Help to launch the Help window, or Getting Started link to go to Microsoft’s official website, otherwise use the Contact us option to contact Microsoft via email or phone.
You have probably encountered the problem of Microsoft Word Document or Microsoft Word Option Missing from the right-click context menu on your Windows desktop screen. If you want this option to return to the right-click menu, we have a solution or will show you how to replace or restore a missing Microsoft Word option to the right-click context menu on your desktop. If you can’t find the Microsoft Word Document in the right-click context menu when right-clicking on the Desktop, you can use this method to make it appear.
Part 1: Three Methods for Creating a New Word Document
If you have Microsoft Word installed on your computer, there are various ways to quickly generate a new Word document.
Method 1: From the Start Menu, Create A New Word Document.
- Select All programs from the Start menu.
- Scroll down until you find the Word software, then double-click it to open it.
- Next, select Blank Document to start a new Word document.
Method 2: In an Open Word Document, Create A New Word Document.
- By double-clicking the left button in the blank of the tab bar, or by selecting the “New” command item from the context menu, you can rapidly create a new document.
- Select File > New from an open document library, then choose a template.
Method 3: From the Right-Click Context Menu, Create A New Word Document.
- Select New > Microsoft Word Document from the context menu of the blank area in File Explorer or the Desktop.
Tips: If you discover that the Microsoft Word Document option is missing from the right-click context menu, try the remedies in Part 2 to resolve the issue.
Part 2: Return the Microsoft Word Document to The Context Menu by Right-Clicking It.
Solution 1
The first solution is to repair the Microsoft Office program. Then do check if the Office software has recently been installed on your computer.
- Go to Control Panel > Programs and Features in the first step.
- Navigate to Microsoft Office, right-click it, and choose Change.
- Select Repair from the drop-down menu. Then, to begin repairing this application, click the Continue button.
- If the New Microsoft Word document function is not available from the new menu, the problem still exists, and you should attempt the next remedy.
Solution 2
Use these procedures to restore the Right-click New Microsoft Word Document capability in Windows Explorer and on the Desktop in Office 2010-2016:
- Press Win + R to open the Registry Editor, then type regedit and press the Enter key.
- Right-click on HKEY CLASSES ROOT in the Registry Editor’s left pane to expand it.
- Press Ctrl + F, then put Docx into the find box, then press Enter; the.docx folder will be automatically navigated to.
- Create a key by right-clicking on the.docx key and selecting New > Key. Name it Word.Document.12.
- When you’re finished, right-click on a blank area of the Desktop and choose Refresh. The New Word Microsoft option should then appear in the context menu.
- If you lose the New Excel or PowerPoint Microsoft, you can recover them in the same method.
Bottom Line
To conclude, these are some effective solutions to restore a missing Microsoft Word Document to the right-click context menu. We are hoping that Microsoft Word Document users would be able to save their time by going through the article.

Posted on Thursday, July 18th, 2013 at 7:26 am by .
Microsoft Word, like all the Office applications, introduced the Ribbon UI in Office 2007. However, Office 2003 still has a pretty big install base. This means that you will need to cater for the different user interface components that accompany Word 2003 and older.
In this article we’ll take a look at customizing the Word main menu, context menus and then jump to the latest version of Word 2010 and 2013 and see how to customize the Backstage view.
- Creating a COM Add-in for Word 2013 – 2003
- Customizing Microsoft Word main menu
- Creating a custom context-menu for Word 2007 – 2003
- Customizing the rbbon context-menu for Word 2013 – 2010
- Creating a custom Backstage view
Creating a COM Add-in for Word 2013 – 2003
We’ll start by creating a new COM Add-in project in Visual Studio with Add-in Express for Office and .net. Select your programming language (we choose C# for our Word add-in, but you can use VB.NET or C++.NET too), and Microsoft Office 2003 as the minimum supported Office version, in this way we’ll get our addin to work across all versions of Word 2003 – 2013.

Since, we’ll look at Microsoft Word customization in this article, only select Microsoft Word in the list of supported applications.

Customizing Microsoft Word main menu
Adding a custom top-level menu item
The Word main menu (aka menu bar) is the top-most menu visible in the Word application window. Using the Add-in Express ADXMainMenu component, you are able to add your custom menus to the Word menu bar or add your own menu items to the existing menus.
Begin by adding a new ADXMainMenu component to your AddinModule designer surface.

Select the newly added ADXMainMenu component and set its SupportedApp property to Word. You’ll notice that the CommandBarName property’s value automatically changes to Menu Bar.

Next, add an ADXCommandBarPopup control to the main menu by selecting it from the built-in visual designer’s toolbar. Set its Caption Property to Publish and change the BeforeID property to 30003. 30003 is the internal ID of the Edit menu, and setting the BeforeID property to its value will cause our custom menu to be inserted before it on the Word main menu.
You can determine the control IDs of pre-Ribbon Office controls by downloading our free Built-in Control Scanner utility
Complete the menu design by adding two ADXCommandBarButton controls to the ADXCommandBarPopup. The final design of your custom menu should resemble the following:

Build, register and run your add-in project and you should now see your custom menu bar in Microsoft Word in-between the built-in File and Edit menus.

Adding custom menu item to a built-in Word menu
The above takes care of creating a top-level menu item in the Microsoft Word menu bar. To add you own items to, for example, the File menu in Word, add a new ADXCommandBarPopup control to the ADXMainMenu component and set its Id property to 30002, which is the File menu’s internal ID.
Next, add another ADXCommandBarPopup as a child control and set its Caption property to “Share With” and its BeforID property to 30095. This will insert your custom menu before the Send To menu item in the File menu.
In Visual Studio visual designer the final design for the menu will look like follows:

When running your Word addin project, you should see your “Share With” menu in the built-in File menu:

Creating a custom context-menu (Word 2003 – 2007)
Context-menus (aka right-click menus) are the menus that appear when you right-click inside Microsoft Word. If we want to add our own item to the context menu when a user selects an image in Word and right-click on it, we need to add an ADXContextMenu item to the AddinModule designer surface.
When you select the component in Visual Studio, you will be presented with a visual designer similar to the one we’ve used to design the Word main menu earlier. Change the SupportedApp property to Word in order for the CommandBarName property to contain all the available context-menus for MS Word, change it to Inline Pictures.

In the Visual Studio designer the final design should look as follows:

Build and run your project and right-click on an image in Word, you should see your context-menu items in the menu:

Customizing the Ribbon context-menu (Word 2010 – 2013)
The context menu we’ve created earlier will not be visible in Word 2010 or 2013. If you need to customize context-menus of Word 2013 or 2010, you’ll need to use the ADXRibbonContextMenu control.

Select the control and click on the ellipses (…) button next to the ContextMenuNames property.

You will be shown a dialog, from which you can choose all the Word right-click menus your custom menu items should be added to.

You can then design your custom context-menu items using a similar visual designer in Visual Studio:

Customizing the Word Backstage view
Since Office 2010 the traditional File menu has been replaced by the Backstage view. The Backstage view is used to manage your document and perform the expected tasks such as creating, saving and sending documents in Word 2010 and 2013.
It is also a great place to add various options for your Word add-ins. To customize it, start by adding an ADXBackstageView component to your AddinModule designer surface.

You’ll notice a similar visual designer as the rest of the components. The Backstage view layout can be a little confusing, but the best way to understand it, is to experiment with different layouts until you’re happy with the result.
Using the visual designer, add components by clicking on their respective icons in the toolbar, and the final design can look similar to the following:

When running the add-in in Word, you should see your own Backstage view item when clicking on the File menu:

Thank you for reading. Until next time, keep coding!
Available downloads:
This sample Word addin was developed using Add-in Express for Office and .net:
C# Word add-in
Word add-in development in Visual Studio for beginners:
- Part 1: Word add-in development – Application and base objects
- Part 2: Customizing Word UI – What is and isn’t customizable
- Part 4: Creating custom Word ribbons and toolbars
- Part 5: Building custom task panes for Word 2013 – 2003
- Part 6: Working with Word document content objects
- Part 7: Working with Word document designs, styles and printing
- Part 8: Working with multiple Microsoft Word documents
- Part 9: Using custom XML parts in Word add-ins
- Part 10: Working with Word document properties, bookmarks, content controls and quick parts
- Part 11: Populating Word documents with data from external sources
- Part 12: Working with Microsoft Word templates
![]()
Written by Allen Wyatt (last updated September 17, 2022)
This tip applies to Word 97, 2000, 2002, and 2003
When you right-click on an item within Windows, a Context menu is displayed. The items listed on the Context menu vary, depending on the item on which you are right-clicking. Within Word, Context menus are referred to as Shortcut menus. (It is unclear why Word would use different terminology than Windows does.) Word allows you to modify the Shortcut menus which appear when you right-click on an item within your document. As an example of the process you can follow to make changes, try these steps. (These steps assume you want to change the Shortcut menu that appears when you right-click on text within your document.)
- Choose Customize from the Tools menu. Word displays the Customize dialog box.
- Make sure the Toolbars tab is selected. (See Figure 1.)
- Scroll through the list of toolbars, and select the Shortcut Menus item. A floating Shortcut Menus toolbar appears.
- The toolbar has three items on it. These items represent the three categories of Shortcut menus used by Word.
- Click on Text, then choose Text from the drop-down list. This displays the actual Shortcut menu that appears when you right-click on text within your document.
- Within the Customize dialog box, click on the Commands tab. (See Figure 2.)
- Using the Categories list, choose the type of item you want to add to the Shortcut menu. This modifies the commands listed in the Commands list.
- Drag items from the Commands list to the position where you want them to appear on the Shortcut menu.
- To rename an item on the Shortcut menu, right-click on it and specify the name.
- To delete an item on the Shortcut menu, drag the item off the menu.
- Repeat steps 7 through 10 to continue modifying the menu.
- Close the Shortcut Menus toolbar.
- Click Close in the Customize dialog box when you are done.
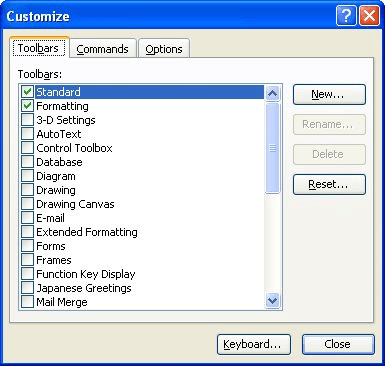
Figure 1. The Toolbars tab of the Customize dialog box.
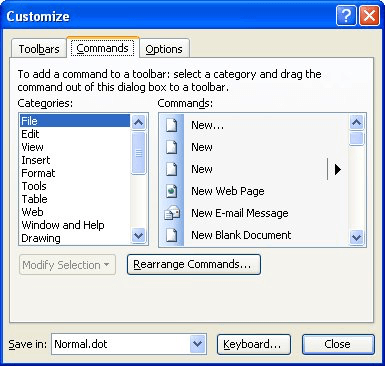
Figure 2. The Commands tab of the Customize dialog box.
WordTips is your source for cost-effective Microsoft Word training.
(Microsoft Word is the most popular word processing software in the world.)
This tip (389) applies to Microsoft Word 97, 2000, 2002, and 2003.
Author Bio
With more than 50 non-fiction books and numerous magazine articles to his credit, Allen Wyatt is an internationally recognized author. He is president of Sharon Parq Associates, a computer and publishing services company. Learn more about Allen…
MORE FROM ALLEN
Entering Calculations in a Form Field
One of the many uses for Word is to create forms that can be easily filled in by other people. This is made possible by …
Discover More
Automatically Formatting Graphics and Shapes
Want to change the graphics formatting defaults in Word? You can customize some of these defaults, saving yourself some time.
Discover More
Viewing Document Statistics
As you develop a document, Word keeps track of certain statistics about the document itself. Here is how you can review …
Discover More
More WordTips (menu)
Animated Menus
Want to get a bit fancy with how the Word interface behaves? You can configure Word so that its menus don’t just appear, …
Discover More
Deleting Menu Items
Want to get rid of some menu options so that they can’t be selected? It’s easy to do when customizing Word by using these …
Discover More
Resetting Menus to Their Default
After a few weeks, months, or years of editing Word’s menus, you may forget what the original menus looked like. Don’t …
Discover More

Мы с радостью представляем вам новую функцию просмотра в контексте для документов в формате MS Word и других форматах, из которых можно извлекать текст при помощи технологии оптического распознавания символов OCR (например, PDF или изображения). Это новый способ получать информацию в более понятной, по сравнению с обычным текстом, форме. Вот как это работает:
Зачем нужен визуальный контекст?
Предварительный просмотр в контексте дает возможность увидеть исходный макет, форматирование текста и изображения. Теперь не нужно загружать файл, открывать его в соседнем окне, искать вручную нужный фрагмент в документе и переключаться между приложениями. Документ можно просматривать прямо в CAT-инструменте. Он автоматически прокручивает текст до фрагмента, который вы сейчас редактируете, и выделяет его.
А при работе с документами, преобразованными в текст при помощи технологии OCR, быстро понять, где находится конкретный фрагмент текста, очень удобно. В таких документах текст может располагаться в произвольном порядке, поэтому поиск становится сложной задачей.
Но эта функция полезна не только переводчикам. Для менеджеров проектов тоже есть свои преимущества:
1. Соблюдение сроков
Имея перед глазами структуру документа, переводчики могут переводить быстрее, чем раньше. Это позволяет завершать проекты быстрее и меньше волноваться о срыве сроков.
2. Более высокое качество перевода
Отсутствие контекста — одна из самых распространённый причин неправильного перевода. Просмотр текста в его исходном виде позволяет переводчикам лучше понимать, что они переводят.
3. Меньше времени на объяснения
Ответы на вопросы переводчиков отнимают много времени и сил. С предпросмотром в контексте переводчики моментально получают ответы на большинство своих вопросов. У вас уходит меньше времени на общение с исполнителями, и вы можете потратить освободившиеся часы на другие задачи.
Как ещё можно предоставлять контекст?
Визуальный контекст важен, но есть и другие способы помочь вашим переводчикам выполнять свою работу быстрее и качественнее:
Комментарии к сегментам
Вы можете оставить важную информацию об исходном тексте в комментариях к сегментам или использовать их для предоставления инструкций своим переводчикам. Ваши комментарии появляются на специальной панели в CAT-инструменте.
Память переводов (TM)
Память переводов, хотя и не совсем связана с контекстом, позволяет переводчикам проверять, как подобный текст переводился в прошлом. Это обеспечивает единообразие терминов и, следовательно, лучшее качество перевода.
Глоссарии
Глоссарии очень важны для высокого качества перевода. Даже если вам составление глоссариев займёт некоторое время, в конце концов, это окупится.
Понятный исходный текст
Наконец, переводчикам нужно будет меньше контекста, если исходный текст будет чётким и понятным. Конечно, в большинстве случаев чистота языка не зависит от вас, но если вы всё-таки можете как-то на это влиять, попробуйте, и вы сразу заметите разницу.
Протестируйте функцию предпросмотра в контексте в вашем личном кабинете в Smartcat прямо сейчас. Она находится в CAT-инструменте, просто откройте любой документ в формате MS Word и щелкните на значок глаза, чтобы увидеть сегмент в контексте. В месяц переводчики могут бесплатно просматривать до десяти документов в их исходном виде. Для держателей подписки действуют дополнительные условия, вплоть до возможности просмотра неограниченного количества документов.
Предпросмотр документов Word — это только первый шаг. У нас есть планы по настройке предварительного просмотра HTML, видеосубтитров и других форматов. Мы знаем, что добавления функции предпросмотра переведенного текста ждут многие из вас, так что следите за новостями!
Download PC Repair Tool to quickly find & fix Windows errors automatically
Content Controls in Microsoft Word offer a great way to automate your document creation. It also helps in organizing the content in a structured manner. These and many more features make Content controls easy to understand and use. So, let’s see how to add and change content controls in Word.
Content controls mostly find their use in creating templates and forms as they provide flexibility in content placement. Also, depending on your preferences, you can prevent them from being edited or deleted. Here’s how!
- Click File in Word.
- Scroll down to Options.
- Choose Customize Ribbon.
- Select the Developer box.
- Click OK.
- To add a Content control, click Rich Text Content Control box.
- Place the box at appropriate location, select Properties.
- Add General Information.
- Change Locking permissions.
How do you edit Rich Text Content Control?
Before proceeding with the steps to edit or Rich Text Content Control in Word, you’ll need to add the Developer tab to the Ribbon menu in Word.
For this, click the File tab on the Ribbon menu and choose Options.
When the Options window opens, navigate to Customize Ribbon.

Here, select the Developer box and hit the Ok button as shown in the image above.
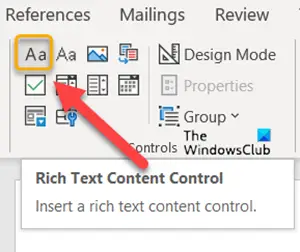
Next, to add a Content control, click Rich Text Content Control box.
Place the box at the appropriate location, to create a template.
Then, select Properties under Controls block.
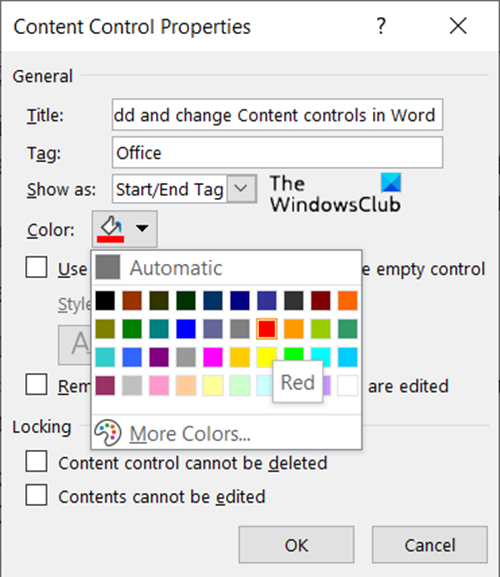
Add description like the title for the box, tags to be used, color for the box, etc.
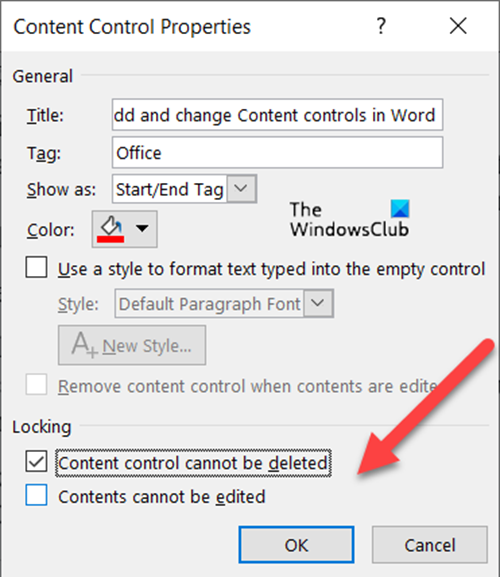
You can also change Content controls by changing its locking permission (editing or deleting them) by checking/un-checking the following boxes.
- Content Controls cannot be deleted.
- Content Controls cannot be edited.
Similarly, you can choose to create a Drop-down List via Content controls.
How do I remove content control in Word?
If you would like to delete or remove Content controls in Word:
- Press Ctrl+A to select the entire document.
- Then, right-click a visible content control.
- Now, in the context menu that appears on your computer screen, click Remove Content Control.
What is a Rich Text Content control?
A block of rich text that can be formatted represents a Rich Text Content control. So, all the custom formatted text like pictures, tables and other such items can be included in this category.
Hope it helps!

A post-graduate in Biotechnology, Hemant switched gears to writing about Microsoft technologies and has been a contributor to TheWindowsClub since then. When he is not working, you can usually find him out traveling to different places or indulging himself in binge-watching.