

-
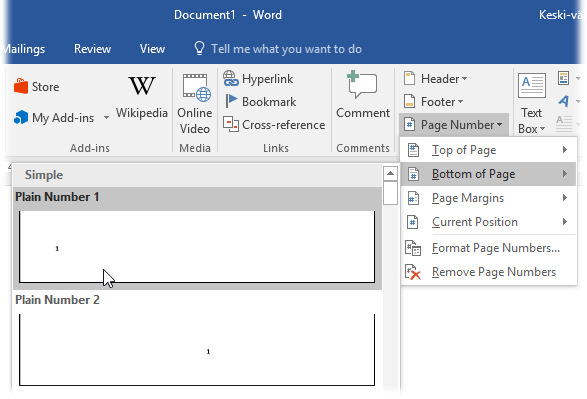
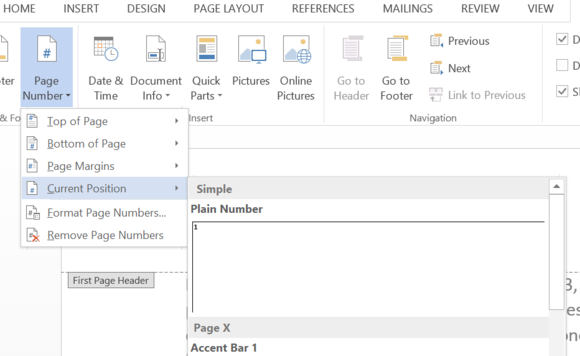
Select Insert > Page Number, and then choose the location and style you want.
-
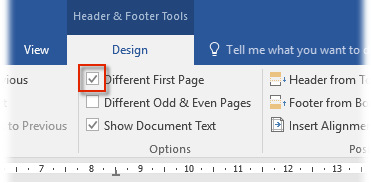
If you don’t want a page number to appear on the first page, select Different First Page.
-
If you want numbering to start with 1 on the second page, go to Page Number > Format Page Numbers, and set Start at to 0.
-
When you’re done, select Close Header and Footer or press Esc.
Tip: To get back to a header or footer to make changes, double-click in the header or footer area.
-
On the Insert tab, click the Page Number icon, and then click Page Number.
-
Select a location, and then pick an alignment style. Word automatically numbers every page, except designated title pages.
-
To change the numbering style, select Format and then choose the formatting you want to use.
-
Select OK twice to close both dialog boxes.
![]()
Download Article
![]()
Download Article
- Adding a Table of Contents
- Updating the Table of Contents
- Stylizing the Table of Contents
- Video
|
|
|
This wikiHow teaches you how to customize and update the table of contents in your Word document. When you create a table of contents in Word, page numbers are added automatically based on the headings you’ve added to each section. Word makes it easy to customize the way the page numbers and section titles appear on the table. If you make changes to your document that affects your section headers or page numbers, you’ll need to choose the Update Table option so the table of contents remains correct.
-

1
Format the headings of each section of your document. Word’s table of contents builder automatically generates a table of contents based on the headings in your document.[1]
This means each section that you want represented in your table of contents must have a properly-formatted heading.- If a section should appear as a primary section in the table of contents, select its heading, click the Home tab, and then select Heading 1 on the «Styles» panel.
- To add a sub-section to the primary section in the table of contents, give that section a Heading 2 header: Select its heading and choose Heading 2 from the Styles section.
- You can can also use Heading 3, Heading 4, etc., to add even more pages to your table of contents.
- Make sure any page you want to include in the table of contents has a heading.
-
2
Click the location where you want to insert the table of contents. Typically this will be at the beginning of your document.
Advertisement
-
3
Click the References tab. It’s at the top of Word.
-
4
Click Table of Contents on the toolbar. It’s at the upper-left corner of Word. A list of Table of Contents styles will expand.
-
5
Select an automatic style template. Several style options appear for your table of contents—choose one of the suggested styles to get started. Once selected, this will add a table of contents that lists the page numbers for each of your formatted sections.


Advertisement
-
1
Click the References tab. It’s at the top of Word.[2]
- Use this method if you’ve made a change (changing a heading, adding/removing pages) to your document and need to update the table of contents to reflect that change.
- The only way to change the name of a section on the table of contents is to change the name of the corresponding header in the document.
-
2
Click Update Table on the «Table of Contents» panel. It’s in the upper-left corner. Two options will appear.
-
3
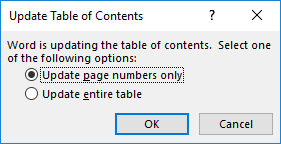
Select an update option.
- Select Update page numbers only if you want to refresh the page numbers without applying any changes you’ve made to the headings.
- Select Update entire table to apply all heading and page number changes.
-
4
Click OK. The table of contents is now up-to-date.


Advertisement
-
1
Click the References tab. It’s at the top of Word.
-
2
Click Table of Contents on the toolbar. It’s at the upper-left corner of Word. A list of Table of Contents styles will expand.
-
3
Click Custom table of contents on the menu. This opens the Table of Contents dialog box.
-
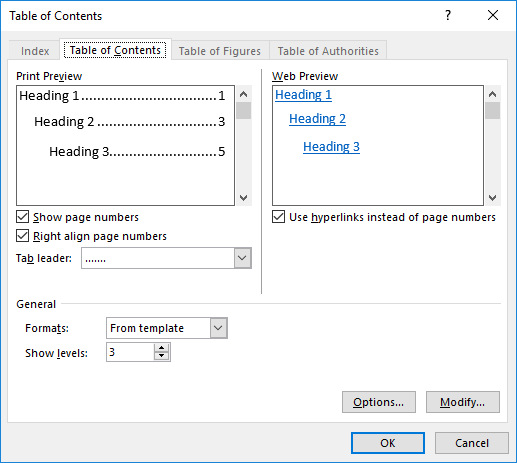
4
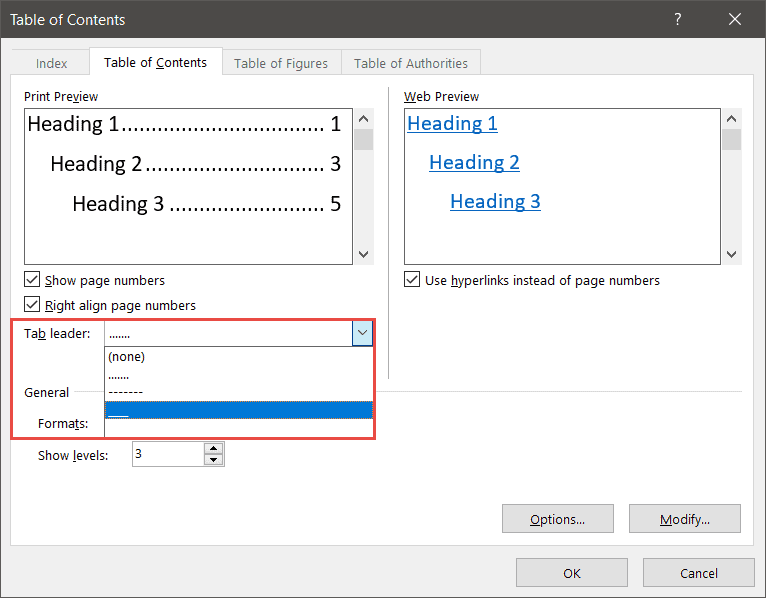
Adjust your general preferences. The «Print Preview» box at the upper-left corner shows you how the printed table of contents will appear, while the «Web preview» box displays how it will look on the web.[3]
- Use the checkbox next to «Show page numbers» to show or hide page numbers. If you just want to hide page numbers on the web version of the table of contents, check the box next to «Use hyperlinks instead of page numbers.»
- Use the checkbox next to «Right align pages numbers» top adjust the alignment.
- To change the style of the line or pattern that separates the heading title and the page number, make your selection from the «Tab leader» menu.
- To choose another theme, select something from the «Format» menu.
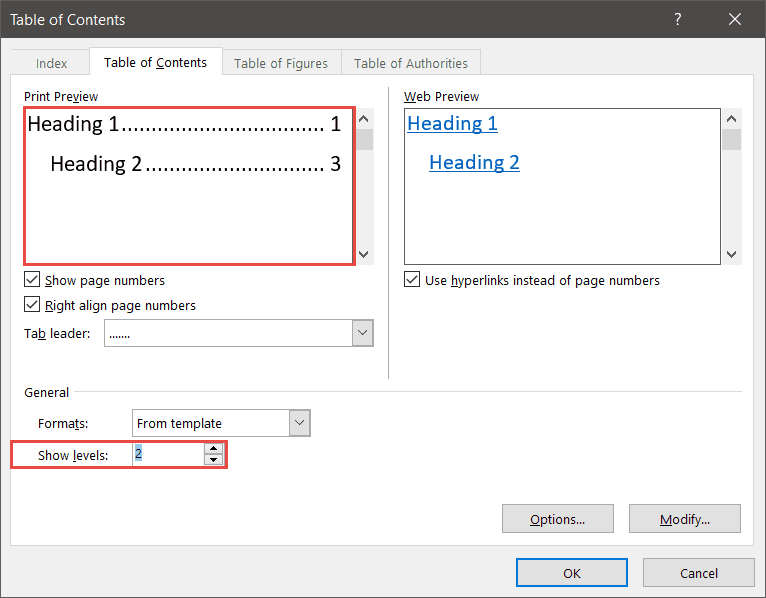
- To adjust how many heading levels are displayed in the table, select an option from the «Show levels» menu (the default is 3).
-
5
Click the Modify button. It’s in the lower-right corner of the window. This is where you can change the properties of the text on the table of contents page.
- If you don’t see this button, click the «Formats» menu and select From template. It should appear then.
-
6
Select a style and click Modify. The styles you can change appear in the «Styles» box on the left side of the window. When you click a style (e.g., TOC 1), you’ll see the font size, spacing, and other details—clicking Modify allows you to change these details.
-
7
Make your changes and click OK. You can choose different fonts, alignments, colors, and numerous other details for each selected style. Alternatively, you can keep the defaults, which come from the table of contents template you selected.
-
8
Click OK. The style changes you’ve made will apply to your table of contents immediately.


Advertisement
Ask a Question
200 characters left
Include your email address to get a message when this question is answered.
Submit
Advertisement
Video
Thanks for submitting a tip for review!
About This Article
Article SummaryX
1. Click the References tab.
2. Click Update Table.
3. Select an update option.
4. Click OK.
Did this summary help you?
Thanks to all authors for creating a page that has been read 59,876 times.
Is this article up to date?

This page covers the following topics:
- Page numbers
- Table of contents
- Setting page numbers on a part of a document
In most word processing programs, you can automatically add different parts, such as page numbers and tables of contents, to the document. This page contains information on how to use these functions. The instructions are for Microsoft Word, but the same principles can also be applied in other text processing programs.
Nearly all word processing programs have the ability to automatically add page numbers to a document. You should never add page numbers manually!
Adding page numbers
To add page numbers to your document, select the Insert tab on the ribbon, find the Header & Footer group and select Page number. A menu will be displayed (see image below), allowing you to select the location of the page numbers (top or bottom of page, page margins or the current position of the mouse pointer). Move the pointer to the desired location choice and select the suitable style from the alternatives in the submenu.
If you do not wish to add page numbering on the first page, select the Different First Page check box on the Header & Footer Tools tab, which comes up when the header and footer of the document are active. For more information on headers and footers, click here.
Removing page numbers
The page numbers are located in the header or footer of the document, depending on where you have chosen to add them. If you wish to remove a page number added in the way described above, follow these instructions:
- Go to the identifier in question You will see the page number in a text box.
- Click on the box to activate it.
- Remove it by pressing Delete.
For more information on adding page numbers, including instructions for how to start page numbering on a page other than the first page, please visit the Helpdesk site.
Setting page numbers on a part of a document
If you divide the document into parts, you can add page numbers to just one specific part of the document. For instance, for a Bachelor’s or Master’s Thesis, you usually do not want to have page numbers on the covers or the table of contents, so they should start with the actual body text.
When you want to divide the document into parts, follow these instructions:
If you need to add elements such as a cover page, several different page number systems or lists not included in the page numbering, section breaks are the key to creating them in your document!
Table of contents
Setting up a table of contents is easy if you have used the heading styles (Heading 1, Heading 2, etc.) to format the headers in your document. When you create a table of contents, the program will find the headings formatted using the styles and use them to generate the table of contents. The table of contents will show the document’s headings in the page order.
Word processors offer different predefined formats for tables of content. You can also change the appearance of the table of contents by editing the style of the table of contents. Styles for tables of contents are normally named from TOC 1 to TOC 9: the name of the style comes from the words Table of Contents, and the numbers refer to the heading levels.
If you change the appearance of the table of contents by editing it, any changes you make will disappear when you update the table of contents! To achieve permanent changes, edit the style used by the table of contents.
Creating a table of contents
To create a table of contents, your document must use heading styles. Move the cursor to the location where you want to place the table. Usually it is created on a blank page at the beginning of the document. You can create a new blank page in the document by placing the pointer at the beginning of the document and selecting Blank page on the Insert tab.
Then select the Table of contents icon in the Table of contents group under the References tab. A menu will open displaying the list of automatic table of contents styles available in the program, allowing you to select one to use in the new table of contents.
Customising the table of contents
Alternatively, you can customise the table of contents of your document as you wish by clicking Custom Table of Contents. This will open a dialog box (see image below). Now you can customise the appearance of your table of contents to suit your wishes. The Preview window displays the different options. At the bottom of the window, you can specify the settings for page numbers, the number of heading levels included in the table of contents, and the leader character to be used.
If you want to customise the appearance of the table of contents yourself, select From template. Then click Modify to open the Style dialog box. In the dialog box, you can make changes concerning fonts and other settings for the table of contents. Accept each change by clicking OK, and approve the settings by clicking OK. The program will create a table of contents at the location you specified.
Please note that the table of contents must be created in the document where the actual text is. Otherwise the table of contents cannot be updated.
Updating the table of contents
The table of contents is normally not updated automatically. When you add or remove text in the document, you also have to update the table of contents.
In Word, you can perform the update by right-clicking the table of contents and selecting the command Update Field in the pop-up menu. If you have added any new headings in the document or changed them, select the bottom option shown in the image below. In other cases, the top alternative, updating the page numbers only, is likely sufficient. Accept the update by clicking OK.
Multilevel list as a heading style
You can create multilevel lists as their own heading styles in the Styles menu on the Home tab. This will allow you to automatically number headings in the text. The numbers will also change automatically for each heading level and in the table of contents in case you insert new paragraphs and headings.

 To create a new multilevel list, go to the Home tab and in the Paragraph group, click on Multilevel List and then select Define New Multilevel List. In the window displayed, you can define the formatting and linking separately for each level.
Define a multilevel list in the following way:
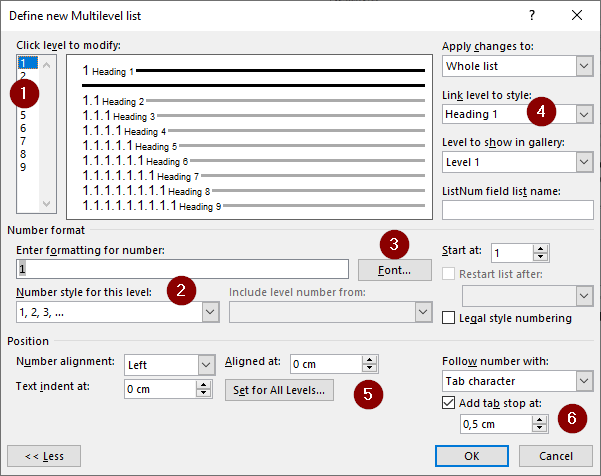
- First, select the level you want to edit. Start with level 1.
- Select the numbers in the Number style for this level In the Enter formatting for number field, enter the character you would like to include after the number, such as a dot or a bracket. To include numbers from previous levels in the heading, move the cursor in front of the number and select the numbers to add to the heading in the Include level number from menu. Always start with Level 1 and then add the other levels in order. You can also insert characters between numbers.
- The Font button allows you to edit the font settings of the numbers. This setting only changes the formatting of the number.
- The Link level to style button allows you to link the level to a specific heading level. Level 1 is linked to Heading 1, Level 2 to Heading 2, and so on.
- Use the Position field to define the position of headings. We recommend left-aligning the number. If you want all the headings to be at the same distance from the left margin, define the same number for each level in Aligned at. Text indent at defines where the text starts if the heading is divided across two lines. If you define the same value for Aligned at and Text Indent at, both lines will be aligned.
- Tab stop defines where the text of the heading starts after the number.
- To change the font and paragraph settings for the heading, go to the Styles group in the Home tab, right-click on the style you want and select Modify. Click on Format to access more formatting settings, including advanced font settings and paragraph settings.

You can find a multilevel list as a heading style in the University’s material bank, under Letter Templates https://uni.materialbank.net/ui/home?lang=en
This Contents Page in Word tutorial is suitable for users of Word 2010, 2013, 2016, 2019, and Word for Microsoft 365.
Objective
Create a Table of Contents for a Word document and update it to add new entries.
Table of Contents Explained
A Table of Contents page makes it easier for your readers to navigate and work with long documents. It gives documents a professional look and feel and helps you jump to a specific section quickly and easily.
A Table of Contents is usually inserted at the beginning of a document or just after a cover page. It can be modified to fit the overall style of the document and be updated easily with one click when new headings and paragraphs are added to the document.
The golden rule, when creating a contents page, is good preparation.
A Table of Contents relies on the document being formatted with heading styles in order to work correctly. Word scans the document and looks for anything marked with a heading style and pulls it through into the contents page. You can choose how many heading levels you would like to include.
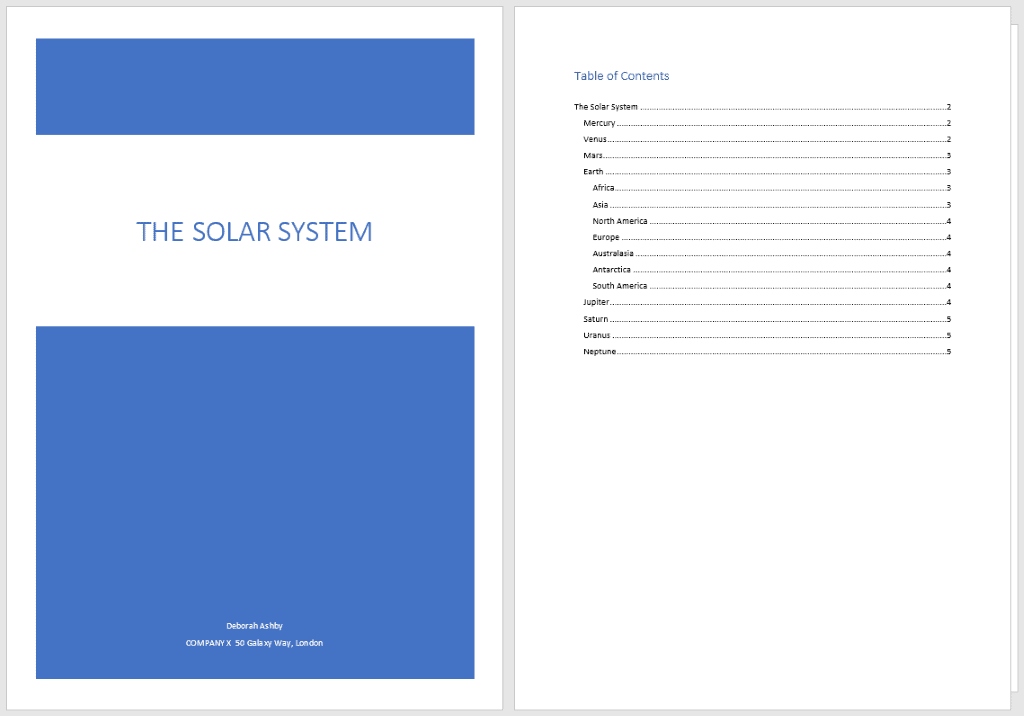
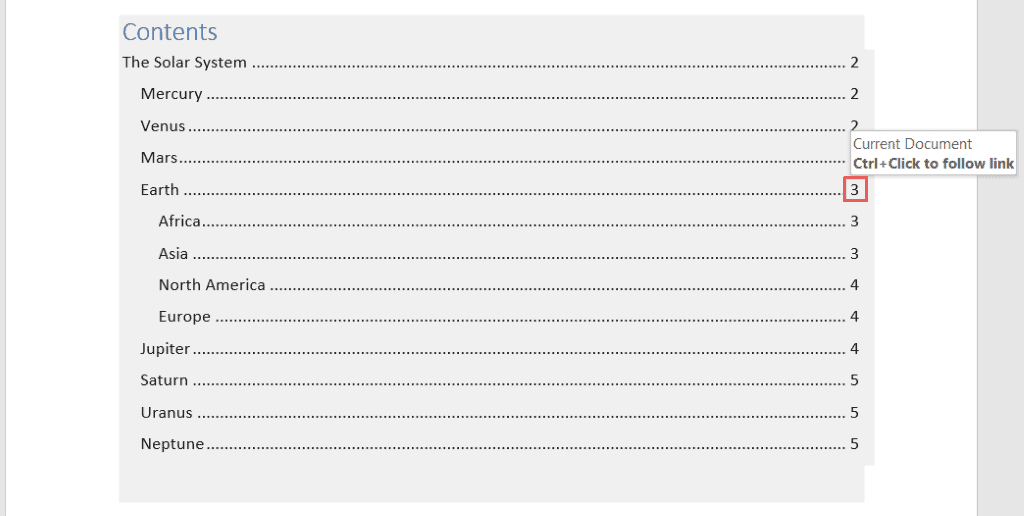
In this screenshot, I have pulled through 3 levels of heading.
Method
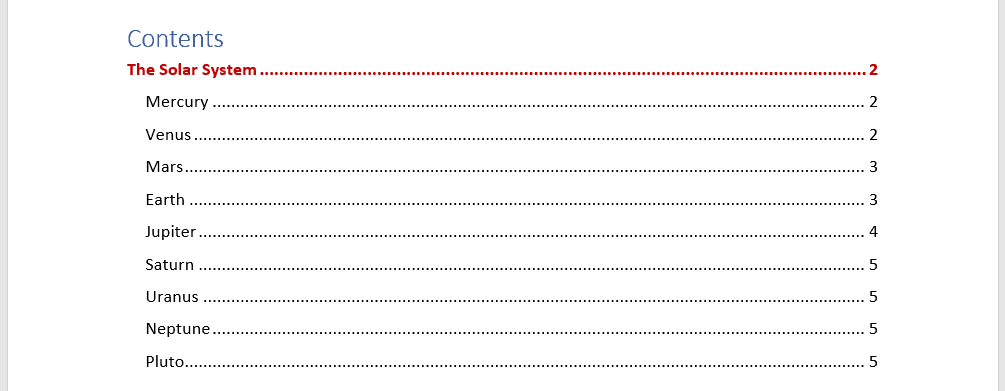
In this example, I am going to go through the process of creating, modifying, and updating a Table of Contents in Word for a document titled ‘The Solar System’.
Prepare the Word document
In order to successfully insert a Table of Contents page, you must first set-up the document correctly by using Word styles to denote headings.
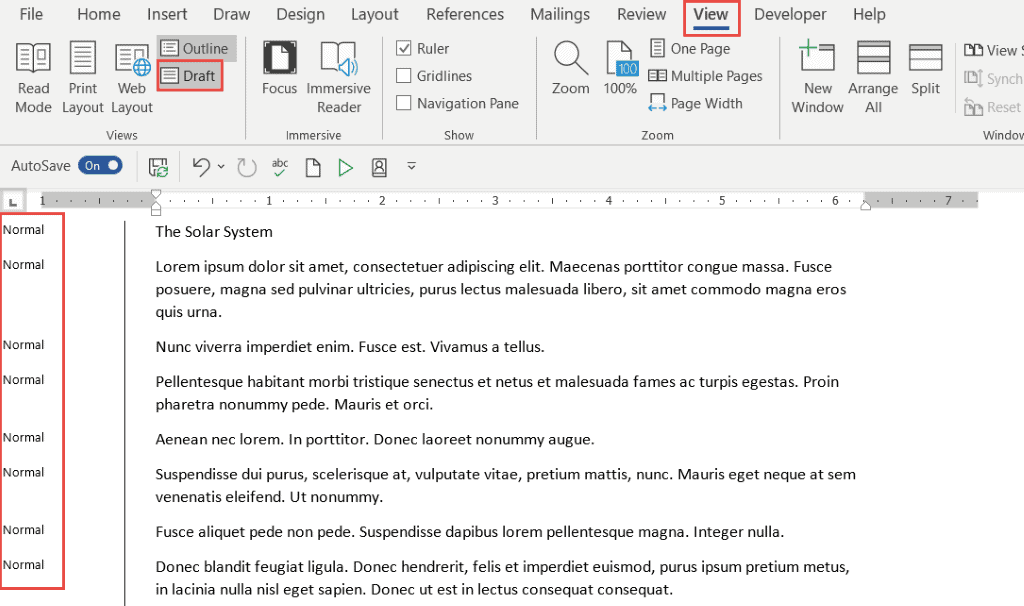
Switching to Draft View
You may find it easier to view your document in draft mode when working with styles, as it makes it easy to see which headings you’ve applied to which items.
- Click the View tab
- Click Draft
The style currently applied to each paragraph will display on the left-hand side of the document. Normal denotes no style has been applied.
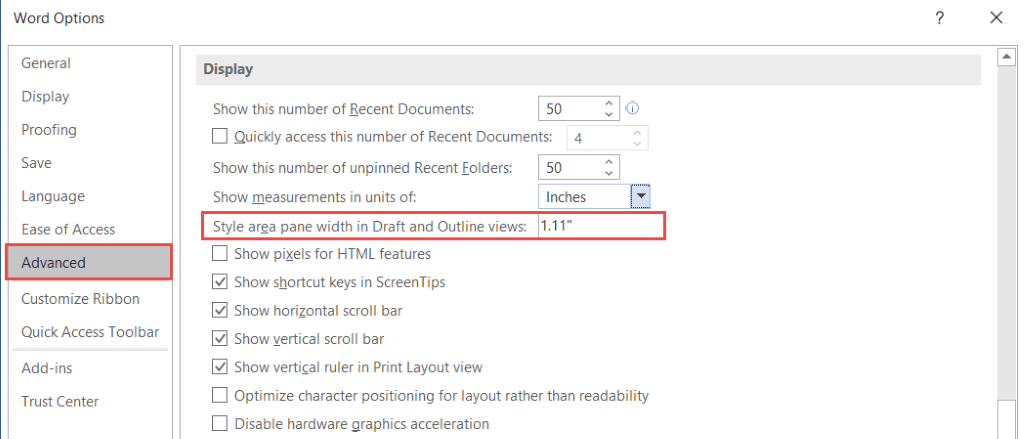
NOTE: When you switch to Draft view, if you do not see the style pane on the left-hand side, you will need to go into Word Options and turn it on.
- Click the File tab
- Click Options
- Click the Advanced tab
- Scroll down the Display section
If you cannot see the styles pane, it will say 0 inches. Set this to 1 – 2 inches and click OK.
Apply heading styles to the document
- Select the first main heading in your document
- Click the Home tab
- In the Styles group, click Heading 1
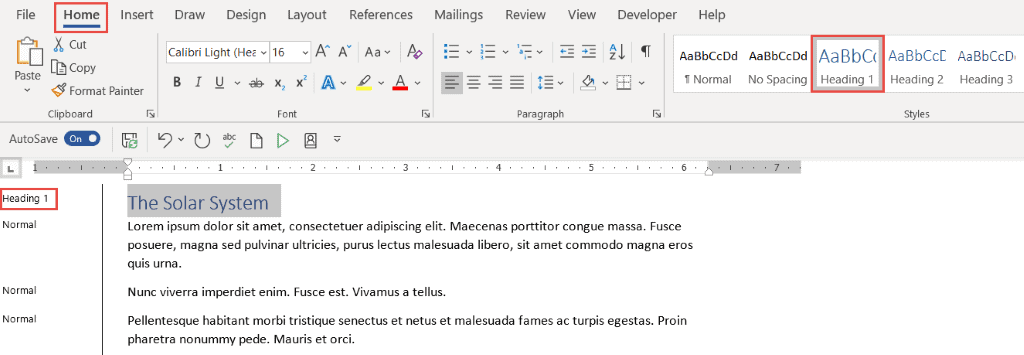
Scroll through the document and apply a Heading 1 style to all top-level headings
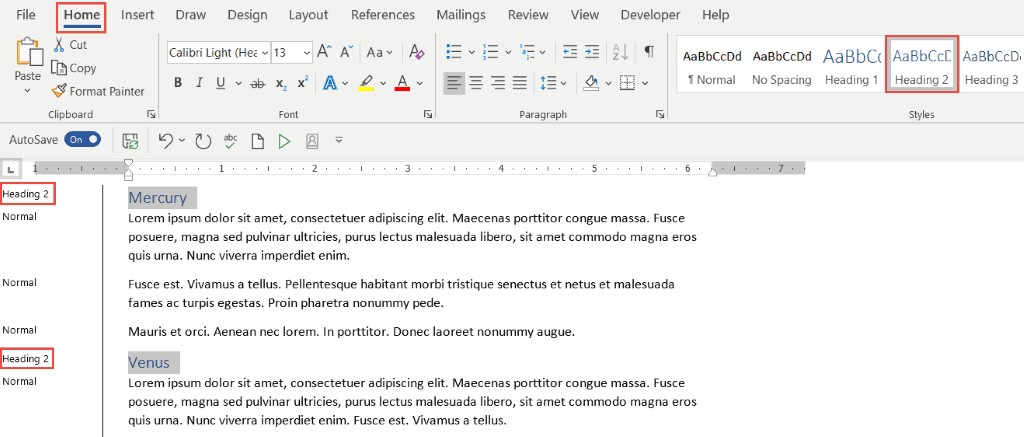
- Select the second-level headings in your document
- In the Styles group, click Heading 2
Apply a Heading 2 to all second-level headings in the document. You can hold down the CTRL key to select multiple headings at the same time.
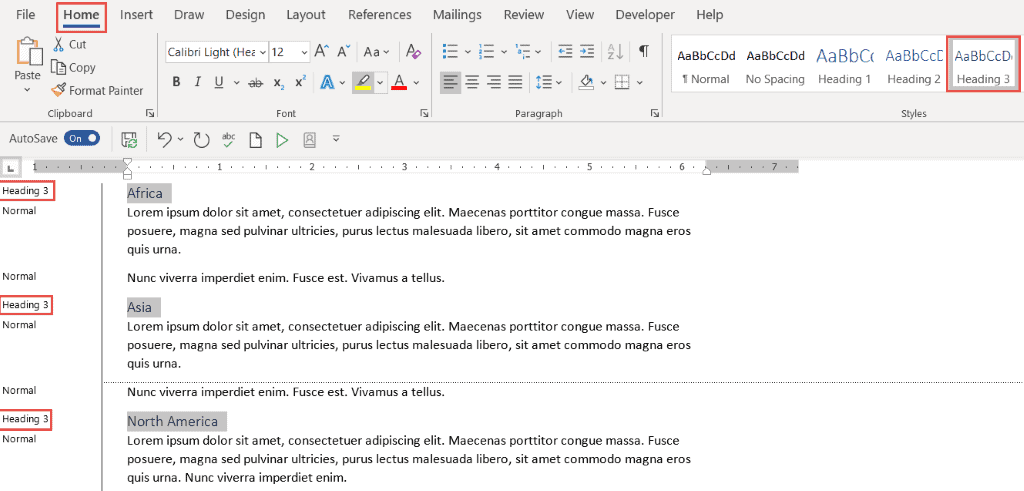
Repeat this process for any other headings in the document. In this example, I have three levels of heading in my document.
Once the document is styled and organized correctly, it becomes easy to insert a Table of Contents.
Insert the Contents Page
A contents page is normally inserted at the beginning of the document.
- Scroll to the top of the document and position the cursor before the first letter of the first word in the document
- Press CTRL+Enter to insert a page break
- Click the References tab
- Click Table of Contents
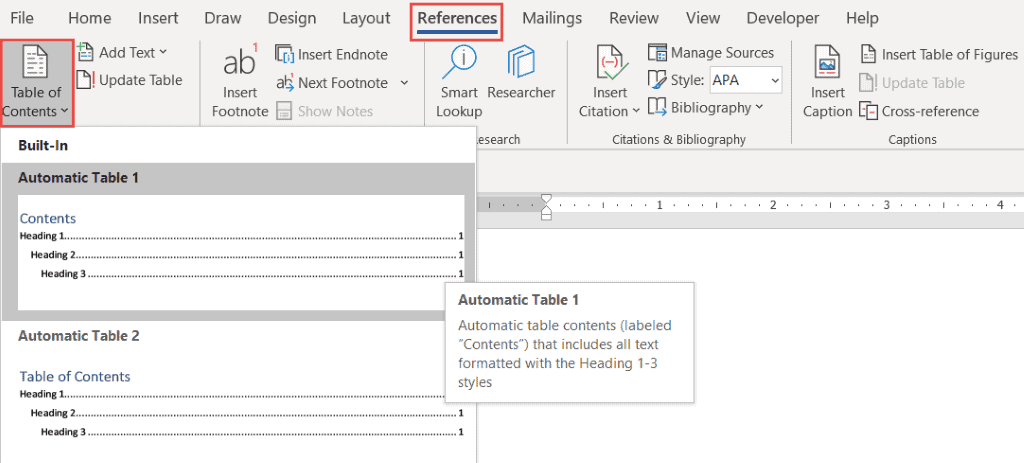
Word makes it simple to quickly add a Table of Contents by providing a small selection of in-built tables. In this example, I have selected Automatic Table 1.
Hold down the CTRL key and click on a page number to jump to that page.
Modify a Table of Contents
You can make changes to the Table of Contents and format it as you please.
- Click on the Table of Contents to select it
- Click on the References tab
- Click Table of Contents
- Click Custom Table of Contents
Tab leaders and levels
Tab leaders
Tab leaders are the dots you see between the heading and the page number in the Table of Contents. You can change these to solid lines or dashes.
Show levels
You can also specify how many levels of heading you want to show in the Table of Contents. For example, you might have four levels of heading in the document, but you only want to show two levels in the Table of Contents.
- Click OK
If you make a change to the Table of Contents, Word will ask if you would like to replace the current Table of Contents.
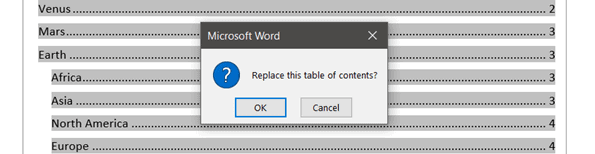
- Click OK to replace
Updating a Table of Contents
It’s rare for a document to stay the same forever. New paragraphs might be added either at the end of the document or somewhere within it. With each new addition, headings are pushed on to new pages, and the new items need to be added to the Table of Contents.
Fortunately, it’s very easy to update a Table of Contents in Word.
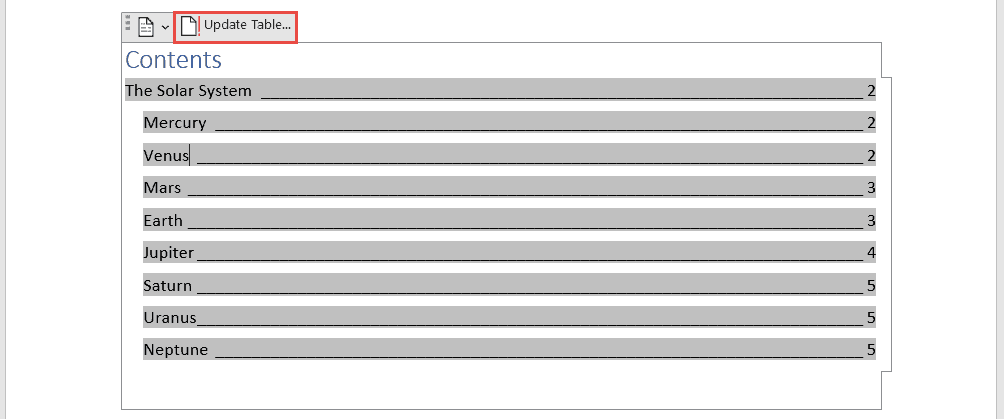
In this example, I’ve added a paragraph for ‘Pluto’ at the end of the document. I’ve formatted it with a heading 2 style.

I now need to update my Table of Contents to include the additional heading.
- Click on the Table of Contents to select it
- Click the Update Table button
Word will ask if you want to update the pages numbers only or the entire table.
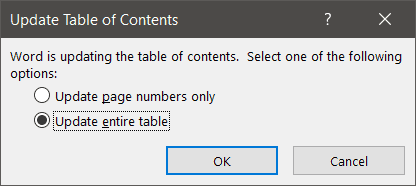
If you have reorganized your document and moved headings on to different pages but not added any new headings, you could select ‘Update page numbers only.’ For everything else, select ‘Update entire table.’
Custom Table of Contents
You can customize the look and feel of your Table of Contents by modifying the formatting. For example, you might decide that you want all level 2 headings to display in a bold, red font.
- Click on the Table of Contents to select it
- Click on the References tab
- Click Table of Contents
- Click Custom Table of Contents
- Click Modify
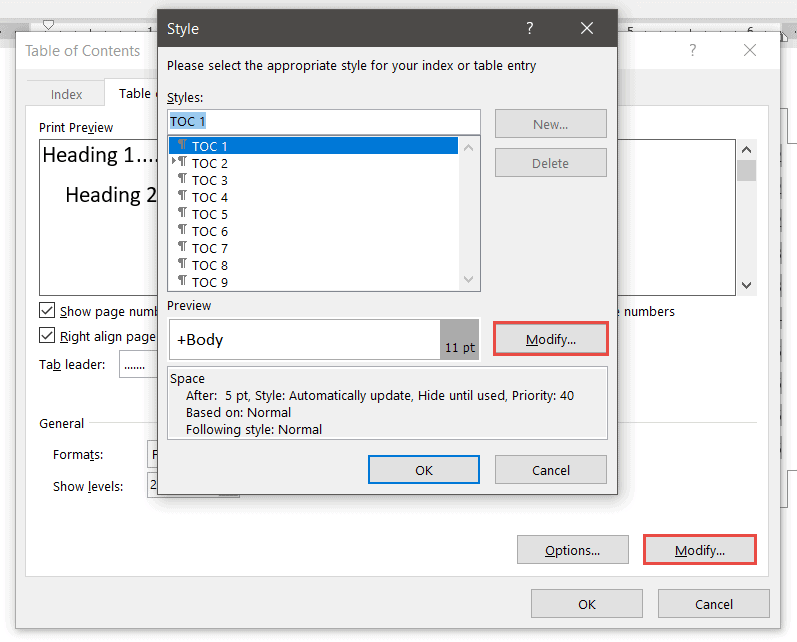
Modifying ‘TOC 1’ will affect all level 1 headings. Modifying ‘TOC 2’ will affect all level 2 headings and so on.
- Select TOC 1
- Click Modify
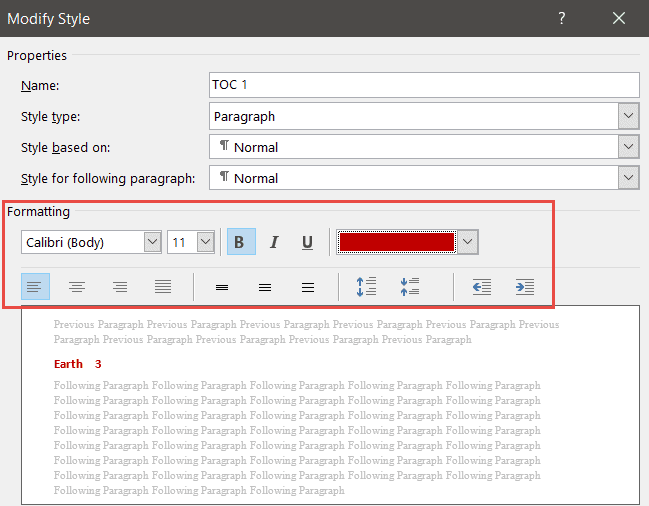
- Make the desired formatting changes
- Click OK
Video Tutorial
To see a demo of how to create a Contents Page in Word, please watch the following video tutorial.
How to create a Contents Page in Word Video (15:09)
For more Free Microsoft Office tutorials from Simon Sez IT. Take a look at our MS Office Resource Center.
To learn Word with Simon Sez IT. Take a look at the Word courses we have available.
Deborah Ashby

Deborah Ashby is a TAP Accredited IT Trainer, specializing in the design, delivery, and facilitation of Microsoft courses both online and in the classroom.She has over 11 years of IT Training Experience and 24 years in the IT Industry. To date, she’s trained over 10,000 people in the UK and overseas at companies such as HMRC, the Metropolitan Police, Parliament, SKY, Microsoft, Kew Gardens, Norton Rose Fulbright LLP.She’s a qualified MOS Master for 2010, 2013, and 2016 editions of Microsoft Office and is COLF and TAP Accredited and a member of The British Learning Institute.

Microsoft Word offers an easy way to add different styles of page numbers to your document. If you’ve got a simple document, it works well enough. But if you’ve worked with Word for a while and use it to create more complex documents, you know page numbering can get a little flaky. So let’s take a closer look.
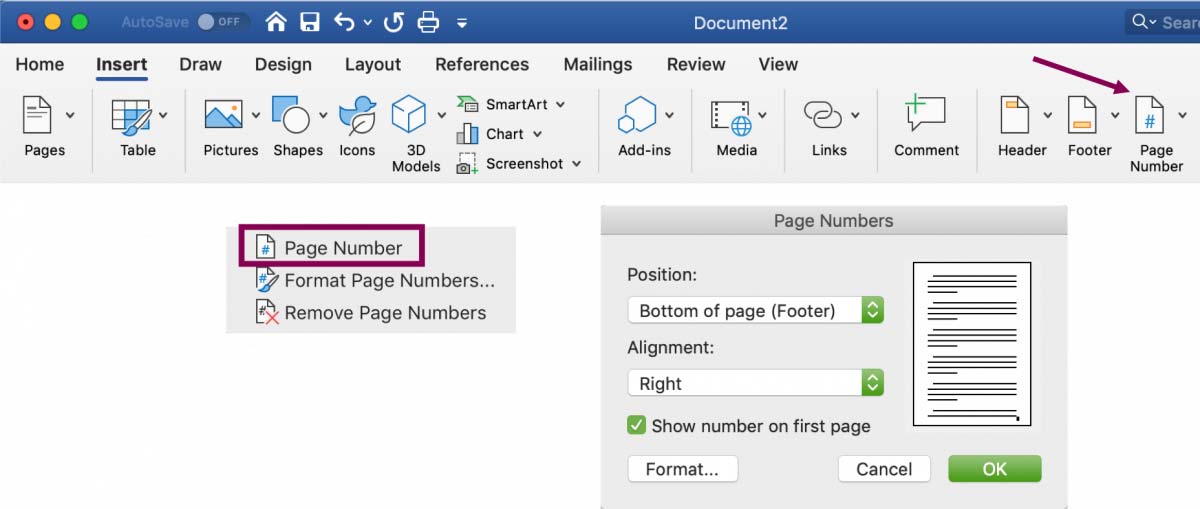
To add page numbers to your Word document, switch over to the “Insert” tab on the Ribbon and then click the “Page Number” button in the “Header & Footer” section.

A drop-down menu shows several different options for where you’d like the page numbers to appear—top of the page, bottom of the page, and so on. The last couple of options let you format your page numbers more precisely (something we’ll look at a bit later in this article) or remove page numbers from your document.
Hover over one of the first four options and a page number gallery appears. Each option in the gallery gives you a general idea of how the page numbers will look on your page.
Once you find an option you like, go ahead and click it to have Word automatically number all the pages of your document in that style. In this example, we’ve selected the “Accent Bar” style in the “Page X” format.
RELATED: How to Insert Page X of Y into a Header or Footer in Word
If you inserted page numbers at the top or bottom of the page, the header or footer area of your document automatically opens up, and you can make any addition you like around your new page numbers. When you’re ready to get back to your document, you can tap the “Close Header & Footer” button on the Ribbon or double-click anywhere in your document outside the header or footer area.
That’s the simple version of adding page numbers, and it works well enough if you’ve got a simple document—one where you want all the pages numbered, and you want them numbered using the same convention.
For some documents, though, you’ll want to get a little fancier. For example, what if you don’t want the page number to appear on the first page of the document (or on the first page of each section)? Or what if you want the page number placement to be different on odd and even pages, the way it is in a book? Or what if you have different sections that you want to be numbered differently—like an introduction or table of contents where you want Roman numerals instead of the Arabic numerals used in the rest of your document?
Well, Word has a way to do all of that.
How to Make Page Numbering Not Appear on the First Page of a Document or Section
When your first page is a title page, you might want to use a different footer or header for it than you use in the rest of your document and you might not want the page number to show up on that page. When you open your header or footer section by double-clicking somewhere in those areas, Word opens a new “Design” tab on the Ribbon in a section named “Header & Footer Tools.”
On that tab, you’ll find a “Different First Page” option.
The critical thing to know here is that this option applies to the section of the document where your insertion point is currently placed. If you only have one section in your document, selecting the “Different First Page” option makes the current header and footer disappear from the first page of your document. You can then type in different information for your header or footer on the first page if you want.
If you have multiple sections in your document, you can change the header and footer for the first page of each section. Say you were writing a book with different chapters and you had each chapter set up in its own section. If you didn’t want the regular header and footer (and page numbers) showing up on the first page of each section, you can just place your insertion point somewhere in that section and then enable the “Different First Page” option.
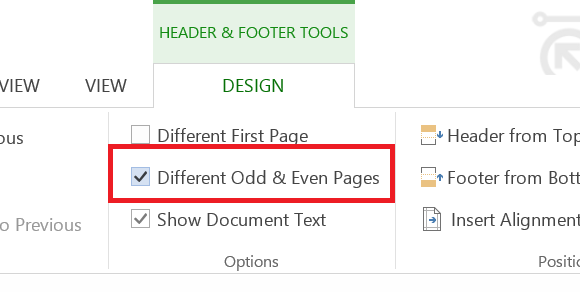
How to Number Odd & Even Pages Differently
You can also set up page numbering so that the position of the page numbers is different on odd and even pages. You’ll find that most books take this approach so that the page number appears toward the left side on the left (even) pages and toward the right side on the right (odd) pages. This prevents the page numbers from being obscured by the book’s binding and makes them easier to see as you flip through pages.
Word also has an option for that. On that same “Design” tab in the “Header & Footer Tools” section of the Ribbon, just click the “Different Odd & Even Pages” option.
Word automatically formats the page numbers to appear the way they would in a book, and you can then make any manual adjustments you want.
How to Add Different Numbers and Formats to Different Sections
Most documents use Arabic numerals (1, 2, 3, etc.) in the main body of the document and some use Roman numerals (i, ii, iii, etc.) for different sections like the table of contents, introduction, and glossary. You can set up your document this way in Word, too.
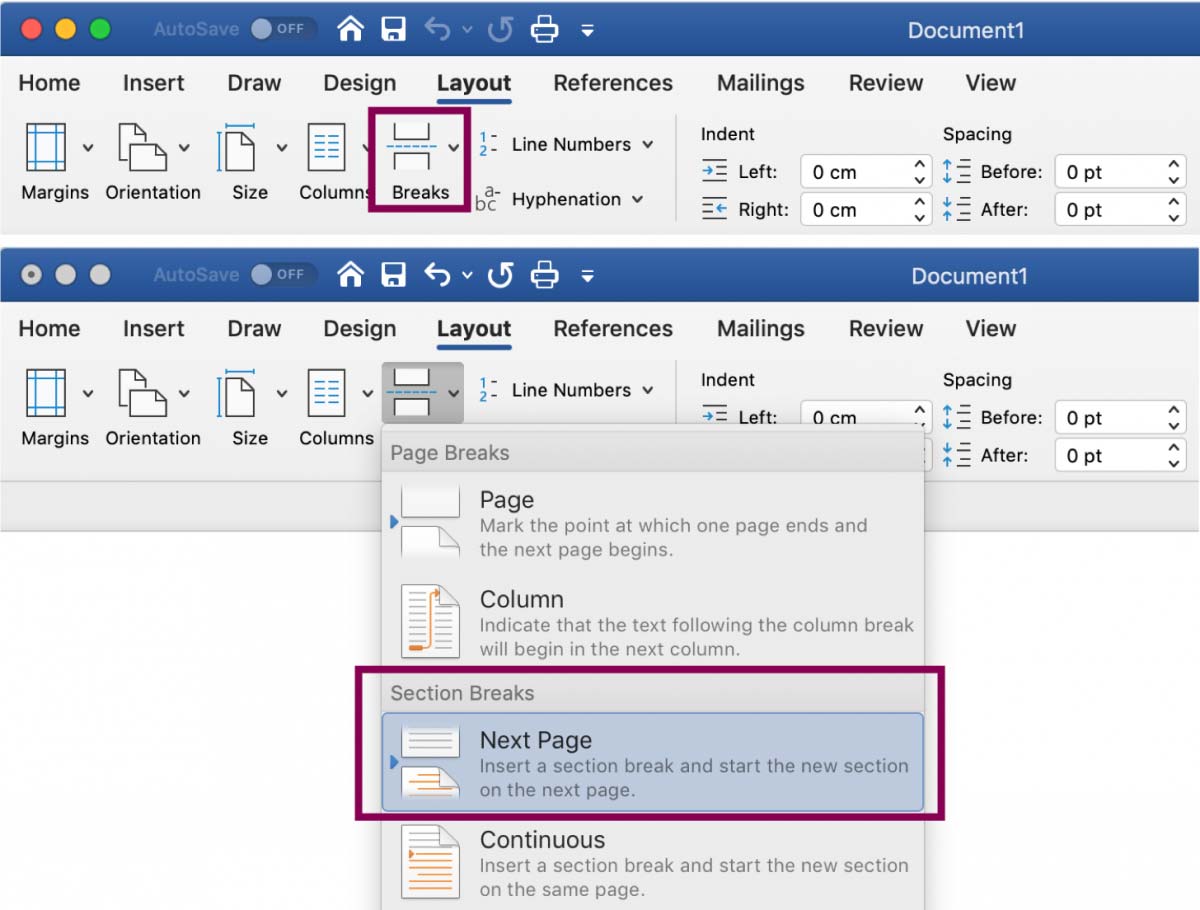
The first thing you’ll need to do is create different sections in your document for these different parts of your document. So, for example, if you wanted your table of contents and introduction to be numbered differently than the main body of your document, you’d need to create a different section up front to hold those parts.
To do this, place your insertion point at the very beginning of your document (if you haven’t already created that preliminary content) or place it right before the first page of your main content (if you have already created the preliminary content).
Switch over to the “Layout” tab on the Ribbon and click the “Breaks” button.
In the drop-down menu, click the “Next Page” option. As the description says, this creates a section break and starts the new section on the next page.
Now that you’ve created the separate section, you can change the format of the page numbers there. The first thing you’ll want to do is break the link between your new preliminary section and the next section where the main body of your document starts. To do that, open up the header or footer area (wherever you have your page numbers) in the main section of your document. On the “Design” tab in the “Header & Footer Tools” section of the Ribbon, click the “Link to Previous” option to break the link to the previous section’s header and footer.
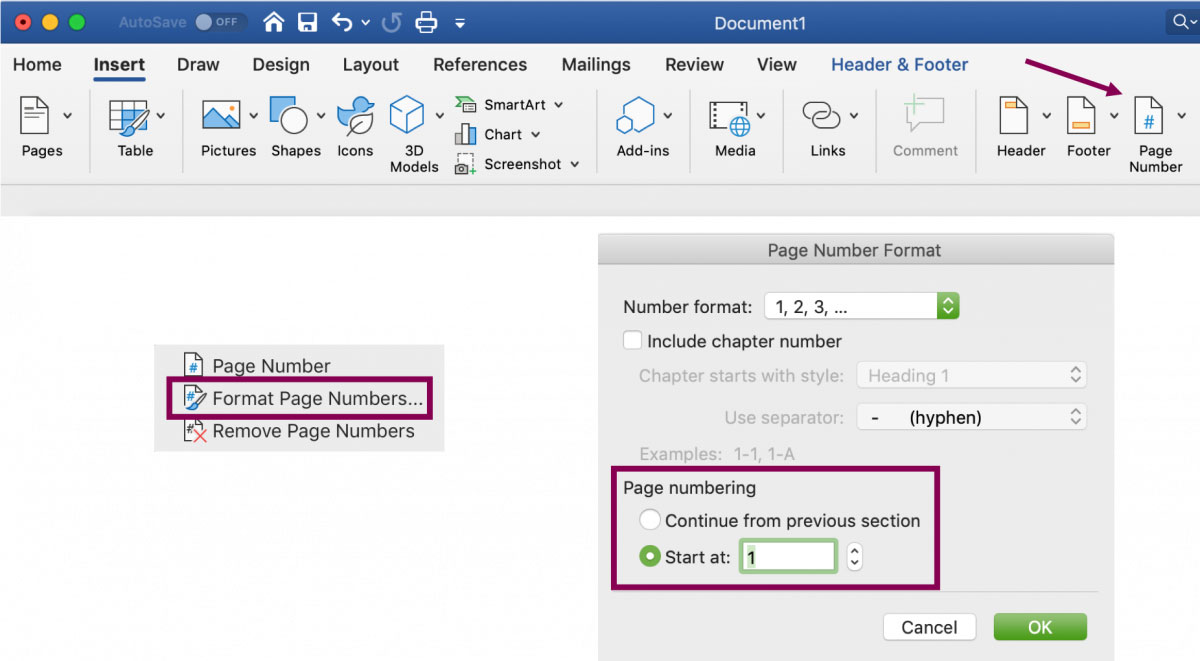
Now that you’ve broken the link, you can fix the page numbering the way you want it. This takes a few steps.
Start by opening up the header and footer area of any page in that preliminary section. You’ll see that the page numbering persists from before you created the new section break.
Right-click the page number and choose the “Format Page Numbers” command from the context menu.
In the Page Number Format window, select the type of numbers you want to use for the section from the “Number Format” drop-down menu. Here, we’ve gone with standard lowercase Roman numerals. Click “OK” when you’re done.
And you can see that our page numbering in that section has changed to Roman numerals.
There’s one more step you’ll need to take, though. Scroll down to the first page in your next section (the one with the main body of your document). You’ll see that the page numbering likely doesn’t start off at page one. That’s because it maintained the same numbering it had before you created that additional section.
It’s an easy fix, though. Right-click the page number and choose the “Format Page Numbers” command from the context menu.
In the Page Number Format window, select the “Start At” option and then set the box at the right to “1” to start the section off on page one.
That’s all there is to it. Now you should have two sections with different numbers and formats.
Controlling Page Numbers Using Fields
Word numbers all your pages, but those numbers remain hidden unless you tell Word to display them. By inserting a field code anywhere on the page, you can tell Word to reveal the page number. This option gives you fine control over page numbers. It also lets you put numbers anywhere you need and not just in the headers, footers, and margins. For example, you could put them in a text box if you wanted to.
Place your insertion point where you’d like to insert page numbers and then press Ctrl+F9 to insert a pair field brackets, which look like this: { }. Then, type “PAGE” inside the brackets like this:
You can also use a few switches along with the PAGE command that gives you some control over the style in which your numbers appear. Use one of the codes below to give your numbers the look you need.
{ PAGE * Arabic }
{ PAGE * alphabetic }
{ PAGE * ALPHABETIC }
{ PAGE * roman }
{ PAGE * ROMAN }
To finish, right-click anywhere between the brackets and choose the “Update Field” command from the context menu.
Here’s an example of a page number we’ve inserted into a text box at the bottom right of our page.
Fixing Broken Page Numbers
If your page numbers are broken in a document—maybe they appear non-sequentially or restart seemingly at random—it’s almost always because of problems with sections.
For Word, a document isn’t really a thing when it comes to formatting. Word breaks things down into sections, paragraphs, and characters—and that’s it.
To fix broken page numbering, start by identifying the sections in your document. The easiest way to do this is to switch over to the “View” menu on the Ribbon and then click the “Draft” button to enter draft view.
In draft view, Word shows you exactly where section breaks occur and what kinds of breaks they are.
When you’ve identified the location of your section breaks, switch back over to the Print Layout view (so you can see headers and footers easier). This is where you’ll need to start doing some detective work.
Make sure that that the sections where you want continuous page numbering have their headers and footers linked together and that sections where you don’t want continuous numbering have that link broken. You can also use the methods we’ve covered in this article to make sure the page numbering of sections start at the right number
READ NEXT
- › How to Add Page Numbers to Google Docs
- › Learn These Microsoft Word Features to Make College Easier
- › How to Rearrange Pages in Microsoft Word
- › How to Print Double-Sided in Microsoft Word
- › How to Cross-Reference in Microsoft Word
- › How to Create a Book in Microsoft Word
- › BLUETTI Slashed Hundreds off Its Best Power Stations for Easter Sale
- › The New NVIDIA GeForce RTX 4070 Is Like an RTX 3080 for $599
In more formal texts, such as theses and dissertations, it is common that page numbers only start with the introduction or background. In other words, the pages that include your title, abstract and table of contents are usually not numbered.
This step-to-step guide describes how to start numbering your pages on, for instance, page 3. Note that exactly where you begin numbering your pages depends on your specific text and which layout is required.
The guide is made for the latest version of MS Word, both for PC and Mac.
1. Start by clicking on ¶ to show the section break.

2. Put the cursor after the text on the page that should be the last page without a page number, for example, the table of contents.
3. Click on the Layout tab. Select Breaks → Sections Breaks → Next Page.
4. Put the cursor on the page where the page numbering should start (that is, section two in the document).
5. Click on the Insert tab and Page Number. Select position and style for pagination.
6. Click on the bottom of the page to activate the Header & Footer menu. Deactivate Link to Previous and check that Different First Page is unchecked.

7. To ensure your pages begin with 1, go to the Insert tab → Page Number. Select Format Page Numbers… → Page numbering → Start at and add 1.
8. Manually delete the page numbers on the first pages of section 1 by double-clicking on them and then deleting them.
9. That’s it, you’re finished. Well done!
No matter how great your idea is, the difference between your business proposal and someone else’s could boil down to the look and feel. A title page, header and footer, table of contents, and other elements separate a professional-looking document from a dull sea of text. It’s worth your time to learn how Word’s tools and wizards make such formatting easy—and keep exploring other ways to present your work in the best possible light.
Any type of professional-looking document should have headers and footers. Headers and footers are where the title of your document, the page number, and any footnotes and citations you’ve referenced in the body of your paper will reside. Based on the type of document you’re creating, you’ll want a header, footer, or both to house relevant information for the reader to reference.
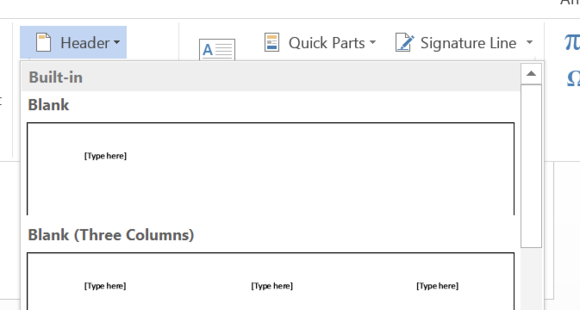
To insert a header and footer, use the Header & Footer menu in the Insert ribbon.
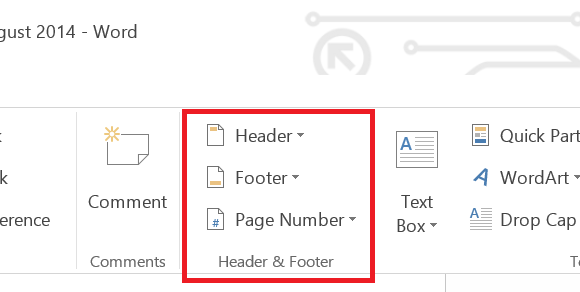
Creating a header and/or footer
To get to the Header and Footer submenu, click Insert. Depending on which you want to insert, click on either the Header or Footer drop-down menu, and select a format for the section.
Word has several types of header and footer formats available, plus you can find user-submitted formats on Office.com.
If you’re creating both a header and a footer, you’ll want to pick the same format to ensure you end up with a consistent-looking document.
Adding content to your header/footer
The header and footer Design ribbon has all the tools you’ll need to add content to those sections.
Everything you need to build your header and footer will appear in the Design tab.

The first thing everyone should add is a page number. In the ‘Header & Footer’ section of the Insert ribbon, click the Page Number drop-down menu and select the formatting. In addition to the options built into Word, you can find user-submitted choices on Office.com.
One of the most important things to do on all documents is inserting page numbers. Fortunately, it’s easy to do.
To give your page numbers the book effect (page numbers show up on the lefthand or righthand sides of pages alternately), check Different Odd & Even Pages. Now, you can change content in your headers and footers on odd and even pages independently.
From there, use the Insert Page Numbers tool and text justification settings on the “Home Ribbon” to have them appear on the left and right hand side of your document.
To achieve the book effect for page numbers in your header, you’ll need to change the settings so you have different odd and even page numbers. Insert page numbers and use justification settings to position the text.
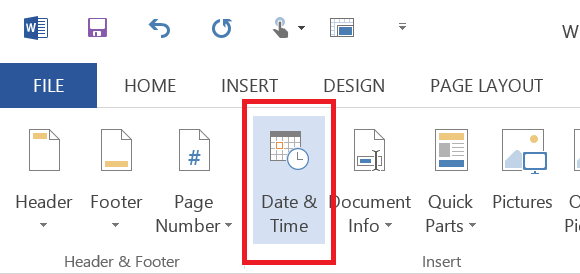
You can also insert the date and time the document was created using the Date & Time wizard on the Text submenu, choosing from a wide variety of formats. Use the left, center, and right justification options in the Home ribbon to align your content within the header and footer.
You can insert the date and time into your header or footer with just two clicks.
Tables of contents
Microsoft made it pretty easy to create a table of contents that is both functional and attractive. Best of all, some of the options will update your table of contents automatically, so you don’t need to update titles or page numbers every time you make a change.
A table of contents is essential for longer documents to help your reader keep track of where they are. Creating one is as easy as a few mouse clicks.
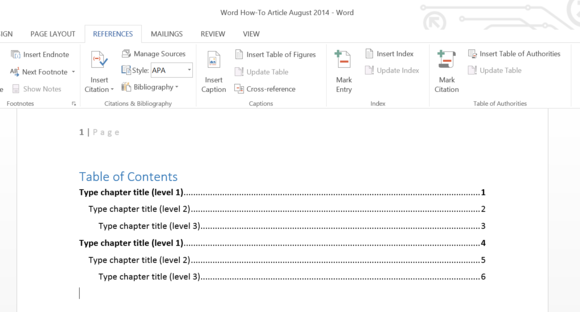
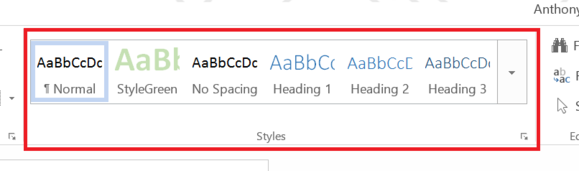
To take best advantage of the automatic tables of contents, make sure your in-document headers are formatted appropriately. Select the header text you’d like to format, and click Home.
In the Styles submenu, you’ll see options for Heading 1, Heading 2, and Heading 3. Just mouse over any of these header options to preview that style on your text, and click to apply.
It’s very important to use Microsoft’s built-in heading font styles if you want to use an automatic table of contents.
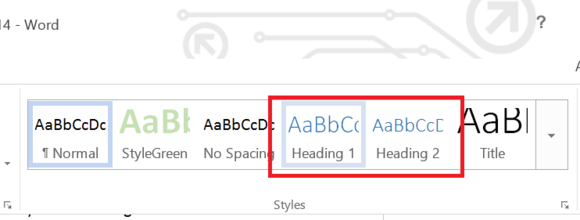
Make sure your headings are used hierarchically. Heading 1 should be a major section, while Heading 2 should be a subsection, for example.
Next, I’ll show you how to insert your table of contents into your document.
Inserting your table of contents
Once your document headers are formatted, click References, then the Table of Contents drop-down menu.
This dropdown menu will bring up three built-in options for your table of contents. You can also find some alternative options online.
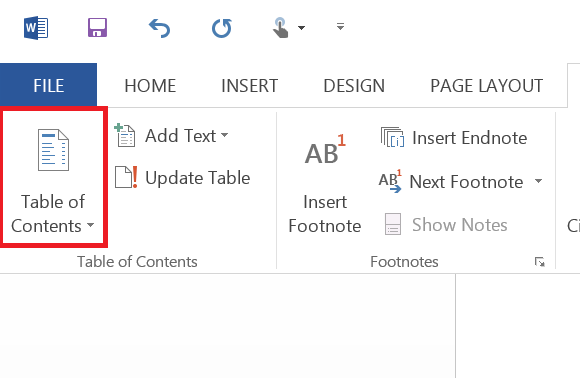
As with most of the other Word functions, the Table of Contents wizard gives you several options. Two automated formats update your table based on text formatted in Headers 1 through 3, and a manual version lets you do as you wish.
The two automatic options will automatically fill in any new headers and update the page numbers whenever you click Update Table.
If you’d rather update your table of contents manually, you can either insert the one manual template, or create one of your own. If you use the manual template, Word will give you a few placeholders to get you started.
If you prefer, you can insert a manual table of contents and edit the text yourself. Just remember to update it as you add content.
You can delete or copy and paste the different levels to customize your table. Simply edit the text boxes for chapter title and page number to update the listing.
Title pages
Title pages lend a finished look to reports, proposals, and other professional documents. They provide an opportunity to set the stage for the contents, as well as communicate basic information such as authorship. Some organizations require a specific format for the title page.
Every good story needs a cover page, and Word’s built in templates help you make a good-looking cover page in no time.

If you’re not constrained by a prescribed format, you can customize the title page to your heart’s content. The built-in wizard makes a cover page in a few easy clicks, or there’s also a manual tool.
Using the wizard
To use the Wizard, click Insert > Cover Page. You can select one of the dozen or so templates built into Word itself, or search through Office.com for Microsoft and user-created templates.
If you’re the kind of person to set it and forget it, you can use the Cover Page Wizard to create your front page. You can use template cover pages built into Word and user submitted options on Office.com.

The premade templates have text boxes you can click and customize. Some have images you can replace with your own. With the Wizard, creating a cover page takes less than a minute, and they look just as good (or even better) than what you could build on your own.
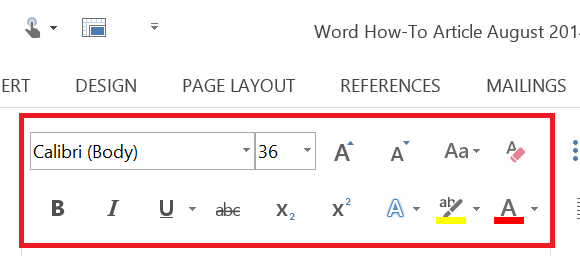
Change the font
Text styling options are found in the Home ribbon in Word. Under the Styles subsection, you can select from several text formats Microsoft has built into Word, or you can create a style unique to your paper.
A solid font and font size can really make your cover page pop, and it’s as simple as clicking a few dropdown boxes and toggle buttons.
Click the drop-down menu to select and apply a style, or launch the creation tool. Click on the selected style to apply it to your selected text.
Word even has preset font styles that can help you focus on content instead of formatting.
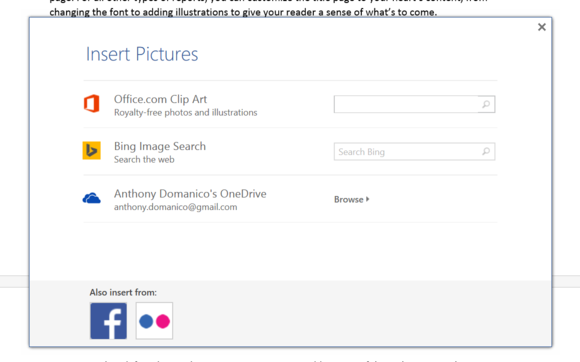
Insert images
Images add impact to title pages and contents alike. Click Insert > Pictures or select Online Pictures from the Illustrations submenu. Pictures pulls an image from your computer’s hard drive, while Online Pictures pulls images from Office clip art, Bing, OneDrive, Facebook, or Flickr.
In addition to images on your hard drive, you can use images from Office.com, Bing, OneDrive, Facebook, or Flickr.
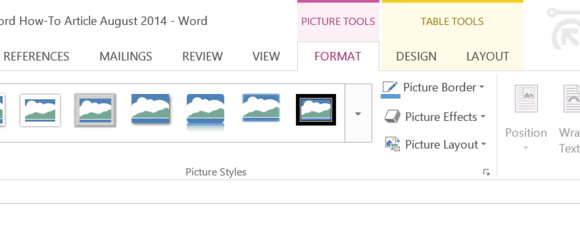
When you insert an image, click and drag on any of the eight points surrounding your image to resize it. You can set text to wrap around your image. You can also add borders, artistic effects, and more from the Format menu that appears the image is selected.
For quick edits and effects, you can use Word’s built-in image manipulation tools to jazz up your image.
Once you’ve mastered Word’s formatting tools, you’ll never be able to go back to the standard Blank document. It’s amazing how even page numbers can make your work look more organized, and how well-placed images deepen the impact of your content. If you’re a Word formatting geek, let us know your favorite tricks in the comments.

Contents
- 1 How to Add Page Numbers in Word
- 2 How to Format Page Numbers in Word
- 3 How to Start Page Numbers over in Word (Restart Numbering)
- 4 How to Skip the First Page Number in Word
- 5 How to Change Types of Page Numbering in Word
- 6 How to Leave the Header and Footer or Design Bar
- 7 Extra: How to Add Line Numbers in Word
- 8 Extra: How to Add a Page Border in Microsoft Word
Microsoft Word page numbering
Page numbers in Word are a valuable tool to help you order pages after printing or quickly reference information for other readers. Today, we’re going to show you how to add page numbers in Word, format them, and skip the first page number if necessary.
Inserting page numbers in Word is easy, modifying them not so much
Though inserting page numbers in Word in the base form is quite easy, it gets more complex once you start to modify them to suit your exact needs. Microsoft Word has a variety of styles, placement, and formatting choices that can make things feel a little overwhelming.
Not to worry, though – we’ll be breaking down all the major options so you can quickly get your page numbering in Word looking exactly how you want. Let’s get started:
If you’re wondering how to insert page numbers in Word, the first place you might think to look is the “Page Number” tool. Thankfully, you’d be right. This makes the entire process very simple:
- Open the “Insert” tab of the ribbon and press “Page Number > Bottom of Page > Plan Number 2”
Naturally, you can choose a different style for the page number if you like, such as the accent bar. You can also choose to have the number at the top of the page if you wish.


How to Format Page Numbers in Word
After inserting page numbers in Word, you may want to format them to match the styling of the rest of your document. You can quickly change aspects such as font, text color, size, center/right/left justification, and more. Here’s how:
- Double-click your page number and adjust the formatting options in the fly-out
You should already be familiar with the options here – they’re the same as they are for any other text. Once you’ve finished modifying the number, you can double-click anywhere that’s not in the footer to return to your document.


How to Start Page Numbers over in Word (Restart Numbering)
If you want your page numbers restart at a certain point, you need to make use of Word’s section breaks feature. This is a useful tool in many situations, so it’s worth familiarizing yourself with:
- Place your cursor at the start of the page you want to restart page numbers on and insert a “Next Page” break
To do so, open the “Layout” tab of your ribbon, click on “Breaks” below it, then press “Next Page” under the “Section Breaks” heading.

- Double-click the page number, then press “Page Number > Format Page Numbers…” in the ribbon
To clarify, you should double-click the page number of the page you’re planning to restart the page numbers on.

- Tick “Start at” under the page numbering heading select “1”, and press “OK”


How to Skip the First Page Number in Word
In many cases when adding page numbers in Word, you’ll want to skip the first page number. This happens most commonly when you have a cover page or title page. Here’s how to make page numbers start on page 2:
- Double-click the first page number and tick “Different First Page” in the ribbon
The “Different First Page” option can be found in the “Header & Footer” section of the ribbon, which should automatically appear once you double-click your page number.

- Delete the first page number
Due to the “Different First Page” option, deleting the first page number now won’t remove page numbers from the rest of your document.


How to Change Types of Page Numbering in Word
As well as the style, position and starting position of page numbers, you can change the type of page number. For example, whether the numbers take the form of numbers, letters, or Roman numerals, and whether they use dots or dashes:
- Double-click your number and press “Page Number > Format Page Numbers…” in the ribbon
- Press the dropdown arrow next to “Number format”, choose an option, and press “OK”
The changes will automatically apply to all of the page numbers in your Word document.


How to Leave the Header and Footer or Design Bar
If you find yourself stuck in the Header and Footer or design bar with no way to edit the rest of your document, you can use the following trick:
Press the “Esc” button on your keyboard
This will instantly exit the header and footer bar and bring you back to your normal document view.

As well as page numbers, you can add individual line numbers to your document so that you can reference part of it even more easily. Just follow our linked tutorial to do so.

While you’re at it, you can add a page border to your Word document to ensure a clear margin for annotations once it has been printed. You can read our dedicated guide here to learn how to do so.
