

-
Select Insert > Page Number, and then choose the location and style you want.
-
If you don’t want a page number to appear on the first page, select Different First Page.
-
If you want numbering to start with 1 on the second page, go to Page Number > Format Page Numbers, and set Start at to 0.
-
When you’re done, select Close Header and Footer or press Esc.
Tip: To get back to a header or footer to make changes, double-click in the header or footer area.
-
On the Insert tab, click the Page Number icon, and then click Page Number.
-
Select a location, and then pick an alignment style. Word automatically numbers every page, except designated title pages.
-
To change the numbering style, select Format and then choose the formatting you want to use.
-
Select OK twice to close both dialog boxes.

This page covers the following topics:
- Page numbers
- Table of contents
- Setting page numbers on a part of a document
In most word processing programs, you can automatically add different parts, such as page numbers and tables of contents, to the document. This page contains information on how to use these functions. The instructions are for Microsoft Word, but the same principles can also be applied in other text processing programs.
Nearly all word processing programs have the ability to automatically add page numbers to a document. You should never add page numbers manually!
Adding page numbers
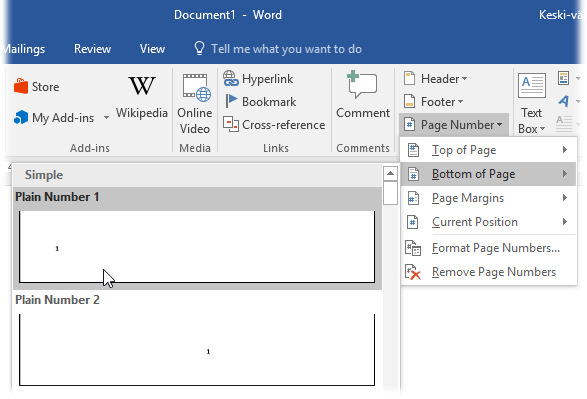
To add page numbers to your document, select the Insert tab on the ribbon, find the Header & Footer group and select Page number. A menu will be displayed (see image below), allowing you to select the location of the page numbers (top or bottom of page, page margins or the current position of the mouse pointer). Move the pointer to the desired location choice and select the suitable style from the alternatives in the submenu.
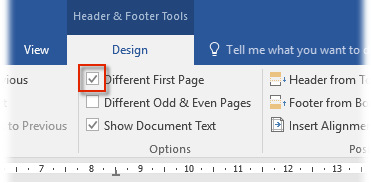
If you do not wish to add page numbering on the first page, select the Different First Page check box on the Header & Footer Tools tab, which comes up when the header and footer of the document are active. For more information on headers and footers, click here.
Removing page numbers
The page numbers are located in the header or footer of the document, depending on where you have chosen to add them. If you wish to remove a page number added in the way described above, follow these instructions:
- Go to the identifier in question You will see the page number in a text box.
- Click on the box to activate it.
- Remove it by pressing Delete.
For more information on adding page numbers, including instructions for how to start page numbering on a page other than the first page, please visit the Helpdesk site.
Setting page numbers on a part of a document
If you divide the document into parts, you can add page numbers to just one specific part of the document. For instance, for a Bachelor’s or Master’s Thesis, you usually do not want to have page numbers on the covers or the table of contents, so they should start with the actual body text.
When you want to divide the document into parts, follow these instructions:
If you need to add elements such as a cover page, several different page number systems or lists not included in the page numbering, section breaks are the key to creating them in your document!
Table of contents
Setting up a table of contents is easy if you have used the heading styles (Heading 1, Heading 2, etc.) to format the headers in your document. When you create a table of contents, the program will find the headings formatted using the styles and use them to generate the table of contents. The table of contents will show the document’s headings in the page order.
Word processors offer different predefined formats for tables of content. You can also change the appearance of the table of contents by editing the style of the table of contents. Styles for tables of contents are normally named from TOC 1 to TOC 9: the name of the style comes from the words Table of Contents, and the numbers refer to the heading levels.
If you change the appearance of the table of contents by editing it, any changes you make will disappear when you update the table of contents! To achieve permanent changes, edit the style used by the table of contents.
Creating a table of contents
To create a table of contents, your document must use heading styles. Move the cursor to the location where you want to place the table. Usually it is created on a blank page at the beginning of the document. You can create a new blank page in the document by placing the pointer at the beginning of the document and selecting Blank page on the Insert tab.
Then select the Table of contents icon in the Table of contents group under the References tab. A menu will open displaying the list of automatic table of contents styles available in the program, allowing you to select one to use in the new table of contents.
Customising the table of contents
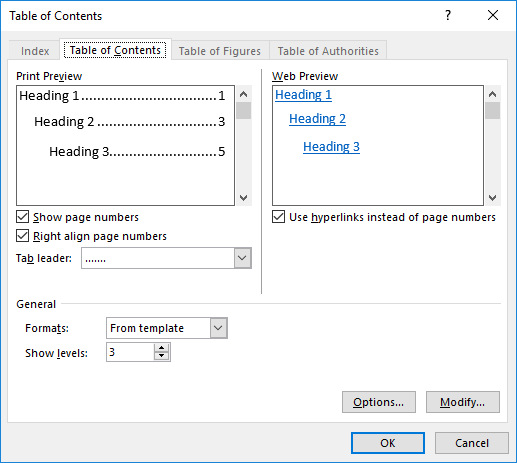
Alternatively, you can customise the table of contents of your document as you wish by clicking Custom Table of Contents. This will open a dialog box (see image below). Now you can customise the appearance of your table of contents to suit your wishes. The Preview window displays the different options. At the bottom of the window, you can specify the settings for page numbers, the number of heading levels included in the table of contents, and the leader character to be used.
If you want to customise the appearance of the table of contents yourself, select From template. Then click Modify to open the Style dialog box. In the dialog box, you can make changes concerning fonts and other settings for the table of contents. Accept each change by clicking OK, and approve the settings by clicking OK. The program will create a table of contents at the location you specified.
Please note that the table of contents must be created in the document where the actual text is. Otherwise the table of contents cannot be updated.
Updating the table of contents
The table of contents is normally not updated automatically. When you add or remove text in the document, you also have to update the table of contents.
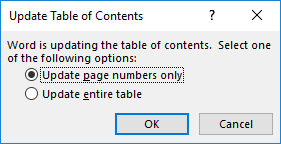
In Word, you can perform the update by right-clicking the table of contents and selecting the command Update Field in the pop-up menu. If you have added any new headings in the document or changed them, select the bottom option shown in the image below. In other cases, the top alternative, updating the page numbers only, is likely sufficient. Accept the update by clicking OK.
Multilevel list as a heading style
You can create multilevel lists as their own heading styles in the Styles menu on the Home tab. This will allow you to automatically number headings in the text. The numbers will also change automatically for each heading level and in the table of contents in case you insert new paragraphs and headings.

 To create a new multilevel list, go to the Home tab and in the Paragraph group, click on Multilevel List and then select Define New Multilevel List. In the window displayed, you can define the formatting and linking separately for each level.
Define a multilevel list in the following way:
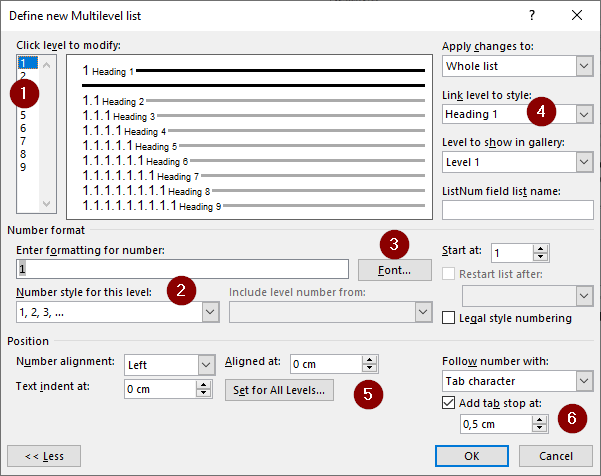
- First, select the level you want to edit. Start with level 1.
- Select the numbers in the Number style for this level In the Enter formatting for number field, enter the character you would like to include after the number, such as a dot or a bracket. To include numbers from previous levels in the heading, move the cursor in front of the number and select the numbers to add to the heading in the Include level number from menu. Always start with Level 1 and then add the other levels in order. You can also insert characters between numbers.
- The Font button allows you to edit the font settings of the numbers. This setting only changes the formatting of the number.
- The Link level to style button allows you to link the level to a specific heading level. Level 1 is linked to Heading 1, Level 2 to Heading 2, and so on.
- Use the Position field to define the position of headings. We recommend left-aligning the number. If you want all the headings to be at the same distance from the left margin, define the same number for each level in Aligned at. Text indent at defines where the text starts if the heading is divided across two lines. If you define the same value for Aligned at and Text Indent at, both lines will be aligned.
- Tab stop defines where the text of the heading starts after the number.
- To change the font and paragraph settings for the heading, go to the Styles group in the Home tab, right-click on the style you want and select Modify. Click on Format to access more formatting settings, including advanced font settings and paragraph settings.

You can find a multilevel list as a heading style in the University’s material bank, under Letter Templates https://uni.materialbank.net/ui/home?lang=en
This tutorial shows how to add page numbers in Microsoft Word. Then, we will format page numbers, remove page numbers from the first page, and start the second page with page number 1.
Table of Contents
- How to add page numbers
- How to format page numbers
- How to remove the page number from the first page
- How to start the second page with page number 1
Do you want to start your page numbers on a specific page? Please see “How to Start Page Numbers on a Specific Page in Microsoft Word (PC & Mac).”
This tutorial is available as a YouTube video showing all the steps in real time.
Watch more than 200 other writing-related software tutorials on my YouTube channel.
The images below are from Word for Microsoft 365. These steps will also work in Word 2021, Word 2019, Word 2016, Word 2013, and Word 2010. However, your interface may look slightly different in those older versions of the software.
Are you on a Mac? Please see “How to Add Page Numbers in Word for Mac.”
Important Note: Page numbers added to the top of the page or the bottom of the page will be inserted into the header or footer. The page numbers will replace any existing text placed in the same location within the header or footer. Therefore, you should add page numbers before adding other elements to the header or footer.
- Select the Insert tab in the ribbon.

- Select the Page Number button in the Header & Footer group.

- Select a location to insert the page numbers from the drop-down menu:
-
- Top of Page (in the header)
- Bottom of Page (in the footer)
- Page Margins
- Current Position
The Current Position option is the current location of your cursor in the header, footer, or body of the text. If the current position is in the body of the text, the page number will only appear on the current page. It won’t appear in the same location on other pages.

- Select additional location and style options from the submenu. (The options will depend on the selection made in step 3.)

Your page numbers should appear immediately.
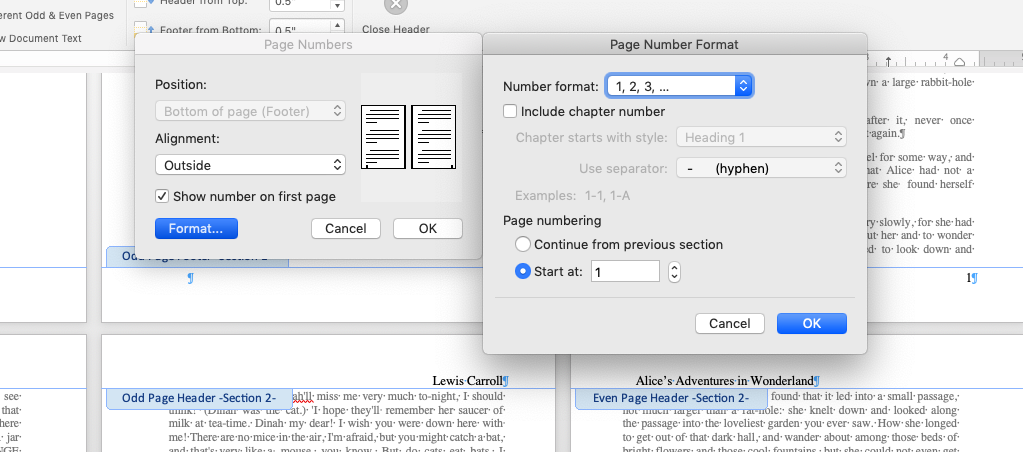
How to Format Page Numbers in Microsoft Word
This section shows how to change the number format, include chapter numbers, and start on a specific page.
- Select the Insert tab in the ribbon (see figure 1).
- Select the Page Number button in the Header & Footer group (see figure 2).
- Select Format Page Numbers from the drop-down menu.

- Select the options you want from the Page Number Format dialog box.
-
- Number format (e.g., numerals, letters, Roman numerals)
- Include chapter number (This option only works if you already established heading numbers.)
- Continue from previous section (When this option is selected, your sections will be number continuously. If you do not want the page numbers to continue from the previous section, select Start at.)
- Start at (This option will default to page 1. However, if you enter another number, such as 5, the page number 5 will appear on the first page of the document or first page of the section.)

- Select the OK button.

Your page number formatting should be applied immediately.
How to Remove the Page Number from the First Page in Microsoft Word
You may want to remove the page number from the first page because it is a title page or a cover page.
- Select the Insert tab in the ribbon (see figure 1).
- Select the Header or Footer button in the Header & Footer group. (Choose the location where your page numbers are located.)

- Select Edit Header or Edit Footer from the drop-down menu.

- Select Different First Page in the Options group in the Header & Footer tab.
Pro Tip: The Header & Footer tab only appears while you are working in headers or footers.

The page number on the first page should disappear. If the page number does not disappear, select it and press the Delete key to remove it manually.
How to Start the Second Page with Page Number 1 in Microsoft Word
After removing the page number from the first page, as shown in the previous section, you can force the second page to start with page number 1.
- Select the Page Number button in the Header & Footer group.

- Select Format Page Numbers from the drop-down menu (see figure 5).
- Enter the number 0 into the Start at menu in the Page Number Format dialog box.

- Select the OK button (see figure 7).
The page number on the second page should be changed to number 1.
- Select the Close Header and Footer button.

Related Resources
How to Adjust Page Margins in Microsoft Word
How to Adjust Line Spacing in Microsoft Word
How to Insert Page Breaks in Microsoft Word
How to Use the Editor in Word for Microsoft 365 (Spelling & Grammar Check)
Updated April 05, 2023
If you’re publishing and using print-on-demand to sell your book, you know the pain and frustration page formatting causes. Today, we’re going to cover one of the more annoying and (unnecessarily) challenging steps when using Microsoft Word: adding page numbering to your file.
Here’s a tl;dr version, for those of you in a hurry:
Adding Page Numbers in Microsoft Word
- Finishing Writing and Editing
Finalize the content before you do any page layout. You should also add any styling and general formatting before you mess with page numbers.
- Add Breaks
Use Page Breaks for controlling where content appears on the page and Section Breaks to control section-by-section headers.
- Format Header and Footer
Each section break defines a new Header and Footer. Check the settings for all your sections before inserting page numbering.
- Insert Page Numbers
Add the Page Numbers and review each section for proper linking and accuracy.
Step 1: Finish Your File
Do not, under any circumstances, add page numbers before you have finished editing and revising your book. It’s a waste of time and energy. Book formatting is best approached in a thoughtful order; page numbering being among the last steps.
So before you insert page numbers, see to your page layout design. That includes formatting your text, adding styles, setting your page margins, and any images or graphics. Create and add all the front matter and back matter too.
Finally, the last part of formatting your book design ties directly to your page numbering: adding breaks. That’s our next step, but first, turn on Reveal Non-Printing Characters.

Non-Printing Characters include spaces, returns, and breaks. You’ll want these revealed so you can properly add breaks to your file.
Step 2: Add Breaks
Breaks—Page Breaks and Section Breaks—divide the page dynamically, so that when you export your PDF for printing, the spacing will stay uniform.
Please, NEVER use hard returns to create space on the page.
Breaks will allow you to segment and section your file. Importantly, breaking your file into sections allows you to control which pages have page numbers.
Think about it; have you ever bought a book that has a page number on the very first page (the title or half-title usually)? Go grab a couple books off your shelf and have a look. I’ll wait.

I’m guessing you found that the front matter didn’t have any page numbering. Then you get to the first official page of the book and the page numbering begins at 1.
Create Something
Create your book and share it with the world.
Create Something
Create your book and share it with the world.
Page Break
Inserting a Page Break tells Word to stop adding content and move to the next page. Simple as that.

If your book uses the same numbering style for the entire file and you don’t have unique header content, add a Page Break at the end of every chapter to start the next chapter on a new page.
Section Break
Word has four kinds of Section Break you can use:
- Section Break (Next Page) – starts the new section on the next page
- Section Break (Continuous) – starts the new section on the current page
- Section Break (Odd Page) – starts the new section on the next odd page
- Section Break (Even Page) – starts the new section on the next even page
Use the ‘Next Page’ Section Break until you’re very comfortable with Word formatting. A Section Break (Next Page) works exactly like a Page Break with one addition—the file is split into a new ‘section’ on either side of the Break.

Use a Section Break (Next Page) to make each chapter a unique section of the document. You’ll have the control to add unique content for the Header (like chapter titles) for each section.
Word offers a lot of options to format the Header and Footer. With all of your breaks added, start with the first section and work sequentially to update the settings for the header/footer in each section.

- Link to Previous – This setting defaults to being ‘ON’ so you have to check it for all your sections. If selected, the header and footer will link to the header and footer in the previous section. If you plan to add unique content for each section, you must turn off Link to Previous for all sections.
- Different First Page – A lot of authors like to leave off the header and/or footer on the first page of a section. Check this box and you’ll be able to format the first page of the section separately from the rest of the section.
- Different Odd & Even Pages – If you want to have different content on the odd and even pages (like a title on one side and author on the other) you need to check this option.
Step 4: Insert Page Numbers
If you just used page breaks to separate chapters, you’ve got it easy.
Head to the first page you want your numbers to appear on (probably the first page of the first chapter) and double-click on the footer. While in the footer, the ribbon should swap to the header/footer menu and you’ll see the ‘Insert Page Numbers’ button.
Here we see the Page Number menu and the Format… menu opened beside it. Select the alignment for your page numbering. Also set the Start at: to 1 so that the page I’m currently on will show ‘1’ in the footer. Click ‘OK’ for both menus and your page numbering will appear in the footer.
Be sure to close the header and footer (just double-click in the body of your page) to see how the page numbering will look.
If your chapters will have unique content in the header, you’ll need to insert section breaks at the end of each chapter. With that done, add page numbering to the first section. For each successive section, you’ll need to change the formatting when you insert the page numbers: select Continue from the previous section in the Page Number Format menu.

This will link the page numbering independently of the Footer linking, allowing us free to edit the Header/Footer for other content without breaking the page numbering.
Simplifying the Complex
The best way to keep page numbering simple is to do it last. This gives you the freedom to design the pages of your file without having to set up a section and ensures once you get to that step, there won’t be any additional changes to disrupt the page numbering.
Microsoft Word’s method of page numbering is much more challenging than tools like Adobe InDesign or Affinity Publisher—but these publishing programs are designed for more complex book layouts. Microsoft Word is primarily a word processor and will always struggle to match tools like InDesign for page layout.
Last note: if you’re looking at Word and what you see doesn’t match the screenshots in this article, it’s likely because your version of Word and mine are not the same. Microsoft (infuriatingly) has a tendency to change the layout and location of various commands when they update the Office software. You may need to refer to their help pages for information about your version of Word.
Book Design And Print-On-Demand Services
Once you’ve got all your pages numbered and you’ve added header content, the last test is to export a PDF for printing. Most print-on-demand companies require a PDF to print. I would be very skeptical of a printer that DIDN’T require a PDF.
Finally, once you’re satisfied with your layout in Word and the PDF looks good too, you’re ready to make a print order for a proof copy to see how the book (and your page numbering!) will look in print.
Get Started
Create a free Lulu account today to print and
publish your book for readers all over the world.
Get Started
Create a free Lulu account today to print and publish your book.

Paul H
Paul is the Content Marketing Manager at Lulu. When he’s not entrenched in the publishing and print-on-demand world, he likes to hike the scenic North Carolina landscape, read, sample the fanciest micro-brewed beer, and collect fountain pens. Paul is a dog person but considers himself cat tolerant.
Add Page Numbers in Word Documents using Headers or Footers
by Avantix Learning Team | Updated November 15, 2022
Applies to: Microsoft® Word® 2010, 2013, 2016, 2019, 2021 and 365 (Windows)
You can add page numbers in Word documents at the top or bottom of pages using headers or footers. When you insert page numbers in headers and footers, they should be inserted as fields so that they will automatically update as the document is edited. In this article, we’ll review page numbering in simple and more complex Word documents.
Recommended article: How to Add or Remove Page Breaks in Microsoft Word
Note: Some Ribbon tabs may appear with slightly different names if you are working on Word 365 and have a smaller screen or different display settings. Buttons on the Ribbon may appear as icons only and are also affected by screen size and display settings. The Header & Footer tab may appear as Header & Footer Tools Design if you are working on an older version of Word.
Add page numbers in a one section document
By default, Microsoft Word documents contain one section.
To insert page numbers in a one section document:
- Click the Insert tab in the Ribbon.
- In the Header & Footer group, click Header or Footer. A drop-down menu appears.
- Click Edit Header or Edit Footer (although you can select one of the building blocks that appear, you will have more control over your header or footer if you edit it yourself). Word displays the document in Header / Footer mode. A Header & Footer or Header & Footer Tools Design tab appears in the Ribbon.
- Click in the header or footer.
- If you would like text to appear (such as the word Page), type it.
- In the Header & Footer or Header & Footer Tools Design tab, click Page Number. A drop-down menu appears.
- Select Current Position and then Plain Number. A page number field is added to the header or footer.
- You can select the page number field by dragging over it and then apply formatting such as font size or alignment (on the Home tab in the Ribbon).
- To return to the document, double-click anywhere in the document area. You can also click Close in the Header & Footer Tools Design tab. To easily return to Header / Footer mode, double-click in the header or footer area.
The following Header & Footer Tools Design tab appears in the Ribbon when you are in Header / Footer mode:

You can also press Alt + Shift + P to insert the page number field.
Turn off the display of page numbers on the first page in a one section document
Some users may want to turn off the display of page numbers on the first page of a document.
To turn off the display of page numbers on the first page in a one section Word document:
- Click the Insert tab in the Ribbon.
- In the Header & Footer group, click Header or Footer. A drop-down menu appears.
- Select Edit Header or Edit Footer. Alternatively, you can double-click in the header or footer area.
- In the Header & Footer or Header & Footer Tools Design tab, check Different First Page in the Options group. Word creates a different header and footer for the first page of the document and a regular header and footer for all other pages. You can now enter page numbers, text or images in the First Page Header and / or First Page Footer if you’d like.
- To return to the document, double-click anywhere in the document area. You can also click Close in the Header & Footer or Header & Footer Tools Design tab. To return to Header / Footer mode, double-click in the header or footer area.
Below is the Different First Page check box in the Header & Footer Tools Design tab:

Understand page numbers and sections
You can add different page numbers in sections in a Word document. Each section can have a different starting page number, a different numbering style (such as roman numeral) or no numbering at all. For example, you could create a document with three sections with a section for a title page with no numbering, a section for a table of contents page with roman numeral numbering that starts with (i) and another section for the main document that starts with Page 1.
Add different types of page numbers using sections
If you want to have different numbering in parts of a document (such as restarting numbering after a table of contents or using roman numeral numbering), you’ll first need to create sections.
To create a section in a Word document:
- Click in the document where you want to insert a section break.
- Click the Layout or Page Layout tab in the Ribbon and click Breaks. A drop-down menu appears.
- Select a type of section break (normally Next Page under Section Breaks).
Breaks appears in the Page Setup group:

View section breaks
It’s a good idea to click Show/Hide ¶ in the Paragraph group on the Home tab in the Ribbon so you will be able to see where section breaks have been inserted in your document:

With Show/Hide ¶ on, section breaks normally appear as follows:
 You can also view section breaks by clicking the View tab in the Ribbon and selecting Draft in the Views group. To return to the default view, click the View tab in the Ribbon and select Print Layout in the Views group:

Insert page numbers in a section and change numbering
If you want to change numbering in different parts of a Word document, you will need to separate your document into sections and create different headers and footers in the sections.
Typically, you will want to ensure that the header and footer in the section are not linked to the previous section’s header and footer. For example, if you have two sections, one for a table of contents and a second section for the main document, click in the second section and unlink the header and footer with the previous section’s header and footer.
It’s best not to add any text, images or page numbers in the headers or footers before you unlink the headers and footers.
To set up page numbering in a section and then change numbering:
- Add section breaks where necessary.
- Click anywhere in the section in which you want to add page numbers and restart page numbering.
- Double-click in the header or click the Insert tab and the Ribbon, select Header and then Edit Header.
- In the Header & Footer or Header & Footer Tools Design tab in the Ribbon, click Link to Previous to deselect it (to break the link with the header from the previous section).
- Click in the footer.
- In the Header & Footer or Header & Footer Tools Design tab, click Link to Previous to deselect it (to break the link with the footer from the previous section).
- Click in the header or footer and in Header & Footer or Header & Footer Tools Design tab, click Page Number in the Header & Footer group. A drop-down menu appears.
- Choose Current Position and then Plain Number. A page number field is inserted.
- Drag over the page number field to select it.
- To change the page numbering in the section, click Page Number in the Header & Footer or Header & Footer Tools Design tab and click Format Page Numbers. A dialog box appears.
- Enter a number beside Start at if you want to restart numbering (such as 1).
- If you would like a different numbering style (such as roman numerals), select a style from the Number format drop-down menu.
- Click OK.
- To return to the document, double-click in the middle of the document.
The following dialog box appears when you select Page Number and then Format Page Numbers in the Header & Footer or Header & Footer Tools Design tab:

You can also right-click a page number field and select Format Page Numbers from the drop-down menu to access the Page Number Format dialog box:

Similar to a one section document, you can select Different First Page for specific sections if you’d like. Click in the section, double-click in the header or footer and select Different First Page on the Header & Footer or Header & Footer Tools Design tab. You can also select Different Odd & Even Pages.
Be very careful when deleting section breaks. If you delete a section break, the current section takes on the section settings from the following section and your headers, footers, page numbering, orientation and margins could change.
Subscribe to get more articles like this one
Did you find this article helpful? If you would like to receive new articles, JOIN our email list.
More resources
How to Insert a Nonbreaking Space in Word
How to Insert a Watermark in Word (like DRAFT)
How to Superscript or Subscript in Word (with Shortcuts)
3 Strikethrough Shortcuts in Microsoft Word to Cross Out Text
10+ Great Microsoft Word Navigation Shortcuts for Moving Around Quickly in Your Documents
Related courses
Microsoft Word: Intermediate / Advanced
Microsoft Excel: Intermediate / Advanced
Microsoft PowerPoint: Intermediate / Advanced
Microsoft Word: Long Documents Master Class
Microsoft Word: Styles, Templates and Tables of Contents
Microsoft Word: Designing Dynamic Word Documents Using Fields
VIEW MORE COURSES >
Our instructor-led courses are delivered in virtual classroom format or at our downtown Toronto location at 18 King Street East, Suite 1400, Toronto, Ontario, Canada (some in-person classroom courses may also be delivered at an alternate downtown Toronto location). Contact us at info@avantixlearning.ca if you’d like to arrange custom instructor-led virtual classroom or onsite training on a date that’s convenient for you.
Copyright 2023 Avantix® Learning
Microsoft, the Microsoft logo, Microsoft Office and related Microsoft applications and logos are registered trademarks of Microsoft Corporation in Canada, US and other countries. All other trademarks are the property of the registered owners.
Avantix Learning |18 King Street East, Suite 1400, Toronto, Ontario, Canada M5C 1C4 | Contact us at info@avantixlearning.ca