It is very easy to set up an automatic Table of Contents (TOC) in Word 2003 so that you don’t have to manually type in headings and page numbers, and so that you don’t have to go back and change them every time you update the document. (Instructions for Word 2007)
The only ‘rule’ is that you must use styles for your headings.
You can either use Word’s built-in Heading styles or create your own. To get a hierarchical TOC, make sure you also use hierarchical heading styles for each topic’s main heading, subheading, and sub-subheadings (e.g. Heading 1, Heading 2, Heading 3).
Set up your document using hierarchical heading styles for your headings and sub-headings. For this exercise, use Word’s default Heading 1, 2, and 3 styles. Leave some space at the beginning of the document—this is where you’ll insert your auto TOC.
- When you are ready to test the auto TOC, click in the empty space at the beginning of the document.
- From Word 2003’s menu, select Insert > Reference > Index and Tables.
- Select the Table of Contents tab.
- If you don’t want your TOC as blue hyperlinks, clear the Use hyperlinks instead of page numbers check box.
- Click OK—your auto TOC is inserted at the beginning of your document.
If you don’t like the fonts used, or how the heading levels are indented, or want to exclude a heading style from being reported in the TOC, you’ll need to modify the styles:
- Click anywhere in the TOC, then select Insert > Reference > Index and Tables again.
- Select the Table of Contents tab if it’s not already the active tab.
- Click the Options button to specify the styles to use to create the auto TOC, and the hierarchical level appearance they will take (this is very useful if you want to include an extra style in the TOC, such as an Appendix style at level 1). Delete a number from a box to not display that style in the TOC. When finished, click OK.
- Click the Modify button to change the ‘look and feel’ of the TOC. Select the TOC style, then click Modify to change its font etc. Repeat for all other TOC levels. When you have finished changing the appearance of each TOC level, click OK.
- You will be asked if you want to replace the existing TOC—click OK to do so.
After you add more content to the document, or need to update the page numbers in the TOC, you’ll need to update it. The quickest way is to click anywhere in the TOC then press F9. You will be asked if you want to update just the page numbers or the entire table. The safest option is Entire Table—this updates the page numbers and adds or removes headings to reflect the current headings used.
See also:
- Word 2007: Create an automatic Table of Contents: https://cybertext.wordpress.com/2010/07/23/word-2007-create-an-automatic-table-of-contents/
[This article was first published in the December 2003 CyberText Newsletter; links last checked July 2010]
Frequently, the first task in Word is opening a blank document. This procedure sounds pretty straightforward, but just to warm up a little, let’s look at the various ways you can create a blank document.
First, you can simply open Word. By default, a blank document and the Getting Started task pane open whenever you start Word. If you want to create a new blank document from within Word, you can use any of Word’s traditional methods, including the following:
-
Click the New Blank Document button on the Standard toolbar.
-
Press Ctrl+N.
-
Choose File, New to display the New Document task pane and then click Blank Document.
-
Click Create A New Document under Open in the Getting Started task pane.
Tip Open Word automatically on system startup To open Word automatically when you start the Microsoft Windows operating system, drag the Word 2003 icon from its Microsoft Office folder in the All Programs section on the open Start menu to the Startup folder on the Start menu.
At this point, you should take a moment to look over the new Getting Started task pane. This pane debuts in Word 2003 and serves as a home base, giving you a task pane view that can link you to a few helpful resources.
Working with the New Getting Started Task Pane
New Feature When you open Word 2003, the Getting Started task pane (shown in Figure 2-1) appears docked along the right side of the window by default. You can display the Getting Started task pane from the other task pane views at any time by clicking the Home button on the task pane toolbar (directly below the task pane title bar) or by selecting Getting Started from the Other Task Panes list box that you access by clicking the task pane title bar. You can close the task pane by clicking the close button on the right edge of the task pane title bar, or you can move the task pane to various locations on your screen (even making the task pane a floating window) by dragging the line that appears along the left edge of the task pane’s title bar.
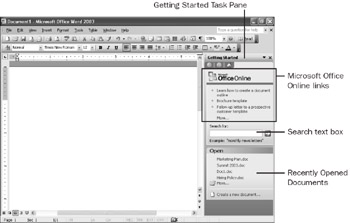
Figure 2-1: The Getting Started task pane provides hyperlinks to Microsoft Office Online resources, a search text box, and links that can expedite opening existing and new documents.
The Getting Started task pane is divided into three main sections:
-
Office Online Enables you to configure Word to periodically download and list helpful hyperlinks from Microsoft.com. To have hyperlinks downloaded, click Automatically Update This List From The Web in the Getting Started task pane. After you activate this feature, the Office Online section lists helpful hyperlinks and a More hyperlink after Word is restarted. Click More to see additional hyperlinks in the Office Online Spotlight task pane, as shown in Figure 2-2. After you review hyperlinks in the Office Online Featured Links task pane, you can click the Home button in the task pane to return to the Getting Started task pane.
Figure 2-2: The Featured Links view in the task pane displays a changing set of additional hyperlinks from Microsoft Office Online and a Search text box. -
Search Enables you to enter keywords in the text box to search for information online. Search results appear in the Search Results task pane, which is discussed in detail in Chapter 4, «Honing Document Navigation Skills.»
-
Open Lists recently opened documents, a link to the Open dialog box, and a link to the New Document task pane. Note that in Microsoft Word Version 2002, recently opened documents appear in the New Document task pane; now, in Word 2003, recently used documents appear in the Getting Started pane. To display the Open dialog box, click the More hyperlink in the Open section, and to display the New Document task pane, click Create A New Document.
Tip Control whether Office Online featured links display You can turn Office Online featured links on or off by configuring an option in the Help task pane. To do so, display the Help task pane, click Online Content Settings in the See Also section, and clear or select the Show Microsoft Office Online Featured Links check box.
You can control the content in the Getting Started task pane in several ways. Basically, you can turn the display of Microsoft Office Online hyperlinks on and off, hide the Search text box and display it again, and specify how many recently opened documents to display.
| Tip |
You can quickly display or hide the task pane by pressing Ctrl+F1. |
Controlling the Display of Links and the Search Option in the Getting Started Task Pane
To specify whether Microsoft Office Online hyperlinks and the Search text box appear in the Getting Started task pane, follow these steps:
-
Choose Tools, Options, click the General tab, and then click Service Options.
-
In the Category section of the Service Options dialog box, click Online Content, as shown in Figure 2-3. Then perform any of the following actions:
Figure 2-3: The Service Options dialog box enables you to control some ways that Word interacts with online resources.-
To stop the display of Microsoft Office Online links, clear the Show Microsoft Office Online Featured Links check box, and then click OK twice.
-
To show only the Open section in the Getting Started task pane (without the Office hyperlinks or the Search text box), clear the Show Content And Links From Microsoft Office Online check box. Note that clearing this check box also removes the hyperlink to online templates in the New Document task pane and to automatic help on templates. Click OK twice, and then restart Word.
-
To turn options on after they’ve been turned off, select the Show Content And Links From Microsoft Office Online check box, select any additional check boxes (such as the Show Microsoft Office Online Featured Links check box), click OK twice, and then restart Word.
-
After the Show Microsoft Office Online Featured Links option has been turned off and then back on, you’ll have to click the Automatically Update This List From The Web hyperlink in the Getting Started task pane to enable Word to download hyperlinks from Microsoft Office Online.
Configuring the List of Recently Opened Documents
Another way you can customize the Getting Started task pane is to specify how many (if any) recently opened documents should be listed in the Open section. By default, the four most recently opened documents appear in the Getting Started task pane. To configure this setting, choose Tools, Options, click the General tab, and type a number from 0 through 9 in the Recently Used File List box to display up to nine recently opened documents in your task pane. If you choose not to display any previously opened documents, you can clear the check box or enter 0 in the Recently Used File List box.
Inside Out: Clearing your document history list
You might think that clearing your document history from the Windows Start menu (by right-clicking Start, choosing Properties, clicking the Start Menu tab, clicking Customize, clicking the Advanced tab, and then clicking Clear List) would automatically clear the Open list box in the Getting Started task pane—but it doesn’t. Instead, this feature clears the history from the My Recent Documents feature found in the Windows operating system. To clear the task pane’s document history list, you must choose Tools, Options, click the General tab, and then clear the Recently Used File List check box or type 0 in the Recently Used File List box.
Working with the New Document Task Pane
You can quickly create a variety of document types using the New Document task pane. To display the New Document task pane, perform any of the following actions:
-
Choose File, New.
-
Click Create A New Document in the Getting Started task pane.
-
Choose View, Task Pane, or choose View, Toolbars, Task Pane to display the task pane if it’s hidden (or press Ctrl+F1, which toggles the task pane’s display), click the task pane title bar, and then click New Document in the title bar list box if necessary.
The New Document task pane, shown in Figure 2-4, provides the following options for creating documents:
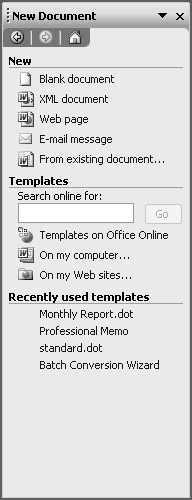
Figure 2-4: The New Document task pane provides a variety of methods you can use to create various types of new documents, including XML documents, Web pages, and e-mail messages.
-
Blank Document Opens a new blank Word document based on the Normal.dot template.
Cross-Reference For information about customizing the Normal.dot template, see Chapter 16, «Formatting Documents Using Templates, Wizards, Add-Ins, and XML Schemas.»
-
New Feature XML Document Opens a new document as an XML file. When you use this new document option, Word automatically specifies the document as an XML document when you save your work. You can save an XML document using Word’s XML schema, or you can attach any XML schema to the document. When you save a document as an XML document, any software that can parse XML can read and process the data in your document. In other words, saving a document as an XML file makes the data available to any application that supports XML, not just to Microsoft Office programs. Further, you can use XML documents in various ways, such as using a document in Word as well as a Web page, without having to manipulate the content in any way.
Cross-Reference For more information about working with XML documents in Word, see Chapter 29, «Working with XML.»
-
Web Page Opens a blank Web page and enables Web page components. By default, Word saves a Web Page created with this option as a Single File Web Page. You can also save a Web page using the Web Page and Web Page, Filtered designations in the Save As dialog box.
Cross-Reference For more information about building Web pages using Word, see Chapter 26, «Creating Professional Web Sites.»
-
E-mail Message Displays an Untitled Message window that you can use to create and send an e-mail message. If Outlook hasn’t been set up on the system yet, the Outlook Startup Wizard appears when you first select the E-mail Message hyperlink.
Cross-Reference For more information about using Word to send e-mail messages, see Chapter 24, «Working and Collaborating Online.»
-
From Existing Document Displays the New From Existing Document dialog box, which is similar to the Open dialog box. You can then create a new document based on an existing document. You might feel as though you’re working on an existing document, but your new document actually contains only a copy of the existing file’s contents. The first time you save the new document, Word automatically displays the Save As dialog box so that you can save the file as a new file instead of replacing the existing document.
In addition to creating new blank workspaces, the New Document task pane offers options to create new documents using templates stored on your computer and online, as described in the next section.
Working with Templates and Wizards
Word makes creating new documents based on templates a snap. Templates are predesigned documents that contain formatting and, in many cases, generic text. They are used as a foundation for creating new documents based on predetermined settings. For example, to create an office memo, you could use the Professional Memo document template, as shown in Figure 2-5. The Professional Memo template is a Word document template that you can access in the Memos tab in the Templates dialog box.
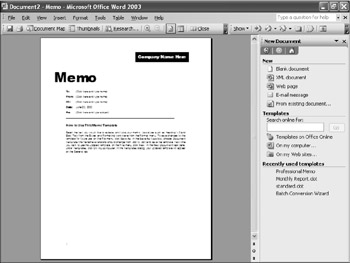
Figure 2-5: Templates can contain standard text elements and font styles as well as providing placeholder text and graphics—as seen here in the Professional Memo template.
By default, templates have the .dot extension, and blank Word documents are based on the standard global template, the Normal.dot template. The Normal template contains default styles but no generic text. You can access document templates by selecting from the Templates options in the New Document task pane. Template options include the following:
-
Search Online For You can search online for templates by entering a keyword in the Search Online For text box, and then clicking Go. By default, when you download and use an online template, the Template Help task pane appears, offering assistance and the opportunity to rate the template. You can turn off the automatic display of Template Help by displaying the Service Options dialog box, selecting Online Content, and then clearing the Show Template Help Automatically When Opening A Template check box, shown earlier in Figure 2-3.
-
Templates On Office Online Clicking this link opens the Microsoft Office Online Templates home page in your Web browser, as shown in Figure 2-6. Microsoft’s Templates home page provides a selection of templates ranging from staffing and management documents to stationery.
Figure 2-6: The Microsoft Office Online Templates home page provides free templates, arranged by category, that you can open in Office applications and modify to suit your purposes. -
On My Computer When you click the On My Computer hyperlink, the Templates dialog box appears, as shown in Figure 2-7. The Templates dialog box contains templates and wizards that can help you create basic documents. By default, the Templates dialog box organizes templates and wizards into the following categories: General (Blank Document, XML Document, Web Page, and E-mail Message), Legal Pleadings, Letters & Faxes, Mail Merge, Memos, Other Documents (including résumé templates), Publications, and Reports.
Figure 2-7: The Templates dialog box enables you to quickly access standard document templates and wizards installed with Office. -
On My Web Sites If you (or an associate) have a Web site on a network or on the Internet where templates are stored, you can click the On My Web Sites link to access your Network Places. Then, in the New From Templates On My Web Sites dialog box, navigate to the network place that stores the template you want.
-
Recently Used Templates The task pane automatically displays links to recently used templates. This feature can dramatically speed the process of applying the same template to one document after another because you won’t need to continually display the Templates dialog box to apply a previously accessed template.
Tip Store templates online Occasionally, you might want to store templates online. If you don’t have a Web site, you can work around this limitation without spending a dime, by using MSN’s free Web space at groups.msn.com. You can use the free space to store templates (and other files), thereby making the files easily accessible on the Internet. You can also configure the Templates On My Web Sites link in the New Documents task pane to include a shortcut to your File Cabinet’s contents. For more information about storing templates on a Web site and using MSN File Cabinets, see Chapter 24, «Working and Collaborating Online.»
Cross-Reference For in-depth information about templates, see Chapter 16, «Formatting Documents Using Templates, Wizards, Add-Ins, and XML Schemas.»
Mastering Document Content Fundamentals
After you open a new document—whether it’s blank or based on an existing document or template—the next order of business is to insert information into the document and format it. Granted, that’s a fairly obvious observation, but it’s well worth discussing. Working with information is what this book’s all about, so just to be sure we cover all our bases, we’ll address content fundamentals here. First, we’ll look at inputting information, and then we’ll look at ways to navigate through documents and perform standard editing and formatting tasks. These topics might sound basic, but you should be able to pick up at least a few pointers here and there throughout the upcoming sections. If nothing else, scan the tables included on the next few pages to learn a new trick or two to help streamline your working style.
Inputting Information
You have a few options when it comes to inserting information into Word 2003 documents:
-
Click in the document and begin typing in the editing window. Typed text appears to the left of the insertion point. You can reposition the insertion point by clicking elsewhere within the editing window.
-
Copy and paste information. Using the Office Clipboard, you can easily copy information from within the current document, other Word documents, Web pages, other applications, and from almost any other application that allows you to copy selected data. After you copy data, you can paste the information directly into Word documents. For more information about using the Office Clipboard, see the section «Using the Office Clipboard» later in this chapter.
-
Insert the contents of another Word document or text file. You can insert the contents of another document into the current document without copying and pasting by choosing Insert, File; navigating in the Insert File dialog box to the file that contains the information you want to insert into the current document; and then double-clicking the document. The document’s contents are inserted into the currently displayed document (and the existing document remains unchanged).
-
Use speech recognition. You can speak your piece by configuring and working with Word’s speech features. Using speech recognition, you can dictate content and use voice commands by talking into a high-quality headset.
-
Handwrite content using the mouse or a stylus. Word can recognize handwritten marks you make with your mouse or a stylus, which is a pencil-like tool used on electronic writing or drawing pads, tablet PCs, and so forth. When you use the handwriting recognition feature or Ink feature, you can retain your written marks, create drawings, or configure Word to interpret your handwriting and display the information as typed text.
Tip Change from Insert mode to Overtype mode By default, new text you type in the middle of a line will be inserted between existing text. To change from Insert mode to Overtype mode, you can choose Tools, Options, and then clear the Overtype Mode check box in the Edit tab. For quicker results, double-click OVR on the status bar or press the Insert (sometime labeled Ins) button to toggle between Insert and Overtype modes.
Moving Within Documents Using Keyboard Shortcuts and Function Keys
After you enter information in documents, you’ll frequently need to move around within your documents so that you can add, edit, and format your documents’ contents. As you most likely know, you can move around within a document using the scroll bars located along the right and bottom edges of the editing window, and you can reposition the insertion point by clicking anywhere within your document. By learning a few keyboard shortcuts, you can speed up text navigation considerably. Table 2-1 lists common keyboard shortcuts and function key combinations that you might find handy as you work your way through Word documents. To print a list of keyboard shortcuts and function commands, follow these steps:
-
Click Tools, Macro, Macros, and then select Word Commands in the Macros In list box.
-
In the Macro Name list box, click ListCommands, and then click Run.
-
In the List Commands dialog box, select the Current Menu And Keyboard Settings option, and then click OK.
-
Click File, Print to print the shortcut list.
Tip Use Shift to select text By pressing Shift in combination with a keyboard navigation shortcut, you can generally select all the text from the insertion point’s current location to the location to which the shortcut takes you. For example, if you press End, the insertion point moves to the end of the line, but if you press Shift+End, you’ll select all the text from the insertion point to the end of the line.
|
Keyboard Shortcut |
Action |
|---|---|
|
Alt+Down Arrow |
Moves to the next object |
|
Alt+End |
Moves to the end of the row |
|
Alt+F1 (or F11) |
Moves to the next field |
|
Alt+F4 |
Closes the active document |
|
Alt+F6 |
Moves to the next window |
|
Alt+F7 |
Moves to the next misspelled word if the Check Spelling As You Type feature is turned on (the default) |
|
Alt+Home |
Moves to the start of a row |
|
Alt+Left Arrow |
Goes back to the previous page in Web view |
|
Alt+Page Down |
Moves to the end of the current column |
|
Alt+Page Up |
Moves to the top of the current column |
|
Alt+Right Arrow |
Goes forward to the next page in Web view |
|
Alt+Shift+F1 (or Shift+F11) |
Moves to the previous field |
|
ALT+Shift+F6 |
Displays the previous window |
|
Alt+Up Arrow |
Moves to the previous object |
|
Arrow keys |
Move the insertion point left, right, up, or down |
|
Ctrl+Alt+Home |
Opens the Select Browse Object menu |
|
Ctrl+Alt+Page Down |
Moves the insertion point to the bottom of the window |
|
Ctrl+Alt+Page Up |
Moves the cursor to the top of the window |
|
Ctrl+Alt+S |
Splits the window view |
|
Ctrl+Alt+Y (or Shift+F4) |
Finds the next instance of a search term |
|
Ctrl+Alt+Z (or Shift+F5) |
Moves to the previous location of the insertion point (even if the insertion point was in a different Word document) |
|
Ctrl+Down Arrow |
Moves to the next paragraph or next table cell |
|
Ctrl+End |
Moves to the end of the document |
|
Ctrl+F |
Displays the Find tab in the Find And Replace dialog box |
|
Ctrl+F5 |
Restores a document’s window from maximized to the previous window size |
|
Ctrl+F6 (or Alt+F6) |
Displays the next window |
|
Ctrl+F7 |
Activates the window so you can move it using the arrow keys |
|
Ctrl+F8 |
Activates the window so you can resize the window height and width using the arrow keys |
|
Ctrl+F10 |
Maximizes the document window |
|
Ctrl+G (or F5) |
Displays the Go To tab in the Find And Replace dialog box |
|
Ctrl+Home |
Moves to the beginning of the document |
|
Ctrl+Left Arrow |
Moves one word to the left |
|
Ctrl+O (or Ctrl+Alt+F2 or Ctrl+F12) |
Displays the Open dialog box |
|
Ctrl+Page Down |
Browses to the next item (based on the current Browse Object setting) |
|
Ctrl+Page Up |
Browses to the previous item (based on the current Browse Object setting) |
|
Ctrl+Right Arrow |
Moves one word to the right |
|
Ctrl+S (or Alt+Shift+F2 or Shift+F12) |
Saves the current document |
|
Ctrl+Shift+F6 |
Displays the previous window |
|
Ctrl+Up Arrow |
Moves to the previous paragraph |
|
Ctrl+W (or Ctrl+F4) |
Closes the active document |
|
End |
Moves to the end of the current line |
|
Esc |
Closes an open menu or cancels the current action |
|
F6 |
Moves to the next pane or frame |
|
Home |
Moves to the beginning of the current line |
|
PageDown |
Displays the next screen |
|
PageUp |
Displays the previous screen |
|
Shift+F6 |
Moves to the previous pane or frame |
|
Shift+Tab |
Moves to the previous cell in a table |
|
Tab |
Moves to the next cell in a table |
An easy way to view the commands associated with function keys is to display the Function Key Display toolbar on your desktop. To do so, choose Tools, Customize, select Function Key Display in the Toolbars tab, and then click Close.
By default, the Function Key Display toolbar shows the basic function key commands. You can press Shift, Ctrl, Alt, or any combination of those three keys to display other commands on the Function Key Display toolbar. To illustrate this little toolbar trick, Figure 2-8 shows the Function Key Display toolbar in normal, Shift, Ctrl, and Alt modes.
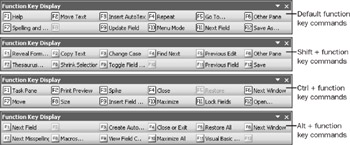
Figure 2-8: The Function Key Display toolbar adjusts to show various options when you press Shift, Ctrl, and Alt alone or in any combination.
| Note |
You can also browse through documents using the Go To tab in the Find And Replace dialog box. To access the Go To tab, press F5, press Ctrl+G, or choose Edit, Go To. For more information about using the Find And Replace dialog box, see Chapter 4, «Honing Document Navigation Skills.» |
Using the Select Browse Object Feature
Another way to browse through documents is to use the Select Browse Object menu and its associated buttons. You can find the three browse buttons—Previous Find/Go To, Select Browse Object, and Next Find/Go To—in the lower-right corner of the editing window, as shown here. Table 2-2 describes the available options.
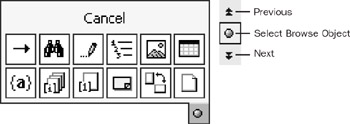
Figure 2-9: The Select Browse Object tool enables you to specify how you’d like to browse through a document based on the type of object.
To use the Select Browse Object feature, follow these steps:
-
Open the Select Browse Object menu by pressing Ctrl+Alt+Home or by clicking the Select Browse Object button on the vertical scroll bar.
-
Select the type of object you want to browse for (such as, browsing from heading to heading). See Table 2-2 for available options.
-
Click the Previous and Next buttons to navigate from one browse object to the next, or press Ctrl+Page Up to see the previous object and press Ctrl+Page Down to see the next browse object.
|
Button |
Description |
|---|---|
|
|
Browses by using the Go To tab in the Find And Replace dialog box |
|
|
Browses by using the Find tab in the Find And Replace dialog box |
|
|
Browses by moving from edit to edit (if the Track Changes feature has been used) |
|
|
Browses by moving from heading to heading |
|
|
Browses by moving from graphic to graphic |
|
|
Browses by moving from table to table |
|
|
Browses by moving from field to field |
|
|
Browses by moving from endnote to endnote |
|
|
Browses by moving from footnote to footnote |
|
|
Browses by moving from comment to comment |
|
|
Browses by moving from section to section |
|
|
Browses by moving from page to page |
Performing Basic Editing Tasks
As you know, merely entering information into a Word document doesn’t usually create a finished product. Instead, your documents are the result of entering information, and editing and formatting the entered text, images, and objects. Now that we’ve covered entering text and navigating within documents, it’s time to work with text by performing basic editing tasks. This section provides information about selecting, copying, cutting, and pasting text; using the Clipboard; and undoing, redoing, and repeating changes—in other words, some of the common tasks you’ll perform every time you work on documents in Word.
Selecting Text
Generally speaking, you can streamline many editing tasks by first selecting the text you want to edit. In fact, you can speed up most text modification tasks by mastering precise selection techniques. You can select text in a variety of ways. Usually (and not too surprisingly), you will select text using the mouse or keyboard commands. (You can also select text that contains similar formatting by using the Styles And Formatting task pane, but because that topic is slightly more advanced and is related to creating and using styles, that technique is addressed in Chapter 9, «Using Styles to Increase Your Formatting Power.») Regardless of how you select text, you can cancel a selection by clicking any area outside the selected text or by pressing an arrow key.
| Note |
You can access a couple of key text-selection options by choosing Tools, Options, and then clicking the Edit tab in the Options dialog box. In the Edit tab, you can specify whether to automatically select paragraph marks when you select paragraphs (the Use Smart Paragraph Selection check box) and whether to automatically select entire words when you’re selecting text (the When Selecting, Automatically Select Entire Word check box). Both text selection settings are activated by default. |
Selecting Information with Your Mouse Selecting information using the mouse is the most common way to select text and other elements (such as graphics, tables, objects, and so forth) in Word documents. To select information using the mouse, you can use any of the options described in Table 2-3.
|
Selection |
Method |
|---|---|
|
Word or single element |
Double-click the word or element. |
|
Sentence |
Press Ctrl and click in the sentence. |
|
Paragraph |
Triple-click within the paragraph, or double-click in the left margin next to the paragraph. |
|
Entire line |
Click in the left margin. |
|
Multiple lines |
Click and drag in the left margin. |
|
Contiguous text or elements |
Position the insertion point at the beginning of the text to be selected, click and drag to select the desired text, and then release the mouse button. |
|
Multiple noncontiguous instances of text or elements |
Select the first item (as described above), press Ctrl, and then select additional text or elements elsewhere within your document. |
|
Entire section |
Display your document in Outline view, and then triple-click a heading or click a heading. |
|
Large block of text |
Click at the start of the selection, scroll to the end of the selection, and then hold down Shift as you click. |
|
Blocks of text using Extend mode |
Click at the beginning of the text you want to select, double-click EXT on the status bar, and then click at the end of the text you want to select. To deactivate Extend mode, press Esc or double-click EXT again so that it appears dimmed on the status bar. |
|
Vertical block of text |
Press Alt, and then drag over the text. |
|
Table Cell |
Click the left edge of the cell. |
|
Table Row |
Click in the left margin next to the row. |
|
Table Column |
Click the column’s top gridline or border. |
|
Entire Table |
Click in the table and press Alt+Num 5, with Num Lock turned on. Alternatively, click the table selection box that displays near the top-left corner of the table when you position the cursor over the table. |
|
Text box or frame |
Position the cursor over the edge of the text box until it changes to a four-headed arrow, and then click. |
|
Graphic |
Click the graphic. |
|
Headers and Footers |
In Print Layout View, double-click the dimmed header or footer text, and then click in the left margin. |
|
Footnotes and Endnotes |
In Print Layout View, click in the left margin. |
|
Entire document |
Triple-click in the left margin or press Ctrl+A. |
| Note |
When you want to select large areas of contiguous text, consider using Extend mode, which enables you to select contiguous blocks of text without holding down the mouse button. |
| Tip |
Select all instances of an element You can select all instances of a word, a symbol, or a phrase. To do so, select the Find tab in the Find And Replace dialog box (press Ctrl+F), type the text you want to select in the Find What text box (or paste information, such as a symbol), select the Highlight All Items Found In check box, select Main Document in the list box if necessary, and then click the Find All button. |
| Cross-Reference |
Chapter 9, «Using Styles to Increase Your Formatting Power,» discusses how to select text based on formatting attributes. |
Selecting Text Using Keyboard Commands As most people’s Word proficiency increases, so does their desire to take advantage of Word’s numerous keyboard commands. Keyboard commands increase productivity by limiting how frequently you move your hand from your keyboard to your mouse and back again. For the most part, selecting text using keyboard commands requires you to press Shift while you press the keyboard combination that moves the insertion point in the direction of the text you want to select. If you know the keyboard combinations used to move the insertion point (shown in Table 2-1), you can generally select text by using the same keyboard combinations while holding down Shift. For example, Ctrl+Right Arrow moves the insertion point to the next word, and Shift+Ctrl+Right Arrow selects the text from the insertion point to the beginning of the next word. Table 2-4 lists the text selection keyboard commands that might be most useful for you.
| Tip |
Combine cursor-movement keyboard commands with text-selection commands to make selections precisely (for example, press Home to move to the beginning of a line before you select the line; see Table 2-1). |
| Tip |
To select multiple noncontiguous areas, make your first selection, hold down Ctrl, and then select the other items. |
|
Keyboard Command |
Selects |
|---|---|
|
Alt+Shift+Page Down |
From the insertion point to the end of a column |
|
Alt+Shift+Page Up |
From the insertion point to the beginning of a column |
|
Ctrl+A |
Entire document |
|
Ctrl+Alt+Shift+Page Down |
From the insertion point to the bottom of the window |
|
Ctrl+Alt+Shift+Page Up |
From the insertion point to the top of the window |
|
Ctrl+Shift+Down Arrow |
From the insertion point to the end of the current paragraph |
|
Ctrl+Shift+End |
From the insertion point to the end of the current document |
|
Ctrl+Shift+F8 + arrow keys or mouse button |
Vertical or horizontal blocks of text beginning at the insertion point (press Esc to cancel selection mode) |
|
Ctrl+Shift+Home |
From the insertion point to the beginning of the current document |
|
Ctrl+Shift+Left Arrow |
From the insertion point to the beginning of a word; to select preceding words, press Left Arrow repeatedly while holding down Ctrl+Shift |
|
Ctrl+Shift+Right Arrow |
From the insertion point to the end of a word; to select subsequent words, press Right Arrow repeatedly while holding down Ctrl+Shift |
|
Ctrl+Shift+Up Arrow |
From the insertion point to the beginning of the current paragraph |
|
Esc (or double-click EXT on the status bar) |
To turn off Extend mode |
|
F8 |
To turn Extend mode on and increase the size of a selection (press twice to select a word, three times to select a sentence, and so forth) |
|
F8+F8 |
Current word |
|
F8+F8+F8 |
Current sentence |
|
F8 + arrow key |
From the insertion point to a specific location in a document (press Esc to cancel selection mode) |
|
F8+Left Arrow or F8+Right Arrow |
The character nearest to the insertion point to the left or right |
|
Shift+Down Arrow or Shift+Up Arrow |
Entire line above or below the insertion point, beginning from the insertion point |
|
Shift+End |
From the insertion point to the end of the current line |
|
Shift+F8 |
To reduce the size of a selection |
|
Shift+Home |
From the insertion point to the beginning of the current line |
|
Shift+Left Arrow |
One character to the left of the insertion point |
|
Shift+Page Down |
One screen down, beginning from the insertion point |
|
Shift+Page Up |
One screen up, beginning from the insertion point |
|
Shift+Right Arrow |
One character to the right of the insertion point |
|
Shift+Tab |
Preceding cell’s contents in a table |
|
Tab |
Next cell’s contents in a table |
Copying, Cutting, and Pasting
Copying, cutting, and pasting are probably among the top word-processing features responsible for saving countless trees. Thousands of sheets of paper have been conserved as people copy, cut, and paste text instantaneously instead of painstakingly retyping documents on fresh paper each time a sentence or paragraph needs to be moved or revised. Using Word, you can easily copy, cut, and paste selected text without retyping or wasting a single sheet of paper.
Word provides a number of ways to go about your copying, cutting, and pasting business, as shown in Table 2-5. To use the Copy and Cut features, select the text you want to manipulate, and then choose one of the listed commands. To paste information, position the insertion point where you want to insert the information, and then choose one of the Paste commands. Alternatively, you can right-click selected text and choose Cut, Copy, or Paste from the shortcut menu. In addition to cutting and pasting, you can reposition text by using Word’s drag-and-drop feature, which essentially enables you to use the mouse to cut and paste text without using the Cut and Paste commands.
|
Action |
Menu Command |
Keyboard Shortcut |
Toolbar Button |
|---|---|---|---|
|
Copy |
Edit, Copy |
Ctrl+C or Ctrl+Insert |
|
|
Copy Format |
None |
Ctrl+Shift+C |
|
|
Cut |
Edit, Cut |
Ctrl+X or Shift+Del |
|
|
Paste |
Edit, Paste |
Ctrl+V or Shift+Insert |
|
|
Paste Format |
None |
Ctrl+Shift+V |
NA |
| Tip |
You can configure your Insert key to serve as a Paste key. To do so, choose Tools, Options, click the Edit tab, and then select the Use The INS Key For Paste check box. |
When you paste an item, Word displays the Paste Options smart tag, as shown in Figure 2-10. This smart tag provides paste-specific formatting options. To apply a paste option, position the pointer over the Paste Options smart tag, click the arrow to display the menu, and then choose a command. To ignore a smart tag after pasting, simply continue to work within your document or press Esc—the smart tag will quietly disappear until the next time you paste an object.
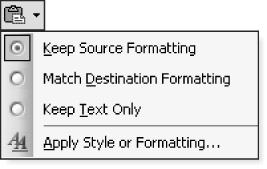
Figure 2-10: By default, the Paste Options smart tag appears whenever you paste an element into your Word document.
If you prefer not to use the Paste Options smart tag, you can configure Word to not display the Paste Options smart tag when you paste. To do this, choose Tools, Options, display the Edit tab, clear the Show Paste Options Buttons check box, and then click OK.
| Cross-Reference |
For more information about the ins and outs of smart tags, see Chapter 7, «Putting Text Tools to Work.» |
Using the Office Clipboard
You can copy, cut, and paste within the same document, between multiple documents, and even between different applications, thanks to the Office Clipboard. The Office Clipboard allows you to store up to 24 items, including text, objects, and graphics, which means you can copy or cut 24 elements from various applications without losing data in the digital abyss. (Of course, as soon as you copy item 25, the first item you copied to your Clipboard is removed.) Further, the Clipboard provides an easy way to see which Clipboard item contains the information you want to access. As shown in Figure 2-11, the Clipboard contents are displayed in the task pane. In this example, 4 items are stored on the Clipboard (notice the 4 of 24 in the task pane’s title bar), including Excel data, a Jasc Paint Shop Pro image, some text copied from a Word document and a clip art image. Each Clipboard item’s parent application is identified by an accompanying icon.
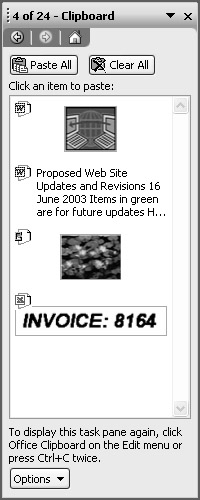
Figure 2-11: The Clipboard holds up to 24 items and displays some of the copied and cut items’ contents to help you identify the item you want to paste into a document.
Opening the Clipboard To open the Clipboard manually, perform any of the following actions:
-
Choose Edit, Office Clipboard.
-
Select Clipboard in the task pane’s menu.
-
Press Ctrl+C+C.
-
Select text or other items and double-click the Copy button on the Standard toolbar.
You can also open the Clipboard using the Clipboard icon, shown in Figure 2-12, which appears on the taskbar by default whenever the Clipboard appears in any Office program. You double-click the icon to display the Clipboard in the current window. For example, if the Clipboard is open in Word, you can start Excel, and then double-click the Clipboard icon on the taskbar to display the Clipboard in Excel.
Figure 2-12: Whenever the Clipboard is open in an Office application, the Clipboard icon appears in the status area of the Windows taskbar by default.
| Tip |
To prevent the Office Clipboard icon from appearing on the taskbar, click the Options button in the Clipboard task pane, and then clear the Show Office Clipboard Icon On Taskbar check box. |
Pasting Clipboard Information After information is stored on the Clipboard, you can paste the information into a document by positioning the insertion point where you want to insert the information, displaying the Clipboard, and then clicking the item you want to paste. If you want to paste everything stored on the Clipboard into your document, click the Paste All button in the task pane.
Deleting Clipboard Information To delete items from the Clipboard, you can either click the down arrow that appears when you position your pointer over a Clipboard item, or right-click an item to display the menu, as shown in Figure 2-13, and then choose Delete. If you want to clear the entire Clipboard, click the Clear All button in the task pane.
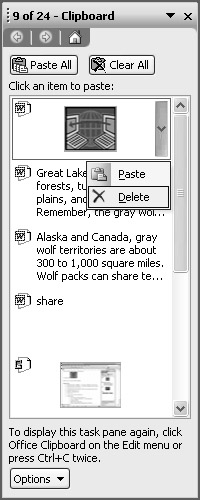
Figure 2-13: You can delete Clipboard items one at a time, or you can clear the entire Clipboard by clicking the Clear All button.
Inside Out: The Office Clipboard and the system Clipboard
You might be wondering how the Office Clipboard relates to the system Clipboard. Here’s a quick rundown of how the two Clipboards relate to one another:
-
The last item you copy to the Office Clipboard is stored on the system Clipboard.
-
Clearing the Office Clipboard also clears the system Clipboard.
-
When you click the Paste toolbar button, choose Edit, Paste, or press Ctrl+V to paste information, you paste the contents of the system Clipboard (which by default is the last item you added to the Office Clipboard).
Undoing, Redoing, and Repeating
Fortunately, changes you make to documents are not immediately set in stone. You have ample opportunity to change your mind when it comes to editing text—not only can you undo edits you’ve recently made but you can also redo undone edits and even repeat an action if you need to. Most likely, you’ll use the Undo command more frequently than the Redo and Repeat commands, so let’s look at that feature first.
Using the Undo Feature The Undo feature enables you to undo one or many changes made to a document during the current session. In fact, the Undo feature can store over 100 actions, so you have plenty of time during the current session to discard your edits. Keep in mind that some actions are too large to store, such as reformatting large tables. When Word encounters a change that the Undo command can’t handle, you’ll receive a warning message indicating that you won’t be able to undo a particular action. In addition to not being able to undo the current action, you’ll also lose the ability to undo prior actions. If you’re sure that’s OK, you simply proceed, and Word will begin a new Undo list box.
| Note |
If you receive a message that you won’t be able to undo a current action and you’re a little leery about moving ahead without the Undo safety net, you can take precautionary action. One easy approach is to simply perform the «risky» action last so that you won’t lose your current Undo list box until you’re sure you’ll no longer need it. Another workaround is to copy the element you want to perform the action on, paste the information into a blank document, perform the desired action on the copied version of your information, and then copy and paste the modified information into the original document. Using this method, you can ensure that if the action doesn’t go as planned, your original document remains intact. |
To Undo one or more actions, use any of the following procedures:
-
Choose Edit, Undo to undo the last action.
-
On the Standard toolbar, click the Undo button to undo the last change (or click it multiple times to undo a series of changes).
-
On the Standard toolbar, click the Undo arrow and click the action you want to undo. (If you don’t see the action you’re looking for, scroll through the list.) When you undo an action in the list, you also undo all the actions that appear above it in the list.
-
Press Ctrl+Z to undo the last action.
-
Press Alt+Backspace to undo the last action.
Tip To undo all the changes to a picture, select the picture you want to restore, and then click Reset Picture on the Picture toolbar.
Using the Redo Feature As soon as you undo an action, you automatically activate the Redo command. The main role of the Redo command is to enable you to redo an undone action before you make any further changes. If you want to redo an undone action, use any of the following techniques:
-
Choose Edit, Redo immediately after you’ve undone an action—before you’ve made any other changes.
-
On the Standard toolbar, click the Redo button to redo the last undone change (or click the Redo button multiple times to undo a series of changes).
-
On the Standard toolbar, click the Redo arrow, and then click the action you want to redo. (If you don’t see the action you’re looking for, scroll through the list.) When you redo an action in the list, you also redo all the actions that appear above it in the list.
-
Press Ctrl+Y to redo the last undone change.
-
Press Alt+Shift+Backspace to redo the last undone change.
-
Press F4 to redo the last undone change.
-
Press Alt+Enter to redo the last undone change.
Caution If you type or perform any other action after you undo a change, you lose the ability to redo the undone action.
Using the Repeat Command The Repeat command is related to the Undo and Redo commands. When the Redo feature isn’t activated (Redo is activated only after you undo an edit), the Edit menu displays a Repeat command. The Repeat feature is fairly self-explanatory—choosing this command repeats the last action you performed. For example, if you typed your name in a form, you could use the Repeat command to insert your name elsewhere in the form. To do so, simply click or press Tab to reposition the insertion point, and then choose the Repeat command. To use the Repeat command after you have added content to your document, you can perform any of the following actions:
-
Choose Edit, Repeat. (If you clicked the Undo command immediately before displaying the Edit menu, the Redo command appears in place of the Repeat command.)
-
Press Ctrl+Y.
-
Press F4.
-
Press Alt+Enter.
The Repeat command comes in handy when you use it as a cut-and-paste shortcut.
| Note |
If you can’t repeat the last action, the Repeat command on the Edit menu changes to Can’t Repeat. |
Positioning Content Effectively
Whenever you create documents (reports, brochures Web pages, and so forth)—regardless of their purpose—you’ll need to position (and reposition) text, graphics, and other elements within the documents. You can easily align and move contents within a Word document by using the Formatting toolbar buttons as well as the Click And Type and drag-and-drop features.
| Cross-Reference |
For a full discussion on aligning information in Word documents, see Chapter 8, «Aligning Information and Formatting Paragraphs and Lists.» |
Aligning Text Using the Toolbar
Word offers four quick and easy paragraph and element alignment options:
-
Left Aligns text and other elements (such as graphics, tables, and so on) along the left margin, leaving a ragged right edge. Left alignment is the default setting in most versions of Word.
-
Center Aligns the midpoint of the selected element with the center point between the page’s margins.
-
Right Aligns text and other elements along the document’s right margin, leaving the left margin ragged.
-
Justified Creates straight (or flush) left and right edges by adding white space between text to force the text to align with the left and right margins.
To apply an alignment setting, click anywhere within the paragraph or element you want to align, highlight the text or element you want to align, or select multiple elements within the document, and then use one of the options shown in Table 2-6.
|
Setting |
Toolbar Button |
Keyboard Shortcut |
|---|---|---|
|
Left |
|
Ctrl+L |
|
Center |
|
Ctrl+E |
|
Right |
|
Ctrl+R |
|
Justified |
|
Ctrl+J |
| Tip |
Activate the automatic hyphenation feature To steer clear of having too much white space inserted within justified text, you might want to activate the automatic hyphenation feature. To do so, choose Tools, Language, Hyphenation to display the Hyphenation dialog box. Select the Automatically Hyphenate Document check box, and then click OK. To learn more about hyphenation, see Chapter 8, «Aligning Information and Formatting Paragraphs and Lists.» |
Using the Click And Type Feature
The Click And Type feature, which was introduced in Word 2000, continues to be available in Word 2003. This feature enables you to click anywhere in a page to position the insertion point and add text, graphics, tables, or other items in a blank area of a document. Before Click And Type came along, you had to insert carriage returns, tabs, and spaces before you could properly position your insertion point away from existing page elements.
By default, the Click And Type feature is enabled in Word 2003. You can verify whether the feature is currently activated by choosing Tools, Options; displaying the Edit tab; and making sure that the Enable Click And Type check box is selected.
To use Click And Type, you must be working in Print Layout or Web Layout view (choose View, Print Layout, or View, Web Layout). From Layout view, double-click in the page to position the insertion point. Watch the insertion point; it will indicate the default alignment of the text you enter.
Keep in mind that you can’t use the Click And Type feature to position text in the following situations:
-
With multiple columns
-
With bulleted and numbered lists
-
Next to floating objects
-
To the left or right of pictures that have top and bottom text wrapping
-
To the left or right of indents
-
To insert a table next to an existing table
-
While recording macros
Tip You can turn the Click And Type feature off and on by configuring the feature’s options. To do so, choose Tools, Options; click the Edit tab; select the Enable Click And Type check box to turn on the feature, or clear the check box to turn off the feature; and then click OK.
Using the Drag-and-Drop Feature
The drag-and-drop feature is a favorite with most people because it seems to come naturally. It reflects how we arrange our lives—we pick up items and put them down elsewhere, without issuing a complex series of cut and paste commands.
To use the drag-and-drop feature, select the text (or other element, such as a graphic or table) that you want to move, click and hold down the mouse button within the selected area, and then drag the selected element to another area in the current document or in another document. When you release the mouse button, the element will be repositioned in the document, and the Paste Options smart tag will appear (because when you use the drag-and-drop feature, you are essentially cutting and pasting). If you right-click when you click and drag, a shortcut menu opens when you release the mouse button, which provides Move Here, Copy Here, Link Here, and Cancel commands.
By default, the drag-and-drop feature is activated. You can control whether this feature is enabled by choosing Tools, Options; displaying the Edit tab; and then selecting the Drag-and-drop Text Editing check box to turn on the feature, or clearing the check box to turn off the feature.
Formatting Text Efficiently
As with most Word tasks, you can format text using menu options, keyboard shortcuts, or toolbar buttons. In addition, you can set formatting options before you enter text, or you can apply formatting to existing text. One of the most common methods of formatting text is to use the buttons readily available on the Formatting toolbar, shown in Figure 2-14.

Figure 2-14: The Formatting toolbar appears by default; it provides quick access to the most frequently used formatting commands.
| Tip |
Add and remove toolbar buttons You can easily add buttons to and remove buttons from the Formatting toolbar by clicking the arrow at the right end of the Formatting toolbar, pointing to Add Or Remove Buttons, selecting Formatting, and then selecting the buttons you want to show or hide. The following Formatting toolbar buttons can be added: Grow Font, Shrink Font, Superscript, Subscript, and Language. |
| Cross-Reference |
For more information about customizing toolbars, see Chapter 5, «Customizing Word and Enhancing Accessibility.» |
Using the Formatting toolbar is often the quickest way to get formatting results, but once you memorize key combinations, keyboard shortcuts also enable you to format text quickly and efficiently. Finally, while choosing menu options to format text is generally the slowest method, menus can provide more control and flexibility when you are formatting text as well as allow you to apply multiple formatting settings at one time.
Regardless of whether you use toolbar buttons, keyboard shortcuts, or menu options, the procedure is basically the same: You select the text you want to format (or position the insertion point where you want formatting to begin when you start typing), and then click the appropriate toolbar button, press the keyboard shortcut, or choose a menu option. In this section, you’ll learn how to manipulate text using all three techniques.
| Note |
Most toolbar buttons and keyboard shortcuts are toggle commands, which means that you perform the same action both to apply and to remove a formatting attribute. For example, selecting unformatted text and pressing Ctrl+B (or clicking the Bold button on the Formatting toolbar) applies boldface formatting to the selected text, and pressing Ctrl+B (or clicking Bold) again removes the boldface formatting from the selected text. |
Specifying Fonts and Sizes
As you know, the world of documents embraces numerous fonts. Thus, it should come as no surprise that Word can handle thousands of fonts that are compatible with the Windows operating systems, including Adobe PostScript fonts (if the Adobe Type Manager is installed) and TrueType fonts. The quickest way to specify a font is to select the text you want to format, and then select a font in the Font list box on the Formatting toolbar, as shown in Figure 2-15. The Font list box contains all the currently available fonts.
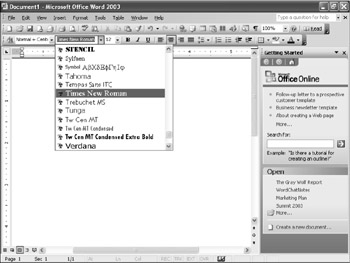
Figure 2-15: By default, the Font list box displays font names in their respective fonts.
| Note |
The default fonts installed with the Microsoft Office System are all TrueType fonts. With TrueType fonts, the text that appears on your screen is the same as the text in your printed document. |
You can specify whether the font names in the Font list box appear in their respective fonts or in plain text. To configure this setting, follow these steps:
-
Choose Tools, Customize, and then click the Options tab in the Customize dialog box.
-
Select or clear the List Font Names In Their Font check box.
Serif vs. Sans Serif Fonts
All fonts can be classified as serif or sans serif. You can easily differentiate between the two font types. Serif fonts add «hooks» to their letters, similar to the font used in the following paragraph’s text. Examples of serif fonts are Times and Times New Roman. In contrast, sans serif fonts have plain-edged letters, like the font used in the headings throughout this book. Examples of sans serif fonts are Arial and Helvetica. Using sans serif fonts for headings and serif fonts for body text is common practice in the print community because most readers find it easiest to read in hard copy. For online documents, the print setup is often switched for easier onscreen reading; frequently in online documents, serif fonts are used for headings and sans serif fonts are used for body text.
After you select a font for your text, you’ll most likely want to specify a size. The quickest way to size text is by using the Size list box, located to the right of the Font list box on the Formatting toolbar (shown previously in Figure 2-14). As you probably know, font sizes are measured in points, and 72 points equals an inch. By default, the Size list box provides a variety of common point sizes. To apply a font size using the Size list box, you simply select the text you want to resize or position your cursor at the point where you want the size specification to apply to newly entered text, click the Size arrow, and select a size from the list.
If you want to use a font size not listed in the Size list box, you need to do the following:
-
Select the text you want to resize or position your cursor at the point where you want the size specification to apply to newly entered text.
-
Click the Size box to select the currently displayed font size (or press Ctrl+Shift+P), and then enter a new value.
You can enter half-point sizes in the Size box using decimal notation (for example, 10.5), and you can specify sizes as tiny as 1 point and as large as 1,638 points (which is approximately two feet high).
| Tip |
When you type large numbers in the Size box, don’t include a comma separator—it will only confuse Word and slow you down. |
As a Word veteran, you won’t be surprised to hear that you can also resize text using keyboard shortcuts. Table 2-7 lists the keyboard shortcuts you can use to change the font size.
|
Keyboard Shortcut |
Sizing Effect |
|---|---|
|
Ctrl+Shift+P, and then enter a font size or press the Up Arrow and Down Arrow keys to choose a font size from the Size list box |
Changes font to a specified size |
|
Ctrl+] |
Enlarges font by 1 point |
|
Ctrl+[ |
Reduces font by 1 point |
|
Ctrl+Shift+> |
Increases font to the next larger size in the Size list box |
|
Ctrl+Shift+< |
Decreases font to the next smaller size in the Size list box |
Specifying Default Fonts for Templates, Web Pages, and E-Mail Messages
Instead of applying font sizes and styles to each document, you can speed up document formatting by specifying default fonts for templates, Web pages, and e-mail messages. You might find changing the default font settings especially useful if you frequently use formatting other than Word’s default styles. When you change default settings, you essentially use Word’s dialog boxes to modify the template used by a particular document type.
Specifying Default Fonts for Templates To specify a template’s default font, first open a document and attach the template (choose Tools, Templates and Add-Ins, and then attach the template you want to modify). If you set a default font for a document that doesn’t have an attached document template, you will modify Word’s Normal template, which is a global template and affects all documents created in Word. To modify a template’s default font, follow these steps:
-
Choose Format, Font.
-
In the Font tab, select the settings you want to configure for the template’s default font, and then click Default.
-
In the message box (shown in Figure 2-16), click Yes to change the template’s default font.
Figure 2-16: When you specify a change to a template’s default font, Word shows you which template you are modifying before you complete your changes.
After you set a default font, all new documents created using the template will be based on the new default font settings.
| Cross-Reference |
For more information about creating, modifying, and attaching templates, see Chapter 16, «Formatting Documents Using Templates, Wizards, Add-Ins, and Schemas.» |
Specifying Default Fonts for Web Pages To specify a default font for Web pages, follow these steps:
-
Choose Tools, Options, and then display the General tab.
-
Click Web Options, and then display the Fonts tab.
-
Specify proportional and fixed-width font settings, and then click OK twice.
| Cross-Reference |
For more information about creating and formatting Web pages, see Chapter 26, «Creating Professional Web Sites.» |
Specifying Default Fonts for E-Mail Messages You can also specify a default font for e-mail messages that you create using Word. To do this, follow these steps:
-
Choose Tools, Options, and then display the General tab.
-
Click E-mail Options, and then display the Personal Stationery tab in the E-mail Options dialog box, as shown in Figure 2-17. As you can see in the E-mail Options dialog box, you can configure settings for new messages, for replies and forwarded messages, and for plain text messages.
Figure 2-17: E-mail messages open using the formatting specified in the Personal Stationery tab in the E-mail Options dialog box. -
Click the Theme button (which displays the Theme Or Stationery dialog box) or any Font button (which displays the Font dialog box, shown in Figure 2-18) to specify default settings for the particular types of e-mail.
Figure 2-18: The Font dialog box enables you to select additional formatting effects as well as format multiple font attributes at one time, including font, size, color, and effects.
| Cross-Reference |
For more information about using Word to create e-mail messages, see Chapter 24, «Working and Collaborating Online.» |
Applying Multiple Font Attributes at One Time
Formatting toolbar buttons and keyboard shortcuts are great for simple formatting needs. But, in other instances, you might want to take advantage of a not-so-readily-accessible formatting effect (such as Emboss or Superscript) or apply a number of formatting attributes at one time. In those cases, a better approach would be to use the Font dialog box. To format text using the Font dialog box, follow these steps:
-
Select the text you want to format, click within the word you want to format, or position the insertion point where you want formatting to start when you begin typing.
-
Choose Format, Font (or right-click the text and choose Font on the shortcut menu, or press Ctrl+D).
In the Font dialog box, you can specify the font name, font style (including italic, bold, and bold italic), size, underline style, character spacing, text effects, and more. The Font dialog box also contains a preview window, so you can see how your font selections will appear in your document.
Applying Bold, Italic, and Underline Attributes
In addition to selecting fonts and resizing text, you can apply formatting attributes. The Formatting toolbar includes buttons for the three most commonly used formatting attributes—Bold, Italic, and Underline. To apply boldface, italic, or underlining to your text, simply click the appropriate toolbar button or press the keyboard shortcut, as listed in Table 2-8.
|
Format |
Toolbar Button |
Keyboard Shortcut |
|---|---|---|
|
Bold |
|
Ctrl+B |
|
Italic |
|
Ctrl+I |
|
Underline |
|
Ctrl+U |
|
Underline Words Only |
None |
Ctrl+Shift+W |
|
Double Underline |
None |
Ctrl+Shift+D |
The Underline button and keyboard shortcuts allow you to quickly apply standard underlining, but you can access a greater variety of underline styles using the Font dialog box. To choose an underline style in the Font dialog box, display the Font dialog box (press Ctrl+D), click the Underline Style arrow (shown previously in Figure 2-18), and select an underline style in the list. Figure 2-19 shows some of the Underline Style options in action.
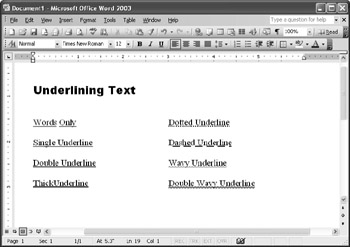
Figure 2-19: Word provides a variety of underline styles, including the styles shown here, which you can apply to text by using the Font dialog box.
| Tip |
Remove or change a custom underline To quickly remove a custom underline or to change the underline to a standard underline, select the underlined text (or click within the word you want to remove the underline from), and press Ctrl+U or click the Underline button on the Formatting toolbar once to remove the custom underline and twice to remove the underline altogether. The first time you execute the Underline toggle command, the custom underline changes to a standard (single-line) underline, and the second time you execute the command, the standard underline is removed. |
| Note |
You can quickly underline a blank line using Word’s Click And Type feature. To do this, ensure that you’re working in Page Layout View or Web Layout View, position your cursor where you want the line to start, click the Underline button on the Formatting toolbar, double-click where you want the line to end, and then click the Underline button to turn off the underline option. If you need a more accurately placed line, you can manually set a tab instead of using Click and Type. |
Changing Text Color
Applying color to text and underlines provides another avenue for customizing text attributes. By default, Word displays and prints black text on a white background. (You can configure your view in Word to display white text on a blue background by choosing Tools, Options, clicking the General tab, and selecting the Blue Background, White Text check box, but keep in mind that this setting changes your view, not the printed text color.) In many cases, you might want to change the color of text to add pizzazz to your documents. For example, you might add color to text when you’re creating a brochure, a Web page, an e-mail message, or any other document in which the text will appear on a colored background.
The most straightforward way to apply color to text is to follow these steps:
-
Select the text you want to color.
-
Click the Font Color arrow on the Formatting toolbar.
-
Select a color from the color palette shown in Figure 2-20.
Figure 2-20: You use the color palette to specify the color you want to apply to selected text.
After you’ve applied color to some text, the Font Color button retains that color setting for the rest of your current session (or until you select another color in the color palette). The thick underline under the A on the Font Color button reflects the most recently selected color. You can select other text and simply click the Font Color button to apply the same color to the text; you don’t have to repeatedly select the same color in the color palette each time you want to apply the color. By default, the Font Color button is set to Automatic (which generally equates to black).
If you’re going to color text frequently within a document, you can drag the top bar of the color palette to display it as a floating toolbar that remains available as you work, as shown in Figure 2-21. To close the Font Color toolbar after you’ve detached it from the Formatting toolbar, simply click the Close button—the color palette will be available from the Font Color arrow on the Formatting toolbar whenever you need it.
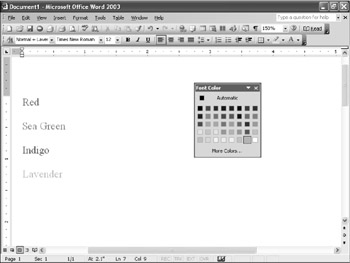
Figure 2-21: You can drag the color palette by its top bar to display it as a floating toolbar.
In addition to these methods of changing font color, you can also color text using the Font dialog box, shown earlier in Figure 2-18. Notice that you can specify a font color as well as an underline color. Clicking either color arrow in the Font dialog box displays the color palette, which you can use to apply an appropriate color to your text.
| Cross-Reference |
For more information about creating custom colors, see Chapter 12, «Enlivening Documents with Drawings and AutoShapes.» |
Copying Styles Using the Format Painter
After you’ve formatted your text, you might want to apply similar attributes to other text. For example, suppose you’ve used the following settings to style a book title that’s embedded in body text: bold italic, 12 points, Arial, red. When you type the next book title in your document, you could either apply all the formatting settings manually, create a style, or use the Format Painter tool to copy and paste the settings from the last book title to the current book title. Usually, the quick-and-convenient route of copying formatting settings will be preferable to manually applying a set of attributes over and over.
Using the Format Painter tool is a breeze. By default, the Format Painter tool is available on the Standard toolbar. To use the Format Painter, follow these steps:
-
Click in or select the text that has the formatting you want to apply to other text.
-
Click the Format Painter button.
-
Click or select the text you want to format.
To format multiple instances of text using the Format Painter, select the text with the desired format, and then double-click the Format Painter; this keeps the Format Painter turned on until you turn it off. All text you select or words you click while the Format Painter is activated will be reformatted. To turn off the Format Painter, click the Format Painter button on the Standard toolbar or press Esc.
You can also use keyboard commands to copy formatting. To do so, follow these steps:
-
Click in or select the text with the desired format, and press Ctrl+Shift+C.
-
Click in a word or select the text you want to format, and press Ctrl+Shift+V to apply the formatting attributes.
The advantage of using keyboard shortcuts in this case is that you can repeat the Ctrl+Shift+V command as many times as necessary on various instances of selected text—the formatting settings are retained during the current session until you execute another Ctrl+Shift+C command. Sometimes, having a group of formatting commands available with a single keyboard shortcut can prove to be a real time-saver.
Adding Text Effects and Animation
In addition to basic formatting, Word provides a number of other text effects that you can access from the Font dialog box (shown previously in Figure 2-18). Figure 2-22 illustrates these text effects.
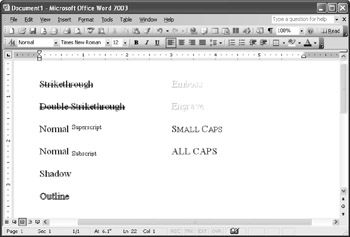
Figure 2-22: Word offers a number of font effects that you can apply to existing text.
The following options are available in the Effects section in the Font tab:
-
Strikethrough
-
Double Strikethrough
-
Superscript (Ctrl+Shift+=)
-
Subscript (Ctrl+=)
-
Shadow
-
Outline
-
Emboss
-
Engrave
-
Small Caps (Ctrl+Shift+K)
-
All Caps (Ctrl+Shift+A)
-
Hidden (Ctrl+Shift+H)
Adding an effect to text using the Font dialog box is accomplished in a predictable manner, as follows:
-
Click within a word, select the text you want to format, or position the insertion point where you want an effect to begin when you start typing.
-
Choose Format, Font, select the appropriate check box in the Font tab, and then click OK.
You can also add animation effects by clicking the Text Effects tab in the Font dialog box. The following animations are available in Word:
-
(None) Applies no animation effects (the default selection).
-
Blinking Background Creates a blinking effect by alternating reversed text within a black rectangle with regular text.
-
Las Vegas Lights Surrounds selected text with a looping series of blinking colored shapes.
-
Marching Black Ants Borders selected text with a black dashed line that moves clockwise.
-
Marching Red Ants Borders selected text with a red dashed line that moves clockwise.
-
Shimmer Repeatedly blurs and unblurs selected text.
-
Sparkle Text Displays moving colored «sparkles» on top of the selected text.
To see each effect in action, press Ctrl+D to display the Font dialog box, click the Text Effects tab, and then click each option in the Animations list box. The Preview section at the bottom of the Text Effects tab shows a small animated display as you select each option.
Working with Hidden Text
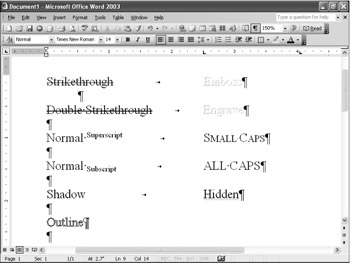
You can’t see it in Figure 2-22, but the word Hidden is inserted below ALL CAPS and formatted using the Hidden effect. You can create hidden text by selecting text, and then selecting the Hidden check box in the Font tab in the Font dialog box or by pressing Ctrl+Shift+H. Hidden text is useful for making notes to yourself. Word uses hidden text for certain components, including index fields, bookmarks, and table of contents fields.
To display hidden text on screen, click the Show/Hide button on the Standard toolbar or press Ctrl+Shift+8 to toggle your display. Hidden text is identified with a dotted underline, as shown in the following graphic:
Keep in mind that if you print your document while hidden text is displayed on your screen, the text will be printed by default. Likewise, if you click the Show/Hide button to hide all hidden text, the hidden text will not be printed by default when you print your document. However, if you want, you can print hidden text that’s in a document even if the hidden text doesn’t appear on screen. To do so, verify that the hidden text does not appear on screen; choose Tools, Options; click the Print tab; select the Hidden Text check box in the Print tab; click OK; and then print the document.
| Tip |
Animate with care Animated text should be used sparingly. Animation can serve a purpose in a few select cases, but the effects are frequently distracting and can be downright annoying when overused. In addition, you need to consider software limitations when you use animated text. For example, earlier versions of Word, such as Microsoft Word 95 and Microsoft Word 6, don’t recognize animations, and of course animated text can’t be printed (which could be a concern). |
Troubleshooting: I can’t use animations in Word documents saved as Web pages
Although using the text animation feature seems like a natural fit for creating Web pages, the feature doesn’t work in Word documents saved as Web pages. When you save a document containing animated text, Word displays a message box stating that the animated text will appear as italicized text. If you truly need to show animated text in an online document, the only workaround at this time is to create a link on your Web page that points to the Word document containing the animation or to insert an animated Graphics Interchange Format (GIF) file. For more information about creating Web pages, see Chapter 26, «Creating Professional Web Sites.»
Changing Case
Occasionally, you might want to change lowercase text to all caps, all caps to lowercase, or mixed-case text to all caps or all lowercase. Fortunately, you can perform these potentially tedious maneuvers without displaying the Font dialog box or retyping text. In fact, all you need to do is select the text you want to change and press Ctrl+Shift+A to alternate between all lowercase and all uppercase or press Shift+F3 to cycle through all lowercase, initial capped, and all uppercase.
In addition, Word offers more advanced capitalization schemes in the Change Case dialog box. To display the Change Case dialog box, shown in Figure 2-23, choose Format, Change Case (or press Alt+O+E). Notice that you can format selected text using the following options: Sentence Case, Lowercase, Uppercase, Title Case, or Toggle Case.
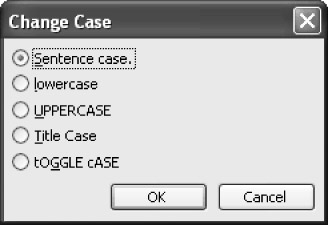
Figure 2-23: The Change Case dialog box enables you to quickly revise uppercase and lowercase letters.
Controlling Character Spacing
Another key font formatting issue is character spacing. Word provides space-tweaking features that were once available only to professional typesetters. You can (and should) use character spacing features to improve the look and readability of your documents. To view the primary character spacing options, choose Format, Font (or press Ctrl+D), and click the Character Spacing tab, as shown in Figure 2-24.
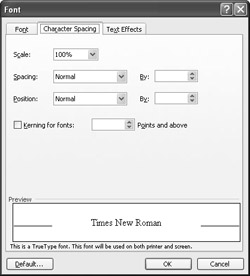
Figure 2-24: The Character Spacing tab in the Font dialog box enables you to rescale selected text, adjust spacing between characters, and reposition text.
You can control the following spacing parameters:
-
Scale Lets you stretch or compress selected text characters horizontally as a percentage of the text’s current size. You can choose a scaling option from the list box, or you can manually enter a scaling value from 1% to 600%. The Scale option is set to 100% for normal text.
-
Spacing Enables you to expand or condense the spacing between text characters by the amount you enter in the By box. If you decide you don’t like the expanded or condensed spacing settings, you can choose Normal in the Spacing list box to revert to standard letter spacing.
-
Position Allows you to raise or lower selected text relative to the text’s baseline by the amount you enter in the By box. To reset the text on the baseline, choose Normal in the list box.
-
Kerning For Fonts Enables Word to automatically adjust the amount of space between specific character combinations so that words and letters look evenly spaced. You can specify the minimum font size that should be automatically kerned in the Points And Above box. Generally, kerning is used for headings and larger fonts sizes (12 to 14 points and larger). In Word, kerning works only with TrueType or Adobe Type Manager fonts. Be aware that turning on the Kerning For Fonts feature can slow processing. If you want to manually kern characters, select the characters and use the Spacing option to tighten or loosen the characters’ positions.
Note To reiterate, the Scale option narrows and widens the actual characters, whereas the Spacing option adjusts the space between characters.
The Character Spacing tab also includes a Default button. This Default button enables you to store all the current settings in the Font, Character Spacing, and Text Effects tabs in the Font dialog box as the default settings for the active document as well as for all new documents based on the current template. If your current document uses the Normal template, clicking the Default button will change the defaults for all new blank documents you create, so be careful.
Clearing Formatting Attributes
Up to now, we’ve been looking at adding font formatting attributes, but at times you might want to remove all formatting attributes from within a paragraph. Word provides a quick way to clear all formatting attributes from text at one time. To clear all formatting from a single word or selected text, follow these steps:
-
Select the word or text you want to convert to plain text.
-
Press Ctrl+Spacebar.
Tip You can remove formatting from an entire document by pressing Ctrl+A to select the entire document, and then pressing Ctrl+Spacebar.
Similarly, you can remove formatting by using the Styles And Formatting task pane. To do so, follow these steps:
-
Select the word or text you want to clear.
-
Click the Styles And Formatting button on the Formatting toolbar (or select Styles And Formatting in the Task Pane list box if the task pane is already open).
-
In the Formatting Of Selected Text section, click Select All.
-
In the Pick Formatting To Apply section, choose Clear Formatting in the list box, or in the Formatting Of Selected Text section, position the pointer over the style box, click the arrow, and then choose Clear Formatting.
Inserting Symbols and Special Characters
Sometimes your text will require symbols and special characters that aren’t readily available on your keyboard. For example, you might want to show a copyright symbol, insert words containing accent marks, include small «dingbat» graphics, insert a nonbreaking space, and so forth. Quite a few symbols and special characters are available in Word if you know where to look. Nicely enough, when you find what you’re looking for, Word makes it easy to insert and reuse symbols and special characters in the future.
Adding Symbols
Word provides the Symbol dialog box to take care of your symbol and special character needs. (To access the Symbol dialog box, choose Insert, Symbol.) Figure 2-25 shows the Symbols tab in the Symbol dialog box.
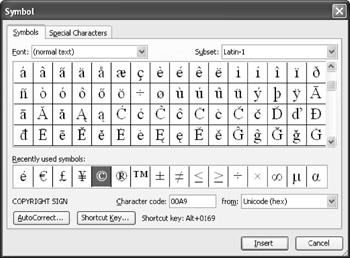
Figure 2-25: The Symbols tab in the Symbol dialog box enables you to browse and insert symbols.
You can insert symbols in three main ways:
-
Click a symbol in the symbol table, and then click the Insert button.
-
Double-click a symbol in the symbol table.
-
Press the symbol’s shortcut key.
Tip Pressing a keyboard shortcut command to insert a symbol inserts the symbol without displaying the Symbol dialog box. If you don’t know the keyboard shortcut for a symbol, you can click the symbol in the Symbol dialog box and view the associated keyboard command in the lower portion of the dialog box or by clicking the Shortcut button.
When you’re inserting symbols from within the Symbol dialog box, keep in mind that you can insert multiple symbols during a single visit. In fact, inserting all the symbols you’ll need for a while can prove to be fairly efficient. (After all, cutting and pasting or dragging and dropping inserted symbols is quicker and easier than repeatedly accessing the Symbol dialog box.) When you’ve inserted the symbols you need, click Close to close the Symbol dialog box.
Troubleshooting: I want to insert symbols without repeatedly displaying the Symbol dialog box
In some instances, you can quickly display the Symbol dialog box by double-clicking a symbol that’s been inserted into your document. Unfortunately, you can’t always count on this being the case. For example, you can double-click smiley faces and arrows to display the Symbol dialog box, but you can’t display the Symbol dialog box by double-clicking copyright and registered trademark symbols.
If you’re going to need more than a few symbols, you can either paste in a number of symbols you think you’ll need or leave the Symbol dialog box open while you work. Fortunately, you can enter text in your document while the Symbol dialog box is open. The main drawback to this approach is that the Symbol dialog box stays on top, so you’ll probably have to drag the dialog box out of your way a few times as you work. In addition, although you can resize the Symbol dialog box by making it larger, you can’t make it smaller. The capability to reduce the Symbol dialog box can’t be too far in the future, however, now that resizable dialog boxes are becoming more widely available in Office applications.
Adding Special Characters
Inserting special characters is similar to inserting symbols. Logically enough, special characters can be found in the Special Characters tab in the Symbol dialog box, as shown in Figure 2-26. Most of the special characters are typesetting characters that you use when refining document text. You will find that a number of the special characters can also be inserted by using the Symbols tab or by using the AutoCorrect feature.
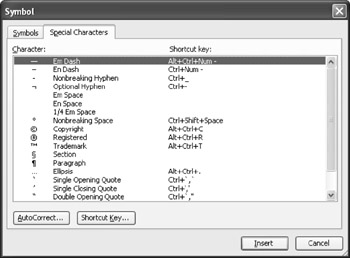
Figure 2-26: The Special Characters tab in the Symbol dialog box provides quick access to special characters.
You can insert special characters using any of these techniques:
-
Double-click an entry in the Special Characters tab.
-
Select an entry in the Special Characters tab, and then click Insert.
-
Press the character’s keyboard shortcut.
Using Shortcut Keys to Insert Symbols and Special Characters
If you frequently need to insert a symbol or special character that requires displaying the Symbol dialog box, you can simplify your life by memorizing preassigned keyboard shortcuts or by creating custom keyboard shortcuts. In Figures 2-25 and 2-26, you can see that both tabs in the Symbol dialog box contain a Shortcut Key button. In addition, both tabs display currently assigned keyboard shortcuts for quick reference. In the Symbols tab, available keyboard shortcuts appear next to the Shortcut Key button when a symbol is selected; in the Special Characters tab, keyboard shortcuts are listed in the Shortcut Key column.
If you find that you use a symbol or special character that isn’t already assigned a keyboard shortcut (or if you want to associate your own command with a symbol or special character even though it already has a shortcut), you can create a custom shortcut for future use. To do so, follow these steps (from either the Symbols or the Special Characters tab):
-
Display the Symbols dialog box (choose Insert, Symbol), and select a symbol or special character.
-
Click the Shortcut Key button. The Customize Keyboard dialog box appears.
-
By default, the cursor is positioned in the Press New Shortcut Key box; therefore, you can just type the keyboard shortcut you’d like to assign to the symbol. If the combination is already associated with another operation, the dialog box indicates which operation uses the keyboard shortcut. If the keyboard shortcut is not already associated with another operation, the dialog box indicates that the combination is currently unassigned, as shown in Figure 2-27.
Figure 2-27: The Customize Keyboard dialog box enables you to assign a custom keyboard shortcut to a symbol or special character. -
Click Assign, and then click Close twice to close the remaining dialog boxes.
-
Test your newly created keyboard shortcut within your document to verify that it is working properly.
As you might imagine, you can remove keyboard shortcut commands assigned to symbols and special characters. To do so, display the Customize Keyboard dialog box (as described in preceding steps 1 and 2), select the key combination you want to delete in the Current Keys list box, click Remove, and then click Close twice to close the open dialog boxes.
Inserting Symbols Automatically
In addition to inserting symbols manually and using keyboard shortcuts, Word enables you to automatically create symbols as you’re typing, without displaying the Symbol dialog box. The magic behind this trick is the AutoCorrect feature. When the AutoCorrect feature is turned on, you can automatically insert symbols that are included in the built-in list of AutoCorrect entries. Table 2-9 lists the symbols you can create using the AutoCorrect feature.
|
Symbol |
Keyboard Shortcut |
|---|---|
|
© |
(c) |
|
® |
(r) |
|
™ |
(tm) |
|
… |
… |
|
|
|
|
|
|
|
|
|
|
|
—> |
|
|
<— |
|
|
==> |
|
|
<== |
|
|
<=> |
When symbols are inserted automatically, Word 2003 accompanies the symbol with a smart tag. (If the smart tag doesn’t appear immediately, position the pointer over the symbol until it appears.) Figure 2-28 shows the AutoCorrect smart tag associated with the automatically generated right arrow symbol.
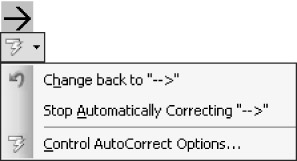
Figure 2-28: The AutoCorrect smart tag enables you to control whether automatically generated symbols should replace typed text.
If an AutoCorrect symbol is inserted but you would prefer to display the typed text, simply press the Backspace key once after you type the text. For example, if you want to display (c) instead of ©, type an opening parenthesis, c, and then a closing parenthesis (at which point, the text changes to the copyright symbol automatically), and then press the Backspace key (which removes the copyright symbol and redisplays the (c) text).
In some cases, you might find yourself removing a symbol repeatedly. Instead of driving yourself crazy, hold the pointer over the symbol’s smart tag before you remove it, click the arrow, and then choose the Stop Automatically Correcting command from the smart tag’s menu. This action forces Word to stop converting the typed combination to a symbol throughout the remainder of the document. If you want to stop the action in all Word documents, choose Control AutoCorrect Options from the smart tag menu, and then delete the action from the AutoCorrect tab. To delete an AutoCorrect option, select the option in the table in the AutoCorrect tab, and click Delete.
| Cross-Reference |
For more information about AutoCorrect, see Chapter 7, «Putting Text Tools to Work.» |
Inserting Date and Time Elements—The Quick Way
Word offers a variety of elements that you can use to insert dates and times into documents. Basically, date and time elements are fields (which are discussed in greater depth in Chapter 31, «Working with Field Codes and Custom Forms»), but Word provides a quick and easy method of inserting date and time components without your having to delve into the nitty-gritty of fields. If you want to simply enter the current date and time without manually configuring fields, you can do so as follows:
-
Choose Insert, Date And Time. The Date And Time dialog box appears, as shown in Figure 2-29.
Figure 2-29: The Date And Time dialog box enables you to insert date and time elements that will either show the date and time when the element was inserted or will update automatically each time the document is opened or printed. -
Select a date and time format in the Available Formats list box, and, if necessary, choose a language in the Language list box.
-
If you’d like the date and time to be updated automatically, select the Update Automatically check box; if you prefer to keep the date and time unchanged, leave the check box empty.
-
Click OK. The date and time information is inserted into your document and is accompanied by a smart tag that enables you to schedule a meeting or display your calendar. You can format the date and time elements just as you format other text within your document.
You can also insert a current time or date that is updated when you update the document’s fields by pressing Alt+Shift+T to insert a time field or Alt+Shift+D to insert a date field. By default, fields are updated each time you open a Word document, as specified in the General tab in the Options dialog box (using the Update Automatic Links At Open check box). In addition, you can choose to update fields when you print by selecting the Update Fields check box in the Print tab in the Options dialog box, or you can select fields (or press Alt+A to select the entire document, if desired) and press Alt+Shift+U or F9 to update the fields in the active document.
The basic options for making a Table of Contents in a Word document.
In this issue we’ll look at the basic options for making a Table of Contents in a Word document.
It’s very easy to do this in Word and it’s not just for people who are making books, for it can be useful in any long document such as a contract. A table of contents can be there for ‘in house’ use while making the document, and later removed from the final version. It’s a good way to see an overview of a long document and ensure that it’s in a logical structure.
Finally it can be a way to jump to parts of the document if you don’t like using the Document Map feature in Word.
Preparing your document
Before you make your Table of Contents (aka TOC) you need to setup your document with headings that will make up the TOC.
Word takes the text from paragraphs in nominated styles to make up the TOC. Normally you’ll use the ‘Heading 1’, ‘Heading 2’ etc styles in Word to define the headings that you want to show in the Table of Contents.
That’s the easy way however you can assign any paragraph style to a level in the TOC.
If you haven’t already, go through your document applying Heading styles to heading and sub-headings.
Making a simple TOC
Once you’ve got some headings formatted in your document you can make a Table of Contents. The basics haven’t changed much for many versions of Word. In Word 2003 you’ll find it under Insert | Reference | Index and Tables | Table of Contents. Word 2007 has it under the ‘References’ tab on the ribbon.
If you just click OK you’ll get a standard TOC showing headings from ‘Heading 1′, Heading 2′ and Heading 3’.
Chances are you’ll notice some anomalies in your initial TOC – headings missing or items that should not be there. Just go through your document and adjust the styles accordingly.
Updating a TOC
The Table of Contents is a Word field code – the Word 2003 default looks like this:
{ TOC o “1-3” h z u}
Press Alt+F9 to reveal the field codes in any Word document, press a second time to return to standard view.
Thankfully you should never need to worry about the field code parameters – the menu gives you access to all the options. However we’ve copied the TOC field parameters below if you’re interested.
But it’s important to understand how the TOC works so that you know how to update it.
As with any field, pressing F9 will update the field, but if you do that with a TOC you’ll get the choice to:
- Update Page Numbers only
- Update entire table
The default is ‘update Page Numbers only’ which is fine if you’ve not changed or moved any headings and only added or removed text. This choice is faster but we generally avoid it because a change in the headings may be overlooked.
We prefer to use ‘Update entire table’ to ensure the TOC is fully up to date. It rarely takes a noticeable time to update even on a long document. Certainly it’s a wise move to fully update the TOC before sending a document out.
Note: the use of the word ‘Table’ in the second option should not mislead you into thinking that the TOC is a Word table – it isn’t.
Changing the TOC
Unless you dig into the details of the field codes, the way to change a Table of Contents is to replace it.
If you right-click in a TOC field and choose Edit Field you get the standard Field codes edit box, scroll down to TOC in the Field Names then click on the Table of Contents button.
Then make the changes you want and Word will replace the current TOC field with a new one.
The TOC settings
Which brings us to the Table of Contents settings, there are a lot and we’ll look at the main ones here.
The two preview panes show how the current settings will look in printed form or online. The term ‘Web Preview’ really means any non-paper form not just a HTML document.
Show Page Numbers: you can uncheck this option if your document is meant to be printed, for example our ebooks don’t have page numbers in the TOC but do use the ‘Use hyperlinks instead of page numbers’ to make each TOC line clickable and jump to that chapter.
Right align page numbers tells Word to justify the page numbers on the right edge of the page while ‘Tab Leader’ indicates what character to use between the TOC entry and the page number (to guide a readers eye along the line).
Formatting can be done from the TOC styles in the current template or from some pre-defined options available in the drop-down list. You can refine the look of your TOC by choosing ‘from template’ then adjusting the TOC1, TOC2 etc styles via the Modify button (or the standard Styles dialog boxes or taskbars).
As we mentioned earlier, the TOC entries are normally taken from the Heading styles but if you click on the Options button you’ll see there are other, er, options.
You can assign a TOC level to any style or use Outline levels instead of styles (which is why there’s an option to enable the Outlining toolbar). Most of the time, you’ll stick with the Heading styles but the ability to change that is under the ‘Modify’ button.
You don’t have to show all the levels of Heading in the TOC. For example you can have a document using Heading styles 1 to 9 but only display in the TOC the main headings. Do this from the ‘Show Levels’ settings. This means you can have many levels of headings and perhaps display all of them in drafts of the document then hide all but a few in the final document.
Multi-level TOC
A table of contents doesn’t have to use only main headings in the document, for it can have multiple levels just like a numbered or bulleted list.
For example a book could have these headings based on Heading 1 only:
- Akira Kurosawa
- Stanley Kubrick
- Preston Sturges
Changing the TOC settings to include ‘Heading 2’ would change the TOC to show the sections under each main heading.
- Akira Kurosawa
- Seven Samurai
- Rashomon
- Yojimbo
- Stanley Kubrick
- Paths of Glory
- 2001, A Space Odyssey
- Barry Lyndon
- Full Metal Jacket
- Preston Sturges
- Sullivan’s Travels
- Palm Beach Story
There’s no need to create and remove Headings to do this, leave the document unchanged and just change the ‘Show Levels’ option in the TOC options dialog.
TOC within a chapter
You might want to start each chapter with a summary of the sections within it, and this is possible but not as elegantly done in Word as you’d like.
In short, there’s no way to directly make a TOC such as ‘Level 2’ but only until it reaches the next ‘Level 1’. Instead you have to separately define the part of the document to make the TOC for then tell the TOC field to only summarise that area. That’s done with the bookmark feature in Word.
Select the entire chapter or section you want the sub-TOC for and then define a bookmark for it using Insert | Bookmark.
Make a TOC in the usual way but change the levels to omit Level 1 (assuming that’s the chapter heading) and only show Levels 2 and below as you wish.
Insert the TOC into your document (presumably under the main chapter heading). Word assumes you only want one TOC in a document and you’ll get a message asking if you want to replace the existing TOC with the new one – in this case click No.
Finally you have to tell the TOC to only look at the chapter. There is no dialog box to do that, press Alt+F9 to reveal the field codes and add the b switch followed by the name of the bookmark eg b Kurosawa or b Chapter1 etc. Eg { TOC o “1-2” h z u b Kurosawa}
Press Alt+F9 again then F9 to update the entire TOC.
Field Parameters
Here, direct from the Word 2003 help files, are the TOC field code settings in case you want to get down in the detail.
”
a Identifier
Lists items captioned with the Caption command (Insert menu, Reference submenu) but omits caption labels and numbers. The identifier corresponds to the caption label. For example, although a caption on page 12 is “Figure 8: Mercury”, the field { TOC a figures } displays entries as “Mercury…………12”.
Use the c switch to build a table of captions with labels and numbers.
b BookmarkName
Collects entries only from the portion of the document marked by the specified bookmark
c “SEQIdentifier”
Lists figures, tables, charts, or other items that are numbered by a SEQ (Sequence) field. Word uses SEQ fields to number items captioned with the Caption command (Insert menu, Reference submenu). SEQIdentifier, which corresponds to the caption label, must match the identifier in the SEQ field. For example, { TOC c “tables” } lists all numbered tables.
f EntryIdentifier
Builds a table from TC fields. If EntryIdentifier is specified, the table is built only from TC fields with the same identifier (typically a letter). For example, { TOC f t } builds a table of contents from TC fields such as { TC “Entry Text” f t }.
h Hyperlinks
Inserts TOC entries as hyperlinks
l Levels
Builds a table of contents from TC fields that assign entries to one of the specified levels. For example, { TOC l 1-4 } builds a table of contents from TC fields that assign entries to levels 1-4. TC fields that assign entries to lower levels are skipped.
n Levels
Omits page numbers from the table of contents. Page numbers are omitted from all levels unless a range of entry levels is specified. For example, { TOC n 3-4 } omits page numbers from levels 3 and 4. Delete this switch to include page numbers.
o “Headings”
Builds a table of contents from paragraphs formatted with built-in heading styles (heading style: Formatting applied to a heading. Microsoft Word has nine different built-in styles: Heading 1 through Heading 9.). For example, { TOC o “1-3” } lists only headings formatted with the styles Heading 1 through Heading 3. If no heading range is specified, all heading levels used in the document are listed. Enclose the range numbers in quotation marks.
p “Separators”
Specifies the characters that separate an entry and its page number. For example, the field { TOC p “–” }, with an em dash, displays a result such as “Selecting Text–53.” The default is a tab with leader dots. You can use up to five characters, which must be enclosed in quotation marks.
s Identifier
Includes a number such as a chapter number before the page number. The chapter or other item must be numbered with a SEQ field. Identifier must match the identifier in the SEQ field. For example, if you insert { SEQ chapter } before each chapter heading, { TOC o “1-3” s chapter } displays page numbers as 2-14, where “2” is the chapter number.
d “Separator”
When used with the s switch, specifies the number of characters that separate the sequence numbers and page numbers. Enclose the characters in quotation marks. Word uses a hyphen (-) if no d switch is specified. In the table of contents generated by { TOC o “1-3” s chapter d “:” }, a colon (:) separates chapter numbers and page numbers — for example, “2:14.”
t “Style,Level, Style,Level,…”
Builds a table of contents from paragraphs formatted with styles other than the built-in heading styles. For example, { TOC t “chaptertitle,1, chapterhead,2” } builds a table of contents from paragraphs formatted with the styles “chaptertitle” and “chapterhead.” The number after each style name indicates the table of contents entry level that corresponds to that style.
You can use both the o switch and the t switch to build a table of contents from built-in heading styles and other styles.
u
Builds a table of contents by using the applied paragraph outline level (outline level: Paragraph formatting you can use to assign a hierarchical level (Level 1 through Level 9) to paragraphs in your document. For example, after you assign outline levels, you can work with the document in outline view or in the Document Map.).
w
Preserves tab entries within table entries.
x
Preserves newline characters within table entries.
z
Hides tab leader and page numbers in Web layout view.
”
Содержание
- 1 Как сделать содержание в ворде?
- 2 Оглавление в в Word 2010
- 2.1 Форматирование документа стилями заголовков
- 2.2 Вставка оглавления:
- 3 Автоматическое оглавление в ворде 2003
- 4 Содержание в Ворд имеет следующие преимущества:
- 5 Как обновить Автосодержание в Ворде:
-
- 5.0.1 От автора
- 5.0.1.1 teacher
- 5.0.1 От автора
-
- 6 Нумерация страниц
- 7 Заголовки
- 8 Оглавление
- 9 Каким оно может быть?
- 10 Обновление оглавления
- 11 Удаление оглавления
Очень часто, мы сталкиваемся с курсовыми работами, либо просто рефератами. И каждый преподаватель наверно оценит, если у его студента или ученика, будет красивый, читабельный план.
Именно поэтому я хотел бы вам сегодня рассказать: Как сделать содержание в ворде 2003. Этот замечательный план, будет иметь пронумерованные пункты, через которые можно будет перейти к нужному пункту вашего документа.
Как сделать содержание в ворде 2003
Для начала я хотел бы сказать, что этот процесс состоит из нескольких пунктов, которые я постараюсь вам поподробнее описать.
Пункт 1. Стиль Заголовок Ваш план будет состоять из каких-то пунктов. Для того, чтобы сделать первый пункт плана, выделяем нужный текст и потом в стилях выбираем Заголовок 1 .
Если же это подпункт типа 1.1, то это будет Заголовок 2 и так далее. Так проставляем все нужные пункты вашего плана до конца документа.
Все это лучше делать либо при написании текста, либо уже в конце, когда уже готов весь документ. Это уже кому как удобнее.
Пункт 2. Создание содержания Переходим на страницу, где будет создан план. Теперь нажимаем Вставка далее Ссылка и потом Оглавление и указатели.
В следующем появившемся окне переходим на Оглавление. Подбираем получше параметры для вашего содержания и нажимаем ОК.
Пункт 3. План готов Ваш план создан и теперь он имеет прекрасный вид
Пункт 4. Редактирование Если вы внесли какие либо изменения, то всегда можно обновить план.
Нажимаем правой кнопкой мыши — Обновить поле.
И теперь выбираем из двух пунктов. Если же вы сдвинули ваше оглавление на другую страницу, то лучше нажать Обновить только номера страниц.
Если внесли какие-либо изменения в текст, то лучше выбрать Обновить целиком и потом ОК.
Как сделать содержание в ворде 2003
Пожалуй это все, что я хотел рассказать о том Как сделать содержание в ворде 2003.
Если же вы забыли или просто не знаете как проставить нумерацию ваших страниц, то зайдите на статью Как пронумеровать страницы в ворде 2003.
Опубликовано в Полезности teacher Октябрь 27, 2015
Как сделать содержание в ворде?
Общий порядок такой:
- Отформатировать документ, используя стили заголовков (Заголовок 1, Заголовок 2 и так далее)
- Добавить оглавление с помощью меню «Ссылки» (Ворд 2007 и позднее) либо меню «Вставка» (Ворд 2003)
Оглавление в в Word 2010
Форматирование документа стилями заголовков
- Отформатируйте заголовки документа с помощью соответствующих стилей
- Выделите название раздела
- На панели инструментов в группе «Стили» нажмите стиль «Заголовок 1»
- Выделите название подраздела и примените к нему стиль «Заголовок 2»
- По аналогии отформатируйте все заголовки документа, которые Вам нужно включить в его содержание
Вставка оглавления:
- Поставьте курсор в то место в документе, в которое Вам нужно добавить автоматическое оглавление в ворде
- Перейдите в группу команд «Ссылки» на панели инструментов и выберите «Оглавление» — Автособираемое оглавление 1
- В результате у Вас на странице появится список всех заголовков, которые Вы отметили, в виде красивого оглавления
- Выполнить команду «Формат» — «Стили и форматирование», в правой части окна у Вас откроется список доступных стилей.
- Последовательно пройтись по документу и отформатировать заголовки соответствующими стилями.
- Установить курсор в то место документа, где должно появиться содержание в ворде 2003.
- Выполнить команду «Вставка» — «Ссылка» — «Оглавление и указатели» — Перейти во вкладку «Оглавление» и нажать «ОК»
- В результате у Вас появится оглавление, собранное из Ваших названий разделов и подразделов.
Содержание в Ворд имеет следующие преимущества:
- автоматически «собирает» Ваши заголовки из документа
- упрощает навигацию по многостраничным документам (пункты содержания — ссылки на страницы с этими разделами)
- обновляет номера страниц, а также изменения в разделах двумя кликами мыши
- такое содержание очень удобно при написании рефератов, курсовых работ и дипломов, когда Вам не надо вручную проставлять номера страниц, искать их по всей работе, переписывать каждый раз названия разделов и подразделов.
Как обновить Автосодержание в Ворде:
- Клацнуть правой кнопкой мыши на любом заголовке в содержании
- Выбрать команду «Обновить поле»
- обновить целиком — если Вы меняли в тексте названия заголовков разделов и подразделов и изменился порядок страниц
- номера страниц — если в Вашей работе поменялось только количество текста, т.е. нужно обновить нумерацию в содержании
- Нажать «ОК».
От автора
teacher
Нередко документ, который мы создаем в «Ворде», имеет очень сложную структуру, с большим количество заголовков и подзаголовков, огромным количеством страниц. В таком случае для навигации по документу создается оглавление. Его можно сделать вручную, вводя названия подзаголовков и номера страниц, на которых они расположены. Однако если текст действительно большой, то это процесс может занять много времени. Поэтому лучше воспользоваться автоматическим оглавлением в «Ворде». Рассмотрим этот процесс на примере «Ворда 2003».
Нумерация страниц
Несмотря на то, что оглавление в «Ворде» можно создать и без нумерации страниц, поскольку программа отлично справляется с этим в фоновом режиме, для большинства работ требуется наличие номеров страниц. Для того чтобы пронумеровать страницы в «Ворде 2003», нужно нажать на вкладку «Вставка» и выбрать пункт «Номера страниц…».
Здесь можно выбрать положение номера и нажать «Ок».
Заголовки
Для того чтобы сделать оглавление в «Ворде 2003», как ни странно, понадобится создать заголовки, которые могут быть различных уровней. Для этого нужно выделить слово или фразу, которая является заголовком, и выбрать стиль заголовка во вкладке главной панели. Как правило, для основного заголовка используется форматирование «Заголовок 1», а для подзаголовков – «Заголовок 2», но вы можете использовать тот, который вам больше нравится. Кроме того, можно создавать собственные заголовки или изменять уже имеющиеся.
Оглавление
Теперь рассмотрим, как сделать оглавление в «Ворде 2003». Итак, после того как нумерация задана и заголовки оформлены, нужно выбрать вкладку «Вставка», найти там строку «Ссылка» и в выпадающем окне нажать на строку «Оглавление и указатели…».
После этого нажатия появится окно, в котором имеются три вкладки: «Указатели», «Оглавление» и «Список иллюстраций». Для того чтобы создать оглавление, необходимо открыть вкладку «Оглавление». В данной вкладке можно создать то оглавление, которое необходимо, отформатировав его по своему усмотрению.
Каким оно может быть?
Как сделать оглавление в «Ворде 2003», теперь понятно, но как его сделать не таким, как установлено по умолчанию, а создать желаемый формат? Для этого в «Ворде 2003» предусмотрено несколько функций. Во-первых, можно настроить так, чтобы в оглавлении отображались только названия заголовков, а номера страниц не указывались. Для этого нужно во вкладке «Оглавление» окна «Оглавление и указатели» убрать галочку рядом со строкой «Показать номера страниц».
Если же убрать галочку у строки «Номера страниц по правому краю», то номера страниц будут не по правому краю, а рядом с названиями заголовков.
Кроме того, можно использовать заполнитель, который позволит заполнить расстояние между заголовком и номером страницы. Он может быть в виде точек, в виде прерывистой и сплошной линии. Здесь же можно выбрать один из предложенных вариантов форматов: классический, изысканный, затейливый, современный, формальный и простой.
Обновление оглавления
В ряде случаев, когда названия заголовков были изменены или в результате форматирования изменились номера страниц, на которых эти заголовки располагаются, может потребоваться корректировка оглавления. Если бы оно делалось вручную, то это потребовало бы пролистывания документа в поисках заголовков и номеров страниц. Однако автоматическое оглавление облегчает эту задачу. Для того чтобы изменить оглавление, нужно нажать правой кнопкой мыши на него и выбрать пункт «Обновить поле».
В результате этих действий появится окно с вариантами режимов обновления. Если заголовки не изменялись, то можно выбрать пункт «Обновить только номера страниц», в противном случае нужно задействовать пункт «Обновить целиком». После чего оглавление автоматически обновится в соответствии с внесенными в документ изменениями.
Удаление оглавления
Как сделать оглавление в «Ворде 2003», как его изменить и обновить, мы разобрались, но что делать, если оно больше не нужно? К сожалению, в отличие от более поздних версий «Ворда» здесь нет конкретной кнопки, позволяющей удалить оглавление, поэтому придется делать это вручную: выделить текст оглавления, нажать правой кнопкой мыши и выбрать пункт «Вырезать».
Использование автоматического оглавления очень облегчает процесс навигации, особенно в больших документах, где присутствует много заголовков. Однако и в небольших текстах его применение очень удобно. Плюсом является то, что создать такое оглавление очень просто, придерживаясь наших простых рекомендаций.
Комментарии к записи Как легко сделать содержание в Ворде для версий 2003, 2007, 2010 и 2016 отключены
Узнав, как сделать содержание в редакторе Ворд, пользователь сможет не только быстро систематизировать структуру документа, но и мгновенно получать доступ к каждому разделу без необходимости пролистывать страницу за страницей.
Автоматическое оглавление – это встроенная функция программы MS Word, с помощью которой создается перечень разделов и подразделов открытого документа. Главная особенность опции заключается в интерактивности. Чтобы открыть нужный раздел файла, достаточно просто кликнуть на соответствующем пункте в содержании.
Оно поддерживает гиперссылки и создается автоматически. Доступны несколько стилей перечня разделов.
При необходимости, пользователь может править стили созданного списка или создавать свой вид.
Еще одно преимущество автоматических содержаний заключается в их обновлении.
Если вы меняете название любого раздела документа или номер его страницы, эти данные сразу отобразятся в оглавлении. Вручную ничего менять не нужно.
Что нужно сделать перед созданием
Прежде чем начинать создание автоматического следует продумать следующие детали:
- Убедитесь, что все заголовки и подзаголовки документа форматированы в соответствии со встроенными стилями. Для создания названия раздела выделите нужный текст и во вкладке «Главная» кликните на «Стили». Для раздела выбирайте «Заголовок 1», для подраздела – «Заголовок 2» и так далее;
Рис.2 – создание подзаголовков с помощью стилей
Правильное расположение уровней документа позволит быстрее ориентироваться в его структуре и сделает оглавление максимально удобным.
- Подготовьте место для содержания. Оно может находиться в начале или в конце документа на новом листе. Согласно стандарту, страница с оглавлением не нумеруется, на ней не располагаются рамки и другие посторонние элементы.
Инструкция для версий Word 2003 и 2007
Word 2003
В Ворд 2003 пользователи не могут создавать автоматические оглавления, выбирая понравившийся шаблон. Доступна только функция разметки заголовков. Следуйте инструкции:
1Откройте документ, который содержит неформатированный заголовками текст;
2Добавьте уровни. Для этого поочередно выделяйте каждый подзаголовок, нажимайте на вкладку «Формат» и во вкладке стилей выбирайте первый, второй или третий уровни;
Рис.3 – создание разметки заголовков в Word 2003
3Когда все заголовки будут отформатированы, можно переходить к созданию систематизированного содержания. Нажмите на пункт меню «Вставка»;
4Выберите пункт «Ссылка» и в выпадающем списке кликните на «Оглавление и указатели»;
Рис.4 – переход к странице редактирования содержания
5В открывшемся окне отметьте галочкой опцию «Номера страниц по правому краю». Это позволит визуально выделить раздел и номер его страницы. В поле «Образец» вы увидите предварительную версию содержания;
Рис.5 – создание указателей
6В этом же окне откройте вкладку «Оглавление»;
7Нажмите на клавишу «Панель структуры», чтобы она стала неактивной. Если этого не сделать, появиться системная ошибка при создании перечня разделов;
Рис.6 – создание панели структуры содержания
8Нажмите на «ОК».
Чтобы обновить поле разделов кликните правой клавишей мышки на содержании и выберите метод обновления – только номера страниц или обновление целиком.
Рис.7 – результат создания в Word 2003
Word 2007
В Ворд 2007 доступно только создание автоматически собираемого списка разделов.
Создавать расположение пунктов и подпунктов функции «Оглавление» вручную пользователь не может в этой версии Word. Следуйте инструкции:
- Откройте документ, в котором заранее были созданы все заголовки;
- Создайте пустой лист в начале или в конце файла;
- Перейдите во вкладку «Ссылки»;
- Нажмите на пункт «Оглавление» и впадающем списке выберите его шаблон;
Рис.8 – панель настроек перечня заголовков
Далее список со всеми разделами файла автоматически появится на странице. В Ворд 2003 и 2007 содержание имеет табличную структуру.
Оно не обновляется автоматически после внесения изменений в тело документа.
Рис.9 – промотор и редактирование содержимого в Word 2007
Чтобы отредактировать список, выберите его с помощью двойного щелчка.
Теперь можно создавать форматирование для элементов списка – выделять заголовки жирным или наклонным текстом, изменять цвет, применять маркер.
Помните! Если вы изменили значение названия раздела, номера страниц, добавили новую часть, необходимо вручную обновлять оглавление, чтобы изменения отобразились. В противном случае, при попытке печати, вместо него появится текст с ошибкой «Заголовок не определён».
Чтобы обновить содержание кликните по нему правой клавишей мышки и в контекстном меню нажмите на «Обновить содержимое» или прейдите во вкладку «Ссылки» и кликните на «Обновить таблицу».
Делаем в Word 2010
Начиная с версии 2010, в Ворд можно создавать полностью автоматизированные варианты.
Их главное отличие заключается в том, что программа сама отслеживает изменения в документе и обновляет данные его содержания. Пользователю следить за этим больше не нужно.
Также в Word 2010 появилась возможность выбора шаблона. Юзеры могут выбрать понравившийся вид списка из предложенных разработчиком или создать свой кастомный вид перечня.
Создать список разделов можно для пустого документа. Это очень удобно, если вы начинаете писать документ с нуля. Все разделы будут созданы автоматически с новой страницы после добавления оглавления. Пользователю останется только заполнить каждый раздел текстом.
Если нужно добавить оглавление в уже готовый документ, необходимо вручную добавить уровни текста. Эти уровни и есть подзаголовками файла.
Выберите строку с названием пункта документа и во вкладке меню «Ссылки» и кликните на кнопку «Добавить текст».
В выпадающем списке выберите значение уровня – первое, второе или третье.
Рис.10 – создание уровней в Word 2010
После добавления всех уровней в меню «Ссылки» кликните на «Оглавление» и выберите понравившийся шаблон.
Объект будет создан автоматически и добавлен на новую страницу открытого документа.
Рис.11 – выбор шаблона в Word 2010
Пользователи Ворд 2010 могут легко переходить между разделами документа не только с помощью нажатия на нужный раздел в оглавлении, но и с помощью работы с панелью навигации.
После создания оно будет отображаться в левой части окна. Нажав на один из блоков, вы автоматически попадаете на соответствующую страницу файла.
Рис.12 – итог создания содержания в Word 2010
Руководство для пользователей Word 2016
В 2016 версии программы Ворд создаются по такому же принципу, как и в версии 2010 года.
Единственное отличие — наличие более удобного интерфейса и больше возможностей работы с пользовательскими шаблонами.
Два способа создания:
Автоматически – применяется для уже готового документа, в котором выделены заголовки;
Чтобы добавить на пустую страницу готового документа автособираемое, следуйте инструкции:
- Откройте файл MS Office Word и убедитесь в том, что все разделы выделены должным образом. При необходимости воспользуйтесь клавишей «Стили» и удалите/добавьте разделы самостоятельно;
- Далее откройте вкладку «Ссылки», как показано на рисунке ниже, и нажмите на блок создания. Далее вы увидите список доступных шаблонов. Кликнув по одному из них, на странице появиться готовый перечень заголовков;
Рис.13 – выбор шаблона в Word 2016
Вид готового оглавления в Ворд 2016 можно легко редактировать. Само название «Оглавление» может быть изменено, удалено или перемещено.
Также, для создания нужного вида есть возможность подправить расположение пунктов списка или добавить новые элементы.
Рис.14 – шаблон перечня заголовков в Word 2016
Чтобы изменить содержимое объекта, дважды кликните по нему мышкой. Затем откройте контекстное меню. С его помощью изменяются поля, коды и значения поле, добавляются новые шрифты, форматирование абзацев.
Рис.15 – редактирование автособираемого содержания
Чтобы создать оглавление для пустого документа, в окне выбора шаблона кликните на «Ручное оглавление»:
Рис.16 – создание перечня вручную
Теперь нужно самостоятельно ввести наименования пунктов документа первого, второго и третьего уровней. Также, следует вручную добавить все номера страниц.
Для добавления нового пункта в оглавление кликните по нему правой кнопкой мышки и нажмите на «Добавить поле», а затем выберите уровень поля.
Рис.17 – редактирование
Тематические видеоролики:


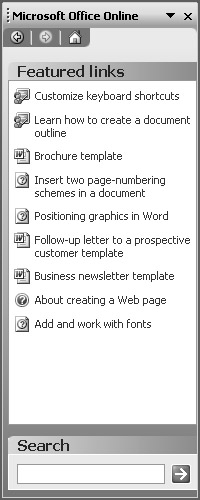
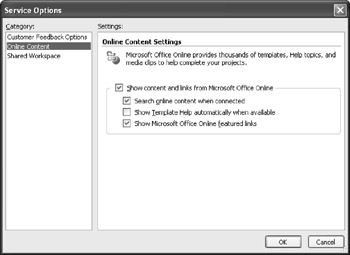
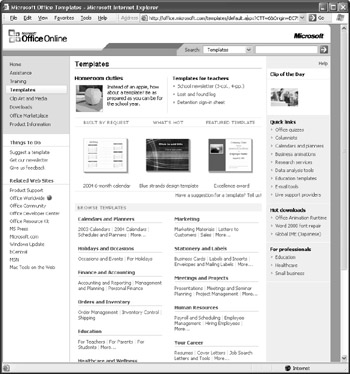
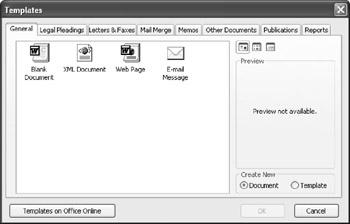

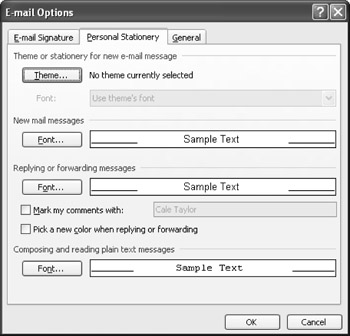
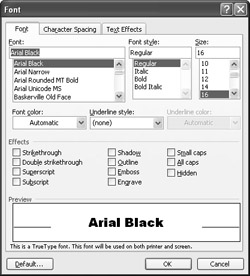
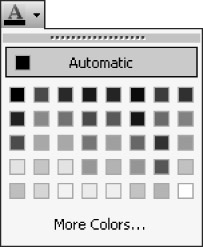
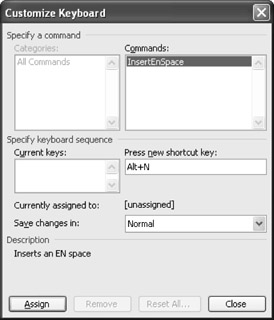
 or
or  or
or  or
or 