
Download PC Repair Tool to quickly find & fix Windows errors automatically
Content Controls in Microsoft Word offer a great way to automate your document creation. It also helps in organizing the content in a structured manner. These and many more features make Content controls easy to understand and use. So, let’s see how to add and change content controls in Word.
Content controls mostly find their use in creating templates and forms as they provide flexibility in content placement. Also, depending on your preferences, you can prevent them from being edited or deleted. Here’s how!
- Click File in Word.
- Scroll down to Options.
- Choose Customize Ribbon.
- Select the Developer box.
- Click OK.
- To add a Content control, click Rich Text Content Control box.
- Place the box at appropriate location, select Properties.
- Add General Information.
- Change Locking permissions.
How do you edit Rich Text Content Control?
Before proceeding with the steps to edit or Rich Text Content Control in Word, you’ll need to add the Developer tab to the Ribbon menu in Word.
For this, click the File tab on the Ribbon menu and choose Options.
When the Options window opens, navigate to Customize Ribbon.

Here, select the Developer box and hit the Ok button as shown in the image above.
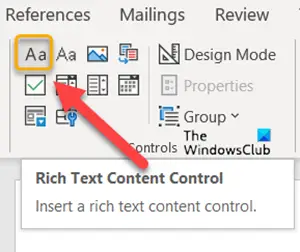
Next, to add a Content control, click Rich Text Content Control box.
Place the box at the appropriate location, to create a template.
Then, select Properties under Controls block.
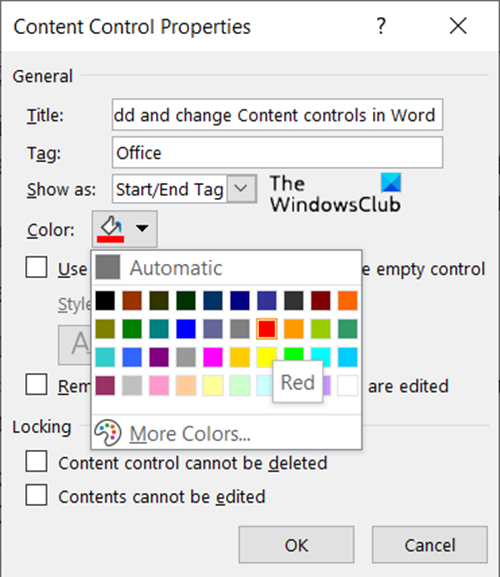
Add description like the title for the box, tags to be used, color for the box, etc.
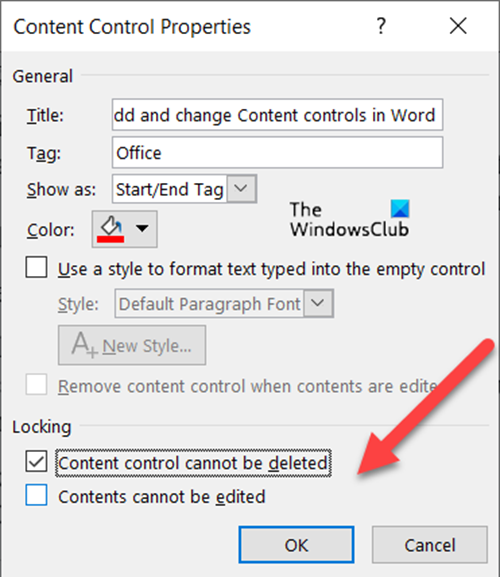
You can also change Content controls by changing its locking permission (editing or deleting them) by checking/un-checking the following boxes.
- Content Controls cannot be deleted.
- Content Controls cannot be edited.
Similarly, you can choose to create a Drop-down List via Content controls.
How do I remove content control in Word?
If you would like to delete or remove Content controls in Word:
- Press Ctrl+A to select the entire document.
- Then, right-click a visible content control.
- Now, in the context menu that appears on your computer screen, click Remove Content Control.
What is a Rich Text Content control?
A block of rich text that can be formatted represents a Rich Text Content control. So, all the custom formatted text like pictures, tables and other such items can be included in this category.
Hope it helps!

A post-graduate in Biotechnology, Hemant switched gears to writing about Microsoft technologies and has been a contributor to TheWindowsClub since then. When he is not working, you can usually find him out traveling to different places or indulging himself in binge-watching.
Word for Microsoft 365 Word for Microsoft 365 for Mac Word 2021 Word 2021 for Mac Word 2019 Word 2019 for Mac Word 2016 Word 2016 for Mac Word 2013 Word 2010 Word for Mac 2011 More…Less
To create a form in Word that others can fill out, start with a template or document and add content controls. Content controls include things like check boxes, text boxes, date pickers, and drop-down lists. If you’re familiar with databases, these content controls can even be linked to data.
Show the Developer tab
If the developer tab isn’t displayed in the ribbon, see Show the Developer tab.
Open a template or a blank document on which to base the form
To save time, start with a form template or start from scratch with a blank template.
-
Go to File > New.
-
In Search online templates, type Forms or the type of form you want and press ENTER.
-
Choose a form template, and then select Create or Download.
-
Go to File > New.
-
Select Blank document.
Add content to the form
Go to Developer, and then choose the controls that you want to add to the document or form. To remove a content control, select the control and press Delete. You can set properties on controls once inserted.
Note: You can print a form that was created using content controls, but the boxes around the content controls will not print.
In a rich text content control, users can format text as bold or italic, and they can type multiple paragraphs. If you want to limit what users add, insert the plain text content control.
-
Click or tap where you want to insert the control.
-
Select Developer > Rich Text Content Control
 or Plain Text Content Control .
 or Plain Text Content Control
  .
.To set specific properties on the control, see Set or change properties for content controls.
A picture control is often used for templates, but you can also add a picture control to a form.
-
Click or tap where you want to insert the control.
-
Select Developer > Picture Content Control
.
 .
.To set specific properties on the control, see Set or change properties for content controls.
Use building block controls when you want people to choose a specific block of text. For example, building block controls are helpful when you need to add different boilerplate text depending on the contract’s specific requirements. You can create rich text content controls for each version of the boilerplate text, and then you can use a building block control as the container for the rich text content controls.
-
Click or tap where you want to insert the control.
-
Go to DeveloperBuilding Block Gallery Content Control
(or Building Block Content Control). -
Select Developer and content controls for the building block.
 (or Building Block Content Control).
-
Click or tap where you want to insert the control.
To set specific properties on the control, see Set or change properties for content controls.
In a combo box, users can select from a list of choices that you provide or they can type in their own information. In a drop-down list, users can only select from the list of choices.
-
Go to Developer > Combo Box Content Control
or Drop-Down List Content Control . -
Select the content control, and then select Properties.
-
To create a list of choices, select Add under Drop-Down List Properties.
-
Type a choice in Display Name, such as Yes, No, or Maybe.
Repeat this step until all of the choices are in the drop-down list.
-
Fill in any other properties that you want.
Note: If you select the Contents cannot be edited check box, users won’t be able to click a choice.
 or Drop-Down List Content Control
  .
.-
Click or tap where you want to insert the date picker control.
-
Select Developer > Date Picker Content Control
.
 .
.To set specific properties on the control, see Set or change properties for content controls.
-
Click or tap where you want to insert the check box control.
-
Select Developer > Check Box Content Control
.
 .
.To set specific properties on the control, see Set or change properties for content controls.
Legacy form controls are for compatibility with older versions of Word and consist of legacy form and Active X controls.
-
Click or tap where you want to insert a legacy control.
-
Go to Developer > Legacy Forms
drop-down. -
Select the Legacy Form control or Active X Control that you want to include.
 drop-down.
Set or change properties for content controls
Each content control has properties that you can set or change. For example, the Date Picker control offers options for the format you want to use to display the date.
-
Select the content control that you want to change.
-
Go to Developer > Properties.
-
Change the properties that you want.

Add protection to a form
If you want to limit how much others can edit or format a form, use the Restrict Editing command:
-
Open the form that you want to lock or protect.
-
Select Developer > Restrict Editing.
-
After selecting restrictions, select Yes, Start Enforcing Protection.


Advanced Tip:
If you want to protect only parts of the document, separate the document into sections and only protect the sections you want.
To do this, choose Select Sections in the Restrict Editing panel. For more info on sections, see Insert a section break.

Show the Developer tab
If the developer tab isn’t displayed in the ribbon, see Show the Developer tab.
Open a template or use a blank document
To create a form in Word that others can fill out, start with a template or document and add content controls. Content controls include things like check boxes, text boxes, and drop-down lists. If you’re familiar with databases, these content controls can even be linked to data.
-
Go to File > New from Template.
-
In Search, type form.
-
Double-click the template you want to use.
-
Select File > Save As, and pick a location to save the form.
-
In Save As, type a file name and then select Save.

-
Go to File > New Document.
-
Go to File > Save As.
-
In Save As, type a file name and then select Save.

Add content to the form
Go to Developer, and then choose the controls that you want to add to the document or form. To remove a content control, select the control and press Delete. You can set Options on controls once inserted. From Options, you can add entry and exit macros to run when users interact with the controls, as well as list items for combo boxes, .
-
In the document, click or tap where you want to add a content control.
-
On Developer, select Text Box, Check Box, or Combo Box.
-
To set specific properties for the control, select Options, and set .
-
Repeat steps 1 through 3 for each control that you want to add.

Options let you set common settings, as well as control specific settings. Select a control and then select Options to set up or make changes.
-
Set common properties.
-
Select Macro to Run on lets you choose a recorded or custom macro to run on Entry or Exit from the field.
-
Bookmark Set a unique name or bookmark for each control.
-
Calculate on exit This forces Word to run or refresh any calculations, such as total price when the user exits the field.
-
Add Help Text Give hints or instructions for each field.
-
OK Saves settings and exits the panel.
-
Cancel Forgets changes and exits the panel.
-
-
Set specific properties for a Text box
-
Type Select form Regular text, Number, Date, Current Date, Current Time, or Calculation.
-
Default text sets optional instructional text that’s displayed in the text box before the user types in the field. Set Text box enabled to allow the user to enter text into the field.
-
Maximum length sets the length of text that a user can enter. The default is Unlimited.
-
Text format can set whether text automatically formats to Uppercase, Lowercase, First capital, or Title case.
-
Text box enabled Lets the user enter text into a field. If there is default text, user text replaces it.
-
-
Set specific properties for a Check box.
-
Default Value Choose between Not checked or checked as default.
-
Checkbox size Set a size Exactly or Auto to change size as needed.
-
Check box enabled Lets the user check or clear the text box.
-
-
Set specific properties for a Combo box
-
Drop-down item Type in strings for the list box items. Press + or Enter to add an item to the list.
-
Items in drop-down list Shows your current list. Select an item and use the up or down arrows to change the order, Press — to remove a selected item.
-
Drop-down enabled Lets the user open the combo box and make selections.
-
-
Go to Developer > Protect Form.
Note: To unprotect the form and continue editing, select Protect Form again.
-
Save and close the form.

If you want, you can test the form before you distribute it.
-
Protect the form.
-
Reopen the form, fill it out as the user would, and then save a copy.
Show the Developer tab
-
On the right side of the ribbon, select
, and then select Ribbon Preferences. -
Under Customize, select Developer .
 , and then select Ribbon Preferences.
Open a template or a document on which to base the form
You can start with a blank document and create your own form. Or, to save time, you can start with a form template.
-
Go to File > New from Template.
-
In the left pane, expand Online Templates, and then select Forms.
-
Double-click the form template that you want to use.
Add content controls to the form
-
In the document, click where you want to add the control.
-
On the Developer tab, under Form Controls, select Text Box, Check Box, or Combo Box.
-
To set specific properties for the control, select Options, and then configure the properties that you want.
Note: To create a list of drop-down items in a combo box, select the combo box placeholder, click Options, and then add the items that you want to appear in the drop-down list.
-
Repeat steps 1 through 3 for each control that you want to add.
Add instructional text (optional)
Instructional text (for example, «Type First Name») in a text box can make your form easier to use. By default, no text appears in a text box, but you can add it.
-
Select the text box control that you want to add instructional text to.
-
On the Developer tab, under Form Controls, select Options.
-
In Default Text, type the instructional text.
-
Make sure that Fill-in enabled is selected, and then select OK.
Protect the form
-
On the Developer tab, under Form Controls, select Protect Form.
Note: To unprotect the form and continue editing, click Protect Form again.
-
Save and close the form.
Test the form (optional)
If you want, you can test the form before you distribute it.
-
Protect the form.
-
Reopen the form, fill it out as the user would, and then save a copy.
Creating fillable forms isn’t available in Word for the web.
You can create the form with the desktop version of Word with the instructions in Create a fillable form.
When you save the document and reopen it in Word for the web, you’ll see the changes you made.
Need more help?
Most
of us use Microsoft Office for professional and personal purposes. When you
create many documents, you may need to use same content blocks on some of your
documents. For example, you have a company logo in WordArt and need to insert
on all the documents. Another example is that you want to insert notes on
certain pages in pre-formatted text block. Word by default offers many reusable
building blocks; however, you can also create reusable content blocks in
Microsoft Word based on your need.
Related: How to changed embedded file name in Office documents?
We
will discuss the following topics in this article:
- What is content block?
- Using default content block from Quick Parts
- Insert content blocks with F3
- Creating custom content blocks
- Inserting custom content blocks
1. What is Content Block?
Open
a new Word document and navigate to “Insert” tab. Here you can see many
pre-defined blocks for Cover Page, Shapes, WordArt, Header, Footer, etc.
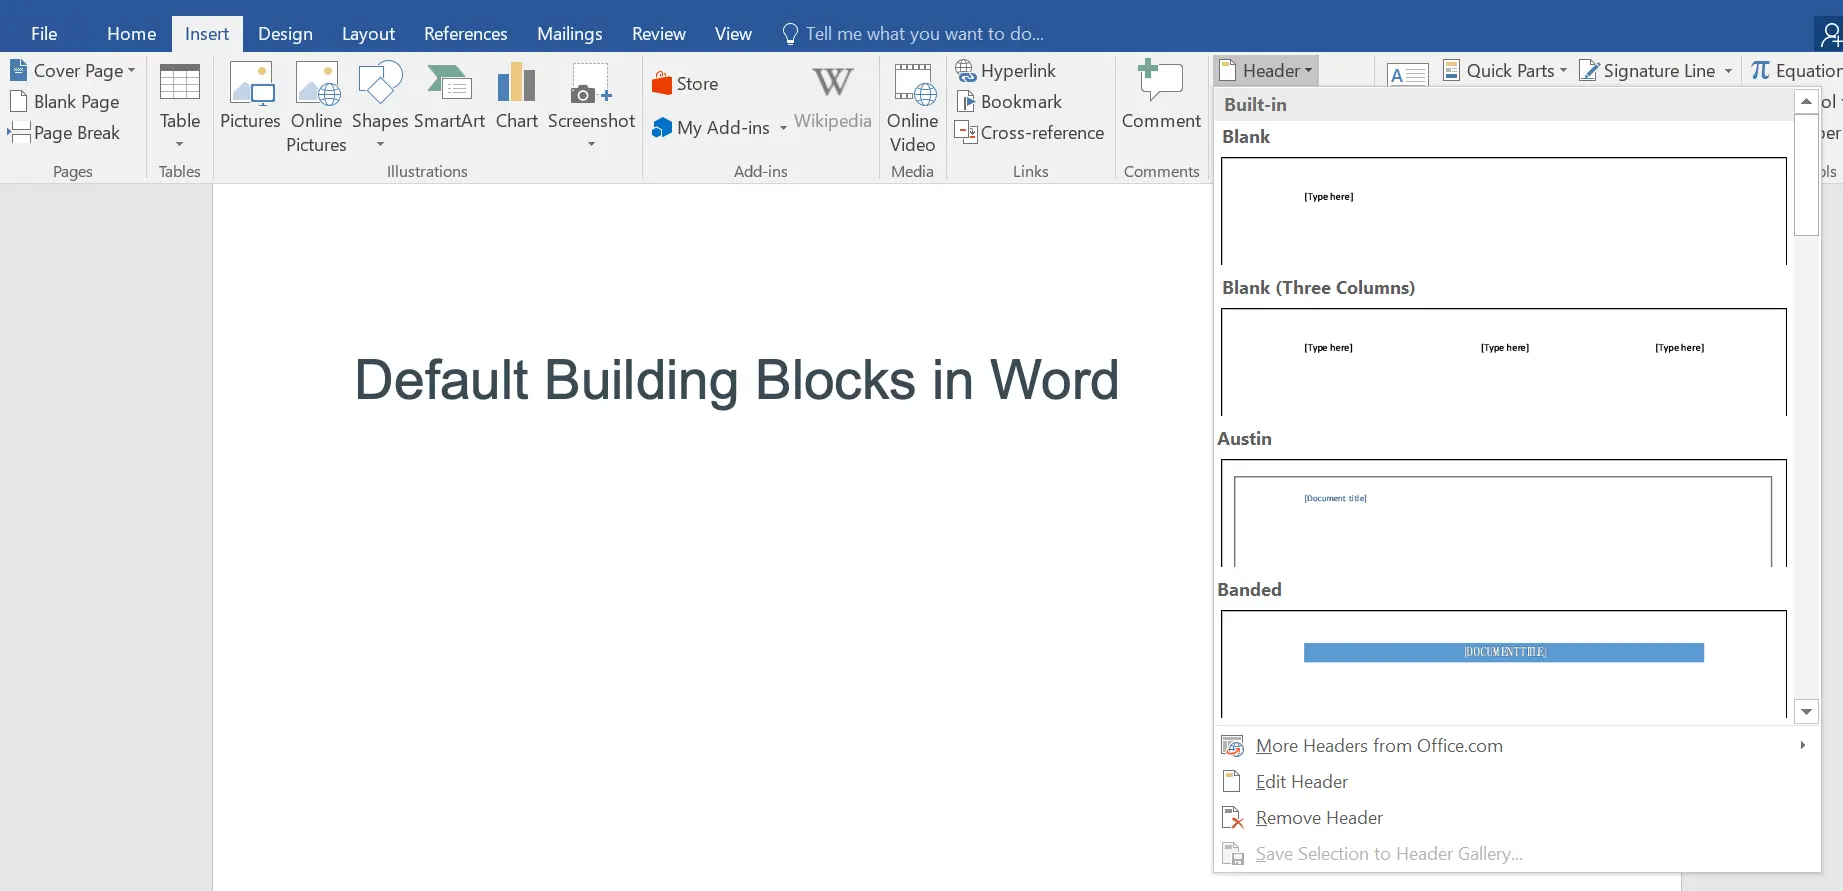
For
example, click on the “Header” and choose one of the available design for your
document. The advantage of the building blocks is that they are available on
the Word global document template and you can use on all your documents with
few clicks.
You
can also create and save custom building blocks so that you can insert anywhere
on your documents.
2. Using Quick Parts
Since
there are so many content blocks available in Word, finding it will be a
difficult task. However, Word offers a Quick Parts option to find all the
reusable content blocks in one place. Click on the “Quick Parts” option under
“Insert” tab.

You
can use Auto Text, Document Property and Field options to quickly insert
reusable blocks on documents. For example, you can quickly insert the published
date of a document by selecting the “Publish Date” option from “Document
Property”.
Click
on the “Building Blocks Organizer…” option to view all the available building
blocks.

You
can quickly filter with the “Gallery” column to select the required content
block. For example, select “Double Table” option from “Tables” “Gallery”
column. Preview the table and click on “Insert” to add on your document.
Be
cautious before deleting any of the built-in content blocks category items. You
may not be able to recover the block permanently. We also don’t recommend editing
the properties of the default content blocks. If you want to have custom blocks
then create a new block and customize as per your requirement.
Related: Quickly insert dividers in Word.
2.1. Insert Content Blocks Using F3
Before
we create custom block, you can easily insert the blocks using the name and F3
key. As you can see, Double Table is the name of the block, which is unique on
the template level. Simply type double table and press F3 key to insert a
table. Similarly, you can insert any content blocks available in the Quick
Parts.
3. Creating Custom Content Blocks
As
explained above, reusing existing blocks may not be helpful for inserting your
company logo or any custom text blocks. Let us explain two cases for creating
content blocks in Word.
3.1. Create Content Block of WordArt Logo
It is
obvious; you may need to use elements like company logo frequently on your
documents. In order to improve your productivity and avoid repeatedly creating
/ formatting a logo, save it as a reusable content building block. You can use
the logo later any point of time and on any Word documents.
- First select your logo and go to “Insert > Quick Parts” and choose
“Save Selection to Quick Part Gallery” option.

- Word will open a pop-up for creating a custom building block.

- Fill up the following details:
- Name – unique name for your
block, ensure to provide a name that does not already exist.
- By default, Word uses the
“General” category for its own quick parts. You can also define your own
categories if necessary. You can use this category name to filter the custom
blocks when searching.
- Gallery – select where you
want to add your building block. We recommend selecting “Quick Parts” so that
you can access the block from “Quick Parts” drop-down menu. However, you can
select any available gallery like “Header” and the custom block will be added
under that section.
- Word saves graphic elements
of text boxes automatically in the “Building Blocks” template. You can also
choose “Normal” template or ay other global template you use. Remember, both
these templates are global which means your custom block will be available on
all the documents.
- Click on the “Options”
dropdown to choose how you want to insert the block. You can choose to save
only inserting the content, inserting on own paragraph or inserting on own
page.
- Now confirm the settings
with “OK” and check the logo block under “Quick Parts”. You can quickly insert
anywhere on your documents and save time in formatting repeatedly.
- Name – unique name for your

3.2. Saving Text as a Building Block
You
can save any element in a document as a quick part, including titles,
formatting and graphics. Similar to logo as explained above, you can also save
text passages. Frequently used phrases like headings, signatures or an opening
passage can so be inserted easily.

- Select the text block on your document. This time, use the keyboard shortcut Alt+ F3 to open the dialog window.
- Word uses the beginning of the text as the name of the building block. Replace it with a more meaningful name.
- This quick part contains only text and is saved in the “Normal” file template.
- Confirm the settings with “OK”.
- You can view the custom text block under “Quick Parts > AutoText” section.
4. Inserting Building Blocks
Once
you have defined the building blocks you need, you can place them in your
document whenever you like. Using a simple function you can precisely insert
your building blocks and so save a lot of time and energy.
- Enter the name of the building block.
- Press the F3 key to insert the quick part.
- After inserting the block, you can edit it in the normal way.
- Word provides another option for inserting building blocks. To do this, open the “Insert” tab and the “Quick Parts” menu. Choose the block you have previously saved from the list.
- Remember that the text you have saved as “Normal” template appears under the “AutoText” submenu. However, the logo you have saved as “Building Blocks” will appear right under the “Quick Parts” drop-down.
You
can also right click on the custom block under “Quick Parts” menu and choose
where you want to insert the block on your document.

If
you want to modify the properties, choose “Edit Properties” and change the
options
Note: Whenever you enter the name of a building block text, Word will recognize it while you are typing. You can see this in a small window and insert the building block using the return key.
Related: How to create eBook in Microsoft Word?
5. Moving Content Blocks in Word
In addition to creating building blocks, you can structure
your document with headings. When using heading, enable the “Navigation Pane”
under “View” tab.

Now, you can see all the heading structure of your document. Simply drag and drop the heading block up or down to move the entire content under the heading. This will help you to easily organize the structure of your document after writing the content.
You can also select the content block on your document, simply drag and drop anywhere to move the entire block.
Achieve more control and flexibility with your documents
Updated on September 11, 2022
What to Know
- Select Insert > Text Box > choose a text box template. Select and drag box to the position you want.
- To resize text, select and drag circles around the edge. To rotate text, select and drag the circular arrow.
- Place the cursor inside the text box and type the information you want to appear.
This article explains how to use text boxes in Microsoft Word. Instructions apply to Word for Microsoft 365, Word 2019, Word 2016, and Word 2013.
How to Insert a Text Box in Word
Start by opening the document you want to add a text box to. Then follow the steps below.
-
On the ribbon, select Insert.
-
In the Text group, select Text Box, then choose a text box template.
-
The new text box appears in the middle of the text, and the Shape Format tab is automatically selected.
-
Select and drag the box to the position you want. To resize the text box, select and drag the circles around the edge. To rotate the text box, select and drag the circular arrow at the top of the box.
-
Place the cursor inside the text box and type the information you want to appear there.
Why Use Text Boxes?
When you type text in Microsoft Word, you have options for making it look a particular way on the page (such as changing the page margins), but those options are limited. Text boxes expand your formatting repertoire by offering additional control and flexibility for how your text appears. You can place a text box anywhere within a document and format it with different colors and fonts. This feature is especially helpful for creating a blockquote or a sidebar.
Customize a Text Box
After you create a text box, you can customize it in a number of ways.
-
To bring up options, place the cursor inside the text box and right-click. Choose an option and follow the screen prompts to add a border, change the style, or adjust the way the text box interacts with the other text on the page.
Alternatively, use the controls on the Shape Format tab.
-
To go directly to the Layout Options menu, select the text box, then select the Layout Options icon (it looks like a horseshoe and is located to the right of the text box).
-
Change the text, make more adjustments, or move the box to another location at any time. To delete a text box, select its border, then press Delete on the keyboard.
Thanks for letting us know!
Get the Latest Tech News Delivered Every Day
Subscribe
Insert, Format and Update a Table of Contents or TOC in Microsoft Word (The Easy Way)
by Avantix Learning Team | Updated April 14, 2022
Applies to: Microsoft® Word® 2013, 2016, 2019, 2021 or 365 (Windows)
You can create a table of contents quickly in Word using built-in heading styles. Although you can insert a table of contents (TOC) using different strategies in Word documents, it’s easiest to use Heading 1, Heading 2 and so on to format headings and then generate your table of contents. You can then change the formatting and update the TOC when your document changes.
Because a table of contents is a Word field, you should not type over it as any typing will be removed when you update the TOC.
There are 4 steps for creating a table of contents in Word using heading styles:
- Prepare the document by applying built-in heading styles such as Heading 1, Heading 2 and so on
- Create or insert the table of contents
- Format the table of contents
- Update the table of contents
Both custom and automatic table of contents can be updated when changes are made to the document. An automatic table of contents is inserted in a content control and some users may have difficulty working with, or understanding, content controls (which act as containers for specific content). The Manual Table that appears in the Insert Table of Contents drop-down menu is an option that requires the user to type entries and is not an efficient way to create a table of contents in Word (and should rarely be used).
Recommended article: 14 Timesaving Microsoft Word Shortcuts to Quickly Select Text
Do you want to learn more about Microsoft Word? Check out our virtual classroom or in-person classroom Word courses >
Step 1: Prepare the document by applying built-in heading styles
In order to easily insert a table of contents in Word, you’ll need to apply heading styles to titles and subheadings in your document first.
To apply a built-in heading style to a title or subheading:
- Click in the title or subheading to which you wish to apply a built-in heading style. Each title or subheading is a paragraph and should be followed by a hard return (you pressed Enter or Return).
- Click the Home tab in the Ribbon and in the Styles group, click a heading style (such as Heading 1). You can click the down arrow on the bottom right of the Styles Gallery to display more styles.
Below is the Styles Gallery in the Home tab in the Ribbon in Word:

It’s common to have one or two levels of headings (Heading 1 and Heading 2), but you can apply multiple heading levels. By default, Word will typically display the next heading level if a previous level has been used in the document.
You can also click in a title or subheading and press Ctrl + Alt + 1 to apply Heading 1, Ctrl + Alt + 2 to apply Heading 2 and so on.
Step 2: Create or insert the table of contents
Once you have applied built-in heading styles, you can easily create a custom table of contents or TOC.
To create or insert a table of contents:
- Click in the document where you want to insert or create a table of contents (typically at the beginning of the document).
- Type «Contents» or «Table of Contents» and press Enter. Format the text, but do not use built-in heading styles.
- Click below the title where you want to insert the table of contents.
- Click the References tab in the Ribbon and click Table of Contents in the Table of Contents group. A drop-down menu appears.
- Select Custom Table of Contents. A custom table of contents will not appear in a content control. A dialog box appears.
- Enter the number of levels to display in the table of contents beside Show levels (such as 2).
- Select or check Use hyperlinks instead of page numbers if you want to create active hyperlinks or links if you save the document as a PDF (Portable Document Format) file. This will enable users to click the table of contents in the PDF to jump to specific locations in the file.
- Ensure Show page numbers is selected if you want page numbers to appear in the table of contents. If you select Show page numbers, the page numbers are typically right aligned by default. If necessary, select a tab leader from the Tab leader drop-down menu to change the character that leads up to the page numbers in the table of contents.
- Select an option from the Formats drop-down menu if necessary. It’s best to select From template if you want to modify the formatting of the table of contents.
- Click OK. A table of contents appears in the document. This is a Word field so if you click in it, it will normally appear in grey. Do not type manual entries in the table of contents.
The Table of Contents dialog box appears as follows:

Step 3: Format the table of contents
You can format a table of contents in many ways using the Table of Contents dialog box:
- Click in the table of contents.
- Click the References tab in the Ribbon and click Table of Contents in the Table of Contents group. A drop-down menu appears.
- Select Custom Table of Contents. A dialog box appears.
- Click Modify. Note: you will not be able to select Modify if you have selected any option other than From Template from the Formats drop-down menu. A dialog box appears with TOC styles.
- Click a TOC style. For example, click TOC 1 if you want to format the first level items in the table of contents.
- Click Modify. The Modify Style dialog box appears.
- Select the desired options (such as font size, bold, etc.). You can also select Format and choose other options from the drop-down menu. It’s a good idea to turn off Automatically update so if a user selects and formats paragraphs manually in a table of contents, the table of contents does not update with the changes. It’s also usually best to select Only in this document so that the formatting changes apply only to the current document, not future documents based on the template (typically the Normal template).
- Click OK.
- Repeat for other TOC levels.
- Continue clicking OK until you return to the document. A dialog box appears asking if you want to replace the table of contents.
- Click OK.
You can modify an automatic table of contents in the same way. Click in the automatic table of contents and follow steps 2-9.
Below is the Style dialog box that appears when you click Modify:

If you selected 2 heading levels to include in your table of contents, you may want to modify TOC 1 and TOC 2.
When you click a TOC style and then click Modify, the following Modify Style dialog box appears:

You can select options under Formatting or click Format on the bottom left and select other options such as Font or Paragraph.
The following table of contents example includes 2 heading levels (TOC 1 and TOC 2):

Step 4: Update the table of contents
After you edit your document, you can update the table of contents at any time.
To update a table of contents:
- Click in the table of contents.
- Right-click and select Update Field from the drop-down menu or press F9. You can also click the References tab and then click Update Table in the Table of Contents group. A dialog box appears.
- Click Update page numbers only or Update entire table (recommended).
- Click OK.

Navigate to table of contents entries
If you want to quickly jump to a table of contents entry, Ctrl-click it in the table of contents.
Remove a table of contents
You can remove a table of contents if it’s no longer required.
To remove a table of contents:
- Click in the table of contents.
- Click the References tab in the Ribbon and click Table of Contents in the Table of Contents group. A drop-down menu appears.
- Select Remove Table of Contents.
You can also select the entire table of contents by dragging over it and then pressing Delete.
Table of contents can be generated easily from built-in heading styles so it’s best to use the built-in styles when formatting your Word documents rather than creating new styles for headings.
This article was first published on February 8, 2020 and has been updated for clarity and content.
Subscribe to get more articles like this one
Did you find this article helpful? If you would like to receive new articles, JOIN our email list.
More resources
How to Create, Edit, Use and Save Templates in Microsoft Word
10 Microsoft Word Navigation Shortcuts for Moving Around Faster
How to Insert an Em or En Dash in Word (4 Ways with Shortcuts)
How to Keep Text Together in Microsoft Word (Words, Lines or Paragraphs)
How to Convert a PDF to Word in Microsoft Office (No Third Party Programs Needed)
Related courses
Microsoft Word: Intermediate / Advanced
Microsoft Excel: Intermediate / Advanced
Microsoft PowerPoint: Intermediate / Advanced
Microsoft Word: Long Documents Master Class
Microsoft Word: Styles, Templates and Tables of Contents
Microsoft Word: Designing Dynamic Word Documents Using Fields
VIEW MORE COURSES >
Our instructor-led courses are delivered in virtual classroom format or at our downtown Toronto location at 18 King Street East, Suite 1400, Toronto, Ontario, Canada (some in-person classroom courses may also be delivered at an alternate downtown Toronto location). Contact us at info@avantixlearning.ca if you’d like to arrange custom instructor-led virtual classroom or onsite training on a date that’s convenient for you.
Copyright 2023 Avantix® Learning
Microsoft, the Microsoft logo, Microsoft Office and related Microsoft applications and logos are registered trademarks of Microsoft Corporation in Canada, US and other countries. All other trademarks are the property of the registered owners.
Avantix Learning |18 King Street East, Suite 1400, Toronto, Ontario, Canada M5C 1C4 | Contact us at info@avantixlearning.ca