
Word for Microsoft 365 Word 2021 Word 2019 Word 2016 Word 2013 Word 2010 Word 2007 More…Less
You can often improve the look of your document by keeping certain words and paragraphs together on the page or across page breaks. Also, you can use hyphenation to improve overall readability.
Word automatically breaks the text at a space or a hyphen at the end of a line. To keep two words or a hyphenated word together on one line, you can use a nonbreaking space or nonbreaking hyphen instead of a regular space or hyphen.
-
Click where you want to insert the nonbreaking space.
-
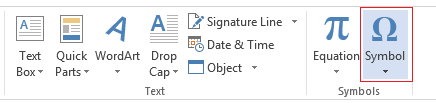
On the Insert tab, in the Symbols group, click Symbol.

-
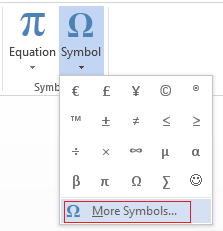
In the box that opens, click More Symbols.
-
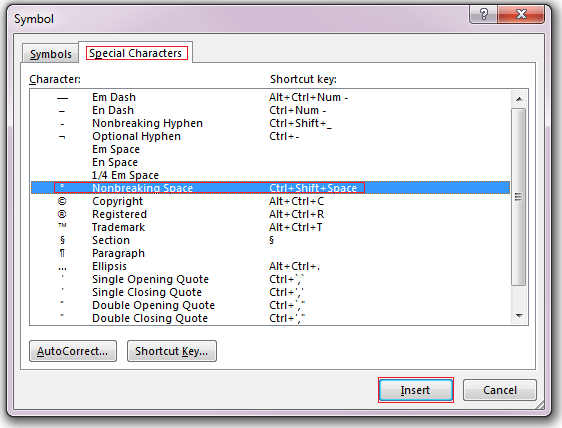
In the Symbol dialog box, on the Special Characters tab, click the Nonbreaking Space row to highlight it, and then click Insert.
-
Click Close.
Tip: You can also use the keyboard shortcut. Click where you want to insert the nonbreaking space, and press Ctrl+Shift+Spacebar.
Sometimes you want a hyphenated word to stay together on one line, without it breaking across lines.
-
Click where you want to insert the nonbreaking hyphen.
-
On the Insert tab, in the Symbols group, click Symbol.
-
In the box that opens, click More Symbols.
-
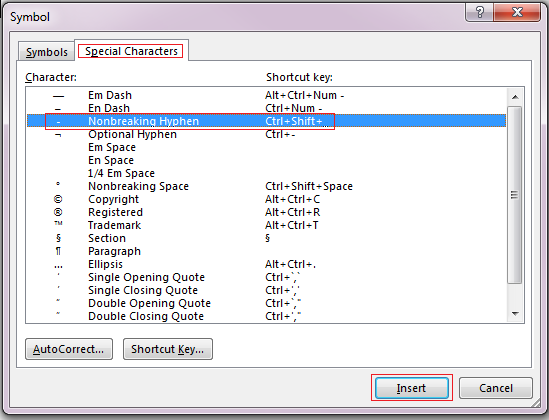
In the Symbol dialog box, on the Special Characters tab, click the Nonbreaking Hyphen row to highlight it, and then click Insert.
-
Click Close.
Tip: You can also use the keyboard shortcut. Click where you want to insert the nonbreaking hyphen, and press Ctrl+Shift+Minus Sign.
Word automatically breaks paragraphs at the end of a page, so a paragraph that started on one page continues on to the next page. To keep the whole paragraph on the same page, follow these steps.
-
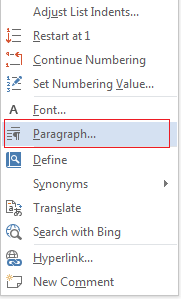
Right-click the paragraph that you want to keep together. In the box that opens, select Paragraph.
-
In the Paragraph dialog box, click the Line and Page Breaks tab.
-
In the Pagination section, select the Keep lines together check box, and click OK.
If two consecutive paragraphs or a subhead and a paragraph are closely related, you might want to keep them on the same page.
-
Right-click the paragraph or subhead that you want to keep with the content that follows it. In the box that opens, select Paragraph.
-
In the Paragraph dialog box, click the Line and Page Breaks tab.
-
In the Pagination section, select the Keep with next check box, and click OK.
Tip: It’s best not to add additional line breaks between your paragraphs because Word interprets each line break as a beginning of a new paragraph, and page breaks might not occur properly. If you want spaces between paragraphs, use the Paragraph Spacing controls. For more information, see Change spacing between paragraphs.
If a paragraph has a page break in the middle so that only the last line appears at the top of the following page, this lonely line is called a “widow.” If, on the other hand, a paragraph has a page break in the middle so that only the first line appears at the bottom of a page while the rest of the paragraph appears on the next page, this lonely line is called an “orphan.”
If you want to avoid widow and orphan lines in your document, follow these steps.
-
Right-click the paragraph in which you want to avoid widows and orphans. In the box that opens, select Paragraph.
-
Click the Line and page breaks tab.
-
In the Pagination section, select the Widow/Orphan control check box.
-
Click OK.
If a word is too long to fit at the end of a line, Microsoft Office Word 2007 moves the word to the beginning of the next line instead of hyphenating it. However, you can use the Hyphenation feature to automatically or manually hyphenate the text, insert optional or nonbreaking hyphens, and set the maximum amount of space allowed between a word and the right margin without hyphenating the word.
With automatic hyphenation, Office Word 2007 automatically inserts hyphens where they are needed. If you edit the document later and change line breaks, Office Word 2007 will re-hyphenate the document.
-
Make sure that no text is selected.
-
On the Page Layout tab, in the Page Setup group, click Hyphenation, and then click Automatic.
An optional hyphen is a hyphen that is used to control where a word or phrase breaks if it falls at the end of a line. For example, you can specify that the word «nonprinting» breaks as «non-printing» instead of «nonprint-ing.» When you insert an optional hyphen in a word that is not at the end of a line, the hyphen will be visible only if you turn on Show/Hide.
-
On the Home tab, in the Paragraph group, click Show/Hide.
-
Click in the word where you want to insert the optional hyphen.
-
Press CTRL+HYPHEN.

To automatically hyphenate part of a document, do the following:
-
Select the text that you want to hyphenate.
-
On the Page Layout tab, in the Page Setup group, click Hyphenation, and then click Automatic.
When you manually hyphenate text, Office Word 2007 searches for text to hyphenate. After you indicate where you want to hyphenate the text, Word inserts an optional hyphen. If you later edit the document and change line breaks, Office Word 2007 displays and prints only the optional hyphens that still fall at the end of lines. Word doesn’t re-hyphenate the document.
-
Select the text you want to hyphenate.
-
On the Page Layout tab, in the Page Setup group, click Hyphenation, and then click Manual.
-
If Office Word identifies a word or phrase to hyphenate, do one of the following:
-
To insert an optional hyphen in the location that Office Word proposes, click Yes.
-
To insert an optional hyphen in another part of the word, move the insertion point to that location, and then click Yes.
-
Nonbreaking hyphens prevent hyphenated words, numbers, or phrases from breaking if they fall at the end of a line of text. For example, you can prevent 555-0123 from breaking; instead, the entire item will move to the beginning of the next line.
-
Click where you want to insert a nonbreaking hyphen.
-
Press CTRL+SHIFT+HYPHEN.
The hyphenation zone is the maximum amount of space Office Word 2007 allows between a word and the right margin without hyphenating the word. You can change the hyphenation zone to make it wider or narrower. To reduce the number of hyphens, make the hyphenation zone wide. To reduce the raggedness of the right margin, make the hyphenation zone narrower.
-
On the Page Layout tab, in the Page Setup group, click Hyphenation, and then click Hyphenation Options.
-
In the Hyphenation zone, type the amount of space you want.
You can remove all automatic hyphenation and each instance of manual hyphenation, such as optional and nonbreaking hyphens.
-
To remove automatic hyphenation, on the Page Layout tab, in the Page Setup group, click Hyphenation, and then click None.

-
To remove manual hyphenation, on the Home tab, in the Editing group, click Replace.
-
If you don’t see the Special button, click More.
-
Click Special, and then click either Optional Hyphen to remove manual hyphens, or Nonbreaking Hyphen to remove nonbreaking hyphens.
-
Leave the Replace box empty.
-
Click Fix Next, Replace, or Replace All.
See Also
Line and page breaks
Insert a page break
Change spacing between paragraphs
Need more help?
Want more options?
Explore subscription benefits, browse training courses, learn how to secure your device, and more.
Communities help you ask and answer questions, give feedback, and hear from experts with rich knowledge.
Insert a Nonbreaking Space in Word to Keep Words or Characters Together
by Avantix Learning Team | Updated October 11, 2022
Applies to: Microsoft® Word® 2010, 2013, 2016, 2019, 2021 and 365 (Windows)
If you want to keep words or characters together on the same line in a Word document, you can insert nonbreaking spaces. Nonbreaking spaces can be inserted using the Insert Symbol dialog box or a keyboard shortcut.
Recommended article: 14 Timesaving Microsoft Word Selection Shortcuts to Quickly Select Text
Do you want to learn more about Microsoft Word? Check out our virtual classroom or in-person classroom Word courses >
Note: We are using a US keyboard layout but the strategies and shortcuts apply to English Canada keyboards. Keyboard shortcuts may work differently depending on your keyboard layout / language.
Inserting a nonbreaking space using a keyboard shortcut
To insert a nonbreaking space between two words or characters using a keyboard shortcut:
- Position the cursor between the two words or characters you want to keep together (there should be no space between these characters).
- Press Ctrl + Shift + Spacebar. Word inserts a nonbreaking space.
Inserting a nonbreaking space using Insert Symbol
To insert a nonbreaking space between two words or letters using Insert Symbol:
- Position the cursor between the two words or characters you want to keep together (there should be no space between these characters).
- Click the Insert tab in the Ribbon.
- In the Symbols group, click Insert Symbol and then More Symbols in the drop-down menu. A dialog box appears.
- Select the Special Characters tab.
- Select Nonbreaking space and click Insert.
- Click Close. Word inserts a nonbreaking space.
Below is the Insert Symbol dialog box with Nonbreaking Space selected:

You can also insert several other special characters using Insert Symbol.
Viewing nonbreaking spaces
To view nonbreaking spaces and other nonprinting characters:
- Click the Home tab in the Ribbon.
- Click Show/Hide ¶ on the Home tab in the Ribbon in the Paragraph group. Nonbreaking spaces display as circles but do not print.
- Click Show/Hide ¶ again to hide nonprinting characters.
Nonbreaking spaces can be extremely useful in Word to keep phone numbers together or specific characters that should be kept together on the same line.
Subscribe to get more articles like this one
Did you find this article helpful? If you would like to receive new articles, join our email list.
More resources
How to Quickly Remove Hard Returns in Word Documents
How to Insert, Format and Update Cross-References in Word
3 Ways to Insert the Copyright or Trademark Symbol in Word (with Shortcuts)
5 Ways to Insert the Approximately Equal To or Almost Equal To Symbol in Word
10+ Great Microsoft Word Navigation Shortcuts to Move Around Quickly in Your Documents
Related courses
Microsoft Word: Intermediate / Advanced
Microsoft Excel: Intermediate / Advanced
Microsoft PowerPoint: Intermediate / Advanced
Microsoft Word: Long Documents Master Class
Microsoft Word: Styles, Templates and Tables of Contents
Microsoft Word: Designing Dynamic Word Documents Using Fields
VIEW MORE COURSES >
Our instructor-led courses are delivered in virtual classroom format or at our downtown Toronto location at 18 King Street East, Suite 1400, Toronto, Ontario, Canada (some in-person classroom courses may also be delivered at an alternate downtown Toronto location). Contact us at info@avantixlearning.ca if you’d like to arrange custom instructor-led virtual classroom or onsite training on a date that’s convenient for you.
Copyright 2023 Avantix® Learning
Microsoft, the Microsoft logo, Microsoft Office and related Microsoft applications and logos are registered trademarks of Microsoft Corporation in Canada, US and other countries. All other trademarks are the property of the registered owners.
Avantix Learning |18 King Street East, Suite 1400, Toronto, Ontario, Canada M5C 1C4 | Contact us at info@avantixlearning.ca
I’m pasting selected portions from a few different PDFs into MS Word, and in some cases entire sentences get pasted together as one word without spaces in between (eg: whatImeanistextlikethis). Manually inserting spaces between every single word gets exhausting. Is there any built-in way or a plugin to automatically do such a thing? MS Word obviously knows what words are supposed to be, from its dictionary, so I’m hoping there’s a plugin or macro out there that utilizes this to do an intelligent splitting.
Update: I’ve now tried Ctrl+V, Paste Text Only, Paste Special (Unformatted Text) and Paste Special (Unformatted Unicode Text), with no difference. Pasting into plain old notepad also pastes the words clumped together.
Update2: Here’s some relevant links for anyone else looking into splitting words automatically:
-
How can I split multiple joined words?
-
Word Split ~ A text segmentation tool
-
Warrior Forum ~ software to separate words?
![]()
asked Apr 7, 2014 at 18:54
![]()
9
Note: It’s been two years since this question was asked, but I also have (had) this problem as of writing
This solution requires Google Chrome (and the built-in PDF plugin)
-
Open the PDF in Google Chrome (eg. drag and drop the file into Google Chrome)
-
Highlight the text you want to copy
-
Copy the text (eg. through context menu)
-
Paste the clipboard contents into a text editor (in your case Microsoft Word)
-
Replace all the parentheses (or whatever character is in between the words) with a space
Text copied from PDF: what)I)mean)is)text)like)this
Text with parentheses replaced with spaces: what I mean is text like this
Note that if there are parentheses in the original text (ie. from the PDF), special precautions need to be taken
answered Jul 20, 2016 at 21:02
![]()
I understand what you’re looking for, but honestly I’m in doubt of such a script/plugin/macro based on the complexity of the operation you want… luckily I’m confident there’s a simpler solution. I’m not expert on the matter but I’m certain Word is incorrectly interpreting the formatting of the text. I would paste into notepad first, see if the spacing is correct there, then paste THAT into Word.
answered Apr 7, 2014 at 19:59
![]()
WutnautWutnaut
7283 silver badges15 bronze badges
3
While typing word documents, you usually separate words and sentences by pressing the Space key (also known as Spacebar), which inserts a regular general-purpose space character. However, some Microsoft Word documents may contain other kinds of spaces. You can discover those white-space symbols during editing the document but not on printing.
To show non-printable and white-space symbols in Microsoft Word, click the button button Show/Hide ¶ (or pressing Ctrl+* or Ctrl+Shift+8):

You will be able to see the following marks for white-space characters:
1) A little dot between words represents a normal space (also called word space):

A general rule of publishing is to use only one normal space between words (the only exception is a pre-formatted text, e.g., code listings). If you need to align text at fixed positions of the line, use
tabs and tab stops.
2) A degree symbols between word represents a nonbreaking space (also called non-breaking space, no-break space, non-breakable space (NBSP), hard space, or fixed space) that prevents text wrapping at the end of the line. A Nonbreaking space in the Word document looks like:
![]()
A general rule of publishing is to use non-breaking spaces between words of
organization and person names, postal addresses, etc.
Some popular rules:
- Insert a nonbreaking space between the copyright symbol and the following year(s) to ensure they will not end up on different lines or pages. For example:

- Insert a nonbreaking space before and after ellipses (also called a suspension point, points of ellipsis, periods of ellipsis, or even «dot-dot-dot» is a sequence of three dots used to indicate an omission in quoted material). For example:

3) A little dot with varying gaps before and after the dot represents Em Space and En Space. These spaces have different widths on printing:
- Em space is a space with the width of the lowercase m character.
- En space is a space with the width of the lowercase n character.
4) A vertical bar between words represents a ¼ Em space (also known as mid-space) is a space with the ¼ width of the lowercase m character:
![]()
If you want to see only space marks and no other non-printable symbols, do the following:
1. On the File tab, click the Options button:

2. In the Word Options dialog box, on the Display tab, under Always show these formatting marks on the screen, check or uncheck the Spaces option:

See also this tip in French:
Types d’espaces spéciaux dans les documents Word.
While you might have experience changing the formatting for your Word documents to meet the requirements for your school or job, you might encounter a situation where you need to use different settings.
Microsoft Word is full of different tools and menus that let you customize your document, and line spacing is something that you can adjust.
Our tutorial below will show you how to single space in Word, even if you have already written and edited the entire document.
How to Make a Word Single Space Document
- Open the document.
- Click inside the document and press Ctrl + A to select everything.
- Select the Home tab at the top of the window.
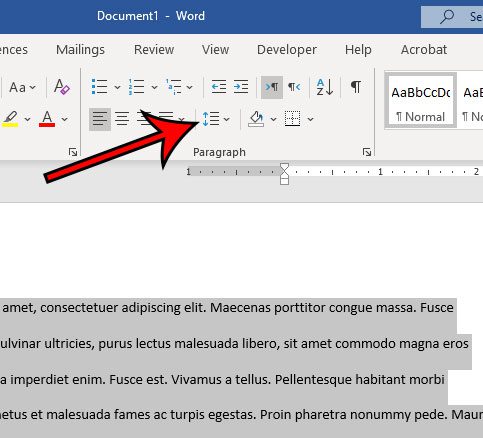
- Click the Line and Paragraph Spacing button.
- Choose the 1.0 option.
Our guide continues below with additional information on how to make a document single space instead of double space in Microsoft Word, including pictures of these steps.
Last update on 2023-04-13 / Affiliate links / Images from Amazon Product Advertising API
| As an Amazon Associate, I earn from qualifying purchases.
Document spacing can impact several things, including the number of pages in the document. Microsoft Word includes several different options from which you can select to control the amount of space between the lines in your document.
Many schools and organizations have their own rules and preferences when it comes to the amount of line spacing that you have in your documents. Often they want you to use double spacing, but it’s entirely possible that they might want single spacing to reduce the number of pages in documents.
A document in Microsoft Word can have a lot of different formatting options, including the amount of space between lines.
If your current document is double spaced, or if it appears to have more or less spacing than the single spacing you need, you may be looking for a way to adjust that.
You can make a Microsoft Word single space document by opening the document, selecting all of the text, choosing the Home tab, clicking the Line and Paragraph Spacing button, then choosing the 1.0 option from the drop down menu.
Our guide below will show you how to single space in Word by selecting all of the text in the document and adjusting the line spacing setting.
You can also check out our tutorial on how to select all in Word if you would like to know more about using that option.
How to Use Single Spacing in Word for Office 365 (Guide with Pictures)
The steps in this article were performed in the Microsoft Word for Office 365 version of the application but will work in most other versions as well.
Step 1: Open your document in Microsoft Word.
Step 2: Click inside the document, then press Ctrl + A on your keyboard to select everything.
If this is a new, blank document, you can skip this step.

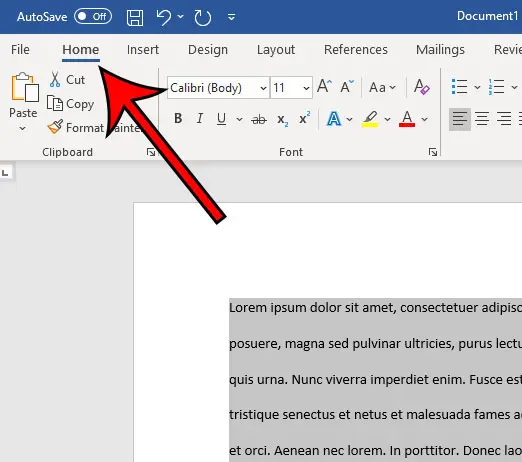
Step 3: Select the Home tab at the top of the window.
Step 4: Click the Line & Paragraph Spacing button in the Paragraph section of the ribbon.
Step 5: Choose the 1.0 option from the dropdown menu to switch the document to single spacing.
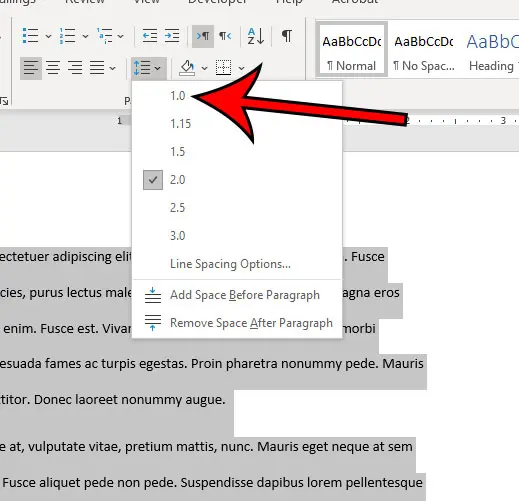
Note that there is a Line Spacing Options button at the bottom of that dropdown menu.
If you select that option, you will be able to customize your document spacing further and set a new default spacing option if you would like.
Our tutorial continues below with additional discussion about how to make a document single spaced in Word.
You can also read our article on how to double space in Word for additional information about Microsoft Word line spacing.
How to Change Default Line Spacing in Microsoft Word
While you can change line spacing in every document that you create or edit in Microsoft Word, you might not want to adjust spacing every time.
But if your Word Normal template is defaulting to double spacing and you need to have single spacing more often, then constantly switching the line spaces can not only be tedious, it can be something that you forget to do.
Fortunately, among all of the different formatting adjustments that you can make for your document, there is a way to set the default line spacing.
- Open Microsoft Word.
- Select the Home tab.
- Click Line and Paragraph Spacing.
- Choose Line Spacing Options.
- Click the Line spacing drop down.
- Select your default line spacing preference.
- Click Set as Default.
- Choose All documents based on the Normal template.
- Click OK.
Now any new documents that you create in Microsoft Word that use the Normal template will have the line spacing that you just chose.
this will not affect the line spacing in any of your existing documents.
More Information on How to Apply Single Line Spacing in Word
While we have focused on changing the line spacing setting in an MS Word document, for the entire document, you can also format a document so that only some of it is single spaced.
Rather than selecting the whole document, simply use your mouse to select the part of the document for which you want to change the spacing, then follow the steps above to apply a new line spacing setting to that selection.
Another thing that you can adjust that relates to line spacing is the paragraph space setting. This affects the amount of line spacing that appears before and after your paragraphs.
You can find the paragraph spacing settings by clicking the Home tab, then clicking the small Paragraph Settings button at the bottom-right corner of the Paragraph group in the ribbon. This will open the Paragraph dialog box.
There you can select line spacing options in the “Spacing” section so that you can choose the amount of space before and after a paragraph, as well as determine the line spacing type.
Frequently Asked Questions About How to Make a Document Single Spaced in Word
How do I get to the paragraph spacing menu in Word?
While this document has focused on using the Line and Paragraph Spacing drop down menu to change document spacing, you might want to adjust some other spacing options, too.
if you select the Home tab, then click the Paragraph Spacing button at the bottom-right of the Paragraph group, it will open a Paragraph dialog box.
At the top of the Paragraph dialog box, you will see Indents and Spacing, as well as Line and Page Breaks tabs.
Here you can customize the spacing before and after your paragraphs, as well as select line spacing options.
What is the Set as Default button at the bottom of the Paragraph dialog box?
If you have made a lot of changes in this dialog box and want them to apply to new documents that you create in the future, you have the option of using these settings as the default for future documents.
Simply click the Set as Default button at the bottom of the Paragraph menu, then confirm that you want to make this change.
Can I have single spaced text in just part of my Microsoft Word document?
Yes, you can have a mixture of different types of spacing in a single document.
Simply follow the steps above, but rather than selecting the entire document, select only the part of the document that you want to single space.
Then when you click the Line and Paragraph Spacing button in the Paragraph group and choose the 1.0 option, it will only affect the part of the document that’s currently highlighted.

Matthew Burleigh has been writing tech tutorials since 2008. His writing has appeared on dozens of different websites and been read over 50 million times.
After receiving his Bachelor’s and Master’s degrees in Computer Science he spent several years working in IT management for small businesses. However, he now works full time writing content online and creating websites.
His main writing topics include iPhones, Microsoft Office, Google Apps, Android, and Photoshop, but he has also written about many other tech topics as well.
Read his full bio here.