
-
— By
Sumit Bansal
In Excel, there are two ways to combine the contents of multiple cells:
- Excel CONCATENATE function (or the ampersand (&) operator)
- Excel TEXTJOIN function (new function in Excel if you have Office 365)
If you’re using Excel with Office 365 subscription, I suggest you click here to skip to the part where the TEXTJOIN function is covered. If you’re not using Office 365, keep reading.
In its basic form, CONCATENATE function can join 2 or more characters of strings.
For example:
- =CONCATENATE(“Good”,”Morning”) will give you the result as GoodMorning
- =CONCATENATE(“Good”,” “, “Morning”) will give you the result as Good Morning
- =CONCATENATE(A1&A2) will give you the result as GoodMorning (where A1 has the text ‘Good’ in it and A2 has the text ‘Morning’.
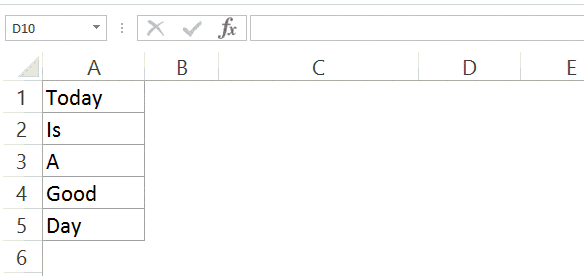
While you can enter the reference one by one within the CONCATENATE function, it would not work if you enter the reference of multiple cells at once (as shown below):
For example, in the example above, while the formula used is =CONCATENATE(A1:A5), the result only shows ‘Today’ and doesn’t combine all the cells.
In this tutorial, I will show you how to combine multiple cells by using the CONCATENATE function.
Note: If you’re using Excel 2016, you can use the TEXTJOIN function that is built to combine multiple cells using a delimiter.
CONCATENATE Excel Range (Without any Separator)

Here are the steps to concatenate an Excel range without any separator (as shown in the pic):
- Select the cell where you need the result.
- Go to formula bar and enter =TRANSPOSE(A1:A5)
- Based on your regional settings, you can also try =A1:A5 (instead of =TRANSPOSE(A1:A5))
- Select the entire formula and press F9 (this converts the formula into values).
- Remove the curly brackets from both ends.
- Add =CONCATENATE( to the beginning of the text and end it with a round bracket).
- Press Enter.
Doing this would combine the range of cells into one cell (as shown in the image above). Note that since we use any delimiter (such as comma or space), all the words are joined without any separator.
CONCATENATE Excel Ranges (With a Separator)

Here are the steps to concatenate an Excel Range with space as the separator (as shown in the pic):
- Select the cell where you need the result.
- Go to formula bar and enter =TRANSPOSE(A1:A5)&” “
- Based on your regional settings, you can also try =A1:A5 (instead of =TRANSPOSE(A1:A5)).
- Select the entire formula and press F9 (this converts the formula into values).
- Remove the curly brackets from both ends.
- Add =CONCATENATE( to the beginning of the text and end it with a round bracket).
- Press Enter
Note that in this case, I used a space character as the separator (delimiter). If you want, you can use other separators such as a comma or hyphen.
CONCATENATE Excel Ranges (Using VBA)
Below is an example of the custom function I created using VBA (I named it CONCATENATEMULTIPLE) that will allow you to combine multiple cells as well as specify a separator/delimiter.
Here is the VBA code that will create this custom function to combine multiple cells:
Function CONCATENATEMULTIPLE(Ref As Range, Separator As String) As String
Dim Cell As Range
Dim Result As String
For Each Cell In Ref
 Result = Result & Cell.Value & Separator
Next Cell
CONCATENATEMULTIPLE = Left(Result, Len(Result) - 1)
End Function
Here are the steps to copy this code in Excel:
Click here to download the example file.
Now you can use this function as any regular worksheet function in Excel.
CONCATENATE Excel Ranges Using TEXTJOIN Function (available in Excel with Office 365 subscription)
In Excel that comes with Office 365, a new function – TEXTJOIN – was introduced.
This function, as the name suggests, can combine the text from multiple cells into one single cell. It also allows you to specify a delimiter.
Here is the syntax of the function:
TEXTJOIN(delimiter, ignore_empty, text1, [text2], …)
- delimiter – this is where you can specify a delimiter (separator of the text). You can manually enter this or use a cell reference that has a delimiter.
- ignore_empty – if this is TRUE, it will ignore empty cells.
- text1 – this is the text that needs to be joined. It could be a text string, or array of strings, such as a range of cells.
- [text2] – this is an optional argument where you can specify up to 252 arguments that could be text strings or cell ranges.
Here is an example of how the TEXTJOIN function works:

In the above example, a space character is specified as the delimiter, and it combines the text strings in A1:A5.
You can read more about the TEXTJOIN function here.
Have you come across situations where this can be useful? I would love to learn from you. Do leave your footprints in the comments section!
You May Also Like the following Excel tutorials:
- How to Merge Cells in Excel the Right Way.
- How to Find Merged Cells in Excel (and get rid of these)
- How to Quickly Transpose Data in Excel.
- How to Split Data using Text to Columns.
- The Ultimate Guide to Find and Remove Duplicates in Excel.
Get 51 Excel Tips Ebook to skyrocket your productivity and get work done faster
54 thoughts on “CONCATENATE Excel Range (with and without separator)”
-
thank you so much bro!! from the Philippines
-
For some reason the formula =@CONCATENATEMULTIPLE(A1:A5,” “) OR =CONCATENATEMULTIPLE(A1:A5,” “) in my own spreadsheet. I receive a #NAME error. Only work in your downloadable example – Why would this be happening?
-
textjoin is awesome
-
Thank you very much for this tip. As others have said, it solves the =CONCANT issue of time.
I use this daily within Maximo to turn a column of WO #s into a row with a comma and space between each. I then can paste them into a program for modifications. -
Textjoin = No more Concatenation torture on many columned joins. Thanks!
-
Wow this is supremely helpful, saved me A LOT of time! Thanks man.
-
Your macro just saved my life! Thank you
-
I. Love. You.
-
Hy!
Can someone help me with this formula or similiar please?I want to use texjoin for one row with results only in non empty cells, but I got result with zeroes.
and also I have to combine a column name with data found in particular cellname1 Name2 Name3
row 0 1 2=1 Name2, 2 name3
is that possible?
tnx-
In case that you have values
Name1 Name2 Name3
0 1 2
in a range A1:C2, than you can insert formula
=IF(A2=0,””,TEXTJOIN(” “,,A2,A1))
into cell A3 and fill it to the right two cells.
Then you will get
(Empty cell),1 Name2, 2 Name3
in cells A3:C3.-
Thank you!
-
-
-
Thanks a lot . It worked great. I have 1000s of multiple “|”delimited rows and this function did a great job. God bless you .
-
Thanks, very helpful! One suggestion is to strip off the number of characters in the separator (accommodates separators with multiple characters, e.g. a comma with a space, like “, “).
CONCATENATEMULTIPLE = Left(Result, Len(Result) – Len(Separator))
-
This is a more generalized solution to Rowan’s specific empty string (“”) seperator fix. Well done and thanks for sharing.
Note, for some reason in Excel MVBA 7.1, I was unable to apply this code directly. I had to apply the simple math from the second parameter in Len() for the VB editor to accept the code. I.e.:
resLen = Len(Result)
sepLen = Len(Separator)
tmpLen = resLen – sepLenCONCATENATEMULTIPLE = Left(Result, tmpLen)
-
-
Thanks a lot for the code and the explanation. Great function 🙂
-
Hi, looking for a VBA code to concatenate the complete row like (A1:A25 in A26). what is the easy way to do it…!!
-
Many thanks for Multiple option – much appreciated
-
Concatenatemultiple is fantastic! Only limitation I noticed is if you don’t have a separator (using “”) then it cuts off the last value of the text. So with a small if function it was corrected:
If Separator = “” Then
CONCATENATEMULTIPLE = Left(Result, Len(Result))
Else
CONCATENATEMULTIPLE = Left(Result, Len(Result) – 1)
End If-
Thanks for providing the fix. I ran into this.
-
-
The CONCATENATEMULTIPLE code works well. What about when the number of cells to concatenate is variable? What would this code look like?
-
Hi,
Does anyone know a way to do the following:
Concatenate the values of several cells into a single cell and separate them with any delimiter of your choosing.
Project Name Result
Project1 Mike Project1, Mike, Neal, Peter
Project1 Neal
Project1 Peter
Project2 Mike Project2, Mike, Neal, Peter
Project2 Neal
Project2 Peter-
This could be done much simpler with VBA, but also have many solutions with Excel embedded formulas:
Lets suppose you have the following values in column A:
Project1 Mike
Project1 Neal
Project1 Peter
Project2 Mike
Project2 Neal
Project2 Peter
First, add one row above all and leave it empty, so the content starts with cell A2.
Second, add formula =IF(ROW()=2,LEFT(A2,8)&”, “&RIGHT(A2,LEN(A2)-8-1),IF(LEFT(A2,8)=LEFT(A1,8),B1&”, “&RIGHT(A2,LEN(A2)-8-1),LEFT(A2,8)&”, “&RIGHT(A2,LEN(A2)-8-1))) to cell B2 and fill it down the column B.
For additional clearing add formula =IF(ISNUMBER(FIND(B2,B3)),””,B2) to cell C2 and fill down the column C.
Changing delimiter can be done by changing every “, ” in the first formula.
If your shared word is not “Project1”, you would have to change every 8 (the length of the word Project1) in the first formula with the length of another word.
-
-
Thanks, nice little function. Also adapted to use the ‘Len(Separator)’ value:
Function CONCATENATEMULTIPLE(Ref As Range, Separator As String) As String
Dim Cell As Range
Dim Result As StringFor Each Cell In Ref
Result = Result & Cell.Value & Separator
Next CellCONCATENATEMULTIPLE = Left(Result, Len(Result) – Len(Separator))
End Function
-
This is a great post and will save me tons of time. Just one query, how would i set up the VBA code to ignore #N/A entries? I want to run the code from a pivot table and the number of results from the pivot changes each time?? Any help would be great. Thanks…..
-
=IFNA(TEXTJOIN(…..
-
I think I should clarify my suggestion.
=IFNA(TEXTJOIN(” “,0,$A$1:$A$6),””)
It’s great for getting rid of #N/A if they appear.
There are references on it’s uses on other sites, but it basically is an IF statement that is triggered when #N/A is true, else “”. You can substitute whatever you want to the second part instead of “”. This TEXTJOIN is really useful, and I’ve been using it ever since I stumbled across it.
-
-
-
Perhaps you could implement the TEXTJOIN function from Google Spreadsheet. Here’s my implementation:
Function TEXTJOIN(separator As String, skipEmpty As Boolean, Ref As Range) As String
Dim i As Integer
Dim tmp As String
For Each Cell In Ref
If (Cell.Value “”) Then
tmp = tmp & Cell.Value & separator
End If
Next Cell
TEXTJOIN = Left(tmp, Len(tmp) – Len(separator))
End Function -
Thank you for these solutions!
I would have like to alter the VBA method as to avoid empty cells (i.e. so the user can select a whole column, yet concatenate only non-empty cells).
I know it is not trivial – but it would help to make this a more robust function. -
Hi,
Does anyone know a way to do the following:
I want to combine or concatenate text in every cell in column A with every cell in column B without repeating or flash fill because that won’t do the trick..
Example here:COLUMN A contains:
A
B
CCOLUMN B contains:
10
20
30
40What I want as output in another COLUMN:
A10
A20
A30
A40
B10
B20
B30
B40
C10
C20
C30
C40Anyone an idea how to do this?
-
I am looking to do this same thing. Have you figured out how to do this?
-
One of the solutions without VBA is submitted above.
-
Another solution without VBA is:
Enter formula =COUNTIF(A:A,”?*”) to cell C1 (counts number of cells with text in column A)
Enter formula =COUNTIF(B:B,”>0″) to cell C2 (counts number of cells with numbers >=0 in column B)
Enter formula =INDIRECT(ADDRESS(QUOTIENT(ROW()-1,$C$2)+1,1)) to cell D1 and fill down until it starts giving zeros.
Enter formula =D1&INDIRECT(ADDRESS(COUNTIF(D$1:D1,D1),2)) to cell E1 and fill down until it has values in column D. Your solution should be in column E.
PS: Formula in cell C1 is given just in need for making pairs with textual data. -
Third solution without VBA (in one line) could be done with formula =INDIRECT(ADDRESS(QUOTIENT(ROW()-1,COUNTIF(B:B,”>0″))+1,1))&INDIRECT(IF(MOD(ROW(),COUNTIF(B:B,”>0″))0,ADDRESS(MOD(ROW(),COUNTIF(B:B,”>0″)),2),ADDRESS(COUNTIF(B:B,”>0″),2))) in cell C1 and fill it down until it starts giving superfluous solutions. In case that you are pairing text in column B, change all COUNTIF(B:B,”>0″) in formula with COUNTIF(B:B,”>0”) .
-
* Correction:
In case that you are pairing text in column B, change all COUNTIF(B:B,”>0″) in formula with COUNTIF(B:B,”?*”) .
-
-
-
Copy values from column A to column C, beginning from C2:C4. Copy values from column B to column D, beginning from D1, but with Paste_Special>>Transpose, so everything start looking as a empty table with letters for rows and numbers for columns. Now select cell D2 and enter formula =$C2&D$1 (dollar signs must be on that places). Now fill in formula till the end of the rows and columns. Now select all 12 values and copy it without moving the selection, then paste>>paste_values. Now you have to place values in one column. Open new sheet, copy 12 values, select B1 and Paste_Special>>Transpose. Now insert formula =IF(ROW()*1/4=INT(ROW()*1/4),ROW()*1/4,INT(ROW()*1/4)+1) into cell A1. The most important thing is number 4, because it is related with number of rows filled wit values. ***In case of 50 rows with data, formula would be =IF(ROW()*1/50=INT(ROW()*1/50),ROW()*1/50,INT(ROW()*1/50)+1).*** Fill down formula (with fours) 12 times (because you have 12 values). Now insert formula =INDIRECT(ADDRESS(ROW()-(A5-1)*4,COLUMN()+(A5-1),4)) in cell B5 and fill down till B12. The most important in this formula is that FIRST number 4 has same role as in previous, and A5 is there because we put formula in B5.***In case of 50 rows with data formula would be =INDIRECT(ADDRESS(ROW()-(A51-1)*50,COLUMN()+(A51-1),4)) *** Number 4 at the end of the formula is relative address and is not related to your number of rows.*** Column B is one of the solutions without using VBA.
-
-
Apparently TEXTJOIN is associated with Office 365, NOT Excel 2016.
TEXTJOIN() is NOT available on my desktop version of Excel 2016.
-
Hey Cornan.. You’re right! I have edited the tutorial accordingly.
-
Hi Sumit, im in need to of 2018 leave tracker template. Could you share updated excel version to adriana.galiano@gmail.com
-
-
-
Thx for this, perfect replacement for the MCONCAT formula from the now defunct (for anyone on 64bit OS) morefunc add-in
-
Cool! I was finding for auto update concatenate. Thanks for VBA code.
-
This is great – thanks!
Would suggest one change to the VBA code – instead of using
CONCATENATEMULTIPLE = Left(Result, Len(Result) – 1), you can use
CONCATENATEMULTIPLE = Left(Result, Len(Result) – Len(Separator)); this will allow for multi-character separators.-
… and allows even an empty string as a separator. A nasty little bug 😀
-
-
This completely saved my ass today creating contact list spreadsheets to import elsewhere!!!!
-
Excellent! This did exactly what I needed it to in combination with Dynamic Ranges.
-
Theres a bug in the code. ExcelConcatenate is not equal to CONCATENATEMULTIPLE you should set CONCATENATEMULTIPLE =
-
Thanks for sharing such wonder ful trick.
How do you do the reverse, plz suggest. -
-
Very Very time saving & Interesting brother, Nice tips
-
Thanks for commenting.. Glad you liked it 🙂
-
-
Can you add sample document?
Thanks…
-
That is a really cool solution. Will save lots of time. What is the more advanced method that automatically removes the curly brackets?
-
The more advanced way would be to use two cells. In one cell you would use the F9 key and get the hard coded values, and in another you can have a formula that would automatically remove curly brackets (using replace/substitute). You can go that way if you want this to be partially dynamic. But i would say the one mentioned in the article is easier and faster way.
-
-
Very cool. I always had this problem.
-
Thanks for the comment buddy.. glad it helped 🙂
-
Comments are closed.
Combining values with CONCATENATE is the best way, but with this function, it’s not possible to refer to an entire range.
You need to select all the cells of a range one by one, and if you try to refer to an entire range, it will return the text from the first cell.
In this situation, you do need a method where you can refer to an entire range of cells to combine them in a single cell.
So today in this post, I’d like to share with you 5 different ways to combine text from a range into a single cell.
[CONCATENATE + TRANSPOSE] to Combine Values
The best way to combine text from different cells into one cell is by using the transpose function with concatenating function.
Look at the below range of cells where you have a text but every word is in a different cell and you want to get it all in one cell.
Below are the steps you need to follow to combine values from this range of cells into one cell.
- In the B8 (edit the cell using F2), insert the following formula, and do not press enter.
- =CONCATENATE(TRANSPOSE(A1:A5)&” “)
- Now, select the entire inside portion of the concatenate function and press F9. It will convert it into an array.
- After that, remove the curly brackets from the start and the end of the array.
- In the end, hit enter.
That’s all.
How this formula works
In this formula, you have used TRANSPOSE and space in the CONCATENATE. When you convert that reference into hard values it returns an array.
In this array, you have the text from each cell and a space between them and when you hit enter, it combines all of them.
Combine Text using the Fill Justify Option
Fill justify is one of the unused but most powerful tools in Excel. And, whenever you need to combine text from different cells you can use it.
The best thing is, that you need a single click to merge text. Have look at the below data and follow the steps.
- First of all, make sure to increase the width of the column where you have text.
- After that, select all the cells.
- In the end, go to Home Tab ➜ Editing ➜ Fill ➜ Justify.
This will merge text from all the cells into the first cell of the selection.
TEXTJOIN Function for CONCATENATE Values
If you are using Excel 2016 (Office 365), there is a function called “TextJoin”. It can make it easy for you to combine text from different cells into a single cell.
Syntax:
TEXTJOIN(delimiter, ignore_empty, text1, [text2], …)
- delimiter a text string to use as a delimiter.
- ignore_empty true to ignore blank cell, false to not.
- text1 text to combine.
- [text2] text to combine optional.
how to use it
To combine the below list of values you can use the formula:
=TEXTJOIN(" ",TRUE,A1:A5)
Here you have used space as a delimiter, TRUE to ignore blank cells and the entire range in a single argument. In the end, hit enter and you’ll get all the text in a single cell.
Combine Text with Power Query
Power Query is a fantastic tool and I love it. Make sure to check out this (Excel Power Query Tutorial). You can also use it to combine text from a list in a single cell. Below are the steps.
- Select the range of cells and click on “From table” in data tab.

- If will edit your data into Power Query editor.
- Now from here, select the column and go to “Transform Tab”.
- From “Transform” tab, go to Table and click on “Transpose”.
- For this, select all the columns (select first column, press and hold shift key, click on the last column) and press right click and then select “Merge”.
- After that, from Merge window, select space as a separator and name the column.
- In the end, click OK and click on “Close and Load”.


Now you have a new worksheet in your workbook with all the text in a single cell. The best thing about using Power Query is you don’t need to do this setup again and again.
When you update the old list with a new value you need to refresh your query and it will add that new value to the cell.
VBA Code to Combine Values
If you want to use a macro code to combine text from different cells then I have something for you. With this code, you can combine text in no time. All you need to do is, select the range of cells where you have the text and run this code.
 Sub combineText()
 Dim rng As Range
 Dim i As String
 For Each rng In Selection
 i = i & rng & " "
 Next rng
 Range("B1").Value = Trim(i)
 End Sub
Make sure to specify your desired location in the code where you want to combine the text.
In the end,
There may be different situations for you where you need to concatenate a range of cells into a single cell. And that’s why we have these different methods.
All methods are easy and quick, you need to select the right method as per your need. I must say that give a try to all the methods once and tell me:
Which one is your favorite and worked for you?
Please share your views with me in the comment section. I’d love to hear from you, and please, don’t forget to share this post with your friends, I am sure they will appreciate it.
Excel для Microsoft 365 Excel для Microsoft 365 для Mac Excel для Интернета Excel 2021 Excel 2021 для Mac Excel 2019 Excel 2019 для Mac Excel 2016 Excel 2016 для Mac Еще…Меньше
Функция CONCAT объединяет текст из нескольких диапазонов и (или) строк, но не предоставляет аргументы delimiter или IgnoreEmpty.
Функция CONCAT заменяет функцию CONCATENATE. Функция СЦЕПИТЬ (CONCATENATE) также будет поддерживаться для совместимости с более ранними версиями Excel.
Синтаксис
СЦЕПИТЬ(текст1; [текст2]; …)
|
Аргумент |
Описание |
|---|---|
|
text1 |
Элемент текста, который нужно присоединить. Строка или массив строк, например диапазон ячеек. |
|
[text2, …] |
Дополнительные текстовые элементы для объединения. Для текстовых элементов можно указать до 253 аргументов. Каждый из них может быть строкой или массивом строк, например диапазоном ячеек. |
Например, выражение =СЦЕП(«Не»;» «;»слышны»;» «;»в»;» «;»саду»;» «;»даже»;» «;»шорохи.») вернет строку Не слышны в саду даже шорохи.
Совет: Чтобы включить разделители (например, интервалы или амперсанды (&)) между текстом, который требуется объединить, и удалить пустые аргументы, которые не должны отображаться в объединенном текстовом результате, можно использовать функцию TEXTJOIN.
Примечания
-
Если объединенная строка содержит свыше 32767 символов (ограничение для ячейки), функция СЦЕП вернет ошибку #ЗНАЧ!.
Примеры
Скопируйте данные примеров из приведенных ниже таблиц и вставьте их в ячейку A1 нового листа Excel. Чтобы отобразить результаты формул, выделите их и нажмите клавишу F2, а затем — клавишу ВВОД. При необходимости измените ширину столбцов, чтобы видеть все данные.
Пример 1
|
=СЦЕПИТЬ(B:B; C:C) |
A’s |
B’s |
|---|---|---|
|
a1 |
b1 |
|
|
a2 |
b2 |
|
|
a4 |
b4 |
|
|
a5 |
b5 |
|
|
a6 |
b6 |
|
|
a7 |
b7 |
Так как эта функция допускает ссылки на целый столбец и строку, она возвращает следующий результат: A’sa1a2a4a5a6a7B’sb1b2b4b5b6b7
Пример 2
|
=СЦЕПИТЬ(B2:C8) |
A’s |
B’s |
|---|---|---|
|
a1 |
b1 |
|
|
a2 |
b2 |
|
|
a4 |
b4 |
|
|
a5 |
b5 |
|
|
a6 |
b6 |
|
|
a7 |
b7 |
Результат: a1b1a2b2a4b4a5b5a6b6a7b7
Пример 3
|
Данные |
Имя |
Фамилия |
|---|---|---|
|
вида |
Виталий |
Токарев |
|
речная форель |
Fourth |
Pine |
|
32 |
||
|
Формула |
Описание |
Результат |
|
=СЦЕПИТЬ(«Популяция рек для «;A2;» «;A3;» составляет «;A4;» на километр.») |
Создает предложение, объединяя данные в столбце А с остальным текстом. |
Популяция рек для вида речная форель составляет 32 на километр. |
|
=СЦЕПИТЬ(B2;» «; C2) |
Объединяет строку в ячейке В2, пробел и значение в ячейке С2. |
Виталий Токарев |
|
=СЦЕПИТЬ(C2; «, «; B2) |
Объединяет текст в ячейке C2, строку, состоящую из запятой и пробела, и значение в ячейке B2. |
Токарев, Виталий |
|
=СЦЕПИТЬ(B3;» & «; C3) |
Объединяет строку в ячейке B3, строку, состоящую из пробела, амперсанда и еще одного пробела, и значение в ячейке C3. |
Fourth & Pine |
|
=B3 & » & » & C3 |
Объединяет те же элементы, что и в предыдущем примере, но с помощью оператора & (амперсанд) вместо функции СЦЕПИТЬ. |
Fourth & Pine |
Дополнительные сведения
Вы всегда можете задать вопрос специалисту Excel Tech Community или попросить помощи в сообществе Answers community.
См. также
Функция СЦЕПИТЬ
Функция ОБЪЕДИНИТЬ
Общие сведения о формулах в Excel
Рекомендации, позволяющие избежать появления неработающих формул
Поиск ошибок в формулах
Сочетания клавиш и горячие клавиши в Excel
Текстовые функции (справочник)
Функции Excel (по алфавиту)
Функции Excel (по категориям)
Нужна дополнительная помощь?
In this example, the goal is to combine ranges. With the introduction of the VSTACK function and the HSTACK function, this is quite a simple task. To combine ranges vertically, stacking one range on top of another, you can use the VSTACK function like this:
=VSTACK(range1,range2)To combine ranges horizontally, you can use the HSTACK function like this:
=HSTACK(range1,range2)In both formulas above, range1 (B5:B8) and range2 (D5:D9) are named ranges. The named ranges are for convenience only, you can use the raw cell references with the same result. For details on how these functions work see our documentation here: VSTACK function, HSTACK function.
Manual approach
Before the VSTACK and HSTACK functions where introduced, but after dynamic array formulas were available, it was possible to combine ranges with a more complex formula using the SEQUENCE function together with the LET function, the INDEX function, and the IF function. This is a much more manual approach, but it is an interesting example of how you can iterate through cells in a range keeping track of where you are as you go. The original formulas are below for reference. They are still useful for understanding how you can manipulate arrays in a formula.
Single column ranges

The formula to combine single column ranges is based on INDEX function, the SEQUENCE function, the IF function, and the LET function. In the example above, the formula in cell F5 is:
=LET(a,range1,b,range2,s,SEQUENCE(ROWS(a)+ROWS(b)),IF(s>ROWS(a),INDEX(b,s-ROWS(a)),INDEX(a,s)))
Adding line breaks to make the formula more readable, we have:
=LET(
   a,range1,
   b,range2,
   s,SEQUENCE(ROWS(a)+ROWS(b)),
   IF(s>ROWS(a),
      INDEX(b,s-ROWS(a)),
      INDEX(a,s)))
where range1 (B5:B8) and range2 (D5:D9) are named ranges. The first two lines inside let assign range1 to the variable «a» and assign range2 to the variable «b».
Note: Range1 and Range2 do not have to be provided as named ranges; you could instead use B5:B8 and D5:D9.
Next, the SEQUENCE function creates a numeric «row index» to cover all rows in both ranges:
=SEQUENCE(ROWS(a)+ROWS(b))
=SEQUENCE(9)
={1;2;3;4;5;6;7;8;9}
The resulting array is assigned to the variable «s». In the next line, the IF function is used to iterate through the array. If the current value s is greater than the rows in a, the INDEX function returns the value of b at row s minus the row count of a:
INDEX(b,s-ROWS(a)) // value from b
Otherwise, the INDEX function returns the value of a at row s:
INDEX(a,s) // value from a
The resulting values spill into the range F5:F13.
Note: a reader mentioned this formula to me based on the stackoverflow answer here.
Multiple column ranges
The formula to combine ranges with multiple columns is more complex. In the worksheet below, the formula in B5 looks like this
=LET(
   a,range1,
   b,range2,
   r,SEQUENCE(ROWS(a)+ROWS(b)),
   c,SEQUENCE(1,COLUMNS(a)),
   IF(
      r<=ROWS(a),
      INDEX(a,r,c),
      INDEX(b,r-ROWS(a),c))
)
where range1 (E5:F9) and range2 (H5:I10) are named ranges. Note that line breaks have been added for readability.

Like the formula above, this formula figures out how many rows are in both ranges, and uses the SEQUENCE function to create a «row index» with the SEQUENCE function here:
SEQUENCE(ROWS(a)+ROWS(b)) // returns {1;2;3;4;5;6;7;8;9;10;11}
In a similar way, SEQUENCE is also used to create a «column index», named «c»:
SEQUENCE(1,COLUMNS(a)) // returns {1,2}
The IF function tests all values in the row index sequence with the row count for range 1. When a row index value is less than or equal to the count of the rows in a (5), the INDEX function is used to fetch a row from range a at the current index value (r):
INDEX(a,r,c) // from range a
When a row index value is greater than 5, INDEX is used to fetch rows from b:
INDEX(b,r-ROWS(a),c))
Note c remains constant as {1,2} , the column index for range a. This is a shortcut to keep things simple. This formula does not try to figure out if the column counts for both ranges are the same or not. It simply assumes the column counts are the same and requests both columns.
Custom function with LAMBDA
The LAMBDA function can be used to create custom functions. The formula on this page is a good candidate, because it is relatively complex. When converted to a custom LAMBDA function, it is much easier to call:
=AppendRange(range1,range2)
See this article for more detail.
Often the data in your spreadsheets is not according to your needs, so you may need to replace some strings, split some text, merge cells or concatenate data to format the data as per your needs.
In this tutorial, we are going to learn different ways to concatenate cells, columns, and ranges in excel. So, without further ado, let’s dive right in.

What is Concatenation?
Concatenation in Excel means combining data from multiple columns into a single column. Let’s try to understand concatenation with a simple example.

As seen in the screenshot above, we have a spreadsheet with ‘First name’ and ‘Last name’ columns. Now let’s say, we want to have another column ‘Full Name’.
So to generate data for the ‘full name’ column, we can make use of a string concatenation function such as CONCATENATE to combine ‘First name’ and the ‘Last name’ and show that result in the ‘Full Name’ column.
Besides the obvious CONCATENATE function, there are a few other inbuilt functions and operators that Excel provides to concatenate data. In this post, we are going to have a look at all those functions and operators and try to understand them.
But before going ahead, let’s try to understand the difference between concatenation and merging.
How Concatenation Differs from Merging Cells
Although both the operations (concatenating cells and merging cells) look somewhat similar, yet the results they yield are very different.
Merging cells does not mean combining data, it means combining cells. Merging joins two or more cells to form a new, bigger cell, but the merged cell data would only be the left-most cell’s data.

Let’s understand this with an example, as you may see in the screenshot, merging cells will combine the cells by only retaining the left-most value in the merged cell. All the other cell values are discarded.

As you can see above, by merging the First name and Last Name cells we are only left with the First name value (i.e. Lionel) in the merged cell and the Last name value was discarded. On the other hand, concatenation takes data from the selected cells and combines it in a separate cell (where concatenation functions or concatenation operators are used).
CONCAT and CONCATENATE functions In Excel
CONCAT and CONCATENATE are the two functions available in excel for concatenation. CONCAT is a relatively new function that has replaced the older CONCATENATE function from Excel 2019 onwards.
Although, the CONCATENATE function has been made obsolete however it still exists in Excel 2019 and Office 365 for backward compatibility.
Let’s first try to see the syntaxes of both these functions and then we will see some examples:
CONCAT Function
The syntax of the CONCAT function is as follows:
=CONCAT(text1, [text2], ...)
Arguments:
text1 – can be a cell reference, cell range, or a text value.text2 – is an optional argument. It can be a cell reference, cell range, or a text value.
CONCATENATE Function
The syntax of the CONCATENATE function is as follows:
=CONCATENATE(text1, text2, [text3], ...)
Arguments:
text1 – can be a cell reference or a text value.text2 – can be a cell reference or a text value.text3 – is an optional argument. It can be a cell reference or a text value.
Let’s try to see simple examples of both these functions.

In the above example, we have two input strings, and with the help of CONCAT and CONCATENATE functions, we are joining them to get the same results.
The formulas used in the above example are as follows:
=CONCATENATE(A2," ",B2) //Concatenate
=CONCAT(A2," ",B2) //Concat
In both the above formulas, function arguments, as well as results, are the same.
The functions have 3 arguments – A2 is the cell reference of the first cell to be concatenated. We have passed » » (space) as the second argument to have space between Input1 and Input 2. Finally, B2 is passed as the third argument, which signifies the cell reference of the second cell to be concatenated.
In the above example instead of passing the cell references we could also have passed text values and the result would have been the same.
=CONCATENATE("Lionel"," ","Messi") //would result in Lionel Messi
=CONCAT("Lionel"," ","Messi") //would result in Lionel Messi
Concatenation Operator in Excel (& Operator)
We already discussed two of the concatenation functions above however there is yet another easy way to concatenate cells in excel. With the use of & operator, we can join two strings in excel. Everything that the CONCATENATE function can do, the ampersand (&) can do just as well.
Actually, this method can come in very handy when you have to join only a few strings. But if you are planning to use this method for concatenating several strings, then it can be quite inconvenient as it doesn’t give you the ease of CONCATENATE Function.
Let’s recreate the example used above again, but this time with & operator in Excel.

As seen in the screenshot above, the results, in this case, are the same as the CONCATENATE function, but the syntax is different.
Concatenation Operator Syntax
The syntax of using the concatenation operator (&) in Excel is as follows:
=text1&text2&text3&….&textN
Arguments:
text1 – can be a cell reference or a text value.text2 – can be a cell reference or a text value.text3 – is an optional argument. It can be a cell reference or a text value.
Same as the CONCATENATE function, the concatenation operator can also accept cell references or text values and the result would have been the same.
="Lionel"&" "&"Messi" //would result in Lionel Messi
Difference between CONCATENATE, CONCAT and & Operator
All three concatenation methods discussed above produce similar results, but then what are the differences between these three?
Let’s get one thing clear, the key difference between the CONCAT and CONCATENATE functions is that CONCAT can handle cell ranges while the CONCATENATE function cannot.

In the above screenshot, we can clearly see that the CONCAT function can work with cell ranges whereas the CONCATENATE function returns a #SPILL! Error.
The concatenation operator (&) also can’t handle the cell ranges. Another major difference between the & operator and CONCATENATE function is that CONCATENATE Function can only join up-to 255 strings whereas the “&” operator doesn’t have any such limitations.
I personally think that 255 is a huge number and no one practically needs to merge 255 strings. So, the difference really boils down to the ease of use. Also, while deciding which way you want to concatenate cells, you should also keep in mind that the CONCATENATE function has been made obsolete and can be removed in future versions of Excel.
Concatenation in Excel using the TEXTJOIN function
TEXTJOIN function was introduced with Excel 2019, it provides another way to combine text from multiple cells into a single cell.
TEXTJOIN function also allows you to pass a range of cells. In addition to this, it also has a parameter that allows ignoring empty values.
One thing that differentiates the TEXTJOIN function from other functions is the out-of-box ability to pass a delimiter parameter.
Before going any further let’s have a look at the syntax of the TEXTJOIN function.
The syntax of the TEXTJOIN function is as follows:
=TEXTJOIN(delimiter, ignore_empty, text 1, [text2], …)
Arguments:
delimiter – is the text separator, it can be any text value or a cell reference.ignore_empty – is used for instructing the function to ignore empty cells within the range. You can set its value to TRUE or FALSE, depending on your preference.text 1 – can be a cell reference, cell range, or a text value.[text 2] – is an optional parameter. It can be a cell reference, cell range, or a text value.
Now, let’s try to understand the TEXTJOIN function with an example.

As shown in the above screenshot, the TEXTJOIN function is used for concatenating the values in A2 and B2 cells. The first argument to the TEXTJOIN function is the ‘delimiter’ since in our case we wish to separate the values with a “ “ (space) so we have used that as the delimiter.
The second argument is set to TRUE which means that the function will ignore any empty cells within the given range.
The third and fourth arguments are cell references of A2 and B2 cells. Since the TEXTJOIN function can also accept ranges hence instead of passing two cells we can also pass the entire range as A2:B2 and in both cases result would be the same.
Now, as we have learned about all the approaches to concatenate cells in excel. Let’s try to see some practical examples.
How to Concatenate Two or More Columns With Or Without Delimiters
To concatenate data from multiple columns with a delimiter (like a comma, space, or line breaks) you can use any one of the above-listed functions. In this section, we will see all the three functions and concatenation operator along with different delimiters:
Concatenating Multiple Columns with Delimiter Using the CONCATENATE function
In this example, we have used CONCATENATE function to combine the data from 4 different columns along with several delimiters like comma (“,”), space (“ ”), or line break (newline character).

To use the CONCATENATE function for combining multiple columns the formula would be:
=CONCATENATE(A2,B2,C2,D2) //Concatenating without delimiter
=CONCATENATE(A2,",",B2,",",C2,",",D2) //"," (comma) as delimiter
=CONCATENATE(A3," ",B3," ",C3," ",D3) //" " (space) as delimiter
=CONCATENATE(A4,CHAR(10),B4,CHAR(10),C4,CHAR(10),D4) //linebreak as delimiter
Note 1: To add line breaks or newline characters in your formulas you can make use of the CHAR(10) or CHAR(13):
- CHAR(10): 10 is the ASCII code for line feed for Windows.
- CHAR(13): 13 is the ASCII code for Carriage Return for MAC.
Note 2: To make sure that text is displayed with proper line breaks, you must turn on the «Wrap text» option. To enable wrap text, you can follow these steps.
- Select the cell where you want to apply the line break.
- Press CTRL + 1 and open the cell formatting menu.
- Navigate to the alignment tab and check the «Wrap text» option and click “OK”.
Concatenating Multiple Columns with Delimiter Using the Concatenation Operator «&»
Here instead of the CONCATENATE function, we have used Concatenation Operator “&” to combine the data from 4 different columns along with several delimiters like comma (“,”), space (“ ”), or line break (newline character).
To concatenate two cells using the ampersand (&) is easy and quick, the results can be achieved by sandwiching the delimiters between the two ampersand operators on either side and the cell references as seen in the screenshot above.
But this concatenation method can be quite cumbersome especially if data from many columns need to be combined.

To combine data from multiple columns using the Concatenation Operator the formula would be:
=A2&B2&C2&D2 //Concatenating without delimiter
=A2&","&B2&","&C2&","&D2 //with "," (comma) as delimiter
=A3&" "&B3&" "&C3&" "&D3 //with " " (space) as delimiter
=A4&CHAR(10)&B4&CHAR(10)&C4&CHAR(10)&D4 //with linebreak as delimiter
Concatenating Multiple Columns with Delimiter Using the CONCAT function
In this example, we will try to use the CONCAT function to join data from 4 different columns along with several delimiters like comma (“,”), space (“ ”), or line break (newline character).

To use the CONCAT function for combining multiple columns, the formula would be:
=CONCAT(A2,B2,C2,D2) //Concatenating without delimiter
=CONCAT(A2:D2) //Concatenating without delimiter, can accept ranges
=CONCAT(A2,",",B2,",",C2,",",D2) //with "," (comma) as delimiter
=CONCAT(A3," ",B3," ",C3," ",D3) //with " " (space) as delimiter
=CONCAT(A4,CHAR(10),B4,CHAR(10),C4,CHAR(10),D4) //with linebreak as delimiter
Concatenating Multiple Columns with Delimiter Using the TEXTJOIN function
Now let’s try to use the TEXTJOIN function (my personal favorite) to join the data from 4 different columns along with several delimiters like comma (“,”), space (“ ”), or line break (newline character).

To use the TEXTJOIN function for concatenating multiple columns the formula would be:
=TEXTJOIN("",TRUE,A2:D2) //Concatenating without delimiter
=TEXTJOIN(",",TRUE,A2:D2) //with "," (comma) as delimiter
=TEXTJOIN(" ",TRUE,A3:D3) //with " " (space) as delimiter
=TEXTJOIN(CHAR(10),TRUE,A4:D4) //with linebreak as delimiter
Since the TEXTJOIN function accepts cell ranges so we do not have to manually type the cell reference for each column, this makes the formulas shorter and easier to write, debug and understand.
How to Concatenate a Cell Range With Or Without Delimiters
There are cases when instead of concatenating data from multiple columns you might need to concatenate data from a range of cells. Till now we know that we have two concatenation functions namely – CONCAT and TEXTJOIN that can work with cell ranges.
Let’s try to use these formulas one by one and see how well they support cell ranges.
CONCAT Function with Cell Ranges
CONCAT function can be used with both horizontal and vertical cell ranges, but while using it with cell ranges you are not able to specify delimiters.
Let’s see all this in action.

In the above image, you can see that the CONCAT function works nicely with horizontal cell ranges. To use it with horizontal cell ranges you can use the formula –
=CONCAT(A2:D2) //where A2:D2 specifies the horizontal range of cells
Similarly, the CONCAT function can also work with the vertical cell ranges as shown in the below image.

To use it with vertical cell ranges you can use the formula –
=CONCAT(A2:A5) //where A2:A5 specifies the vertical range of cells
CONCAT function also allows you to concatenate two separate cell ranges as shown in the next example.

In this case, we have two ranges – A2:D2 (horizontal range) and A5:A8 (vertical range) and with the help of the CONCAT function, we are concatenating the data from these two ranges.
You can use the formula to accomplish this –
=CONCAT(A2:D2, A5:A8) //where A2:D2 is one range and A5:A8 is the second range
The only downside of the CONCAT function is – since we are passing the range, we would not be able to supply a delimiter with the function.
TEXTJOIN Function with Cell Ranges
With the TEXTJOIN function, you can concatenate both horizontal and vertical cell ranges. Also, unlike the CONCAT function, TEXTJOIN allows you to use delimiters along with the cell ranges.
Let’s see this with some examples:

In the above image, we can see, how the TEXTJOIN function can be used to combine a horizontal range of cells without a delimiter.
To use the TEXTJOIN function with horizontal cell ranges without separator use the following formula –
=TEXTJOIN("",TRUE,A2:D2) //where A2:D2 is the range to be concatenated.
In order to use a delimiter, simply pass the desired delimiter in the first argument to the function as shown in the following image.

So, to use the TEXTJOIN function with horizontal cell ranges with separator use the following formula –
=TEXTJOIN("-",TRUE,A2:D2) //where hyphen/dash is used as the delimiter
In the same way, the TEXTJOIN function can be used for concatenating a vertical range of cells with or without a delimiter.

To use the TEXTJOIN function with vertical cell ranges use the following formula –
=TEXTJOIN("",TRUE,A2:A5) //where A2:A5 is a vertical cell range with no separator
=TEXTJOIN(«–«,TRUE,A2:A5)
Like the CONCAT function, the TEXTJOIN function also allows to combine values from multiple cell ranges, but it has one advantage over the CONCAT function that it allows the user to pass concatenation separators/delimiters. Below is an example:

In this example, we have two ranges – A2:D2 (horizontal range) and A6:A9 (vertical range) and with the help of the TEXTJOIN function, we are concatenating the data from these two ranges with and without delimiters.
For this, you can use the formula –
=TEXTJOIN("",TRUE,A2:D2,A6:A9) //A2:D2 & A6:A9 are two cell ranges
=TEXTJOIN("-",TRUE,A2:D2,A6:A9) //A2:D2 & A6:A9 are two ranges with "-" as delimiter
How to Use TEXTJOIN function with Excel 2016 or Lower Versions
Now, we have seen how amazing is the TEXTJOIN function – it supports cell ranges, delimiters, removes blank cells if required. And all these features make it a great concatenation function.
But since it was added only after Excel 2019 so many users who are working with older versions of Excel are not able to use it. For all those users we have a developed a custom UDF (user-defined function) that resembles the TEXTJOIN function.
To add this UDF to your spreadsheet, follow the below steps:
- If you are on Windows, press the keys (ALT + F11). If you are on MAC, press the keys (Opt + F11). This will open the Visual Basic Editor.

- After the Visual Basic Editor is opened. Go to «Insert» and click the «Module» option as shown in the image. This will insert a module object for your workbook.

- Now you can copy-paste the following UDF code in the module, save the spreadsheet and you will be ready to use it.
'ConcatCellRange User Defined Function
'Created By - ExcelTrick.com
Function ConcatCellRange(delimiter As String, ignore_blanks As Boolean, text_range As range) As String
Dim Cell As range
Dim Result As String
For Each Cell In text_range
 If Not (ignore_blanks = True And IsEmpty(Cell.Value)) Then
 Result = Result & Cell.Value & delimiter
 End If
Next Cell
If (Right(Result, 1) = delimiter) Then
 ConcatCellRange = Left(Result, Len(Result) - 1)
Else
 ConcatCellRange = Result
End If
End Function
How to Use this ConcatCellRange UDF
The syntax of the ConcatCellRange function is as follows:
=ConcatCellRange(delimiter, ignore_blanks, text_range)
Arguments:
delimiter – is the text separator, it can be any text value or a cell reference.ignore_blanks – is used for instructing the function to ignore empty cells within the range. You can set its value to TRUE or FALSE, depending on your preference.text_range – can be a horizontal or vertical range of cells.
In the following example, we have used the ConcatCellRange function with a horizontal range of cells.

In the first case, the UDF is used for concatenating the cells without a separator. While in the second case, the function is used on a horizontal range along with a separator. Finally, the third case depicts the function used with the ability to skip empty cells within the given range.
Lets, see how to use the function with vertical ranges

In the above example, the UDF is used with a vertical range from A2:A5, wherein the first case the function is used without a separator whereas in the other case it is used with “-“ (hyphen) as the range separator.
How to Split or Un-Concatenate Columns in Excel
Looking for the opposite of concatenation? If you want to split cells or the data in cells instead of combining, you can use a few different methods which you can find right here.
- Split cells using Flash Fill in Excel
- Split cells using the Text to Columns feature in Excel
- Split cells using Excel Formulas (Mid, Left, Right functions)
So, this was all about concatenating columns, rows, and ranges in excel. Do let us know in case you have any other special tricks or tips related to this.