
You can compare two versions of a document to see how they differ. You can also merge two versions of the same document into one new document. In both cases, Word shows the differences with revision marks.
Do either of the following:
Compare two versions of a document
-
Open one of the two versions of the document that you want to compare.
-
On the Review menu, select Compare Documents.
-
In the Original document list, select the original document.
-
In the Revised document list, browse to the other version of the document, and then select OK.
Changes from the revised copy are merged into a new copy that is based on the original version of the document. The original copy remains untouched. Revision marks show any differences introduced by the revised copy of the document.
Tip: To change document comparison settings or the level of detail shown, on the Tools menu, point to Track Changes, click Compare Documents, and then click
 .
.
 .
.Merge two versions of a document
-
Open one of the two versions of the document that you want to merge.
-
On the Review menu, select Combine Documents.
-
In the Original document list, select one version of the document.
-
In the Revised document list, browse to the other version of the document, and then select OK.
Changes from the revised copy are merged into a new copy that is based on the original version of the document. The original copy remains untouched. Revision marks show any differences introduced by the revised copy of the document.
Do either of the following:
Compare two versions of a document
-
Open one of the two versions of the document that you want to compare.
-
On the Tools menu, point to Track Changes, and then click Compare Documents.
Note: If the Compare Documents option is not available, the document might be protected. To unprotect a protected document, on the Tools menu, click Unprotect Document.
-
On the Original document pop-up menu, select the original document.
-
On the Revised document pop-up menu, browse to the other version of the document, and then click OK.
Changes from the revised copy are merged into a new copy that is based on the original copy of the document. The original copy remains untouched. Revision marks show any differences introduced by the revised copy of the document.
Tip: To change document comparison settings or the level of detail shown, on the Tools menu, point to Track Changes, click Compare Documents, and then click
.
 .
.Merge two versions of a document
-
Open one of the two versions of the document that you want to merge.
-
On the Tools menu, click Merge Documents.
-
On the Original document pop-up menu, select one version of the document.
-
On the Revised document pop-up menu, browse to the other version of the document, and then click OK.
See also
Use tracked changes
Insert, delete, or change a comment
Need more help?
When working with documents with co-authors, it is often necessary to compare two versions of the document. For example, if you forgot to block the ability to make changes to a document without tracking changes, after receiving an edited, agreed, or reviewed version of the document, you need to make sure that the resulting version of the document is identical to the original.
Word offers a useful function to compare two versions of the document and display only changed fragments. The Compare function does not change the original documents; by default, it creates a new document.
To compare two documents and display the changes, do the following:
1. Open the documents that you want to compare.
2. On the Review tab, in the Compare group, click the Compare button:

3. From the Compare drop-down list, select Compare… Compare two versions of a document (legal blackline):

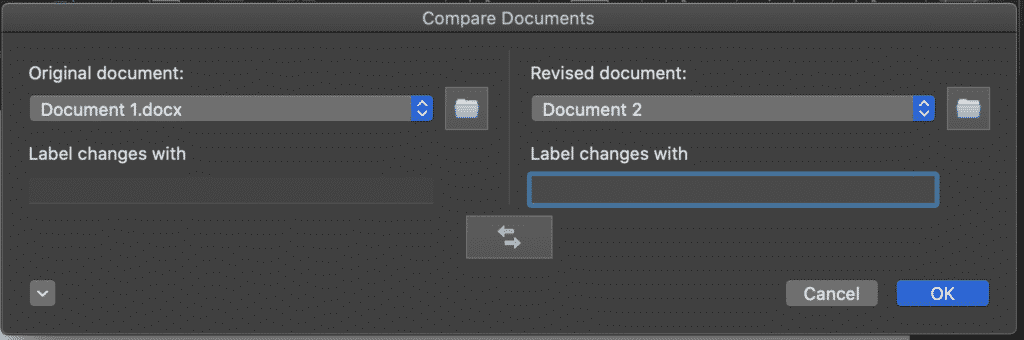
4. In the Compare Documents dialog box:

- In the Original document group, browse for the document you want to use as the original document.
- In the Revised document group, browse for another document you want to compare with the original document.
Note: You can change the label of changes by entering the corresponding label in the Label changes with field.
- Click the More >> button to select the settings for what you want to compare in the documents.
For example:

- Under Show changes, choose whether you want to show Character level or Word level changes.
- If you do not want to display changes in a new document, choose the document in which you want to show the changes in the Show changes in group: in Original document or Revised document.
Important: Any options you select under More will be the default options for comparison the next time you compare documents.
- Click OK.

Note: If either version of the document has tracked changes, Microsoft Word displays a message box:

Click Yes to accept the changes and compare the documents.
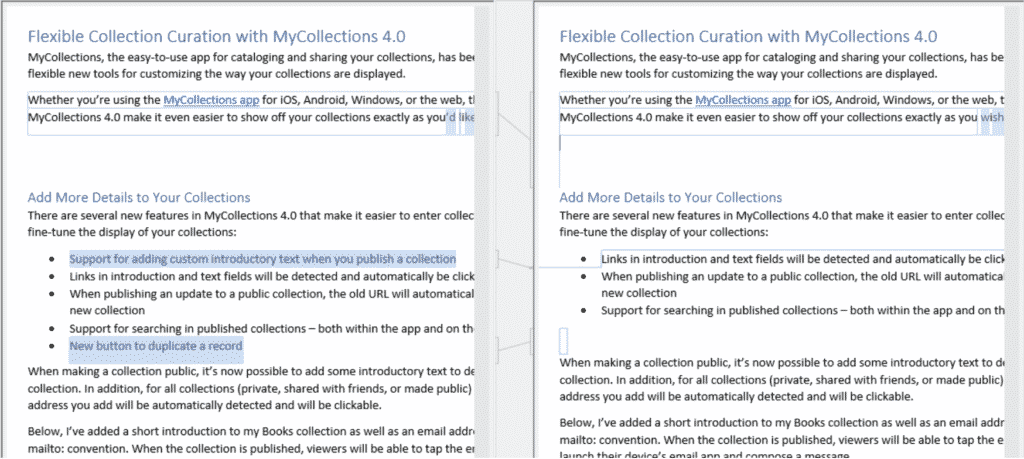
Word displays a new third document (unless otherwise specified) in which tracked changes in the original document are accepted, and changes in the revised document are shown as tracked changes. For example:

Notes:
- If you continue to work with the new third document, do not forget to save it because Word doesn’t save it automatically.
- If you want to compare changes from several reviewers, from the Compare dropdown list, choose Combine… Combine revisions from multiple authors into a single document:


There are many reasons that you may need to compare two Microsoft Word Documents. Maybe you have ended up with two different versions of the same document due to simultaneously editing, or you work in the legal profession and are required to create a legal backline document.
For whatever reason, you have two or more Word Documents and don’t have the time (or the sanity) to manually compare them.
In this post we will walk you through the best way to compare two Microsoft Word Documents, saving you a whole heap of time and frustration. It’s as easy as a click of a button!
Comparing two Word Documents
Microsoft Word does have a built-in document comparison tool called ‘Compare’. The tool allows you to compare two Word Documents at once, highlighting any changes or differences between the two, leaving you to edit, approve and accept the changes.
You may not want to merge the documents together if you are reviewing a contract and simply need to see what was changed between the two versions you can review this by following the first few steps below and not making any further changes.
If you would like to merge the documents, follow the steps below and continue moving your approved changes across into a ‘Master File’. Before saving this as a new version.

Steps to compare two Word Documents using Word Compare
- Open Word
- Open one of the Word Documents you want to compare
- Click Review in the menu
- Find and Click Compare under Tools

- Click Compare Documents
- Under Original Document, select the original word file (or one of the word files)
- Under Revised Document, select the document you wish to compare to the document selected above
- Select a label for the changes (optional)

- Click OK
Microsoft Word will now merge the two documents and highlight all changes on the revised document file. The original Copy will be shown, untouched.
A third version will appear, this is your ‘Master Version’ and the file that will reflect any of the changes you accept or reject from the revised document.
Looking for an easier way to compare Word Documents?
You’re not alone, although Microsoft’s Word Compare is very assessable (already exists in your version of Microsoft Word) it’s clunky and not very user friendly. It’s overwhelming to see three versions of your document on the same screen, referring between the original document and revised document to see what changed.
Because so many of us face this problem every day, there are now some pretty amazing, purpose-built tools out there to make comparing Word Documents a whole lot easier.
Introducing Simul Docs, a tool built with easy document comparison, collaboration and version control in mind. It’s a simple, user-friendly tool that works seamlessly with your current version of Microsoft Word.
Simply drag and drop your two documents into Simul and press ‘compare’ in the click of a button Simul will merge the two files and highlight any difference for you to accept or decline.
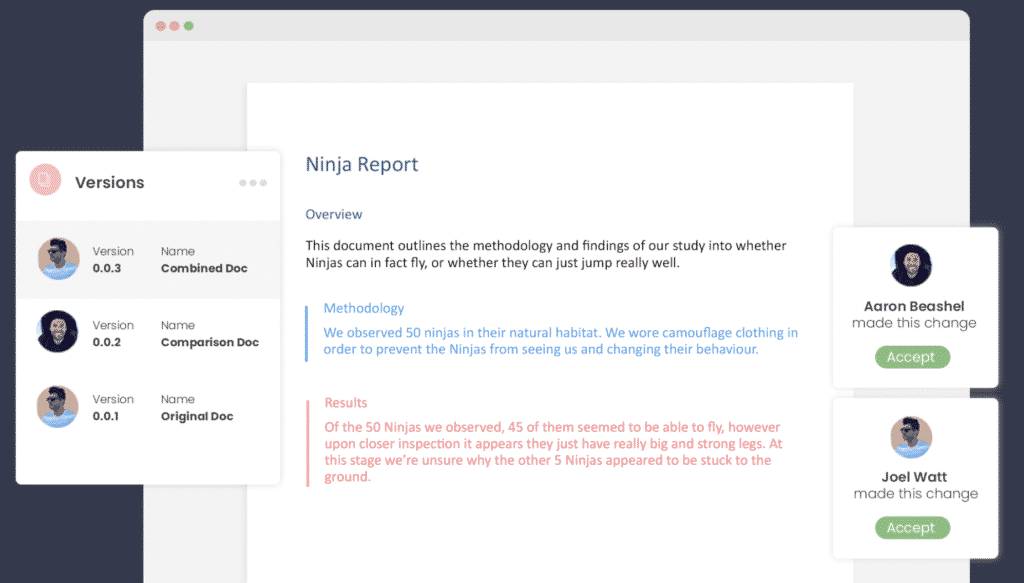
Simul will also manage the version control side of things for you because sometimes you do need to refer back to an older version or you are required by law to keep these versions saved. By dropping a document into Simul, Simul will automatically give the document a version number such as 0.0.1. Then saving all future versions, in order without you even asking.
When you compare two files and merge (optional) the together Simul would have not only saved the original and revised documents as separate versions but also give the new file a trackable number so you won’t save over a thing.

If you are a legal professional, or someone that is often required to compare files using a purpose-built tool such as Simul Docs can save you a lot of valuable time. With the bonus of built-in version control and so much more, Simul was built to help you collaborate better.
Did we mention they offer a free trial?
Многие пользователи часто работают на компьютере с различными текстовыми файлами, при этом в документы вносятся исправления, поэтому бывает необходимо сравнить документы Word. Над одним документом может работать несколько человек, которые правят текст исходного документа, вставляя туда дополнения или убирая лишнее.
Это может быть договор, некий юридический документ, соглашение и т. п. При простом чтении не всегда заметны мелкие исправления, сделанные партнером в период согласования документа.
Содержание:
- Как сравнить два документа Ворд вручную рядом — 1 способ
- Как сравнить два документа Ворд одновременно — 2 способ
- Сохранение измененного документа на компьютере
- Как сравнить 2 документа Word в ABBYY Comparator
- Как сравнить 2 документа в Ворде онлайн
- Выводы статьи
Абзац, предложение, несколько слов или даже одна запятая могут существенно изменить содержание важного документа с соответствующими негативными последствиями. Поэтому необходимо предварительно сравнить документы Ворд, чтобы сразу увидеть все изменения, сделанные партнером.
Это поможет избежать ошибок, например, внесение в текст невыгодных условий, увидеть юридические ловушки перед подписанием и принятием данного документа между обеими сторонами.
Документы можно сравнить визуально, прокручивая их рядом друг с другом при синхронной прокрутке. Чтобы избежать недоразумений и увидеть все изменения, лучше выбрать самый эффективный способ: необходимо сравнить два документа Word и подсветить различия между ними. Вы сразу увидите, какие правки были внесены в исходный документ в период согласования.
Принимая во внимание все вышесказанное, у пользователя возникает закономерный вопрос о том, как сравнить два документа Word. Есть несколько способов для решения этой проблемы. Можно сравнить два открытых документа или два закрытых файла.
В зависимости от ситуации, сравнить текст в двух документах Word можно с помощью двух методов:
- Визуальное сравнение текста документов вручную.
- Автоматическое сравнение содержимого документов с помощью программы или сервиса.
В этой статье вы найдете инструкции о том, как сравнить два документа Word на различия, используя само приложение MS Office, стороннее программное обеспечение, а также узнаете, как сравнить документы Word онлайн.
Это руководство подходит для использования в разных версиях текстового редактора Microsoft Word: в MS Word 2019, MS Word 2016, MS Word 2013, MS Word 2010, MS Word 2007.
Как сравнить два документа Ворд вручную рядом — 1 способ
Сейчас мы разберем, как сравнить 2 документа Word, если они одновременно открыты. В этом случае, мы можем просмотреть открытые документы рядом, расположив их вплотную друг к другу.
Чтобы сравнить исправления в двух открытых документах визуально, нужно сделать следующее:
- Откройте оба документа Word, текст в которых необходимо сравнить.
- В одном из открытых документов перейдите во вкладку «Вид».
- В группе «Окно» нажмите на кнопку «Рядом».

- В открывшемся окне «Сравнить рядом» выберите другой документ, если в это время на ПК открыто несколько файлов Word.

- На экране компьютера появятся два окна открытых документа, расположенные рядом друг с другом.
- Во вкладке «Вид» войдите в группу «Окно».
- Щелкните по опции «Синхронная прокрутка».

Вы можете просмотреть одновременно оба документа с помощью прокрутки, чтобы увидеть отличия.
Есть еще одна подсказка, позволяющая понять, вносились ли изменения в документ Word. В левой части нижней панели окна документа отображается число слов в тексте каждого документа. У вас есть возможность сравнить также количество символов, имеющихся в каждом из документов.
Чтобы выйти из режима просмотра рядом, во вкладке «Вид», в группе «Окно» нажмите на кнопку «Рядом».
Как сравнить два документа Ворд одновременно — 2 способ
А можно ли сравнить версии документов Word, если они не открыты? Конечно, в этом нам поможет функция сравнения, которая называется «Юридическое примечание». При использовании этого способа, нам необходимо сравнить два документа Word и подсветить исправления.
Пройдите последовательные шаги:
- Запустите программу Word на компьютере, открыв в приложении один из требуемых документов или просто пустой документ.
- Перейдите во вкладку «Рецензирование».
- В группе «Сравнение» нажмите на кнопку «Сравнить».
- В открывшемся контекстном меню выберите «Сравнить…».
Это сравнение двух версий документа (юридическое примечание).

- В окне «Сравнение версий» сначала выберите на компьютере «Исходный документ», а затем «Измененный документ».

- Если вам необходимы дополнительные опции сравнения, нажмите на кнопку «Больше».
- Измените параметры сравнения по своему усмотрению.
Включите настройки, по которым необходимо отслеживать изменения. Обратите внимание на параметр «Отображение изменений». Здесь можно выбрать степень сравнения — «по знакам» или «словам».
В разделе «Показать изменения» выбираем место, где разместится это сравнение: «в исходном документе», «в измененном документе», или в «новом документе». Рекомендуемое значение — «в новом документе».

- В окне «Сравнение версий» нажмите на кнопку «ОК».
- На экране откроется программа Word с результатами сравнения в четырех окнах:
- окно исправлений документа;
- окно сравниваемого (объединенного) документа;
- окно исходного документа;
- окно измененного документа.
Справа друг над другом находятся два окошка с исходным (вверху) и измененным (внизу) документами. В центре размещен сравниваемый документ со всеми внесенными изменениями. Слева отображено окно исправлений с информацией и списком изменений.
- Щелкните по вставке в исправлениях, чтобы переместиться к данному исправлению в основном окне.
Измененный текст будет подсвечен цветом. При необходимости, отредактируйте текст в окне объединенного документа.

Для большего удобства вы можете выбрать горизонтальное расположение области «Исправления». Во вкладке «Рецензирование», в группе «Запись исправлений» нажмите на стрелку около кнопки «Область проверки», выберите один из вариантов: «Вертикальная область проверки…» или «Горизонтальная область проверки…».

Сохранение измененного документа на компьютере
После ознакомления с результатами проверки, вы можете сохранить на ПК объединенный документ Word со всеми или только некоторыми исправлениями.
В случае согласия с изменениями, выполните следующие действия:
- Из вкладки «Рецензирование» переместитесь в группу Изменения».
- Нажмите на кнопку «Принять», или нажмите на стрелку для выбора другого подходящего параметра:
- Принять и перейти к следующему.
- Принять исправление.
- Принять все исправления.
- Принять все исправления и прекратить отслеживание.

Если вы не согласны с исправлениями в тексте документа, нажмите на кнопку «Отклонить и перейти к следующему». Щелкните на стрелку для выбора одного из вариантов действий:
- Отклонить и перейти к следующему.
- Отклонить все исправления.
- Отклонить все исправления и перейти к следующему.
- Сохраните документ Word в качестве нового файла на компьютере, а исходный и измененный файлы останутся на вашем ПК в первоначальном виде.
Как сравнить 2 документа Word в ABBYY Comparator
Приложение «ABBYY Сравнение документов» предназначено для сравнения различных типов документов, в том числе файлов Microsoft Office. Это платное приложение находит несоответствия в документах и показывает разницу.
Пройдите шаги:
- В окне программы ABBYY Comparator добавьте в соответствующие области первый и второй документы.
- Нажмите на кнопку «Найти различия».

- В окне приложения отобразится информация об обнаруженных несоответствиях.

В случае необходимости, сохраните на своем ПК отчет о сравнении файлов в формате PDF или DOCX.
Как сравнить 2 документа в Ворде онлайн
Может так случится, что у вас не будет под рукой компьютера с программой Word. Например, вам нужно сравнить файлы с телефона, а в мобильной версии офиса нет подобного функционала.
В этом случае, вы можете сравнить два документа Word онлайн. Существует несколько сервисов в интернете, способных решать эту задачу.
Мы воспользуемся помощью онлайн сервиса Embedika:
- Войдите на страницу «Сравнение документов»: https://compare.embedika.ru/.
- Выберите файлы со своего мобильного устройства или с компьютера, и загрузите поочередно их в первую и во вторую области страницы.
- Нажмите на кнопку «Сравнить».
- Посмотрите на результат этой операции.

Выводы статьи
При работе с документами Word, пользователю может понадобится выполнить сравнение двух редакций документа, если над ним работало несколько человек. В этом случае, необходимо сравнить два документа на соответствия друг другу, чтобы узнать о внесенных исправлениях, сделанных партерами или коллегами. Сделать это можно несколькими способами: в программе Word, используя сторонний софт или онлайн сервис в интернете.
Похожие публикации:
- Как вставить дату и время в Word
- Как поставить ударение над буквой в Ворде — 3 способа
- Как сделать оглавление (содержание) в документе Word
- Как убрать пустую страницу в Ворде — 6 способов
- Как выделить текст в Word: разные способы

Compare Documents in Word: Overview
You can easily compare documents in Word to note changes between them. One of the most commonly performed tasks in the legal profession is creating a legal blackline document. The terms “redlining” or “comparing documents” are two other ways to refer to this. When you compare documents in Word, you can show only the changed content between the two copies in a third, separate document.
Many legal professionals use this feature when reviewing contracts to note the revisions between two copies of a contract. This lets you create and compare multiple copies of a legal document, noting changes between the original, the first draft, the second draft, and so on. This helps you keep all copies of the drafts for historical purposes. It also shows the changes made and who requested the changes. This lesson shows how to compare documents in Word to create a legal blackline document.
To compare documents in Word, first open the two documents to compare in Microsoft Word. Then click the “Review” tab in the Ribbon. Then click the “Compare” drop-down button in the “Compare” button group. Then select the “Compare…” command from the button’s drop-down menu to open the “Compare Documents” dialog box.
In the “Compare Documents” dialog box, then select the name of the original document from the “Original document” drop-down menu. If you didn’t open the original document before opening the “Compare Documents” dialog box, you can select the document to use by either clicking the “Open” button that appears as a folder icon at the right end of the drop-down menu or by selecting the “Browse…” command from the drop-down menu’s listing of document choices. Microsoft Word then displays the “Open” dialog box, which you can use to find and open the original document.
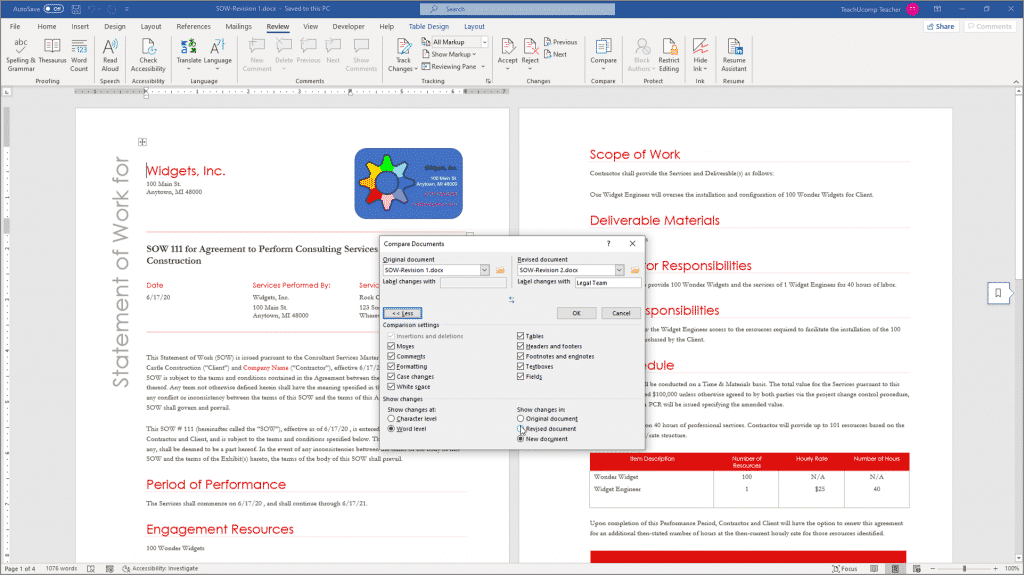
Compare Documents in Word- Instructions: A picture of a user comparing two documents in Word within the “Compare Documents” dialog box.
Next, use the “Revised document” drop-down to select the name of the revised copy of the document from the drop-down menu. You can also use the “Open” button or the “Browse…” command with the “Revised document” drop-down, just as with the “Original document” drop-down if you did not open the revised document before opening the “Compare Documents” dialog box.
Next, underneath the “Revised document” drop-down, enter the name with which to label changes in the resultant legal blackline document into the “Label changes with” text box, if needed.
Then click the “More >>” button to display all of the options for creating the legal blackline document at the bottom of the dialog box. Any changes you make here are saved as the new default settings for creating a legal blackline document in the future. By default, Word shows changes on a “Word level” in a “New document.” These are the recommended settings. However, you have the flexibility to change them, if needed. After reviewing the settings, click the “<< Less” button to set the options and hide them again.
Then click the “OK” button in the “Compare Documents” dialog box to compare the documents and then create the resultant legal blackline document within Microsoft Word. The original document and the revised document also appear at the right side of the screen. The compared document appears in the center of the screen. Any revisions appear in the “Revisions” pane at the left side of the screen.
Compare Documents in Word: Instructions
- To compare documents in Word, open the two documents to compare.
- Click the “Review” tab in the Ribbon.
- Then click the “Compare” drop-down button in the “Compare” button group.
- Then select the “Compare…” command from the drop-down menu to open the “Compare Documents” dialog box.
- Select the name of the original document from the “Original document” drop-down menu.
- If you forgot to open the original document before opening the “Compare Documents” dialog box, select the document by either clicking the “Open” button at the right end of the drop-down menu or by selecting the “Browse…” command from the drop-down menu.
- Then, in the “Open” dialog box that appears, find and open the original document.
- Use the “Revised document” drop-down to select the name of the revised copy of the document from the drop-down menu.
- You can also use the “Open” button or the “Browse…” command with the “Revised document” drop-down, if you forgot to open the revised document before opening the “Compare Documents” dialog box.
- Under the “Revised document” drop-down, enter the name with which to label changes in the resultant legal blackline document into the “Label changes with” text box, if needed.
- To show all the options for comparing documents at the bottom of the dialog box, click the “More >>” button.
- Any changes you make are saved as the new default settings.
- To set the options and hide them again, click the “<< Less” button.
- When finished, click the “OK” button.
- The original document and revised document appear at the right side of the screen.
- The compared document appears in the center of the screen.
- Any revisions appear in the “Revisions” pane at the left side of the screen.
Compare Documents in Word: Video Lesson
The following video lesson, titled “Using the Compare Feature,” shows you how to compare documents in Word. This video lesson is from our complete Word for lawyers tutorial, titled “Mastering Word Made Easy for Lawyers v.2019 and 365.”
Tagged under:
blacklining, compare, compare documents, Compare Documents in Word, course, document, documents, draft, drafts, file, files, help, how-to, instructions, law, law firm, lawyer, lawyers, learn, legal, legal backline, legal blackline, lesson, microsoft word, original document, overview, redlining, revised document, self study, teach, training, tutorial, video, word, Word 2013, Word 2016, Word 2019, Word for Microsoft 365, word for Office 365, word training for lawyers