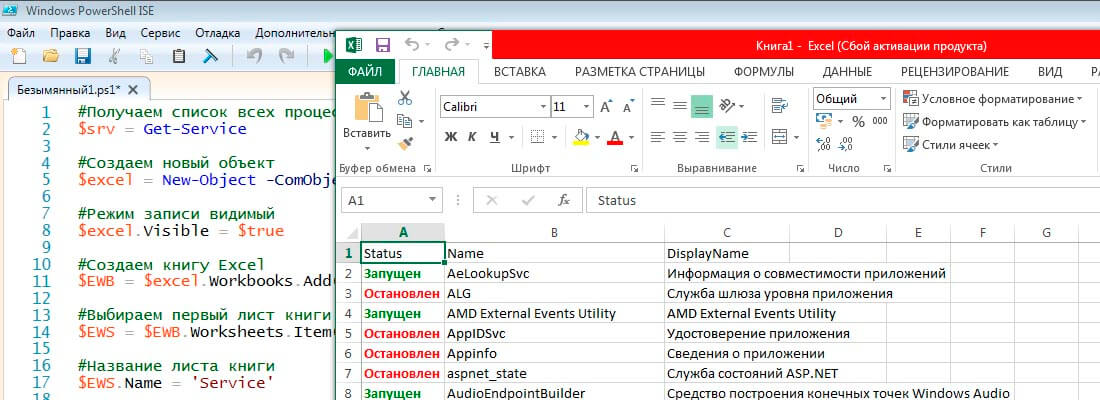
Для работы с Excel в среде powershell нужно использовать COM объект.
#Создаем новый объект
$excel = New-Object -ComObject Excel.Application
При выполнении данного командлета произойдет запуск приложения Excel в скрытом состоянии, т.е. у нас будет висеть
процесс Excel, но при этом самого приложения как такового мы не увидем. Для того чтобы увидеть работу приложения
нужно обратиться к его свойству Visible и установить его в TRUE т.к. по умолчанию стоит FALSE
#Режим записи видимый
$excel.Visible = $true
Далее после того как приложение открылось нужно создать книгу воспользовавшись свойством Workbooks и методом Add().
#Создаем книгу Excel
$EWB = $excel.Workbooks.Add()
После создания книги нужно выбрать лист с которым будем работать в данной книге. Для этого воспользуемся
свойством Worksheet и методом Item()передав ему номер листа с которым будем работать.
#Выбираем первый лист книги
$EWS = $EWB.Worksheets.Item(1)
Зададим имя нашему листу для этого используем свойство Name и присвоим ему значение нового имени листа.
#Название листа книги
$EWS.Name = 'Service'
Так как Excel это таблица и мы работаем с ее ячейками то используем свойство Cells и метод Item() для
указания с какими ячейками данного листа мы будем работать. Отсчет начинается с 1.
#Первая строка ячеек
$EWS.Cells.Item(1,1) = 'Status'
$EWS.Cells.Item(1,2) = 'Name'
$EWS.Cells.Item(1,3) = 'DisplayName'
В данном примере мы устанавливаем названия наших колонок которые в дальнейшем будем заполнять. Первый аргумент
это номер строки с которой работаем, второй аргумент это ячейка в таблице. Перед тем как перебирать массив с
данными и записывать все в таблицу нам нужна вспомогательная переменная которая будет ссылаться на начальную
строку в таблице с дальнейшим увеличением в цикле для перехода на новую строку.
#Перебераем массив и вставляем в нужные ячейки листа
$j = 2
foreach($arr in $srv)
{
   #Если процесс запущен то зеленый иначе красный
   if($arr.Status -eq 4){
    $EWS.Cells.Item($j,1) = 'Запущен'
    $color = 10
   }else{
    $EWS.Cells.Item($j,1) = 'Остановлен'
    $color = 3
   }


   $EWS.Cells.Item($j,2) = $arr.Name
   $EWS.Cells.Item($j,3) = $arr.DisplayName

   $EWS.Cells.Item($j,1).Font.Bold = $true
   $EWS.Cells.Item($j,1).Font.ColorIndex = $color

   $j++
}
После того как книга заполнена нужными данными ее необходимо сохранить. Для этого используем метод Saveas() и
передаем ему путь и имя файла для сохранения.
#Сохраняем книгу
$EWB.Saveas('C:Excelservices.xlsx')
После этого закрываем саму книгу воспользовавшить методом Close().
#Закрываем книгу
$EWB.Close()
После того как закрыли книгу можно завершать работу приложения Excel использую метод Quit(). Тем самым освободив память в системе.
#Закрываем приложение Excel
$excel.Quit()
У данного способа есть существенный недостаток это очень медленная работа экспорта данных в таблицу Excel, но за то можно создавать красивые отформатированные таблицы для конечного пользователя. Здесь представлен полный скрипт, который получает список всех служб на вашем компьютере и записывает их в ячейки таблицы Excel.
#Получаем список всех процессов
$srv = Get-Service

#Создаем новый объект
$excel = New-Object -ComObject Excel.Application

#Режим записи видимый
$excel.Visible = $true

#Создаем книгу Excel
$EWB = $excel.Workbooks.Add()

#Выбираем первый лист книги
$EWS = $EWB.Worksheets.Item(1)

#Название листа книги
$EWS.Name = 'Service'

#Первая строка ячеек
$EWS.Cells.Item(1,1) = 'Status'
$EWS.Cells.Item(1,2) = 'Name'
$EWS.Cells.Item(1,3) = 'DisplayName'

#Перебераем массив и вставляем в нужные ячейки листа
$j = 2
foreach($arr in $srv)
{
   #Если процесс запущен то зеленый иначе красный
   if($arr.Status -eq 4){
    $EWS.Cells.Item($j,1) = 'Запущен'
    $color = 10
   }else{
    $EWS.Cells.Item($j,1) = 'Остановлен'
    $color = 3
   }


   $EWS.Cells.Item($j,2) = $arr.Name
   $EWS.Cells.Item($j,3) = $arr.DisplayName

   $EWS.Cells.Item($j,1).Font.Bold = $true
   $EWS.Cells.Item($j,1).Font.ColorIndex = $color

   $j++
}

#Сохраняем книгу
$EWB.Saveas('C:Excelservices.xlsx')

#Закрываем книгу
$EWB.Close()

#Закрываем приложение Excel
$excel.Quit()
I want to open an excel workbook and read out data, do other kinds of operations, etc. I know that I have to add an assembly reference:
[Reflection.Assembly]::LoadFile("C:Program FilesMicrosoft OfficeOffice16ADDINSMicrosoft Power Query for Excel IntegratedbinMicrosoft.Office.Interop.Excel.dll")
And then I need to instantiate an Application object.
$workbook = New-Object -TypeName Microsoft.Office.Interop.Excel.Application
This however returns an error «A constructor was not found»
Isn’t by the way Microsoft.Office.Interop.Excel.Application an interface actually? I am wondering how it can be instantiated in this scenario.
asked Jun 6, 2016 at 19:09
1
You need to open it as a ComObject.
$Excel = New-Object -ComObject Excel.Application
$Workbook = $Excel.Workbooks.Open($FilePath)
In that example you would have needed to define $FilePath as the full path to the Excel file that you are trying to open.
answered Jun 6, 2016 at 19:54
TheMadTechnicianTheMadTechnician
34.4k3 gold badges42 silver badges54 bronze badges
I’ve found a nice snippet which also runs a macro here
# start Excel
$excel = New-Object -comobject Excel.Application

#open file
$FilePath = 'C:tempBook1.xlsm'
$workbook = $excel.Workbooks.Open($FilePath)

#make it visible (just to check what is happening)
$excel.Visible = $true

#access the Application object and run a macro
$app = $excel.Application
$app.Run("Macro1")
answered Jun 11, 2016 at 22:58
ThomasMXThomasMX
1,6152 gold badges18 silver badges35 bronze badges
4
If you just add the path to the variable $FilePath without quotes, it will open automatically:
$FilePath = C:temptempfile.csv
The only problem is that if you did not properly closed the file on Excel, the next time you run it, it will open as READ ONLY and you have to kill the process on TASK manager.
Depending of the needs and coding, sometimes simple works the best.
stateMachine
4,9884 gold badges13 silver badges28 bronze badges
answered Jul 1, 2020 at 22:41
1
Just let Windows take care of the hard part for you:
explorer.exe $filename
Simples 
answered Aug 6, 2019 at 12:56
2
In this article we’ll show how to read and write data from Excel worksheets directly from PowerShell scripts. You can use Excel along with PowerShell to inventory and generate various reports on computers, servers, infrastructure, Active Directory, etc.
Contents:
- How to Read Data from an Excel Spreadsheet using PowerShell?
- Exporting Active Directory User Info to Excel Spreadsheet using PowerShell
You can access Excel sheets from PowerShell via a separate COM object (Component Object Model). This requires Excel to be installed on the computer.
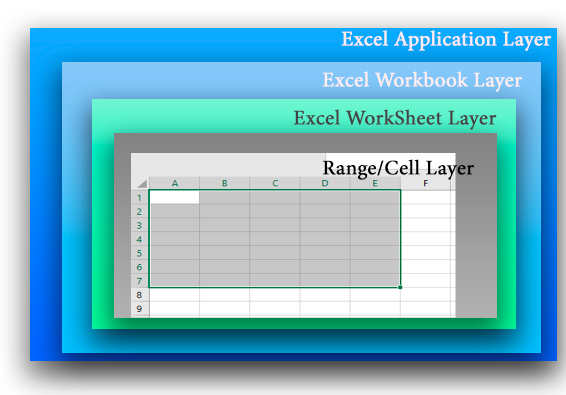
Before showing how to access data in an Excel cell, it is worth to understand the architecture of presentation layers in the Excel file. The figure below shows 4 nested presentation layers in the Excel object model:
- Application Layer – deals with the running Excel app;
- WorkBook Layer – multiple workbooks (Excel files) may be open at the same time;
- WorkSheet Layer – each XLSX file can contain several sheets;
- Range Layer – here you can access data in the specific cell or cell range.
How to Read Data from an Excel Spreadsheet using PowerShell?
Let’s take a look at a simple example of how to use PowerShell to access data in an Excel file containing a list of employees.
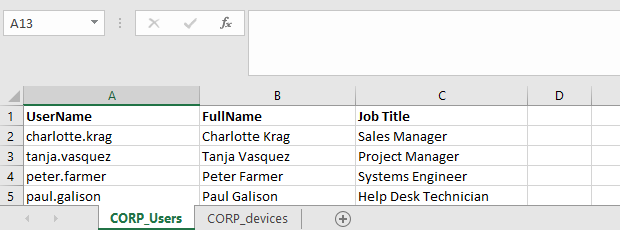
First, run the Excel app (application layer) on your computer using the COM object:
$ExcelObj = New-Object -comobject Excel.Application
After running the command, Excel will be launched on your computer in the background. To show the Excel window, change the Visible property of the COM object:
$ExcelObj.visible=$true
You can display all Excel object properties as follows:
$ExcelObj| fl
Then you can open an Excel file (a workbook):
$ExcelWorkBook = $ExcelObj.Workbooks.Open("C:PScorp_ad_users.xlsx")
Each Excel file can contain several worksheets. Let’s display the list of worksheets in the current Excel workbook:
$ExcelWorkBook.Sheets| fl Name, index
Then you can open a sheet you want (by its name or index):
$ExcelWorkSheet = $ExcelWorkBook.Sheets.Item("CORP_users")
You can get the name of the current (active) Excel worksheet using this command:
$ExcelWorkBook.ActiveSheet | fl Name, Index
Then you can get values from cells in Excel worksheet. You can use different methods to get the cell values on the current Excel worksheet: using a range, a cell, a column or a row. See the examples of how to get data from the same cell below:
$ExcelWorkSheet.Range("B4").Text

$ExcelWorkSheet.Range("B4:B4").Text

$ExcelWorkSheet.Range("B4","B4").Text

$ExcelWorkSheet.cells.Item(4, 2).text

$ExcelWorkSheet.cells.Item(4, 2).value2

$ExcelWorkSheet.Columns.Item(2).Rows.Item(4).Text

$ExcelWorkSheet.Rows.Item(4).Columns.Item(2).Text
Exporting Active Directory User Info to Excel Spreadsheet using PowerShell
Let’s see a practical example of how to access Excel data from PowerShell. Suppose, we want to get some information from Active Directory for each user in an Excel file. For instance, their phone number (the telephoneNumber attribute), department and e-mail address .
# Importing Active Directory module into PowerShell session

import-module activedirectory

# Open an Excel workbook first:

$ExcelObj = New-Object -comobject Excel.Application

$ExcelWorkBook = $ExcelObj.Workbooks.Open("C:PScorp_ad_users.xlsx")

$ExcelWorkSheet = $ExcelWorkBook.Sheets.Item("CORP_Users")

# Get the number of filled in rows in the XLSX worksheet

$rowcount=$ExcelWorkSheet.UsedRange.Rows.Count

# Loop through all rows in Column 1 starting from Row 2 (these cells contain the domain usernames)

for($i=2;$i -le $rowcount;$i++){

$ADusername=$ExcelWorkSheet.Columns.Item(1).Rows.Item($i).Text

# Get the values of user attributes in AD

$ADuserProp = Get-ADUser $ADusername -properties telephoneNumber,department,mail|select-object name,telephoneNumber,department,mail

# Fill in the cells with the data received from AD

$ExcelWorkSheet.Columns.Item(4).Rows.Item($i) = $ADuserProp.telephoneNumber

$ExcelWorkSheet.Columns.Item(5).Rows.Item($i) = $ADuserProp.department

$ExcelWorkSheet.Columns.Item(6).Rows.Item($i) = $ADuserProp.mail

}

# Save the XLS file and close Excel

$ExcelWorkBook.Save()

$ExcelWorkBook.close($true)
As a result, the columns containing AD information have been added for each user in the Excel file.
Let’s consider another example of making a report using PowerShell and Excel. Suppose, you want to make an Excel report about Print Spooler service state on all domain servers.
# Create an Excel object

$ExcelObj = New-Object -comobject Excel.Application

$ExcelObj.Visible = $true

# Add a workbook

$ExcelWorkBook = $ExcelObj.Workbooks.Add()

$ExcelWorkSheet = $ExcelWorkBook.Worksheets.Item(1)

# Rename a worksheet

$ExcelWorkSheet.Name = 'Spooler Service Status'

# Fill in the head of the table

$ExcelWorkSheet.Cells.Item(1,1) = 'Server Name'

$ExcelWorkSheet.Cells.Item(1,2) = 'Service Name'

$ExcelWorkSheet.Cells.Item(1,3) = 'Service Status'

# Make the table head bold, set the font size and the column width

$ExcelWorkSheet.Rows.Item(1).Font.Bold = $true

$ExcelWorkSheet.Rows.Item(1).Font.size=15

$ExcelWorkSheet.Columns.Item(1).ColumnWidth=28

$ExcelWorkSheet.Columns.Item(2).ColumnWidth=28

$ExcelWorkSheet.Columns.Item(3).ColumnWidth=28

# Get the list of all Windows Servers in the domain

$computers = (Get-ADComputer -Filter 'operatingsystem -like "*Windows server*" -and enabled -eq "true"').Name

$counter=2

# Connect to each computer and get the service status

foreach ($computer in $computers) {

$result = Invoke-Command -Computername $computer –ScriptBlock { Get-Service spooler | select Name, status }

# Fill in Excel cells with the data obtained from the server

$ExcelWorkSheet.Columns.Item(1).Rows.Item($counter) = $result.PSComputerName

$ExcelWorkSheet.Columns.Item(2).Rows.Item($counter) = $result.Name

$ExcelWorkSheet.Columns.Item(3).Rows.Item($counter) = $result.Status

$counter++

}

# Save the report and close Excel:

$ExcelWorkBook.SaveAs('C:psServer_report.xlsx')

$ExcelWorkBook.close($true)
You can use PowerShell to access Excel in a variety of scenarios. For example, you can create handy Active Directory reports or create PowerShell scripts to update AD data from Excel.
For example, you can ask an employee of your HR department to keep the user register in Excel. Then using a PowerShell script and the Set-ADUser cmdlet, the employee can automatically update user info in AD (just delegate the employee the permissions to change AD user attributes and show how to run the PowerShell script). Thus you can keep an up-to-date address book with the relevant phone numbers, job titles and departments.
In this blog post, i try to give simple idea about how to create, write and save excel files using PowerShell. This will help you in many reporting automation process.
First of all we have to understand what is PowerShell. PowerShell is is a shell developed by Microsoft for purposes of task automation and configuration management . This powerful shell is based on the .NET framework and it includes a command-line shell and a scripting language.
Let’s start, what am try to do is, import 3 “txt” files with some data and write those details in to one excel file.
1.How to import .txt files ?
I have 3 txt files with some numeric data. import those files into our script using Get-Content cmdlet.
$Time = Get-Content 'C:InputFilesTIME.txt'
$Current = Get-Content 'C:InputFilesCUR.txt'
$volt = Get-Content 'C:InputFilesVOLT.txt'
2.How to Create Excel file ?
Create Excel file by creating powershell objects. Following Line create object using excel.
$excel = New-Object -ComObject excel.application
The next line hold visiblity of excel application. if you use $False it will run as hidden process and if you use $True it will show you the writing process as well. I use it as $False.
$excel.visible = $False
Now I add workbook to my excel.
$workbook = $excel.Workbooks.Add()
Then add worksheet to my workbook and rename it as “Data Set”. You can replace any name with it.
$diskSpacewksht= $workbook.Worksheets.Item(1)
$diskSpacewksht.Name = "Data Set"
Now add column names and the Header for our excel. we use (row number,col number) format.
$diskSpacewksht.Cells.Item(2,8) = 'Header - Data Set Excel'
$diskSpacewksht.Cells.Item(3,1) = 'Time'
$diskSpacewksht.Cells.Item(3,2) = 'Current'
$diskSpacewksht.Cells.Item(3,3) = 'Volt'
Then i try to use some styles for our excel, to get some attractive look. in this case change the font family, font size, font color and etc.
$diskSpacewksht.Cells.Item(2,8).Font.Size = 18
$diskSpacewksht.Cells.Item(2,8).Font.Bold=$True
$diskSpacewksht.Cells.Item(2,8).Font.Name = "Cambria"
$diskSpacewksht.Cells.Item(2,8).Font.ThemeFont = 1
$diskSpacewksht.Cells.Item(2,8).Font.ThemeColor = 4
$diskSpacewksht.Cells.Item(2,8).Font.ColorIndex = 55
$diskSpacewksht.Cells.Item(2,8).Font.Color = 8210719
3.How to Write Data to Excel file ?
Following code show you to how 3 txt files data write into a one excel file using powershell.
$col = 4
$col1 = 4
$col2 = 4

 foreach ($timeVal in $Time){
              $diskSpacewksht.Cells.Item($col,1) = $timeVal
              $col++
 }
 foreach ($currentVal in $Current){
              $diskSpacewksht.Cells.Item($col1,2) = $currentVal
              $col1++
 }
 foreach ($voltVal in $volt){
             $diskSpacewksht.Cells.Item($col2,3) = $voltVal
             $col2++
 }
4.How to Save Excel file ?
Finally we have to save our excel file. This whole process run as hidden. so we have to off Display alerts. Then file extension has to be .xlsx and we have to set the file path to save the file and quit from the excel.
$excel.DisplayAlerts = 'False'
$ext=".xlsx"
$path="C:CSVfilesDataSetE$ext"
$workbook.SaveAs($path)
$workbook.Close
$excel.DisplayAlerts = 'False'
$excel.Quit()
Following Source code shows the complete scenario.
$Time = Get-Content 'C:InputFilesTIME.txt'
$Current = Get-Content 'C:InputFilesCUR.txt'
$volt = Get-Content 'C:InputFilesVOLT.txt'

$excel = New-Object -ComObject excel.application
$excel.visible = $False
$workbook = $excel.Workbooks.Add()
$diskSpacewksht= $workbook.Worksheets.Item(1)

$diskSpacewksht.Name = "Data Set"
$diskSpacewksht.Cells.Item(2,8) = 'Header - Data Set Excel'
$diskSpacewksht.Cells.Item(3,1) = 'Time'
$diskSpacewksht.Cells.Item(3,2) = 'Current'
$diskSpacewksht.Cells.Item(3,3) = 'Volt'

$diskSpacewksht.Cells.Item(2,8).Font.Size = 18
$diskSpacewksht.Cells.Item(2,8).Font.Bold=$True
$diskSpacewksht.Cells.Item(2,8).Font.Name = "Cambria"
$diskSpacewksht.Cells.Item(2,8).Font.ThemeFont = 1
$diskSpacewksht.Cells.Item(2,8).Font.ThemeColor = 4
$diskSpacewksht.Cells.Item(2,8).Font.ColorIndex = 55
$diskSpacewksht.Cells.Item(2,8).Font.Color = 8210719

$col = 4
$col1 = 4
$col2 = 4
 foreach ($timeVal in $Time){
             $diskSpacewksht.Cells.Item($col,1) = $timeVal
             $col++
 }
 foreach ($currentVal in $Current){
           $diskSpacewksht.Cells.Item($col1,2) = $currentVal
           $col1++
 }
 foreach ($voltVal in $volt){
          $diskSpacewksht.Cells.Item($col2,3) = $voltVal
          $col2++
 }

$excel.DisplayAlerts = 'False'
$ext=".xlsx" $path="C:CSVfilesDataSetE$ext"
$workbook.SaveAs($path)
$workbook.Close$excel.DisplayAlerts = 'False'
$excel.Quit()
You have to copy this code and save as any name with “.ps1” file extension. Also change all file paths related to your file locations. I have attached my .txt files with this post, and you can test the script using those files.
Download TXT files :https://drive.google.com/open?id=0Bw-UUdtr10I8RW50X0NpZERPS1E
Author : Malith Oshan Lankarathne
При работе с файлами Excel очень удобно использовать PowerShell. С помощью PowerShell можно сократить время обработки и значительно облегчить себе жизнь. Сегодня мы рассмотрим способы чтения данных из файла.
Для начала немного теории.
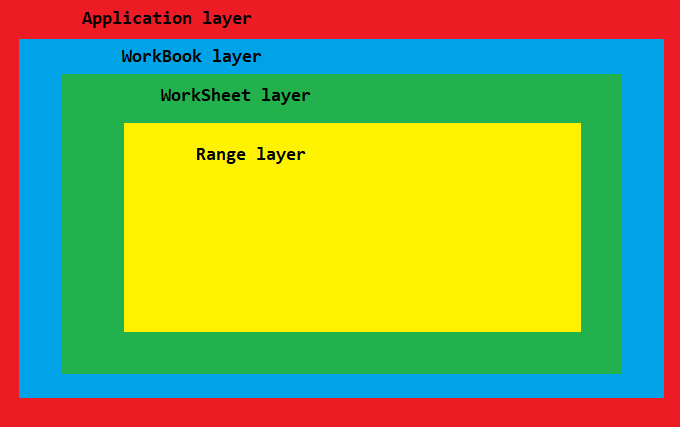
Excel представляет из себя иерархическую структуру, состоящую из нескольких уровней (layers). Первым, верхним уровнем является приложение (Application). В приложении содержится одна или несколько книг (WorkBooks). Каждая книга состоит из одного или нескольких листов (Worksheets), а внутри каждого листа находится диапазон ячеек (Range), в которых расположены данные.
Соответственно для доступа к данным необходимо точно знать расположение каждого уровняэлемента и его место в общей иерархии. На первый взгляд это выглядит сложно и запутанно, но на самом деле все довольно просто.
Перейдем к практике. Для примера возьмем типичный файл со списком сотрудников и с помощью PowerShell разберем его на уровни.
Application
PowerShell не умеет напрямую работать с файлом, поэтому первое, что нам надо сделать — это запустить само приложение Excel. Для запуска приложения создаем COM-объект и помещаем его в переменную:
$Excel = New-Object -ComObject Excel.Application
Примечание. Описание класса Microsoft.Office.Interop.Excel.ApplicationClass на MSDN.
Если посмотреть свойства полученного объекта, то можно найти много интересного. К примеру так мы можем узнать подробные данные о версии приложения:
$Excel | fl value, version, build, path
а так посмотреть свойства окна:
$Excel | fl visible, windowstate
Кстати, свойство Visible отвечает за видимость приложения. По умолчанию Excel открывается в фоне, но можно сделать его видимым с помощью команды:
$Excel.visible = $true
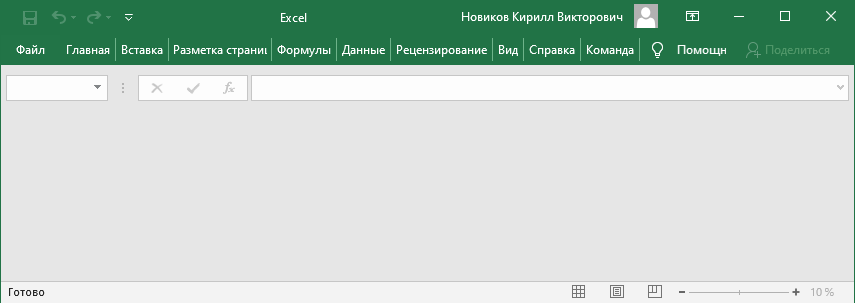
Вот собственно как выглядит уровень приложения. Чистый, ничем не замутненный Excel 🙂
WorkBook
Следующим шагом будет открытие книги (workbook), т.е. файла, с которой мы будем работать. Для этого выполним команду:
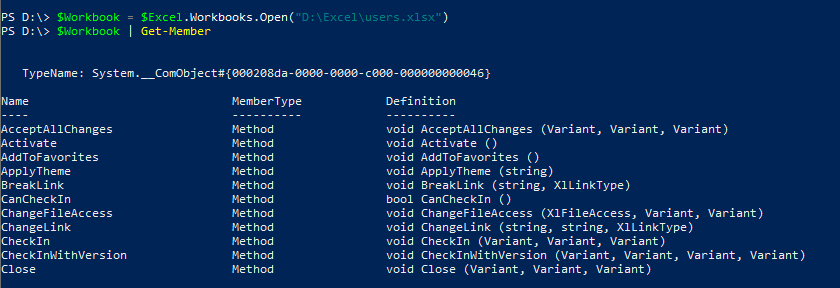
$WorkBook = $Excel.Workbooks.Open("D:Excelusers.xlsx")
Убедимся, что открыли нужный файл, проверим имя, путь и автора:
$WorkBook | fl Name, Path, Author
WorkSheet
Каждая книга состоит из одного или нескольких листов (worksheets). Вывести список имеющихся листов можно командой:
$WorkBook | fl Name, Index
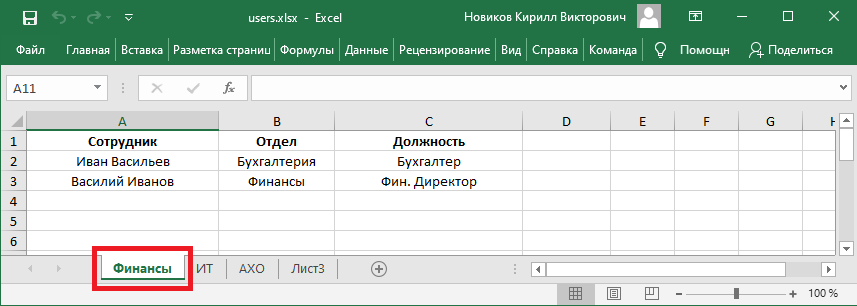
Обращаться к листу можно как по имени, так и по индексу. Выберем лист с именем «Финансы»:
$WorkSheet = $WorkBook.Sheets.Item("Финансы")
Посмотреть, какой лист выбран, можно командой:
$WorkBook.ActiveSheet | fl Name, Index
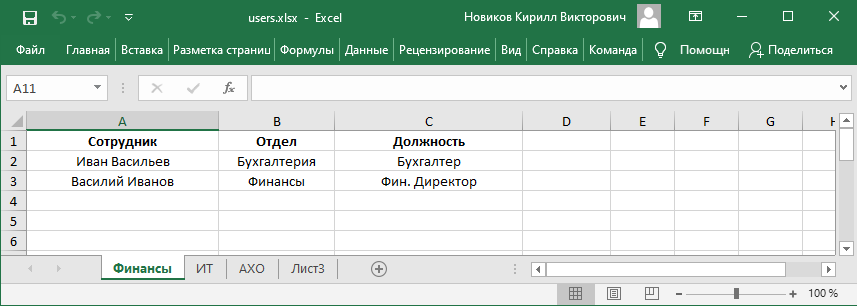
Ну а в приложении это выглядит так.
Range
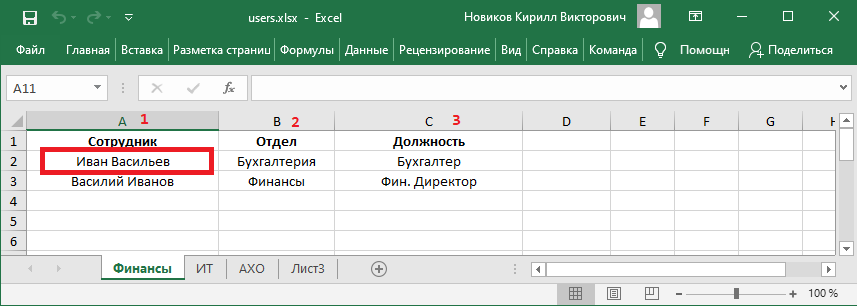
Вот мы и добрались до нижнего уровня, на котором находятся данные. Данные хранятся в ячейках, и для доступа к ним нам надо выбрать нужную ячейку и извлечь ее содержимое. Для примера возьмем ячейку с именем сотрудника.
Каждая ячейка имеет свои координаты, по которым ее можно найти. При этом для доступа есть несколько различных способов. Например если использовать диапазон (Range), то в качестве координат указываем имя столбца и номер строки:
$Worksheet.Range("A2").Text
Чтобы не попасть на пустую ячейку, можно ограничить диапазон только занятыми ячейками (UsedRange):
$Worksheet.UsedRange.Range("A2").text
Можно обращаться к самой ячейке (cell) по номеру строки и столбца, например так:
$Worksheet.Cells.Item(2,1).text
или так:
$Worksheet.Cells.Item(2,1).Value2
Можно отдельно указать столбец (column) и строку (row):
$Worksheet.Columns.Item(1).Rows.Item(2).Text
или наоборот:
$Worksheet.Rows.Item(2).Columns.Item(1).Text
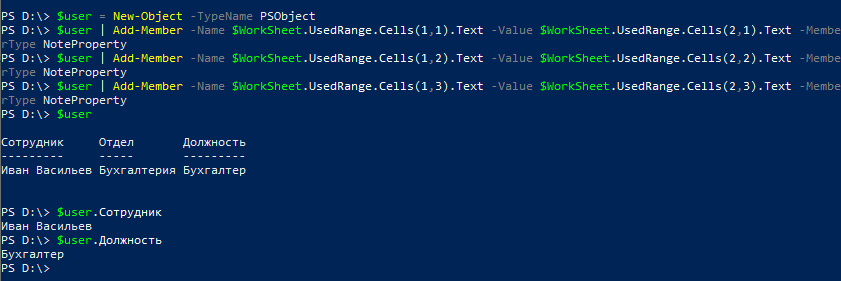
Ну и немного о том, как обрабатывать полученные данные. Один из способов — это создать объект типа PSObject:
$user = New-Object -TypeName PSObject
и извлеченные из ячеек данные добавлять как свойства объекта:
$user | Add-Member -Name $WorkSheet.UsedRange.Cells(1,1).Text -Value $WorkSheet.UsedRange.Cells(2,1).Text -MemberType NoteProperty

$user | Add-Member -Name $WorkSheet.UsedRange.Cells(1,2).Text -Value $WorkSheet.UsedRange.Cells(2,2).Text -MemberType NoteProperty

$user | Add-Member -Name $WorkSheet.UsedRange.Cells(1,3).Text -Value $WorkSheet.UsedRange.Cells(2,3).Text -MemberType NoteProperty
Это очень удобно, поскольку позволяет при необходимости извлекать нужные свойства объекта, например имя:
$user.Сотрудник
или должность:
$user.Должность
Ну а если необходимо извлечь все данные из книги, то можно создать массив, состоящий из объектов. К примеру, считать данные из нашего файла можно с помощью такого скрипта:
$file = "D:Excelusers.xlsx";

$SheetName = "Финансы";
$Excel = New-Object -ComObject Excel.Application;

$Workbook = $Excel.workbooks.open($file);

$Worksheets = $Workbooks.worksheets;

$WorkSheet = $WorkBook.sheets.item($SheetName);
$MaxRows = ($WorkSheet.UsedRange.Rows).count;

$MaxColumns = ($WorkSheet.UsedRange.Columns).count;

$users=@();
for ($row = 2; $row -le $MaxRows; $row++) {
$user = New-Object -TypeName PSObject;
for ($col = 1; $col -lt $MaxColumns; $col++) {
$user | Add-Member -Name $WorkSheet.UsedRange.Cells(1,$col).Text -Value $WorkSheet.UsedRange.Cells($row,$col).Text -MemberType NoteProperty;
}
$users+=$user
}
$users

$Excel.Quit();
Запускаем скрипт и получаем вот такую картину.
На этом все. В следующий раз рассмотрим способы создания и редактирования Excel файлов.

