
You can add comments to cells. When a cell has a comment, an indicator appears in the corner of the cell. When you hover your cursor over the cell, the comment appears.

-
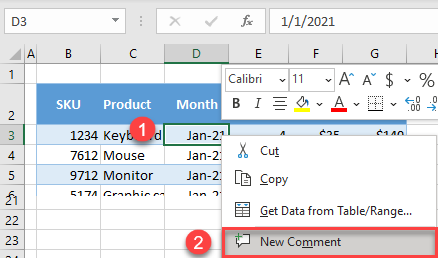
Right-click the cell and then click New Comment.
-
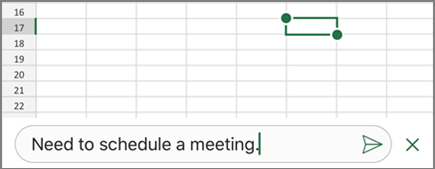
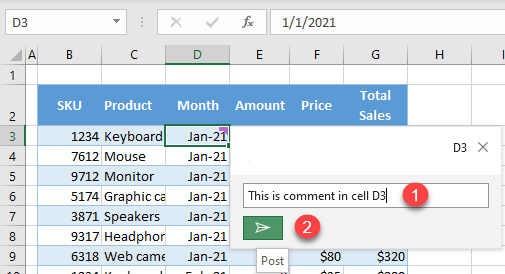
Type your comment. You can @mention someone to address the comment to them — this sends them email notification of the comment.
-
Click the Post button (or press Ctrl+Enter).
-
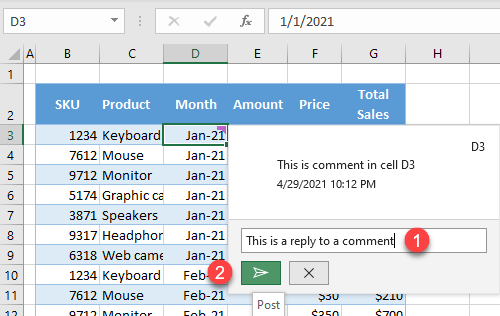
If other people have something to add, they can right-click the cell and choose Reply to Comment.
-
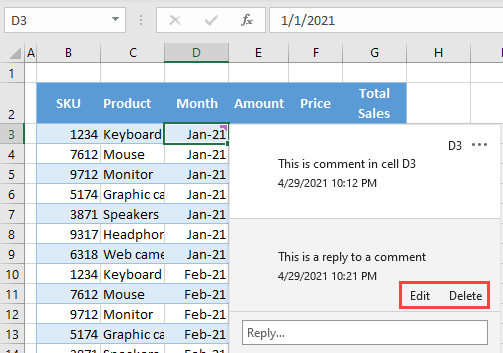
If you need to edit a threaded comment, rest your cursor over the cell. Then rest your cursor over the comment text itself, and click Edit.
-
If you need to delete a threaded comment, right-click the cell and then click Delete Comment.
-
If you need to delete a reply, rest your cursor over the cell. Then rest your cursor over the reply text itself, and click Delete.
-
If a comment thread is complete, then you can mark it as Resolved: rest your cursor over the cell, then click … > Resolve thread. The comment will still be viewable, but no further additions can be made to it unless it’s reopened. Anyone who has write access to a workbook can resolve or reopen comments.
Note: Keep in mind that it’s possible for others to edit your comments. Comments in Office documents are stored in the file, so anyone with edit access to your file can edit your comment.
-
Right-click the cell and then click Insert Comment (or press Shift+F2). If you’re using Excel for Office 365, right-click the cell and choose New Note.
-
Type your annotation text.
-
Click outside the cell.
If you need to edit the note, right-click the cell, and then click Edit Comment. If you’re using Excel for Office 365, right-click the cell and choose Edit Note.
If you need to delete the note, right-click the cell and choose Delete Comment. If you’re using Excel for Office 365, right-click the cell and choose Delete Note.
The Comments Task Pane shows you all the comments on the current worksheet, and lets you navigate to other worksheets to review those comments as well.
-
Select the first worksheet containing comments, and then on the ribbon, next to the Editing menu, select Comments.
-
Review the listed comments. Select a comment to see the cell containing it, and to make changes to the comment.
-
After you’ve reviewed all the comments on the sheet, at the bottom of the list select See more comments to see the next comment on another worksheet.
-
When you’ve reviewed the last set of comments you can go back to where you started: at the bottom of the list, select Return to first comment.
In Excel for Office 365, there are two kinds of comments to choose from: comments and notes. For more information, see the article, Threaded comments and notes.
-
Select the cell or cells that contain the comments that you want to copy.
-
Press Ctrl+C.
-
On the Home tab, click the arrow below Paste, and then click Paste Special.
-
In the Paste Special dialog box, under Paste, click Comments, and then click OK.
-
To cancel the moving border, click another cell or press Esc.
Notes:
-
Do not press Enter after you click OK. If you do, cell contents are copied to the paste area in addition to the comment.
-
Copied comments replace any existing comments in the destination area.
By default, Excel displays an indicator when a cell contains a comment or a note. You can control how Excel displays comments and indicators in cells by changing the default settings to always show or hide the comments.
-
Click the File tab, then click Options.
-
In the Advanced category, under Display, do one of the following:
-
To hide both comments and indicators throughout the workbook, under For cells with comments, show, click No comments or indicators.
-
To show indicators but display comments only when you rest the pointer over their cells, under For cells with comments, show, click Indicators only, and comments on hover.
-
To always display both comments and indicators, under For cells with comments, show, click Comments and indicators. Note that in Excel for Office 365, this setting only applies to notes, not threaded comments.
-
Excel labels each threaded comment with the name of the person who is currently logged in with their account. This cannot be changed by typing over it. However, notes are different. Excel labels notes by using a name that you specify in the Options dialog box. The following procedure explains how to change the name that appears on notes, not threaded comments.
-
Click the File tab and then click Options.
-
In the General category, under Personalize your copy of Microsoft Office, type a name in the User name box.
Notes:
-
If the User name box is empty, Excel automatically sets the value of the User name box to your user name, and uses that name for the label.
-
Although you can’t suppress note labels, you can remove labels from notes by deleting them.
-
See Also
Print comments and notes in Excel
What to do if you’re missing New Comment and New Note from Excel’s context menu
-
Right-click the cell and then click New Comment.
-
Type your comment.
-
Click the Post button (or press ⌘+Enter).
-
If other people have something to add, they can right-click the cell and choose Reply to Comment.
-
If you need to edit a threaded comment or reply, rest your cursor over the cell. Then rest your cursor over the comment text itself and click Edit. You can only edit comments you’ve created.
-
If you need to delete a threaded comment, right-click the cell and then click Delete Comment.
-
If you need to delete a reply, rest your cursor over the cell. Then rest your cursor over the reply text itself and click Delete.
-
If a comment thread is complete, then you can mark it as Resolved: rest your cursor over the cell, then click … > Resolve thread. The comment will still be viewable, but no further additions can be made to it unless it’s reopened. Anyone who has write access to a workbook can resolve or reopen comments.
-
Select the cell or cells that contain the comments that you want to copy.
-
Press ⌘+C.
-
On the Home tab, click the arrow below Paste, and then click Paste Special.
-
In the Paste Special dialog box, under Paste, click Comments, and then click OK.
-
To cancel the moving border, click another cell or press Esc.
-
Select a destination cell, and then press ⌘+V.
Note: Copied comments replace any existing comments in the destination area.
By default, Excel for Mac displays an indicator when a cell contains a comment or a note. You can control how Excel displays comments and indicators in cells by changing the default settings to always show or hide the comments.
-
Click Excel > Preferences > View (under Authoring).
-
In the View dialog box, under For Cells with Comments, Show, do one of the following:
-
To hide both comments and indicators throughout the workbook, click No comments or indicators.
-
To show indicators but display comments only when you rest the pointer over their cells, click Indicators only, and comments on rollover.
-
To always display both comments and indicators, click Comments and indicators.
-
Excel labels each threaded comment with the name of the person who is currently logged in with their account. This cannot be changed by typing over it. However, notes are different. Excel labels notes by using a name that you specify in the Options dialog box. The following procedure explains how to change the name that appears on notes, not threaded comments.
-
Click Excel > Preferences > General.
-
In the General dialog box, under Personalize , type a name in the User name box.
Notes:
-
If the User name box is empty, Excel automatically sets the value of the User name box to your user name, and uses that name for the label.
-
Although you can’t suppress note labels, you can remove labels from notes by deleting them.
-
The Comments Task Pane shows you all the comments on the current worksheet, and lets you navigate to other worksheets to review those comments as well.
-
Select the first worksheet containing comments, and then on the ribbon, next to the Editing menu, select Comments.
-
Review the listed comments. Select a comment to see the cell containing it, and to make changes to the comment.
-
After you’ve reviewed all the comments on the sheet, at the bottom of the list select See more comments to see the next comment on another worksheet.
-
When you’ve reviewed the last set of comments you can go back to where you started: at the bottom of the list, select Return to first comment.
See Also
Print comments and notes in Excel
What to do if you’re missing New Comment and New Note from Excel’s context menu
-
Right-click the cell and then select New Comment.
-
Type your comment. You can @mention someone to address the comment to them — this sends them email notification of the comment.
-
Select the Post Comment button (or press Ctrl+Enter).
-
If other people have something to add, they can right-click the cell and choose New Reply.
-
If you need to edit a threaded comment, rest your cursor over the cell. Then select the comment, select the More thread actions menu, and select Edit comment.
-
If you need to delete a threaded comment, right-click the cell and then click Delete Comment.
-
If you need to delete a reply, rest your cursor over the cell. Then rest your cursor over the reply text itself, and click Delete.
-
If a comment thread is complete, then you can mark it as Resolved: rest your cursor over the cell, then click More thread actions > Resolve thread. The comment will still be viewable, but no further additions can be made to it unless it’s reopened. Anyone who has write access to a workbook can resolve or reopen comments.
Note: Keep in mind that it’s possible for others to edit your comments. Comments in Office documents are stored in the file, so anyone with edit access to your file can edit your comment.
-
Right-click the cell and then click Insert Comment (or press Shift+F2). If you’re using Excel for Office 365, right-click the cell and choose New Note.
-
Type your annotation text.
-
Click outside the cell.
If you need to edit the note, right-click the cell, and then click Edit Comment. If you’re using Excel for Office 365, right-click the cell and choose Edit Note.
If you need to delete the note, right-click the cell and choose Delete Comment. If you’re using Excel for Office 365, right-click the cell and choose Delete Note.
In Excel for Office 365, there are two kinds of comments to choose from: comments and notes. For more information, see the article, Threaded comments and notes.
Note: When you copy and paste threaded comments to other cells, Excel for the web will also paste the cell values.
-
Select the cell or cells that contain the comments that you want to copy.
-
Press Ctrl+C.
-
Select the empty cells and press Ctrl + V.
Note: Copied comments replace any existing comments in the destination area.
The Comments Task Pane shows you all the comments on the current worksheet, and lets you navigate to other worksheets to review those comments as well.
-
Select the first worksheet containing comments, and then on the ribbon, next to the Editing menu, select Comments.
-
Review the listed comments. Select a comment to see the cell containing it, and to make changes to the comment.
-
After you’ve reviewed all the comments on the sheet, at the bottom of the list select See more comments to see the next comment on another worksheet.
-
When you’ve reviewed the last set of comments you can go back to where you started: at the bottom of the list, select Return to first comment.
-
In an Excel workbook, tap in the worksheet.
-
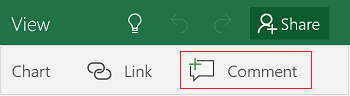
Tap Review.
-
Tap Comment.
-
Type your comment and tap the Post button.
-
To reply to a comment, tap the cell (that has the comment), tap the purple comment icon that appears above it, and in the Reply text box, enter a reply and tap the Post button.
Here are other things you can do with threaded comments on your Android tablet:
-
To view a particular thread, tap the cell, and then tap the purple comment icon.
-
To view all threads in the worksheet, tap Review and then tap Show Comments.
-
To edit a particular comment in a thread, tap the cell (that has the comment), tap the purple comment icon that appears above it, tap the particular comment you want to edit, and then tap Edit. Modify the comment as necessary and then click Save.
-
To delete a particular comment in a thread, tap the cell (that has the comment), tap the purple comment icon that appears above it, tap the comment you want to delete, and then tap Delete.
-
To delete an entire thread, tap the cell (that has the comment), tap the purple comment icon that appears above it, tap … (the ellipsis icon) next to the first comment in the thread, and tap Delete thread.
-
To resolve a thread, tap the cell (that has the comment), tap the purple comment icon that appears above it, tap … (the ellipsis icon) next to the first comment in the thread, and tap Resolve thread.
-
Tap the Edit icon
 on your Android phone.
 -
Tap Home, and then tap Review.
-
Tap Comment, type your comment, and then tap the Post button.
-
To reply to a comment, tap the cell (that has the comment), tap the purple comment icon that appears above it, and in the Reply text box, enter a reply and tap the Post button.
 on your Android phone.
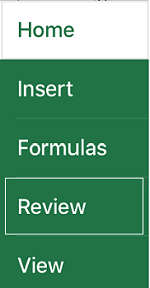
Here are other things you can do with threaded comments on your Android phone:
-
To view a particular thread, tap the cell, and then tap the purple comment icon.
-
To view all threads in the worksheet, tap Review and then tap Show Comments.
-
To edit a particular comment in a thread, tap the cell (that has the comment), tap the purple comment icon that appears above it, tap the particular comment you want to edit, and then tap Edit. Modify the comment as necessary and then click Save.
-
To delete a particular comment in a thread, tap the cell (that has the comment), tap the purple comment icon that appears above it, tap the comment you want to delete, and then tap Delete.
-
To delete an entire thread, tap the cell (that has the comment), tap the purple comment icon that appears above it, tap … (the ellipsis icon) next to the first comment in the thread, and tap Delete thread.
-
To resolve a thread, tap the cell (that has the comment), tap the purple comment icon that appears above it, tap … (the ellipsis icon) next to the first comment in the thread, and tap Resolve thread.
-
In an Excel workbook, tap in the worksheet.
-
Tap Insert.
-
Tap Comment.
-
Type your comment and tap the Post button.
-
To reply to a comment, tap the cell (that has the comment), tap the purple comment icon that appears above it, and in the Reply text box, enter a reply and tap the Post button.
Here are other things you can do with threaded comments on your iPad:
-
To view a particular thread, tap the cell, and then tap the purple comment icon.
-
To view all threads in the worksheet, tap Review and then tap Show Comments.
-
To edit a particular comment in a thread, tap the cell (that has the comment), tap the purple comment icon that appears above it, tap the particular comment you want to edit, and then tap Edit. Modify the comment as necessary and then click Save.
-
To delete a particular comment in a thread, tap the cell (that has the comment), tap the purple comment icon that appears above it, tap the comment you want to delete, and then tap Delete.
-
To delete an entire thread, tap the cell (that has the comment), tap the purple comment icon that appears above it, tap … (the ellipsis icon) next to the first comment in the thread, and tap Delete thread.
-
Tap the Edit icon
on your iPhone. -
Tap Home, and then tap Review.
-
Tap Comment, type your comment, and then tap the Post button.
-
To reply to a comment, tap the cell (that has the comment), tap the purple comment icon that appears above it, and in the Reply text box, enter a reply and tap the Post button.
-
Click the green down arrow once you are done.
Here are other things you can do with threaded comments on your iPhone:
-
To view a particular thread, tap the cell, and then tap the purple comment icon.
-
To view all threads in the worksheet, tap Review and then tap Show Comments.
-
To edit a particular comment in a thread, tap the cell (that has the comment), tap the purple comment icon that appears above it, tap the particular comment you want to edit, and then tap Edit. Modify the comment as necessary and then click Save.
-
To delete a particular comment in a thread, tap the cell (that has the comment), tap the purple comment icon that appears above it, tap the comment you want to delete, and then tap Delete.
-
To delete an entire thread, tap the cell (that has the comment), tap the purple comment icon that appears above it, tap … (the ellipsis icon) next to the first comment in the thread, and tap Delete thread.

-
In an Excel workbook, tap in the worksheet.
-
Tap Insert.
-
Tap Comment.
-
Type your comment.
-
Tap outside the comment box to stop commenting.
-
To view the comment, tap the comment in the workbook.
To delete a comment, tap the comment icon and then tap X.
-
Tap More
on your Windows phone. -
Tap Home, and then tap Review.
-
To add a comment, tap Comment on your Windows phone, type your comment, and then tap Done.
-
To view or edit existing comments, tap the comment.
To edit a comment, tap the Edit comment icon.
To delete a comment, tap the Delete comment icon.
When you are done with your changes, close the comment box by tapping the X on your Windows phone.
 on your Windows phone.

Important: Keep in mind that it’s possible for others to edit your comments. Comments in an Office document are stored in the file, so anyone with edit access to your file can edit your comment.
Need more help?
You can always ask an expert in the Excel Tech Community or get support in the Answers community.
Follow the below steps to insert a comment to a cell in Excel:
- Step 1: To add a comment in Excel first, we must right-click on the cell with which the comment must be associated.
- Step 2: Then, click on “Insert Comment” and type the comment.
Table of contents
- How to Insert Comments in Excel Cell? (Steps)
- Shortcut to Insert Comment in Excel
- Examples
- Example #1
- Example #2
- Example #3
- How to Add a Comment to Multiple Cells in Excel?
- Things to Remember
- Recommended Articles
The shortcut to insert a comment in the cell is “Shift+F2.”

Another way to insert a comment in Excel is to click on the “Review” tab and select “New Comment.”
Examples
You can download this Insert Comment Excel Template here – Insert Comment Excel Template
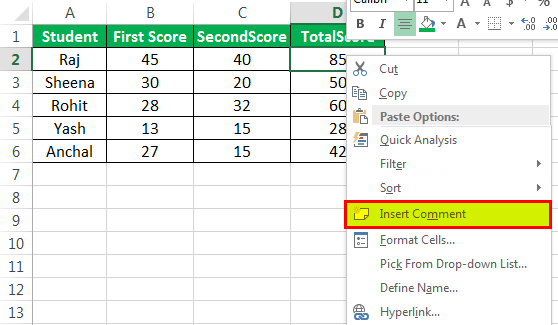
Example #1
Example of adding a comment attached to a cell in Excel.
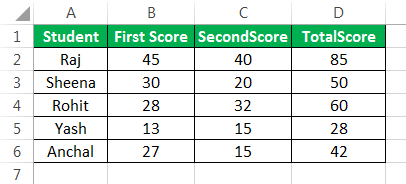
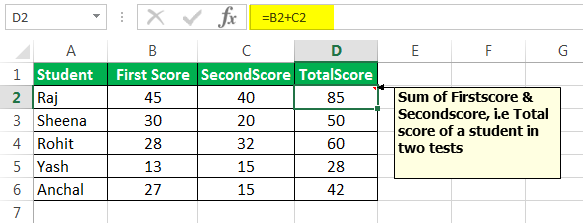
Suppose we wish to find how a student scores in an exam. There are two exam scores for a student. We must find the total score (sum of the two scores).
Below are the steps to insert a comment in Excel:
- To add a comment in Excel with the total score, right-click on the cell containing a total score and select “Insert Comment.”

- A box will appear: Type the comment in the box.

The red triangle at the top right corner of the cell indicates that a comment is associated with it.

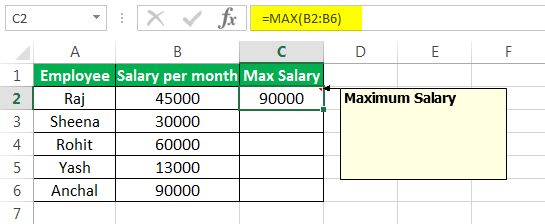
Example #2
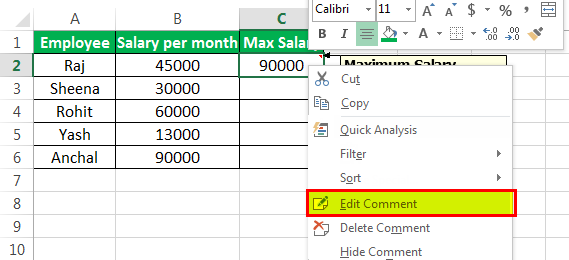
Suppose we want to find the maximum salary per month from a list of some employees’ salaries.
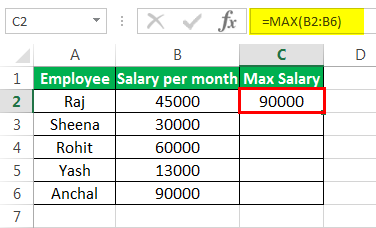
- Step 1: To insert a comment in Excel with the maximum salary, we must right-click on the maximum salary cell and select “Insert Comment.”

- Step 2: A box will appear: Type the comment in the box.
Example #3
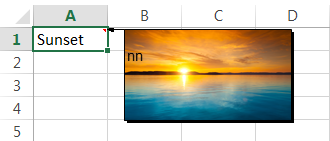
If a picture needs to be inserted as a comment in Excel, we can carry out the following steps:
- Step 1: We must right-click on the cell and select “Insert Comment.”

- Step 2: Then, we must insert the text to be displayed in the comment and right-click on the edge of the comment box. Then, select “Format Comment.”
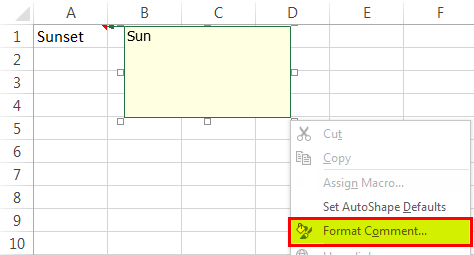
- Step 3: Now, go to the “Color” and “Line” tab, expand the “Colors” dropdown listA drop-down list in excel is a pre-defined list of inputs that allows users to select an option.read more and select “Fill Effects.”

- Step 4: Select the “Picture” tab and click “Select Picture.”
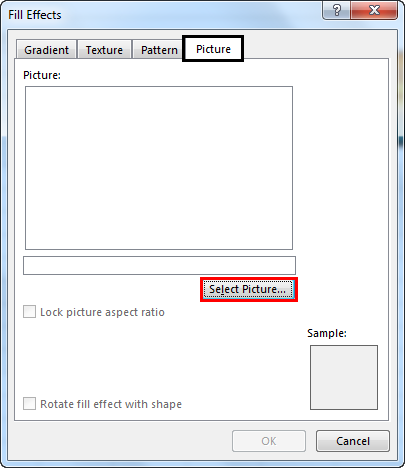
- Step 5: Browse for a picture as per choice and click “OK.”
We can copy a single comment to multiple cells at the same time. We can carry out the following steps:
- Step 1: We must first insert a comment in the first cell.
- Step 2: Select the commented cell and press “Ctrl+C,” which copies the cell to the clipboard.
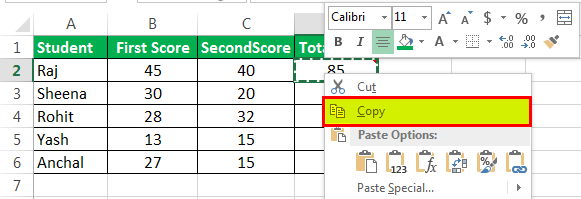
- Step 3: Select the range of cells on which we want to paste the same comment.

- Step 4: Select “Paste Special” from the “Edit” menu, and a Paste Special dialog boxPaste special in Excel allows you to paste partial aspects of the data copied. There are several ways to paste special in Excel, including right-clicking on the target cell and selecting paste special, or using a shortcut such as CTRL+ALT+V or ALT+E+S.read more will appear.
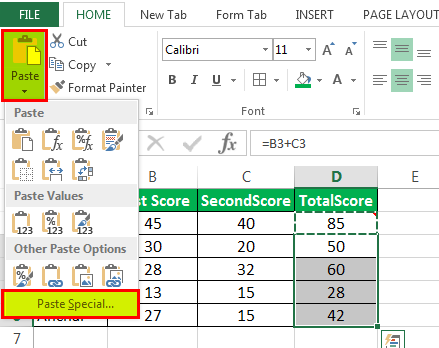
- Step 5: Select the “Comments” button and click “OK.”.

- Step 6: We must copy the comment from a cell in the first step to the range of cells selected in Step3.

If the range of cells selected already had some comments, those comments would be replaced by the comment we are pasting from a cell in Step2.
Things to Remember
- The cell comments help communicate ideas, problems, and questions when collaborating on documents. They make the document review/understanding process smoother and faster for everyone involved.
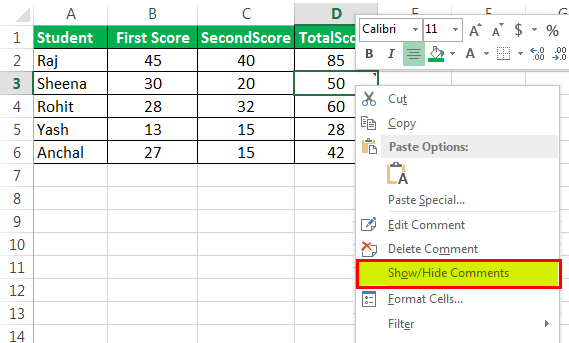
- After entering the text as a comment and clicking on any cell again, the comment gets hidden. But the red flag or comment indicator remains.

- Right-clicking on the cell and selecting “Show/Hide Comments” enables showing or hiding the comment associated with that cell.
- If we want to show all the comments on all worksheets in a workbook, we must click “Show All Comments” in the “Review” tab’s “Comments” section.
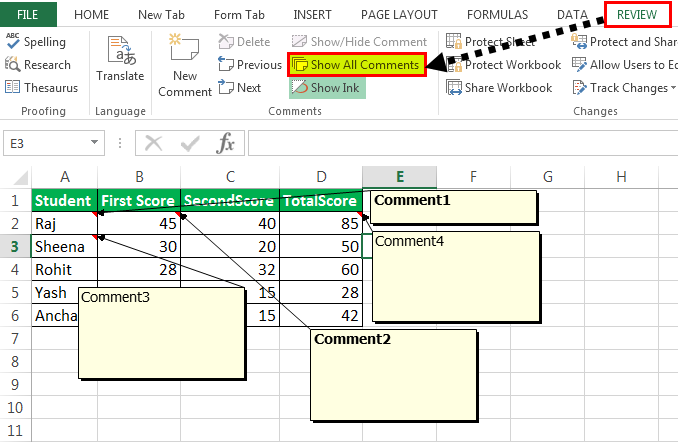
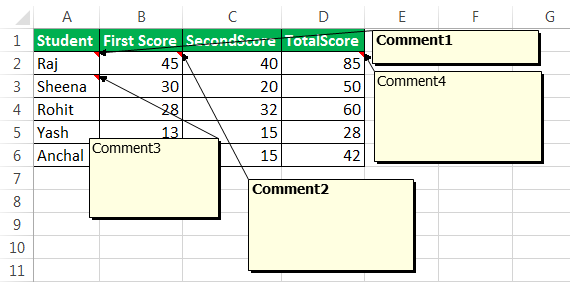
- When we have too many comments on a sheet, there may be a possibility that some of the comments may overlap. To fix this issue, we have an option of “Move or Resize a Comment.” So if some comments are blocking other comments or cells, we may want to move them. For moving a comment, it should display without the user hovering over the cell.
- So first, we must show the comment using “Show or Hide Comments.”
- Then, we must move the cursor over the border of the comment box until the cursor turns to a plus sign with arrows.
- Then, click to select the comment box. We will see sizing handles appear on the sides and corners of a box.
- Now, keep the mouse cursor over the border of the comment box and then click and drag the comment box to another location.

We can see that some comments overlap, so we must drag them to another location using the above method of moving and resizing a comment.
- Right-clicking on the cell and clicking “Edit Comment” in Excel can help change a comment.
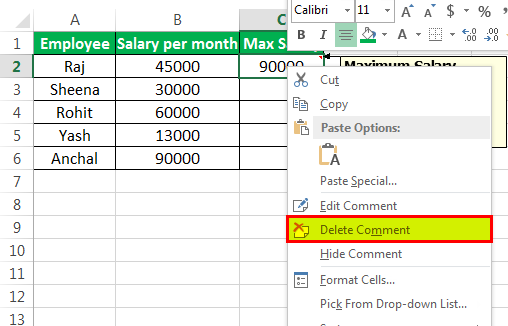
- A comment associated with a cell can be deleted by right-clicking on the cell and selecting “Delete Comment” in Excel.
- We first commented using “Edit Comment” in Excel to format a comment. Then, we should highlight the text that we wish to format. Next, right-click on the selected text and click “Format Comment.” It will open a “Format Comment” dialog box. After that, we can make any changes to apply a different format to the text. For example, suppose we want to make some text bold and blue using the “Font style” and “Color” dropdown list.

This will make changes in a comment with the new formatting.
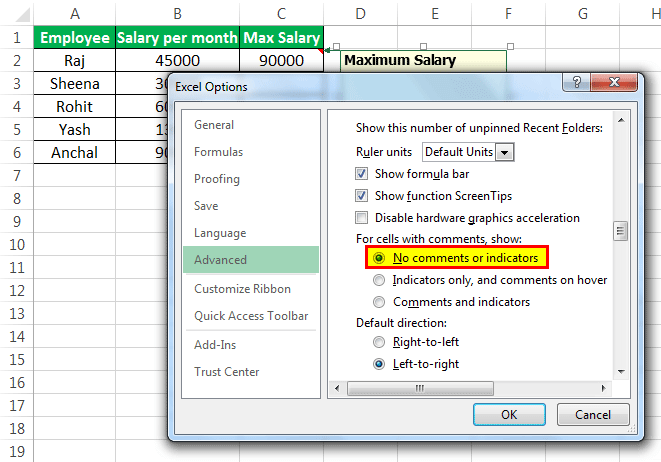
- When we have too many comments, the red flags on the cells might be distracting. Therefore, we can remove these flags from the cell in the following way:
- First, we must go to the “File”-> “Options” and click on “Advanced” on the left side of the Excel “Options” dialog box.
- Then, scroll down to the “Display” section on the right side of the Excel “Options” dialog box.
- Lastly, we must select “No comments or indicators’ under” “For cells with comments, show.”
- With these options selected, hovering over a cell with a comment will not display the comment.
Recommended Articles
This article is a guide to Insert Comment in Excel. We discuss adding, editing, copying, and deleting the comment in Excel manually and using keyboard shortcuts, practical examples, and a downloadable Excel template. You may learn more about Excel from the following articles: –
- VBA Comment Block
- Excel Print Comments
- Insert Calendar In Excel – Examples
- How to Insert Button in Excel?
In this tutorial, you will learn how to insert a comment or note to a cell in Excel and Google Sheets.
Insert a Comment into a Cell
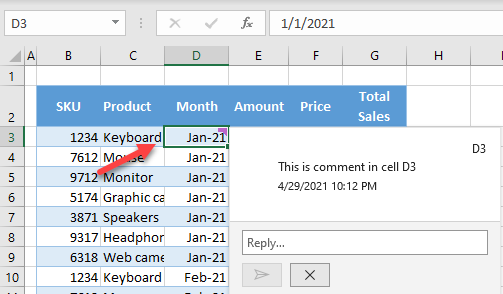
In Excel, you can easily add a comment in any cell by right-clicking on that cell (here, D3), and clicking New Comment.
In the pop-up window, type a comment and click Post.
Now if you hover the mouse over a cell with a comment, the comment will be displayed.
Excel also records the user who entered the comment, and the date and time of entry. If a cell contains a comment, it will have a purple symbol in the upper right corner.
It’s also possible to use VBA to add comments.
Reply to a Comment
You can also reply to a comment. Click on the reply field and type a comment, then click Post.
This functionality allows multiple users to leave comments and replies, to communicate about changes in specific cells.
Edit or Delete a Comment
If you want to edit or delete a comment, select that comment, and when the Edit and Delete buttons appear, click on one of them.
Insert Note in a Cell
You can also insert notes in Excel. Notes are actually something which were known as comments in earlier versions of Excel. While comments are displayed as threads, where users can leave multiple comments and reply to them, notes are fixed text displayed in a yellow box.
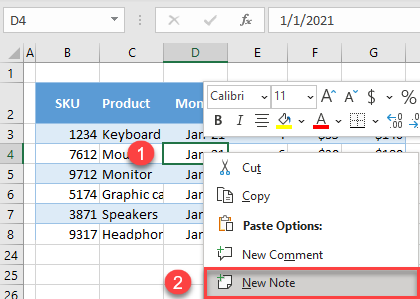
To insert a note, right-click on a cell (e.g., D4), and click New Note (or press SHIFT + F2).
In the yellow pop-up window, type to enter a note.
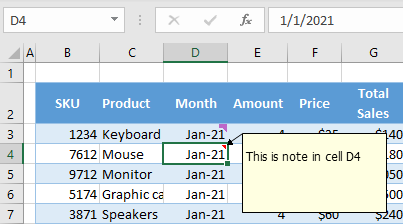
Similar to comments, notes are displayed when you hover your cursor over a cell containing a note. If a cell has a note, it will have a little red triangle in the upper right corner.
Edit or Delete a Note
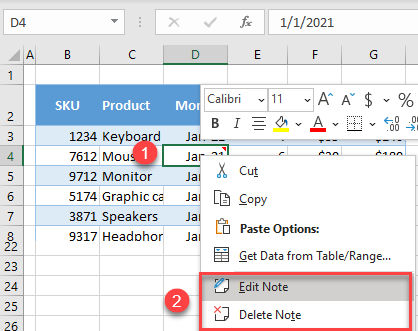
To edit or delete a note, right-click on a cell with a note (e.g., D4), and click on Edit Note or Delete Note.
Insert a Comment into a Cell in Google Sheets
You can insert comments in cells in Google Sheets in much the same way.
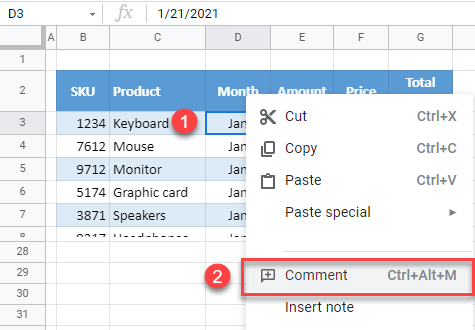
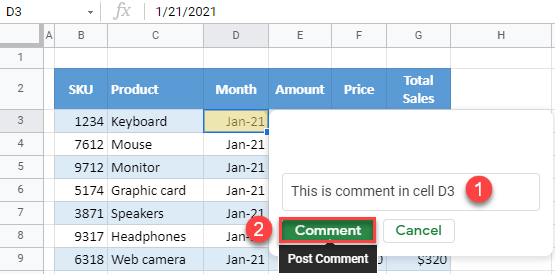
Right-click on a cell (e.g., D3), and click on Comment (or use the keyboard shortcut CTRL + ALT + M).
In the pop-up window, type the comment text and click on Comment to post it.
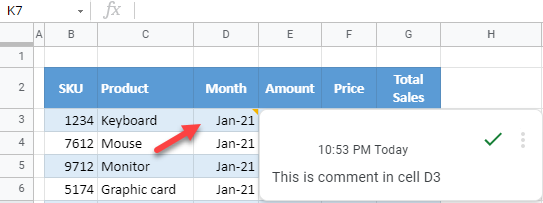
If you click on a cell with a comment, the comment is displayed showing the user who entered it and the date and time of entry. Every cell containing a comment has a yellow triangle in the upper right corner.
Reply to a Comment in Google Sheets
To reply to a comment, in the comment window, type the reply text and click Reply.
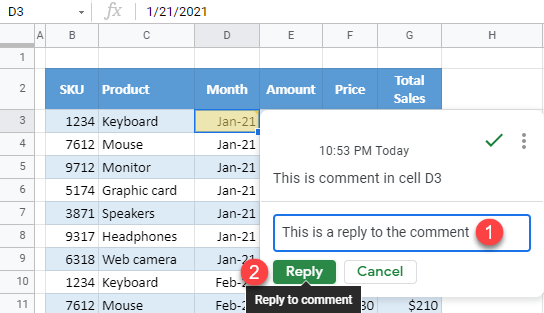
When replying to a comment, you can also type @ and a list of all contacts will be offered. This way, you can choose to tag a person to whom you are replying, and this person will be notified by email about your comment.
Edit or Delete a Comment in Google Sheets
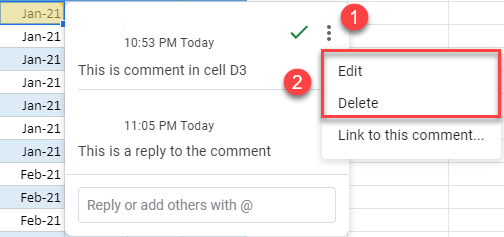
To edit or delete a comment in Google Sheets, in the comments window, click on the three dots in the upper right corner of a comment, and click on Edit or Delete.
See also…
- How to Copy Comments in Excel
- How to Show or Hide All Comments in Excel & Google Sheets
- How to Print Comments in Excel & Google Sheets
Insert Note in a Cell in Google Sheets
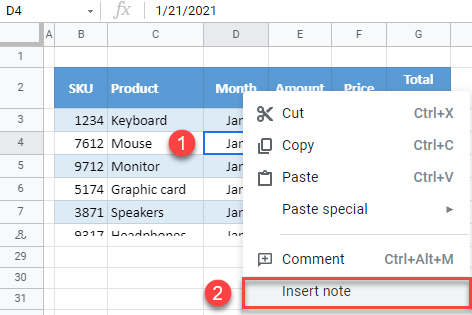
All differences between comments and notes described for Excel are the same for Google Sheets. To insert a note, right-click on a cell (e.g., D4), and click Insert note.
In the pop-up box, type your note.
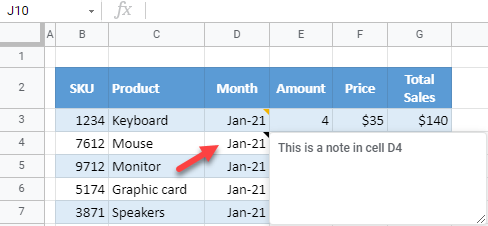
Every cell with a note will have a black triangle in the upper right corner, and if you position the cursor over that cell, the note will appear. To edit or delete a note in Google Sheets, just click in a note box when it appears and change or delete the text.
How to Easily Insert, Edit, Delete, Show and Hide Comments in Excel Workbooks
by Avantix Learning Team | Updated December 9, 2019
Applies to: Microsoft® Excel® 2010 and 2013 (Windows)
You can insert comments in Microsoft Excel using the comments feature. After you insert comments in cells, you can edit, show, hide and delete comments. Note that this article applies to Excel 2010 and 2013 and not 2016 and newer versions of Excel which have threaded comments and traditional comments are called notes. Although you can also insert text boxes with comments, we’ll forgo that method here.
Recommended articles: How to Hide Excel Worksheets [3 Ways] and How to Hide Formulas from Clients, Colleagues and Other Users
Do you want to learn more about Excel? Check out our virtual classroom or live classroom Excel courses >
Setting options to manage the display of comments and indicators
If you are using the comments feature within Excel, the first thing you should do is specify options as to how you want comments to display. By default, when you insert comments in cells, Excel will display indicators as red markers in cells with comments.
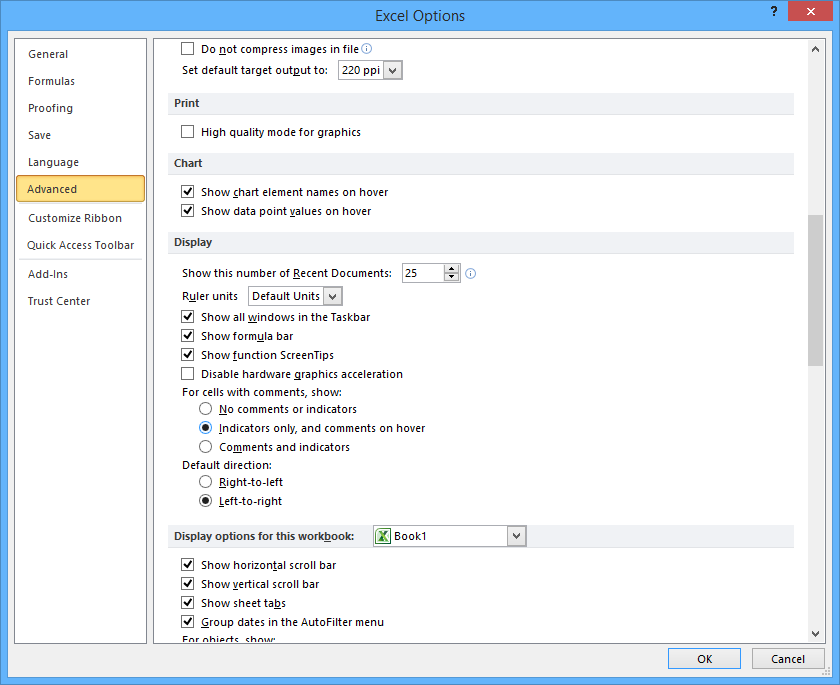
To control the display of comments and indicators through Excel’s Options:
- Click the File tab in the Ribbon and then click Options. An Options dialog box appears.
- Click the Advanced category in the left panel.
- In the right panel, scroll down to the Display section.
- In the area For cells with comments, show, choose the desired option. Check No comments or indicators if you do not want the red markers to display. Check Indicators only, comments on hover to display the red markers. Check Comments and indicators if you wish comments and indicators to display.
- Click OK.
Inserting a comment
You can insert a comment in a cell using the Ribbon:
- Click the cell where you wish to enter a comment.
- Click the Review tab in the Ribbon.
- Click New Comment in the Comments group.

You can also right-click on a cell and choose Insert Comment from the drop-down menu that appears.
Once you have inserted a comment, you can enter text in the comment box and drag the borders of the comment to move it or the handles to resize it.
Showing all comments using the Ribbon
Assuming that you have set the display of comments to show red markers and comments on hover, you may want to show all comments when you are working on them and then later hide the comments to display the red markers again.
To show all comments using the Ribbon:
- Click the Review tab in the Ribbon.
- Click Show All Comments in the Comments group.
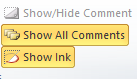
Hiding all comments using the Ribbon
Assuming that you have set the display of comments to show red markers and comments on hover, you can hide the comments and display the red markers.
To hide all comments using the Ribbon:
- Click the Review tab in the Ribbon.
- Click Show All Comments in the Comments group to hide the comments.
Editing comments
To edit comments easily:
- Click the Review tab in the Ribbon.
- Click Show All Comments in the Comments group to show the comments.
- Click in the comment you wish to edit and change the content, formatting, size and/or position.
- Click Show All Comments in the Comments group to hide the comments.
You can also right-click on a cell with a comment and choose Edit Comment from the drop-down menu that appears.
Hiding all comments and indicators using Options
You can use Excel Options to hide comments and indicators:
- Click the File tab in the Ribbon and then click Options. An dialog box appears.
- Click the Advanced category in the left panel.
- In the right panel, scroll down to the Display section.
- In the area For cells with comments, show, check the No comments or indicators.
- Click OK.
This can be very dangerous if you don’t know there are comments in a workbook and it’s sent to a client or third party with the hidden comments.
Deleting all comments
You can delete all comments in a workbook, hidden or not, using the Inspector. It’s not a bad idea to run the Inspector before sending any workbook to a client or third party.
To delete all comments using the Inspector:
- Save the workbook.
- Save a copy of the workbook (assuming you want to save the original with the comments).
- In the copy, click the File tab in the Ribbon and then click Info.
- Click Check for Issues and then Inspect Document from the drop-down menu. The Inspector appears.
- Ensure Comments and Annotations is selected. Deselect the other options.
- Click Inspect.
- If comments are found, a red exclamation mark appears beside Comments and Annotations.
- Click Remove All (this cannot be undone) and click Close.
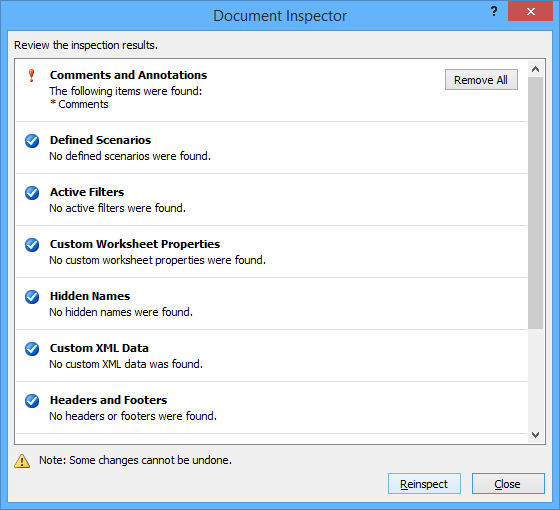
The Inspector is a very important tool and can be used to prevent sensitive information from being sent to a client or third party.
Subscribe to get more articles like this one
Did you find this article helpful? If you would like to receive new articles, join our email list.
To request this page in an alternate format, contact us.
More resources
How to Delete Blank Rows in Excel (5 Easy Ways with Shortcuts)
How to Convert Text to Numbers in Excel
How to Use Flash Fill in Excel to Clean or Extract Data (Beginner’s Guide)
How to Replace Blank Cells with a Value from the Cell Above in Excel
10 Great Excel Navigation Shortcuts
Related courses
Microsoft Excel: Intermediate / Advanced
Microsoft Excel: Data Analysis with Functions, Dashboards and What-If Analysis Tools
Microsoft Excel: Visual Basic for Applications (VBA) | Introduction
Microsoft Excel: Introduction to Power Pivot and Power Query Business Intelligence Tools
ViEW MORE COURSES >
Our instructor-led courses are delivered in virtual classroom format or at our downtown Toronto location at 18 King Street East, Suite 1400, Toronto, Ontario, Canada (some in-person classroom courses may also be delivered at an alternate downtown Toronto location). Contact us at info@avantixlearning.ca if you’d like to arrange custom instructor-led virtual classroom or onsite training on a date that’s convenient for you.
Copyright 2023 Avantix® Learning
Microsoft, the Microsoft logo, Microsoft Office and related Microsoft applications and logos are registered trademarks of Microsoft Corporation in Canada, US and other countries. All other trademarks are the property of the registered owners.
Avantix Learning |18 King Street East, Suite 1400, Toronto, Ontario, Canada M5C 1C4 | Contact us at info@avantixlearning.ca
Comments are quite useful when you want to add some information about a cell/data point without changing the content of the cell.
I often use these when I am using formulas and I need to specify what a formula does and what a cell value means. If you’re collaborating with others, you can also add comments for other people’s reference.
In this tutorial, I will show you all you need to know about comments – including how to insert comments in Excel, how to edit/delete comments, how to delete comments from the entire sheet or workbook, etc.
But before I go ahead and show you how to insert comments in Excel (or delete/edit comments), there is something important you need to know.
In Office-365, Microsoft has renamed the Comment functionality as Notes. So the traditional comments that you know (one that shows a yellow box and small red triangle in the cell at top-right) are now called Notes. And comments now refer to a new feature that allows you to create threaded conversations. Here is an article about the difference between notes and comments
Bottom line – If you’re NOT using Office 365, you don’t need to worry about anything and a comment remains unchanged. If you’re using Office 365, comments are now referred to as Notes
How to Insert Comments in Excel (Shortcut)
If you want to insert a comment in a cell in Excel, you can use the below keyboard shortcut:
SHIFT + F2 in Windows
and
Command + F2 in Mac
Here is how to use this shortcut to insert a comment:
- Select a cell where you want to insert a comment
- Hold the Shift Key (or Command key if using Mac)
- Press the F2 key
The above steps would instantly add a comment to the selected cell.

Now, you can enter any text that you want in the comment and then hit the Escape key or click anywhere in the worksheet to make that comment save in the cell.
In case you select a range of cells and use the above shortcut, it would insert a comment in the active cell only.
In case you don’t prefer the shortcut method, below is another method to add a comment:
- Right-click on the cell in which you want to add the comment
- Click on New Comment (or New Note in case you’re using Office 365)

Show All Comments/Notes
If you want all the comments to expand and show the text in it, you can do that easily with a single click:
- Go to the Review tab
- In the Comments group, click on Show All comments

This will instantly show all the comments on the worksheet.
This works like a toggle button. So if you click on it again, it will hide all the comments in the worksheet.
In case you’re using Office 365, you need to click on the Notes option and then click on Show All Notes

Navigate Through Comments (Previous/Next)
If you want to go through each comment one by one, you can do that as well. This can be useful when you have a lot of comments and you want to make sure you don’t miss any while going through these comments.
Below are the steps to go through comments one by one:
- Click the Review tab
- In the Comments group, click on the Next option to go to the Next comment (and Previous to go to the previous comment).

When you are navigating through these comments, only the comment that is active will be shown. The rest will be hidden. When you click on Next, it takes you to the next comment and hides all the other comments.
If you’re using Office 365 (where comments are now called Notes), you need to click on the Review tab, then click on the Notes option and then click on the Next/Previous Note options. This has been made a bit difficult if you have to use this option a lot (as it now takes more clicks). One way to deal this could be to add the Next/Previous notes option to the QAT (this option comes when you right-click on the Next/Previous Note options).

Copy Comments
When you do a simple copy-paste, it will copy everything including the values, formulas, formatting and comments. So if you want to copy-paste everything, all you need is the regular Control-C and Control-V
But what if you only need to copy the comments (and nothing else).
Excel allows you to do this using the Paste Special options.
Below are the steps to copy and paste comments only in Excel:
- Select all the cells that have the comments that you want to copy
- Right-click on any cell in the selection and then click on Copy (or use Control + C keyboard shortcut)
- Go to the cell where you want to paste the comments.
- Right-click and select Paste Special.
- In the Paste Special dialog box, click on Comments (it will be ‘Comments and Notes’ if you’re using Office 365)

- Click OK

The above steps would only paste the comments and not the values/formatting/formulas.
This can be a useful thing when you have two versions of the same file with different comments. You can copy and paste all the comments in the latest version to make sure you’ve everything in one place.
Delete Comments
There are different methods you can use to Delete comments in Excel. The method you choose will depend on what comments you want to delete.
For example, if you only want to delete comments in a selection or from the entire worksheet, you can use the easy way – shortcut or option in the ribbon.
But if you want to delete comments from all the worksheets at one go, you need to use VBA.
Let’s see both of these scenarios.
Delete Comments from a Selected Range or the Entire Worksheet
This one is simple.
To delete all comments in a selection, follow the below steps:
- Right-click anywhere in the selection
- Click on Delete Comment (or ‘Delete Note’ if you’re using Office 365)

In case you want to remove comments from the entire worksheet, follow the below steps:
- Click on the gray triangle at the top-left of the Excel application. This will select the entire worksheet (or you can use Control + A + A)
- Click the Home tab
- In the Editing group, click on Clear
- Click on Clear Comments

The above steps would remove all the comments in the worksheet.
Note that when you select the entire worksheet and then right-click on any cell, you won’t get the option to delete all the comments (or notes)
Delete Comments from All the Worksheets at One Go
Deleting comments from the entire workbook is a bit tricky. You can go to each sheet and delete all the comments in each sheet, but this can become tiresome if you have a lot of sheets in the workbook.
A simple VBA code, in this case, can do all the heavy lifting.
Below is the code that will go to each sheet in the workbook and delete comments from the entire sheet:
For each ws in Worksheets: ws.cells.ClearComments: Next ws
The above code uses the For Each Next loop to go through each worksheet in the workbook. And for each sheet, it uses the ClearComments method to remove all the comments at one go.
Since Microsoft has renamed comments to notes in Office 365, in future, the above code may delete comments (new feature in O365) and you may have to use the below code to delete notes (the comments in prior versions)
For each ws in Worksheets: ws.cells.ClearNotes: Next ws
As of now, both of these codes work and delete comments from the specified cells.
Now, let me show you how to use this code.
- Right-click on any sheet tab
- Click on View code. This will open the VB Editor (you can also open the keyboard shortcut ALT + F11)

- In the VB Editor, if you don’t see the immediate window, click on the View option in the menu and then click on Immediate window

- Copy and Paste the above VBA macro code into the immediate window.

- Place the cursor at the end of the line in the immediate window
- Hit the Enter key


The above steps will delete all the comments in the entire workbook.
Copy All Comments In a Separate Worksheet
It would be great to have a list of all the comments and all the text within each comment as a list in the worksheet. This will make it easy to go through the comments one by one (instead of navigating and jumping across cells in the sheet).
While this can not be done with an in-built feature, you can get this done using VBA.
Here is a detailed tutorial that shows how to get a list of all the comments in a separate worksheet.
Convert Notes to Comments (Office 365 Only)
This feature is only available to the users of Office 365.
Since there are two types of comments now – comments and notes, it allows you to change notes to comments (not vice-versa).
So if you have traditional comments (now called notes in O365), you can easily convert these to comments using the below steps:
- Click the Review tab
- Click on the Notes option
- Click on Convert to Comments

- In the dialog box that opens, click on ‘Convert All Notes’


The above steps would convert all the comments into Notes.
Note that if you have any formatting or images in the comments, it would be removed automatically.
Also, you can not choose to convert some of the notes to comments and leave others as is. The above steps would change all the notes to comments in the entire worksheet.
So this is all that there is to know about inserting and deleting comments in Excel.
I hope you found this tutorial useful!
You may also like the following Excel tutorials:
- How to Print Comments in Excel
- How to Remove Cell Formatting in Excel (from All, Blank, Specific Cells)
- Delete Blank Rows in Excel (with and without VBA)